
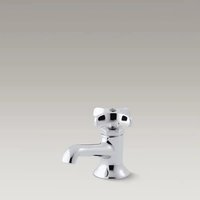
Coralais K-15597 - Faucet KOHLER - Free user manual and instructions
Find the device manual for free Coralais K-15597 KOHLER in PDF.


| Product Type | Lavatory Faucet |
| Brand | Kohler |
| Model | Coralais K-15597 |
| Supply | Hot and Cold Water |
| Recommended Water Pressure | 20 to 120 psi (1.4 to 8.3 bar) |
| Main Material | Chrome-Plated Brass |
| Spout Type | Fixed Spout |
| Drain Type | Pop-up Drain or Grid |
| Main Functions | Maximum temperature adjustment, pop-up drain |
| Installation | On 1 or 3-hole lavatory (depending on model) |
| Care and Cleaning | Clean with a soft cloth and soapy water. Avoid abrasive products. |
| Safety | Follow local plumbing codes, shut off water before installation |
| Replacement Parts and Repairability | O-ring, upper disc, valve stem available |
| Warranty | Limited lifetime warranty (per Kohler terms) |
Frequently Asked Questions - Coralais K-15597 KOHLER
User questions about Coralais K-15597 KOHLER
0 question about this device. Answer the ones you know or ask your own.
Ask a new question about this device
Download the instructions for your Faucet in PDF format for free! Find your manual Coralais K-15597 - KOHLER and take your electronic device back in hand. On this page are published all the documents necessary for the use of your device. Coralais K-15597 by KOHLER.
USER MANUAL Coralais K-15597 KOHLER
Centerset Lavatory Faucet
K-15182, K-15186, K-15198,
K-15199, K-15582, K-15583.
K-15592, K-15593, K-15597,
K-15598, K-15681, K-15686,
K-P15182, K-P15186, K-P15199,
K-P15681, K-P15686
Mproduct numbers are for Mexico (i.e. K-12345M)
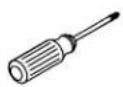
Phillips
Screwdriver
Before You Begin
□ Observe all local plumbing and building codes.
□ Shut off the main water supply.
□ Carefully inspect the waste and supply tubing for any sign of damage.
☐ For new installations, install the faucet and drain to the lavatory before installing the lavatory.
☐ Kohler Co. reserves the right to make revisions in the design of faucets without notice, as specified in the Price Book.
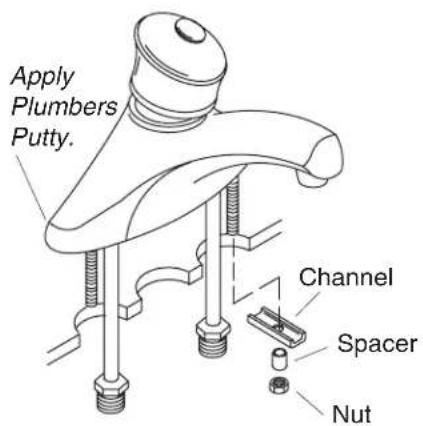
1. Faucet Installation
□ Clean the lavatory surface to remove any grease, oil, or debris.
□ Apply a ring of plumbers putty or other sealant around the underside edge of the faucet body according to the putty manufacturer's instructions.
☐ Insert the faucet into the lavatory holes. Check alignment.
□ Slide a channel and spacer onto each shank.
☐ Thread a nut onto each shank and loosely tighten.
□ Position the faucet as desired.
☐ Secure the faucet by securely wrench tightening the nuts.
□ Wipe away any excess sealant.
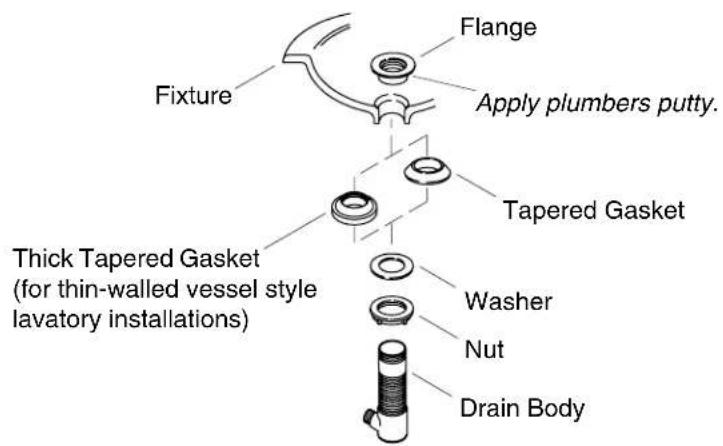
2. Pop-Up Drain Installation
□ Remove the protective cover from the flange.
□ Apply a ring of plumbers putty or other sealant to the underside of the flange according to the putty manufacturer's instructions.
☐ Assemble the nut, flat washer, and tapered gasket (tapered side up) fully onto the body.
□ From the underside of the fixture, insert the drain body up into the drain hole.
□ From the top of the fixture, securely hand tighten the flange onto the drain body.
□ Make sure the drain body seal hole is facing the back of the fixture, and securely tighten the nut.
□ Remove any excess putty or sealant.
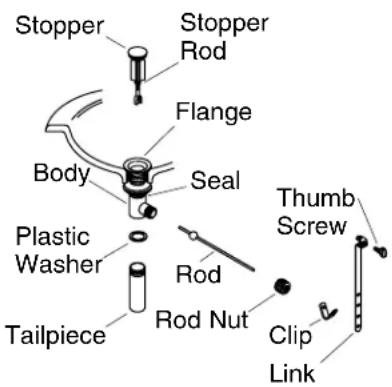
3. Complete Pop-Up Drain Installation
IMPORTANT! If the tailpiece has been removed, double check that the plastic washer is installed inside the flange body or the drain will leak.
□ Connect the P-trap to the tailpiece.
□ Press the seal into the lift rod hole on the body.
☐ Insert the stopper into the flange.
☐ For regular installations, insert the short end of the rod into the lift rod hole and underthe stopper rod. For vandal-resistant installations, fit the rod throughthe hole in the stopper rod. Hand tighten the rod nut.
☐ Remove and adjust the stopper as needed so it lifts about 3/8"(1 cm) when opened. To adjust, rotate the threaded stopper rod in or out as needed. Retighten the stopper nut.
☐ Slide one end of the clip onto the rod. Slide the link onto the lift rod with the thumbscrew facing the back of the fixture.
☐ Squeeze the other end of the clip, aligning the hole with the rod. Move the link to the proper position by squeezing the clip and sliding it along the rod.
☐ Insert the lift rod into the hole in the body and then into the hole in the link.
☐ Tighten the thumbscrew onto the link so the lift rod knob extends 1/2"(1.3 cm) above the lift rod hole.
□ Check for leaks.
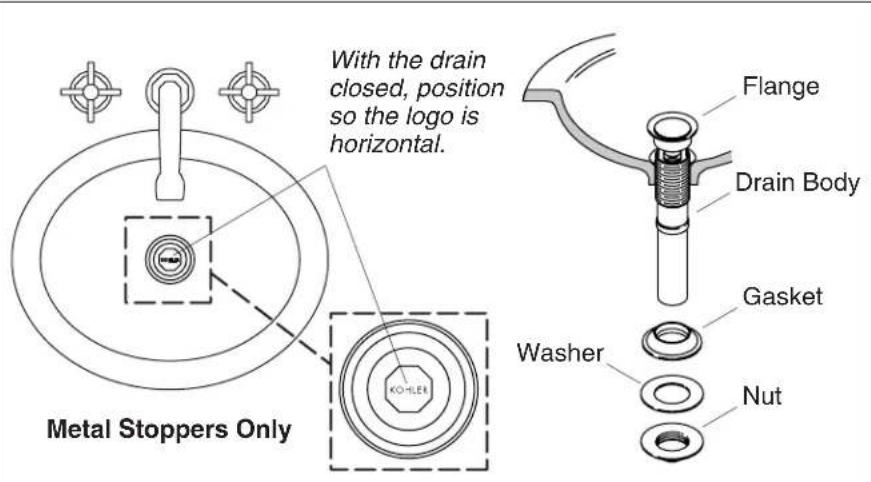
4. Grid Drain Installation
☐ If present, remove the protective plastic cap from the drain and discard.
□ Remove the nut, washer, and gasket from the drain body.
□ Apply a bead of plumbers putty or other sealant around the underside of the flange according to the sealant manufacturer's instructions.
☐ Fordrainswithmetalstoppers: Close the drain and rotate the drain body until the logo is positioned horizontally (as illustrated).
☐ Insert the drain into the drain hole and press into place.
☐ Slide the gasket (tapered side up) onto the drain body.
☐ Slide the washer over the threads on the drain body.
☐ Thread the nut up the drain body until snug against the underside of the lavatory. Use care not to rotate the drain while tightening the nut.
□ Using a wrench, tighten the nut.
□ Remove any excess putty or sealant.
□ Connect the P-trap to the drain body.
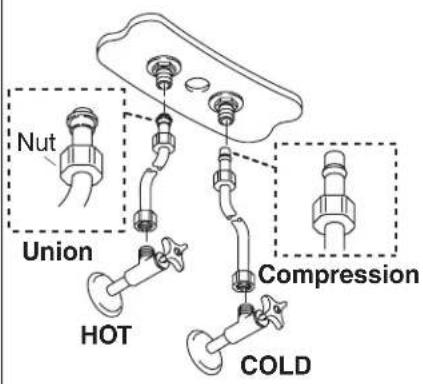
5. Supply Connections
□ If the lavatory is not installed, install it at this time according to the lavatory manufacturer's instructions.
□ Allow enough space for penetration of supply tubes into the supply stops. Cut the supply tubes if necessary.
□ Connect the supply hoses to the supply stops. (Left is hot - right is cold).
□ Tighten all connections.
6. Installation Checkout
□ Connect the P-trap.
□ Make sure all connections are tight.
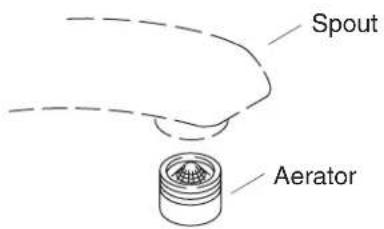
□ Remove the aerator by turning it counterclockwise.
□ Open the drain.
☐ Turn on the main water supply and check for leaks. Make any adjustments as needed.
□ Open both hot and cold valves and run water through the spout for about a minute to remove debris. Check for leaks.
□ Close the hot and cold valves.
□ Rinse any debris from the aerator and reinstall.
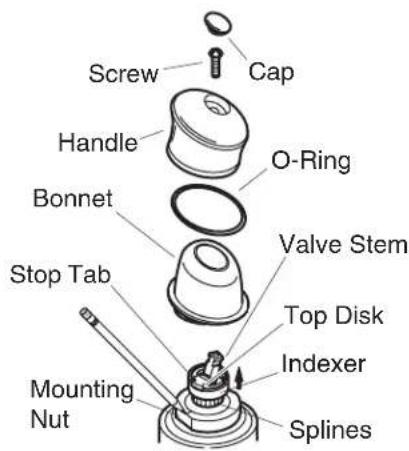
7. Adjust the Maximum Water Temperature
NOTE: Prior to adjustment, make sure the handle is in the maximum hot position.
□ Remove the handle and bonnet.
☐ Turn on the water to the maximum hot water temperature by pushing the valve stem up, and turning it fully clockwise.
☐ Use a pencil or marker to mark the current position of the temperature stop tab (top edge) on the mounting nut. Lift both the indexer and the top disc just enough to clear the splines and to allow rotation.
NOTE: Each indexer notch is an average 9.5^ F ( 5.3^ C) change in temperature.
□ Turn the indexer, top disc, and valve stem counterclockwise until you achieve the desired temperature.
☐ Reinstall the indexer and top disc to the valve. Make sure the top disc is snapped fully into the indexer.
□ Turn off the water, and reinstall the bonnet and handle.




Brand : KOHLER
Model : Coralais K-15597
Category : Faucet