
Coralais K-15889 - Faucet KOHLER - Free user manual and instructions
Find the device manual for free Coralais K-15889 KOHLER in PDF.


User questions about Coralais K-15889 KOHLER
0 question about this device. Answer the ones you know or ask your own.
Ask a new question about this device
Download the instructions for your Faucet in PDF format for free! Find your manual Coralais K-15889 - KOHLER and take your electronic device back in hand. On this page are published all the documents necessary for the use of your device. Coralais K-15889 by KOHLER.
USER MANUAL Coralais K-15889 KOHLER
natural_image
Technical line drawing of a kitchen sink with handle and base (no text or symbols)M product numbers are for Mexico (i.e. K-12345M)
Thank You For Choosing Kohler Company
We appreciate your commitment to Kohler quality. Please take a few minutes to review this manual before you start installation. If you encounter any installation or performance problems, please don't hesitate to contact us. Our phone numbers and web site are listed on the back cover. Thanks again for choosing Kohler Company.
Before You Begin
□ Observe all local plumbing and building codes.
□ Shut off the water supplies.
□ Carefully inspect waste and supply tubing for any sign of damage and replace if necessary.
☐ For new installations, assemble the faucet on the sink before installing the sink.
☐ Before installation, unpack the new faucet and inspect it for damage. Return the faucet to the carton until you are ready to install it.
☐ Kohler Co. reserves the right to make revisions in the design of faucets without notice, as specified in the Price Book.
text_image
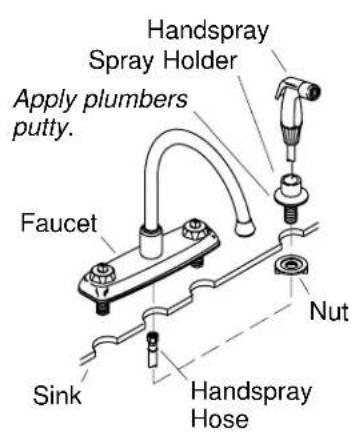
Handspray Spray Holder Apply plumbers putty. Faucet Nut Sink Handspray Hose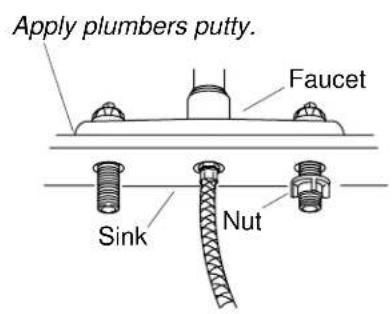
text_image
Apply plumbers putty. Faucet Sink Nut1. Faucet Installation
□ Apply plumbers putty or other sealant to the underside of the faucet according to the manufacturer's instructions.
□ Center and align the faucet on the sink.
□ Securely hand tighten the nuts from under the sink.
2. Handspray Installation
Separate Handspray
□ Apply a bead of plumbers putty or other sealant to the underside of the spray holder according to the manufacturer's instructions.
☐ Insert the spray holder through the sink hole.
□ Hand tighten the nut to the spray holder from under the sink.
□ Remove any excess putty or sealant.
☐ Insert the handspray hose through the spray holder.
□ Attach the hose to the faucet base using thread sealant.
text_image
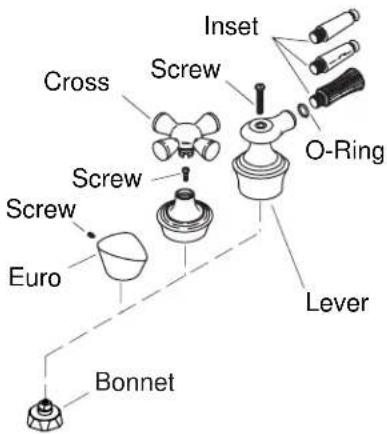
Inset Cross Screw Screw Euro Screw O-Ring Lever Bonnet3. Handle Installation
For Euro handles:
□ Align the "D" shape of the valve stem and the hole in the handle.
□ Secure the handles with a screw and finishing trim.
For Cross handles:
□ Align the "D" shape of the valve stem and the hole in the handle.
□ Secure the insert with the screw.
□ Align the slots on the insert with the cross and push down.
□ Secure the handles with a screw and finishing trim.
For Lever handles:
□ Align the "D" shape of the valve stem and the hole in the handle.
☐ Ensure that the O-ring is behind the threads of the inset.
□ Secure the handles with a screw and finishing trim.

text_image
Faucet Shank Nut Supply Tube Supply Stop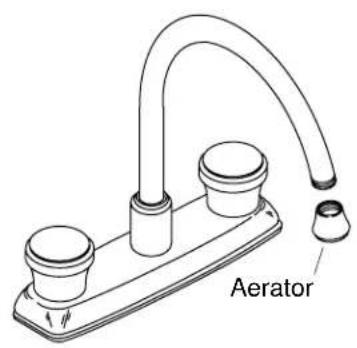
text_image
Aerator4. Supply Installation
For ground joint connections:
□ Slip the nut onto the supply tube.
☐ Position the round end of the supply tube squarely to the inlet of the faucet shank and supply stop.
□ Securely tighten all nuts.
5. Checkout Installation
☐ Ensure that both faucet handles are turned off. Hot is clockwise close and cold is counterclockwise close.
☐ Turn on the hot and cold water supplies.
□ Check for leaks.
□ Remove the aerator by turning it counterclockwise.
☐ Turn on the hot and cold faucet handles for one minute to flush debris from the faucet.
□ Close the hot and cold water handles.
☐ Reattach the aerator by turning it clockwise until hand tight.




