EAMO 360 Solo V2 - Vacuum Cleaner Essentiel B - Free user manual and instructions
Find the device manual for free EAMO 360 Solo V2 Essentiel B in PDF.

| Product type | Cordless stick vacuum |
| Brand | Essentiel B |
| Model | EAMO 360 Solo V2 |
| Reference | 8004630 |
| Power supply | 36 V Lithium-Ion battery |
| AC adapter | Model JOD-S-400036GS, input 100-240 V~ 50/60 Hz, output 40.0 V --- 0.36 A |
| Charging time | Approximately 6 hours 30 minutes |
| Battery life | 60 min at low speed, 30 min at high speed |
| Speeds | 2 speeds (low and high) |
| Dust bin capacity | 0.6 liter |
| Filter | Washable EPA filter, replacement recommended every 6 months |
| Lighting | LED on the power brush |
| Charge indicator | 4 blue LED lights on the dust bin |
| Power cord length | 1.50 m |
| Wall mount | Included with screws |
| Functions | On/off, speed selector, LED lighting, battery indicator |
| Cleaning and maintenance | Dust bin and filter washable with clean water; power brush can be disassembled to remove obstructions |
| Safety | Safety instructions included (additional leaflet); do not immerse the body or adapter; unplug before maintenance |
| Spare parts | Replacement EPA filter available from retailer |
| Repairability | Repairs reserved for qualified technicians |
Frequently Asked Questions - EAMO 360 Solo V2 Essentiel B
User questions about EAMO 360 Solo V2 Essentiel B
0 question about this device. Answer the ones you know or ask your own.
Ask a new question about this device
Download the instructions for your Vacuum Cleaner in PDF format for free! Find your manual EAMO 360 Solo V2 - Essentiel B and take your electronic device back in hand. On this page are published all the documents necessary for the use of your device. EAMO 360 Solo V2 by Essentiel B.
USER MANUAL EAMO 360 Solo V2 Essentiel B
Stick vacuum cleaner SOLO
Aspiradora de escoba SOLO
Saugbesen SOLO
Steelstofzuiger SOLO
natural_image
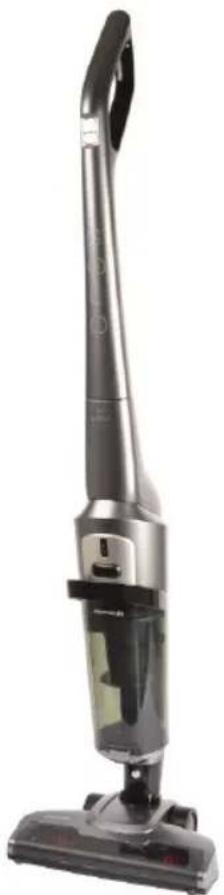
Exterior view of a modern vacuum cleaner (no visible text or symbols)To help you get the best out of your purchase
installation du support mural 7
natural_image
Technical line drawing of a handheld device with an arrow indicating assembly or transformation (no text or symbols present)Fig. 1
natural_image
Technical line drawing of a mechanical assembly with exploded view, showing internal components and assembly steps (no text or symbols)installation du support mural
natural_image
Simple line drawing of a rectangular shape with four small circular indentations at the center (no text or symbols)Fig. 5
natural_image
Simple line drawing of a hand holding a tool, with dashed grid lines and no text or symbolsFig. 6
natural_image
Diagram showing three mechanical components with dashed alignment lines, no text or symbols present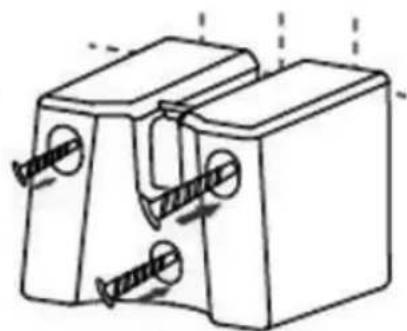
natural_image
Technical line drawing of a mechanical clamp or bracket with two screws inserted (no text or symbols)Fig. 7 Fig. 8
natural_image
Line drawing showing a vacuum cleaner being adjusted to form a device, with no text or symbols present.natural_image
Line drawing of a vacuum cleaner with attached electrical outlet, showing wiring and component movement (no text or symbols)natural_image
Technical line drawing of a mechanical device with gears and housing (no text or symbols)Fig. 16
natural_image
Technical line drawing of a mechanical component with an arrow indicating assembly (no text or symbols present)natural_image
Technical illustration of a mechanical component before and after assembly, showing internal structure and motion (no text or symbols)natural_image
Technical line drawing of a mechanical assembly with exploded view, showing internal components and part outline (no text or symbols)Contents of package 17
Technical specifications 17
description of the appliance 18
assembling/disassembling the appliance 19
installing the wall bracket 21
charging the battery 23
Connecting the mains adapter 23
Charge level indicator 24
use 25
Vacuum cleaner controls 25
cleaning and maintenance 26
Cleaning the body of the appliance 26
Disassembling and cleaning the powered brush 26
Removing and cleaning the dust collector and filter 27
troubleshooting guide 29
Thank you for purchasing an Essentiel b product. We take great care in the RELIABILITY, EASE OF USE and DESIGN of our products.
We are confident that you will be totally satisfied with this stick vacuum cleaner.
your product
Contents of package
• 1 single function vacuum cleaner
• 1 wall bracket with fasteners
- 1 mains adapter
- 1 user guide
Technical specifications
- EAMO 360 SOLO rechargeable stick vacuum cleaner, Ref. 8004630, for recharging at the specified voltage using the included JOD-S-400036GS battery charger.
• Rechargeable 36 V Lithium-Ion battery -
Mains adapter:
-
Model: JOD-S-400036GS
- Input: 100 - 240 V\~ 50/60 Hz 0.5 A
- Output: 40.0 V --- 0.36A 14.4W
- Charging time: 6 hours 30 minutes
- Battery life:
- Slow speed: 60 minutes
- Fast speed: 30 minutes
- 2 speeds
• LED illumination on the powered brush
- Charge and battery level indicator
• Usable dust collector capacity: 0.6 litres
• 1 washable EPA filter
• Cable length: 1.50 m
- Wall bracket
description of the appliance
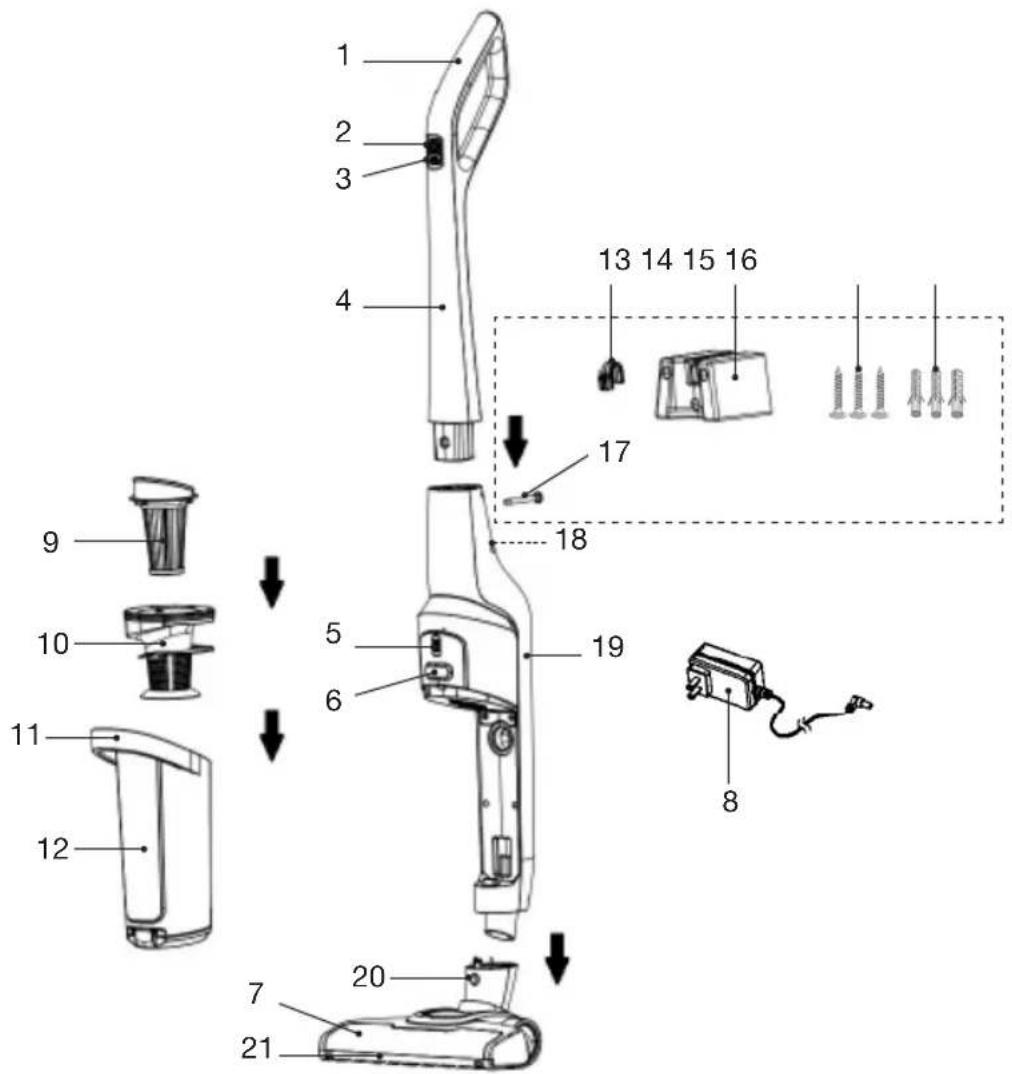
- Handle
- On/Off button
- Speed selector button
- Wand
- Charge and battery level indicator
- Dust collector unlock button
- Powered brush
- Mains adapter
- EPA filter
- Filter unit
-
Dust collector handle
-
Dust collector
- Wall hook
- Wall bracket
- Screws (x3)
- Wall plugs (x3)
- Screw for attaching the wand to the body of the appliance
- Charging port
- Body of the appliance
- Appliance body unlock button
- LED illumination
assembling/disassembling the appliance
Remove all the parts from the packaging and make sure the appliance is powered off and unplugged before commencing assembly or disassembly.
natural_image
Technical line drawing of a handheld device with an arrow indicating assembly or transformation (no text or symbols present)Fig. 1
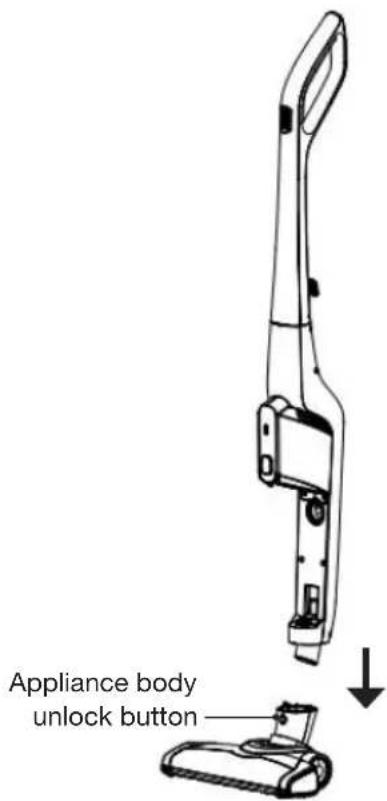
Fig. 2
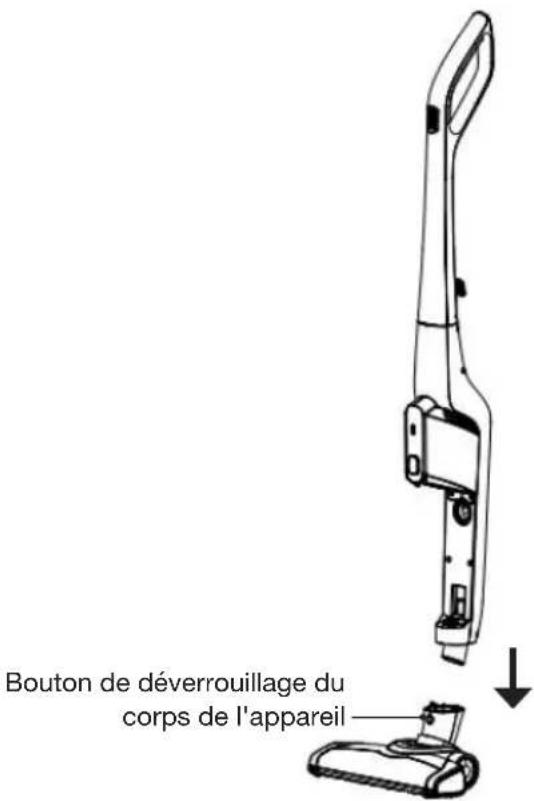
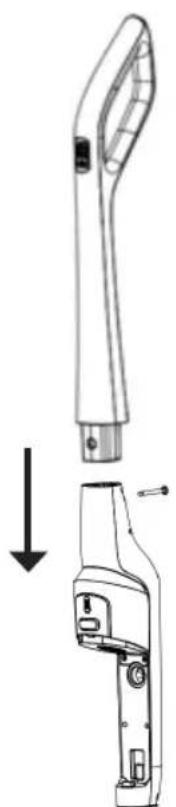
- Insert the wand (4) into the body of the appliance (19), then insert the screw into the hole in the back of the wand and do up as indicated in figure 1 above.
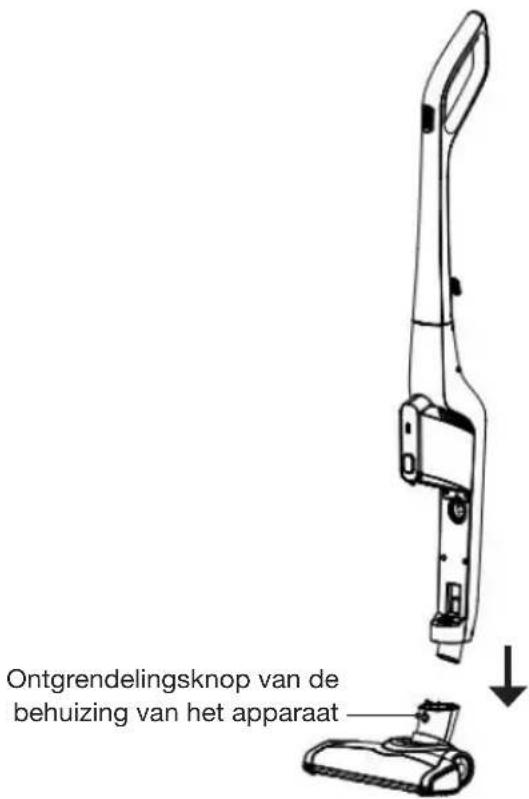
- Insert the body of the appliance into the powered brush until it clicks into place (see figure 2).
To remove the powered brush from the body of the appliance, press the unlock button located on the powered brush (see figure 2).
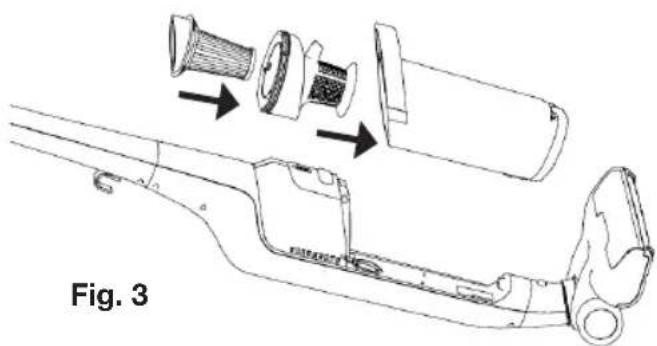
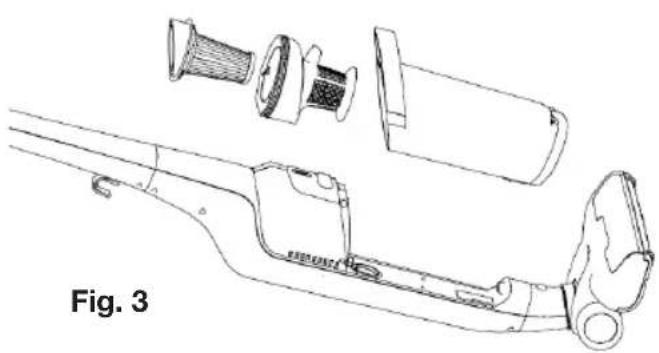
- Insert the EPA filter (9) into the notches in the filter unit (10) and gently rotate in a clockwise direction until it locks into place (see figure 3).
- Insert the filter unit (10) into the dust collector (12) (fig. 3).
natural_image
Technical line drawing of a mechanical assembly with exploded view, showing internal components and assembly steps (no text or symbols)- Insert the dust collector into the body of the appliance by engaging it at the bottom, then moving the top inwards until it clicks into place (see figure 4).
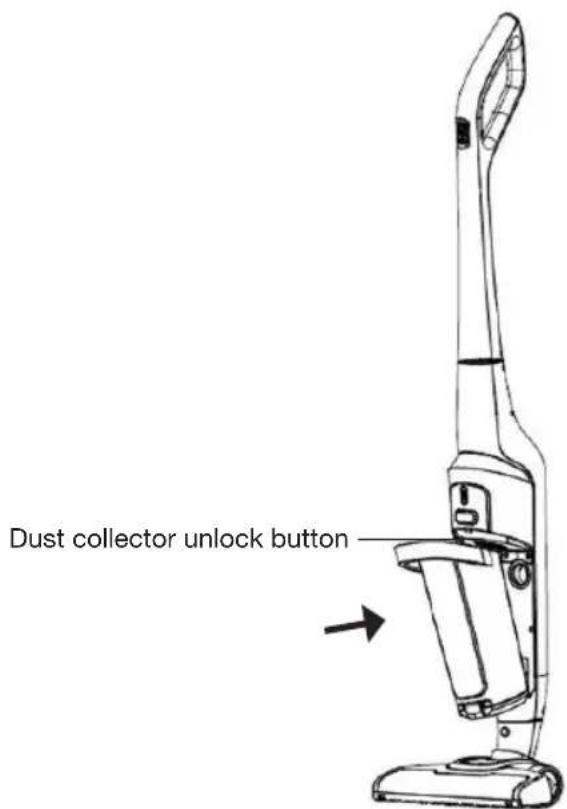
Fig. 4
To remove the dust collector from the body of the appliance, press the unlock button (see figure 4).
installing the wall bracket
NOTE: the included wall plugs are suitable for solid walls made of concrete, solid brick, stone, etc. only.

Inspect the partition or wall type where you want to fix the bracket. Make sure that the included fastenings are compatible.
If they are not, use expanding wall plugs designed for your type of partition or wall (use special fixings for hollow walls, BA13 plasterboard walls, hollow bricks, etc.).
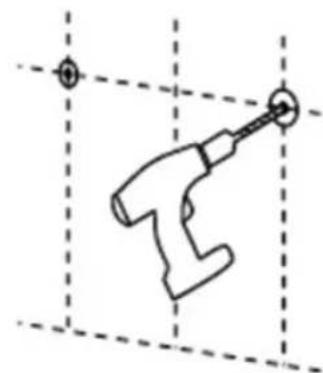
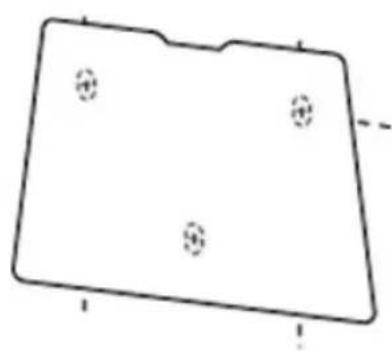
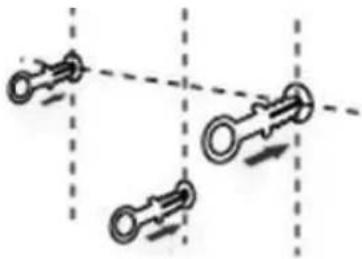
- Position the bracket (14) against the wall at the intended place. Mark the hole locations using a pencil inserted into the 3 bracket holes (see figure 5).
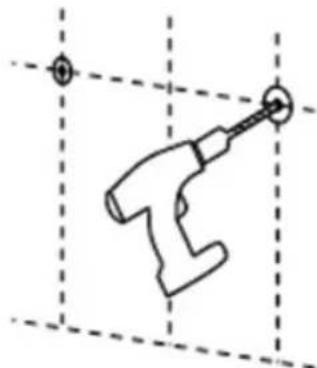
- Drill 3 holes into the wall (figure 6).
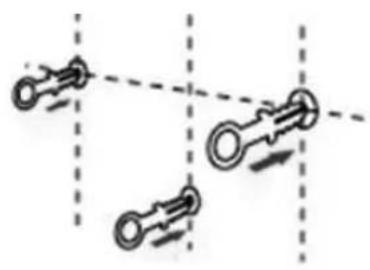
- Insert the 3 wall plugs into the holes (figure 7).
- Insert the 3 screws into the holes and do up tightly so that the bracket is securely attached to the wall (figure 8).
natural_image
Simple line drawing of a rectangular shape with four small circular holes and a horizontal line (no text or symbols)Fig. 5

natural_image
Simple line drawing of a hand holding a tool, with dashed grid lines and no text or symbolsFig. 6

natural_image
Diagram showing three identical mechanical components with directional arrows, no text or symbols present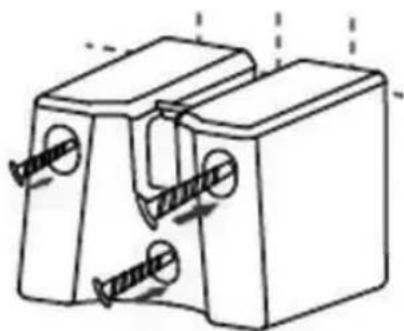
natural_image
Technical line drawing of a mechanical component with threaded fasteners and mounting holes (no text or symbols)Fig. 7 Fig. 8
- Insert the hook into the notch on the back of the wand (see figure 9).
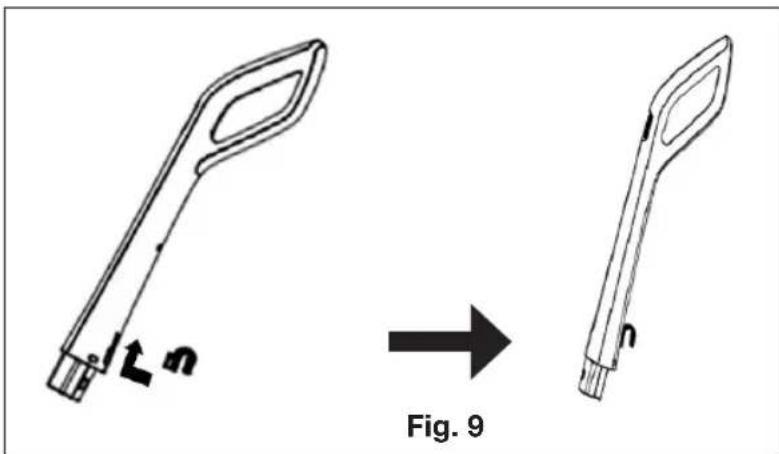
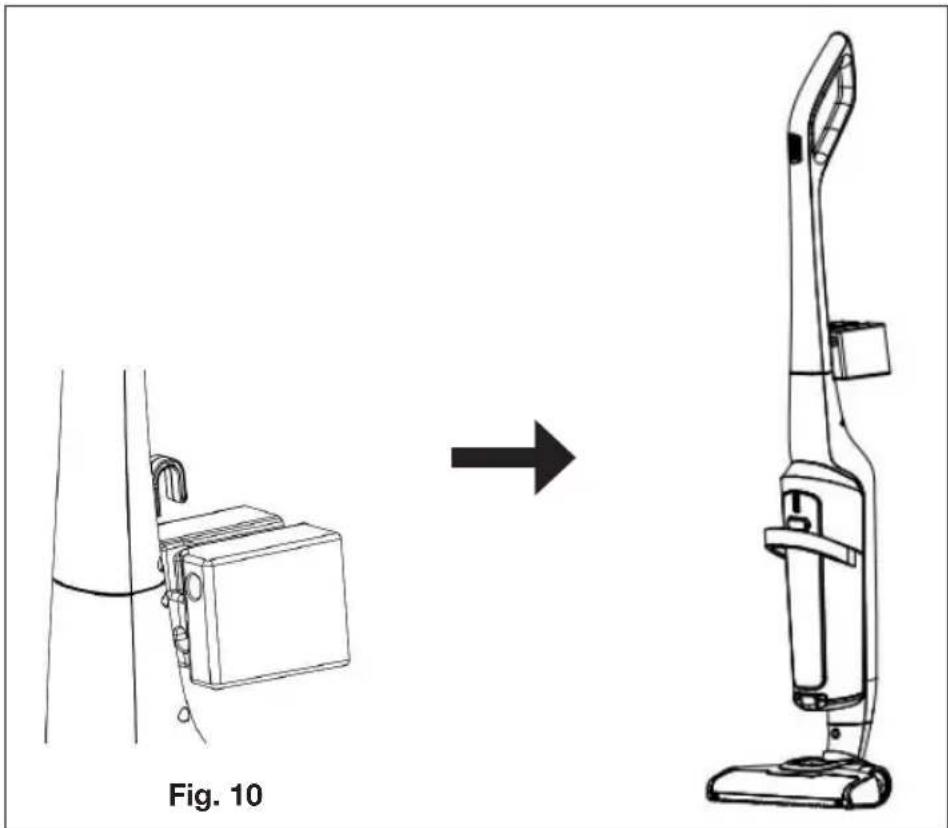
- Lock the wand into the upright position and insert the hook into the wall bracket (see figure 10).
natural_image
Line drawing of a vacuum cleaner from side to front, showing internal components and assembly (no text or symbols)charging the battery
Before using the appliance for the first time or if the charge indicator is showing that the battery is depleted, it must be charged.
Note: you cannot use the vacuum cleaner when it is charging.
Connecting the mains adapter
natural_image
Line drawing of a vacuum cleaner with attached electrical outlet, showing wiring and component movement (no text or symbols)You can recharge the vacuum cleaner either by attaching it to its bracket or directly when in the upright position (with the wand locked at 90° to the brush).
-
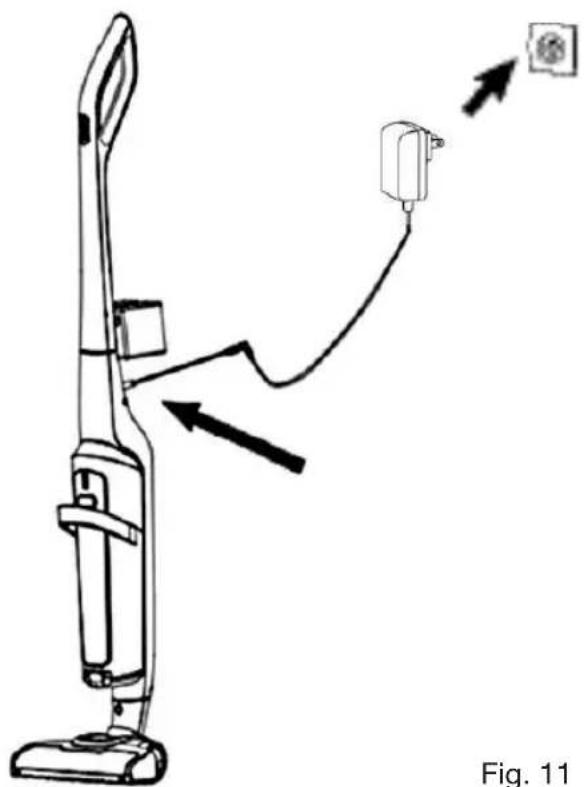
Completely unwind the power supply cable and connect the plug to the charging port on the back of the wand.
-
Then connect the other end of the mains adapter to a wall socket (Fig 11).
-
The blue charge indicator LEDs will blink during charging.
-
For a full charge, allow around 6 hours and 30 minutes.
-
When charging is finished, the 4 blue LEDs will stop blinking and remain lit before going out.
Note: It is normal for the vacuum cleaner wand to become warm during charging.
Charge level indicator
The charge level indicator is located on the top of the dust collector (Fig. 12). There are 4 markers indicating the charge level:
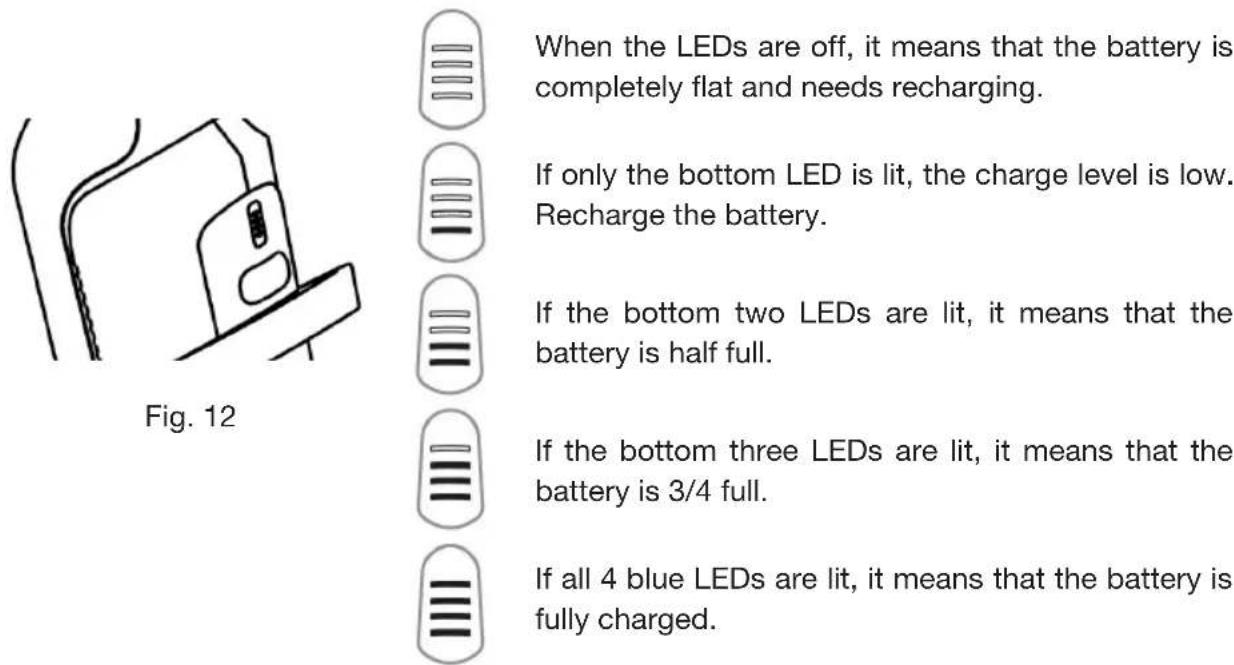
When the LEDs are off, it means that the battery is completely flat and needs recharging.
If only the bottom LED is lit, the charge level is low. Recharge the battery.
If the bottom two LEDs are lit, it means that the battery is half full.
If the bottom three LEDs are lit, it means that the battery is 3/4 full.
If all 4 blue LEDs are lit, it means that the battery is fully charged.
Battery life:
- Slow speed: 60 minutes
- Fast speed: 30 minutes
Note: If the 4 LEDs blink rapidly at the same time, it means that the filter is not installed correctly or there is an obstruction. Check the filter installation and clean where necessary.
use
- Before using the vacuum cleaner, make sure that the filter is inserted correctly into the filter unit.
- Never use the appliance without the filter or dust collector!
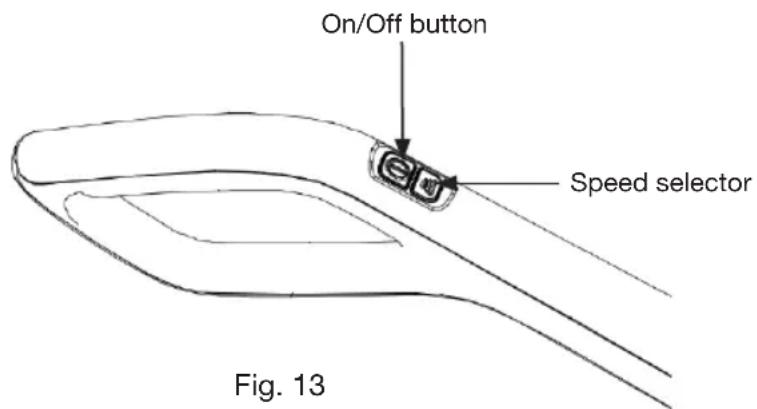
Vacuum cleaner controls
When the appliance is fully assembled and the battery charged:
- Press the On/Off button on the handle once (Fig. 13). By default, the appliance will come on at the high speed setting and the blue charge indicator will be lit.
- Press the speed selector button to switch to the slow speed setting (Fig. 13). Press the button again if you want to go back to the high speed setting. On slow, the battery will last for 60 minutes whereas on fast, it will last for 30 minutes.
- Gently press on the powered brush to unlock the wand, incline it to 45^ and use a back-and-forth motion to do the vacuuming.
- When you have finished, press the On/Off button to power off the vacuum cleaner. The charge indicator will go out.
- If necessary, empty and clean the dust collector, filter unit and EPA filter (See the Cleaning and Maintenance section).
cleaning and maintenance
- Make sure that the appliance is powered off and unplugged before you start cleaning it.
- Never immerse the body of the appliance or the mains adapter in water or other liquids.
- Never use solvents, abrasive detergents or scouring pads to clean the appliance.
Cleaning the body of the appliance
The outer surfaces of the appliance can be cleaned with a lightly moistened soft cloth.
Disassembling and cleaning the powered brush
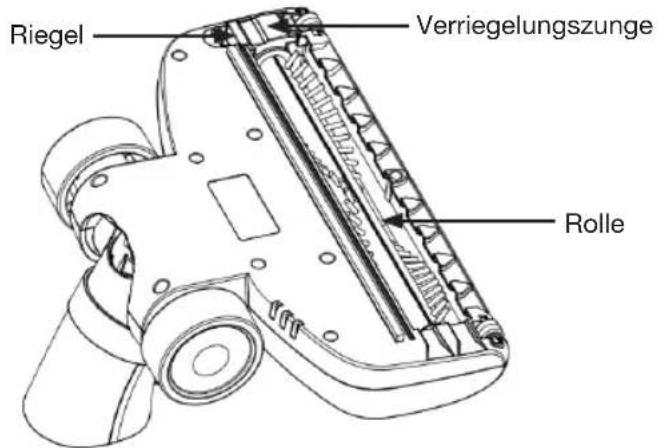
If the brush won't rotate or is obstructed:
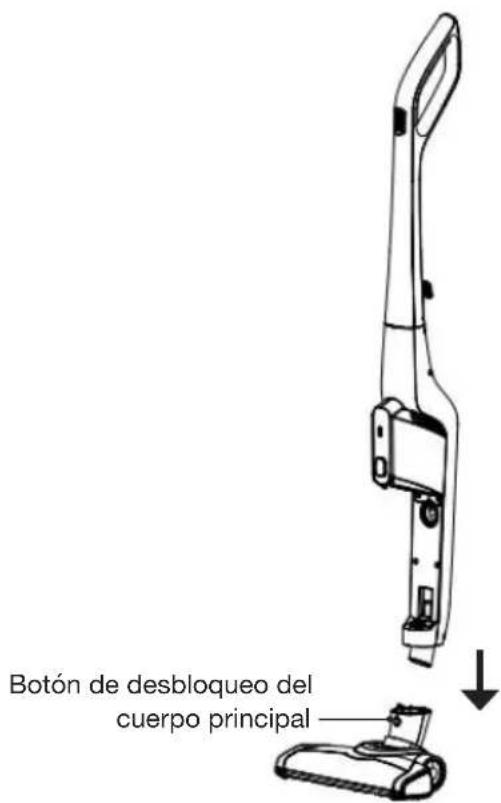
- Separate the powered brush from the body of the appliance by pressing the unlock button located on it (Fig. 14).
- Turn the powered brush over (Fig. 15).
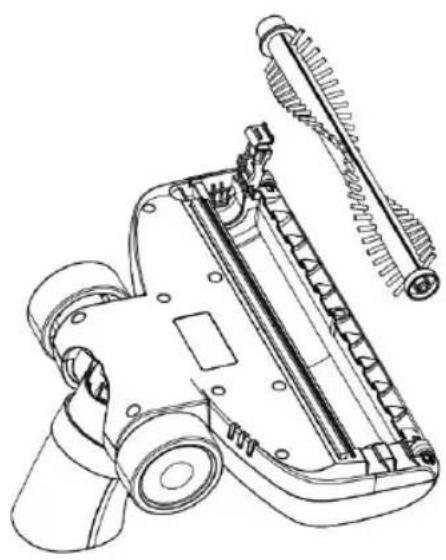
- Press the latch and lift up the locking tab (Fig. 15): this will allow you to extract the roller from its housing (Fig. 16).
- Carefully remove anything that is stuck in the roller by hand or using a pair of scissors, then replace the roller into its housing.
- Close the tab by clicking it back into place and refit the powered brush to the vacuum cleaner.
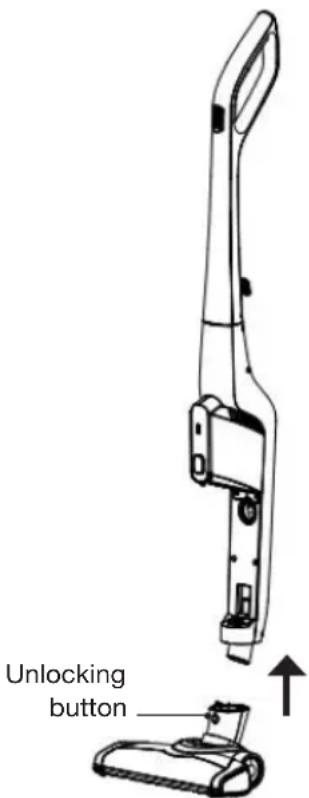
Fig. 14
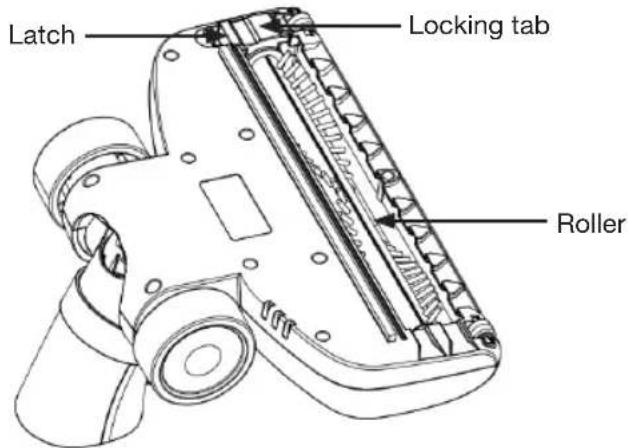
Fig. 15

natural_image
Technical line drawing of a mechanical device with gears and housing (no text or symbols)Fig. 16
Removing and cleaning the dust collector and filter
You should empty and clean the dust collector and filter unit when the contents reach the MAX level on the container.
REMOVING AND CLEANING THE DUST COLLECTOR AND FILTER UNIT
- Press the dust collector unlock button and extract it from its housing (see figure 4).
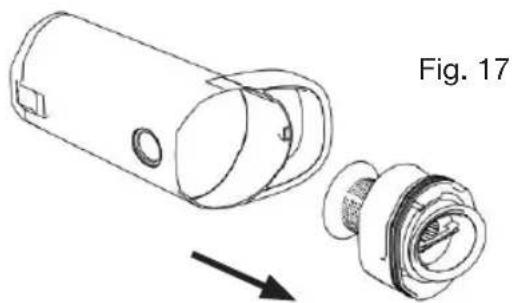
- Remove the filter unit (Fig. 17).
natural_image
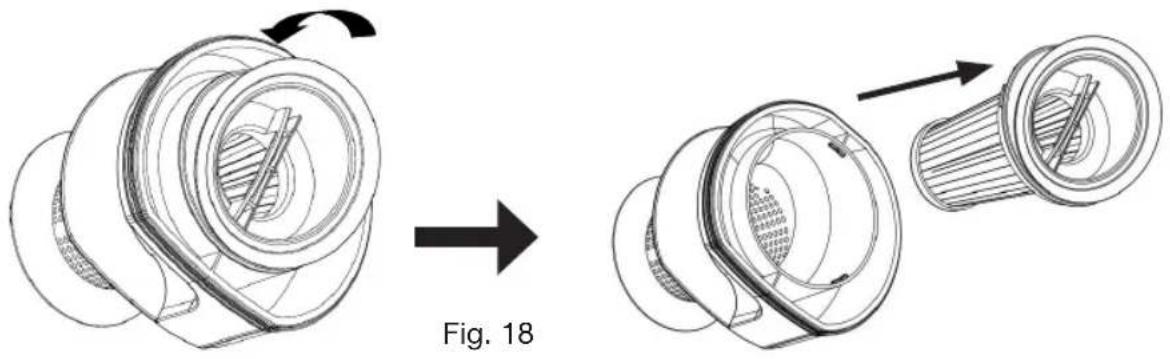
Technical line drawing of a mechanical component with an arrow indicating assembly (no text or symbols present)- Remove the EPA filter by gently turning it anticlockwise to release it (Fig. 18).
natural_image
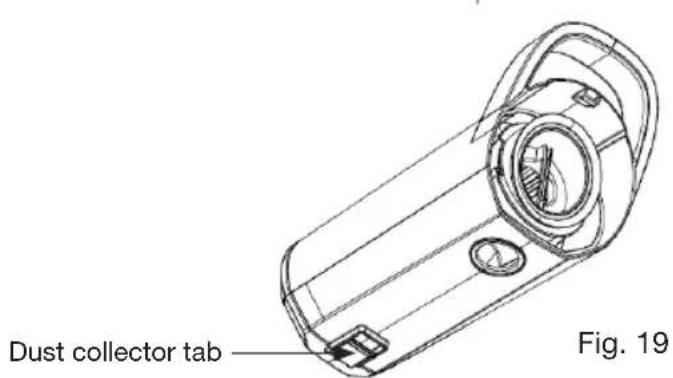
Technical illustration of a mechanical component before and after assembly, showing internal structure and motion (no text or symbols)- Hold the dust collector over a dustbin and press the tab located on it (Fig. 19) to open it and empty its contents.
-
Shake all the components above the dustbin.
-
Rinse everything with clean water and allow to dry completely in the open air (for at least 24 hours in the case of the EPA filter) before refitting to the appliance. Refit the components in reverse order (see figure 3).
natural_image
Technical line drawing of a mechanical component with exploded view, labeled Fig. 3 (no text or symbols on the diagram itself)As a general rule, the EPA filter should be replaced every 6 months (how long the filter lasts depends on how often the appliance is used and the state of the filter).
You can purchase replacement EPA filters at your retail store.
Do not use your appliance if the EPA filter is damaged as this may cause the unit to malfunction.
troubleshooting guide
If the appliance malfunctions, it may be due to a minor problem that you can rectify by following the instructions below. Before you call in a technician, you should carry out the following checks:
The appliance won't turn on.
- Check the battery level and recharge if necessary.
- See if any fibres are jamming the powered brush roller. Remove it and pull off any fibres that are preventing the roller from rotating. You should also check the state of the EPA filter. If it is dirty, clean it; if it is worn out, replace it.
The vacuum cleaner stops working after a short period of time:
- The battery is only partially charged. Recharge the vacuum cleaner for approximately 6 hours to fully charge the battery.
- Check that both ends of the mains adapter are plugged in properly (one end should be plugged into the vacuum cleaner wand and the other into a functioning mains socket).
Vacuuming performance is weak:
- The dust collector is full and needs emptying.
- The EPA filter is dirty and needs cleaning.
- The powered brush is obstructed. Remove it and pull off any fibres that are preventing the roller from rotating.
If the problem persists, contact your retail store's customer service department. Do not try to carry out any repairs yourself. Your appliance should only be repaired by qualified maintenance technicians. Poorly-done repairs can be dangerous for the user and are not covered by the warranty.
índice
natural_image
Technical line drawing of a mechanical device with an arrow indicating assembly or transformation (no text or symbols present)Fig. 1
natural_image
Technical line drawing of a mechanical assembly with exploded view, showing internal components and part outline (no text or symbols)natural_image
Simple line drawing of a rectangular shape with four small circular indentations on its sides (no text or symbols)Fig. 5

natural_image
Simple line drawing of a tool with a handle, positioned on a grid background (no text or symbols)Fig. 6
natural_image
Diagram showing three mechanical components with directional arrows, no text or symbols present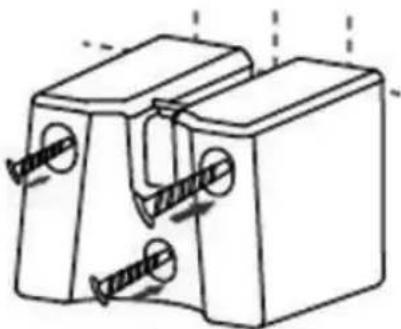
natural_image
Technical line drawing of a mechanical component with two slots and mounting holes (no text or symbols)Fig. 7 Fig. 8
natural_image
Line drawing showing a vacuum cleaner being adjusted to form a device, with no text or symbols present.natural_image
Line drawing of a vacuum cleaner with attached electrical outlet, showing wiring and component movement (no text or symbols)Fig. 11
natural_image
Technical line drawing of a mechanical device with gears and housing (no text or symbols)Fig. 16
natural_image
Technical line drawing of a mechanical component with an arrow indicating assembly (no text or symbols present)natural_image
Technical illustration of a mechanical component before and after assembly, showing internal structure and motion (no text or symbols)natural_image
Technical line drawing of a mechanical assembly with exploded view and labeled Fig. 3 (no text or symbols on the diagram itself)natural_image
Simple line drawing of a rectangular shape with four small circular indentations on its sides (no text or symbols)Abb. 5
natural_image
Simple line drawing of a tool with a handle, positioned on a grid background (no text or symbols)Abb. 6

natural_image
Diagram showing three mechanical components with directional arrows, no text or symbols present
natural_image
Technical line drawing of a mechanical component with two slots and mounting holes (no text or symbols)Abb. 7 Abb. 8
natural_image
Line drawing of a vacuum cleaner with attached electrical outlet, showing wiring and directional arrows (no text or symbols)natural_image
Technical line drawing of a vacuum cleaner with labeled component 'ste' (no text or symbols beyond label)Verriegelungstaste
Abb. 14
natural_image
Technical line drawing of a mechanical device with gears and housing (no text or symbols)Abb. 16
natural_image
Technical line drawing of a mechanical component with an arrow indicating assembly (no text or symbols present)natural_image
Technical illustration of a mechanical component before and after assembly, showing a circular component with internal structure and directional arrows (no text or symbols)natural_image
Technical line drawing of a mechanical component with exploded view, labeled Abb. 3 (no text or symbols on the diagram itself)natural_image
Technical line drawing of a handheld device with an arrow indicating assembly or transformation (no text or symbols present)Fig. 1
natural_image
Technical line drawing of a mechanical assembly with exploded view, showing internal components and assembly steps (no text or symbols)natural_image
Simple line drawing of a rectangular shape with four small circular holes, no text or symbols present.Fig. 5

natural_image
Simple line drawing of a hand holding a tool, with dashed grid lines and no text or symbolsFig. 6

natural_image
Diagram showing three mechanical components with dashed alignment lines, no text or symbols present
natural_image
Technical line drawing of a mechanical clamp or bracket with two screw holes and two flanges (no text or symbols)Fig. 7 Fig. 8
natural_image
Diagram showing a mechanical component before and after modification, labeled as Fig. 9 (no text or symbols on the diagram itself)natural_image
Line drawing showing a vacuum cleaner being adjusted to form a device, with no text or symbols present.opladen van de accu
natural_image
Line drawing of a vacuum cleaner with attached electrical outlet, showing wiring and component movement (no text or symbols)Fig. 11
natural_image
Technical line drawing of a vacuum cleaner with labeled component 'nop' (no text or symbols beyond label)Ontgrendelingsknop
Fig. 14
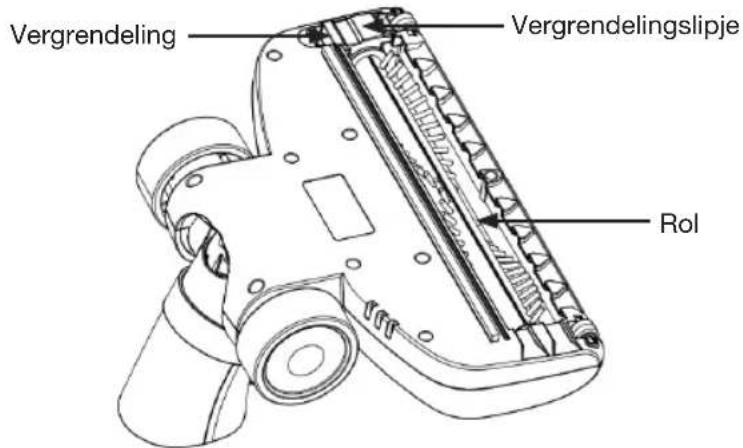
Fig. 15
natural_image
Technical line drawing of a mechanical device with gears and housing (no text or symbols)Fig. 16
natural_image
Technical line drawing of a mechanical component with an arrow indicating assembly (no text or symbols present)natural_image
Technical illustration of a mechanical component before and after assembly, showing internal structure and motion (no text or symbols)natural_image
Technical line drawing of a mechanical device with exploded view, labeled Fig. 3 (no text or symbols on the diagram itself)All information, designs, drawings and pictures in this document are the property of SOURCING & CREATION. SOURCING & CREATION reserves all rights to its brands, designs and information. Any copy and reproduction through any means shall be deemed and considered as counterfeiting.
All information, diagrams and images in this document are the exclusive property of SOURCING & CREATION. SOURCING & CREATION reserves all rights relating to its brands, designs, and information. Any copy or reproduction, by any means whatsoever, will be treated as an infringement of copyright.
All information, designs, drawings and pictures in this document are the property of SOURCING & CREATION. SOURCING & CREATION reserves all rights to its brands, designs and information. Any copy and reproduction through any means shall be deemed and considered as counterfeiting.
All information, designs, drawings and pictures in this document are the property of SOURCING & CREATION. SOURCING & CREATION reserves all rights to its brands, designs and information. Any copy and reproduction through any means shall be deemed and considered as counterfeiting.
| FR | EN | |||||
| Information publiée | Valeur et précision | Unité | Information published | Value and precision | Unit | |
| Raison sociale ou marque déposée, numéro d'enregistrement au registre du commerce et adresse du fabricant | SOURCING & CREATION347 384 570AVENUE DE LA MOTTE59810 LESQUIN FRANCE | - | Manufacturer's name or trade mark, commercial registration number and address | SOURCING & CREATION347 384 570AVENUE DE LA MOTTE59810 LESQUIN FRANCE | - | |
| Référence du modèle | JOD-S-400036GS | - | Model identifier | JOD-S-400036GS | - | |
| Tension d'entrée | 100-240 | V | Input voltage | 100-240 | V | |
| Fréquence du CA d'entrée | 50/60 | Hz | Input AC frequency | 50/60 | Hz | |
| Tension de sortie | DC40.0 | V | Output voltage | DC40.0 | V | |
| Courant de sortie | 0.36 | A | Output current | 0.36 | A | |
| Puissance de sortie | 14.4 | W | Output power | 14.4 | W | |
| Rendement moyen en mode actif | 88.46 | % | Average active efficiency | 88.46 | % | |
| Rendement à faible charge (10 %) | 75.53 | % | Efficiency at low load (10 %) | 75.53 | % | |
| Consommation électrique hors charge | 0.061 | W | No-load power consumption | 0.061 | W | |
| NL | ES | |||||
| Bekendgemaakte informatie | Waarde en precisie | Eenheid | Información publicada | Valor y precisión | Unidad | |
| Naam of handelsmerk van de fabrikant, handelsregisternummer en adres | SOURCING & CREATION347 384 570AVENUE DE LA MOTTE59810 LESQUIN FRANCE | - | Nombre o marca, número del registro mercantil y dirección del fabricante | SOURCING & CREATION347 384 570AVENUE DE LA MOTTE59810 LESQUIN FRANCE | - | |
| Typeaanduiding: | JOD-S-400036GS | - | Identificador del modelo | JOD-S-400036GS | - | |
| Voedingsspanning | 100-240 | V | Tensión de entrada | 100-240 | V | |
| Voedingsfrequentie | 50/60 | Hz | Frecuencia de la CA de entrada | 50/60 | Hz | |
| Uitgangsspanning | DC40.0 | V | Tensión de salida | DC40.0 | V | |
| Uitgangsstroom | 0.36 | A | Intensidad de salida | 0.36 | A | |
| Uitgangsvermogen | 14.4 | W | Potencia de salida | 14.4 | W | |
| Gemiddelde actieve efficiëntie | 88.46 | % | Eficiencia media en activo | 88.46 | % | |
| Efficiëntie bij lage belasting (10 %) | 75.53 | % | Eficiencia a baja carga (10 %). | 75.53 | % | |
| Energieverbruik in niet-belaste toestand | 0.061 | W | Consumo eléctrico en vacío | 0.061 | W | |
Stick vacuum cleaner SOLO
Aspiradora de escoba SOLO
Saugbesen SOLO
Steelstofzuiger SOLO

Protection of the environment
This symbol means that it is an appliance whose treatment at the end of its life is subject to regulations relating to waste electrical and electronic equipment (WEEE). Under no circumstances can this appliance be treated as household waste, it must be collected and treated separately. Recycling and collection systems are available through local authorities (waste treatment centres) and distributors. By ensuring that your appliance is appropriately recycled at the end of its life, you are contributing to the protection of the environment and preventing consequences that could be harmful to your health.
Customer Relations Department
Guarantee valid from date of purchase (receipt serves as proof). This guarantee does not cover defects or damage resulting from incorrect installation, incorrect use, or normal wear of the product.
Please behave responsibly
towards the environment. Recycle this product at the end of its life.