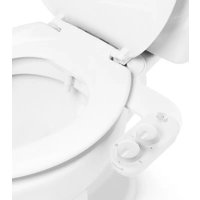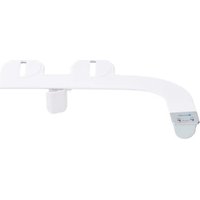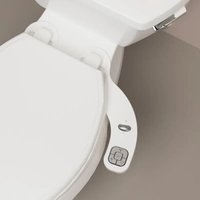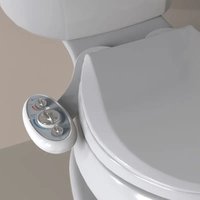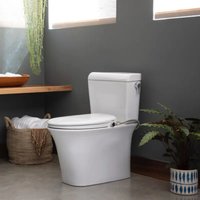
Swash EcoSeat S101 - Toilet Brondell - Free user manual and instructions
Find the device manual for free Swash EcoSeat S101 Brondell in PDF.


User questions about Swash EcoSeat S101 Brondell
0 question about this device. Answer the ones you know or ask your own.
Ask a new question about this device
Download the instructions for your Toilet in PDF format for free! Find your manual Swash EcoSeat S101 - Brondell and take your electronic device back in hand. On this page are published all the documents necessary for the use of your device. Swash EcoSeat S101 by Brondell.
USER MANUAL Swash EcoSeat S101 Brondell
Swash Ecoseat 101 Owner's Manual
Models: S101-RW, S101-EW
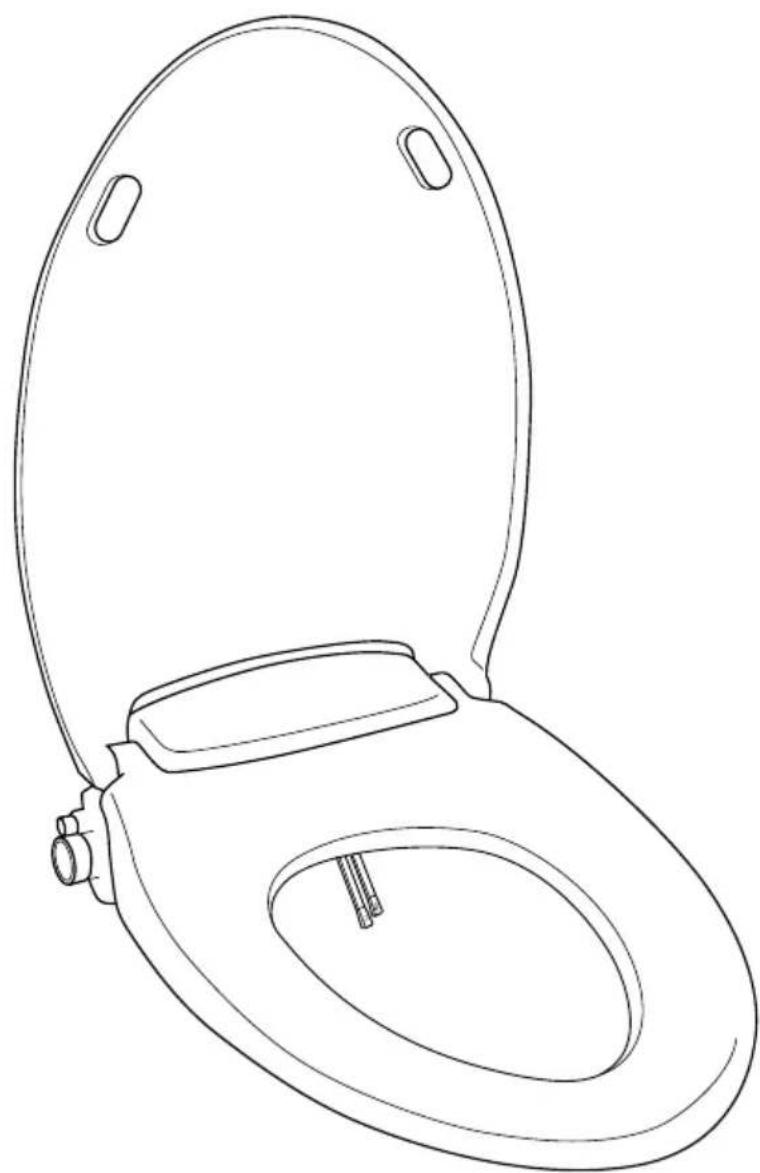
natural_image
Line drawing of a standard open toilet with lid and seat (no text or symbols)Attach Proof of Purchase to This Page
Safety Information..... Page 2
Product Features .... Page 2
Product Dimensions .... Page 3
Product Parts .... Page 4
PRODUCT INSTALLATION
Installation Parts .... Page 5
Connecting Cold Water Supply ..... Page 5
PRODUCT OPERATION
Swash Operation....Page 8
MAINTENANCE & TECHNICAL INFO
Technical Specifications.....Page 9
Swash Cleaning....Page 10
Nozzle Cleaning....Page 10
Troubleshooting.....Page 11
Warranty....Page 12
Contact Page 13
Español Page 15
Français Page
29
PRODUCT INFORMATION
SAFETY INFORMATION
Use this product only for its intended use as directed in this manual.
Do not disassemble, repair or modify the product - service should only be performed by a certified Brondell representative.
Do not submerge or spray water directly on or into the product.
Do not stand or drop heavy objects on this product and do not insert any object into openings or hose.
Do not pull or stress the water supply hose.
Do not use harsh brushes or abrasive detergents to clean the product, use only mild soap and a soft cloth for cleaning.
PRODUCT FEATURES
Hygienic Dual Wash Wands
The Swash uses two hygienic wash wands: one for posterior cleansing and the other for feminine cleansing.
Non-Electric Operation
No electricity is required to use the Swash. All Swash functions are operated by the convenient jog dial control and household water pressure.
Easy Installation
No special tools, professional plumber, or electrical outlet required for installation.
Ergonomic Design
The slow-close ergonomic lid and seat are designed to ensure the most comfortable experience.
Self-cleaning Hygienic Wands
Before and after each use, the wash wands self-clean to help stay free of build-up or debris.
PRODUCT INFORMATION (CONT.)
PRODUCT DIMENSIONS
Elongated Top View
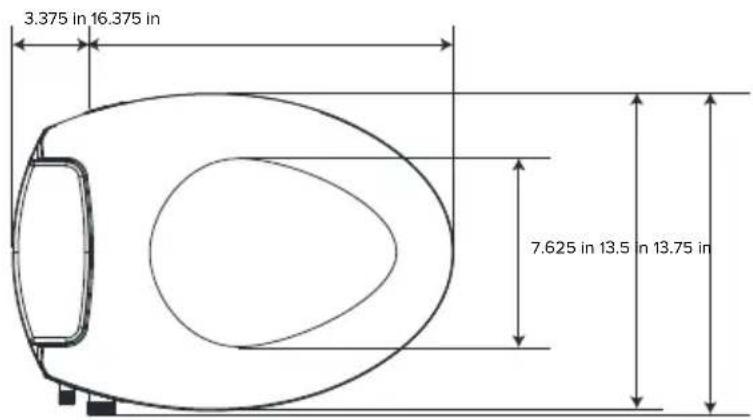
text_image
3.375 in 16.375 in 7.625 in 13.5 in 13.75 inRound Top View
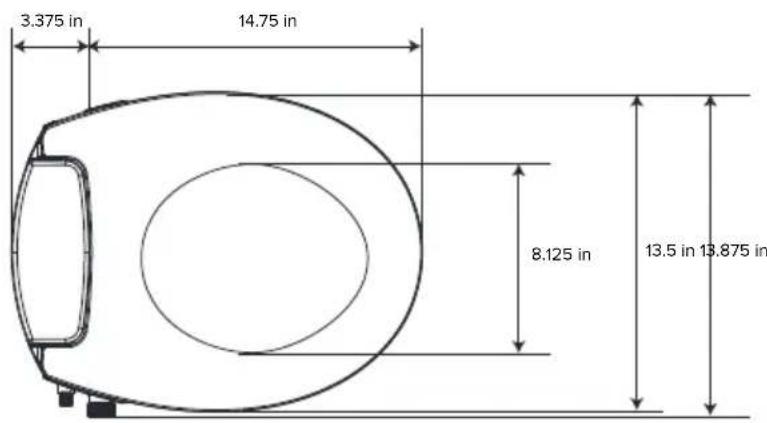
text_image
3.375 in 14.75 in 8.125 in 13.5 in 13.875 inRequired Distance Between Mounting Holes
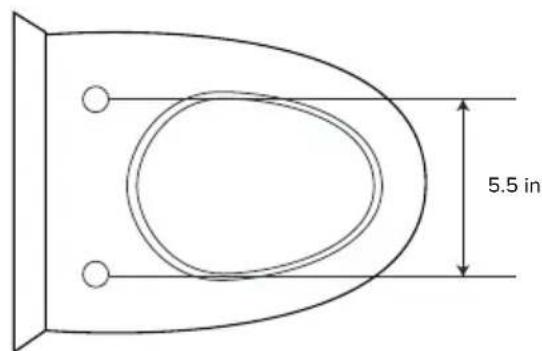
text_image
5.5 inPRODUCT PARTS
- Lid
- Seat
- Wash Wands
a. Posterior Wand
b. Front Wand
- Cold Water Inlet
- Wash Control Knob
- Quick Release Button
- Mounting Plate
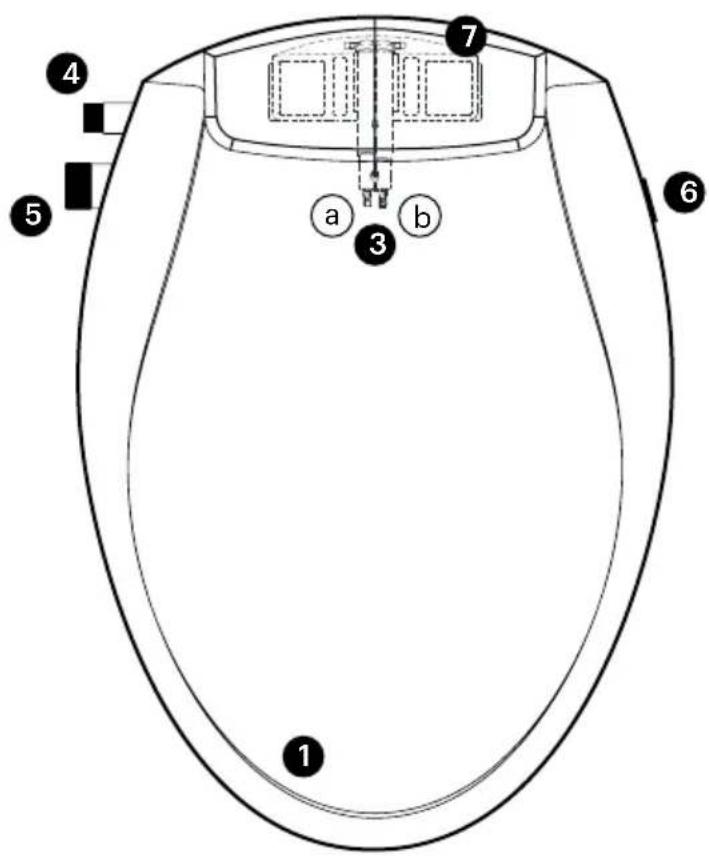
text_image
1 2 3 4 5 6 7 a b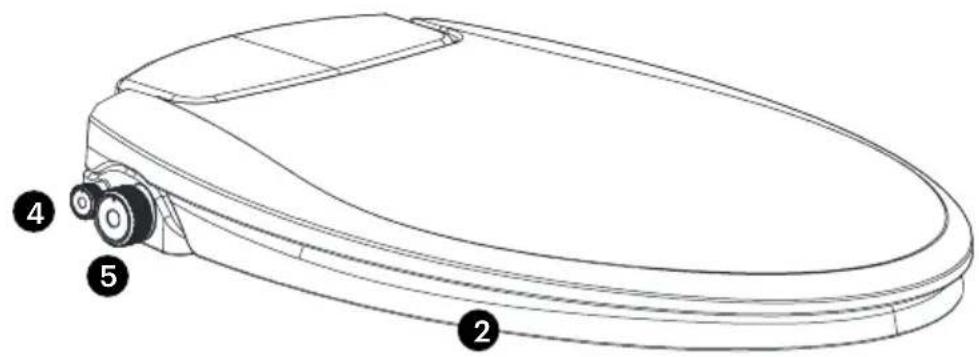
text_image
Technical diagram of a car toilet with numbered parts labeled 2, 4, and 5PRODUCT INSTALLATION
INSTALLATION PARTS
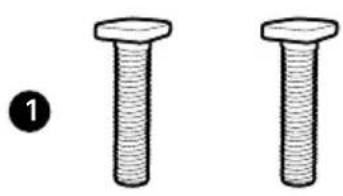
- Mounting Bolt (2)
- Barrel Nut (2)
- Mounting Plate
-
Adjustable Bracket
-
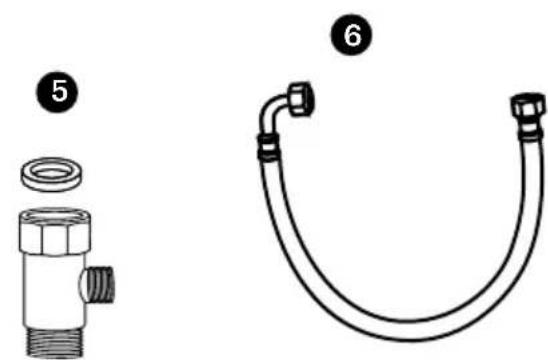
T-Valve Connector With Washer
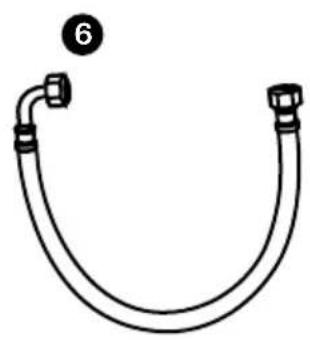
- 27.5" Cold Water Braided Metal Hose
- Teflon Tape
natural_image
Two identical screw illustrations with no text or symbols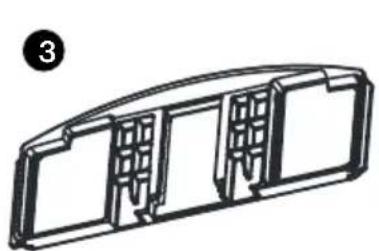
natural_image
Technical line drawing of a curved mechanical component with internal slots (no text or symbols)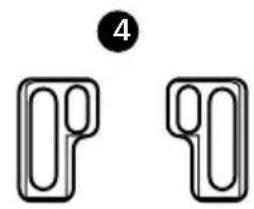
natural_image
Two abstract geometric shapes with a numbered circle (4) above them, no text or symbols present.
natural_image
Technical diagram showing two components: a valve assembly with a coiled hose and a U-shaped tube with connectors (no text or labels)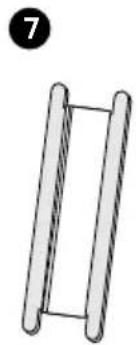
natural_image
Simple line drawing of two parallel rods with a central gap, no text or symbols presentCONNECTING COLD WATER SUPPLY
Please read these instructions carefully before installing the Swash. Failure to do so could result in flooding, leaking or damage to the product.
- Existing Toilet Seat Removal
a. Lift hinge covers and use a screwdriver to remove the mounting bolts.
b. Remove the toilet seat.
NOTE: Steps may vary by type of seat and toilet.
PRODUCT INSTALLATION (cont.)
CONNECTING COLD WATER SUPPLY (CONT.)
- Turn off Water Supply Valve and flush toilet
a. Turn Water Valve off to stop the flow of water.
b. Flush toilet and hold down handle to completely empty tank.
c. Disconnect Water Supply Hose from toilet tank. Do not disconnect from the Water Supply Valve.
NOTES:
- You may wish to place a container under the tank to catch any excess water.
- Do not continue without completing the above steps.
-
Failure to do so could result in flooding, leaking or damage to the Swash.
-
Connect T-valve to the Toilet Tank Fill Valve
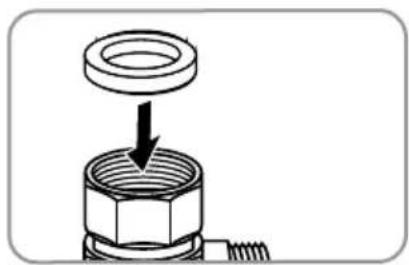
a. Place the Rubber Washer into the T-valve.
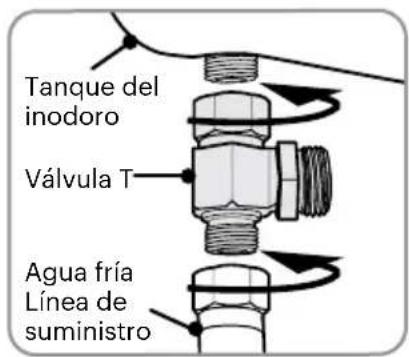
b. Install the T-valve with the rubber washer to the incoming water connection on the bottom of your toilet tank.
NOTES:
- The T-valve connects to the fill valve directly under your toilet tank - it does not connect at the wall.
- Only connect to the toilet cold water supply line.
-
If your water supply line is rigid, you may need to replace it before continuing.
-
Connect the water supply line coming from the wall to the bottom of the T-valve.
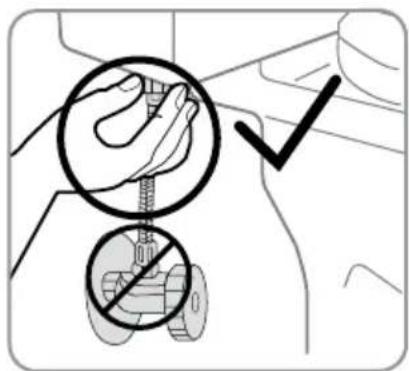
text_image
Diagram showing hand operating a valve with checkmark indicating no valve, accompanied by a magnified view of the valve mechanism.Step 2c
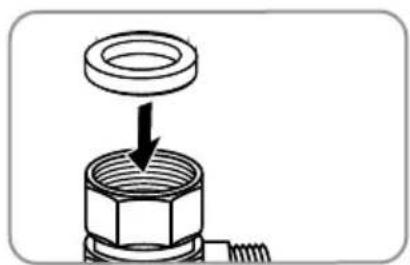
natural_image
Diagram of a bolt being inserted into a nut, showing the bolt's cap and base (no text or symbols)Step 3a
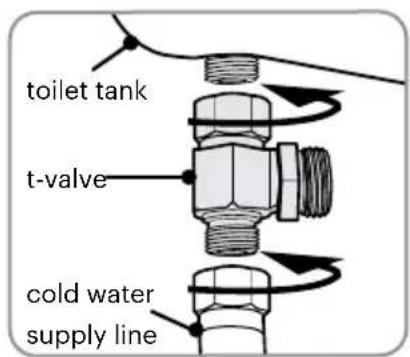
text_image
toilet tank t-valve cold water supply lineSteps 3-4
CONNECTING COLD WATER SUPPLY (CONT.)
- Install Mounting Plate
a. Place Adjustable Mounting Plate over mounting holes on toilet, rubber side faces down, curved edge faces toward the toilet tank.
b. Place the Adjustable Brackets groove side down on the center of the square opening in the Mounting Plate, then insert Mounting Bolts through the Adjustable Brackets and through the bolt holes in your toilet. Be sure that the square Mounting Bolt Head is flush with the sides of the Adjustable Bracket.
c. Slide Barrel Nut onto Mounting Bolts under the toilet bowl and tighten to keep mounting plate in place.
- Attach the Swash to the Mounting Plate
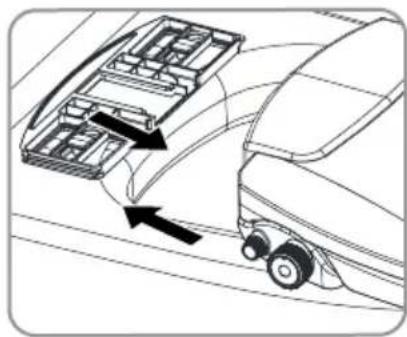
a. Set the Swash flat on the toilet bowl in front of the Mounting Plate and slide Swash onto plate until it is secure and "clicks" into place.
b. If the Swash appears too short or too long for the toilet, adjust the Mounting Plate accordingly. To adjust the Mounting Plate, loosen Barrel Nuts underneath the toilet and slide Swash forward or backwards as needed. Once the Swash is lined up properly, tighten Barrel Nuts to hold in place.
NOTES:
- If you follow the mounting directions in 6b and your seat still won't mount flush with the lip of your toilet, depending on the width of your toilet's bolt spread, you can insert the bolts through the top brackets above the main brackets on your Mounting Plate to move your seat up another 34 inches.
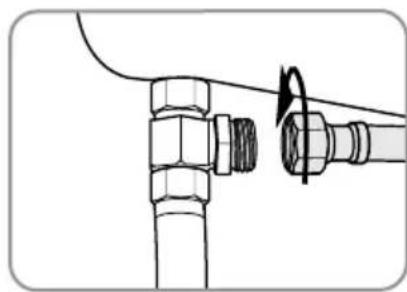
- Connect the Bidet Hose to the Cold Water Inlet
a. Connect the Bidet Hose to the Cold Water Inlet. Hand-tighten to secure. Take care not to twist the bidet hose, excessively bend it, or strip the plastic screw threads when screwing the hose onto the bidet seat.
-
Connect the open end of the Bidet Hose to the T-valve.
-
Turn on water supply
a. Open the main water supply valve slowly and check for leaks.
b. Wait 5 minutes, check again, and if there are no leaks, continue.
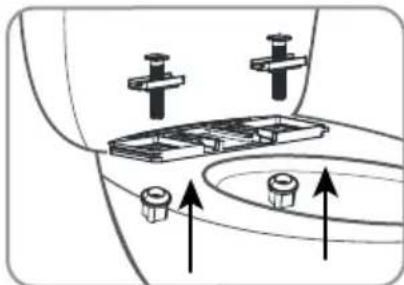
natural_image
Diagram of a vehicle interior showing two sensors and three circular components with upward arrows (no text or symbols)Steps 5b & 5c
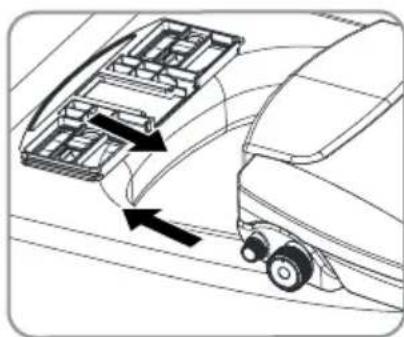
natural_image
Diagram of a vehicle's rearview assembly showing airflow direction and component layout (no text or labels)Step 6a
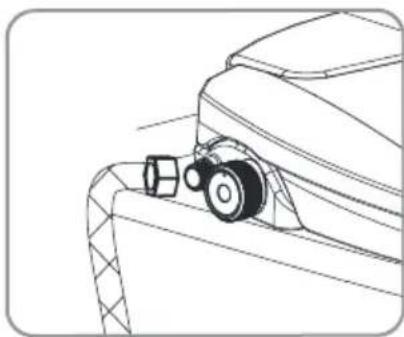
natural_image
Line drawing of a car's wheel assembly (no text or symbols)Step 7a
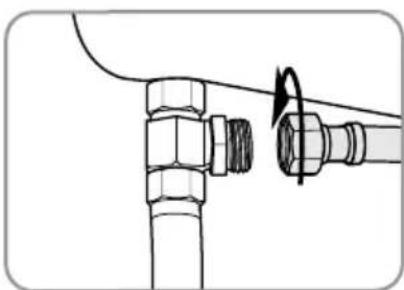
natural_image
Technical diagram of a pipe fitting with a valve and rotating knob (no text or symbols)Step 8
PRODUCT OPERATION
SWASH OPERATION
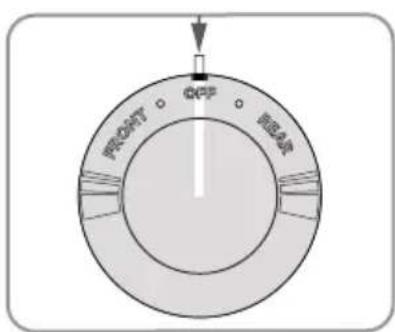
With the intuitive Wash Control Dial on the right-hand side of your seat, you can easily select your wash settings and water pressure using these instructions:
Off
To close off the valve and stop the flow of water, turn the dial back to its original center position so that the indicator hash on the dial aligns with the top notch on the body of the seat.
Front Cleansing
For front (feminine) wash, turn the dial clockwise (or roll it forward) while seated. The further the dial is turned, the stronger the water pressure will be.
Rear Cleansing
For rear (posterior) wash, turn the dial counterclockwise (or roll it back) while seated. The further the dial is turned, the stronger the water pressure will be.
Self-Cleaning Nozzles
The nozzles will initially go through a brief self-clean as you turn the dial between front cleansing and rear cleansing and will last as long as the dial is in that position.
(Non-shaded area represents active setting.)
text_image
FRONT OFF M2.48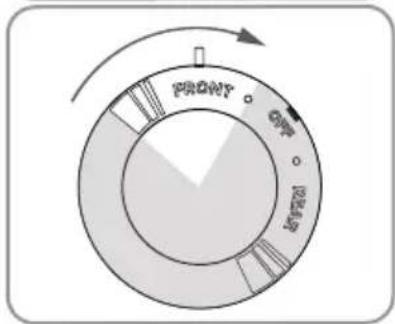
text_image
FRONT ON OFF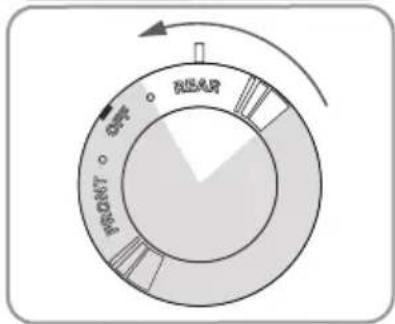
text_image
ON BEAF LINDA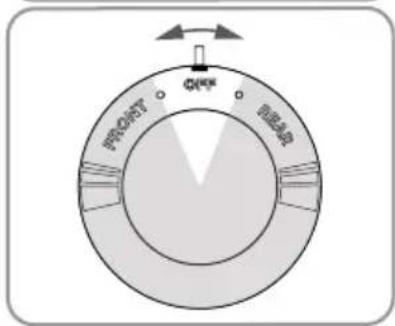
text_image
FRONT OFF RBRPRODUCT SPECIFICATIONS
TECHNICAL SPECIFICATIONS
| S101 SWASH ECOSEAT | |
| Model | Ecoseat Ambient Temperature |
| Supply Water Pressure | 14 psi – 100 psi |
| Dimensions | Elongated: 14.39 in x 20.03 in x 2.55 inRound: 14.34 in x 18.47 in x 2.55 in |
| Weight | Elongated: 4.3 lbs / Round: 4.5 lbs |
| Seat / Lid Weight Limit | 330 lbs / 330 lbs |
MAINTENANCE
SWASH CLEANING
Use a soft, damp cloth and mild cleanser (such as dish soap, Simple Green or Windex) to wipe down the seat. DO NOT scrub or use harsh, abrasive products to clean the seat. DO NOT use thinner, benzene, acidic chemicals, chloride, or hydrochloric acid detergent. This may result in corrosion to the metal parts or discoloration or scratches to the bidet body. For a more thorough cleaning, you may remove the bidet seat. To remove the seat, press the Quick Release button on the right side of the seat, and slide the seat forward off of the mounting plate and toilet.
NOTE:
- Be cautious of leaving home and beauty products in contact with the bidet seat, the result of which can be irreversible discoloration. Most stains can be removed using a 1:1 mix of rubbing alcohol and water and a soft cloth or towel. Be cautious of home and beauty products (including but not limited to various hair and air freshener sprays, lotions, body wash, skin tanners, body butters, and oils) that come in contact with the seat. Wash off any substances that come in contact with the seat as soon as possible.
NOZZLE CLEANING
To clean the nozzles, gently pull them out from inside of the seat manually and use a soft cloth or toothbrush to clean off any build up. Clean front and rear nozzles in the same manner.
TROUBLESHOOTING
If the bidet appears to be operating abnormally, please review the troubleshooting tips before calling the Brondell Service Center as most issues are easily resolved with a few simple steps. If you are unable to resolve the issue after checking the following items, please call the Service Center at 888-542-3355, Mon-Fri, 9am-5pm PST, or email us at support@brondell.com.
Check before continuing:
• Make sure main water supply valve is open.
- Confirm there are no leaks from hoses or water supply.
After checking items above, refer to the following troubleshooting chart for additional solutions.
| Problem Possible | Cause(s) Solution(s) | |
| Low water flow or spray pressure | 1. Water supply valve not opened fully2. Nozzles dirty3. External bidet filter | 1. Check that the water supply valve at wall is fully open.2. Clean nozzles (see maintenance section).3. If you have an external bidet filter like SWF44, check and replace if necessary. |
| Nozzles do not function properly | 1. Nozzles are dirty2. Water pressure is too low3. External bidet filter | 1. Clean nozzles (see maintenance section).2. Check water supply valve at wall to fully open.3. If you have an external bidet filter like SWF44, check and replace if necessary. |
| Water leaks from areas other than the nozzles | 1. Water leaking from the T-valve2. Water leaking from the bidet hose connection | 1. Make sure that the rubber gasket is inserted correctly into the T-valve.2. Make sure that the bidet hose is correctly connected and tight. Check any rubber washers and do not overtighten. |
WARRANTY
BRONDELL products are backed by some of the most comprehensive warranties in the industry. BRONDELL warrants that all products (excluding consumable items) shall be free from defects in material and workmanship under normal use and service.
Swash Ecoseat Residential One-Year Limited Warranty
100% Coverage of all parts and labor for the entire product (excluding consumable filters) for the first year from original date of purchase.
Swash Ecoseat Commercial Warranty
Warranty period one year from original purchase date for all BRONDELL products. Warranties may not apply to products that are used for heavy commercial, hospital, or other high use non-residential applications.
Exclusions and Limitations
- BRONDELL warrants its products to be free from manufacturing defects under normal use and service. This warranty is extended only to the ORIGINAL PURCHASER.
- BRONDELL's obligations under this warranty are limited to repairs or replacement, at BRONDELL's option, of products or parts found to be defective, provided that such products were properly installed and used in accordance with instructions. BRONDELL reserves the right to make such inspections as may be necessary in order to determine the cause of the defect. BRONDELL will not charge for labor or parts in connection with warranty repairs for the first year from date of purchase on all products except those that may be subject to commercial use limitations.
-
BRONDELL is not responsible for the cost of removal, return (shipping) and/or re-installation of products. This warranty does NOT apply to:
-
Damage or loss which occurs during shipment.
- Damage or loss sustained through any natural or man-made causes beyond the control of BRONDELL, including but not limited to fire, earthquake, floods, etc.
- Damage or loss resulting from sediments or foreign matter contained in a water system.
- Damage or loss resulting from negligent or improper installation including installation of a unit in a harsh or hazardous environment.
-
Damage or loss resulting from removal, improper repair, modification of the product, or improper maintenance including damage caused by chlorine or chlorine related products.
-
This warranty gives you specific legal rights. You may have other rights which vary from state to state.
THIS WRITTEN WARRANTY IS THE ONLY WARRANTY MADE BY BRONDELL. REPAIR OR REPLACEMENT AS PROVIDED UNDER THIS WARRANTY SHALL BE THE EXCLUSIVE REMEDY AVAILABLE TO THE PURCHASER. BRONDELL SHALL NOT BE RESPONSIBLE FOR LOSS OF USE OF THE PRODUCT OR FOR OTHER INCIDENTAL, SPECIAL, FOR CONSEQUENTIAL DAMAGES OR EXPENSES INCURRED BY THE PURCHASER OR FOR LABOR OR OTHER COSTS DUE TO INSTALLATION OR REMOVAL OR COSTS OF REPAIRS BY OTHERS, OR FOR ANY OTHER EXPENSE NOT SPECIFICALLY STATED ABOVE. EXCEPT TO THE EXTENT PROHIBITED BY APPLICABLE LAW, ANY IMPLIED WARRANTIES, INCLUDING THAT OF MERCHANTABILITY, ARE EXPRESSLY LIMITED TO THE DURATION OF THIS WARRANTY. SOME STATES DO NOT ALLOW LIMITATIONS, SO THE ABOVE LIMITATION AND EXCLUSION MAY NOT APPLY TO YOU.
How to Obtain Service
To obtain repair service under this warranty, you must contact an authorized BRONDELL Service Center to obtain an RMA (Return Merchandise Authorization) number. Proof of purchase in the form of a copy of the original receipt must accompany the returned unit for the warranty to be valid. Take or ship the unit pre-paid to the closest BRONDELL authorized service center along with the RMA number and proof of purchase.
To obtain the RMA number and locate the BRONDELL Service Center location nearest you, please call 1-888-542-3355, Mon–Fri, 9am–5pm PST.
Brondell®
Feels better already.
CONTACT:
Brondell, Inc.
PO Box 470085
San Francisco, CA 94147-0085
Phone: 1-888-542-3355
Email: support@brondell.com
Web: www.brondell.com
For questions, contact Brondell Customer Service:
1-888-542-3355, Monday – Friday, 9am – 5pm PST
MANUFACTURED BY:
Brondell
PO Box 470085
San Francisco, CA 94147-0085
Made in China
Please retain receipt records for any warranty claims.
Brondell®
Swash Ecoseat 101 Manual Del Usario
Models: S101-RW, S101-EW
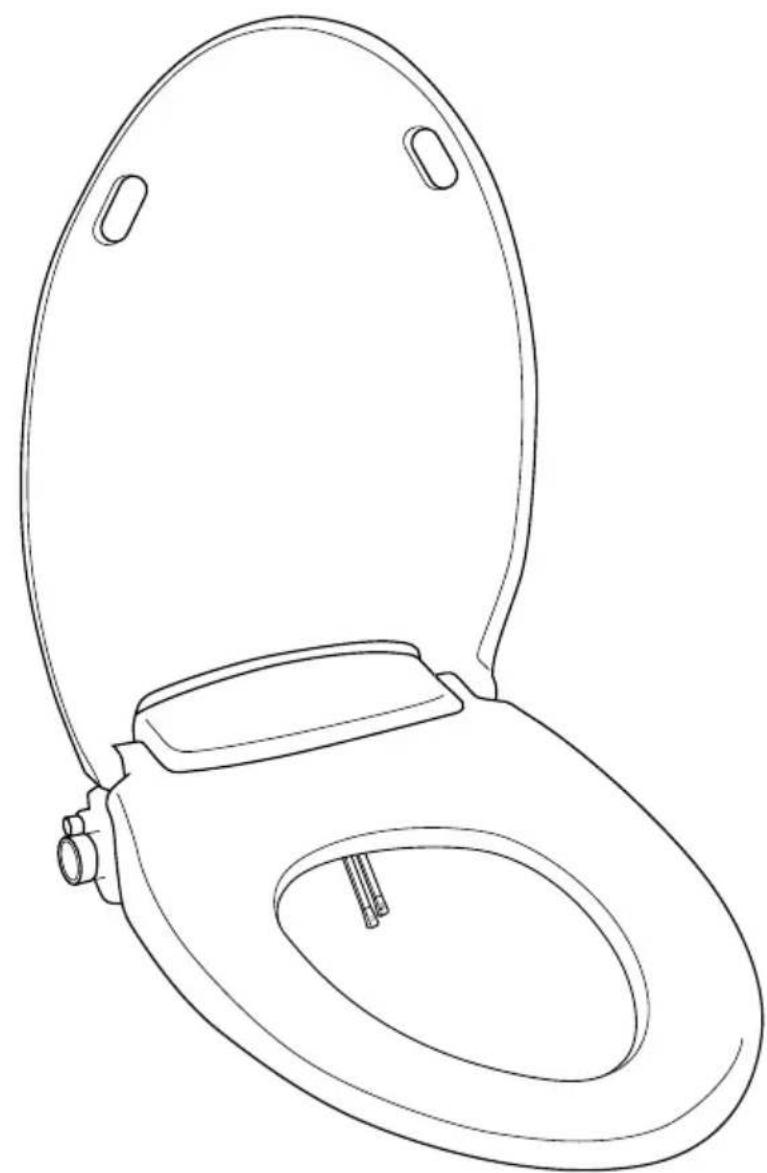
natural_image
Line drawing of a standard open toilet with a small sink and handle (no text or symbols)ÍNDICE
DIMENSIONES DEL PRODUCTO
Vista Superior Alargada

text_image
3.375 in 16.375 in 7.625 in 13.5 in 13.75 inVista Superior Redonda
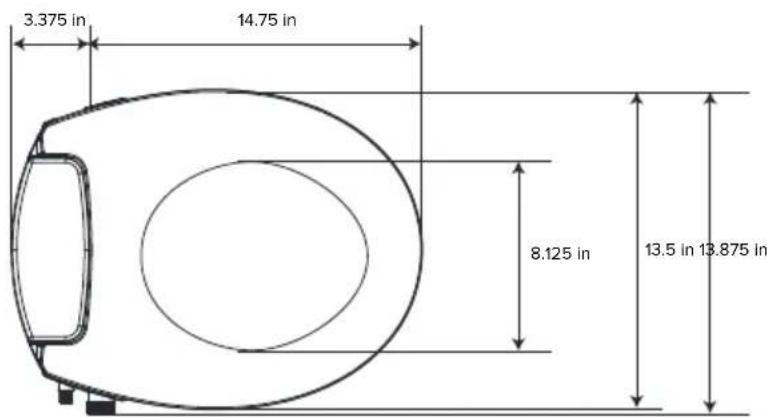
text_image
3.375 in 14.75 in 8.125 in 13.5 in 13.875 intext_image
Technical diagram of a toilet with numbered parts labeled 2, 4, and 5text_image
Diagram showing hand grip and no拘ure on a vehicle, with checkmark indicating actionPaso 2c
natural_image
Diagram of a bolt being inserted into a nut, showing the bolt's center and base (no text or symbols)Paso 3a
natural_image
Diagram of a mechanical assembly with two bolts and directional arrows indicating movement or force (no text or symbols)Pasos 5b & 5c
natural_image
Diagram of a vehicle's rearview assembly showing internal components and directional arrows (no text or labels)Paso 6a
NOTAS:
natural_image
Technical line drawing of a mechanical component with no visible text or symbolsPaso 7a
natural_image
Technical diagram of a pipe fitting with a valve and rotating component (no text or symbols)Paso 8
text_image
Open WIRE HEAR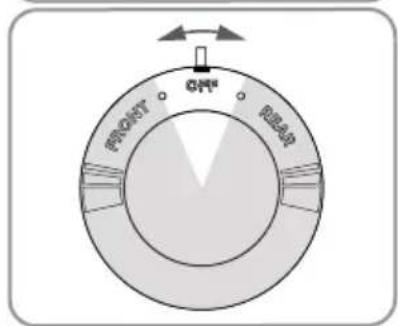
text_image
FRONT ON RIBARFeels better already.
CONTACTO:
Brondell, Inc.
PO Box 470085
San Francisco, CA 94147-0085
natural_image
Line drawing of a standard open toilet with seat and sink (no text or symbols)SOMMAIRE
INFORMATIONS SUR LE PRODUIT
INSTALLATION DU PRODUIT
Pièces D'Installation .... Page 32
INFORMATIONS SUR LE PRODUIT
CONSIGNES DE SÉCURITÉ
CARACTÉRISTIQUES DU PRODUIT
DIMENSIONS DU PRODUIT
text_image
3.375 in 16.375 in 7.625 in 13.5 in 13.75 intext_image
3.375 in 14.75 in 8.125 in 13.5 in 13.875 inINFORMATIONS SUR LE PRODUIT (suite)
PIÈCES DU PRODUIT
text_image
Technical diagram of a car toilet with numbered parts labeled 2, 4, and 5INSTALLATION DU PRODUIT
PIÈCES D'INSTALLATION
text_image
Technical diagram showing exploded view of mechanical components with numbered labels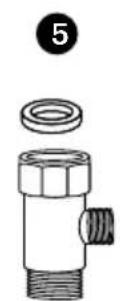
natural_image
Simple line drawing of a U-shaped tube with connectors and a small square head, no text or symbols present.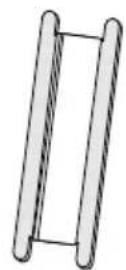
RACCORDEMENT DE L'ALIMENTATION EN EAU FROIDE
INSTALLATION DU PRODUIT (suite)
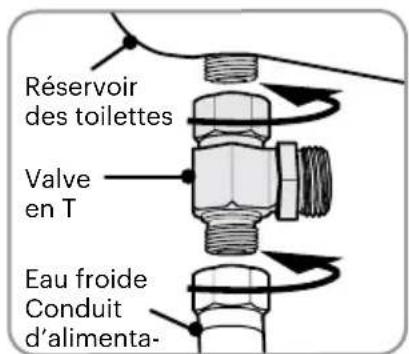
RACCORDEMENT DE L'ALIMENTATION EN EAU FROIDE (SUITE)
text_image
Diagram showing a hand holding a tool with a circular annotation highlighting the tool's position, and a checkmark indicating selection.Étape 2c

natural_image
Diagram of a mechanical assembly showing a bolt and nut assembly with a downward arrow indicating force or direction (no text or symbols)Étape 3a
natural_image
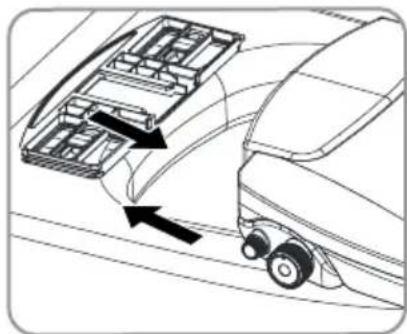
Diagram of a mechanical assembly with two bolts and directional arrows indicating movement or force (no text or symbols)Étapes 5b & 5c
natural_image
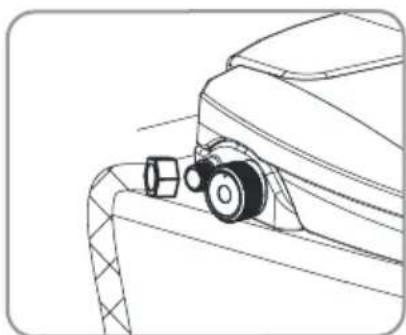
Diagram of a vehicle's rearview structure showing engine, wheels, and structural components (no text or labels)Étape 6a
natural_image
Technical line drawing of a mechanical component with no visible text or symbolsÉtape 7a
natural_image
Technical diagram of a pipe fitting with a valve and connecting rod (no text or symbols)Étape 8
UTILISATION DU PRODUIT
FONCTIONNEMENT DU SWASH
text_image
OFF LIFTING NEAR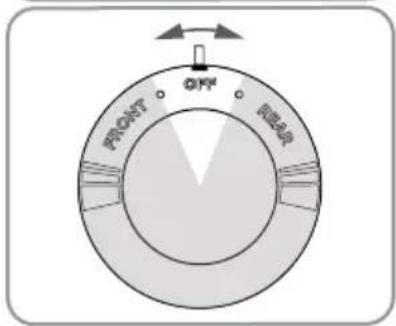
text_image
FRONT OFF RERSPÉCIFICATIONS DU PRODUIT
Feels better already.
COORDONNÉES:
Brondell, Inc.
PO Box 470085
San Francisco, CA 94147-0085
Feels better already.