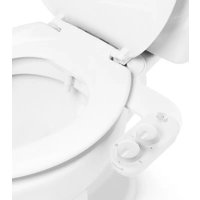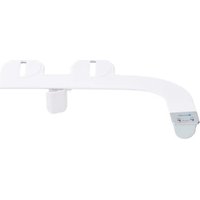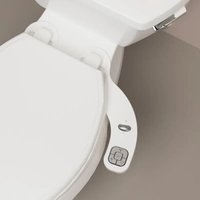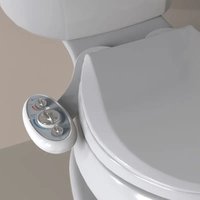
Swash S1000 - Toilet Brondell - Free user manual and instructions
Find the device manual for free Swash S1000 Brondell in PDF.


User questions about Swash S1000 Brondell
0 question about this device. Answer the ones you know or ask your own.
Ask a new question about this device
Download the instructions for your Toilet in PDF format for free! Find your manual Swash S1000 - Brondell and take your electronic device back in hand. On this page are published all the documents necessary for the use of your device. Swash S1000 by Brondell.
USER MANUAL Swash S1000 Brondell
text_image
brondell Rear Front Move Stop Dry Water Pressure Dry temp. Norchy Position Seat Temp. Wide Spray Water Temp. Nozzle Clean+ Deodorize brondell S1000 BRONDELL™ a better bathroom experience S1000-EW S1000-RB S1000-RW S900-EW S1000-EB S900-RWSwash 900/1000
This manual contains important safety information. Before operating the unit, please read this manual thoroughly, and retain it for future reference.
TABLE OF CONTENTS
| Section 1 | Product Features | page 1 |
| Section 2 | Safety Precautions | page 2-6 |
| Section 3 | Parts & Configuration | page 7-8 |
| Section 4 | Installation | page 10-13 |
| Section 5 | Operation page | 14-20 |
| Section 6 | Specifications | page 21 |
| Section 7 | Maintenance page | 22-23 |
| Section 8 | Troubleshooting | page 24-25 |
| Section 9 | Warranty Information | page 26-27 |
Swash 900/1000
PRODUCT FEATURES
S900 and S1000 Models:
Ergonomic heated seat – with four temperature settings (High/Med/Low/Off).
Instant and endless warm water – the cutting-edge instant ceramic heating system ensures an endless warm water stream for posterior and feminine washes while reducing power consumption by up to 60% over conventional storage tank systems.
Dual stainless steel nozzles – separate stainless steel nozzles resist soiling and bacterial contamination for enhanced hygiene. The dual nozzle configuration ensures accurate coverage for all types of users.
Wireless remote control – the intuitive remote control comes with convenient mounting bracket and includes its own Eco Mode to conserve battery life.
Wide spray option – 3 stage width settings widens the wash spray from a strong concentrated stream to a soft spray for a more personal and thorough cleansing.
Positionable nozzles—each nozzle has 5 different positions to ensure the most comfortable and complete cleansing.
Aerated wash spray - micro-bubbles introduced into the wash spray create a gentler, softer cleansing action designed for sensitive skin. In addition, the aerated spray reduces overall water consumption and is more effective in cleansing the skin.
Automatic Eco Mode – when engaged, the power saving Eco Mode function automatically lowers the seat temperature settings to conserve energy.
Gentle closing seat and lid – "slam free" gentle closing seat and lid are user friendly.
Quick release seat – quick release button for easy removal and cleaning of seat and toilet.
S1000 Models - Additional Features
Warm air dryer – includes adjustable temperature with 3 levels for a completely hands free experience and toilet paper elimination.
Deodorizer – active carbon deodorization begins at the press of a button to neutralize odors at the source.
Nozzle Clean+ – on-demand, self-cleaning, dual stainless steel nozzle rinse guarantees a hygienic wash with every use.
Nozzle oscillation – the move function provides a massaging, oscillating cleanse during the wash cycle ensuring a thorough and comfortable cleansing.
Swash 900/1000
SAFETY PRECAUTIONS
IMPORTANT SAFETYGUARDS
DANGER: If not observed, serious injury or even death may occur as a result of electrocution.
WARNING: If these warnings are not observed, considerable physical injury or property damage may occur as a result of burns, electrocution, fire, or injury.
CAUTION: If these cautions are not observed, slight physical or property damage may occur.
READ ALL INSTRUCTIONS BEFORE USING.
Save these instructions for future reference.
When using electrical products, especially when children are present, basic safety precautions should always be taken:
⚠️ DANGER-To reduce the risk of electrocution
Failure to observe the following warnings may result in electric shock, fire, personal injury, property damage or product damage:
- Do not use a damaged power plug or loose electric outlet.
- Make sure to use a dedicated electrical outlet. Failing to do so may result in electric shock or fire.
- Do not move the product by pulling the power cord.
- Do not handle the power plug with wet hands.
- Do not forcefully bend the power cord or place heavy objects on it to prevent it from being damaged or deformed.
- Do not connect and pull out the power plug repeatedly.
- Unplug the product before cleaning, repairing, inspecting, or replacing parts.
- Remove any dust or water from the power plug.
- Do not plug the appliance into an electrical outlet or power strip that is being used by too many appliances. Use an electrical outlet adequate for the wattage of the product.
- If the power cord is damaged, do not attempt to repair, modify, or replace the cord yourself. Call a Brondell Service Center.
SAVE THESE INSTRUCTIONS
Swash 900/1000
SAFETY PRECAUTIONS
⚠️ DANGER-To reduce the risk of electrocution
- If the product produces a strange noise, a burnt smell, or emits smoke, unplug it immediately from the electrical outlet and call Brondell Service Center. Failing to do so may result in electric shock or fire.
- Do not insert a wire or sharp object in any product gaps or the warm air outlet. This may result in electric shock, fire, or product damage.
- Do not place an electric heater near the product or dispose of any burning materials such as a lit cigarette in the toilet. This may result in fire or product deformation.
- Do not place any containers filled with water, medicine, food, any metallic objects, or any flammable material on top of the product. If foreign material enters the product, this may result in electric shock or fire.
- Do not use the product in locations exposed to excessive moisture and do not splash water onto the product.
- Do not use the product if it is not working properly.
※ Please unplug the product immediately, and call Brondell Service Center after closing the main water supply valve. Failing to do so may result in electric shock or fire. - While taking a shower or cleaning the bathroom, pull the power plug out of the electrical outlet and exercise caution that water or detergent does not splash onto the bidet. Failing to do so may result in electric shock or fire.
- If foreign material enters the product, pull the power plug out of the electrical outlet, turn off the main water valve, and call the Brondell Service Center.
- Do not disassemble, repair, or modify the product yourself.
- Do not use the product while bathing.
- Do not place or store the product where it can fall or be pulled into a tub or sink.
- Do not place in or drop the product into water or any other liquid.
- Do not reach for the product if it has fallen into water. Unplug the product immediately, and call the Brondell Service Center.
SAVE THESE INSTRUCTIONS
Swash 900/1000
SAFETY PRECAUTIONS
WARNING-To reduce the risk of burns, electrocution, fire, or injury to persons
Failure to observe the following warnings may result in electric shock, fire, personal injury, property damage or product damage:
- Do not operate or store the unit in locations where flammable or combustible materials are used.
- Do not use industrial water or gray water for the supply as this may cause skin damage or disease.
- Do not block the warm air outlet with your hand.
- Turn off the main water supply valve when cleaning the filter.
- For children and seniors who may have difficulties with adjusting temperature or those with sensitive skin or impaired heat sensitivity, set the temperature of wash spray, warm air dryer, and seat to "low" or "off" to prevent burning.
- Close supervision is necessary when this product is used by children or persons requiring general assistance.
- Do not press the buttons using excessive force.
- Do not stand or place a heavy object on the seat cover.
- Use this product for its intended use only, as described in this manual. Do not use any attachments that are not recommended by Brondell.
- Never operate this product if it has a damaged cord or plug, if it is not working properly, if it has been dropped or damaged, or dropped into water. Return the product to a service center for examination and repair.
- Keep the cord away from heated surfaces.
- Never block the air openings of the product or place it on a soft surface, such as a bed or couch, where the air openings may be blocked. Keep the air openings free of lint, hair, etc.
- Never use the product while sleeping or when drowsy.
- Never drop or insert any object into any opening or hose.
- Do not use the product outdoors or operate where aerosol (spray) products are being used or where it could be exposed to oxygen.
- Connect this product to a properly grounded outlet only. Refer to the Grounding Instructions.
- Unplug this product before filling. Fill (reservoir) with water only unless otherwise specified by the manufacturer. Do not overfill (or specify filling instructions).
SAVE THESE INSTRUCTIONS
Swash 900/1000
SAFETY PRECAUTIONS

CAUTION
Failure to observe the following warnings may result in electric shock, fire, personal injury, property damage or product damage:
- Do not connect the main water to the hot water pipe (only connect to cold water supply).
- After the installation, make sure to check all water supply connections for leaks. Rubber washers should be in place for the water connection hoses & T-Valve.
- Do not open/close the seat cover using excessive force.
- Exercise caution that urine does not come into contact with the nozzles or warm air dryer outlet – failure to do so may result in bad odors or malfunction.
- If the product will not be used for a long period of time unplug the power cord, close the main water supply valve, and drain any water in the water tank.
- Do not pull out the bidet hose or connection hose using excessive force.
- Do not use thinner, benzene, acidic chemicals, chloride, or hydrochloric acid detergent. This may result in corrosion to the metal parts or discoloration or scratches to the bidet body.
- This appliance is not intended for use by persons [including children] with reduced physical, sensory or mental capabilities, or lack of experience and knowledge, unless they have been given supervision or instruction concerning use of the appliance by a person responsible for their safety. Children should be supervised to ensure that they do not play with the appliance.
SAVE THESE INSTRUCTIONS
Swash 900/1000
SAFETY PRECAUTIONS
GROUNDING & GFI OUTLET INSTRUCTIONS
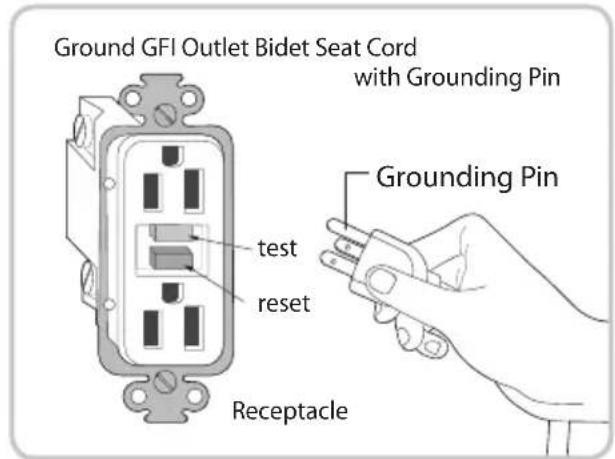
This product should only be used with a grounded GFI (Ground Fault Interrupter) outlet and a grounded 3 prong electrical cord as shown in figure A. In the event of an electrical short circuit, using a grounded GFI outlet reduces the risk of electric shock.
This product is equipped with agrounded cord and is for use on a nominal 120V circuit only (min 15 amps) and must be plugged into an outlet that is properly grounded with a GFI breaket as shown. Replace or repair a damaged cord immediately.
text_image
Ground GFI Outlet Bidet Seat Cord with Grounding Pin test reset Receptacle Grounding Pin⚠️ DANGER- Improper use of the grounding plug can result in a risk of electric shock.
- If repair or replacement of the cord or plug is necessary, do not connect the grounding wire to either flat blade terminal. The wire with insulation having an outer surface that is green with or without yellow stripes is the grounding wire.
- Check with a qualified electrician or serviceman if the grounding instructions are not completely understood, or if in doubt as to whether the product is properly grounded.
Extension cord
If it is necessary to use an extension cord, use only a three wire extension cord with a threeblade grounding plug, and a three-slot receptacle that will accept the plug of the product. Replace or repair a damaged cord immediately.
SAVE THESE INSTRUCTIONS
Swash 900/1000
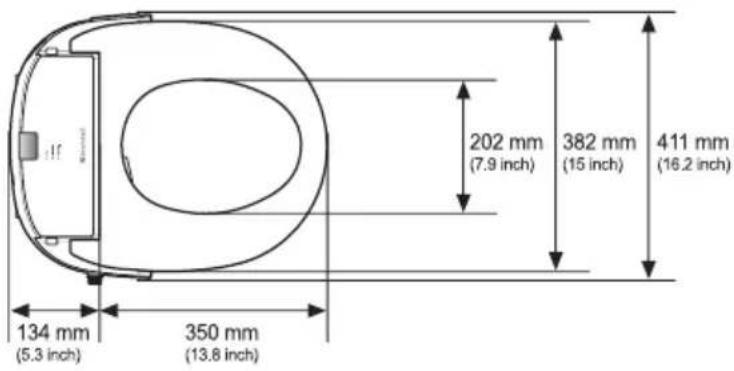
The S900 and the S1000 have the following dimensions:
The S900 and 1000: Round Size
text_image
202 mm (7.9 inch) 382 mm (15 inch) 411 mm (16.2 inch) 134 mm (5.3 inch) 350 mm (13.8 inch)The S900 and 1000: Elongated Size
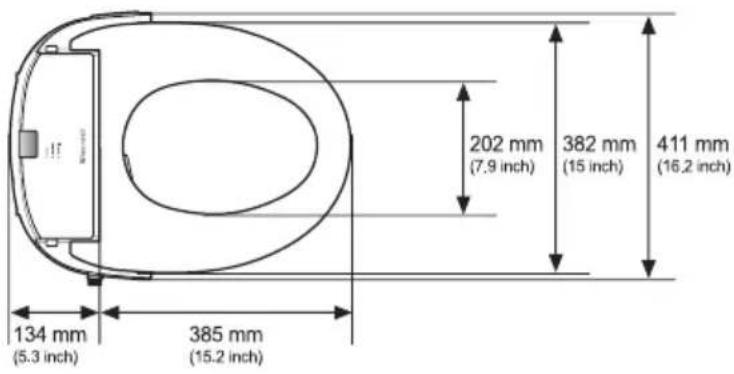
text_image
202 mm (7.9 inch) 382 mm (15 inch) 411 mm (16.2 inch) 134 mm (5.3 inch) 385 mm (15.2 inch)Bottom View
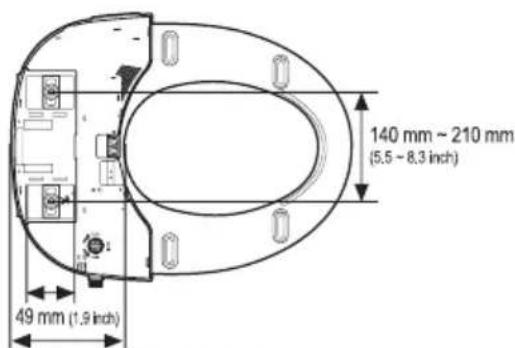
text_image
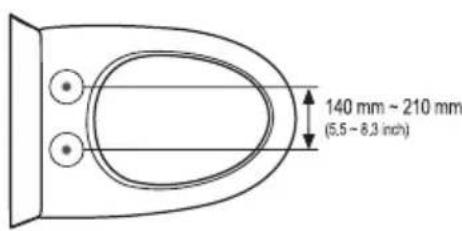
140 mm ~ 210 mm (5.5 ~ 8.3 inch) 49 mm (1.9 inch)Rear fixing distance : 164 mm (6.5 inch)
Distance Between Mounting Holes
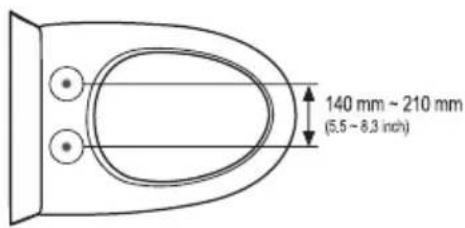
text_image
140 mm ~ 210 mm (5.5 ~ 8.3 inch)Swash 900/1000
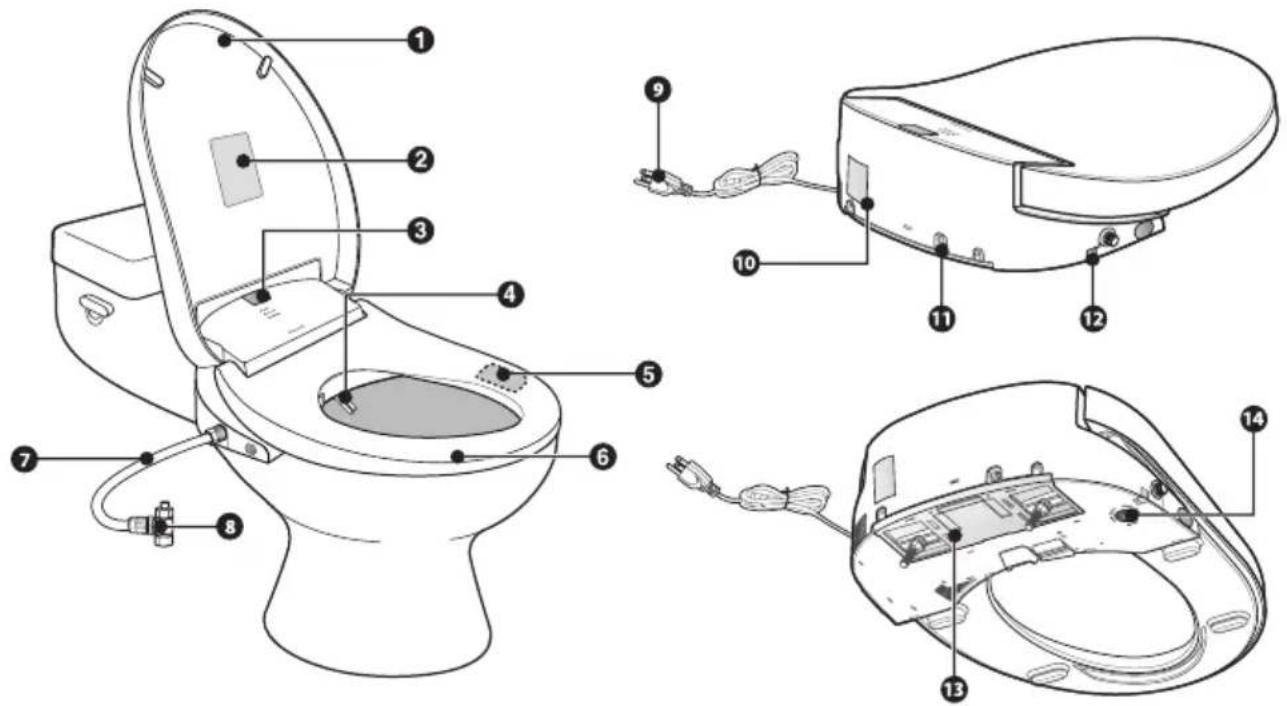
- Lid
- T-valve connector
- Warning sticker 9. Power cord
- IR sensor 10. Production sticker
- Nozzles 11. Drain plug
- Body (seat) sensor 12. Quick release button
- Bidet seat 13. Mounting plate
- Bidet hose 14. Mesh filter
text_image
Technical diagram of a toilet with numbered parts and exploded view, showing internal components like toilet, sink, and electrical connectors.Swash 900/1000
REMOTE CONTROL
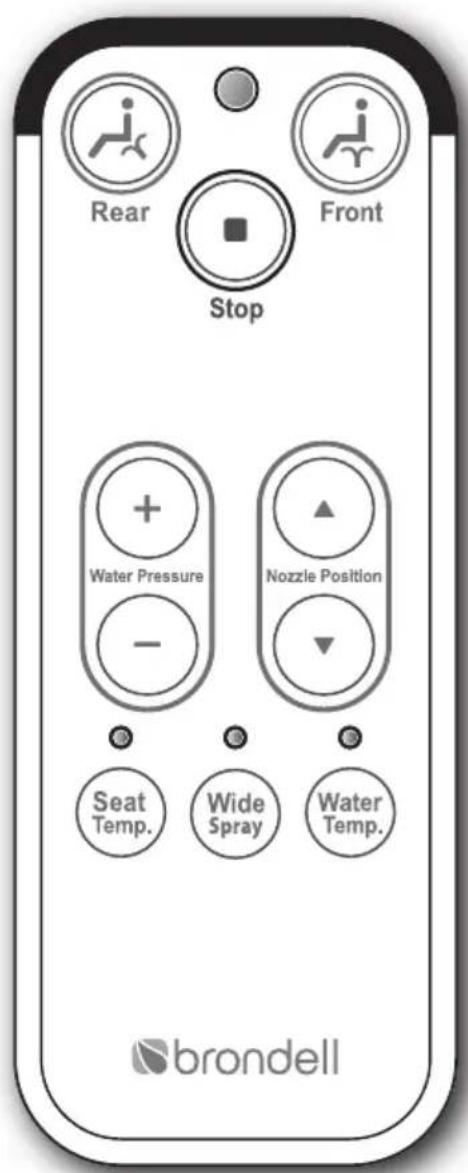
text_image
Rear Front Stop Water Pressure - Nozzle Position Seat Temp. Wide Spray Water Temp. brondellS900 S1000
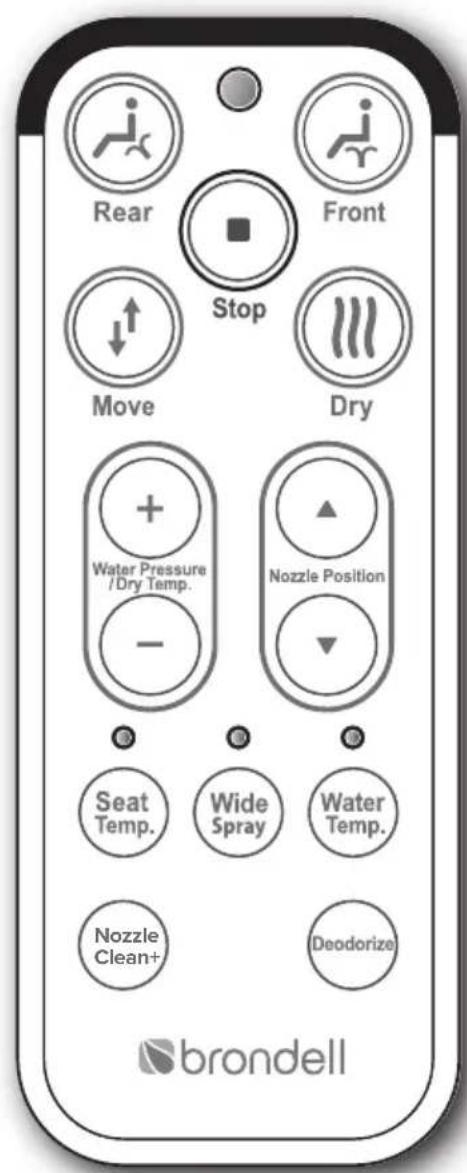
text_image
Rear Front Stop Move Dry Water Pressure /Dry Temp. Nozzle Position Seat Temp. Wide Spray Water Temp. Nozzle Clean+ Deodorize brondellSwash 900/1000
INSTALLATION
Installation Parts
1.2 ea Mounting Bolt
2. 2 ea Rubber Cone Washer
3.2 ea Flat Washer
4.2 ea Barrel Nut
5. Mounting Plate
6.2 ea Adjustable Bracket
- Rubber T-Valve Washer
- T-Valve Connector
- Bidet Hose
- Remote Control w/ Wall Mount
- 2 ea Remote Screw
- 2 ea Remote Anchor
- 3 AAA Batteries
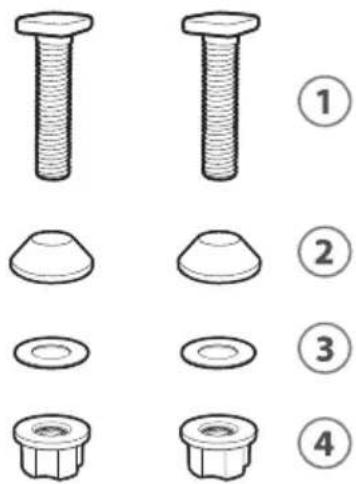
text_image
Technical diagram showing four types of bolt and nut components with numbered labels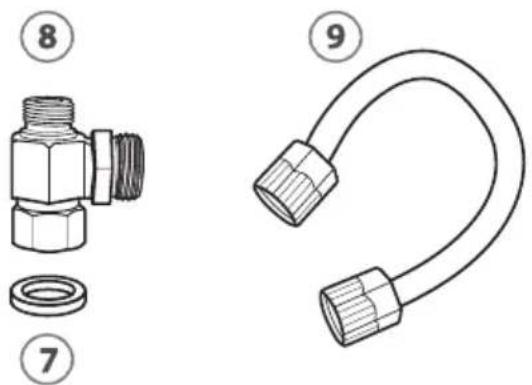
text_image
Technical diagram showing two mechanical components: a threaded connector with a separate inset view labeled 7 and 8, and a flexible hose with numbered callouts.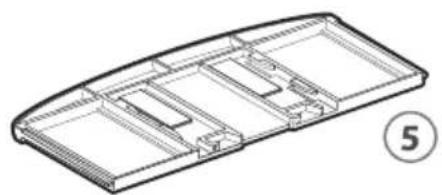
natural_image
Isometric line drawing of a rectangular electronic component or housing with internal compartments and mounting holes (no text or symbols)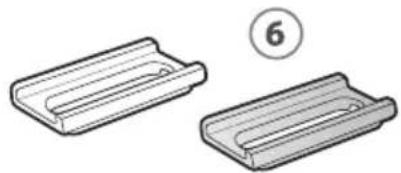
natural_image
Two 3D-rendered plastic clip components with no text or symbols, one labeled with circled number 6 (no text or symbols on the clips themselves)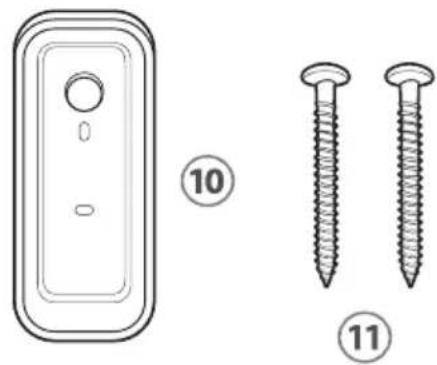
natural_image
Technical illustration of a door panel and two screws (no text or symbols)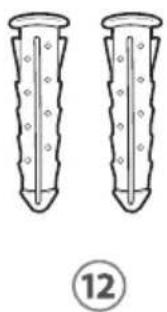
natural_image
Two identical cylindrical objects with evenly spaced holes, labeled with number 12 below (no text or symbols on objects)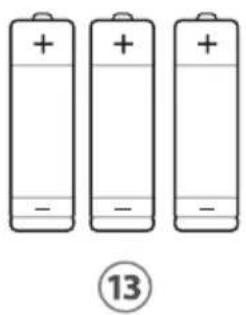
natural_image
Three batteries with positive and negative charge markings, labeled with number 13 below (no text or symbols on the batteries themselves)Swash 900/1000
INSTALLATION
Before Installation:
Check water supply line:
Check the line that connects the toilet tank to the water shut off valve. If it is a rigid pipe, you may need to purchase a flexible hose to replace it before installing the Swash. The length of the hose and the size of the connectors will vary.
Residual Moisture is Normal
Every product is tested with pure water during production to ensure the highest quality and performance. It is normal to find a small amount of residual moisture on the product and in the reservoir and filter.
Tools:
A Phillips head or standard screwdriver may be needed to remove the existing toilet seat and a standard wrench may be needed for tight water supply connections.
Installation:
Please read these instructions carefully before installing the Swash. Failure to do so could result in flooding, leaking or damage to the product.
- Existing Toilet Seat Removal
a. Lift hinge covers and use a screwdriver to remove the mounting bolts.
b. Remove the toilet seat.
Note: Steps may vary by type of seat.
- Turn Off Water Supply Valve and Flush Toilet
a. Turn water valve off completely to stop the flow of water.
b. Flush toilet and hold down handle to completely empty tank.
c. Disconnect water supply hose from toilet tank.
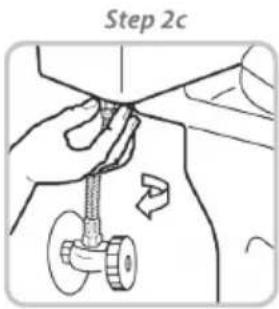
text_image
Step 2cImportant notes:
- You may wish to place a container under the tank to catch any excess water.
-
Do not continue without completing the above steps. Failure to do so could result in flooding, leaking or damage to the Swash.
-
Connect T-Valve to Water Supply Line and Toilet Tank
Note: The T-Valve connects to the fill valve directly under your toilet tank - it does not connect at the wall.
Note: Only connect cold (from your toilet water supply line).
Note: If your water supply line is rigid you may need to replace it before continuing.
Swash 900/1000
INSTALLATION
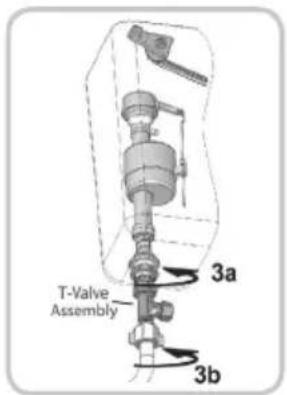
a. Install the T-Valve with the rubber washer to the incoming water connection on the bottom of your toilet tank. Be sure that you place the flat edge of the rubber washer into the T-Valve against the metal with the raised lip facing the toilet tank connection.
b. Connect the water supply line coming from the wall to the bottom of the T-Valve.
- Connect Bidet Hose to T-Valve
a. Connect one end of the bidet hose to the T-Valve and set aside.
- Install Mounting Plate & Attach Swash
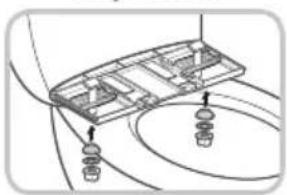
a. Place adjustable mounting plate over mounting holes on toilet, flat side down, black rubber side of mounting plate should be closest to the toilet tank and rubber should be against the ceramic.
b. Place adjustable brackets flat side down in the center of the square opening in the mounting plate and insert mounting bolts through adjustable brackets and mounting holes. Be sure that the square mounting bolt head is even with sides of adjustable bracket.
c. Slide rubber cone washer, flat washer, and then barrel nut onto mounting bolts under the toilet bowl and tighten to keep mounting plate in place.
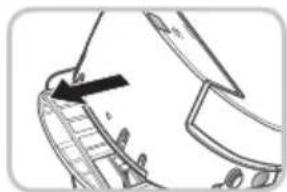
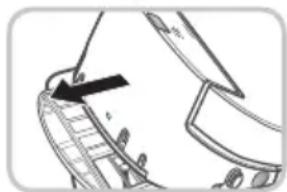
d. Set the Swash flat on the toilet bowl in front of the mounting plate, and slide seat onto plate until it is secure and "clicks" into place.
e. If the seat appears too short or too long for the toilet, adjust the mounting plate accordingly. To adjust the mounting plate, loosen barrel nut and slide seat forward or backwards as needed. Once the seat is lined up properly, tighten barrel nuts to hold in place.
- Connect the Bidet Hose
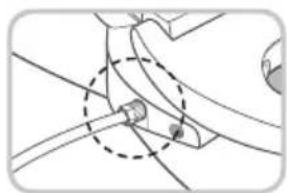
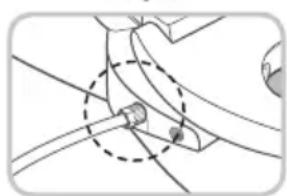
a. Connect the bidet hose to the side of the bidet seat making sure the hose is firmly connected. Take care not to twist the bidet hose, excessively bend it, or strip the plastic screw threads when screwing the hose onto the bidet seat.
- Turn On Water Supply
a. Open the main water supply valve slowly and check for leaks.
b. Wait 5 minutes, check again and if there are no leaks continue.
Steps 3a & 3b
text_image
T-Valve Assembly 3a 3bSteps 5b & 5c
natural_image
Diagram of a vehicle chassis with attached sensors and wiring (no text or labels)Step 5d
natural_image
Diagram of a mechanical component with a tool and arrow indicating assembly (no text or symbols)Step 6
natural_image
Pure mechanical diagram showing a linkage or cable assembly without any text, numbers, or symbolsSwash 900/1000
INSTALLATION
8. Connect Power
a. Plug the power cord into the electrical outlet.
Important: Make sure to only use a grounded GFI (ground fault interrupter) electrical outlet. In the case of a short circuit, a grounded GFI outlet may help prevent electric shock or injury. If using an extension cord is unavoidable, use one with grounding terminals for 120V\~/60 Hz or higher only.
Installing the Remote Control
1. Battery Installation
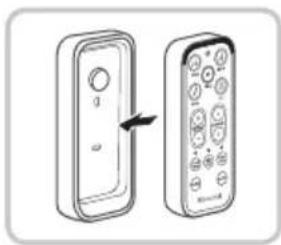
a. Separate the remote control from the magnetic wall mount by pulling apart gently.
b. Turn remote over and open the battery compartment by popping off the battery cover with your finger or small coin. Insert three "AAA" type batteries (included) as indicated inside battery compartment and replace battery cover.
c. To confirm the batteries are installed correctly, press the "Stop" button and you should see the "Wide Spray" LED light turn on for a few seconds (note: the 2 other LED lights may or may not turn on at this time depending on the current settings).
2. Mount Remote (optional)
a. Identify a location in the bathroom for the remote control that is visible and reachable from the toilet.
b. Depending on the wall type, you can install using the supplied screws and anchor mounts or use the provided double stick tape on the back of the remote wall mount. Make sure the remote mount is fully secure with either method so that it does not fall and damage the remote control.
c. Place the remote control into the mount as shown.
natural_image
Diagram showing two remote control devices with buttons and a directional arrow indicating rotation (no text or symbols)Swash 900/1000
OPERATION
Quick Reference Guide: Bidet Seat
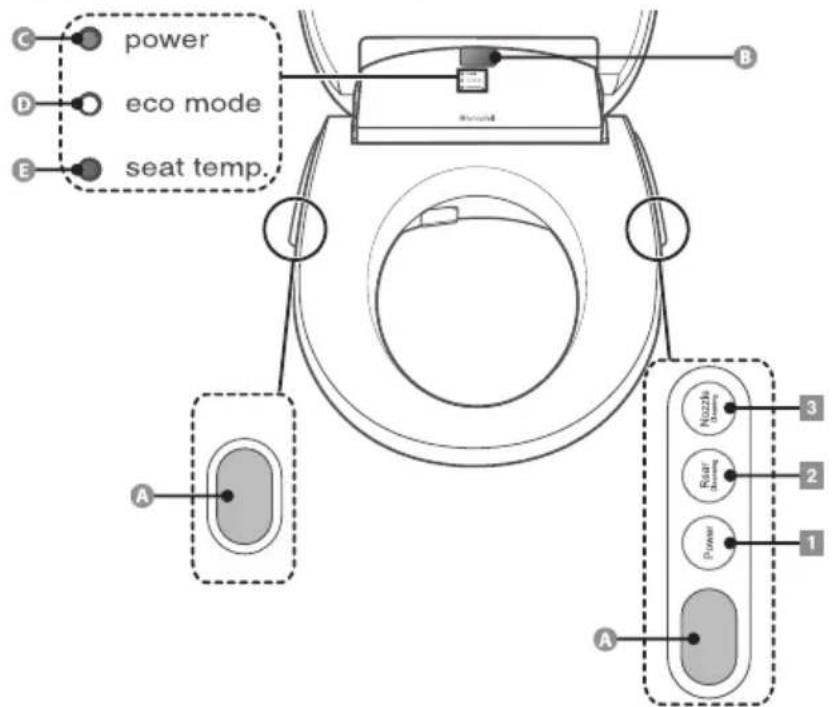
Note: Basic functions such as Rear Cleansing and Nozzle Cleaning can be used without the remote by utilizing the auxiliary buttons shown here.
- Seat Display ■ Auxiliary control panel
text_image
power eco mode seat temp. A Nozzle 3mm Rear 3mm Power 1 A B C D ESeat Display
A Remote IR Receiver Receives signal from remote control
power
Power indicator This indicator is turned on when the bidet power is turned on. * This indicator is turned off when bidet eco mode is activated.
B Remote IR Receiver Receives signal from remote control
○ eco mode
Eco mode indicator If you activate the eco function, this indicator is turned on when eco mode starts.
seat temp.
E Seat Temperature indicator This indicator represents the seat temperature. Indicator on - L/M/H Indicator off - OFF * This indicator is turned off when bidet eco mode is activated.
Auxiliary control panel

1 'Power' button
Turns the product ON/OFF. Press and hold the button for more than 2 seconds to turn off. * If the 'Power' button is pressed while the front, rear cleansing function is operating, the cleansing function is stopped and the bidet changes to standby mode.

2 'Rear Cleansing' button Selects the rear cleansing function.

3 'Nozzle' Cleaning button
When pressed, the nozzles fully extend allowing for easy cleaning. Press again for the second nozzle to extend and once more to retract.
Swash 900/1000
OPERATION
Quick Reference Guide: Remote Control
text_image
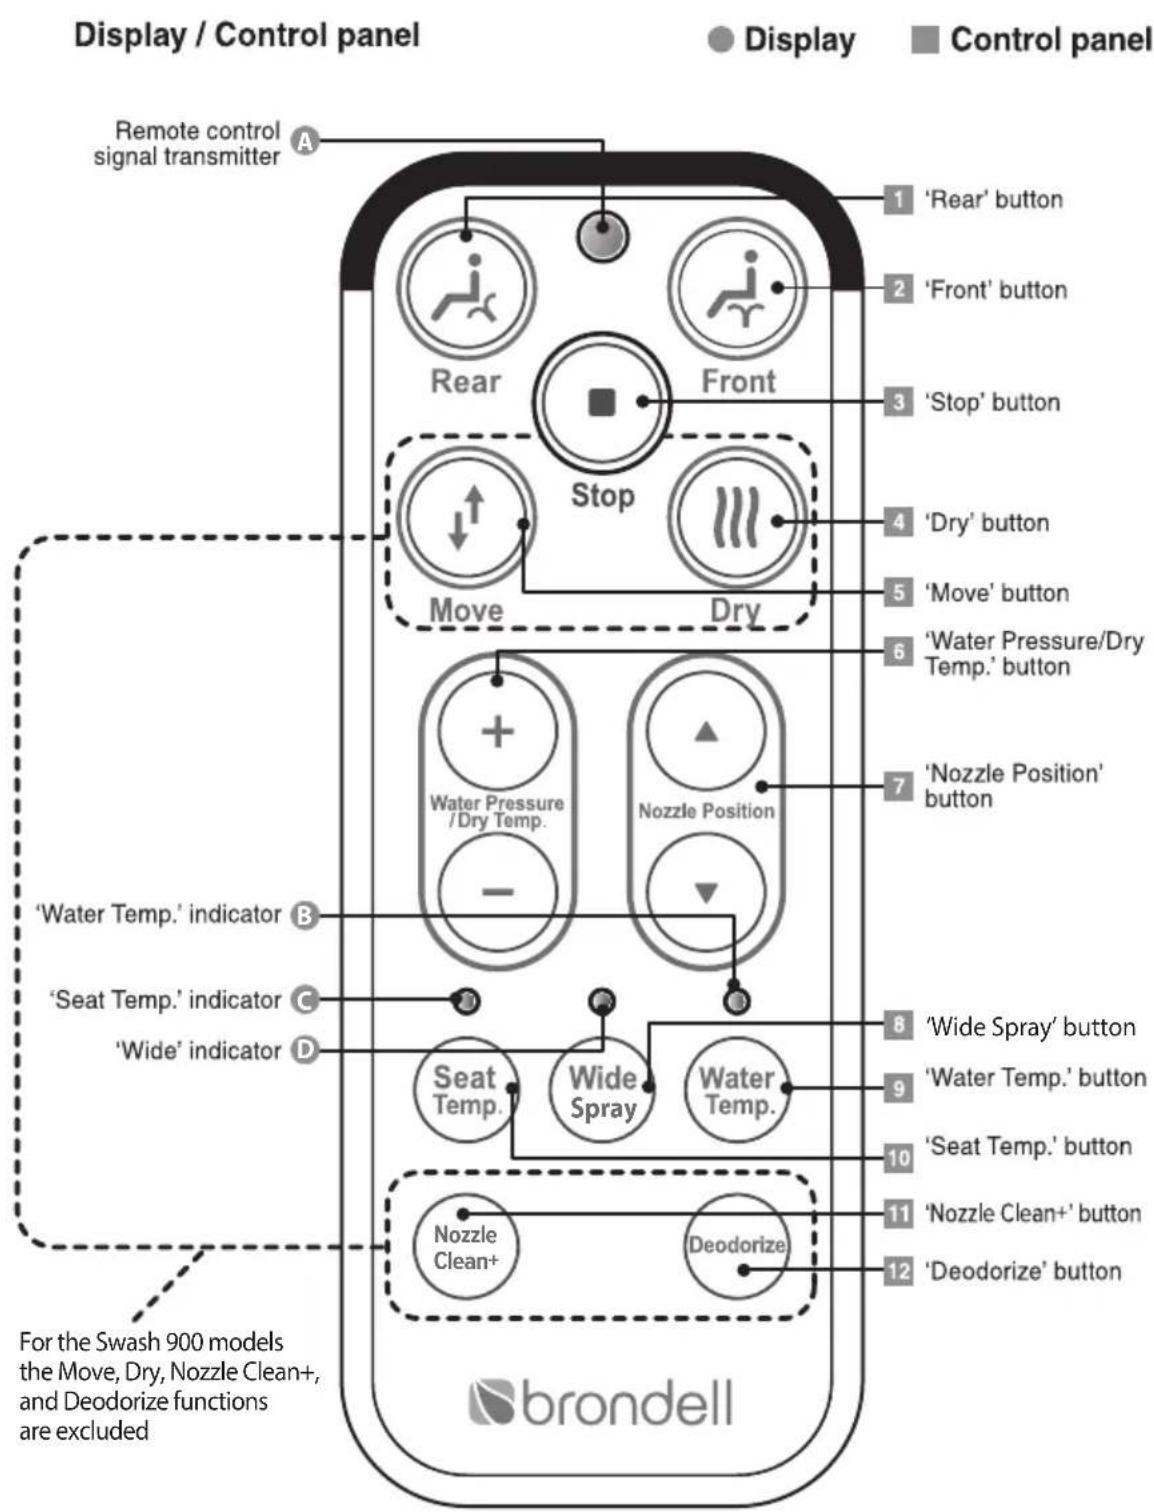
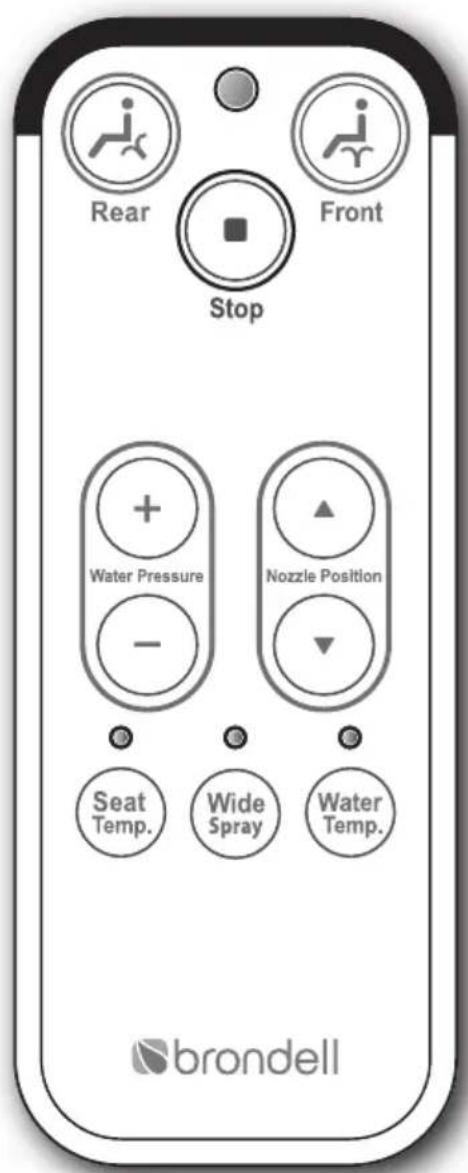
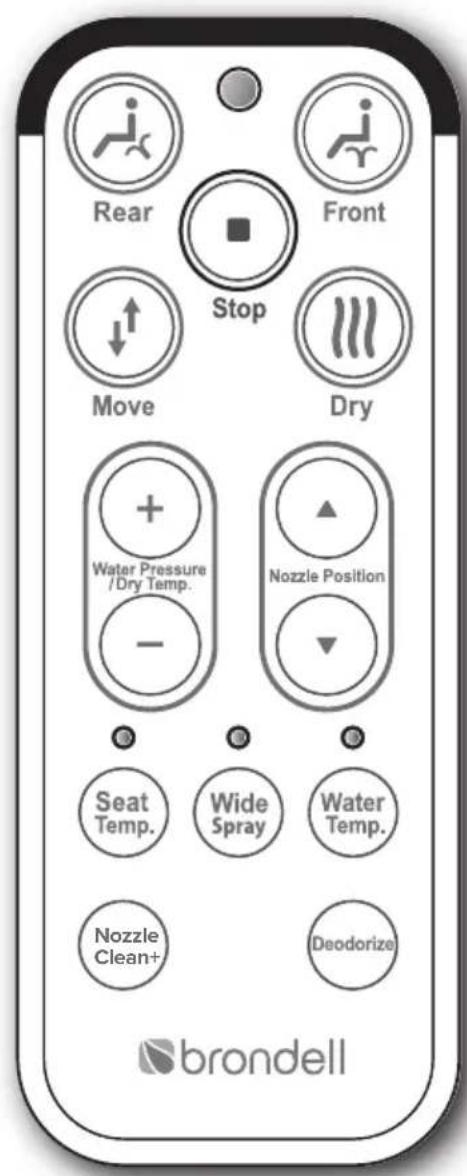
Display / Control panel Remote control signal transmitter 1 'Rear' button 2 'Front' button 3 'Stop' button 4 'Dry' button 5 'Move' button 6 'Water Pressure/Dry Temp.' button 7 'Nozzle Position' button Water Pressure /Dry Temp. Nozzle Position Water Temp. Water Temp. Wide Spray Wider Spray Seat Temp. Seat Temp. Nozzle Clean+ Deodorize For the Swash 900 models the Move, Dry, Nozzle Clean+, and Deodorize functions are excluded brondellSwash 900/1000
OPERATION
Quick Reference Guide: Remote Control (Page 2)
Display

A Remote control signal transmitter
Transmits the signal when a remote control button is pressed.

B 'Water Temp.' indicator
Whenever the 'Water Temp.' button is pressed, the temperature control indicator cycles through the following order: L(Blue)→M(Pink)→H(Red)→Off.

C 'Seat Temp.' indicator
Whenever the 'Seat Temp.' button is pressed, the temperature control indicator cycles through the following options: L(Blue)→M(Pink)→H(Red)→Off.

D 'Wide Spray' indicator
When the "Wide Spray" button is pressed, the indicator cycles through the following options: Concentrated Stream (Blue)→ Medium Stream (Pink)→ Wide Stream (Red).
Control panel

1 'Rear' button
Use this button to use the rear cleansing function.

2 'Front' button
Use this button to use the front cleansing function.
3 'Stop' button
All currently operating functions will stop.

4 'Dry' button
Use this button to engage 3 levels of the warm air dryer. S1000 models only

5 "Move" (Nozzle Oscillation) button
This button engages the oscillation function on the front or rear nozzles moves the wash wand back and forth to during a wash cycle. Nozzle oscillation moves the wash wand back and forth to clean a wider area. S1000 models only
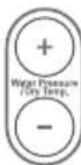
6 'Water Pressure/Dry Temp.' button
You can control the water pressure in 3 levels (L→M→H) and control the air dryer temperature in 4 levels (L→M→H→OFF) using the 'Water Pressure/Dry Temp.' button.
* You can control the water pressure when operating the rear cleansing/front cleansing functions and control the air dryer temperature when operating the drying function.
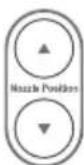
7 'Nozzle Position' button
Use this button to control the nozzle position during the rear cleansing/front cleansing operation. You can move the nozzle in 5 levels using the 'Nozzle Position' button.

8 "Wide Spray" button
Use this button to control the width of the water spray stream during the front or rear wash cycle. You can select from 3 levels: Concentrated Stream (Blue)→ Medium Stream (Pink)→ Wide Stream (Red).

9 'Water Temp.' button
Use this button to control the water temperature. Whenever the 'Water Temp.' button is pressed, you can control the water temperature in 4 levels (L→M→H→Off).

10 'Seat Temp.' button
Use this button to control the seat temperature. Whenever the 'Seat Temp button is pressed. You can control the seat temperature in 4 levels (L→M→H→Off).

11 'Nozzle Clean+' button
Use this button to activate the Nozzle Clean+ function. An on-demand, self-cleaning, dual stainless steel nozzle rinse guarantees a hygienic wash with every use. S1000 models only.

12 'Deodorization' button
Use this button to perform the deodorization function. When you press this button, the deodorization function is performed for approximately 1 minute. S1000 models only
Swash 900/1000
OPERATION
Using the Swash
Important note: The wash functions and the warm air dryer function will not work unless the body sensor in the seat detects someone sitting down (skin conductivity sensor). To override the safety sensor, please refer to the section in the manual called "Configuring a Special Mode".
Important note: The remote control will not operate the Swash if the batteries are weak, dead, or not installed properly (remote requires 3 x AAA batteries to function).
Warm Water Wash
Sit on the seat and press the FRONT or REAR button on the remote to begin water flow. The nozzles will self-clean and purge a small amount of water which will last for several seconds prior to starting the wash function. The front or rear wand will then extend and wash for approximately 2 minute, then turn off automatically.
To keep the wash continuing longer than 2 minute, press the FRONT or REAR button again during the cleansing cycle. Each time your press the button during the cleansing cycle the 2 minute cycle starts again.
If you would like to stop the wash before a 2 minute cycle ends, press STOP button to discontinue flow.
While cleansing, users can adjust the water temperature, water pressure, spray width, and nozzle position according to their preferences.
After the cleansing cycle, the nozzles will perform a self clean cycle purging water for approximately 5 seconds.
** You cannot increase the water pressure level higher than level 2 under the following conditions: Main water supply temperature is under 50 degrees F / 10 degrees C OR if the rated power source is under 110V.**
Nozzle Positioning
While the cleansing function is operating, use the Nozzle Position up and down arrows on the remote control to move the position of the nozzles and spray.
Swash 900/1000
OPERATION
Water Flow / Water Pressure Adjustment
While the cleansing function is operating, press the Water Pressure/Dry Temp "+" and "-" buttons on the remote control to increase or decrease the water pressure of the spray. There are 3 water pressure levels: Low - Med - High.
Wide Spray
To adjust the spray width of the washing stream during a cleansing cycle, press the Wide Spray button. The Wide Spray button has 3 levels indicated by lights on the remote above Wide Spray button: Concentrated Stream (Blue)-> Medium Stream (Pink) -> Wide Stream (Red).
Move (Nozzle Oscillation) Function - S1000 Only
While the wash function is operating, press the MOVE button on the remote control to start or stop the nozzle oscillation function (moving back and forth). This provides a wider range of cleansing spray.
Warm Air Dryer – S1000 Only
Once the wash cycle is complete, press the DRY button to activate the warm air dryer. The dryer will run for approximately 2 minutes.
To keep the dryer continuing longer than 2 minutes, press the DRY button again during the drying cycle. Each time your press the button during the drying cycle the 2 minute cycle starts again.
If you would like to stop the dryer cycle before a 2 minute cycle ends, press STOP button to discontinue.
Adjusting Seat, Water, and Dryer Temperature
Seat Temperature
Press Seat Temp. button to adjust the seat temperature to desired level. There are four temperature levels indicated by lights on the remote above Seat Temp. button: Low(blue) – Med(Pink) – High(Red) – Off(No Light).
Water Temperature
While wash function is operating, press Water Temp. button to adjust temperature to desired level. There are four temperature levels indicated by lights on the remote above. Water Temp. button: Low(blue) – Med(Pink) – High(Red) – Off(No Light)
Swash 900/1000
OPERATION
Warm Air Dryer Temperature - S1000 Only
While air dryer function is operating, press the Water Pressure/Dry Temp. button "+" and "-" to adjust warm air dryer temperature to desired level. There are 4 levels for the warm air dryer: Low – Med – High-Off.
Additional Features
Deodorization - S1000 Only
To activate the deodorizer, press the Deodorize button on the remote control.
The deodorizing function will run on high for approximately 1 minute. To stop the function prior to 1 minute, press STOP button at any time.
Nozzle Clean+ - S1000 Only
For enhanced cleaning of the stainless steel nozzles, press the Nozzle Clean+ button on the remote control, and an on-demand, self-cleaning nozzle rinse cycle begins. The cleansing spray will last for approximately 30 seconds. To stop the function prior to 30 seconds, press the STOP button at any time.
Auxiliary Controls
There are 3 auxiliary buttons on the side of the Swash to be used if remote is unavailable and to set Swash Special Modes:
-
Power button – Turns the product On/Off. Press and hold the button for at least 2 seconds to turn off the Swash. Note: if the Power button is pressed while front or rear cleansing is operating, the cleansing function will stop.
-
Rear Cleansing – Selects the rear cleansing function.
-
Nozzle Cleaning – To better clean the nozzles, press this button, the nozzle will extend fully for easy cleaning. Refer to Maintenance section for additional nozzle cleaning information.
Swash Special Mode Operation
Swash Eco Mode
When Eco Mode is selected: If the Seat Sensor is not activated and no buttons on Remote have been active for approximately 10 minutes, the seat heater is automatically set to Low temperature to reduce power consumption. Once Eco Mode is activated, the Eco Mode light on the seat will turn blue and the other lights will turn off.
Swash 900/1000
OPERATION
(If no buttons on the Remote control are pressed for approximately 5 seconds, the remote display lights are turned off to conserve remote battery life).
Selecting/Cancelling Eco Mode
-
Press and hold down the "Power" and "Rear Cleansing" auxiliary buttons simultaneously for approximately 5 seconds until all the seat display lights start flashing.
-
Press the "Rear Cleansing" button to Set or Cancel Eco Mode.
a. If Eco Mode indicator light is turned on, this indicates Eco Mode has been set.
b. If Eco Mode indicator light is turned off, this indicates Eco Mode has been cancelled.
- The new setting will automatically be saved within 10 seconds if no other buttons are pressed.
Selecting/Cancelling Silent Mode
- Press and hold down the "Power" and "Rear Cleansing" auxiliary buttons simultaneously for approximately 5 seconds until all the seat display lights start flashing.
- Press the "Power" button to Set or Cancel silent mode.
a. If Power indicator light is turned on, this indicates silent mode has been set.
b. If Power indicator light is turned off, this indicates silent mode has been cancelled.
- The new setting will automatically be saved within 10 seconds if no other buttons are pressed.
Selecting/Cancelling Seat Sensor Lock Mode
This function bypasses the body sensor located in the seat and allows the wash functions and dry functions to operate without the sensor being engaged. Use caution in this mode!
- Press and hold down the "Power" and "Rear Cleansing" auxiliary buttons simultaneously for approximately 5 seconds until all the seat display lights start flashing.
- Press the "Nozzle Cleaning" button to Set or Cancel seat sensor lock mode.
a. If Seat Temp. indicator light is turned on, this indicates seat sensor lock mode has been set.
b. If Seat Temp. indicator light is turned off, this indicates seat sensor lock mode has been cancelled. The body sensor in the seat is now bypassed and the wash & air dry functions will work without anyone physically on the seat. Use caution!
- The new setting will automatically be saved within 10 seconds if no other buttons are pressed.
Swash 900/1000
SPECIFICATIONS
| Product name | Brondell Swash | |
| Model no. | S1000-EW, S1000-RW, S1000-EB, S1000-RB, S900-EW, S900-RW | |
| Standard power voltage | 120 V~, 60 Hz | |
| Power consumption | 1200 W | |
| Supply water pressure | 0.1 MPa (14.5 psi) - 0.69 MPa (100.07 psi) | |
| Dimensions | Round | 15" (Width) x 19.4" (Depth) x 5.66" (Height) in inches |
| Elongated | 15" (Width) x 20.8" (Depth) x 5.66" (Height) in inches | |
| Weight | 13.2 lbs (round) - 14.3 lbs (elongated) | |
| Warm water cleansing device | Rear cleansing | Maximum 0.5 L/min, automatic nozzle self-cleaning function |
| Front cleansing | Maximum 0.5 L/min, automatic nozzle self-cleaning function | |
| Standard time | Rear cleansing 2 minute, front cleansing 2 minute | |
| Water pressure control | 3 levels of control | |
| Warm water temperature control | 4 levels (Off : Room temperature, L: 88.7° - M: 94.1° - H: 99.5° in Fahrenheit) | |
| Power consumption by heater | 1200 W | |
| Safety devices | Bimetal, temperature sensor, temperature fuse (overheating prevention), micro switch | |
| Air dryer device | Warm air temperature control | 4 levels (Off : Room temperature, L, M, H) |
| Standard time | Drying for 2 minutes | |
| Power consumption by heater | 180 W | |
| Safety devices | Bimetal, temperature fuse (overheating prevention) | |
| Heated seat | Seat temperature control | 4 levels (Off : Room temperature, L: 87.8° - M: 93.2° - H: 98.6° in Fahrenheit) |
| Power consumption by heater | 60 W | |
| Safety devices | Bimetal, temperature fuse (overheating prevention) | |
| MESH filter | Specifications | 0.99" (Length) X 0.78"(Φ) in inches |
| Remote control dimensions | Remote: 2"(Width) x 5" (Length) x 1" (Depth) Remote w/holder: 2.5"(Width) x 5.5" (Length) x 1.1" (Depth) | |
| Weight limit for Swash 900/1000 | 330 lbs. | |
| Operating temperature | 32° - 104° in Fahrenheit | |
* The specifications are subject to change without prior notice for reasons of improving the product performance.
Swash 900/1000
MAINTENANCE
Seat Cleaning and Removal
Important: Unplug the Swash from the power source before cleaning or removing the seat.
Use a soft, damp cloth and mild cleanser (such as dish soap, Simple Green or Windex) to wipe down the seat. DO NOT scrub or use harsh, abrasive products to clean the Swash. DO NOT use thinner, benzene, acidic chemicals, chloride, or hydrochloric acid detergent. This may result in corrosion to the metal parts or discoloration or scratches to the bidet body.
For a more thorough cleaning, you may remove the Swash. To remove the seat, press the Quick Release button on the left side of the Swash (slightly below & behind the Bidet Hose inlet on the seat) and slide the seat forward off of the mounting plate and toilet.
Nozzle Cleaning
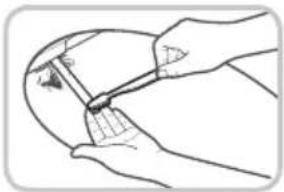
Press the Nozzle Cleaning button on the Auxiliary Control panel on the side of the Swash. The front wash nozzle will fully extend. Gently clean the nozzle with a soft cloth or toothbrush.
Press Nozzle Cleaning button again and the front wash nozzle will retract and rear wash nozzle will fully extend. Gently clean the nozzle with a soft cloth or toothbrush.
natural_image
Line drawing of hands using a tool to apply a small object to a surface (no text or symbols present)Press Nozzle Cleaning button a third time and rear nozzle will retract back into seat. Take care when cleaning the nozzles not to apply too much pressure to avoid damaging the nozzle system.
Cleaning Mesh Filter
Cleaning intervals will differ depending on use and water quality. It is recommended to check the filter at least once every year.
Turn off the water supply, unplug the Swash and remove seat from toilet using Quick
Release button on left side of unit (slightly below & behind the bidet hose inlet).
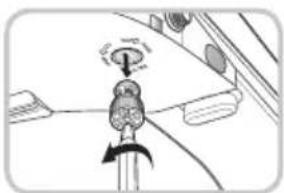
Remove Mesh filter by turning with a Philips head screw driver.
Clean the filter with toothbrush while running under tap water to effectively remove any foreign substances or build up.
Replace Mesh filter and carefully check that it is installed properly. If improperly installed, it could result in the product leaking. Replace seat and turn water supply back on.
natural_image
Diagram of a mechanical component with a knob and adjustment arrow (no text or symbols)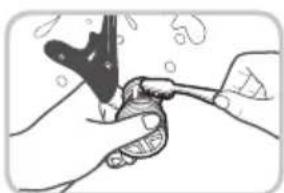
natural_image
Illustration of hands performing a manual task with a tool and a small object (no text or symbols visible)Swash 900/1000
MAINTENANCE
Product Storage & Use
Short term non-use: If the product will not be used for more than a few weeks, you can simply unplug it. You may also consider shutting the water supply off at the wall for extra precaution.
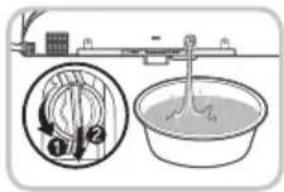
Long term non-use: If the product will not be used for an extended time (longer than 4 months), you should unplug the unit, shut the water supply off at the wall, and then drain the hot water heater. To drain the hot water heater, remove the drain plug and the back of the bidet seat by turning it counterclockwise by 90 degrees (so that it is horizontal – figure 1) and then pulling it forwards (figure 2) so that any residual water in the tank drains out.
text_image
Diagram illustrating a laboratory setup with a beaker, tubing, and a labeled diagram showing two components.TROUBLESHOOTING
If the bidet appears to be operating abnormally, please review the troubleshooting tips before calling the Brondell Service Center as most issues are easily resolved with a few simple steps. If you are unable to resolve the issue after checking the following items, please call the Service Center at 888-542-3355 or email us at support@brondell.com.
Check before continuing:
- Make sure the Swash is connected to power and that the outlet is working properly.
- Make sure you check & test the reset button on the GFI outlet (Standard 120V GFI outlet).
- Make sure the Remote Control has fresh batteries and they are installed correctly (3 x AAA).
- Make sure main water supply valve is open.
• Make sure the seat is not in Eco Mode. - Confirm there are no leaks from hoses or water supply.
- Make sure Mesh Filter is clean and free of build up or debris (see maintenance section).
After checking items above, refer to the following troubleshooting chart for additional solutions:
Swash 900/1000
TROUBLESHOOTING
| Problem | Possible Causes | Possible Solutions |
| The bidet seat is not working | 1. Bidet not plugged in2. No power to Swash3. There is power, but nothing happens when trying to use the Swash4. Not activating body sensor | 1. Make sure the bidet is plugged in2. Check and reset GFI outlet3. Check if the Remote control batteries are dead. Replace them if necessary4. Adjust sitting position to fully cover the body sensor. Override the body sensor (refer to special mode operation section to unlock body seat sensor) |
| Product shuts off during use | 1. Washing or drying time exceeded the cycle time2. Power failure | 1. Press the wash or dry button during cycle to extend the time (see operation section for more information about wash & dry functions)2. Check and reset GFI outlet |
| Low water flow or spray pressure | 1. Clogged filter2. Water supply valve not opened fully3. Nozzles dirty4. External bidet filter5. Pressure & wide spray settings6. Water supply too cold or power source too low | 1. Remove, clean, and reinstall mesh filter (see maintenance section)2. Check water supply valve at wall to fully open3. Clean nozzles (see maintenance section)4. If you have an external bidet filter, check and replace if necessary5. Adjust the water pressure settings on the remote to increase and adjust the wide spray settings on the remote |
| Nozzles do not function properly | 1. Nozzles are dirty2. Clogged filter3. Water pressure is too low4. External bidet filter | 1. Clean nozzles (see maintenance section)2. Remove, clean, and reinstall mesh filter (see maintenance section)3. Check water supply valve at wall to fully open4. If you have an external bidet filter, check and replace if necessary |
| Seat not heated | 1. Seat temperature set to off2. Resettable fuse blown | 1. Make sure that the Seat temperature setting is on (Low- Blue light, Med- Pink light, High- Red light, Off- No light)2. The bimetal resettable fuse may blow if the temperature exceeds over the normal level. The bidet will not work and show an error message until the bidet cools down. The fuse will automatically reset |
Swash 900/1000
TROUBLESHOOTING
| Problem | Possible Causes | Possible Solutions |
| Bidet wash feature does not work or fails to spray | 1. Body sensor does not detect that you are sitting on Swash | 1. Adjust sitting position to fully cover the body sensor. Override the body sensor (refer to special mode operation section to unlock body seat sensor) |
| Water (wash spray) not heated | 1. Water temperature set to off2. Resettable fuse blown | 1. Make sure that the Water temperature setting is on (Low- Blue light, Med- Pink light, High- Red light, Off- No light)2. The bimetal resettable fuse may blow if the temperature exceeds over the normal level. The bidet will not work and show an error message until the bidet cools down. The fuse will automatically reset |
| Cold air blowing from the air dryer | 1. Air temperature set to off | 1. During the drying function, adjust the temperature by pressing the air dryer temperature button on the remote control |
| Water flows before or after use | 1. Water coming from nozzles | 1. The water that comes out between the nozzles before or after a wash cycle is the self-clean cycle and is not a malfunction1b. Residual water may drip into the bowl for several seconds after a wash cycle, self-clean cycle, or Nozzle Clean+ cycle and is not a malfunction |
| Water leaks from areas other than the nozzles | 1. Water leaking from the T-valve2. Water leaking from the bidet hose connection3. Water leaking from under the seat4. Water leaking from behind the seat | 1. Make sure that the rubber gasket is inserted correctly into the T-valve (flat side down with lip pointing up towards the toilet tank connection) and firmly tighten the connector2. Make sure that the bidet hose is correctly connected and tight. Check any rubber washers and do not over tighten3. Check if there is anything between the mesh filter and bidet. Remove, clean, and reinstall mesh filter. Check if the filter is damaged (see maintenance section)4. Check the water tank plug in the back of the seat (see maintenance section under product storage and use) |
Brondell Warranty Policy
Brondell products are backed by some of the most comprehensive warranties in the industry. Brondell warrants that all products (excluding consumable items) shall be free from defects in material and workmanship under normal use and service.
Commercial Warranty: Warranty period 1 year from original purchase date for all Brondell products. Warranties may not apply to products that are used for heavy commercial, hospital, or other high use non-residential applications.
Residential Warranties for Swash High-Tech Toilet Seat Products
S900 Models One-Year Limited Warranty
- 100% Coverage of all parts and labor for the entire product for the first year from original date of purchase
S1000 Models Three-Year Limited Warranty
- 100% Coverage of all parts and labor for the entire product for the first year from original date of purchase
- 75% Coverage of all parts and labor for the entire product for the second year from original date of purchase
- 50% Coverage of all parts and labor for the entire product for the third year from original date of purchase
Exclusions and Limitations
- BRONDELL warrants its products to be free from manufacturing defects under normal use and service. This warranty is extended only to the ORIGINAL PURCHASER.
- BRONDELL's obligations under this warranty are limited to repairs or replacement, at BRONDELL's option, of products or parts found to be defective, provided that such products were properly installed and used in accordance with instructions. BRONDELL reserves the right to make such inspections as may be necessary in order to determine the cause of the defect. BRONDELL will not charge for labor or parts in connection with warranty repairs for the first full year from date of purchase on all products except those that may be subject to commercial use limitations.
- BRONDELL is not responsible for the cost of removal, return (shipping) and/or reinstallation of products. This warranty does NOT apply to:
a) Damage or loss which occurs during shipment.
b) Damage of loss sustained through any natural or manmade causes beyond the control of BRONDELL, including but not limited to fire, earthquake, floods, etc.
c) Damage or loss resulting from sediments or foreign matter contained in a water system.
d) Damage or loss resulting from negligent or improper installation including installation of a unit in a harsh or hazardous environment.
e) Damage or loss resulting from removal, improper repair, modification of the product, or improper maintenance including damage caused by chlorine or chlorine related products.
f) Damage or loss resulting from electrical surges, electrical outages, lightning strikes or other acts which are not the fault of Brondell or which the Product is not specified to tolerate.
- This warranty gives you specific legal rights. You may have other rights which vary from state to state.
THIS WRITTEN WARRANTY IS THE ONLY WARRANTY MADE BY BRONDELL. REPAIR OR REPLACEMENT AS PROVIDED UNDER THIS WARRANTY SHALL BE THE EXCLUSIVE REMEDY AVAILABLE TO THE PURCHASER. BRONDELL SHALL NOT BE RESPONSIBLE FOR LOSS OF USE OF THE PRODUCT OR FOR OTHER INCIDENTAL, SPECIAL, FOR CONSEQUENTIAL DAMAGES OR EXPENSES INCURRED BY THE PURCHASER OR FOR LABOR OR OTHER COSTS DUE TO INSTALLATION OR REMOVAL OR COSTS OF REPAIRS BY OTHERS, OR FOR ANY OTHER EXPENSE NOT SPECIFICALLY STATED ABOVE. EXCEPT TO THE EXTENT PROHIBITED BY APPLICABLE LAW, ANY IMPLIED WARRANTIES, INCLUDING THAT OF MERCHANTABILITY, ARE EXPRESSLY LIMITED TO THE DURATION OF THIS WARRANTY. SOME STATES DO NOT ALLOW LIMITATIONS, SO THE ABOVE LIMITATION AND EXCLUSION MAY NOT APPLY TO YOU.
THIS WARRANTY WARRANTS THAT THE PRODUCT WILL BE FREE FROM MANUFACTURING DEFECTS WHICH AFFECT THE ABILITY OF THE PRODUCT TO OPERATE FOR ITS INTENDED USE; IT IS NOT A WARRANTY THAT THE PRODUCT WILL NEVER REQUIRE REPAIRS OR TO UNDERTAKE RESPOSIBILITES, LIABILITIES, OR OBLIGATIONS OTHER THAN THOSE SPECIFICALLY IDENTIFIED IN THE PRECEDING SECTIONS. BRONDELL IS NOT RESPONSIBLE OR LIABLE FOR PERSONAL INJURY OR PROPERTY DAMAGE OF ANY KIND EVEN IF ARISING FROM A BREACH OF THIS WARRANTY.
How to Obtain Service
To obtain repair service under this warranty, you must contact an authorized BRONDELL Service Center to obtain an RMA (Return Merchandise Authorization) number. Proof of purchase in the form of a copy of your original receipt must accompany the returned unit for the warranty to be valid. Take or ship the unit pre-paid to the closest Brondell authorized service center along with your RMA number and proof of purchase. To obtain your RMA number and locate the BRONDELL Service Center location nearest you, call 1-888-542-3355.
For questions, contact
Brondell Customer Service:
1-888-542-3355
CONTACT INFORMATION
Brondell, Inc.
PO Box 470085
San Francisco, CA 94147-0085
Phone: 1-888-542-3355
Email: support@brondell.com
Web: www.brondell.com
WARRANTY
For detailed warranty information and product registration, please go on-line at www.brondell.com
Please retain receipt records for any warranty claims.
Swash 900/1000
⚠️ DANGER-To reduce the risk of electrocution
⚠️ DANGER-To reduce the risk of electrocution
WARNING-To reduce the risk of burns, electrocution, fire, or injury to persons
text_image
202 mm (7.9 inch) 382 mm (15 inch) 411 mm (16.2 inch) 134 mm (5.3 inch) 350 mm (13.8 inch)text_image
140 mm ~ 210 mm (5.5 - 8.3 inch) 49 mm (1.9 inch)Rear fixing distance : 164 mm (6.5 inch)
text_image
140 mm ~ 210 mm (5.5 ~ 8.3 inch)Swash 900/1000
PIÈCES ET CONFIGURATION
text_image
Technical diagram of a toilet with numbered parts and exploded views, including open and closed views with labeled components.Swash 900/1000
TÉLÉCOMMANDE
text_image
Rear Front Stop Water Pressure - Nozzle Position Seat Temp. Wide Spray Water Temp. brondellS900 S1000
text_image
Rear Front Stop Move Dry Water Pressure /Dry Temp. Nozzle Position Seat Temp. Wide Spray Water Temp. Nozzle Clean+ Deodorize brondellSwash 900/1000
INSTALLATION
text_image
Technical diagram showing four types of bolt and nut components with numbered labels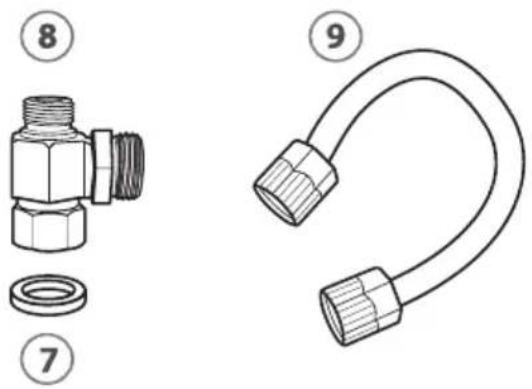
text_image
Technical diagram showing two mechanical components: a threaded pipe fitting with a washer and a coiled hose with flange, labeled with numbers 7 and 8.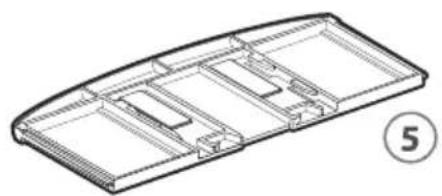
natural_image
Isometric line drawing of a rectangular electronic component or housing with internal compartments and mounting holes (no text or symbols)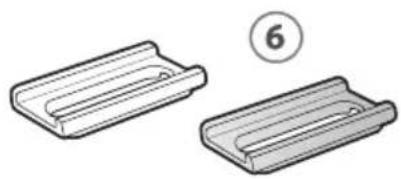
natural_image
Two 3D-rendered plastic components with internal slots, one labeled with number 6 (no text or symbols on the parts themselves)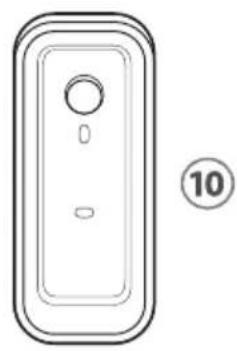
natural_image
Simple line drawing of a rectangular device with a circular top and two side handles, labeled with number 10 (no text or symbols on the device itself)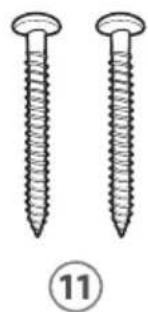
natural_image
Two identical screwdrivers with textured surfaces, labeled with number 11 below (no text or symbols on the screws themselves)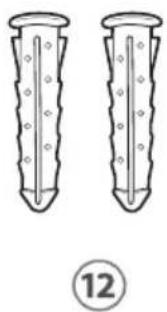
natural_image
Two identical cylindrical objects with evenly spaced holes, labeled with number 12 below (no text or symbols on the objects themselves)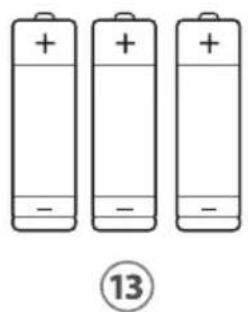
natural_image
Three identical batteries with positive and negative charge markings, labeled with number 13 below (no text or symbols on batteries)Swash 900/1000
INSTALLATION
natural_image
Technical line drawing of a mechanical assembly with no visible text or symbolsStep 5d
natural_image
Diagram of a mechanical component with an arrow pointing to a detail (no text or symbols present)Step 6
natural_image
Diagram of a mechanical or electrical component with no visible text, numbers, or symbolsnatural_image
Diagram showing two remote control panels with buttons and a directional arrow (no text or symbols)Swash 900/1000
FONCTIONNEMENT
* This indicator is turned off when bidet eco mode is activated.
3 Bouton 'Nozzle Cleaning' (Nettoyage des buses)
natural_image
Illustration of hands using a tool to apply a small object to a surface (no text or symbols visible)natural_image
Diagram of a mechanical component with a knob and adjustment knob (no text or symbols)natural_image
Illustration of hands performing a manual task with a tool and a tool (no text or symbols visible)text_image
Diagram illustrating a laboratory setup with a beaker, stirring rod, and a magnified view of the tube being heated by a stand.DÉPANNAGE
a better bathroom experience