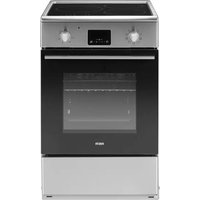
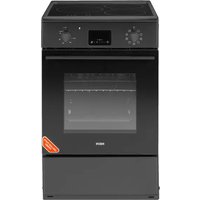
DGV18CH - Cooker FAR - Free user manual and instructions
Find the device manual for free DGV18CH FAR in PDF.

| Product type | Gas cooker |
| Brand | FAR |
| Model | DGV18CH |
| Gas category | II2E+3+ (G20, G30/G31) |
| Power supply | 220-240 V ~ 50/60 Hz, 2 W |
| Gas pressure | G20: 20 mbar, G30: 28-30 mbar, G31: 37 mbar |
| Total power | 4.0 kW |
| Rapid burner | 3.0 kW |
| Auxiliary burner | 1.0 kW |
| Energy efficiency | 55.2 % |
| Dimensions (W x D x H) | 300 x 520 x 105 mm |
| Hob material | Glass |
| Utensil support | Enamel |
| Ignition device | Continuous ignition (electric) |
| Safety device | Thermo-couple (gas shut-off in case of extinction) |
| Number of burners | 2 |
| Rapid burner diameter | 100 mm |
| Auxiliary burner diameter | 50 mm |
| Recommended pan diameter rapid | 200 - 240 mm |
| Recommended pan diameter auxiliary | 120 - 160 mm |
| Compatible gas type | Natural gas (G20) or LPG (G30/G31) |
| Gas connection | Thread G1/2 |
| Included accessories | Fixings, adhesive seal, screws, additional injectors, gasket, manual |
| Compliance | CE, directives 2016/426, 2014/35, 2014/30 |
| Electrical protection class | Class I |
| Gas class | III |
Frequently Asked Questions - DGV18CH FAR
User questions about DGV18CH FAR
0 question about this device. Answer the ones you know or ask your own.
Ask a new question about this device
Download the instructions for your Cooker in PDF format for free! Find your manual DGV18CH - FAR and take your electronic device back in hand. On this page are published all the documents necessary for the use of your device. DGV18CH by FAR.
USER MANUAL DGV18CH FAR
MANUEL D'UTILISATION
DGV18CH/DGVB18CH
Raccordements possibles
GAZ DISTRIBUTE PAR CANALISATION (GAZ NATUREL)
Raccordements possibles
GAZ DISTRIBUTE PAR BOUTEILLE OU RÉSERVOIR (GAZ BUTANE/PROPANE).
Specifications concerning the gaz
Thank you to have chosen the FAR quality. This product has been created by our professional team and according to the European regulation. For a better use of your new device, we recommend you to read carefully this user manual and keep it for record.
TABLE OF CONTENTS
SAFETYINSTRUCTIONS .GB-3
Description of the appliance .GB-10
How to use the appliance . . .GB-13
Cleaning and maintenance . GB-19
APPLIANCE INSTALLATION. GB-22
Troubleshooting .GB-38
DISPOSAL OF OLD ELECTRICAL APPLIANCES GB-42
READ THE INSTRUCTIONS
These instructions contain chapters relating to safety instructions, instructions for use, installation instructions, and troubleshootingips. Read these instructions carefully before starting to use this hob so that you can use and maintain the product correctly.
BEFORE CONTACTING YOUR AFTER SALES SERVICE
The chapter on troubleshooting tips will help you resolve some common problems yourself without the need for professional technicians.
NOTE:
The manufacturer, in accordance with a permanent product update development policy, may make any necessary changes without giving prior notice.
This appliance is in compliance with the
European Directives 2016/426/EC relating to gas appliances, 2014/35/EC relating to electrical safety and 2014/30/ EC relating to electromagnetic compatibility.
SAFETY INSTRUCTIONS
This appliance is designed to be used for domestic and similar purposes such as:
-kitchens used by employees in shops, offices and other working environments;
-farms;
- use by guests of hotels, motels and other residential environments;
- bed and breakfast-type accommodation.
The mains plug must remain easily accessible. If the power cord is damaged, it must be replaced by the manufacturer, their after-sales service or a qualified professional in order to avoid any danger. This appliance can be used by children aged 8 years and above and persons with reduced physical, sensory or mental capabilities or lack of experience and knowledge on the condition that they have been given supervision or instructions concerning use of the appliance in a safe way and understand the hazards involved. Children must not play with the appliance. Cleaning and user maintenance must not be carried out by children unless they are supervised.
Appliances are not designed to be used in conjunction with a separate timer or remote control system.
CAUTION: In case the glass surface breaks: --shut immediately off all burners and any electrical heating element and isolate the appliance from the power supply, --do not touch the appliance surface, --do not use the appliance.
CAUTION: The use of a gas cooking appliance results in the production of heat, moisture and products of combustion in the room in which it is installed. Ensure that the kitchen is well ventilated especially when the appliance is in use.
Prolonged intensive use of the appliance may require additional ventilation, for example the increasing of mechanical ventilation where present, additional ventilation to safely remove the products of combustion to outside (external) air whilst also providing room air changes with additional ventilation.
Consult a professional before installation of the additional ventilation.
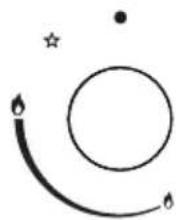
The igniter device must not be in operation for more than 15 seconds. If at the end of these 15 seconds the burner is not lit, stop activating the igniter device, open the outer cover and/or wait at least 1 minute before any new attempt to light the burner.
In the case of accidental extinction of the flames of the burner, close the controller module of the burner and not try to relight the burner for at least 1 minute.
CAUTION: This appliance is for cooking purposes only. It shall not be used for other purposes, for example room heating.
Warnings
- Do not modify this appliance.
- This appliance must be installed by a certified technician or installer.
- The gas connection must be made in accordance with the instructions given in the installation instructions. If these instructions are not followed precisely, there is a risk of explosion, freand poisoning.
- Prior to installation, ensure that the local distribution conditions (nature of the gas and gas pressure) and the adjustment of the appliance are compatible;
- The adjustment conditions for this appliance are stated on the label (or data plate);
- This appliance is not connected to a combustion products evacuation device. It shall be installed and connected in accordance with current installation regulations. Particular attention shall be given to the relevant requirements regarding ventilation.
- Before installation, turn off the gas and the electrical power source of the device.
-
All devices containing electrical components must be earthed.
-
Make sure that the gas pipe and the electrical cable are installed in such a way that they do not touch any part of the appliance that can become hot.
-
The gas pipe or the connector must not be folded or blocked by any other appliance.
-
Check the dimensions of the appliance as well as the dimensions of the gap to be cut in the kitchen cupboard.
-
The panels located above the work top, in the direct vicinity of the appliance, must be made of non-flammable materials. The laminated surface and the adhesive used to attach the hob must be heat resistant to avoid any deterioration.
-
Open the valve of the appliance and light each burner.
-
Check that the flame is transparent blue without a yellow tip.
-
If the burners appear to malfunction, check the following:
-
The cover of the burner is positioned correctly.
-
The flame spreader is positioned correctly.
-
The burner is vertically aligned with the nozzle of the injector.
-
A complete operating test and a leak detection must test be carried out after the installation.
-
The flexible pipe must be placed in such a way that it cannot come in contact with a mobile part of the casing and cannot pass through any space that can become blocked.
- Traces of glue produced during manufacture in the factory meet the standards for all hobs.
- WARNING: The appliance and its accessible parts become hot during use.
- Care should be taken to avoid touching heating elements.
Children less than 8 years of age shall be kept away unless continuously supervised. - WARNING: Unattended cooking on a hob with fat or oil can be dangerous and may result in fire.
- NEVER try to extinguish a fire with water, but switch off the appliance and then cover flame e.g. with a lid or a fire blanket.
- WARNING: Danger of fire: do not store items on the cooking surface.
- WARNING: This appliance is intended for use by adults, for normal domestic use. Do not use it for commercial or industrial purposes or for any other purpose than the intended one. This will avoid physical injury and material damage.
- WARNING: To prevent from explosion and fire risk, do not place flammable products or items
soiled with flammable products inside, nearby or on the appliance.
- WARNING: If the surface is cracked, switch off the appliance to avoid the possibility of electric shock.
- A steam cleaner is not to be used.
- The burner flame must be regular. Avoid any air draft. If the flame shows abnormality, clean the burner. Should the abnormality continue, contact the after-sales service.
- Replace the gas pipe a bit before the expiry date mentioned on it.
- WARNING: Use only hob guards designed by the manufacturer of the cooking appliance or indicated by the manufacturer of the appliance in the instructions for use as suitable or hob guards incorporated in the appliance. The use of inappropriate guards can cause accidents.
- For information on installation, handling, maintenance and disposal of the appliance, please refer to the following paragraph of the product manual.
- For detailed information on how to clean food contact surfaces, refer to the following paragraph of the package leaflet.
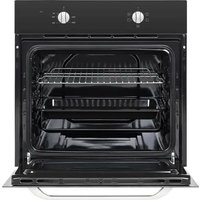
DESCRIPTION OF THE APPLIANCE
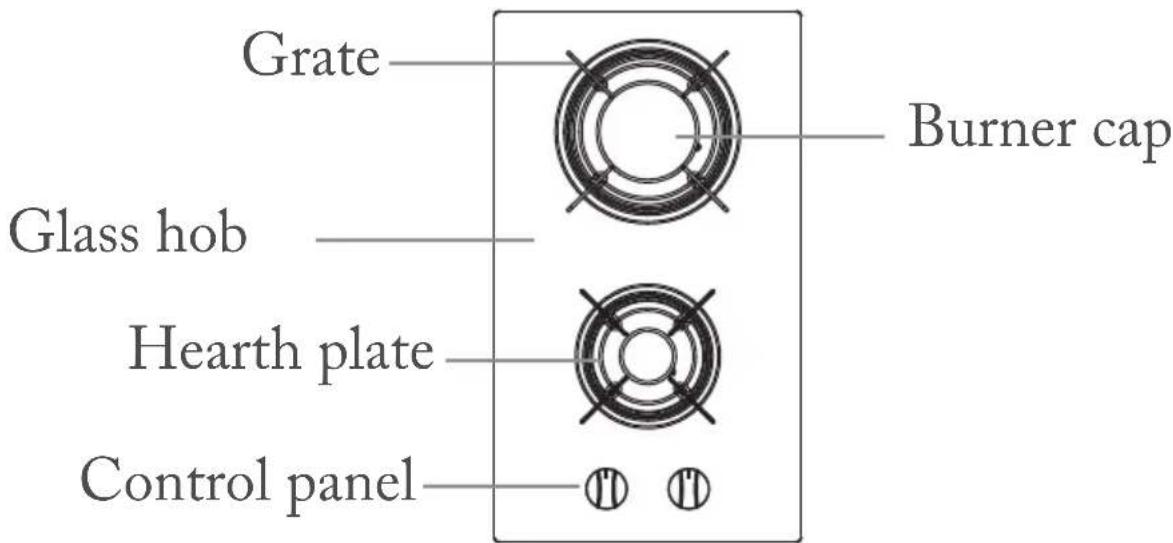
| Model | DGV18CH DGVB18CH |
| Class 3 | |
| Cookware holder Enamel | |
| Wok stand N/A | |
| Top plate Glass | |
| Dimensions (Width x Depth x Height) | 300*520*105 |
| Igniter device Type of | continuous ignition |
| Connection to the gas G1/2 thread | |
| Electrical power supply | 220-240V~, 50Hz- 60Hz - 2W |
| Function of the burners | Rapid (1), Auxiliary (1) |
| EQn 4.0kW | |
| Information for domestic gas hobs | |||||
| Model DG | V18CH | /DGVB18CH | |||
| Type of hob | Gas hob | ||||
| Number of burners | 2 | ||||
| Energy efficiency by burner | Rapid | Semi-rapid 1 | Semi-rapid 2 | Auxiliary | % |
| 55.2 N | A N/A | NA | |||
| Energy efficiency by hob | 55.2 % | ||||
| G20 (NG - I2E+) | |||
| Power (kW) | Injector Size (mm) | Burner Size (mm) | |
| Rear gas 3.0 1.30 100 | |||
| Front gas 1.0 | 0.78 | 50 | |
| G30 (LPG I3+ (28-30/37)) | |||
| Rear gas 3.0 | 0.87 | 100 | |
| Front gas 1.0 | 0.5 | 50 | |
Accessories

Mounting (2) Adhesive seal (2) Screw (2)


Injector (2) Instruetion (1)
manual (1)
The hose connector in No. 4 can only be used in products with liquefied gas sources.
The shape and size of the connector shall follow the national country / countries.
The regulator used shall comply with EN 16129 / local national requirement.
Check up the regulator outlet pressure, it shall comply with the 'Gas Sepcification'
If a flexible hose is used, aovid twisting and worn out. Check the leakage with soapy water. before each use. Replace a new hose if it is out of validity or damaged.
The hose shall comply with national country / countries requirement.
The maximum length of the flexible hose is 1.5m for Finland: 1.2m .
The flexible hose shall be fitted in such a way that it cannot come into contact with a movable part of the housing unit (e.g. a drawer) and shall not pass through any space susceptible of becoming congested. Keep the hose away from hot surface and sharp edge.

HOW TO USE THE APPLIANCE
The following symbols will appear on the control panel, near each control handle:
() Black circle: Gas off
(6) Large flame: Maximum setting
(6) Small flame: Minimum setting
- The minimum setting is at the end of the anticlockwise rotation of the control knob.
- All operating positions must be selected between the maximum position and the minimum position.
- The symbol on the control panel, near the control handle, will indicate the burner which is on.


Automatic lighting with the safety device in the event of failure.
The appliance is equipped with a safety device in the event of ignition failure, on each burner.
These devices are designed to stop the flow of gas to the head of the burner in the event that the flame does not light.
To light a burner:
-
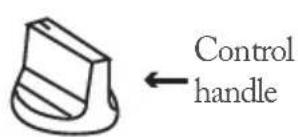
Press the control knob for the burner that you want to turn on and turn it in an anticlockwise direction to the maximum position.
-
If you keep the control knob depressed, the automatic ignition of the burner will work. You must hold the control knob for 15 seconds after the flame on the burner is lit. If after 15 seconds, the burner is not lit, stop the operation of the device and open the compartment door and/or wait at least 1 minute before attempting to turn the burner on again.
-
After this interval of 15 seconds, to regulate the flame, you must continue to turn the control knob anti-clockwise until the flame is at an appropriate level. The operating position MUST be between the maximum and minimum position.
-
To turn off the burner, turn the control knob fully clockwise to turn off the gas.
-
In the event of a power failure, the burners can be lit using a match.
Safety and energy saving tips
- The diameter of the bottom of the pan must match that of the burner.
| BURNERS | COOKWARE | |
| Min. Max. | ||
| Rapid 200 mm | 240 mm | |
| Auxiliary 120 mm | mm 160 mm | |
Do not use cookware that protrudes from the edges of the burner.
| NO YES | |
| Do not use cookware with small diameters on the big burners. The flame must never burn the sides of the cookware. | Always use cookware which is appropriate for each burner, to avoid wasting gas and discolouring the cookware. |
| Avoid cooking without a lid covering or alfcovering the cookware, because this wastes energy | Place a lid on the cookware. |
| Do not use cookware with a convex or concave base. | Use only pots, pans and frying pans with a thick and flat base. |
| Do not place the cookware on the edge of a burner because it could topple. | Always place the cookware in the centre of the burner and not on an edge. |
| Do not use cookware with a large diameter on the burners near the controls, which if placed in the middle of the burner can touch the controls or be so close to the control knobs that it could increase the temperature in this area and could damage them. Never place cookware directly on the burner. | |
| Do not place any object, such as a flame retardant or an asbestos sheet between the pan and the cookware support because the appliance could be damaged. | Place the cookware on the burner grate. |
| Do not use excessive weight and do not hit the hob with heavy objects. | Handle the cookware carefully when it is on the burner. |
- It is not recommended to use roasting pans, frying pans or grill stones heated on multiple burners at the same time because the resulting heat could damage the appliance.
- Do not touch the hob and the grates when in use or for a time afterwards.
- As soon as a liquid begins to boil, reduce the flame so the liquid simmers.
CAUTION: This appliance is for cooking purposes only. It shall not be used for other purposes, for example room heating.
CLEANING AND MAINTENANCE
- Cleaning must only be carried out once the appliance has cooled completely
- The appliance must be disconnected from the power source before cleaning begins.
- Regularly clean the appliance, preferably after each use.
- Abrasive cleaners or sharp objects can damage the surface of the appliance; you must clean it using water and a little washing-up liquid.
| Can be used Must not be used | |
| Soft cloth Neutral detergent ent | Nylon brush Edible oil Abrasive Thinner / Benzene |
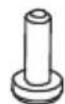
Cookware stand, control handles
- Remove the cookware stand.
- Clean the stand and the control handles with a damp cloth, washing-up liquid and hot water. For stubborn stains, soak the parts before cleaning them.
- Dry them with a clean and soft cloth.
Hob
- Wipe the hob with a soft, well wrung-out cloth with warm water to which washing-up liquid has been added.
- Dry the hob after cleaning.
- Remove all residues of food and liquid from the hob as soon as possible to avoid any risk of corrosion.
- The stainless steel parts of the appliance may discolour over time. This is normal because of the high temperatures. After each use, these parts must be cleaned with a product suitable for stainless steel.
BURNERS
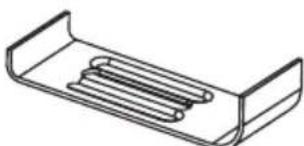
- Remove the burner covers and the flame spreaders by removing them from above and moving them away from the burners.
- Soak in hot water and a little detergent or washing-up liquid.
After cleaning and washing them, wipe them and dry them thoroughly. Make sure that the holes
for the flames are cleaned and dried completely.
- Wipe the fixed parts and the cups of the burners with a damp cloth, then dry them.
- Gently wipe the flame supervision device and ignition device with a well wrung-out cloth and then dry with a dry cloth.
- Before placing the burners on the hob, make sure that the injector is not blocked.
- Reassemble the auxiliary and rapid burners as follows:
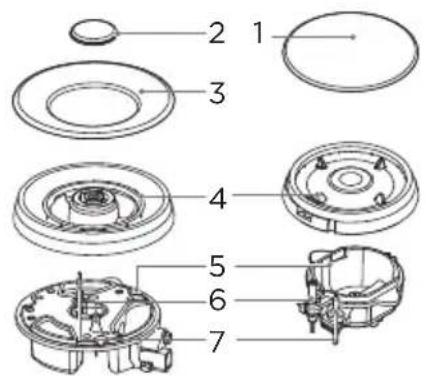
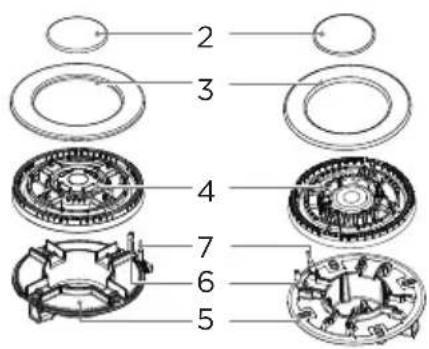
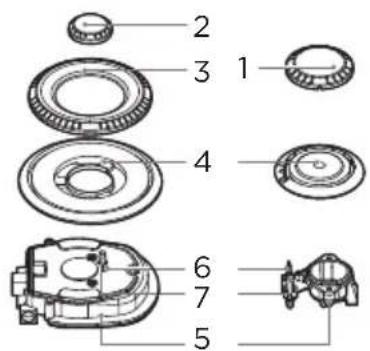
-
Place the flame spreader (4) on the burner cup (5) so that the ignition device and the flame supervision device are aligned with their respective holes in the flame spreader. The flame spreader must lock properly in place.
-
Position the cover of the burner (1,2,3) on the flame spreader (4) so that the holding rods fit in their respective recesses.
Put the parts back in the correct order after cleaning. Do not mix the top and the bottom.
The holding rods must be inserted exactly in the notches.
APPLIANCE INSTALLATION
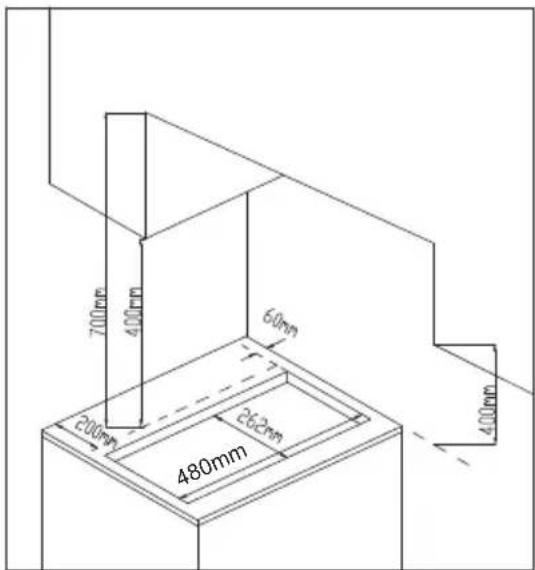
SPACES REQUIRED DURING INSTALLATION OF THE HOB WITH AN EXTRACTOR HOOD ABOVE
-
This appliance must be integrated in a kitchen cupboard or worktop of 600mm , if the following dimensions are respected;
-
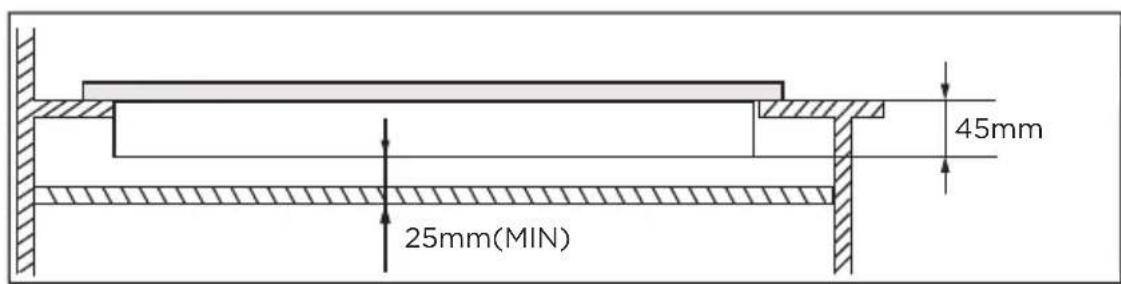
The edges of the hob must be a minimum distance of 60 ~mm from a side or a wall.
-
700 ~mm between the highest point of the surface of the hob (including the burners) and the bottom of any horizontal surface directly above it.
-
400 ~mm between the surfaces of the hob, if the bottom of any horizontal surface is flush with the outer edge of the hob. If the underside of the horizontal surface is less than 400 ~mm , then it must be at least 50 ~mm from the outer edges of the hob.
-
A space of 50~mm around the appliance and between the surface of the hob and any combustible material.
-
You must have a gap of at least 25mm and at most 74mm between the bottom of the appliance and any surface that is below it.
- An oven must be equipped with forced ventilation for installation of the hob above it.
-
Check the dimensions of the oven in the installation manual.
The size of the cut must be in accordance with the information. -
Remove the cookware supports, the burner covers and the flame spreader and carefully turn the appliance upside down, placing it on a padded surface.
Take care to ensure that the flame supervision devices are not damaged during this process.
- Apply the adhesive seal provided to the edges of the appliance.
- Do not leave a gap in the sealant and do not overlap the layer.
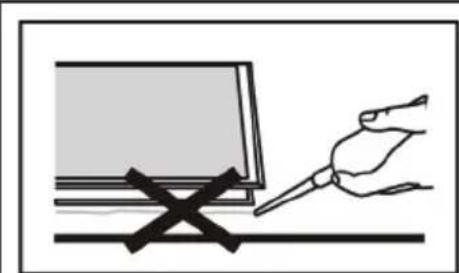
Do not use silicone adhesive to fix the appliance to the work top.
This will make it difficult to remove the appliance from the opening in the future, especially if it needs to be repaired.
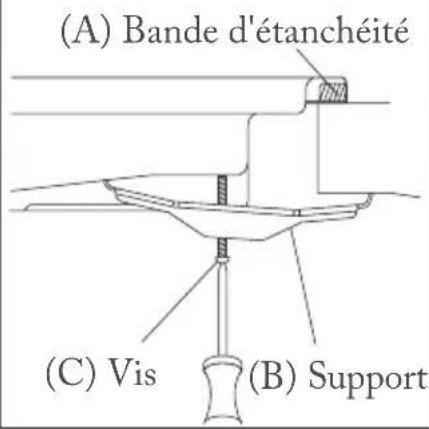
- Place the bracket (B) on the holes that correspond to the size of the screws. There is a set of screws for the holes in each corner of the hob. Lightly tighten one screw (C) through the bracket (B) so that the bracket attaches to the hob but in such a way that the hob can still be adjusted.
- Put the hob back in place and then gently lower it into the opening you have cut into your worktop.
- Under the hob, adjust the brackets to the appropriate position for your worktop. Then retighten the screws completely (C) to secure the hob in position.
Gas Connection
- This appliance must be installed and connected in accordance with installation regulations in force in the country in which the appliance is to be used.
- This appliance is supplied to run on LPG and natural gas. Conversion for use on LPG and natural gases must only be undertaken by a qualified person.
Gas supply replacement and installation guidelines:
LPG > NG
NG > LPG

Installation of appliance Note: Wear protective gloves to fit the hob.
Caution!
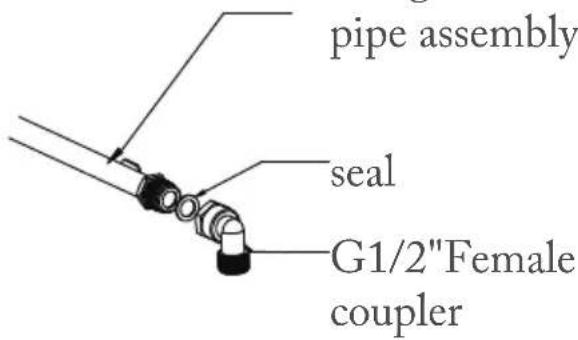
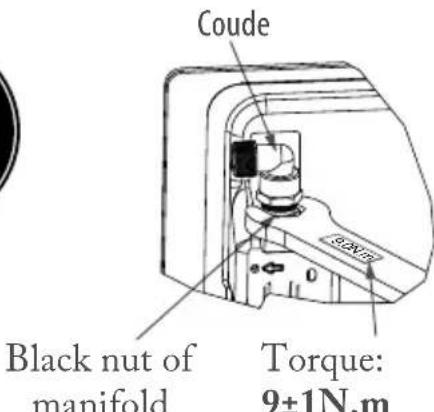
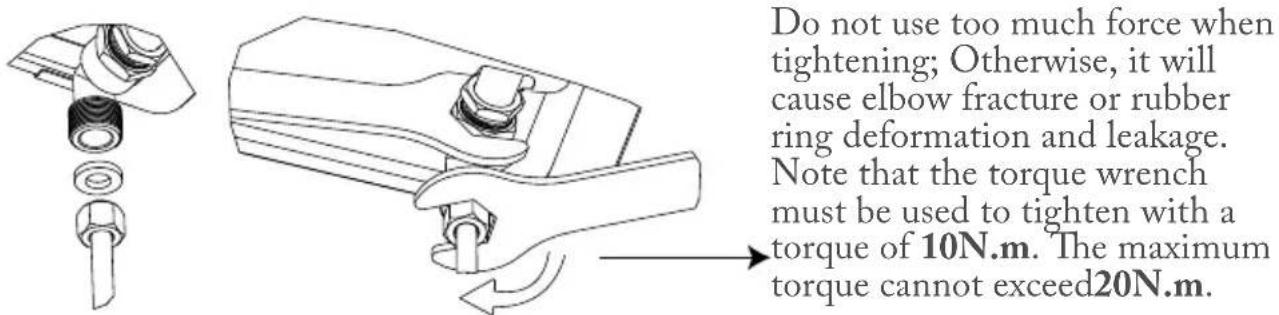
If necessary to adjust or install the elbow, it is allowed only torque wrench with 9 ± 1N.m and work on the Black nut of manifold instead of on the elbow.
(1) Adjusting the direction of elbow

After loosening the elbow, adjust the elbow interface to the required direction as required, and keep the hexagonal head of the elbow motionless with a wrench. Use a 9 ± 1N.m torque wrench to tighten the black bolt of the gas inlet pipe assembly.
Ensure that the torque of the wrench is within the required range to prevent elbow breakage or damage caused by excessive force.
After the installation is tightened, check whether the parts are in good condition and test the air tightness to ensure the tightness of the installation. The installer is responsible for the results of the process.
(2) Installing the gas hob
This appliance should be installed by a registered Gas Safe Engineer!
Gas connection
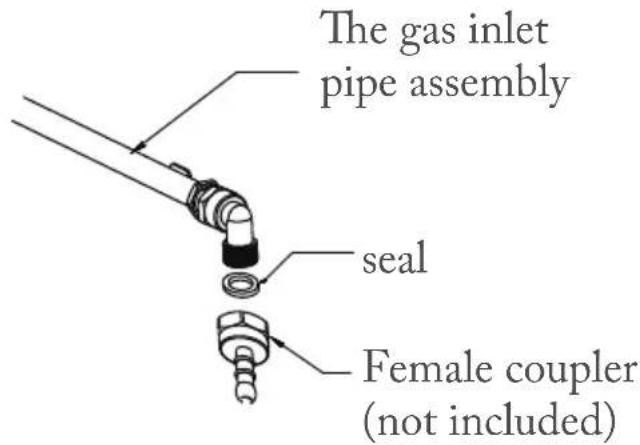
The gas connection must be located in position where the stop tap is accessible. The end of the inlet connection point of the gas hob has a 1/2 thread that allows for:
A fixed connection
- Connection using a flexible pipe (L min. 1 m - max. 3 m)
The watertight seal supplied must be inserted between the manifold outlet and the gas supply.
You must prevent the pipe from coming into contact with moving parts of the kitchen unit (for example, a drawer) and prevent access to any spaces which might become obstructed.

Danger of leaks!
If any connection is handled, check the seal.
The manufacturer is not liable for any connection leaking, after being handled.
- The law stipulates that all gas appliances must be installed by competent persons in accordance with the Gas Safety Installation and Use Regulations.
- It is in your interest and in the interest of safety to ensure compliance with the law.
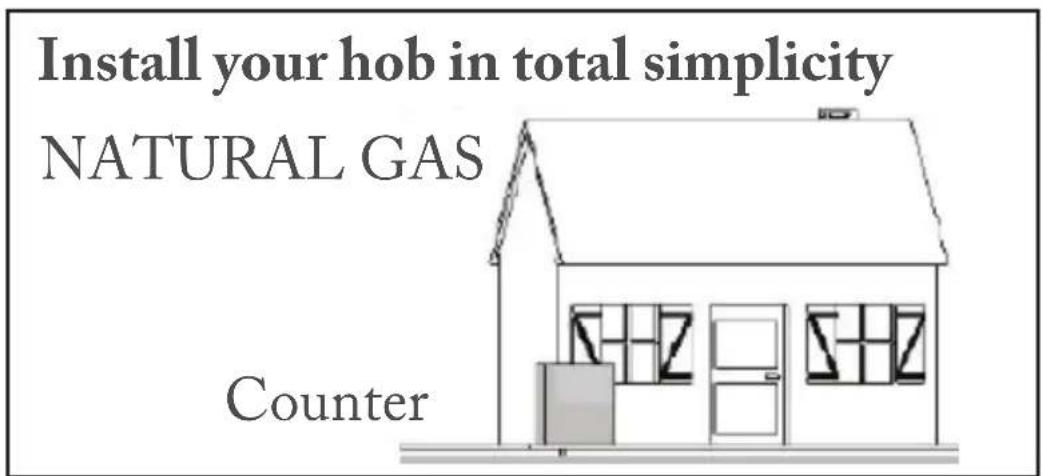
Install your hob in total simplicity Gas connection
Preliminary remarks
The entire length of the connecting pipe must remain accessible and must be changed before its expiry date (indicated on the pipe). Whatever the means of connection chosen, make sure of its tightness, after installation, with soapy water.
If the hob is installed above an oven or if the proximity of other heating appliances risks heating and damaging the connection, it is essential to use a rigid tube to make the connection.
If a flexible pipe is used (e.g. for butane gas), the latter must not be installed in a place where there is a risk of contact with moving parts of furniture and must not pass through a place likely to be obstructed.
Gas connection (continued)
Possible Connections
GAS DISTRIBUTED BY PIPELINE (NATURAL GAS)
Use one of the 3 types of connection:
- connection by rigid tube (gas standard name G1/2).
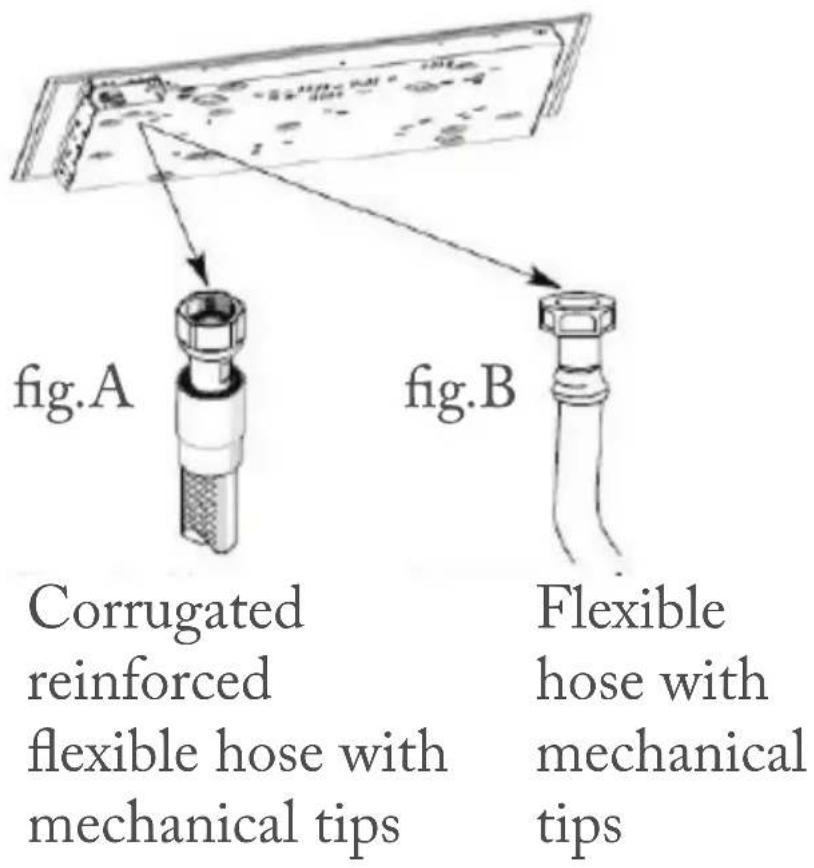
Make the connection directly to the end of the elbow mounted on the appliance, or - connection by corrugated reinforced flexible hose with mechanical tips (fig. A on the previous page).
You can also use a flexible pipe in stainless steel distributor, or - connection by flexible pipe with mechanical tips (fig. B on the previous page).
These pipes must have a maximum length of 2 metres and a validity date that has not expired.
Install your hob in total simplicity Gas connection (continued)
Possible Connections
For the safety of the user, we recommend a connection either by rigid tube if this is possible, or with a corrugated reinforced flexible pipe (maximum length 2 metres) (fig. A).
In the case of an existing installation where the fitting of a rigid tube is impossible, it is always possible to perform the connection with a flexible pipe (maximum length 2 metres) fitted with two clamps: one on the connector (fig. B), and the other on the expansion valve, without forgetting to put a sealing washer in place between the connector and the elbow of the table.
You will find the adapter and the sealing washer in the pouch supplied with the appliance.
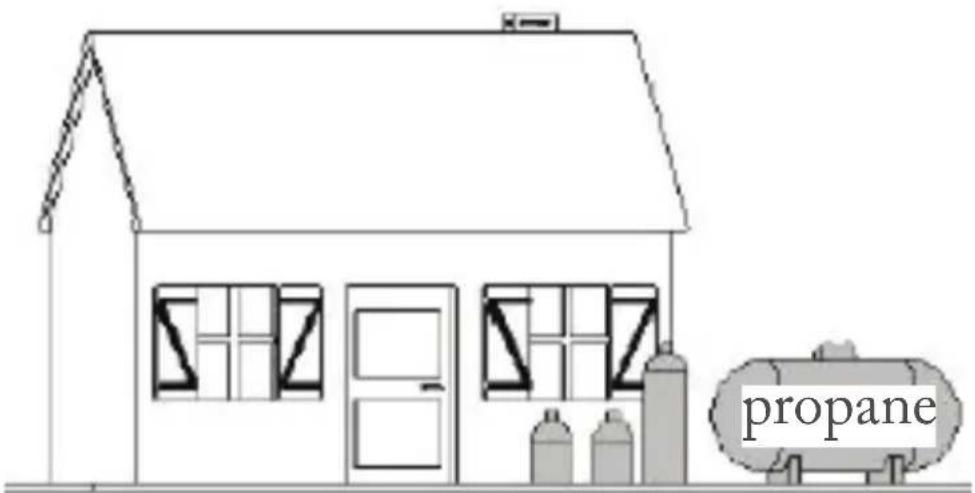
BUTANE/PROPANE Mandatory Expansion Valve
butane propane
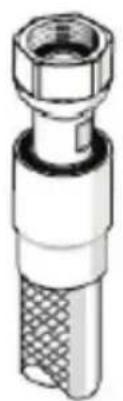
fig.A Corrugated reinforced flexible pipe with mechanical tips
Seal (not supplied)
Clamp (not supplied)
Clamp (not supplied)
fig.B
connection by
flexible pipe
NF gas regulator must be used.
WARNING:
Temperatures above 30^ can cause overheating of the pipe. To avoid this, make sure that no heating appliance is located nearby.
Tighten the connector with a torque not exceeding 2.5m / daN (m / kgF)
In France, you must use a tube or a pipe bearing the stamp «NF Gaz». NF gas regulator must be used.
Specifications of the gas
| Description of the product | Gas hob | CE 2531-24 FR Pin 2531DO-0183 CONFORAMA France 80 Boulevard du Mandinet LOGNES 77432 Marne la Vallee Cedex 2 FRANCE MADE IN CHINA | |
| Model DGV | 18CH DGVB18CH | ||
| Type | 30G20MA089-GFN-R02 | ||
| Electrical power source | 220-240V~50Hz-60Hz 2W | Class I Protection | |
| Gas class according to EN30-1-1 and EN30-2-1 | III | ||
| Serial number | |||
| Cat | II2E+3+ | ||
| Type of gas | G20 (Methane) □ | G30 (Butane), G31 (Propane)□ | |
| Pressure of gas | 20 mbar | G30 (Butane) at (28-30) mbar, | |
| G31 (Propane) at 37 mbar | |||
| Country of destination | FR FR | ||
| Nominal heat input | Total: 4.0kW | Total: 4.0kW (291g/h for G30) | |
| Rapid burner: 3.0kW Auxiliary: 1.0kW | Rapid burner: 3.0kW (218g/h) Auxiliary: 1.0kW (73g/h) | ||
| WARNING: This appliance must be installed in accordance with the regulations in force, and used only in a well ventilated area. Consult the instructions before installing and using this appliance. | |||
Electrical connection
This appliance needs to be earthed.
- This appliance is designed to be connected to an electrical power source 220-240V, 50Hz- 60Hz AC.
Adjusting the gas
Take precautions for operations and adjustments to be made during the conversion of one gas to another.
- All work must be carried out by a qualified technician.
- Before beginning, turn off the gas and the electrical power source of the appliance.
| 1. Change the burner injector | |
| Injector | Remove the cookware stands, the burner covers and the flame spreader. Unscrew the injector using a 7 mm socket wrench and replace it with the injector stipulated for the new gas supply. Carefully reassemble all the components. Once the injectors are replaced, it is advised to tighten the injector securely in place. |
2. Adjusting the minimum level of the flame

Adjustment screw
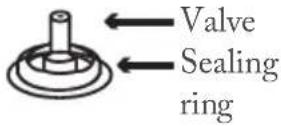
- Turn the valves to the minimum level.
- Remove the valve knob and place a small screwdriver at the centre of the valve handle.
-
The correct adjustment is reached when the flame has a length of approximately 3 to 4 mm.
-
For the butane/propane gas, the adjustment screw must be securely tightened.
- Put the control knob back in its place.
-
Make sure the flame does not turn off quickly when you turn the knob from the maximum level to the minimum level. If this is the case, remove the control knob and adjust the gas flow, then test again once the adjustment is made.
-
Repeat this procedure for each of the gas valves.
- Do not disassemble the valve sleeve: in the event of a malfunction, change the entire valve.
- Before replacing the burners on the plate, make sure that the injector is not blocked.
- A complete operational must be conducted after the gas conversion to detect any leakage of gas (use soap and water or a gas leak detector)
After
completing the
conversion,
a qualified
technician or
an installer
must mark a V on the
correct
category of gas
to match the
setting on the
rating plate.
Remove the
previous V mark.
TROUBLESHOOTING
- Repairs must be carried out by an approved technician only.
- Any incorrect repair can result in considerable danger for you and other people.
However, some minor problems can be resolved as follows:
| Problem | Probable cause | Solution |
| No ignition | No spark | Check the electrical supply |
| The cover of the burner is not assembled correctly | Assemble the cover properly | |
| The gas supply is disabled | Completely open the gas supply | |
| The appliance ignites incorrectly | The gas supply is not completely open | Completely open the gas supply |
| The cover of the burner is not assembled correctly | Assemble the cover of the burner correctly | |
| The ignition socket is contaminated with foreign substances | Clean the substances with a damp cloth | |
| The burners are wet | Thoroughly dry the burners | |
| The holes in the flame spreader are blocked | Clean the flame spreader | |
| There is a noise during combustion and ignition | The cover of the burner is not assembled correctly | Assemble the cover of the burner correctly |
| The flame is extinguished during use | The flame supervision device is contaminated with foreign substances | Clean the flame supervision device |
| Products have boiled over during cooking and extinguished the flame. | Turn off the burner using the knob. Wait one minute and ignite the burner again. | |
| A strong current of air may have extinguished the flame | Please turn off using the knob and check the cooking area to check that there is not an open window. Wait for one minute and ignite the burner again. | |
| Yellow flame The holes of the flame spreader are plugged | Clean the flame spreader | |
| A different gas is used | Check the gas used. | |
| Unstable flame | The cover of the burner is not assembled correctly | |
| Smell of gas | Gas leak | |
- If the problem is not resolved, please contact our Customer Support Centre.
DISPOSAL OF OLD ELECTRICAL APPLIANCES
European directive 2012/19/EU on Waste from Electrical and Electronic Equipment (WEEE), requires that used household appliances are not thrown into the normal
municipal waste stream.
Used appliances must be collected separately in order to optimize the rate of recovery and recycling of materials that compose them, and to reduce the impact on human health and on the environment.
The crossed bin symbol is affixed to all the products to remind you of the obligations of separated collection.
The crossed out "wheeled bin" symbol on the product reminds you of your obligation, that when you dispose of the appliance, it must be separately collected.
Consumers should contact their local authority or retailer for information concerning the correct disposal of their old appliance.
Tis instruction book is also available on our website: www.conforama.fr
If you have a problem with your product, before going to your Conforama store, please get in touch with our aftersales services for electrical household appliances: https://sav-client.conforama.fr 09 69 32 05 05
CONFORAMA France