ARH2101E - Refrigerated display ASPES - Free user manual and instructions
Find the device manual for free ARH2101E ASPES in PDF.

| Brand | Aspes |
| Model | ARH2101E |
| Product type | Refrigerated display case |
| Climate class | 3, 4, 5, 7 |
| Supply voltage | 187-254 V (single phase) |
| Recommended stabilizer power | Less than 500 W |
| Sound pressure level | < 70 dB(A) |
| Door | Glass |
| Lighting | LED |
| Temperature control | Electronic with digital display |
| Defrost | Manual (button) |
| Fans | Condenser and evaporator |
| Wheels and feet | Swivel wheels + adjustable feet |
| Max. transport inclination | 45° |
| Waiting time before start-up | 4 hours if transported upside down |
| Use | Indoor only |
| Maintenance | Cleaning with mild detergent and warm water, do not use corrosive products |
| Safety | Earthing required, do not damage the refrigerant circuit |
Frequently Asked Questions - ARH2101E ASPES
User questions about ARH2101E ASPES
0 question about this device. Answer the ones you know or ask your own.
Ask a new question about this device
Download the instructions for your Refrigerated display in PDF format for free! Find your manual ARH2101E - ASPES and take your electronic device back in hand. On this page are published all the documents necessary for the use of your device. ARH2101E by ASPES.
USER MANUAL ARH2101E ASPES
Read this manual carefully and keep it for future reference
www.aspes.es
Important safety instruction .... 1
Transportation and Placement....2
Product description....3
Installation Instructions .... 3
Operation Instructions....5
Product trouble shooting....5
Product Cleaning....7
Caution for Safety....7
Correct Disposal of this product....7
Dear Customer:
Dear users (customer), this manual contains the product's basic knowledge, use instruction, fault diagnosis and basic trouble shooting methods. In order to better understand and use this product, please take good care of this manual and before installing your cooler, read it carefully.
Important safety instruction
- The Range of operating voltage: 187V\~254V. In order to avoid damaging the electrical performance of the compressor, please equip with a Voltage Stabiliser appliance of power not less than 500W, to protect the Cooler when the voltage is lower than 187V or higher than 254V.
- Individual single-phase socket must be used. It should be reliably connected to a grounding wire. Caution: The grounding wire is not allowed to connect to a water pipe or a gas pipe.
- Strong base, strong acid, organic solvent and corrosive goods or those are easy to pollute to food are prohibited storing in the showcase; otherwise, it can cause corrosiveness or accident.
- Don't raise the showcase or the shell of the electric parts, or it will cause the decline in insulation and cause corrosion.
- When the showcase will be out of use for a long time, disconnect the power first, then clean it. Please examine the circuit whether it is ok before reuse.
- If the supply cord is damaged, it must be replaced by a special cord or assembly available from the manufacturer or its service agent.
- The appliance shall be disconnected from its power source during cleaning or maintenance and when replacing parts.
- The A-weighted emission sound pressure level is below 70Db(A).
- Do not store explosive substances such as aerosol cans with a flammable propellant inside the appliance.
- Flammable blowing gas of the cooler should be handled according to local regulations. Before you scrap the appliance, please take off the doors to prevent children trapped.

WARNING
- Risk of fire / flammable materials, taking care to avoid causing a fire by igniting flammable material.
- Keep clear of obstruction all ventilation openings in the appliance enclosure or in the structure for building-in.
- Do not use mechanical devices or other means to accelerate the defrosting process, other than those recommended by the manufacturer.
- Do not damage the refrigerant circuit.
- Do not use electrical appliances inside the food storage compartments of the appliance, unless they are of the type recommended by the manufacturer.
- Please according to local regulations regarding disposal of the appliance for its flammable blowing gas. Before you scrap the appliance, please take off the doors to prevent children trapped.
- The ambient temperature and humidity conditions of the show case climate class following the tab below:
| Test room climate class | Dry bulb temperature (°C) | Relative Humidity (%) | Dew point (°C) | Water vapor mass in dry air (g/kg) |
| 3 | 25 | 60 | 16.7 | 12.0 |
| 4 | 30 | 55 | 20.0 | 14.8 |
| 5 | 40 | 40 | 23.9 | 18.8 |
| 7 | 35 | 75 | 30.0 | 27.3 |
| NOTE: the water vapor mass in dry air is one of the main points influencing the performance and the energy consumption of the coolers. Therefore, the order of the climate class in the table is based on the water vapor mass column. | ||||
NOTE: the water vapor mass in dry air is one of the main points influencing the performance and the energy consumption of the coolers. Therefore, the order of the climate class in the table is based on the water vapor mass column.
Note: The illustration is a reference image, your device may differ.
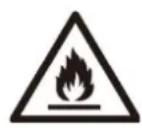
Warning: Risk of fire / flammable materials
Transportation and Placement

natural_image
Illustration of a person pushing a wheelbarrow with a 45-degree angle标注 (no text or symbols beyond the angle)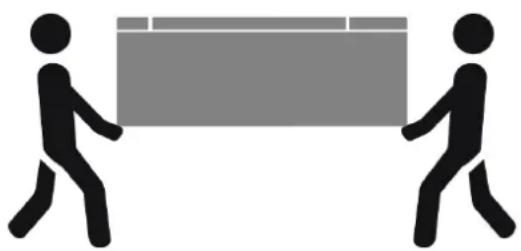
natural_image
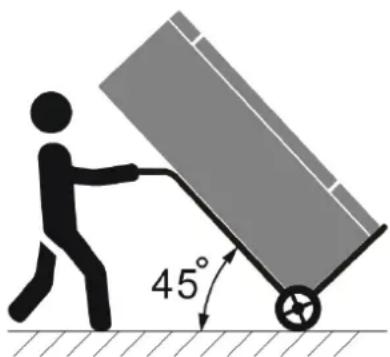
Two stylized human figures carrying a rectangular block (no text or symbols)- Don't slant it over more than 45^ , while moving it.
- The cooler needs to stand upright for 4 hours before it is powered on, while the product is transported upside down.
- The unit is for indoor application only.
- Due to the fact that the unit has a glass door, its performance is highly influenced by environmental conditions. To minimize the environmental effects on the unit's performance, the following are recommended:
● The unit is not to be placed near any kind of heat source
- The unit is not to be placed near or inside air streams produced by ventilation fans, open doors and/or windows
● The unit is not to be situated under a roof-mounted ventilation system.
- The unit should have sufficient space to 'breathe' (always use the rear space to ensure minimum clearance).
● The unit should not be placed under direct sunlight.
- Keep all ventilation openings in the appliance enclosure or in the structure clear of obstruction.
- In order to reduce fire hazard, the installation of this appliance must be carried out only by a suitably qualified person.
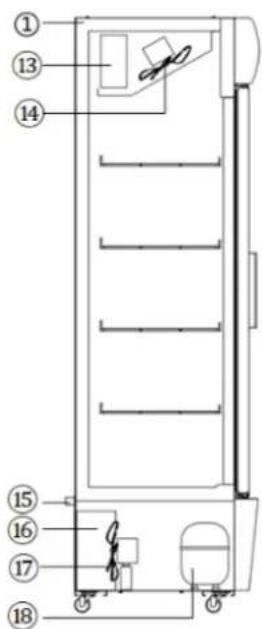
Product description
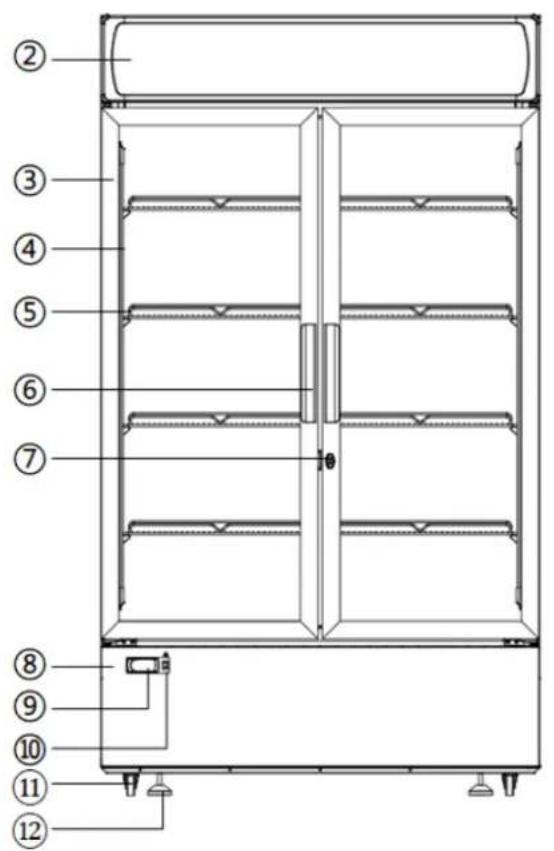
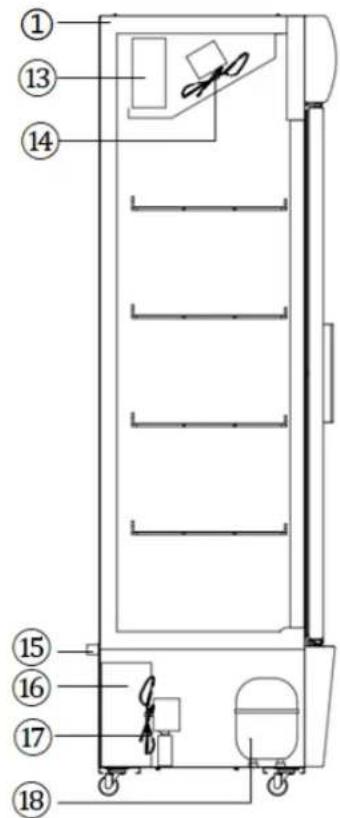
| No. | Description | No. | Description |
| 1 | Cabinet | 10 | Light switch |
| 2 | Canopy | 11 | Universal wheel |
| 3 | Glass door | 12 | Adjustable foot |
| 4 | LED light | 13 | Evaporator |
| 5 | Shelf | 14 | Evaporation fan |
| 6 | Handle | 15 | Stop block |
| 7 | Lock | 16 | Condenser |
| 8 | Decoration panel | 17 | Cooling fan |
| 9 | Electronic controller | 18 | Compressor |
Installation Instructions
- Unpack all the packages and clean all the cabinet using warm water together with 5 % of neutral soap then dry it with a soft-cloth; for the glass parts only use specific products, avoiding the use of water which can leave on the glass limestone residues.
- Keep a distance from the wall of 10 cm at least. Please level the unit settling the adjustable feet.
-
Cabinet must be installed on a perfectly even surface, far away from any heat source included sun rays.
-
Do not install the unit in open places and do not expose it to rain.
Leveling the unit
Place the unit at the chosen location. Using a spirit level, check whether the unit is leveled in both directions.
The spirit level can be placed on one of the shelves.
It is essential that the unit is leveled during operation so as to avoid possible ice formation on the evaporator's fins due to insufficient drainage of the condensates.
Tilt unit by 2^ angle for easy closing of door and drain.
- Do not insert cream or spray bottles inside the cooler.
- Do not store explosive substances such as aerosol cans with flammable propellant in the cooler.
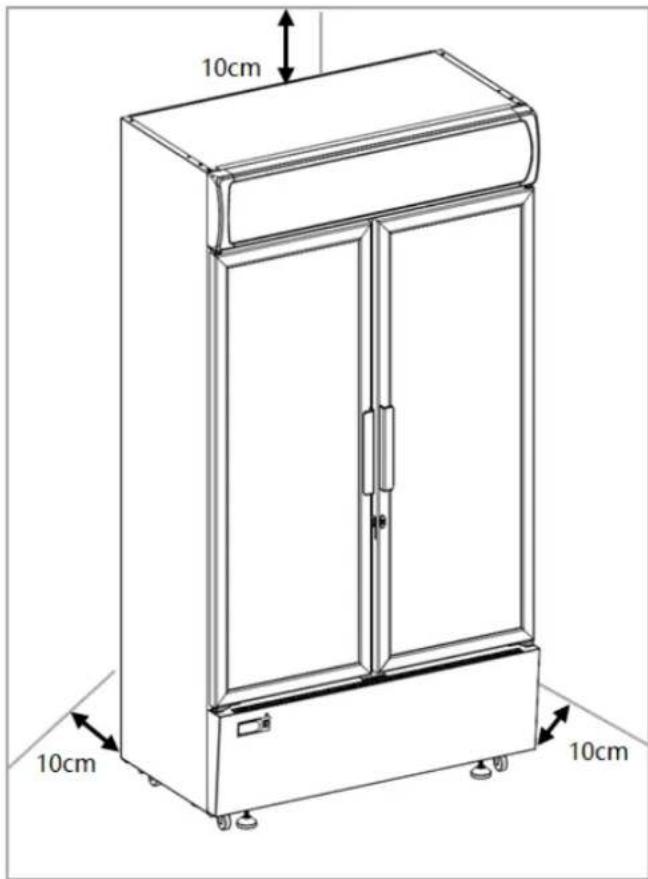
Note: product space demand size schematic diagram
Operation Instructions
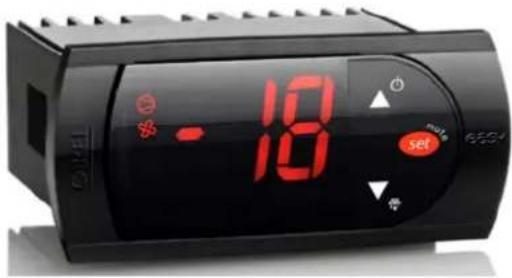
Display and functions
During normal operation, the controller displays the inner temperature. In addition, the display has LEDs that indicate the activation of the control functions (see Table 1), while the 3 buttons can be used to activate/deactivate some of the functions (see Table 2).
LEDs and associated functions
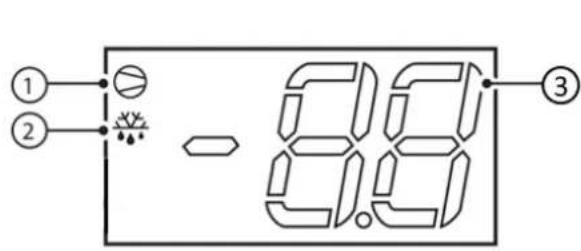
| Index | Function | Normal operation | Start up | ||
| ON | OFF | Blink | |||
| 1 | Compressor | ON | OFF | Request | ON |
| 2 | Defrost | ON | OFF | Request | ON |
| 3 | Digit | 2 digit LED display with sign (-99 to 99) and decimal point | |||
Table.1
Table of functions activated by the buttons
| Index | Button | Normal operation | Start up | |
| pressing the button alone | pressed together | |||
| 1 |  | more than 3 s: toggle ON/OFF | pressed togetherdisplay defrostprobe temp. | --- |
| 2 |  | more than 3 s: start/stopdefrost | Pressed together startparameter resetprocedure | |
| 3 |  | 1 s: display/set the set point | --- | |
Table.2
Product trouble shooting
Please refer to the below trouble shooting lists to overcome any minor problems that occurs during operations.
Notice: The following are not trouble but common phenomenon:
| Trouble | Reason | Check | Solution | Remark | |
| No display on the display | The power plug is not properly plugged in | Plug in the power socket | Reconnect the power | ||
| panel | Outage | Check the socket has electricity or not | Reconnect the power | ||
| key invalid | / | / | Contact our professional after-sales service technician | ||
| Lamp is not lighting on | No voltage | Fuse breaking off | Check fuse | Change fuse | Contact our professional after-sales service technician |
| Poor connection between the plug and socket | The connection lease or not | Repair or change socket | |||
| Have voltage | lamp has poor contact or worn down | Check the circuit and lamp | Tighten the connection or change a new lamp | ||
| Lamp switch has poor contact | Check the switch | Tighten the connection or change a new switch | |||
| Condenser fan not running | Condenser fan is broken down | check condenser fan resistance | Change condenser fan | Contact our professional after-sales service technician | |
| Condenser fan is blocked | clear the blocked | clear the blocked | |||
| Condenser fan operates continuously | Temperature is too high inside of the cabinet | Open the door too frequently | / | / | Contact professional after-sales personnel |
| Too much storage | Air outlet is blocked | Take out part of the storage | |||
| Leakage of refrigerant. | / | Contact professional after-sales personnel | |||
| Noise | Cooler isn't placed levelly | Check if the four wheels adjusted to the same level and touching the ground | Adjust the wheels | Contact professional after-sales personnel | |
| Fixing screws of compressor or condenser fan are loose | Screws fixed tightly or not | Tighten the screws | |||
| Compressor or fan defective | Check the Compressor or fan | Contact professional after-sales personnel | |||
| Condenser fan is working, but the compressor doesn't operate | The terminal of starter or OLP is loose | Check the starter and OLP | Install the starter or OLP | Contact professional after-sales personnel | |
| Compressor defective | Check the resistance of compressor CSM terminal | Change new compressor | |||
| Voltage is lower than 187V | Check the input Voltage | Use a voltage stabilizer | |||
| Evaporator fan not running | No voltage/Poor connection between the terminal | Check the resistance of switch | Change the switch | Contact professional after-sales personnel | |
| Evaporator fan broken down | Remove evaporator fan | Renew evaporator fan | |||
| Electrical cable Broken down | Change the electrical cable | Ask professional to maintain | |||
| Screen no display | Temperature display no voltage | Check the voltage | If it is necessary, please ask to the electrician to maintain. | ||
| Check the temperature display | |||||
| Screen display"E1" or "E2" | Sensor fault | Check the sensor | Ask professional to maintain | ||
| Power cord broken down | Not placed in correct position and broken during transportation | N/A | Change the power cord | Contact professional after-sales personnel | |
- Sound, the refrigerant flows inside the cooler.
- Compressor and condenser become hot.
- If the ambient humidity is high, there may be dew drop on the surface, please use soft and dry cloth to clean in time.
- Note: The illustration is a reference image, your device may differ.
Product Cleaning
External cleaning
- Doors and freezing room should be cleaned with a mild detergent and warm water solution, such as a mixture of 30g detergent to 7.5 liters of hot water, clean with a soft sponge, and then clean again with water. To prevent water residue, wipe again with a soft dry towel.
- Make sure the machine is disconnected from the power supply before performing cleaning and maintenance operations.
- Warning
- Do not use corrosive cleaning agents to clean the interior of the freezing room and the wire rack
Caution for Safety
● Warning! Do not damage the cooling fluid circuit.
● Warning! Do not damage walls of the machine: the cooling fluid circuit may damage.
● Warning! Do not use electrical appliances inside the food storage compartments of the appliance, unless they are of the type recommended by the manufacturer.
- Warning! The equipment must not be used by persons (including children) whose physical, sensorial, or mental capacities are reduced, or who lack experience and know-how, unless they have been provided, by means of a person responsible for their safety, with suitable monitoring or instructions about the use of the equipment. Children must be monitored to ensure they do not play with the equipment.
Correct Disposal of this product
Dispose of packaging in an environmentally-friendly manner.
This appliance is labelled in accordance with European Directive 2012/19/EU concerning used electrical and electronic appliances (waste electrical and electronic equipment - WEEE). The guideline determines the frame work for the return and recycling of used appliances as applicable throughout to the EU.
PACKAGE INFORMATION: Packaging materials of the product are manufactured from recyclable materials in accordance with our National Environment Regulations. Do not dispose of the packaging materials together with the domestic or other wastes. Take them to the packaging material collection points designated by the local authorities.
Q. aspes
VITRINA VERTICAL
natural_image
Silhouette of a person pushing a cart with a 45-degree angle indicator (no text or symbols beyond the angle)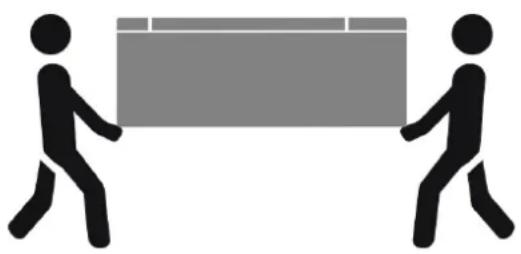
natural_image
Two stylized human figures carrying a large rectangular block (no text or symbols)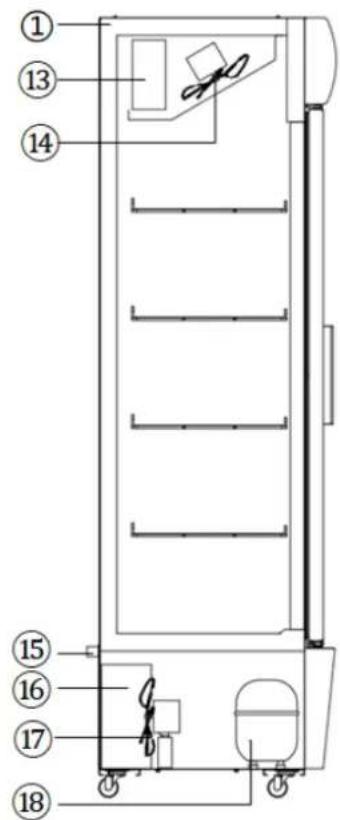
MANUEL D'INSTRUCTIONS
Transport et installation....2
Transport et installation
natural_image
Illustration of a person pushing a cart with a 45-degree angle标注 (no text or symbols beyond the angle)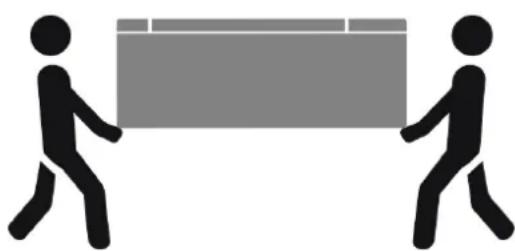
natural_image
Two stylized human figures carrying a large rectangular object, no text or symbols present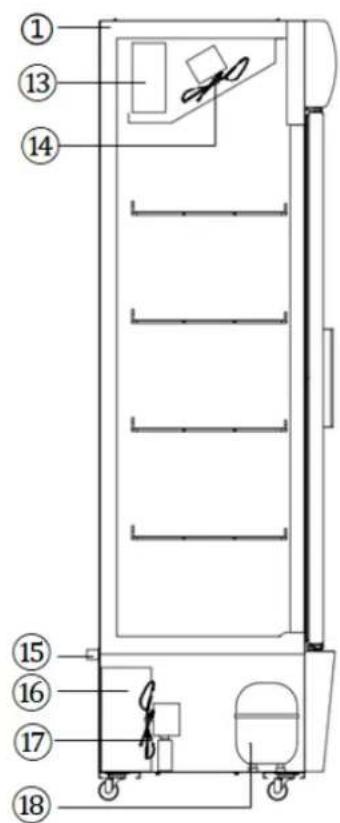
natural_image
Illustration of a person pushing a wheelbarrow with a 45-degree angle标注 (no text or symbols beyond the angle)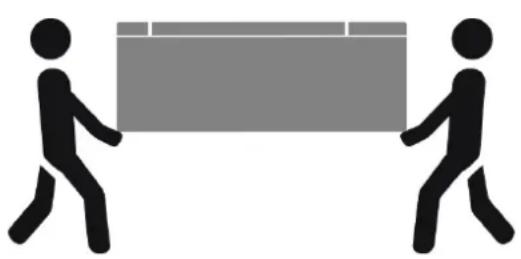
natural_image
Two stylized human figures pulling a large rectangular object (no text or symbols)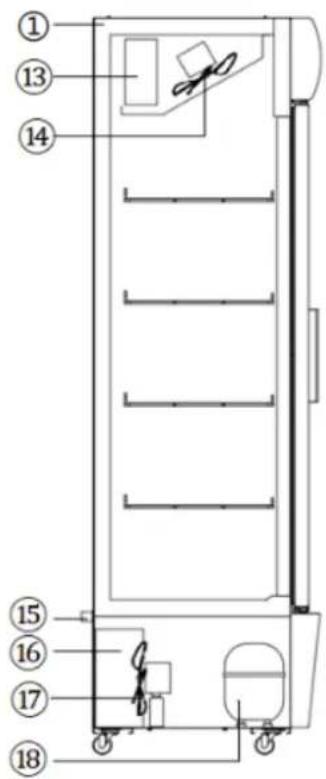
Note: product space demand size schematic diagram
| Index | Function | Normal operation | Start up | ||
| ON | OFF | Blink | |||
| 1 | Compressor | ON | OFF | Request | ON |
| 2 | Defrost | ON | OFF | Request | ON |
| 3 | Digit | 2 digit LED display with sign (-99 to 99) and decimal point | |||
Table.1
Table of functions activated by the buttons
| Index | Button | Normal operation | Start up | |
| pressing the button alone | pressed together | |||
| 1 |  | more than 3 s: toggle ON/OFF | pressed togetherdisplay defrostprobe temp. | --- |
| 2 |  | more than 3 s: start/stopdefrost | Pressed together startparameter resetprocedure | |
| 3 |  | 1 s: display/set the set point | --- | |
Table.2
| Trouble | Reason | Check | Solution | Remark | |
| No display on the display panel | The power plug is not properly plugged in | Plug in the power socket | Reconnect the power | ||
| Outage | Check the socket has electricity or not | Reconnect the power | |||
| key invalid | / | / | Contact our professional after-sales service technician | ||
| Lamp is not lighting on | No voltage | Fuse breaking off | Check fuse | Change fuse | Contact our professional after-sales service technician |
| Poor connection between the plug and socket | The connection lease or not | Repair or change socket | |||
| Have voltage | lamp has poor contact or worn down | Check the circuit and lamp | Tighten the connection or change a new lamp | ||
| Lamp switch has poor contact | Check the switch | Tighten the connection or change a new switch | |||
| Condenser fan not running | Condenser fan is broken down | check condenser fan resistance | Change condenser fan | Contact our professional after-sales service technician | |
| Condenser fan is blocked | clear the blocked | clear the blocked | |||
| Condenser fan | Temperature is | Open the door too frequently | / | / | Contact |
| operates continuously | too high inside of the cabinet | Too much storage | Air outlet is blocked | Take out part of the storage | professional after-sales personnel |
| Leakage of refrigerant. | / | Contact professional after-sales personnel | |||
| Noise | Cooler isn't placed levelly | Check if the four wheels adjusted to the same level and touching the ground | Adjust the wheels | Contact professional after-sales personnel | |
| Fixing screws of compressor or condenser fan are loose | Screws fixed tightly or not | Tighten the screws | |||
| Compressor or fan defective | Check the Compressor or fan | Contact professional after-sales personnel | |||
| Condenser fan is working, but the compressor doesn't operate | The terminal of starter or OLP is loose | Check the starter and OLP | Install the starter or OLP | Contact professional after-sales personnel | |
| Compressor defective | Check the resistance of compressor CSM terminal | Change new compressor | |||
| Voltage is lower than 187V | Check the input Voltage | Use a voltage stabilizer | |||
| Evaporator fan not running | No voltage/ Poor connection between the terminal | Check the resistance of switch | Change the switch | Contact professional after-sales personnel | |
| Evaporator fan broken down | Remove evaporator fan | Renew evaporator fan | |||
| Electrical cable Broken down | Change the electrical cable | Ask professional to maintain | |||
| Screen no display | Temperature display no voltage | Check the voltage | If it is necessary, please ask to the electrician to maintain. | ||
| Check the temperature display | |||||
| Screen display"E1" or "E2" | Sensor fault | Check the sensor | Ask professional to maintain | ||
| Power cord broken down | Not placed in correct position and broken during transportation | N/A | Change the power cord | Contact professional after-sales personnel | |
MANUAL DE INSTRUÇÕES
natural_image
Illustration of a person pushing a wheelbarrow with a 45-degree angle标注 (no text or symbols beyond the angle)
natural_image
Two stick figures carrying a large rectangular block (no text or symbols)