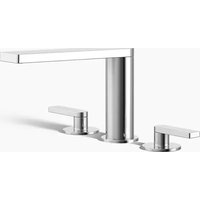
Composed K-73081-4 - Faucet KOHLER - Free user manual and instructions
Find the device manual for free Composed K-73081-4 KOHLER in PDF.


| Product Type | Bath/Deck Faucet |
| Brand | Kohler |
| Model | Composed K-73081-4 |
| Usage | Indoor, bathroom |
| Main Material | Chrome-plated brass |
| Mounting hole diameter | Up to 1-1/2 in (38 mm) |
| Maximum deck thickness | 3 in (76 mm) with reinforcement |
| Number of handles | 2 (levers) |
| Water supply | Hot and cold water via standard supply lines |
| Mounting type | Deck/rim mount with nuts and brackets |
| Main functions | Two-handle mixer, swivel spout |
| Maintenance | Clean with mild detergent and damp cloth |
| Warranty | Lifetime (residential use, original owner) |
| Country of manufacture | United States |
| Estimated weight | Approximately 2 kg |
Frequently Asked Questions - Composed K-73081-4 KOHLER
User questions about Composed K-73081-4 KOHLER
0 question about this device. Answer the ones you know or ask your own.
Ask a new question about this device
Download the instructions for your Faucet in PDF format for free! Find your manual Composed K-73081-4 - KOHLER and take your electronic device back in hand. On this page are published all the documents necessary for the use of your device. Composed K-73081-4 by KOHLER.
USER MANUAL Composed K-73081-4 KOHLER
Installation and Care Guide
Bath/Deck Mount Faucet
K-73081
Mproduct numbers are for Mexico (i.e. K-12345M)
WARNING: Riskofpersonalinjury. Do not install the bath faucet in an area where it may inadvertently be used for support by the bather.

CAUTION: Riskofpropertydamage. Select a cutting tool appropriate for the deck/rim surface type. Refer to the surface manufacturer's instructions for the proper cutting procedures.
IMPORTANT!Install to a finished deck only. Cannot be installed on a rough deck.
IMPORTANT! Do not install the spout or handles to a bath valve other than the one included. The spout and handles are not compatible with other valves.
□ Observe all local plumbing and building codes.
□ Shut off the water supply.
□ Protect the surface of the bath deck/rim during installation.
text_image
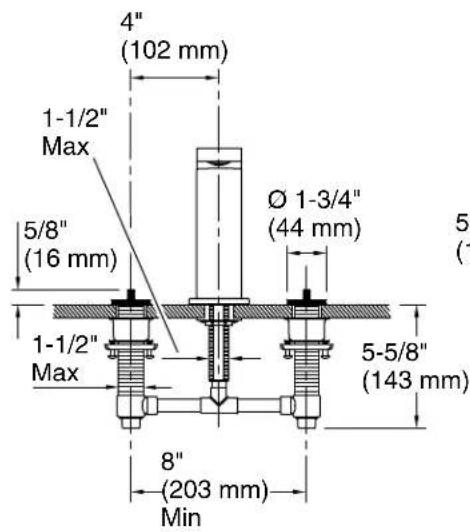
4" (102 mm) 1-1/2" Max 5/8" (16 mm) Ø 1-3/4" (44 mm) 5- (1 1-1/2" Max 5-5/8" (143 mm) 8" (203 mm) Min
text_image
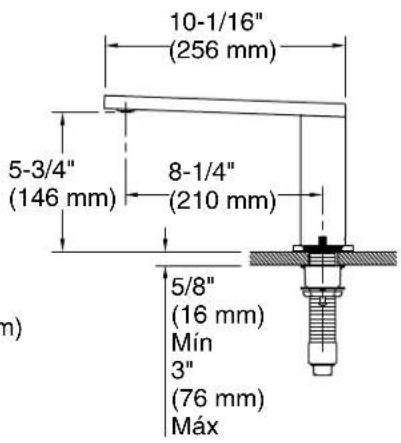
10-1/16" (256 mm) 5-3/4" (146 mm) 8-1/4" (210 mm) 5/8" (16 mm) Min 3" (76 mm) Max m)Roughing-In
1.PreparetheSite
NOTE: To simplify future servicing, install an access panel to reach the plumbing.
NOTICE: In standard installations, locate the valve bodies 4" (102 mm) from the spout center, as shown in the diagram. The valve bodies may be installed anywhere on the deck. Adjust the dimensions as needed.
☐ Determine the mounting hole locations for the spout and valves. Refer to the roughing-in dimensions illustrated for proper placement and diameter.
☐ Forafinishedbathdeck/rimlessthan5/8" (16mm)thick:Install wood reinforcement to the underside of the deck/rim. The combined thickness of the reinforcing material and the deck/rim must not exceed 3" (76 mm).

CAUTION: Riskofpropertydamage. Select a cutting tool appropriate for the deck/rim surface type. Refer to the surface manufacturer's instructions for proper cutting procedures.
PreparetheSite(cont.)
NOTICE: Do not exceed 1-1/2" (38 mm) hole diameters for the spout and valve body mounting holes. Maximum contact area is necessary for a successful installation.
□ Carefully cut mounting holes for the spout and side valves.
□ Install or relocate the water supplies as needed.
text_image
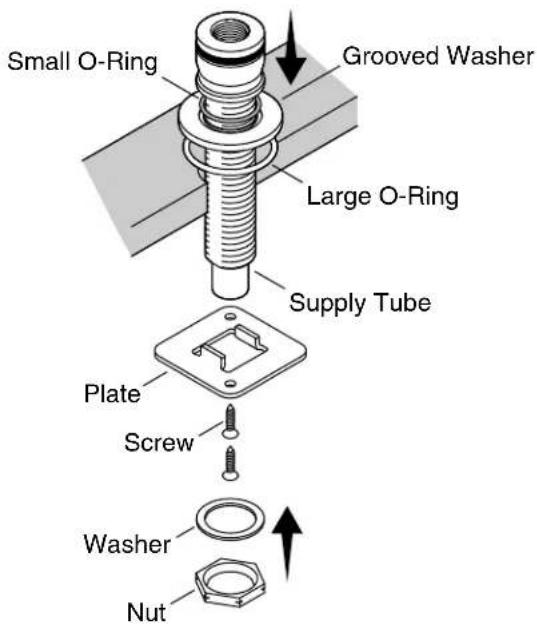
Small O-Ring Grooved Washer Large O-Ring Supply Tube Plate Screw Washer Nut2. InstalltheSupplyTube
☐ Insert the large O-ring into the large groove in the washer, and the small O-ring in the small groove on the opposite side of the washer.
☐ With the large O-ring in the washer and facing down, position the washer over the mounting hole. Carefully insert the supply tube assembly through the washer and mounting hole.
☐ Orient the tabs on the plate up. Slide the plate onto the supply tube assembly from underneath until flush with the underside of the deck/rim. Secure with the screws. Slide the flat washer onto the supply tube assembly, then wrench tighten the nut.
☐ Install the pipe plug (not shown) into the top of the supply tube.

text_image
Collar Setscrew Dished Washer Washer Threaded Ring Valve Body3. InstalltheValveBodies
☐ Measure the thickness of the finished deck. If the deck is less than 1-1/4" (32 mm), use a dished washer. If the deck is more than 1-1/4" (32 mm) thick, you may use or discard the dished washer.
□ Apply plumbers putty or sealant to the underside of a collar.
☐ Partially thread two screws into a threaded ring as shown.
☐ Assemble a threaded ring, washer, and dished washer (if used) down one of the valve bodies as far as possible.
□ From underneath, insert the valve body through the mounting hole.
□ From above, thread the collar onto the valve until it stops.
☐ Lift up the valve body to expose the collar setscrew. Then tighten the collar setscrew.
□ Repeat for the second valve body.
1276523-2-A 6 Kohler Co.
text_image
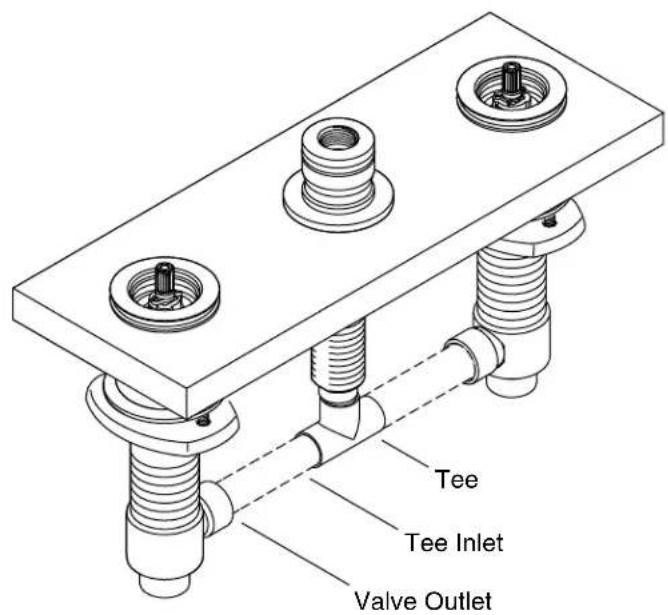
Tee Tee Inlet Valve Outlet4.CuttheTubing
☐ If the tee is not attached to the spout tube, attach it now.
☐ Measure the distance between the tee inlets and each valve body outlet.
□ Cut the tubing to fit.
□ Pivot the valve bodies, and install the two pieces of tubing.
□ Confirm the tubes are cut to the correct lengths.
text_image
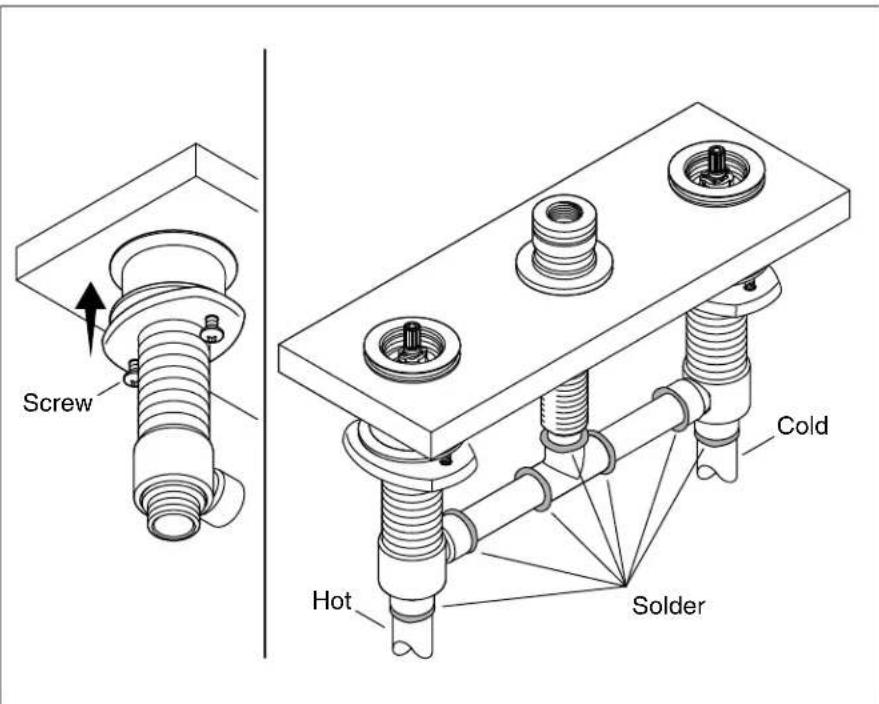
Screw Cold Hot Solder5.SecuretheValves
☐ Turn the threaded ring up each valve body until finger tight, then use a Phillips screwdriver to securely tighten the threaded ring screws.
□ Clean away any excess plumbers putty from the deck.
- Connect the hot and cold valve bodies to the appropriate water supply lines.
□ Solder the connections.
1276523-2-A 8 Kohler Co.
natural_image
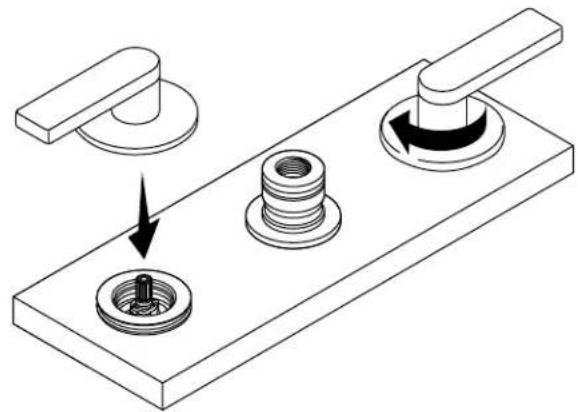
Technical illustration of a mechanical assembly with three components and a directional arrow indicating rotation (no text or symbols)6. InstalltheHandles
NOTE: Lever handles should be parallel to the bath rim when the handles are in the OFF position. The handles should point toward the bath when in the ON position.
□ Align a handle assembly onto the collar. Press down and turn the bonnet to secure the handle assembly.
□ Repeat for the second handle.
□ Open and close the handles to confirm alignment and unobstructed operation.
text_image
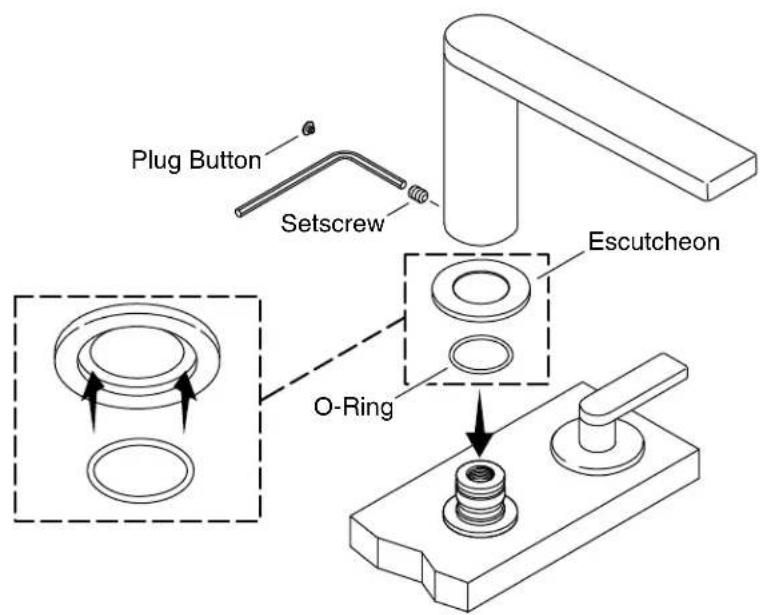
Plug Button Setscrew Escutcheon O-Ring7. Complethethel Installation
□ Make sure the faucet valves are closed.
□ Open the water supplies to the faucet.
□ Check for leaks, and repair as needed.
□ Close the water supplies.
□ Remove the plug from the supply tube.
□ Press the O-ring into the groove in the underside of the escutcheon.
☐ Install the spout and escutcheon onto the supply tube.
□ Align the spout, and secure with the setscrew.
□ Press the plug button into the setscrew hole.
□ Turn the water supplies on.
□ Run water through the spout, and check for leaks.
1276523-2-A 10 Kohler Co.
CareandCleaning
For best results, keep the following in mind when caring for your KOHLER product:
- Use a mild detergent such as liquid dishwashing soap and warm water for cleaning. Do not use abrasive cleaners that may scratch or dull the surface.
- Carefully read the cleaner product label to ensure the cleaner is safe for use on the material.
- Always test your cleaning solution on an inconspicuous area before applying to the entire surface.
• Do not allow cleaners to sit or soak on the surface. - Wipe surfaces clean and rinse completely with water immediately after cleaner application. Rinse and dry any overspray that lands on nearby surfaces.
- Use a soft, dampened sponge or cloth. Never use an abrasive material such as a brush or scouring pad to clean surfaces.
For detailed cleaning information and products to consider, visit www.kohler.com/clean. To order Care & Cleaning information, call 1-800-456-4537.
Warranty
KOHLER® FaucetLifetimeLimitedWarranty
Kohler Co. warrants its Faucets* manufactured after January 1, 1997, to be leak and drip free during normal residential use for as long as the original consumer purchaser owns his or her home. If the Faucet should leak or drip during normal use, Kohler Co. will, free of charge, mail to the purchaser the cartridge necessary to put the Faucet in good working condition. This warranty applies only to Kohler Faucets installed in the United States of America, Canada or Mexico ("North America").
Kohler Co. also warrants all other aspects of the faucet or accessories ("Faucet")*, (except gold, non-Vibrant, non-chrome finishes) to be free of defects in material and workmanship during normal residential use for as long as the original consumer purchaser owns his or her home. This warranty applies only to Kohler Faucets installed in North America. If a defect is found in normal residential use, Kohler Co. will, at its election, repair, provide a replacement part or product, or make appropriate adjustment. Damage to a product caused by accident, misuse, or abuse is not covered by this warranty. Improper care and
Warranty(cont.)
cleaning will void the warranty**. Proof of purchase (original sales receipt) must be provided to Kohler Co. with all warranty claims. Kohler Co. is not responsible for labor charges, installation, or other incidental or consequential costs. In no event shall the liability of Kohler Co. exceed the purchase price of the Faucet.
If the Faucet is used commercially or is installed outside of North America, or if the finish is gold, non-Vibrant or a painted or powder coated color finish, Kohler Co. warrants the Faucet to be free from defects in material and workmanship for one (1) year from the date the product is installed, under Kohler Co.'s standard one-year limited warranty.
If you believe that you have a warranty claim, contact Kohler Co., either through your Dealer, Plumbing Contractor, Home Center or E-tailer, or by writing Kohler Co., Attn.: Customer Care Center, 444 Highland Drive, Kohler, WI 53044, USA. Please be sure to provide all pertinent information regarding your claim, including a complete description of the problem, the product, model number, color, finish, the date the product was purchased and from whom the product was purchased. Also include your original invoice. For other information, or to obtain the name and address of the service and repair facility nearest you, call 1-800-4-KOHLER (1-800-456-4537) from within the USA and Canada, and 001-800-456-4537 from within Mexico, or visit www.kohler.com within the USA, www.ca.kohler.com from within Canada, or www.mx.kohler.com in Mexico.
KOHLERCO.AND/ORSELLERAREPROVIDINGTHESE WARRANTIESINLIEUOFALLOTHERWARRANTIES, EXPRESSEDORIMPLIED,INCLUDINGBUTNOTLIMITEDTO THEIMPLIEDWARRANTIESOFMERCHANTABILITYAND FITNESSFORAPARTICULARPURPOSE.KOHLERCO.AND/OR SELLERDISCLAIMALLLIABILITYFORSPECIAL,INCIDENTAL ORCONSEQUENTIALDAMAGES.Somestates/provincesdonot allowlimitationsofhowlonganimpliedwarrantylastsorthe exclusionorlimitationofsuchdamages,sotheselimitationsand exclusionsmaynotapplytoyou.Thiswarrantygivestheconsumer specificlegalrights.Youmayalsohaveotherrightsthatvaryfrom state/provincetostate/province.
ThisisKohlerCo.'sexclusivewrittenwarranty.
*Trend® faucets, MasterShower® tower, BodySpa systems and components; WaterHaven® tower, systems and components; Tripoint® faucets, Polished Gold, non-Vibrant and painted or powder coated finishes, fittings; all items within the "Fixture Related" section of the Kohler Faucets Price Book, drains, Duostrainer® sink strainers,
Warranty(cont.)
soap/lotion dispensers, Moxie ^® Wireless Speaker; and faucets used in commercial settings, and outside North America, are covered by Kohler Co.'s one-year limited warranty.
**Never use cleaners containing abrasive cleansers, ammonia, bleach, acids, waxes, alcohol, solvents or other products not recommended for chrome. This will void the warranty.
Warranty
ForMexico
KOHLER CO.
It is recommended that at the time of purchase, you verify that all accessories and components are complete in this package.
This Kohler product is warranted to be free of defects in material and workmanship for one (1) year from the date of purchase as shown on the invoice or receipt.
- Kohler Co. will only service its commercialized products through its authorized distributors.
- To obtain warranty service, please present the invoice and corresponding warranty.
- Through its authorized distributors, Kohler Co. promises to repair the defective product or provide a new replacement or an equivalent model (in those cases that the model has been discontinued) when the product is beyond repair, without any charge to the consumer.
- The time of repair will not exceed six (6) weeks commencing on the date the product is received.
- It is recommended that the consumer save the invoice or receipt as additional protection, as it may substitute the warranty in the case that there is a discrepancy in the validity of the warranty.
EXCEPTIONS AND RESTRICTIONS
The Warranty will not be valid in the following cases:
- When the product is not operated in accordance with the instructions concerning use and operation set forth in the owner's manual or installation instructions, and when the recommendations and warnings included are not observed.
- When the product has been modified or dismantled partially or totally; or has been used in a negligent fashion and as a consequence has suffered damages attributable to the consumer, individual, or
Warranty(cont.)
hardware not authorized by Kohler Co.
- This warranty does not cover the damages as a result of disaster such as fire or acts of God, including flooding, earthquake, or electric storms, etc. To obtain a list of distributors in your area where you can exercise your rights under this warranty, please call 001-800-456-4537.
KOHLER CO., KOHLER, WI 53044 U.S.A.
IMPORTER:
text_image
4" (102 mm) 1-1/2" Max 5/8" (16 mm) Ø 1-3/4" (44 mm) 5- (1 1-1/2" Max 5-5/8" (143 mm) 8" (203 mm) Min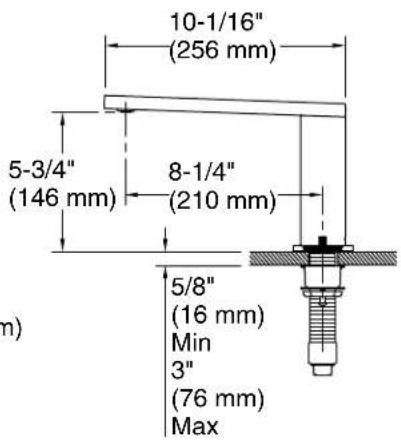
text_image
10-1/16" (256 mm) 5-3/4" (146 mm) 8-1/4" (210 mm) 5/8" (16 mm) Min 3" (76 mm) Max m)Raccordement
1. Préparerlesite
text_image
Vis Chaud Froid Brasure5.Fixerlesvannesenplace
natural_image
Technical illustration of a mechanical switch mechanism with three components and a rotating knob (no text or symbols)EXCEPTIONS ET RESTRICTIONS
text_image
4" (102 mm) 1-1/2" Máx 5/8" (16 mm) Ø 1-3/4" (44 mm) 5- (1 1-1/2" Máx 5-5/8" (143 mm) 8" (203 mm) Mín