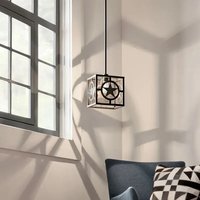
Branko 82335 - Lamp Kichler - Free user manual and instructions
Find the device manual for free Branko 82335 Kichler in PDF.


| Brand | Kichler |
| Model | Branko 82335 |
| Product type | Indoor luminaire (pendant lamp) |
| Maximum bulb wattage | 60 watts (medium base E26/E27) |
| Compatible bulb type | Incandescent, CFL, LED (not included) |
| Supply voltage | 108-132 VAC, 60 Hz (North American standard) |
| Main material | Metal (lacquered finish) |
| Adjustable height | Yes, using threaded rods of 15 cm and 30 cm (total length adjustable) |
| Mounting kit included | Mounting bracket, screws, caps, chain, loop, rods |
| Certification | ETL or C.S.A. (depending on installation) |
| Warranty | 1 year (indoor luminaires) |
| Care and cleaning | Soft damp cloth, non-abrasive soap. Do not use glass cleaner. |
| Safety instructions | Turn off power before installation. Do not exceed 60 W. Use a qualified electrician if in doubt. |
| Spare parts available | Yes (mounting bracket, link, loop, rods, caps, screws, threaded knobs) |
| Customer service | 1-800-554-6504 (Monday-Friday, 8 am-4:30 pm EST) |
Frequently Asked Questions - Branko 82335 Kichler
User questions about Branko 82335 Kichler
0 question about this device. Answer the ones you know or ask your own.
Ask a new question about this device
Download the instructions for your Lamp in PDF format for free! Find your manual Branko 82335 - Kichler and take your electronic device back in hand. On this page are published all the documents necessary for the use of your device. Branko 82335 by Kichler.
USER MANUAL Branko 82335 Kichler
Serial Number Purchase Date

Intertek

Questions, problems, missing parts? Before returning to your retailer, call our customer service department at 1-800-554-6504, 8 a.m. - 4:30 p.m, EST, Monday - Friday.
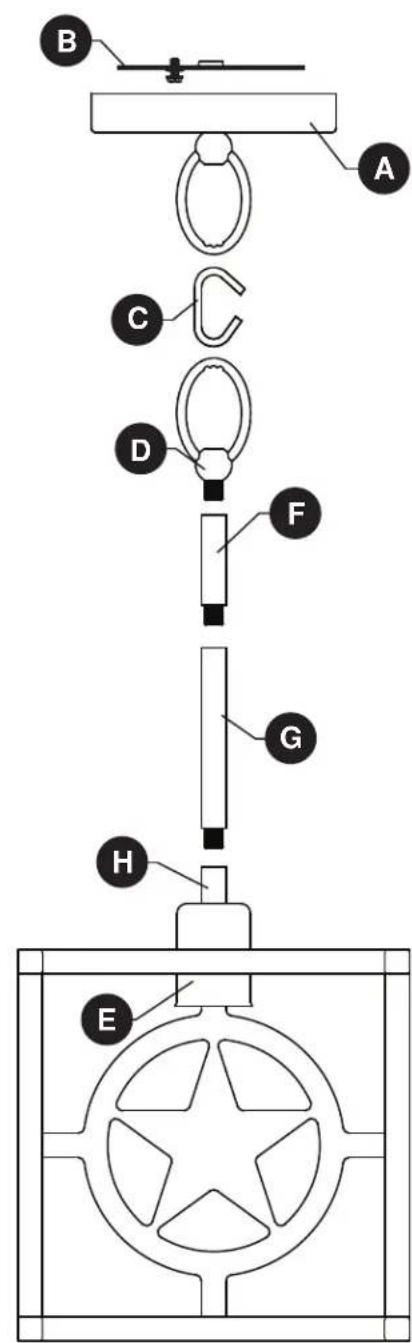
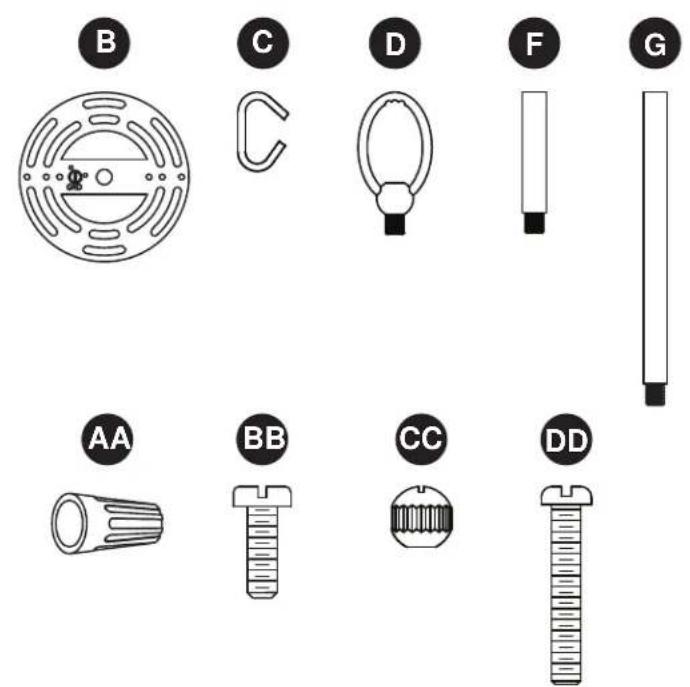
| PART | DESCRIPTION | QTY. |
| A | Canopy | 1 |
| B | Mounting Bracket | 1 |
| C | Open Chain Link | 1 |
| D | Fixture Loop | 1 |
| PART | DESCRIPTION | QTY. |
| E | Socket | 1 |
| F | 6" Threaded Pipe | 2 |
| G | 12" Threaded Pipe | 2 |
| H | Coupling | 1 |
| AA | BB | ● | DD |
| Wire Connector Qty: 3 | Short Machine Screw Qty: 2 | Threaded Knob Qty: 2 | Long Machine Screw Qty: 2 |

SAFETY INFORMATION
Please read and understand this entire manual before attempting to assemble, operate or install the product.

WARNING
- IMPORTANT: NEVER attempt any work without shutting off the electricity.
- Place the main power switch in the "OFF" position and unscrew the fuse(s), or switch "OFF" the circuit breaker switch(es), that control the power to the fixture or room you are working in.
- Place the wall switch in the "OFF" position. If the fixture to be replaced has a switch or pull chain, place it in the "OFF" position.
- Do not use bulbs with wattage greater than specified on this fixture.
California Proposition 65
WARNING: This product can expose you to lead, which is known to the State of California to cause cancer, birth defects or other reproductive harm. For more information go to www.p65warnings.ca.gov
CAUTION
- If you have any doubts about how to install this lighting fixture, or if the fixture fails to operate completely, please contact a licensed electrical contractor.
- All parts must be used as indicated in these instructions. Do not substitute any parts, leave parts out, or use any parts that are worn out or broken. Failure to obey this instruction could invalidate ETL listing and/or C.S.A. certification of this fixture.
PREPARATION
Before beginning assembly of product, make sure all parts are present. Compare parts with package contents list and hardware contents list. If any part is missing or damaged, do not attempt to assemble the product.
Estimated assembly time: 30 minutes to 1 hour
Tools Required for Assembly (not included): Phillips screwdriver, flathead screwdriver, wire strippers, electrical tape, ladder, safety glasses.
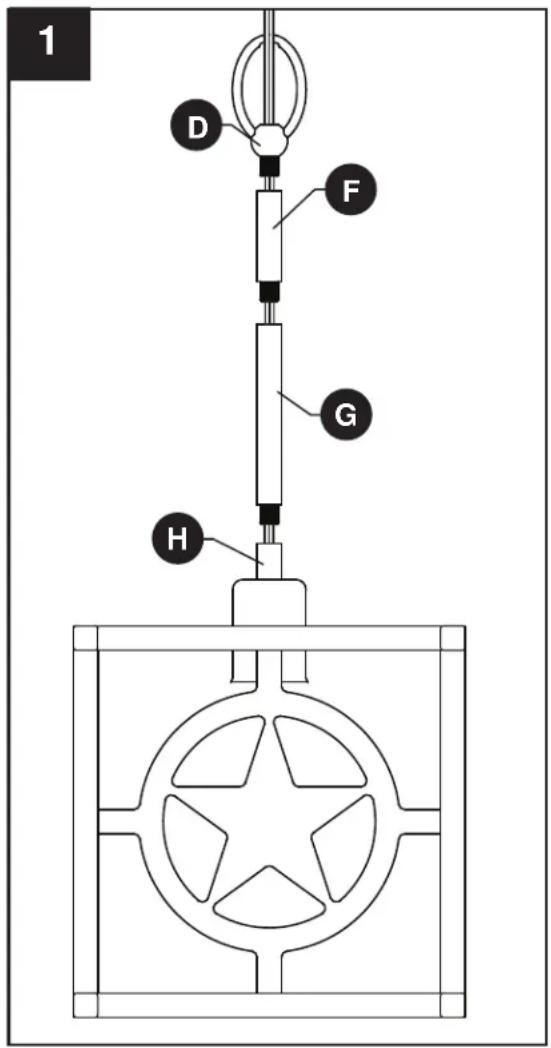
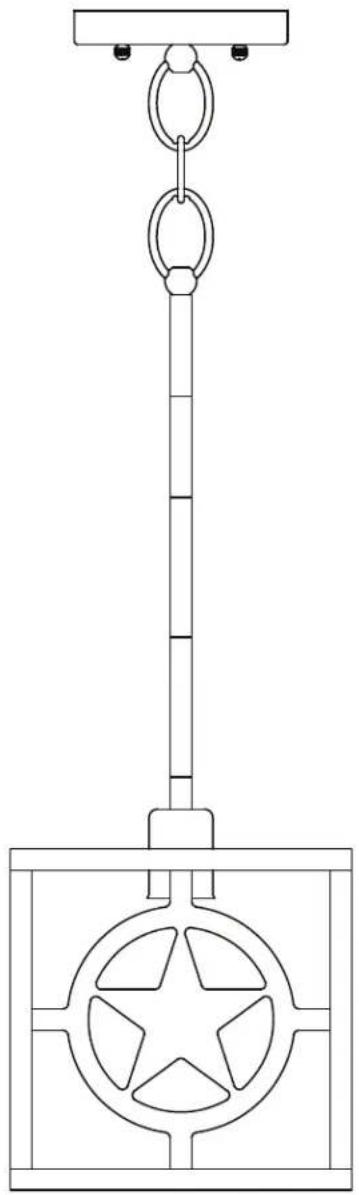
- Screw 12 inch threaded pipe (G) into coupling (H). Next, screw 6 inch threaded pipe (F) into 12 inch threaded pipe (G). Finally, screw fixture loop (D) into 6 inch threaded pipe (F).
Note: The electrical cable will need to get pulled through the individual parts as they are installed on this and later steps.
Note: The hanging height for this fixture is adjustable. Add or subtract threaded pipes to achieve the desired height.
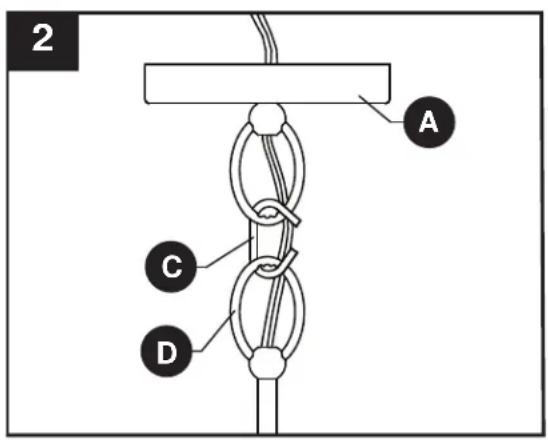
- Using the open chain link (C), connect fixture loop (D) to canopy (A).
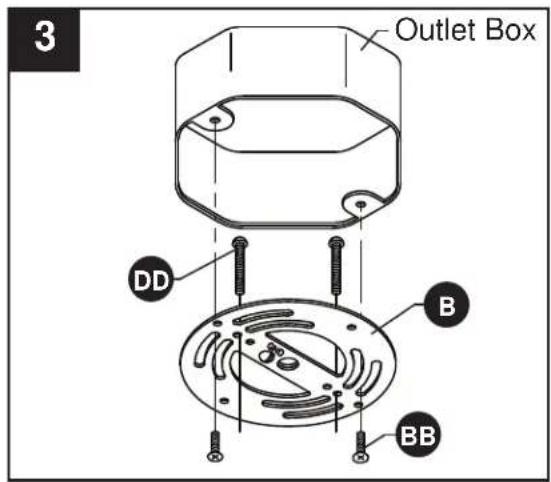
- Insert long machine screws (DD) through mounting bracket (B) so the long machine screws (DD) protrude downward. Connect the mounting bracket (B) to the outlet box with short machine screws (BB).
Hardware Used
| BB | Short Machine Screw | 3 | x2 |
| DD | Long Machine Screw | 3 | x2 |
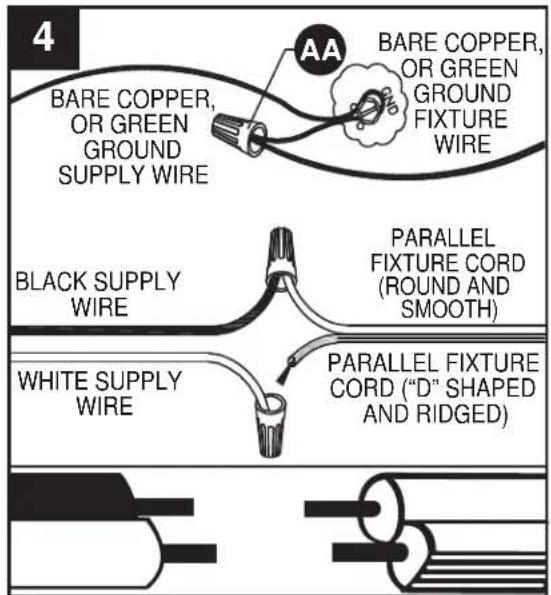
- Wire connection guide:
Ground wire:
- For installation in the United States: Wrap ground wire from outlet box around ground screw preassembled on mounting bracket (B) no less than 2 in. from wire end. Tighten ground screw. If fixture is supplied with a ground wire, connect to outlet ground wire with a wire connector (AA).
- For installation in Canada: If fixture is supplied with ground wire, wrap ground wire around ground screw on mounting bracket (B). Tighten ground screw. Connect fixture ground wire to outlet ground wire with the wire connector (AA).
Supply wires:
- Connect the Neutral (White) supply wire from the outlet box to the Neutral fixture wire (Parallel Cord "D" shaped and ribbed).
- Connect the Hot (Black) supply wire from the outlet box to the Hot fixture wire (Parallel Cord round and smooth).

Hardware Used

x 3Wire Connector
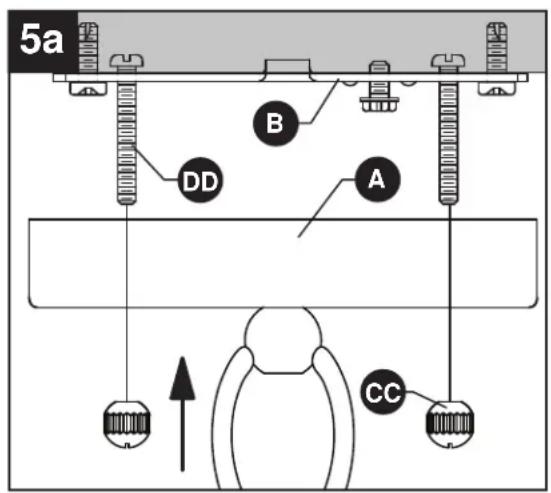
5a. Pass canopy (A) over the long machine screws (DD) protruding from the mounting bracket (B) and secure in place with threaded knobs (CC).
Hardware Used

Threaded Knob

X2
NOTE: The bottom edge of an outlet box should be flush with the bottom surface of a ceiling. However, many boxes are recessed into the ceiling. The long machine screws (DD) are designed to have extra length to accommodate to various box depths.
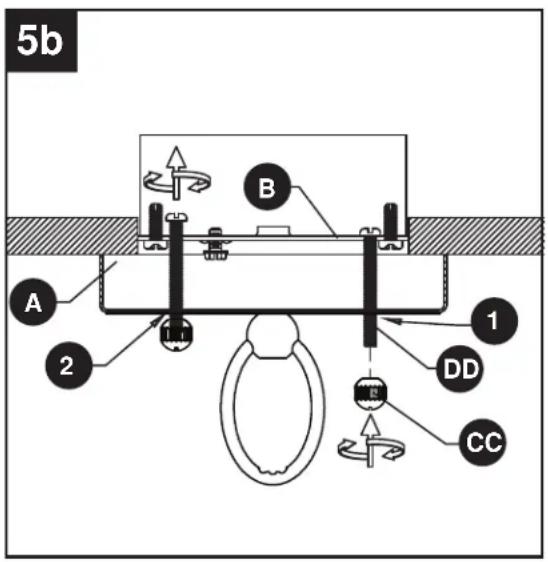
5b.
1) The long machine screws (DD) may, at first, protrude too far past the surface of the canopy (A).
2) Screw the threaded knobs (CC) onto the long machine screws (DD). The screws will back thread into the mounting bracket (B) until the canopy (A) is tight against the ceiling.
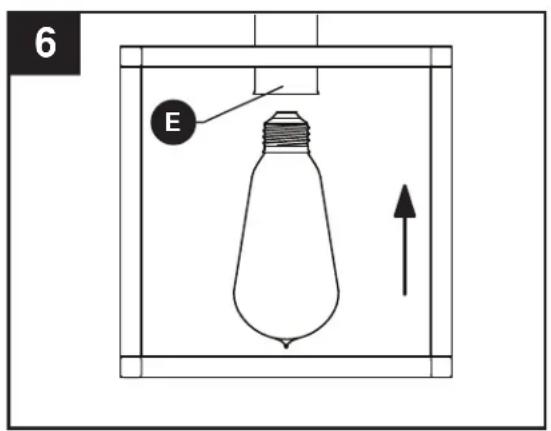
6. Insert 60-watt max. medium-base bulb or CFL/LED equivalent (none included) into socket (E).
- Always be certain that electric current is turned off before cleaning this item.
- Use a soft, moist cloth with mild non-abrasive soap to clean fixture. Never use glass cleaner on fixture, as it will damage the metal finish.
TROUBLESHOOTING
| PROBLEM | POSSIBLE | CAUSE | CORRECTIVE |
| Fixture does not light. | 1. Fixture may be wired incorrectly. 2. Worn or broken bulb. 2. Replace bulb. | 1. Check wiring. | |
Indoor Lighting Warranty
Kichler Lighting LLC ("Kichler Lighting") warrants the following catalogued products and component parts to the original consumer purchaser or commercial purchaser, as applicable, to be free from defects in material and workmanship for the applicable period specified below.
Indoor Lighting Fixtures
One (1) year from the date of purchase.
LED Light Engine and Electrical Components
Five (5) years from the date of purchase when the lighting fixture containing the LED light engine and electrical components is installed in a single family residence by the original consumer purchaser. For commercial purchasers, the warranty period is three (3) years from the date of purchase.
Indoor Lighting Fixtures with Energy Star® Label
Three (3) years from the date of purchase.
Special Order (non-catalogued) Indoor Lighting Fixtures
One (1) year from the date of purchase.
What We Will Do
Kichler Lighting, at its sole discretion, will repair or replace, free of charge, during the applicable warranty period, any product or component part (as described above) that proves defective in material and/or workmanship under normal installation, use and service. If repair or replacement is not practical, Kichler Lighting may elect to refund the purchase price in exchange for the return of the product. Replacement parts are subject to availability and may differ from those originally supplied. These are your exclusive remedies.
What Is Not Covered
The following carry no warranty other than the manufacturer's warranty:
Non-LED light bulbs supplied by, but not manufactured by, Kichler Lighting
- Non-Kichler branded LED light bulbs supplied by, but not manufactured by, Kichler Lighting
This warranty does not cover polished brass finishes on the products described above. This warranty does not cover damage resulting from reasonable wear and tear, voltage outside of the North American Standard Voltage Range 108 to 132 VAC (60HZ), acts of God, misuse (including use of the product for an unintended application), abuse, improper packaging of product returned to Kichler Lighting, neglect and improper or incorrect installation, maintenance or repair, including failure to follow the applicable care and cleaning instructions. Kichler Lighting recommends using a professional electrician for all installation and repair of its products.
What You Must Do to Obtain Warranty Service or Replacement Parts
A warranty claim may be made by returning the product to the distributor or retailer from whom you purchased the product with proof of purchase (original sales receipt) and a written claim briefly describing the defect.
If the distributor or retailer is not available, or if you have questions about this warranty, please contact us by mail or online as follows (please include your model number and date of purchase):
Kichler Lighting LLC
7711 East Pleasant Valley Rd
Cleveland, OH 44131
http://www.kichler.com/customer-service/contact-us/.aspx
Limitation on Duration of Implied Warranties
Note: Some states/provinces (including Quebec) do not allow limitations on how long an implied warranty lasts, so the below limitation may not apply to you. TO THE EXTENT PERMITTED BY LAW, ANY IMPLIED WARRANTY, INCLUDING THE IMPLIED WARRANTYES OF MERCHANTABILITY AND OF FITNESS FOR A PARTICULAR PURPOSE, IS LIMITED TO THE STATUTORY PERIOD OR THE DURATION OF THIS WARRANTY, WHICHEVER IS SHORTER.
Limitation of Special, Incidental or Consequential Damages
Note: Some states/provinces (including Quebec) do not allow the exclusion or limitation of special, incidental or consequential damages, so the below limitations and exclusions may not apply to you. Notice to residents of the State of New Jersey: The provisions of this warranty, including its limitations, are intended to apply to the fullest extent permitted by the laws of the State of New Jersey. KICHLER LIGHTING SHALL NOT BE LIABLE FOR ANY SPECIAL, INCIDENTAL OR CONSEQUENTIAL DAMAGES (INCLUDING LABOR CHARGES TO REPAIR, REPLACE, INSTALL OR REMOVE THIS PRODUCT), WHETHER ARISING OUT OF BREACH OF ANY EXPRESS OR IMPLIED WARRANTY, BREACH OF CONTRACT, TORT, OR OTHERWISE.
Additional Rights
This warranty gives you specific legal rights. You may also have other rights which vary by state or province.
This warranty is not transferable.
For replacement parts, call our customer service department at 1-800-554-6504, 8 a.m. - 4:30 p.m., EST, Monday - Friday.
| PART | DESCRIPTION | PART # | |
| B | Mounting Bracket | XBAR05 | |
| C | Open Chain Link LINK-AGZ | ||
| D | Fixture Loop | FL82335-AGZ | |
| F | 6 inch Threaded Pipe PIPEX6-AGZ | ||
| G | 12 inch Threaded Pipe PIPEX12-AGZ | ||
| AA | Wire Connector | WC001 | |
| BB | Short Machine Screw SCR832X050 | ||
| CC | Threaded Knob | TK1X832-AGZ | |
| DD | Long Machine Screw SCR832X150 | ||
JOIGNEZ VOTRE REÇU ICI
Kichler Lighting LLC
7711 East Pleasant Valley Rd
Cleveland, OH 44131, USA
http://www.kichler.com/customer-service/contact-us/.aspx
ADJUNTE SU RECIBO AQUI
- Insert long machine screws (DD) through mounting bracket (B) so the long machine screws (DD) protrude downward. Connect the mounting bracket (B) to the outlet box with short machine screws (BB).
Hardware Used
| BB | Short Machine Screw | 3 | x2 |
| DD | Long Machine Screw | 3 | x2 |
Kichler Lighting LLC
7711 East Pleasant Valley Rd
Cleveland, OH 44131
http://www.kichler.com/customer-service/contact-us/.aspx