GLH-S-28FB - Mechanical chipper Gardol - Free user manual and instructions
Find the device manual for free GLH-S-28FB Gardol in PDF.


| Product type | Mechanical chipper |
| Brand | Gardol |
| Model | GLH-S-28FB |
| Dimensions (L x W x H) | 675 x 455 x 900 mm |
| Weight | 20.8 kg |
| Power supply | 230-240 V~, 50 Hz |
| Rated power input | 2500 W |
| Maximum branch diameter | 44 mm |
| Number of blades | 8 |
| Blade shaft speed | 60 min⁻¹ |
| Collection tank volume | 60 L |
| Transport wheels | Ø 175 mm |
| Guaranteed sound power level | 94 dB(A) |
| Operating mode | P40 |
| Main functions | On/off, rotation direction reverse, overload protection, counter blade adjustment |
| Maintenance and cleaning | Clean with brush or cloth, do not spray water, check fastenings |
| Safety | FI protection switch ≤30 mA, gloves and goggles mandatory, tank lock |
| Wear parts | Carbon brushes, blades, roller |
| Repairability | Repairs only by authorized service center, use of original parts |
| Warranty | Legal warranty, defective parts replaced free of charge |
| General information | Intended use: shredding branches, garden waste, paper, cardboard. Do not shred stones, glass, metal. |
Frequently Asked Questions - GLH-S-28FB Gardol
User questions about GLH-S-28FB Gardol
0 question about this device. Answer the ones you know or ask your own.
Ask a new question about this device
Download the instructions for your Mechanical chipper in PDF format for free! Find your manual GLH-S-28FB - Gardol and take your electronic device back in hand. On this page are published all the documents necessary for the use of your device. GLH-S-28FB by Gardol.
USER MANUAL GLH-S-28FB Gardol
natural_image
Exterior view of a black and white industrial water purifier with a wheeled cart (no visible text or symbols)GLH-S-28FB
| DE | LeisehäckslerOriginalbedienungsanleitung | 5 |
| GB | Quiet shredderTranslation of original instruction manual | 17 |
| FR | Broyeur silencieuxTraduction des instructions d'origine | 27 |
| IT | Trinciatrice silenziosaTraduzioni del manuale d'uso originale | 38 |
A
natural_image
Top-down view of a medical or rehabilitation device with adjustable arms and central basin (no visible text or symbols)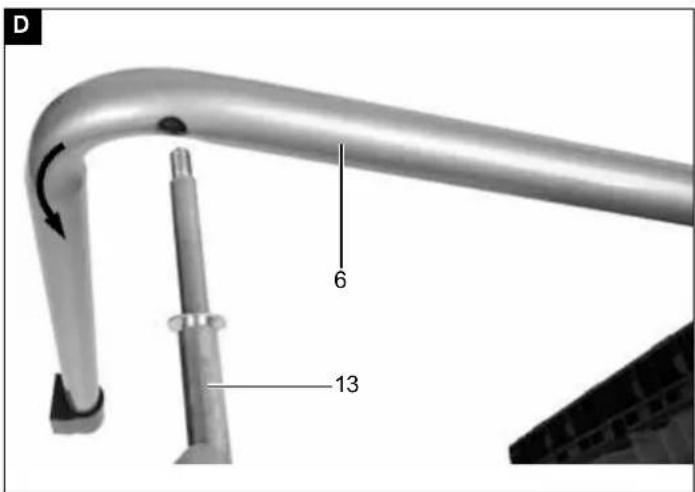
natural_image
Two views of a white industrial water purifier device with wheels and a container, showing internal components and a labeled dimension (8) — no text or symbols present.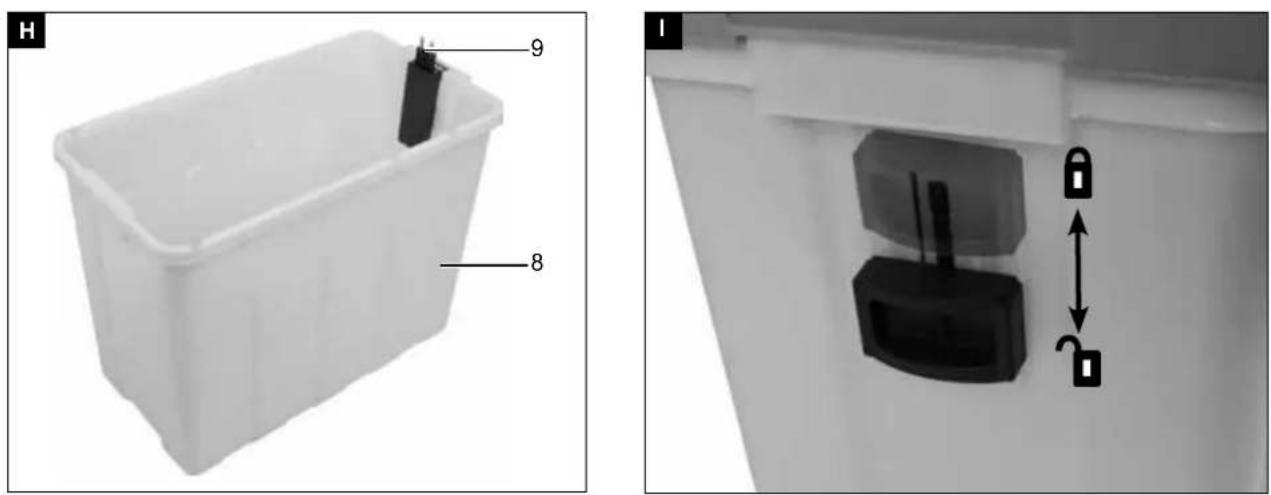
natural_image
Two views of a white plastic container with labeled parts: one showing a small black clip, the other showing a black padlock with an upward arrow and square symbol (no text or symbols on the objects themselves)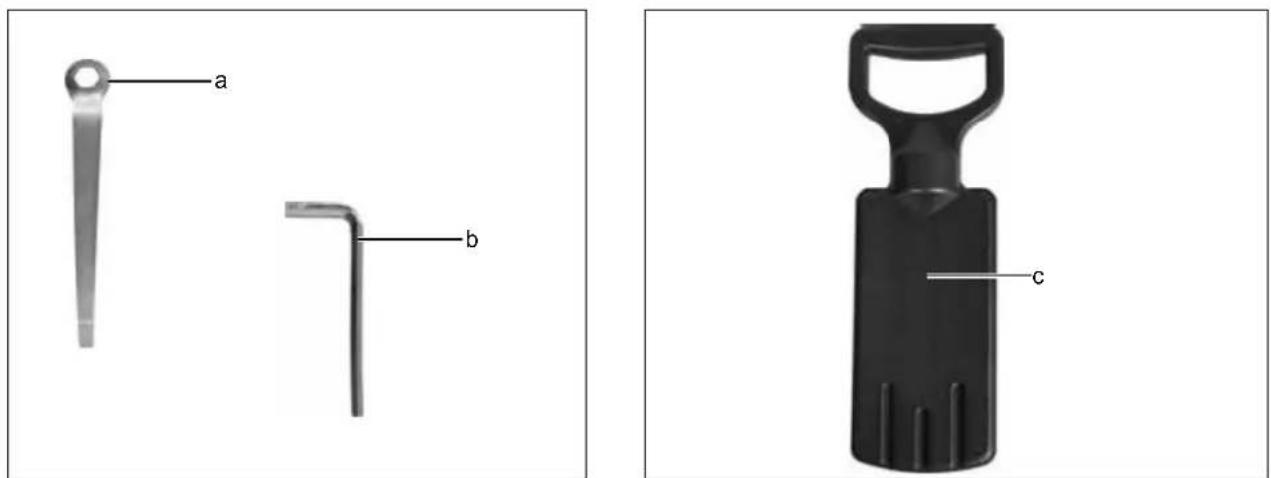
Günzburger Straße 69
D-89335 Ichenhausen
Verehrter Kunde
Explanation of symbols
The use of symbols in this manual is intended to draw your attention to possible risks. The safety symbols and the explanations that accompany them must be perfectly understood. The warnings in themselves do not remove the risks and cannot replace correct actions for preventing accidents.
 | Read, understand and follow all warnings |
 | Read the whole text of the operating instructions thoroughly before start up. |
 | Wear eye and ear protection. |
 | Wear protective gloves when using the device! |
 | Do not misuse as a step! |
 | Keep away all animals and persons not working on the machine! |
 | Protect the tool from getting wet. |
 | Pull out the mains plug. |
 | Danger - Objects may be ejected when the machine is in operation. |
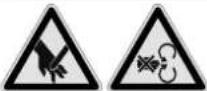 | Keep hands and feet outside of the openings when the machine is running. |
 | Guaranteed sound power level. |
 | Locking mechanism open |
 | Locking mechanism closed |
[3KK3] | The product complies with the applicable European directivesProtection class 2 |
 | Counter blade setting |
 | Forward/reverse run |
 | Weight |
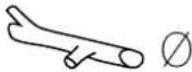 | Branch thickness ∅ |
 | Blade cylinder revolutions |
| ⚠ Caution! | In these operating instructions we have marked the places that have to do with your safety with this sign. |
Table of contents: Page:
- Introduction 20
- Device description (Fig. A).... 20
- Scope of delivery....20
- Intended use....21
- Safety information 21
- Technical data 23
- Before starting the equipment....23
- Montage 23
- Operation 24
- Electrical connection....24
- Cleaning an maintenance 25
- Storage.... 26
- Disposal and recycling 26
- Troubleshooting....26
1. Introduction
Manufacturer:
scheppach
Günzburger Straße 69
D-89335 Ichenhausen
Dear Customer,
we hope your new tool brings you much enjoyment and success.
Note:
According to the applicable product liability laws, the manufacturer of the device does not assume liability for damages to the product or damages caused by the product that occurs due to:
- Improper handling,
• Non-compliance of the operating instructions, - Repairs by third parties, not by authorized service technicians,
• Installation and replacement of non-original spare parts,
• Application other than specified, - A breakdown of the electrical system that occurs due to the non-compliance of the electric regulations and VDE regulations 0100, DIN 57113 / VDE0113.
We recommend:
Read through the complete text in the operating instructions before installing and commissioning the device.
The operating instructions are intended to help the user to become familiar with the machine and take advantage of its application possibilities in accordance with the recommendations.
The operating instructions contain important information on how to operate the machine safely, professionally and economically, how to avoid danger, costly repairs, reduce downtimes and how to increase reliability and service life of the machine.
In addition to the safety regulations in the operating instructions, you have to meet the applicable regulations that apply for the operation of the machine in your country. Keep the operating instructions package with the machine at all times and store it in a plastic cover to protect it from dirt and moisture. Read the instruction manual each time before operating the machine and carefully follow its information.
The machine can only be operated by persons who were instructed concerning the operation of the machine and who are informed about the associated dangers. The minimum age requirement must be complied with.
In addition to the safety notices contained in this operating manual and the particular instructions for your country, the generally recognised technical regulations for the operation of identical devices must be complied with.
We accept no liability for damage or accidents which arise due to non-observance of these instructions and the safety information.
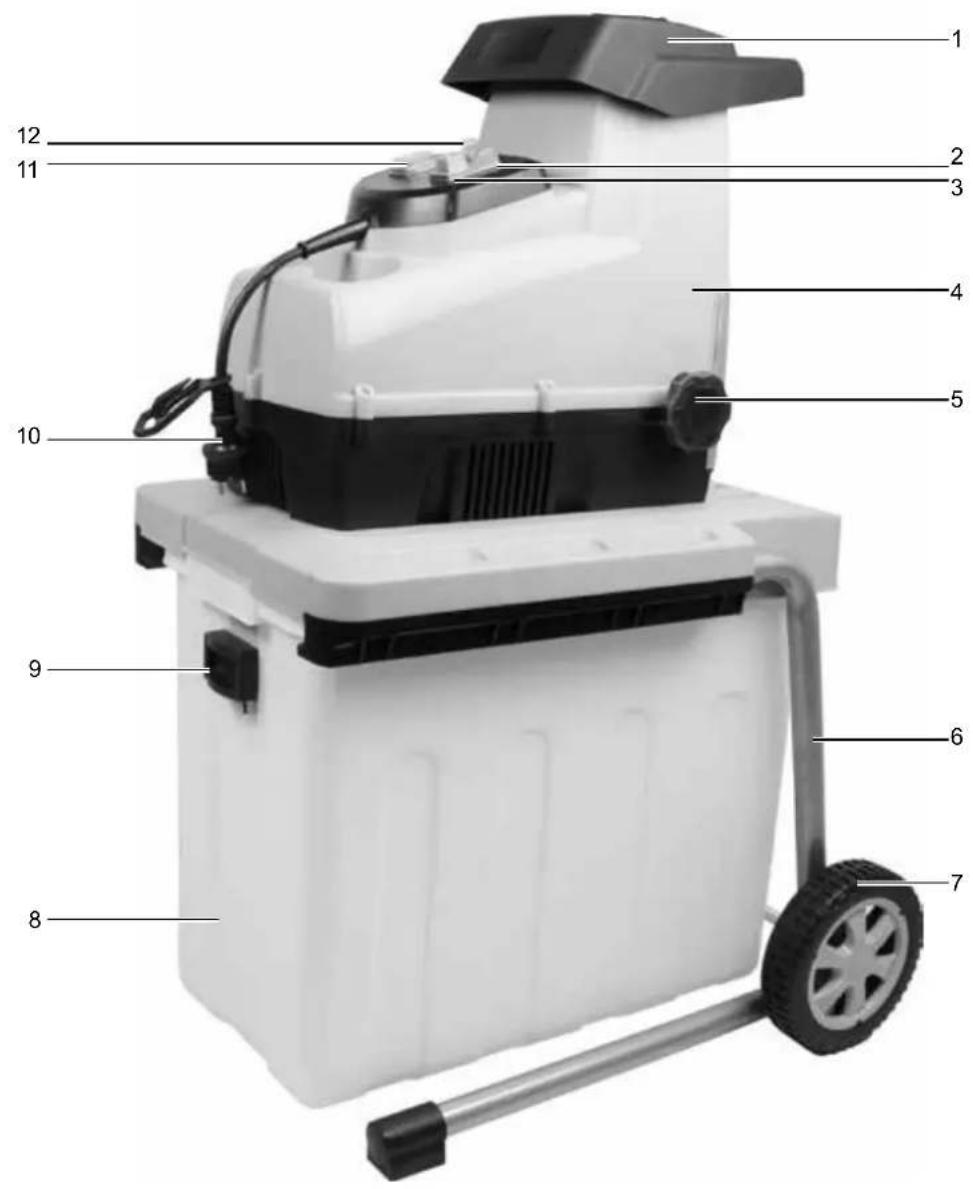
2. Device description (Fig. A)
- Loading slot
- On switch
- Off switch
- Machine body
- Adjusting screw
- Support feet
- Wheel
- Collecting box
- Locking mechanism
- Mains power connection
- Switch for roll rotation direction
- Reset switch
- Axle shaft
- Lock nut
- Wheel sleeve
- Washer
- Wheel cap
- Groove
a. Wrench
b. Allen wrench
c. Stopper
3. Scope of delivery
- Stopper
- Machine body
- Axle shaft
• Collecting box with Locking mechanism - Wheel (2 pieces)
- Lock nut (2 pieces)
- Wheel sleeve (2 pieces)
- Washer (2 pieces)
- Wheel cap (2 pieces)
- Wrench
- Allen wrench
- Instruction Manual
4. Intended use
The equipment is to be used only for its prescribed purpose. Any other use is deemed to be a case of misuse. The user / operator and not the manufacturer will be liable for any damage or injuries of any kind caused as a result of this.
An element of the intended use is also the observance of the safety instructions, as well as the assembly instructions and operating information in the operating manual.
Persons who operate and maintain the machine must be familiar with the manual and must be informed about potential dangers.
In addition, the applicable accident prevention regulations must be strictly observed.
Other general occupational health and safety-related rules and regulations must be observed.
The liability of the manufacturer and resulting damages are excluded in the event of modifications of the machine.
The machine may be operated only with original parts and original accessories of the manufacturer.
The safety, work and maintenance instructions of the manufacturer as well as the dimensions indicated in the Technical Data section must be adhered to.
The shredder may only be used for cutting twigs, branches, shrubs, garden wastes, paper and cardboard.
The proper use includes the shredding of
- all types of branches up to a max. diameter 45 mm (depending on wood species and freshness)
- wilted, moist garden refuse that has already been stored for several days, alternating with branches
Do not fell the shredder with stones, glass, metal, bones, plastics or fabrics.
Please note that our equipment has not been designed for use in commercial, trade or industrial applications. Our warranty will be voided if the equipment is used in commercial, trade or industrial businesses or for equivalent purposes.
5. Safety information
- This appliance is not intended for use by persons (including children) with reduced physical, sensory or mental capabilities, or lack of experience and knowledge, unless they have been given supervision or instruction concerning use of the appliance by a person responsible for their safety..
• Children should be supervised to ensure that they do not play with the appliance.
- Never allow children or other persons unfamiliar with the user manual to use the shredder. Local regulations or bylaws may determine the minimum age for using the shredder.
Observe noise control and local regulations.
Caution!
When using power tools, observe the following basic safety measures for the prevention of electric shocks and the risk of injury and fire:
Preparation:
- Never use the shredder with other persons or animals nearby.
- Wear hearing and eye protection at all times when using the shredder.
- Wear appropriate protective clothing such as protective gloves, firm footwear and long trousers. Do not wear loosely fitting clothes or clothes with dangling cords or belts.
- Only use the shredder in the open (that is, away from walls or other rigid structures) on a firm, level surface.
- Do not use the machine on a paved, gravelled area, which could be damaged by ejected material.
- Before you start up the shredder, check that all of the nuts, bolts and other fastenings are tight. Covers must be fastened properly and in good working order. Replace any damaged or illegible stickers.
- Only use replacement parts and accessories supplied and recommended by the manufacturer. Using third-party parts will immediately invalidate the guarantee.
- Do not leave the shredder working unattended and keep it in a dry place out of children's reach.
- Only connect the shredder to a properly earthed mains power supply. Make sure that the extension cable and socket are properly earthed.
- While being used in the open, connect the shredder to a residual current (RC) circuit breaker with a trip current of not more than 30 mA.
• Always stand clear of the discharge zone when operating the machine.
Working with the device:
• Make sure that the funnel feeder is empty before you start the shredder.
- Keep your head, hair and body away from the intake opening.
- Do not reach into the funnel feeder during operation. The shredder will continue to run for a short period after you switch it off.
• Always make sure you are standing in a firm, balanced position. Do not lean forwards, and never stand above the shredder when inserting materials.
- Make sure that the material inserted into the shredder does not contain hard objects made of metal, stone, glass or similar.
- Do not use the shredder in the rain and in bad weather. Work in daylight or under good lighting conditions.
- Do not operate the shredder when you are tired or distracted, or under the influence of alcohol or medication. Always take a break when you need one.
- Switch the shredder off and pull the plug under the following circumstances:
- when you are not using the device,
- transporting it or leaving it unattended;
- before releasing a jammed blade.
- when you are checking the device, cleaning it or removing blockages;
- when you are carrying out cleaning or maintenance work or replacing accessories;
- Before moving or lifting the shredder
- If foreign objects should enter the shredder, if the shredder is making unfamiliar noises or vibrations (check the shredder for damage before starting it up again)
- Do not allow shredded material to accumulate near the ejection area. This may otherwise hinder proper ejection and force the material back up through the feeder.
- Do not transport or tip the shredder with the motor running.
- Keep hands, other body parts and clothing out of the filling chamber and ejection channel and away from other moving parts.
- In the event of blockages in the machine intake or ejection, switch off the motor and disconnect the machine from the mains before removing leftover material in the intake opening or ejection channel. Ensure that the motor is free of rubbish and other accumulations in order to safeguard the motor from damage or possible fire. Remember that the cutting tool is also activated when the starting mechanism is started on a motor operated machine.
- If foreign objects get into the cutting tool or if the machine makes unusual noises or vibrates in an unusual way, switch off the motor immediately and allow the machine to come to rest. Perform the following steps:
- Check the machine for damage.
- Check that all parts are seated securely and retighten them, if necessary.
- Have any parts replaced or repaired; the parts must be of similar quality.
- Make sure that all covers and shields are in place and in good working condition.
Caution! The following states how damage to the trimmer and possible injury to people can be avoided:
- Clean the ventilation slits regularly; keep to the maintenance instructions.
- Do not overload your device. Work only within the indicated range of performance. Do not employ any low power machines for heavy work. Do not use your device for purposes for which it has not been designed.
- Only switch the shredder off once the funnel feeder is completely empty since the shredder may otherwise clog up and not be able to start afterwards.
- Do not attempt to repair the shredder yourself unless you are qualified to do so. Any work not specified in this manual may only be carried out by our service centre.
Electrical safety
Caution!
The following states how to avoid accidents and injuries due to electric shock:
- Use the tension relief provided for the fixing of the extension cord.
- Damaged cables, coupling and plugs or connecting leads not corresponding to specifications, must not be employed. Remove the plug immediately from the plug socket in case of damage to the mains cable. Do not touch the mains power supply cable under any circumstances until you have pulled the plug out of the mains socket.
- If the power cable for this equipment is damaged, it must be replaced by the manufacturer, a customer service agent of the same or a similarly qualified person in order to prevent hazards.
- Do not use the appliance if the on/off switch does not work properly. Always have a damaged switch repaired by our Service Centre.
- Only use extension cables that have been approved for outdoor use and are resistant to splash water. The core diameter for extension cables measuring up to 25 m must be at least 2.5 mm 2 , and 2.5 mm 2 for cables longer than 25m. Always roll the whole cable off the reel before use. Check the cable for damage.
- Do not unplug the shredder by the cable. Keep the cable away from heat, oil and sharp edges
Warning!
This electric tool generates an electromagnetic field during operation. This field can impair active or passive medical implants under certain conditions. In order to prevent the risk of serious or deadly injuries, we recommend that persons with medical implants consult with their physician and the manufacturer of the medical implant prior to operating the electric tool.
Residual risks
The machine has been built according to the state of the art and the recognised technical safety requirements. However, individual residual risks can arise during operation.
- The use of incorrect or damaged mains cables can lead to injuries caused by electricity.
- Release the handle button and switch off the machine prior to any operations.
- Even if you use this electric power tool in accordance to instructions, certain residual risks cannot be eliminated.
- Remaining hazards can be minimized by following the instructions in „Safety instructions“, „Intended Use“ and in the entire operating manual.
- Avoid accidental starts: do not press the start button while inserting the plug into the socket.
- Use the tool that is recommended in this manual. In doing so, your machine provides optimal performance.
- Hands may never enter the processing zone when the machine is in operation.
6. Technical data
Dimensions L x W x H 675 x 455 x 900 mm
| Blade cylinder ∅ 87 mm | |
| Number of blades 8 | |
| Collection box capacity 60 l | |
| Transport wheels ∅ | 175 mm |
| Weight | 20,8 kg |
| Branch thickness max ∅ | 44 mm |
| Motor | 230-240V~ 50Hz |
| Nominal consumption P1 | 2500 W |
| Blade cylinder revolutions | 60 min -1 |
| Operating type | P40 |
Subject to technical changes!
Noise levels
| Guaranteed sound power level LWA | 94 dB(A) |
| Measured sound power level LWA | 91,7 dB(A) |
| Measurement uncertainty K | 2,67 dB(A) |
| Sound pressure level LpA | 79,1 dB(A) |
| Measurement uncertainty KpA | 3 dB(A) |
Note: The specified sound levels have been determined using a standardised test procedure and can be used to compare different electronic devices. Furthermore, these values can be used to assess in advance the strain on the user caused by the sound.
7. Before starting the equipment
▲ IMPORTANT!
You must fully assemble the appliance before using it for the first time!
- Open the packaging and remove the device carefully.
- Remove the packaging material as well as the packaging and transport bracing (if available).
- Check that the delivery is complete.
- Check the device and accessory parts for transport damage
- Check the device and accessory parts for transport damage. When complaints the dealer must be informed immediately. Subsequent complaints will not be accepted
- If possible, store the packaging until the warranty period has expired
- Read the operating instructions to make yourself familiar with the device prior to using it.
- Only use original parts for accessories as well as for wearing and spare parts. Spare parts are available from your specialized dealer.
- Specify our part numbers as well as the type and year of construction of the device in your orders.
- Before you connect the equipment to the power supply make sure the data on the rating plate are identical to the mains data.
⚠ WARNING!
The device and packaging materials are not toys! Children must not be allowed to play with plastic bags, film and small parts! There is a risk of swallowing and suffocation!
8. Montage
⚠ WARNING!
Always pull the power plug before making adjustments to the equipment.
- Mounting the support feet (Fig. C)
- Turn the chopper so that you can turn the support feet 180°.
-
Insert the axle shaft (13) into the intended position on the support feet. (Fig. D)
-
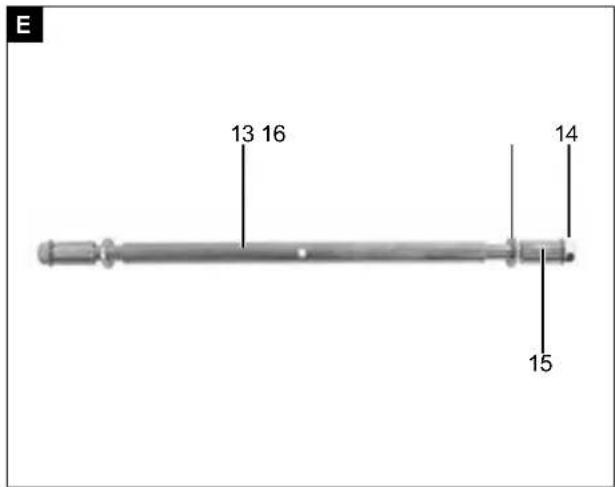
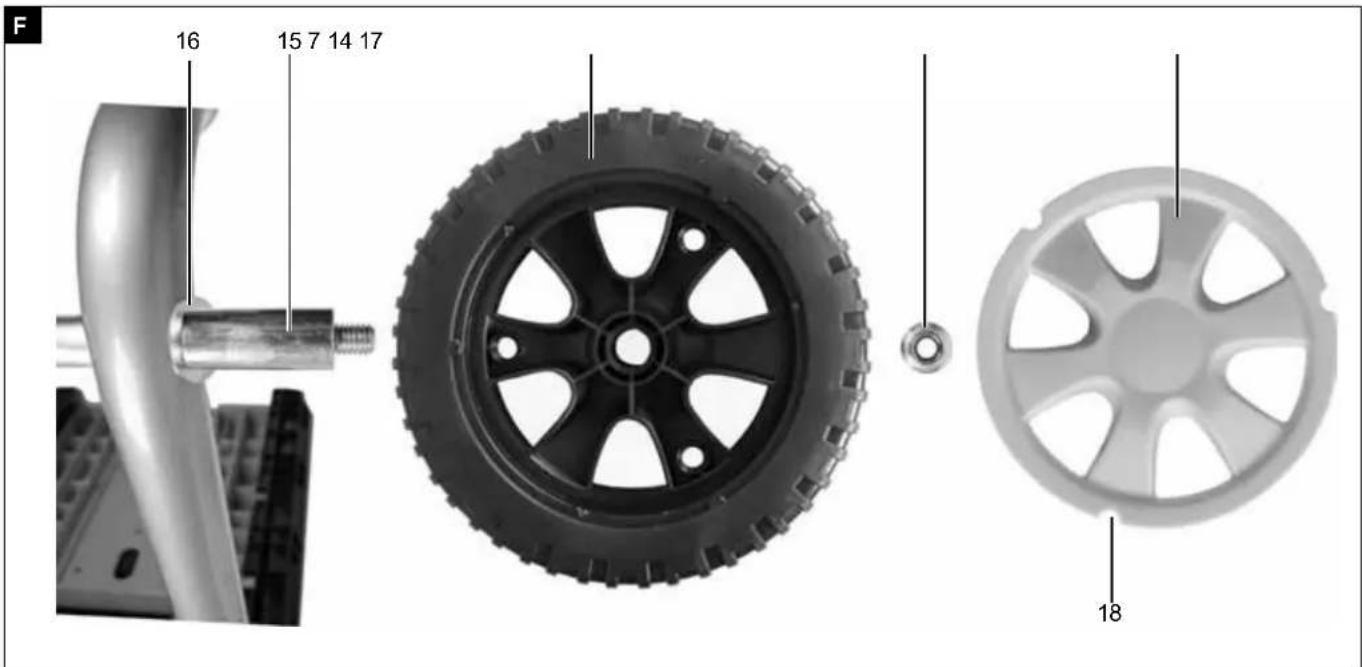
Mounting the wheels (Fig. E/F)
- Mount both wheels as shown in Fig. F. Use the supplied tool to tighten the wheel. NOTE: If the axle rotates when tightened, use the Allen wrench (b) to hold it in place.
- After tightening the lock nut (14), mount the wheel cap (17) onto the wheel (7). The position is indicated by the grooves (18).
-
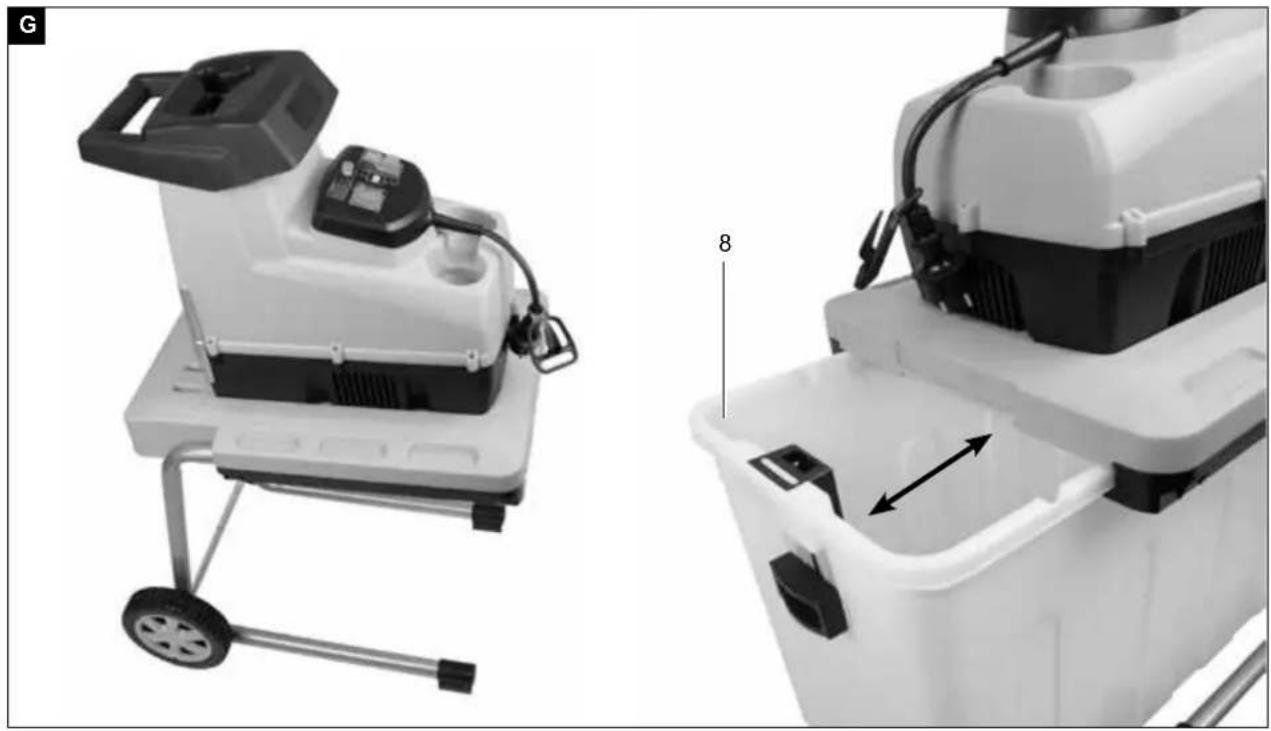
Installing den collection box (Fig. G)
-
Place the locking mechanism (13) on the collection box (8) in its lowest position (Fig. G).
- Push the collection box fully into the frame.
- Press the locking mechanism (9) on the collection box (8) back into its highest position (Fig. 1).
9. Operation
Warning! The shredder can only be started if the collection box (8) has been pushed into the frame and the locking device (9) is in the upper position.
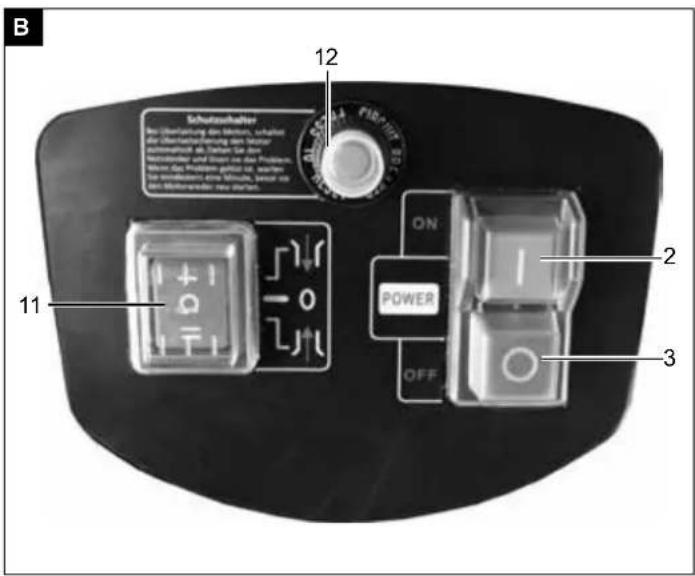
Control panel (Fig. B)
- On switch (2): Pressing this button starts the shredder.
- Off switch (3): Pressing this button stops the shredder.
Switch for roll rotation direction (11):
- Button „▲“ - anti-clockwise: When this button is pressed, the blade cylinder rotates anti-clockwise. This is necessary when jammed shredding material needs to be freed. This function is only available when the shredder is in operation.
- Button „▼“ - clockwise: This button switches the direction of the blade cylinder from anti-clockwise back to clockwise.
- Reset-switch (12): Overload protection
Working with the shredder
Alternating with branches, shred withered garden waste and branches that have been stored several days to prevent the shredder from becoming blocked.
- Make sure the collection box (8) is pushed into the frame correctly and the locking device (9) is in the upper position.
- Connect the shredder to the power supply.
- Turn the shredder on by using the on switch (3).
- Fill shredding material into the feed hopper and it will be drawn in.
- Caution: If the material becomes jammed, first press the red off switch (3) to stop the device. Push the switch for roll rotation direction (11) downwards to the “ = ” sign. Start the device by pressing the green on switch (2). Stop the device by pressing the red off switch (3). Remove the jammed material. Push the switch (11) to the “ - ” sign. The device is ready for operation.
-
Make sure the shredder has completely shredded the input material before adding new.
-
Do not use your hands to push in more shredding material. Use the special pushing device (c) or other shredding material.
- When you have finished working with the shredder, turn it off and disconnect it from the mains.
Emptying the collection box
- Stop the shredder using the off button (3).
- Set the locking device (9) to the lowest position.
- Pull out the collection box (8) and empty it.
- Re-insert the collection box (8) and push the locking device (9) up again.
Setting the counter blade
The counter blade and the blade cylinder have been ideally adjusted by the manufacturer. Re-adjusting the counter blade is only required if it becomes worn. For maximum performance, it is necessary that the distance between the counter blade and blade cylinder is about 0.50 mm.
- Turn the shredder on.
- Turn the adjustment wheel (5) clockwise until you can hear slight grinding sounds.
- When turning the adjustment wheel (5) clockwise by half a turn, the blade cylinder is positioned closer to the counter blade by 0.50 mm.
WARNING: If the shredder blade touches the counter blade, it will be trimmed and small pieces of swarf may fall out of the ejection opening. This is not an error, but it has to be re-adjusted to the required degree because otherwise the counter blade will wear too early.
Overload protection
In the event of overload, e.g. due to branches that are too thick, the equipment automatically switches off. After a short cooling period (approximately 5 minutes), press the reset switch (12).
10. Electrical connection
The electrical motor installed is connected and ready for operation. The connection complies with the applicable VDE and DIN provisions. The customer's mains connection as well as the extension cable used must also comply with these regulations.
Damaged electrical connection cable
The insulation on electrical connection cables is often damaged.
This may have the following causes
- Passage points, where connection cables are passed through windows or doors.
- Kinks where the connection cable has been improperly fastened or routed.
- Places where the connection cables have been cut due to being driven over.
- Insulation damage due to being ripped out of the wall outlet.
- Cracks due to the insulation ageing.
Such damaged electrical connection cables must not be used and are life-threatening due to the insulation damage.
Check the electrical connection cables for damage regularly. Make sure that the connection cable does not hang on the power network during the inspection. Electrical connection cables must comply with the applicable VDE and DIN provisions. Only use connection cables with the marking „H05VV-F“.
The printing of the type designation on the connection cable is mandatory.
AC motor
• The mains voltage must be 230-240 V\~
- Extension cables up to 25 m long must have a cross-section of 1.5 mm 2 .
Connections and repairs of electrical equipment may only be carried out by an electrician.
- The product meets the requirements of EN 61000-3-11 and is subject to special connection conditions. This means that use of the product at any freely selectable connection point is not allowed.
- Given unfavourable conditions in the power supply the product can cause the voltage to fluctuate temporarily.
- The product is intended solely for use at connection points that
a) do not exceed a maximum permitted supply impedance "Z", or
b) have a continuous current-carrying capacity of the mains of at least 100 A per phase.
- As the user, you are required to ensure, in consultation with your electric power company if necessary, that the connection point at which you wish to operate the product meets one of the two requirements, a) or b), named above.
With a single-phase a.c. motor, we recommend a C 16A or K 16A fuse for machines with a high start-up current (from 3000 Watt)!
11. Cleaning an maintenance
Leave all work not described in this manual to an authorised customer service centre. Only use original parts.
Wear hand protection when working on the blade cylinder..
Switch the shredder off, unplug it form the mains, and wait for the blade cylinder to come to a complete stop before working on it.
General cleaning and servicing
Do not spray water onto the shredder. Electric shock hazard.
• Always keep the shredder, wheels and air vents clean. Use a brush or cloth to clean it, avoid cleaners and solvents.
- Always check that the shredder and especially the guards are not worn down or damaged but firmly attached before use. Check that the nuts, bolts and screws are tight.
- Check the covers and guards for damage and improper attachment. If necessary, change the components
- Keep the shredder in a dry place out of children's reach. Do not cover the shredder in nylon bags, as moisture may develop
WARNING!
Pull out the mains plug for any adjustment or repair tasks.
Connections and Repairs
Connections and repairs of electrical equipment may only be carried out by an electrician.
Please provide the following information in the event of any enquiries:
• Type of current for the motor
• Machine data - type plate
• Machine data - type plate
Service information
Please note that the following parts of this product are subject to normal or natural wear and that the following parts are therefore also required for use as consumables.
Wear parts*: Carbon brushes, knives, roller
* Not necessarily included in the scope of delivery!
12. Storage
Store the device and its accessories in a dark, dry and frost-proof place that is inaccessible to children. The optimum storage temperature is between 5 and 30°C.
Store the electrical tool in its original packaging. Cover the electrical tool in order to protect it from dust and moisture. Store the operating manual with the electrical tool.
13. Disposal and recycling
The equipment is supplied in packaging to prevent it from being damaged in transit. The raw materials in this packaging can be reused or recycled. The equipment and its accessories are made of various types of material, such as metal and plastic. Defective components must be disposed of as special waste. Ask your dealer or your local council.
Old devices must not be disposed of with household waste!
This symbol indicates that this product must not be disposed of together with domestic waste in compliance with the Directive (2012/19/EU) pertaining to waste electrical and electronic equipment (WEEE). This product must be disposed of at a designated collection point. This can occur, for example, by handing it in at an authorised collecting point for the recycling of waste electrical and electronic equipment. Improper handling of waste equipment may have negative consequences for the environment and human health due to potentially hazardous substances that are often contained in electrical and electronic equipment. By properly disposing of this product, you are also contributing to the effective use of natural resources. You can obtain information on collection points for waste equipment from your municipal administration, public waste disposal authority, an authorised body for the disposal of waste electrical and electronic equipment or your waste disposal company.
14. Troubleshooting
The table below contains a list of fault symptoms and explains what you can do to remedy the problem if your equipment fails to work properly. If the problem still persists after working through the list, please contact your nearest service workshop.
| Fault Possible cause Remedy | ||
| Motor does not start | Collection box not in correct position | Insert the collection box correctly and check the locking device (see Operation). |
| Motor is overloaded. Turn the shredder | on again (see Operation). | |
| No electricity Have the socket, cable, lead and plug checked by a trained electrician (see Electric connection). | ||
| Garden waste is not drawn in. | Blade cylinder rotates anti-clockwise. Change the rotational direction (see Operation). | |
| No electricity Push shredding material with special pushing device for shredder. | ||
| Blade cylinder has become blocked. Remove blockage (see Operation). | ||
| Shredding material is tangled. | Counter blade is not set correctly. Re-adjusted counter blade (see Operation). | |
Günzburger Straße 69
D-89335 Ichenhausen
Cher Clients,
Günzburger Straße 69
D-89335 Ichenhausen
Egregio cliente,
CE - Declaration of Conformity
Standard references:
EN 60335-1:2012/A11:2014; EN 50434:2014; EN 62233:2008; EN 55014-1:2006/A2:2011; EN 55014-2:2015; EN 61000-3-2:2014; EN61000-3-11:2000
This declaration of conformity is issued under the sole responsibility of the manufacturer.
Garantie DE
Apparent defects must be notified within 8 days from the receipt of the goods. Otherwise, the buyeris rights of claim due to such defects are invalidated. We guarantee for our machines in case of proper treatment for the time of the statutory warranty period from delivery in such a way that we replace any machine part free of charge which provably becomes unusable due to faulty material
or defects of fabrication within such period of time. With respect to parts not manufactured by us we only warrant insofar as we are entitled to warranty claims against the upstream suppliers. The costs for the installation of the new parts shall be borne by the buyer. The cancellation of sale or the reduction of purchase price as well as any other claims for damages shall be excluded.
Garantie FR

- Verehrter Kunde
- Explanation of symbols
- Table of contents: Page:
- Introduction
- Manufacturer:
- scheppach
- Dear Customer,
- Note:
- We recommend:
- Device description (Fig. A)
- Scope of delivery
- Intended use
- Safety information
- Observe noise control and local regulations.
- Caution!
- Preparation:
- Working with the device:
- Electrical safety
- Warning!
- Residual risks
- Technical data
- Before starting the equipment
- ▲ IMPORTANT!
- ⚠ WARNING!
- Montage
- Operation
- Control panel (Fig. B)
- Working with the shredder
- Emptying the collection box
- Setting the counter blade
- Overload protection
- Electrical connection
- Damaged electrical connection cable
- AC motor
- Cleaning an maintenance
- General cleaning and servicing
- Connections and Repairs
- Service information
- Storage
- Disposal and recycling
- Troubleshooting
- Cher Clients,
- Egregio cliente,
- CE - Declaration of Conformity
- Standard references:
- Garantie DE
- Garantie FR
Brand : Gardol
Model : GLH-S-28FB
Category : Mechanical chipper