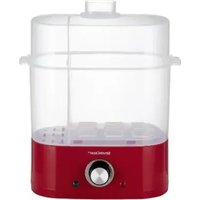
SHME 400 A1 - Electric cooking appliance SILVERCREST - Free user manual and instructions
Find the device manual for free SHME 400 A1 SILVERCREST in PDF.


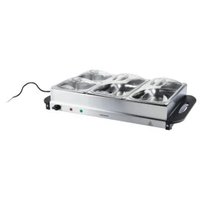
| Appliance type | 2-in-1 electric cooking appliance (egg cooker and hot dog steamer) |
| Brand | SilverCrest |
| Model | SHME 400 A1 |
| Power supply | 220 - 240 V ~, 50/60 Hz |
| Power consumption | 450 W |
| Water tank capacity (MAX mark) | approx. 120 ml |
| Egg capacity | up to 8 eggs |
| Hot dog capacity | up to 6 small sausages + 6 buns |
| Included accessories | Base unit, egg insert, hot dog insert, lid, measuring cup with egg piercer, instruction manual |
| Material of food contact parts | Plastic and stainless steel (food-safe) |
| Cleaning of accessories | Lid, inserts and measuring cup are dishwasher safe (preferably top rack) |
| Cleaning the water tank | Wipe with a damp cloth after cooling |
| Descaling | Use a commercial descaling agent (e.g., for coffee makers) without heating the appliance |
| Safety | Automatic shut-off with audible signal, overheating protection, insulated handles |
| Features | Steam cooking, temperature indicator light, operation indicator, cord wrap |
| Warranty | 3 years (France and Belgium) |
Frequently Asked Questions - SHME 400 A1 SILVERCREST
User questions about SHME 400 A1 SILVERCREST
0 question about this device. Answer the ones you know or ask your own.
Ask a new question about this device
Download the instructions for your Electric cooking appliance in PDF format for free! Find your manual SHME 400 A1 - SILVERCREST and take your electronic device back in hand. On this page are published all the documents necessary for the use of your device. SHME 400 A1 by SILVERCREST.
USER MANUAL SHME 400 A1 SILVERCREST
2-IN-1 HOTDOG MAKER AND EGG COOKER 2-IN-1 HOTDOG-MAKER UND EIERKOCHER APPAREIL À HOT-DOGS ET CUISEUR À OEUFS 2 EN 1 SHME 450 B2
GB IE
2-IN-1 HOTDOG MAKER AND EGG COOKER
Operating instructions
DE AT CH
2-IN-1 HOTDOG-MAKER UND EIERKOCHER
Bedienungsanleitung
FR BE
Before reading, unfold the page containing the illustrations and familiarise yourself with all functions of the device.
DE AT CH
GB/IE Operating instructions Page 1
Warnings and symbols used 2
Package contents 3
Operating elements 3
Safety information....3
Preparations....6
Unpacking 6
Getting started 6
Cable retainer 6
Use 6
Boiling eggs 7
Preparing hot dogs 8
Cleaning and care 8
Cleaning the appliance 9
Descaling the appliance 9
Cleaning the accessories 9
Storage 9
Disposal 9
Disposal of the appliance 10
Disposal of the packaging 10
Technical data 10
Kompernass Handels GmbH warranty 10
Service 12
Importer 12
Introduction
Congratulations on the purchase of your new appliance. You have selected a high-quality product.

The instructions for use are part of this product. They contain important information about safety, usage and disposal. Before using the product, please familiarise yourself with all instructions regarding safety and use. Use the product only as described and for the specified range of applications. Please also pass on all documents to any future owner.
Intended use
This appliance is intended exclusively for generating steam by heating water. It is only suitable for use with eggs, hotdog sausages and hot dog buns.
This appliance is intended solely for use in private households. Do not use the appliance for commercial purposes!
The appliance is intended only for indoor domestic use.
Warnings and symbols used
The following warnings and symbols are used in these instructions for use, on the packaging and on the appliance (where applicable):
 | DANGER! A warning with this symbol and the signal word "DANGER" indicates an imminently hazardous situation which will result in death or serious injury if not avoided. |
 | WARNING! A warning with this symbol and the signal word "WARNING" indicates a potentially hazardous situation which could result in death or serious injury if not avoided. |
| CAUTION! A warning with this symbol and the signal word "CAUTION" indicates a potentially hazardous situation which could result in a minor or moderate injury if not avoided. | |
| ATTENTION! A warning with this symbol and the signal word "ATTENTION" indicates a potential situation that could result in property damage if not avoided. | |
| NOTE A note provides additional information that will assist you in using the appliance. | |
| Dishwasher-proof. | |
| All of the parts of this appliance that come into contact with food are food-safe. | |
| Do not immerse in water! | |
| Caution! Hot surface! | |
| AC current/voltage | |
| Read the instructions for use |
Package contents
The appliance is supplied with the following components as standard:
- Basic appliance
- 1 egg insert
- 1 hot dog insert
• 1 lid
● Measuring cup with egg piercer - Instructions for use
i NOTE
▶ Check the package for completeness and signs of visible damage.
▶ If the delivery is incomplete or damage has occurred as a result of defective packaging or during transport, contact the Customer Service hotline (see section Service).
Operating elements
Figure A:
① Steam outlet openings
2 Lid
③ Power cord
4 MIN/MAX mark
⑤ Water bowl
⑥ Appliance base
⑦ Temperature indicator light (green)
⑧ On/Off switch ON/OFF
⑨ Operating light (red)
⑩ Cable retainer
⑪ Handles on insert for hot dogs
⑫ Insert for hot dogs
13 Handles on insert for eggs
14 Insert for eggs
Figure B:
15 Measuring cup
16 Egg piercer
Safety information
⚠️ DANGER! ELECTRIC SHOCK!
■ Only connect the appliance to a properly installed and earthed power outlet whose voltage corresponds to the specification on the rating plate. The power outlet must be easily accessible so that you can quickly disconnect the appliance from the power supply in an emergency.
■ Always disconnect the mains plug from the power outlet before moving or filling the appliance, in the event of problems, before cleaning the appliance and when it is not in use! Never pull on the power cord; always pull directly on the plug itself. Never touch the appliance plug with wet or moist hands.
■Never immerse the lower part, the power cord or the mains plug in water or any other liquids! If the appliance ever falls into any liquid, disconnect the mains plug from the power outlet immediately. Have the appliance checked before using it again.
■ Do not use the appliance if you are on a wet surface or if your hands or the appliance are wet.
■ Position the power cord so that it does not come into contact with hot or sharp-edged objects. Guide it so that it cannot be kinked, crushed or damaged in any other way.
■ The appliance is not completely disconnected from the mains after it has been switched off. To do this, pull out the mains plug.
■ Do not operate the appliance if the appliance itself, the power cord or mains plug is damaged.
- To avoid potential risks, a damaged power cord for this appliance should be replaced by the manufacturer or the manufacturer's customer service department or a similarly qualified person.
■ Always keep the appliance as well as the power cord and mains plug away from open flames and hot surfaces.
- Do not allow any liquid to run over the appliance's plug connection.
⚠ WARNING! RISK OF INJURY!
■ Never leave the appliance unattended during operation.
■ This appliance may be used by children aged 8 years or above and by persons with reduced physical, sensory or mental capabilities or lack of experience and/or knowledge if they are supervised or have been instructed in the safe use of the appliance and have understood the potential risks.
■ Cleaning and user maintenance tasks must not be carried out by children unless they are aged 8 years or more and are supervised.
■ The appliance and its power cord must be kept away from children younger than 8 years old.
■ Do not allow children to use the appliance as a toy.
■ Children must be supervised to make sure that they do not play with the appliance.
■ Do not allow children to play with packaging materials. Risk of suffocation!
■ CAUTION: Be careful with the egg piercer to prevent injuring yourself.
■ The appliance surfaces can become very hot during operation. Therefore, only hold the lid and cooking insert by the handle provided when removing them.
■ After use, the surfaces of the heating elements will still have some residual heat.
■ Use the appliance only for the intended purpose.
There is a risk of injury if the appliance is misused or used incorrectly!
■ Do not lean over the appliance while it is producing steam or when you open the lid and the contents are still very hot.
■ Do not open the lid while the water is boiling.
■ CAUTION! Hot steam escapes from the steam outlet openings and when the lid is opened! Risk of scalding! Always open the lid by lifting it by the handle and moving it to the side. Avoid any contact between the escaping steam and your hand or arm. Do not remove the cooking insert until the steam has completely dissipated.
! ATTENTION! MATERIAL DAMAGE!
■ Do not use an external timer switch or a separate remote control system to operate the appliance.
■ Never leave the appliance unattended during operation.
■ Never place the appliance near sources of heat.
■ Do not place the appliance near walls or under wall cabinets. This way you will avoid damage caused by rising steam.
■ Never open the housing. This can lead to risks and also invalidates the warranty.
■ Use only the accessory parts provided with the appliance. Never use the appliance without water in the water bowl.
■ Only use fresh drinking water for steam generation. Fill the water bowl at least to the MIN mark and at most to the MAX mark.
■ Allow the appliance and accessories to cool completely before cleaning and storing them.
i NOTE
■ No user action is required to switch the product between 50 and 60 Hz. The product switches automatically to either 50 or 60 Hz.
Preparations
Unpacking
◆ Remove all parts of the appliance and the operating instructions from the box.
◆ Remove all packaging materials and any stickers from the appliance.
WARNING!
▶ Do not allow children to play with packaging materials.
There is a risk of suffocation.
Getting started
1) Clean all parts of the appliance as described in the section Cleaning and care.
2) Unwind the power cord ③ from around the cable retainer ⑩ and guide it through the recess on the edge.
3) Plug the mains plug into a power outlet.
The appliance is now ready for use.
Cable retainer
There is a cable retainer 10 on the bottom of the appliance base 6. This cable retainer 10 allows you to adjust the length of the power cord 3 to your specific requirements.
! ATTENTION!
▶ Ensure that you always guide the power cord ③ through the corresponding recess in the rear of the appliance base ⑥ for the sake of stability (see Fig. C).
Use
WARNING!
Do not open the lid ② while the appliance is in operation.
▶ Fill the water bowl ⑤ with water no higher than the MAX mark ④, otherwise boiling water may splash out.
Hot steam escapes from the steam outlet openings ①. Do not lean over the appliance while it is producing steam or when you open the lid ② and the contents are still very hot.
The appliance surfaces can become very hot during operation. Only hold the operating parts and only lift the lid ② and inserts ⑫/⑭ using the handles ⑪/⑬ provided when removing them.
Boiling eggs
The insert for eggs 14 allows you to cook up to 8 eggs at the same time.
The cooking time of eggs depends on their size, freshness and temperature. Larger, very fresh and chilled eggs require a longer cooking time. Smaller eggs stored at room temperature require shorter cooking times.
i NOTE
The markings on the measuring cup 15 are meant only as guides. They refer to medium-sized eggs (size M) stored at approx. 7 °C.
▶ If you want to cook an odd number of eggs, use the mark for the next even number, e.g. mark 4 for 3 eggs.
When pouring water into the water bowl ⑤, first pour the water into the round heating surface in the centre so that it is completely covered.
| Markings on the measuring cup 15 | for |
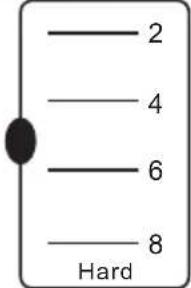 | hard-boiled eggs |
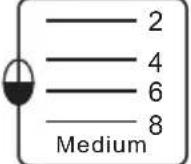 | medium-hard boiled eggs |
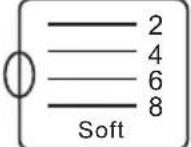 | soft-boiled eggs |
1) Use the egg piercer ⑯ to pierce a hole in the bottom of the eggs. This allows the air inside the egg to dissipate as it expands during boiling and prevents the shell from cracking.
2) Place up to 8 eggs with the pierced side up on the insert 14.
3) Fill the measuring cup ⑮ with cold, fresh tap water up to the corresponding mark, depending on the desired degree of hardness and the quantity of eggs to be boiled, and pour the water into the water bowl ⑤.
4) Place the insert ⑭ in the water bowl ⑤ and fit the lid ②.
5) Plug the mains plug into a power outlet. The operating light ⑨ lights up.
6) Turn the On/Off switch ⑧ to the "ON" position. The temperature indicator light ⑦ lights up to indicate that the appliance is heating up. The cooking process begins.
7) When the cooking time is over, an acoustic signal sounds. Turn the On/Off switch ⑧ to the "OFF" position to switch off the appliance. The operating light ⑨ goes out.
8) Carefully remove the lid ② and insert ⑭ by the handles ⑬ from the water bowl ⑤.
WARNING!
The steam and condensation on the inside of the lid ② are hot. Avoid contact with this steam or water!
9) After cooking, quench the eggs in the insert 14 under cold running water to make it easier to remove the shell and prevent the eggs from overcooking.
10) If necessary, pour the remaining water from the water bowl ⑤ into the sink.
Preparing hot dogs
The hot dog insert 12 allows you to heat up to 6 hot dog sausages and 6 hot dog buns at the same time. For the recommended amount of water, follow the mark on the measuring cup 15.
1) Pour cold drinking water into the water bowl ⑤:
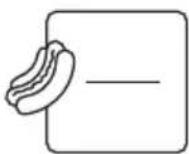
For the correct amount of water, follow the marking for hot dogs on the measuring cup ⑮. It does not matter whether you wish to heat
1 or 6 hotdog sausages / hotdog buns. The amount of water always remains the same. Always take care not to exceed the MAX mark ④ in the water bow ⑤.
2) Place the hot dog insert 12 on the appliance.
i NOTE
▶ Make sure that the arrow markings on the lid ② and on the insert ⑫ are on top of each other and point in the same direction.
3) Place up to 6 hot dog sausages vertically in the smaller compartment of the insert ⑫ and the hot dog buns also vertically in the larger one.
4) Put the lid ② on.
5) Plug the mains plug into a power outlet. The operating light ⑨ lights up.
6) Turn the On/Off switch ⑧ to the "ON" position. The temperature indicator light ⑦ lights up to indicate that the appliance is heating up. The cooking process begins.
7) When the cooking time is over, an acoustic signal sounds. Turn the On/Off switch ⑧ to the "OFF" position to switch off the appliance. The operating light ⑨ goes out.
8) Carefully remove the lid ② and insert ⑫ by the handles ⑪ from the water bowl ⑤.
WARNING!
The steam and condensation on the inside of the lid ② are hot. Avoid contact with this steam or water!
9) Remove the buns and sausages and pour any remaining water from the water bowl ⑤ into the sink.
10) If you no longer wish to use the appliance, disconnect the mains plug from the power outlet and allow the appliance to cool down before cleaning and storing it.
Cleaning and care
DANGER!
▶ Before cleaning the appliance, pull the mains plug out of the power outlet! Otherwise, there is a risk of electric shock!
▶ Never open any parts of the housing. There are no serviceable parts whatsoever inside. When the housing is open, there is a risk of a potentially fatal electrical shock.
Never immerse the appliance base in water or any other liquid! There is a risk of fatal electric shock if residual liquids come into contact with live components during operation.
WARNING!
▶ Allow the appliance to cool down before cleaning it. Risk of burns!
When cleaning the measuring cup 15, be careful of the egg piercer 16. Risk of injury!
! ATTENTION!
▶ Do not use abrasive or caustic cleaning agents. These can attack the surface and damage the appliance beyond repair.
Cleaning the appliance
1) First disconnect the mains plug from the power outlet.
2) Allow the appliance to cool down.
3) Clean the water bowl ⑤ and surface of the appliance base ⑥ after each use with a slightly damp cloth. If necessary, apply a little washing-up liquid to the cloth to remove stubborn dirt from the heating surface or use a soft brush. Then wipe with a cloth moistened only with water to remove all detergent residues.
4) Always dry the appliance thoroughly before using it again.
Descaling the appliance
If limescale starts to build up on the water bowl ⑤, proceed as follows to remove it:
1) Fill the measuring cup ⑮ with a commercially available descaler, e.g. for coffee machines. Follow the descaler manufacturer's instructions for use.
ATTENTION!
▶ Do not heat the descaler in the water bowl ⑤.
2) Pour the descaler into the water bowl ⑤.
3) Allow the descaler to take effect in accordance with the manufacturer's instructions.
4) Pour off the descaler and wipe out the water bowl ⑤ with a damp cloth or sponge.
i NOTE
▶ When pouring out the descaler, make sure that no liquid gets inside the appliance.
5) Repeat the procedure for stubborn limescale residues.
Cleaning the accessories
- Rinse the lid ②, the inserts ⑫/⑭ and the measuring cup ⑮ with washing-up liquid under running water.
NOTE


The inserts 12/14, lid 2 and measuring cup 15 are also suitable for cleaning in the dishwasher. If possible, place the items in the upper basket of the dishwasher, taking care not to wedge them in.
Storage
- Allow the appliance to cool down completely before putting it into storage.
■ Wind the power cord ③ around the cable retainer ⑩ and guide the plug through the recess on the appliance base ⑥ (see Fig. C).
■ Store the appliance in a dry location.
Disposal
Applies only to France:

The product, its packaging and the operating instructions are recyclable. They are subject to an extended manufacturer responsibility and will be collected separately.
Disposal of the appliance
The adjacent symbol of a crossed-out dustbin means that this appliance is subject to Directive 2012/19/EU. This directive states
that this appliance may not be disposed of in the normal household waste at the end of its useful life, but must be taken to specially set-up collection locations, recycling depots or disposal companies.
The disposal is free of charge for the user. Protect the environment and dispose of this appliance properly.
If your old appliance has stored any personal data, you are responsible for deleting it yourself before returning it.

Your local community or municipal authorities can provide information on how to dispose of the worn-out product.
Disposal of the packaging

The packaging materials have been selected for their environmental friendliness and ease of disposal and are therefore recyclable.
Dispose of packaging materials that are no longer needed in accordance with applicable local regulations.
Dispose of the packaging in an environmentally friendly manner. Note the labelling on the packaging and separate the packaging material components for disposal, if
necessary. The packaging material is labelled with abbreviations (a) and numbers (b) with the following meanings: 1-7: plastics, 20-22: paper and cardboard, 80-98: composites.
Technical data
| Power supply 2 | 20 - 240 V ~, 50 / 60 Hz |
| Power consumption | 450 W |
| Capacity | Max. 8 eggsMax. 6 hot dog sausagesMax. 6 hot dog buns |
| Max. filling quantity of water bowl 5 | Approx. 120 ml at the MAX mark 4 |
Applies only to Spain:
The packaging contains paper and/or cardboard components.

The packaging contains plastic and/or metal components.
This appliance has a 3-year warranty valid from the date of purchase. If this product has any faults, you, the buyer, have certain statutory rights. Your statutory rights are not restricted in any way by the warranty described below.
Warranty conditions
The warranty period starts on the date of purchase. Please keep your receipt in a safe place. This will be required as proof of purchase.
If any material or manufacturing fault occurs within three years of the date of purchase of the product, we will either repair or replace the product for you or refund the purchase price (at our discretion). This warranty service requires that you present the defective appliance and the proof of purchase (receipt) within the three-year warranty period, along with a brief written description of the fault and of when it occurred.
If the defect is covered by the warranty, your product will either be repaired or replaced by us. The repair or replacement of a product does not signify the beginning of a new warranty period.
Warranty period and statutory claims for defects
The warranty period is not prolonged by repairs effected under the warranty. This also applies to replaced and repaired components. Any damage and defects present at the time of purchase must be reported immediately after unpacking. Repairs carried out after expiry of the warranty period shall be subject to a fee.
Scope of the warranty
This appliance has been manufactured in accordance with strict quality guidelines and inspected meticulously prior to delivery.
The warranty covers material faults or production faults. The warranty does not extend to product parts subject to normal wear and tear or to fragile parts which could be considered as consumable parts such as switches or parts made of glass.
The warranty does not apply if the product has been damaged, improperly used or improperly maintained. The directions in the operating instructions for the product regarding proper use of the product are to be strictly followed. Uses and actions that are discouraged in the operating instructions or which are warned against must be avoided.
This product is intended solely for private use and not for commercial purposes. The warranty shall be deemed void in cases of misuse or improper handling, use of force and modifications / repairs which have not been carried out by one of our authorised Service centres.
Warranty claim procedure
To ensure quick processing of your case, please observe the following instructions:
■ Please have the till receipt and the item number (IAN) 466185_2404 available as proof of purchase.
■ You will find the item number on the type plate on the product, an engraving on the product, on the front page of the operating instructions (below left) or on the sticker on the rear or bottom of the product.
If functional or other defects occur, please contact the service department listed either by telephone or by e-mail.
■ You can return a defective product to us free of charge to the service address that will be provided to you. Ensure that you enclose the proof of purchase (till receipt) and information about what the defect is and when it occurred.
You can download these instructions along with many other manuals, product videos and installation software at www.lidl-service.com.
This QR code will take you directly to the Lidl service page (www.lidl-service.com) where you can open your operating instructions by entering the item number (IAN) 466185_2404.
Service

Service Great Britain
Tel.: 0800 404 7657
E-Mail: kompernass@lidl.co.uk

Servicelreland
Tel.: 1800 101010
E-Mail: kompernass@lidl.ie
IAN 466185_2404
Importer
Please note that the following address is not the service address. Please use the service address provided in the operating instructions.
KOMPERNASS HANDELS GMBH
BURGSTRASSE 21
44867 BOCHUM
GERMANY
www.kompernass.com
Inhaltsverzeichnis
Einleitung 14
KOMPERNASS HANDELS GMBH
BURGSTRASSE 21
44867 BOCHUM
DEUTSCHLAND
www.kompernass.com
Table des matières
Introduction 26
KOMPERNASS HANDELS GMBH
BURGSTRASSE 21
44867 BOCHUM
ALLEMAGNE
www.kompernass.com
Inhoud
Inleiding 40
⚠ WAARSCHUWING! LETSELGEVAAR!
! POZOR! HMOTNÉ ŠKODY!
KOMPERNASS HANDELS GMBH
BURGSTRASSE 21
44867 BOCHUM
NĚMECKO
www.kompernass.com
Spis treści
W step 64
KOMPERNASS HANDELS GMBH
BURGSTRASSE 21
44867 BOCHUM
NIEMCY
www.kompernass.com
Obsah
Úvod....76
KOMPERNASS HANDELS GMBH
BURGSTRASSE 21
44867 BOCHUM
NEMECKO
www.kompernass.com
Índice
Introducción 88
Uso previsto 88
KOMPERNASS HANDELS GMBH
BURGSTRASSE 21
44867 BOCHUM
ALEMANIA
www.kompernass.com
Indholdsfortegnelse
Indledning 100
KOMPERNASS HANDELS GMBH
BURGSTRASSE 21
44867 BOCHUM
TYSKLAND
www.kompernass.com
Indice
Introduzione....112
Uso conforme 112
KOMPERNASS HANDELS GMBH
BURGSTRASSE 21
44867 BOCHUM
GERMANIA
www.kompernass.com
Tartalomjegyzék
Bevezető 124
KOMPERNASS HANDELS GMBH
BURGSTRASSE 21
44867 BOCHUM
NÉMETORSZÁG
www.kompernass.com
KOMPERNASS HANDELS GMBH
BURGSTRASSE 21
44867 BOCHUM
GERMANY
www.kompernass.com
Last Information Update · Stand der Informationen · Version des informations
Stand van de informatie · Stav informací · Stan informacji · Stav informácií
Estado de las informaciones · Tilstand af information · Versione delle informazioni
- 2-IN-1 HOTDOG MAKER AND EGG COOKER 2-IN-1 HOTDOG-MAKER UND EIERKOCHER APPAREIL À HOT-DOGS ET CUISEUR À OEUFS 2 EN 1 SHME 450 B2
- 2-IN-1 HOTDOG MAKER AND EGG COOKER
- 2-IN-1 HOTDOG-MAKER UND EIERKOCHER
- PACKAGE CONTENTS 3
- OPERATING ELEMENTS 3
- SAFETY INFORMATION....3
- PREPARATIONS....6
- USE 6
- CLEANING AND CARE 8
- STORAGE 9
- DISPOSAL 9
- TECHNICAL DATA 10
- KOMPERNASS HANDELS GMBH WARRANTY 10
- INTRODUCTION
- INTENDED USE
- WARNINGS AND SYMBOLS USED
- PACKAGE CONTENTS
- I NOTE
- OPERATING ELEMENTS
- SAFETY INFORMATION
- ⚠️ DANGER! ELECTRIC SHOCK
- ⚠ WARNING! RISK OF INJURY
- ATTENTION! MATERIAL DAMAGE
- PREPARATIONS
- UNPACKING
- WARNING
- GETTING STARTED
- CABLE RETAINER
- ATTENTION
- USE
- BOILING EGGS
- PREPARING HOT DOGS
- CLEANING AND CARE
- DANGER
- CLEANING THE APPLIANCE
- DESCALING THE APPLIANCE
- CLEANING THE ACCESSORIES
- STORAGE
- DISPOSAL
- DISPOSAL OF THE APPLIANCE
- THE DISPOSAL IS FREE OF CHARGE FOR THE USER. PROTECT THE ENVIRONMENT AND DISPOSE OF THIS APPLIANCE PROPERLY
- DISPOSAL OF THE PACKAGING
- TECHNICAL DATA
- APPLIES ONLY TO SPAIN
- WARRANTY CONDITIONS
- WARRANTY PERIOD AND STATUTORY CLAIMS FOR DEFECTS
- SCOPE OF THE WARRANTY
- WARRANTY CLAIM PROCEDURE
- SERVICE
- IMPORTER
- INHALTSVERZEICHNIS
- EINLEITUNG 14
- TABLE DES MATIÈRES
- INTRODUCTION 26
- INHOUD
- INLEIDING 40
- ⚠ WAARSCHUWING! LETSELGEVAAR
- POZOR! HMOTNÉ ŠKODY
- SPIS TREŚCI
- W STEP 64
- OBSAH
- ÚVOD....76
- ÍNDICE
- INTRODUCCIÓN 88
- INDHOLDSFORTEGNELSE
- INDLEDNING 100
- INDICE
- INTRODUZIONE....112
- TARTALOMJEGYZÉK
- BEVEZETŐ 124
- KOMPERNASS HANDELS GMBH
Brand : SILVERCREST
Model : SHME 400 A1
Category : Electric cooking appliance