221136 - Slow cooker Hendi - Free user manual and instructions
Find the device manual for free 221136 Hendi in PDF.

| Type of product | Slow cooker (sous-vide cooker) |
| Brand | Hendi |
| Model | 221136 |
| Intended use | Indoor, for buffet and domestic use |
| Power supply | 220-240 V, 50/60 Hz |
| Power | 1100 W |
| Temperature range | 20 °C to 99 °C |
| Temperature accuracy | ±0.5 °C |
| Timer range | 0 to 99 hours |
| Water capacity | Between MIN and MAX markings on the unit (volume varies by container) |
| Body material | Stainless steel |
| Protection class | I (earthing mandatory) |
| Display | LED for temperature and time |
| Controls | Buttons On/Off, Temperature/Time, °C/°F setting, +/-, Factory reset |
| Special functions | Keep warm, audible alarm, auto shut-off |
| Safety | Electric shock protection, minimum water level detection (code E01), end-of-cycle shut-off |
| Maintenance | Clean with a damp cloth and mild detergent; descale every 20 uses or 100 hours |
| Included accessories | Clamping clip |
| Dimensions (L x W x H) | Approximately 30 x 15 x 20 cm |
| Weight | Approximately 2 kg |
Frequently Asked Questions - 221136 Hendi
User questions about 221136 Hendi
0 question about this device. Answer the ones you know or ask your own.
Ask a new question about this device
Download the instructions for your Slow cooker in PDF format for free! Find your manual 221136 - Hendi and take your electronic device back in hand. On this page are published all the documents necessary for the use of your device. 221136 by Hendi.
USER MANUAL 221136 Hendi
GB: Read user manual and keep this with the appliance.
GB: For indoor use only.
GB: NOTE: This manual is translated from original English manual using AI and machine translations.
Thank you for purchasing this HENDI appliance. Read this user manual carefully, paying particular attention to the safety regulations outlined below, before installing and using this appliance for the first time.
Safety instructions
- Only use the appliance for the intended purpose it was designed for, as described in this manual.
- The manufacturer is not liable for any damage caused by incorrect operation and improper use.
- DANGER! RISK OF ELECTRIC SHOCK! Do not attempt to repair the appliance by yourself. Do not immerse the electrical parts of the appliance in water or other liquids. Never hold the appliance under running water.
- NEVER USE A DAMAGED APPLIANCE! Check the electrical connections and cord regularly for any damage. When damaged, disconnect the appliance from the power supply. Any repairs should only be carried out by a supplier or qualified person to avoid danger or injury.
- WARNING! When positioning the appliance, route the power cable safely if necessary to avoid unintentional pulling, being damaged, coming into contact with the heating surface, or causing a tripping hazard.
- WARNING! As long as the plug is in the socket the appliance is connected to the power supply.
- WARNING! ALWAYS switch off the appliance before disconnecting from the power supply, cleaning, maintenance or storage.
- Only connect the appliance to an electrical outlet with the voltage and frequency mentioned on the appliance label.
- Do not touch the plug/electrical connections with wet or damp hands.
- Keep the appliance and electrical plug/connections away from water and other liquids. If the appliance falls into water, remove the power supply connections immediately. Do not use the appliance until it has been checked by a certified technician. Failure to follow these instructions will cause life threatening risks.
- Connect the power supply into an easily accessible electrical outlet so you can disconnect the appliance immediately in case of emergency.
- Make sure the cord does not come in contact with sharp or hot objects and keep it away from open fire. Never pull the power cord to unplug it from the socket, always pull the plug instead.
- Never carry the appliance by its cord.
- Never try to open the housing of the appliance yourself.
- Do not insert objects into the housing of the appliance.
- Never leave the appliance unattended during use.
- This appliance should be operated by trained personnel in kitchen of the restaurant, canteens or bar staff, etc.
- This appliance should not be operated by persons with reduced physical, sensory or mental capabilities, or persons that have a lack of experience and knowledge.
- This appliance should, under any circumstances, not be used by children.
- Keep the appliance and its electrical connections out of reach of children.
- Never use accessories or any extra devices other than those supplied with the appliance or recommended by the manufacturer. Failure to do so could pose a safety risk to the user and could damage the appliance. Only use original parts and accessories.
- Do not operate this appliance by means of an external timer or remote-control system.
- Do not place the appliance on a heating object (gasoline, electric, charcoal cooker, etc.).
- Do not cover the appliance in operation.
- Do not place any objects on top of the appliance.
- Do not use the appliance near any open flames, explosive or flammable materials. Always operate the appliance on a horizontal, stable, clean, heat-resistant and dry surface.
- The appliance is not suitable for installation in an area where a water jet could be used.
- Leave a space of at least 20 cm around the appliance for ventilation during use.
- WARNING! Keep all ventilation openings on the appliance free from obstruction.
Special safety instructions
- This appliance is intended for buffet and household use.
- Do not use this appliance for cooking food products, heating substances which are flammable, dangerous or otherwise unsafe.
- The appliance should be mounted vertically to the container.
- Check the water temperature with the temperature display. Do not touch the water.
- CAUTION! RISK OF BURNS! HOT SURFACES! The
temperature of the accessible surfaces are very high during use. Touch only the control panel, handles, switches, timer control knobs or temperature control knobs.
- If the supply cord is damaged, it must be replaced by the manufacturer, its service agent or similarly qualified persons in order to avoid a hazard.
- ATTENTION! Do not fill water over MAX level or below MIN level.
- Never use this appliance without water.
Intended use
- This appliance is intended to be used in household and similar applications such as:
- staff kitchen areas in shops, offices and other working environments;
- farm houses;
- by clients in hotels, motels and other residential type environments;
- bed and breakfast type environments;
- This appliance is intended only for cooking food packed in vacuum bags at the precisely controlled temperature in buffet and household use. Any other use may lead to damage of the appliance or personal injury.
- Operating the appliance for any other purpose shall be deemed a misuse of the device. The user shall be solely liable for improper use of the device.
Grounding installation
This appliance is classified as protection class I and must be connected to a protective ground. Grounding reduces the risk of electric shock by providing an escape wire for the electric current. This appliance is fitted with a power cord with grounding plug or electrical connections with grounding wire. The connections must be properly installed and grounded.
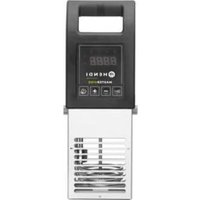
Main parts of the product
(Fig.1 on page 3)
- Control panel
- Indicator light
- Body
- Connection ring
- Housing of heating element
- Water outlet
- Release screw
- Clamp
- Water inlet
Remark: The content of this manual applies for all listed items unless specified otherwise. The appearance may vary from the shown illustrations.
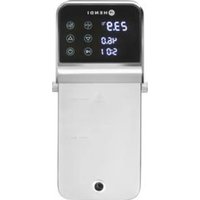
Control panel
(Fig.2 on page 3)
- Temperature display
- Time display
- Set Temperature/Time button
- Set °C / °F button
- Increase button
- Decrease button
- Start/Stop button
- Power ON/OFF button
Temperature/Time display
- Displays real-time working temperature
- In standby mode, displays set target time. In working mode, displays remaining working time, “:” is flashing.
Set Temperature/Time button
- Press the Temperature/Time button to toggle the temperature or time setting. When the temperature display is flashing, set the desired target temperature with INCREASE or DECREASE BUTTON. When the time display is flashing, set the desired target time with INCREASE or DECREASE BUTTON.
Note:
- After the light flashes 3 times, if there is no setting operation, the machine will exit the Temperate/Time setting. If you need to reset it, click the Temperature/Time button again to enter the setting state.
- In the working mode, press and hold the Temperature/Time button, it displays the time and temperature that have been set.
Set °C / °F button
- Use the button to set temperature unit ^ / ^ .
Increase/decrease button
- Use the button to increase or decrease the temperature and time setting, after selecting the appropriate function.
Start/Stop button
- Press the Start/Stop button to start the machine, the button is flashing in red.
- Pressing the Start/Stop button for a second time will start the time to count down, ":" from timer display will flash
- Pressing the Start/Stop button for a third time will stop the machine. ":" from timer display stop flashing.
Power ON/OFF button
- After connecting power supply, the appliance enters standby mode, the Power ON/OFF button light up.
- In standby mode, press the power button to enter the ready mode.
- In ready mode or during the working process, press this button to return to standby mode.
Indicator light
- Red light flashing means the device has not reached the preset temperature.
- Red light remains on means the device has reached the pre-set temperature.
- Green light flashing means the device has reached the preset temperature and the countdown begins.
- Green light remains on means the count down finished, the cooking process is complete.
Preparation before use
- Remove all protective packaging and wrapping.
- Check that the device is in good condition and with all accessories. In case of incomplete or damaged delivery, please contact the supplier immediately. In this case, do not use the device.
- Clean the accessories and the appliance before use (See ==> Cleaning & Maintenance).
- Make sure the appliance is completely dry.
- Place the appliance on a horizontal, stable and heat resistant surface that is safe against water splashes.
- Keep the packaging if you intend to store your appliance in the future.
- Keep the user manual for future reference.
NOTE! Due to manufacturing residues, the appliance may emit a light odor during the first few uses. This is normal and does not indicate any defect or hazard. Make sure the appliance is well ventilated.
Operating instructions
- Place the appliance in a heat resistant container that is sufficiently deep to hold the appliance using the clamp.
- Fill the container with water level between the MIN and MAX markings on the heating element housing.
Note: Placing vacuum bag with food will increase the water level. Check the water level afterwards to ensure that it does not beyond MAX marking.
- Connect the power cable to the power supply. Press the "ON/OFF" button.
-
Use the "Temp/Time" button to select temperature and then set the desired value with the INCREASE or DECREASE buttons.
-
Use the "Temp/Time" button to select the required time with INCREASE or DECREASE buttons
- After you set the temperature and time of cooking, press the "Start/Stop" button to start the appliance. Water is now heating up. After reaching the required temperature, the machine will beep two times, place the vacuum bag with food in water. CAUTION! The water will be hot.
- After reaching the set cooking time, the appliance will beep two times once the cooking has finished. Remove the bag from the hot water using kitchen tongs.
Note: If there is no operation, the appliance will beep two times every 30 seconds in 30 minutes, while the water temperature will remain at the preset temperature. - After the cooking process is finished, disconnect the device from the power supply and leave it to cool down before cleaning. To avoid any risk of burns, leave the water to cool before pouring it from the container
Factory reset
In ready mode, simultaneously press and hold the "Start/Stop" and "+" buttons for 3 seconds. The temperature display will show the set temperature of 60^ , and the time display will show the set time of 24:00. Release the buttons, and the temperature and timer display will blink 3 times simultaneously, indicating a successful factory reset.
Cleaning & maintenance
- ATTENTION! Always disconnect the appliance from the power supply and cool down before storage, cleaning & maintenance.
- Do not use water jet or steam cleaner for cleaning and do not push the appliance under the water as the parts will get wet and electric shock might be resulted.
- If the appliance is not kept in a good state of cleanliness, this can adversely affect the life of the appliance and result in a dangerous situation.
Cleaning
- Clean the cooled exterior surface with a cloth or sponge slightly dampened with a mild soap solution.
- For reasons of hygiene, the appliance should be cleaned before and after use.
- Avoid water contacting the electrical components.
- Clean and descale at regular intervals (see chapter "Descaling")
- No parts are dishwasher safe.
- Place the machines vertically after cleaning, do not place it horizontally or upside down.
Maintenance
- Check the operation of the appliance regularly to prevent serious accidents.
- If you see that the appliance is not working properly or that there is a problem, stop using it, switch it off and contact the supplier.
- All maintenance, installation and repair work must be carried out by specialised and authorised technicians, or recommended by the manufacturer.
Transportation and Storage
- Before storage, always make sure that the appliance has been disconnected from the power supply and completely cooled down.
- Store the appliance in a cool, clean and dry place.
- Never place heavy objects on the appliance as this could damage it.
- Do not move the appliance while it is under operation. Disconnect the appliance from power supply when moving and hold it at the bottom.
Descaling
This appliance should be cleaned and descaled after every 20 uses or 100 hours. To keep this appliance in optimum condition and to ensure its operation, it is crucial that you descale the appliance on a regular basis. Depending on the hardness of the water and the frequency of use, you need to repeat the following procedure regularly.
To descale use a descaling agent that is suitable for the appliance. You can also use pure lemon juice, citric acid or cleaning vinegar as a descaling agent. To ensure the proper mixture, read the instructions supplied with the agent. For pure lemon juice or cleaning vinegar the general mixture applies of 1/3 cleaning vinegar or lemon juice to 2/3 water.
- Pour the solution into a container until you reach the MAX line of the appliance.
- Turn on the appliance, set the working temperature to 80^ C and set the time 3 hours(03:00) then press the Start/Stop button. When the machine reaches the preset temperature, press the Start/Stop button to start the timer.
- When the timer indicates 00:00, stop the appliance and turn off the power, unplug and let the appliance cool.
- Drain out the water from the container and use fresh water to clean the device.
NOTE! Warranty is void if failure to descale regularly leads to reduced functioning or failure of the appliance.
Troubleshooting
If the appliance does not function properly, please check the below table for the solution. If you are still unable to solve the problem, please contact the supplier/service provider.
| Problem Possible cause | Possible solution | |
| Appliance does not work | No power at the socket | Check the fuse |
| The plug is not plugged (correctly) into the power point | Check the plug | |
| Appliance does not reach the set temperature | Heating element faulty | Contact the supplier |
| Heating element fuse faulty | ||
| The buttons do not response or no display | Control unit faulty | Contact the supplier |
Error codes identification
| Error code | Possible cause Possible solution | |
| E01 The water level from container is lower than the lowest water level marking of housing. | Turn off the machine, add right amount of water to the container. | |
| E02 | Heating element is not normal. | Contact the supplier |
| Internal wiring is not normal. | ||
| Temperature sensor is not normal. | ||
Warranty
Any defect affecting the functionality of the appliance which becomes apparent within one year after purchase will be repaired by free repair or replacement provided the appliance has been used and maintained in accordance with the instructions and has not been abused or misused in any way. Your statutory rights are not affected. If the appliance is claimed under warranty, state where and when it was purchased and include proof of purchase (e.g. receipt).
In line with our policy of continuous product development we reserve the right to change the product, packaging and documentation specifications without notice.
Discarding & Environment
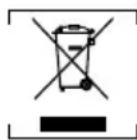
When decommissioning the appliance, the product must not be disposed of with other household waste. Instead, it is your responsibility to dispose to your waste equipment by handing it over to a designated collection point. Failure to follow this rule may be penalized in accordance with applicable regulations on waste disposal. The separate collection and recycling of your waste equipment at the time of disposal will help conserve natural resources and ensure that it is recycled in a manner that protects human health and the environment.
For more information about where you can drop off your waste for recycling, please contact your local waste collection company. The manufacturers and importers do not take responsibility for recycling, treatment and ecological disposal, either directly or through a public system.
DEUTSCH
Ohutusalased erijuhised
39100 Bolzano (BZ), Italy
Tel: +39 800 727 438
Email: office.italy@hendi.eu
HENDI GmbH
Ehring 15
1201, 12/F Exchange Tower
33 Wang Chiu Road, Kowloon Bay, Hong Kong
Tel: +852 2154 2618
Email: info-hk@hendi.eu
HENDI Romania S.R.L.
Str. Sânzienei FN, DE 305
507075, Ghimbav, Braşov, Romania
Tel: +40 268 320330
Email: office@hendi.ro
Find HENDI on internet:
www.hendi.com
www.facebook.com/HendiToolsforChefs
https://www.linkedin.com/company/hendi-tools-for-chefs/
www.youtube.com/HendiEquipment
GB: Changes, printing and typesetting errors reserved.