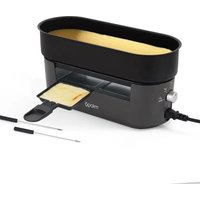
Multiplug Duo - Fondue, raclette and wok appliance Miogo - Free user manual and instructions
Find the device manual for free Multiplug Duo Miogo in PDF.


| Product type | Raclette and fondue (cheese/chocolate) appliance |
| Brand | Miogo |
| Model | Multiplug Duo |
| Number of persons | 2 |
| Power | 300 W |
| Supply voltage | 230 V~ |
| Frequency | 50 Hz |
| Cooking plate coating | Non-stick |
| Small pans and fondue pot coating | Non-stick |
| Multiplug system | Yes (up to 6 connectable appliances) |
| Thermostat | Yes, with indicator light |
| Functions | Raclette, cheese fondue, chocolate fondue |
| Included accessories | Removable plate, 2 small pans, 1 fondue pot, 2 wooden spatulas, 2 mini-forks, power cord, instruction manual |
| Cleaning plate and small pans | Dishwasher |
| Cleaning other parts | By hand |
| Resettable circuit breaker | Yes (overload protection >1500 W) |
| Power consumption in off mode | < 0.3 W |
| Warranty | Yes, from the purchase date |
| Recycling | WEEE, collection points |
Frequently Asked Questions - Multiplug Duo Miogo
User questions about Multiplug Duo Miogo
0 question about this device. Answer the ones you know or ask your own.
Ask a new question about this device
Download the instructions for your Fondue, raclette and wok appliance in PDF format for free! Find your manual Multiplug Duo - Miogo and take your electronic device back in hand. On this page are published all the documents necessary for the use of your device. Multiplug Duo by Miogo.
USER MANUAL Multiplug Duo Miogo
Raclette/Fondue (cheese or chocolate)
MANUEL D'UTILISATION
USER GUIDE
BEDIENUNGSANLEITUNG
GEBRUIKSAANWIJZING
miogo
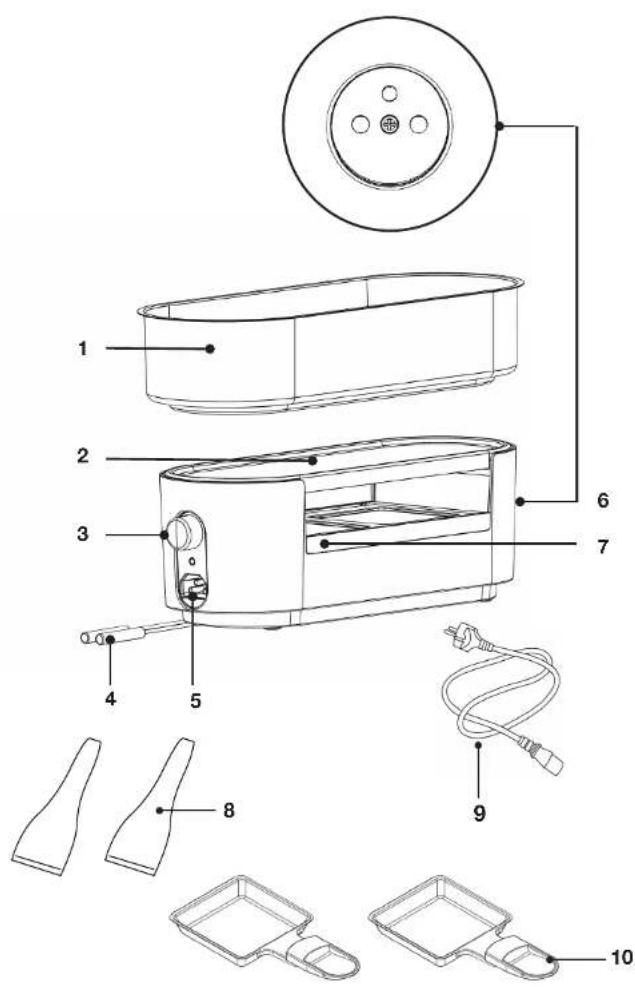
| FR EN DE NL | ||||
| 1 | Caquelon Fondue pot Fenduetopf Fonduepan | |||
| 2 | Plaque de cuisson amovible | Removable griddle plate | Abnehmbare Grillplatte Verwijderbare bakplaat | |
| 3 | Thermostat Thermostat | Thermostat Thermostaat | ||
| 4 | Mini-fourchattes à fondue (x2) | Mini fondue forks (x2) | Minigabeln für Fondue (x2) | Minifonduevorkjes (x2) |
| 5 | Prise du cordon d'alimentation | Power cord socket | Anschlussbuchse für das Netzkabel | Stekker van de veedingskabel |
| 6 | Prise pour extension "multiplug" | Socket for 'multiplug' extension | Buchse für die „Multiplug"-Erweiterung | Stekker voor uitbreiding "multiplug" |
| 7 | Plaque en aluminium Aluminium plate Aluminiumplatte Aluminium plaat | |||
| 8 | Spatules en bois (x 2) | Wooden spatulas (x 2) Holzschaber (x 2) Houtens spatels (x 2) | ||
| 9 | Cordon d'alimentation | Power cable Netzkabel Voedingskabel | ||
| 10 | Foêlons à raclette (x 2) | Raclette pan (x 2) | Raclette-Pfännchen (x2) | Raclettspannstje (x 2) |
Consignes d'usage
LISEZ ATTENTIVEMENT CES INSTRUCTIONS AVANT D'UTILISER L'APPAREIL ET CONSERVEZ- LES POUR POUVOIR LES CONSULTER LORSQUE VOUS EN AUREZ BESOIN.
CUIRE SUR LA PLAQUE AMOVIBLE
FONDUE AU FROMAGE
Instructions for use
READ THESE INSTRUCTIONS CAREFULLY BEFORE USING YOUR APPLIANCE AND KEEP THEM FOR FUTURE REFERENCE.
When using electrical appliances, basic safety precautions should always be followed to reduce the risk of fire, electric shocks and/or physical injury.
- This appliance was designed for indoor domestic use only. It must be used in accordance with the instructions in this leaflet.
- This appliance is not intended for use in the following domestic, or similar, applications:
- Kitchen areas reserved for staff in stores, offi ces and other professional environments;
- Farms;
- Hotels, motels and other residential environments;
- Bed-and-breakfast type environments.
- Before plugging in your appliance, make sure that the voltage of your home matches that indicated on the appliance's rating plate.
- Only connect the appliance to an earthed socket. If an extension lead is used, it must be
earthed and rated according to the power of the appliance. Take all the necessary precautions to ensure that nobody can become tangled in it.
- The plug must always remain accessible when the appliance is connected.
- Do not use the appliance:
- If the plug or the power cord is damaged,
- in case of malfunction,
- If the appliance has been damaged in any way. Take it to an after-sales service centre for inspection and repair. Repairs must not be carried out by the user.
- If the power cable is damaged, it can be replaced by your retailer, their after-sales service department or a similarly qualified person, in order to prevent any kind of risk.
- Always unplug your appliance after each use and leave it to cool before cleaning, storing or moving it.
- Switch off and unplug the appliance before leaving it unattended and before assembling, disassembling, or cleaning it.
- Do not move the appliance while it is running.
- When you unplug the power cord, always pull it at the plug. Do not pull on the cable itself.
• If the surface is cracked, disconnect the
appliance from the power supply to avoid the risk of an electric shock.
- Never leave the appliance unattended when in use.
- Never immerse the appliance, power cord or plug in water or any other liquid.
- Do not position the appliance near a heat source, such as a gas or electric hob, oven or any other appliance that produces heat.
- WARNING: Do not spill any of the contents on the connector.
- This appliance can be used by children over eight years of age and by persons with reduced physical, sensory or mental capacity or lack of experience or knowledge, as long as they are properly supervised or have received instructions on using the appliance safely and understand the dangers involved. Children must not play with the appliance.
- Children must not clean or maintain the appliance, unless they are over eight years of age and are supervised.
- Keep the appliance and its power cord out of the reach of children under the age of eight.
-
Never use or leave your appliance in a place exposed to bad weather and humidity.
-
Do not handle the appliance or power cord with wet hands.
- Do not touch the hot surfaces or allow the power cord to come in contact with the appliance's hot surfaces, during use.
- Do not use the appliance as a backup heater.
- Always put the appliance on a flat, stable, heat-resistant surface that is big enough for it.
- Never place your appliance on a fragile surface (varnished furniture, glass table, etc.) or a soft surface that is not heat-resistant.
- Do not operate the appliance under a wall cabinet or near fl ammable products or fl ammable materials (upholstery, paper, cardboard, etc.).
- IMPORTANT: Do not run the appliance within 15cm of furniture, walls, partitions or fl ammable products/materials (upholstery, paper, cardboard, etc.)
- Never cover with aluminium foil and never put dishes, plates or metallic objects such as knives, etc. on the griddle plate.
- Never use the appliance without one of the griddle plates.
-
Only use the accessories supplied with the appliance (pans and wooden spatulas). Failure to do so may be dangerous for the user and may damage the appliance.
-
The removable griddle plate must always be present regardless of how the appliance is being used. Never use the pans or the fondue pot without the removable heating plate.
- IMPORTANT: Accessible surfaces may be hot to the touch when the appliance is running. Never touch the aluminium plate, the fondue pot or the removable heating plate during use.
- WARNING: The surface of the heating element may remain hot for a while after use.
- NEVER TOUCH THE METAL PARTS WHICH ARE VERY HOT DURING USE: YOU COULD BURN YOURSELF! Use the buttons and only hold the pans by their handles.
- After use, always return the on/off switch to the "off" position, wait for the appliance to cool down and unplug the power cable before handling and cleaning it.
- This appliance is not intended to be operated using an external timer or a separate remote control system.
- To clean the appliance, please read the "Cleaning and Maintenance" paragraph at the end of this manual.
-
IMPORTANT: Never immerse the appliance in water or any other liquid.
-
IMPORTANT: To protect your home from an electric overload, the appliance is equipped with a resettable circuit breaker.
- This protection device will cut the electrical circuit should you connect an appliance whose power exceeds 1500 W or if the total power of all the connected products exceeds 1500 W.
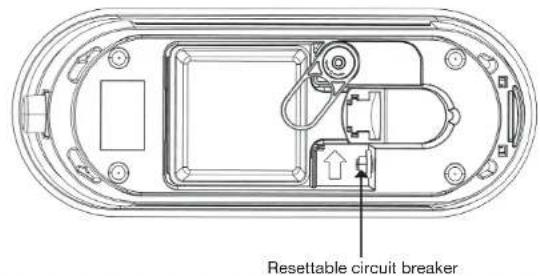
- In this case, unplug the appliance causing the overload (in excess of 1500 W) or wait for the machine to cool and reset the circuit breaker by pressing the push button located underneath the appliance (see diagram on page 18).
- IMPORTANT: After each use, turn the temperature control to the "OFF" position and unplug the appliance from the power outlet. Leave the different parts to cool down before cleaning.
- Never use scouring powder or an abrasive sponge or pad to clean the griddle plate, the spatulas, the pans, or the aluminium and plastic surfaces. Never immerse the appliance in water or any other liquid.
- To clean surfaces in contact with food, please refer to the “Cleaning and Maintenance” section at the end of this manual.
- WARNING: There is a potential risk of injury if used improperly.
Your product
BOX CONTENTS
• 1 raclette or fondue set (cheese or chocolate)
• 1 power cable
• 1 removable heating plate
- 2 raclette pans
- 1 fondue pot
• 2 wooden spatulas
• 2 fondue mini-forks
- 1 user manual
TECHNICAL FEATURES
• Raclette and cheese/chocolate fondue set for 2 people
• "Multiplug" system to connect other appliances
• Supply voltage: 230 V--
• Frequency: 50 Hz
• Power: 300 W
• Temperature control with a power-on indicator light
- Removable griddle plate with non-stick coating
• Raclette pans and fondue pot with a non-stick coating
Unpacking
- Remove the appliance from the packaging, taking care to remove the packing materials. The pans and spatulas are stored under the appliance. Rotate the locking tab to remove them.
- If you have to use an extension lead, use only a male to female extension cable that has an earthed plug and is capable of supporting the power of the appliance.
BEFORE FIRST USE
- Wipe the aluminium plate (7) with a soft, dry cloth. Be careful to not let water get inside the appliance.
- Wash the 2 raclette pans (10), fondue pot (1), mini-forks (4) and removable heating plate (2) with a soft sponge, and hot water with some washing-up liquid. Rinse with clean water and thoroughly dry using a soft cloth.
- A slight odour and a bit of smoke might be emitted the first time the appliance is used. This is normal and will quickly go away.
Use
GETTING STARTED
Important!
- Do not run the appliance within 15cm of furniture, walls, partitions or flammable products/materials (upholstery, paper, cardboard, etc.)
-
The removable griddle plate must always be present regardless of how the appliance is being used. Never use the pans (10) or fondue pot (1) without the removable heating plate.
-
Place the appliance on a flat, stable and heat-resistant surface.
- Fit the heating plate (2) over the heating element. Make sure that it is sitting correctly on the four pads provided.
- Fully unwind the removable power cable (9). Connect one end to the socket on the appliance (5) and the other end to a mains socket, making sure that the cable (9) does not come into contact with the element.
BASIC USE
- Turn the temperature control (3) to the 1/ / position to switch on the appliance and use it in fondue mode.
- Turn the temperature control (3) to the MAX position to use the appliance in raclette mode.
- The indicator light will come on. Preheat the appliance for 5 to 8 minutes. Preheating of the empty appliance (without food) should not exceed 15 minutes.

Important! Accessible surfaces may be hot to the touch when the appliance is running. Never touch the aluminium plate (7), fondue pot (1) or the removable heating plate (2) during use.
- When you've finished, turn the temperature control (3) to the OFF (off) position and unplug the appliance from the power socket.
- Wait for the aluminium plate (7), removable heating plate (7) fondue pot (1) or pans (10) to cool completely before cleaning them.
PREPARING A RACLETTE
- Turn the temperature control (3) to the MAX (raclette) position. Don't forget to remove the fondue pot from the removable heating plate (2).
- Place the cheese in the raclette pans (10).
- Slide the pans (10) into the spaces provided on the aluminium plate (7). The pans must be facing the opposite direction to each other.
Incorrect: the pan is sticking out on the other side. The handle of the pan will get hot and you could burn yourself when you grab hold of it.
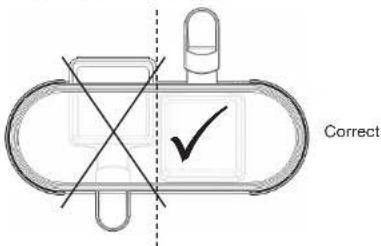
When inserting your pan, make sure that food does not come into contact with the heating element.
- Remove the pans (10) when the cheese has melted, holding them by the handle. Use the wooden spatulas provided to slide the cheese from the pans so as not to damage the non-stick coating.
PAN HOLDER
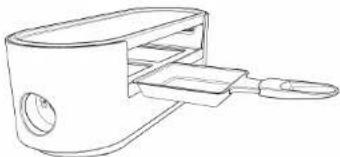
Once you have finished using your pan or if you want to take a break, you can place it on the holder provided for this purpose:
- Hold the empty pan by the handle so as not to burn yourself.
- Tilt the pan slightly downwards, and carefully insert the end underneath the aluminium plate (7) as shown in the diagram below.
- Be careful, do not attempt to take hold of the pan if the handle is not on your side (risk of burning yourself on the griddle plate).
- Leave your pan to cool until you need it again or until the appliance is cleaned.
COOK ON THE REMOVABLE PLATE
- Pour a little cooking oil on the heating plate (2) and wipe off the excess with a piece of kitchen roll.
- Place the meat, fi sh, vegetables or other food items on the plate (2).
- Turn the food over occasionally.
- When the food is cooked, season it on the plates (not directly on the griddle).
- Do not cut food directly on the heating plate (2).
PREPARING A CHEESE OR CHOCOLATE FONDUE

Important! This appliance must not be used as a frying pan and it must not be used with oil.

Important! Be careful not to scratch the bottom of the fondue pot with the mini-forks or any other metal utensil as this could damage the non-stick coating.
CHEESE FONDUE
- Make sure that the fondue pot (1) is stable and correctly positioned on the heating plate (2) of the appliance. Only use the fondue pot provided with the appliance.
- You can melt the cheese in a separate saucepan and pour the preparation into the fondue pot. In this case, simply adjust the power according to the consistency you want (do not put it in an oven, on a gas burner or on an electric hob).
- You can also melt the cheese directly in the fondue pot: start by pouring the liquid (white wine) into the fondue pot and turn the temperature control to the position.
- As soon as the first bubbles appear (about 5 minutes for 12cl of liquid), add the cheese which has been diced into small 1cm sided cubes.
- Make continuous figure-of-eight movements with a wooden spatula until all the cheese is melted (about 20 minutes for 500g of cheese, including the 5 minutes needed to heat the liquid). Be careful not to exceed the MAX level indicated on the fondue pot.
- Once you get the right consistency, adjust the temperature control so as not to overcook your preparation.
- During use, you need to adjust the temperature if the preparation is too liquid (lower the temperature control) or too fi m (increase the temperature control). The settings depend on the quantity and hardness of the cheeses chosen.
- Put the pieces of bread on the mini-forks provided, without going right through them to avoid scratching the fondue pot.
- Dip them in the preparation and enjoy. The temperature of the fondue pot is high. Do not touch it with your hands during use.
CHOCOLATE FONDUE
- Make sure that the fondue pot (1) is stable and correctly positioned on the heating plate (2) of the appliance. Only use the fondue pot provided with the appliance.
- You can melt the chocolate in a bain-marie using a separate saucepan, and pour the preparation into the fondue pot. In this case, simply adjust the power according to the consistency you want (do not put it in an oven, on a gas burner or on an electric hob).
- You can also melt the chocolate directly in the fondue pot: start by pouring the liquid (milk, cream) into the fondue pot and turn the temperature control to the position.
-
After a few minutes (about 3 for 40cl of liquid cream), add the chocolate which has been cut into squares.
-
Make continuous fi gure-of-eight movements with a wooden spatula until all the chocolate is melted (about 12 minutes for 500g of chocolate, including the 3 minutes needed to heat the milk/cream). Be careful not to exceed the MAX level indicated on the fondue pot.
- Once you get the right consistency, adjust the temperature control to a lower temperature so as not to overcook your preparation.
- You can adjust the temperature during use, if the chocolate solidifi es, for example.
- Put the selected food items on the mini-forks provided, without going right through the pieces to avoid scratching the fondue pot.
- Dip them in the preparation and enjoy. The temperature of the fondue pot is high. Do not touch it with your hands during use.
multiplug
Thanks to the built-in socket on the side of the appliance, you can connect up to 6 duo "Multiplug" raclette sets together. So you can enjoy a raclette with friends without having to stretch for your pan:
![graph TD A[" "] --> B[" "] B --> C[" "] D[" "] --> E[" "] E --> F[" "] C --> G[" "] F --> G G --> H[" "] style A fill:#f9f,stroke:#333 style D fill:#f9f,stroke:#333 style B fill:#f9f,stroke:#333 style C fill:#f9f,stroke:#333 style E fill:#f9f,stroke:#333 style F fill:#f9f,stroke:#333](/content/2026/04/743809/images/f18d5453488cd4d27aa70921969f05d1a195ef9b02295242faf64f70b644d402.jpg)
- Place all the appliances on a flat, stable and heat-resistant surface.
- Connect the first appliance as described in the "Setting up" section of this manual.
- Connect the power cable on the second appliance to the socket on the side of the first appliance, making sure that the power cable does not come into contact with the heating element.
- Do the same with other appliances if necessary.

Important! Do not operate the appliance close to furniture, walls, partitions or fl ammable products/materials (upholstery, paper, cardboard, etc.).

- You can also connect other "multiplug" sets to your raclette set (e.g., plate warmer, mobile phone, etc., as well as products equipped with the "multiplug" system). Make sure that the total power of the appliances (sum of the powers of all the appliances connected to each other) does not exceed 1500 W.
- Convenient! You can switch off one appliance, and the others will continue to operate.
Important!
- If you connect appliances together with a combined power of over 1500 W, the electrical circuit will cut out. There is a resettable circuit breaker under the appliance to protect your home from an overload of the current.
- If you do not follow the safety instructions and the total power of all the items connected to each other exceeds 1500 W, the circuit breaker will trip. Unplug the appliance causing the overload (in excess of 1500 W) or wait for the appliance to cool down (at least 30 minutes) and reset the circuit breaker by pressing the push button located underneath the product (see diagram below).
Practical tips for use
- In order to preserve the non-stick coating of the heating plate (2), raclette pans (10) and fondue pot (1), and avoid scratches, use the mini-forks (4) and wooden spatulas (8) provided, or other suitable utensils made of heat-resistant plastic. The use of metal utensils should be avoided. If the plate, pans or fondue pot are scratched, stop using them and replace them. You can get them from your retailer or their after-sales service.
- Do not put wet food on the heating plate (2). Wipe meats and fish thoroughly before cooking.
- Meat, fi sh, etc. cut into small pieces will cook more quickly and better than large pieces.
- Never place frozen food on the heating plate (2) as this may cause a thermal shock.
- Do not prick the meat with a fork or cut it while it is cooking. This will cause the juices to escape, making the meat tough.
- When cooking, if any small bits of food come off and get stuck to the heating plate (2), remove them immediately.
- After cooking fi sh or seafood, wipe the heating plate (2) with some lemon juice to prevent the fl avours from being transferred to subsequent dishes.
Cleaning and maintenance
Important!
- After each use, turn the temperature control (3) to the "OFF" position and unplug the appliance from the power outlet. Leave the different parts to cool down before cleaning.
- Never use scouring powder or an abrasive sponge or pad for cleaning the heating plate (2), spatulas (8), pans (10) and the aluminium and plastic surfaces. Do not immerse the appliance in water or any other liquid.
RACLETTE PANS, SPATULAS AND PLATE
- Lift the heating plate (2) from the appliance to remove it.
- Clean the raclette pans (10), spatulas (8) and heating plate (2) with a non-abrasive sponge and a mild detergent (e.g. washing-up liquid).
- Rinse everything in clean water and dry using a soft cloth.
- Put the heating plate (2) back over the heating element, making sure that it is sitting correctly on the 4 pads provided.

• The griddle plate and raclette pans can be placed in the dishwasher.
• Other parts should be cleaned by hand.
ALUMINIUM SURFACES AND PLASTIC BASE
You can wipe the aluminium surfaces and the plastic base using a soft sponge dipped in a little soapy water. Then dry with a soft cloth.
Be careful to not let water get inside the appliance. Do not spray the appliance with anything. If water has somehow managed to get inside, allow the appliance to dry completely before using it again.
STORING THE SPATULAS AND PANS
Store the spatulas and pans in the locations provided for this purpose under the appliance, as shown in the diagram below:
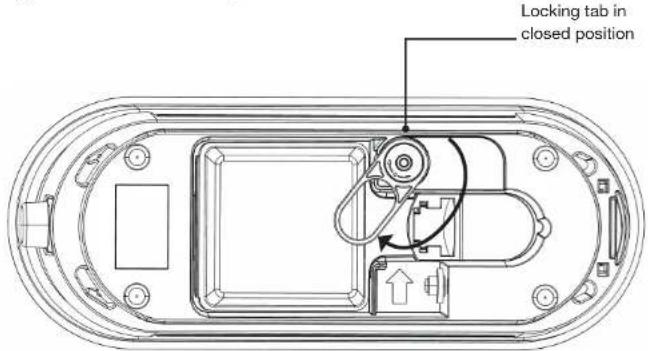
- Rotate the locking tab to the open position.
- Place the spatulas in the central compartment provided for this purpose.
- Place the pans in their compartment with the bottoms of the pans facing up.
- Rotate the locking tab to the closed position. It should overlap the backs of the pans.
FONDUE POT
Wash the fondue pot and mini-forks with a soft sponge and hot water with some washing-up liquid. Rinse them with clear water and dry them carefully with a soft, dry cloth.
If food has become stuck in the fondue pot, fi ll it with hot soapy water and leave it to soak for a few hours. The food will then come away more easily.

The fondue pot can be placed in the dishwasher.
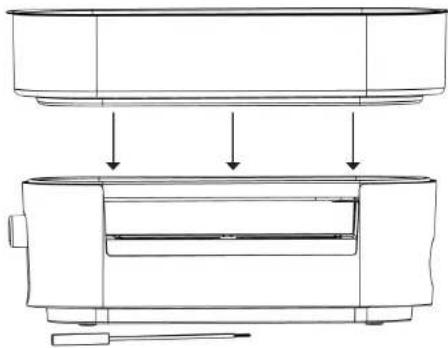
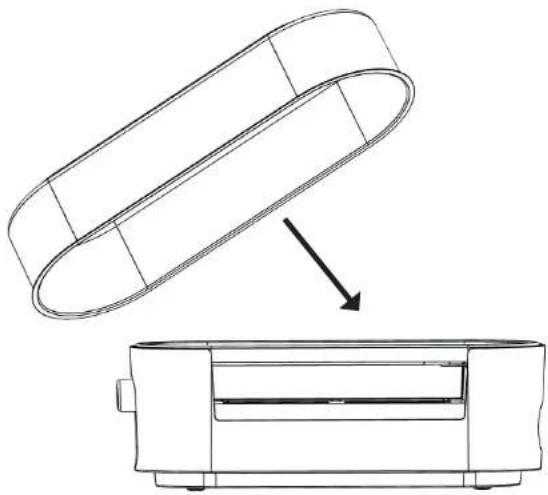
Important! The fondue pot can be inverted and used as a lid for the appliance to facilitate storage. Do not bump the inverted fondue pot when storing the appliance to avoid damaging the non-stick coating.
| Product Information for power consumption and maximum time to reach applicable low power mode | |
| Power consumption in off mode | < 0.3 W |
| Power consumption in standby | NA |
| The maximum time needed to automatically reach the applicable low power mode or condition | NA |
| Power consumption in network standby if all wired network ports are connected and all wireless network ports are activated | NA |
Gebrauchshinweise
GRILLEN AUF DER ABNEHMBAREN GRILLPLATTE
KÄSEFONDUE
KAASFONDUE
All information, designs, drawings and pictures in this document are the property of SOURCING & CREATION. SOURCING & CREATION reserves all rights to its brands, designs and information. Any copy and reproduction through any means shall be deemed and considered as counterfating.
Tested in our laboratories
Warranty valid from the date of purchase (receipt as proof of purchase). This warranty does not cover defects or damage caused by improper set up, incorrect use, or normal wear and tear of this product.
In unseren Labors getestet
Customer Relations Department /
Kundenservice / Klantenafdeling
Avenue de la Motte
CS 80137
59811 Lesquin cedex
contact@sc-ub.com
Art. 8009239
Réf. Multiplug
FABRIQUÉ EN R.P.C. / MADE IN CHINA /
Protection of the environment
This symbol attached to the product means that it is an appliance whose disposal is subject to the directive on waste from electrical and electronic equipment (WEEE). This appliance may not in any way be treated as household waste and must be subject to a specific type of removal for this type of waste. Recycling and recovery systems are available in your area (waste removal) and by distributors. By taking your place at its end of life to a recycling facility, you will contribute to environmental conservation and prevent any harm to your health.

Umweltschutz
- CONSIGNES D'USAGE
- CUIRE SUR LA PLAQUE AMOVIBLE
- FONDUE AU FROMAGE
- INSTRUCTIONS FOR USE
- READ THESE INSTRUCTIONS CAREFULLY BEFORE USING YOUR APPLIANCE AND KEEP THEM FOR FUTURE REFERENCE
- YOUR PRODUCT
- BOX CONTENTS
- TECHNICAL FEATURES
- UNPACKING
- BEFORE FIRST USE
- USE
- GETTING STARTED
- IMPORTANT
- BASIC USE
- PREPARING A RACLETTE
- PAN HOLDER
- COOK ON THE REMOVABLE PLATE
- PREPARING A CHEESE OR CHOCOLATE FONDUE
- CHEESE FONDUE
- CHOCOLATE FONDUE
- MULTIPLUG
- PRACTICAL TIPS FOR USE
- CLEANING AND MAINTENANCE
- RACLETTE PANS, SPATULAS AND PLATE
- ALUMINIUM SURFACES AND PLASTIC BASE
- STORING THE SPATULAS AND PANS
- FONDUE POT
- GEBRAUCHSHINWEISE
- GRILLEN AUF DER ABNEHMBAREN GRILLPLATTE
- KÄSEFONDUE
- KAASFONDUE
- TESTED IN OUR LABORATORIES
- IN UNSEREN LABORS GETESTET
- PROTECTION OF THE ENVIRONMENT
- UMWELTSCHUTZ
Brand : Miogo
Model : Multiplug Duo
Category : Fondue, raclette and wok appliance