MTB1 - Blender Miogo - Free user manual and instructions
Find the device manual for free MTB1 Miogo in PDF.


User questions about MTB1 Miogo
0 question about this device. Answer the ones you know or ask your own.
Ask a new question about this device
Download the instructions for your Blender in PDF format for free! Find your manual MTB1 - Miogo and take your electronic device back in hand. On this page are published all the documents necessary for the use of your device. MTB1 by Miogo.
USER MANUAL MTB1 Miogo
natural_image
Exterior view of a modern kitchen blender with black handle and glass interior (no visible text or symbols)MANUEL D'UTILISATION
USER GUIDE
MANUAL DE USO
BEDIENUNGSANLEITUNG
GEBRUIKSAANWIJZING
miogo
text_image
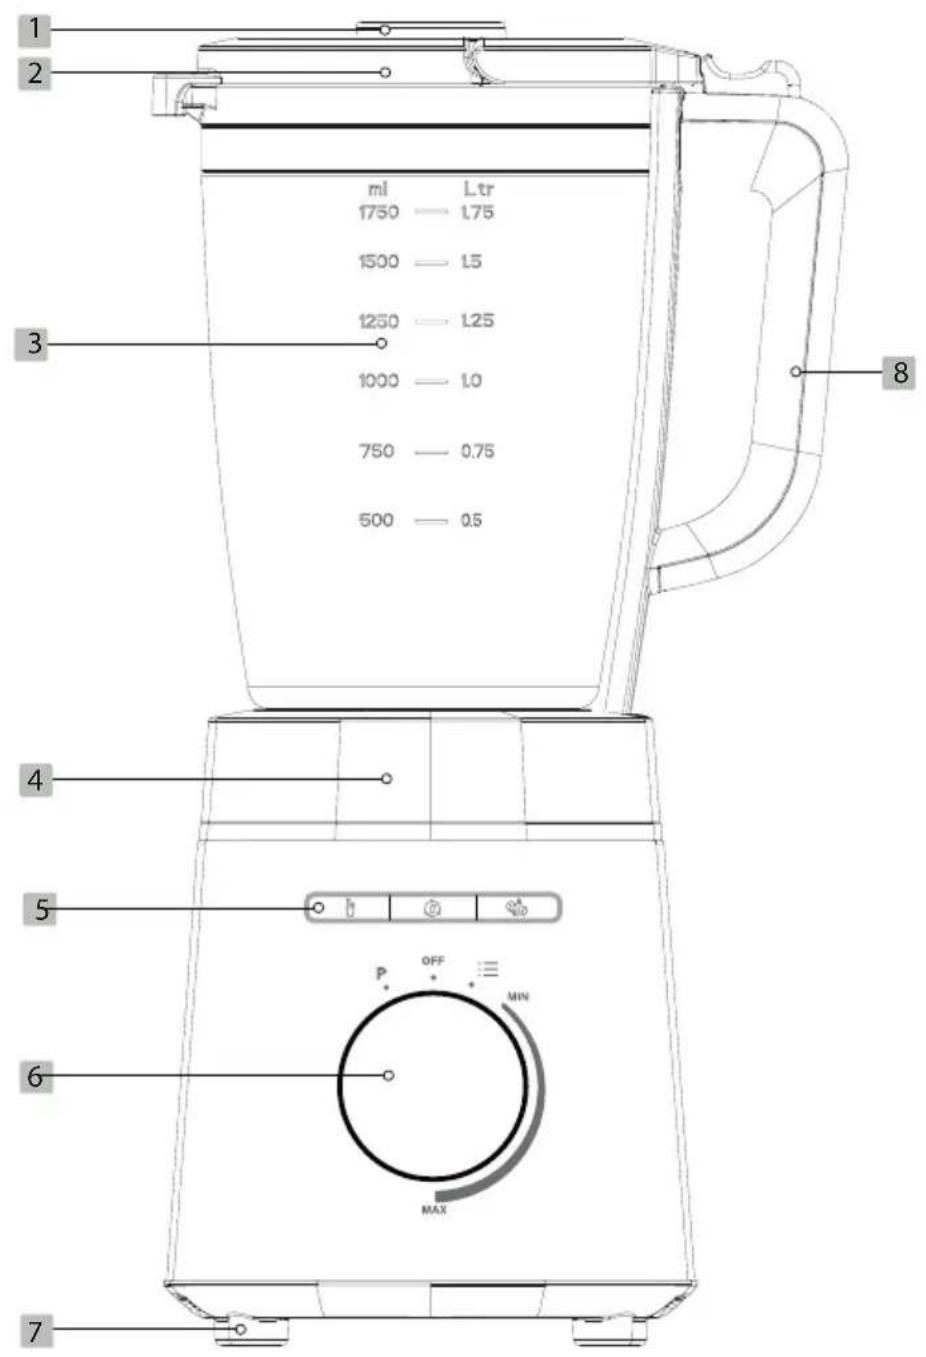
1 2 3 4 5 6 7 8 ml Ltr 1750 — 1.75 1500 — 1.5 1250 — 1.25 1000 — 1.0 750 — 0.75 500 — 0.5 P OFF MIN MAX| FR EN ES DE NL | |||||
| 1 | Bouchon doseur | Measuring cap | Tapón dosificador | Dosierverschluss Doseerdop | |
| 2 | Couvercle avec orifice de remplissage | Lid with filling hole | Tapa con orificio de llenado | Deckel mit Einfüllöffnung | Deksel met vulopening |
| 3 | Bol mélangeur gradué | Graduated blender jar | Vaso mezclador graduado | Mixbehälter mit Messskala | Mengkom met maataanduiding |
| 4 | Bloc moteur Motor unit Bloque motor Motorblock | Motorblok | |||
| 5 | Bandeau de commande | Control panel | Panel de mando | Bedienfeld Bedieningspaneel | |
| 6 | Molette de commande | Control knob | Rueda de control | Drehschalter Bedieningswieltje | |
| 7 | Pieds antidérapants | Non-slip feet | Patas antideslizantes | Rutschfeste Füße | Antislippoten |
| 8 | Poignée Handle Asa Griff | Handvat | |||
Votre produit
CONTENU DE L'EMBALLAGE
text_image
P + OFF - MIN MAXtext_image
P OFF MIN MAX• 1 blender (jar and motor unit)
- 1 user manual
- 1 recipe book
Technical features
• Voltage: 220 - 240 V\~ 50- 60 Hz
• Power: 1400 W
• Capacity of the blender jar: 1.75L
- 6 stainless steel blades for ultra fast and efficient blending
• Programs: smoothie, crushed ice and cleaning
• "Pulse" function
- Speed regulator
- Measuring cap
- Easy to clean
CONTROL PANEL
flowchart
graph TD
    A["1"] --> B["2"]
    B --> C["3"]
    D["8"] --> E["7"]
    E --> F["P'"]
    F --> G["OFF"]
    G --> H["MIN"]
    H --> I["4"]
    H --> J["5"]
    K["6"] --> L["MAX"]
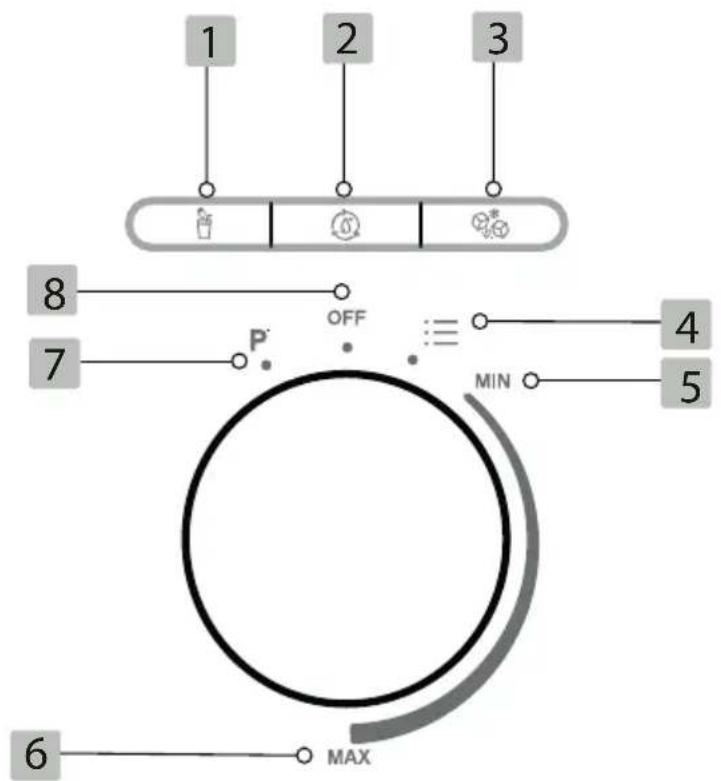
| 1 Smoothie button 5 Minimum speed position | ||
| 2 Cleaning button 6 Maximum speed position | ||
| 3 Crushed ice button 7 P "Pulse" function position | ||
| 4 :≡ (on) position and program selection | 8 OFF position | |
Before first use
- Check that the appliance has not been damaged during transport. Do not plug in a damaged appliance under any circumstances! Please contact your retailer if the appliance is damaged.
- Remove all protective film, labels and other packaging from inside and outside the appliance.
- Place all the elements on a flat surface. Then clean the blender jar, lid and measuring cap with soapy water. Rinse with clear water and dry.
- Refer to the "Cleaning and Maintenance" section for the recommended precautions regarding cleaning.
- The jar and removable accessories can be placed in the dishwasher.
Warning:
- Never immerse the motor in water, as this could cause electrocution.
- The jar contains very sharp blades. Handle them with care!
- Respect the level marks indicated on the jar. Failure to do so may result in damage to the appliance and/or injury to yourself.
- Do not place hot or boiling food in the appliance. Use cold or warm food.
Use
- Do not put a spatula or any other utensil into the jar during operation. Only put utensils into the container when the appliance is stopped.
- Do not put raw meat or fish into the appliance. Cook them before adding them to the jar.
- Never place the following in the blender: bones, frozen food (except ice cubes) and hard food.
- Do not run the appliance for more than 3 minutes to avoid overheating it. Wait for at least 30 minutes before using the appliance again.
- Do not use the appliance when it is empty (no food).
-
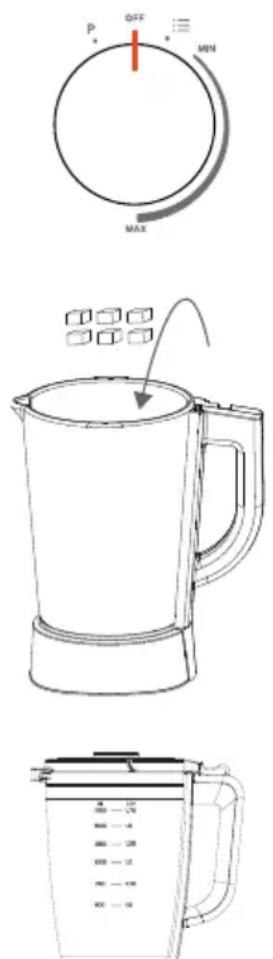
Place the appliance on a flat and stable surface, making sure that the control knob is in the OFF position.
-
Unlock the blender jar from the motor unit. Remove the lid and the measuring cap.
-
Pour the prepared ingredients (peeled and cut into pieces) into the blender jar and add water or juice if necessary to facilitate mixing, taking care not to exceed the maximum level: 1.75L.
Warning:
- Never pour hot or boiling water into the appliance!
-
Never run the appliance when it is empty!
-
Put the lid back in place, and make sure that it is properly locked using the lock on the handle.
-
Plug the filling hole in the lid with the measuring cap. The measuring cap has 2 functions: to measure and prevent splashing.
Note: if the lid is not properly fitted, the appliance will not work.
- Put the blender jar back on the motor unit and turn it slightly. The lugs on the bowl must be correctly inserted into the lugs on the motor unit.
- Connect the power cord to an outlet that complies with the appliance's specifications.
text_image
P OFF MIN MAX-
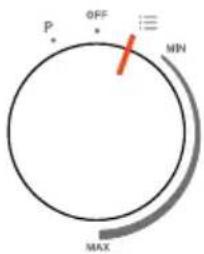
Set the control knob to the (on) position. The program indicator lights flash.
-
You can choose one of the 3 automatic programs:



SMOOTHIE CLEANING CRUSHED ICE
Press the button corresponding to the desired program and the relevant button lights up (refer to the "Programs" section). The appliance then operates for a preset period.
or
- You can simply adjust the operating speed of the appliance, without any specific program, using the control knob (refer to the section on "Adjusting the speed").
Note: the "SMOOTHIE", "CRUSHED ICE CREAM" and "CLEANING" programs cannot be operated when using the control knob.
- Once the preparation is complete,
- If you have activated one of the 3 programs, the appliance switches off automatically after the preset time. However, you can press the button of the chosen program again if you want to stop it before the end.
- If you have adjusted the operating speed manually, turn the control knob to the OFF position.
-
Unplug the appliance from the socket.
-
Remove the blender jar from the motor unit. Remove the lid. You can now serve the preparation.
Warning:
Should the motor overheat, the unit will stop automatically so that it doesn't get damaged. Wait about 30 minutes until the appliance cools down. Then unplug it and plug it in again: the appliance can be used again.
SPEED ADJUSTMENT
You can change the mixing speed using the control knob, depending on the desired result.
text_image
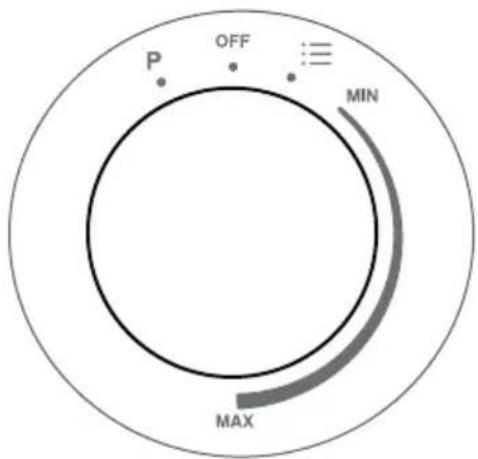
P OFF 3 MIN MAX- Place the knob on the ⏰ (on) position. Then turn the knob clockwise to somewhere between the MIN (slow speed) and MAX (high speed) to get the speed you want. The light circle on the knob lights up.
or
- Turn the knob anticlockwise as far as the P mark to select the Pulse function. This function triggers a high speed pulse and is used to control the blending action more precisely.
Choose the most suitable speed for the ingredients used. The appliance will operate at the selected speed until you turn the knob back to the "OFF" position.
| 1 |  Smoothie Smoothie | Making smoothies*, milk-shakes, etc.Homogeneous mixing | Press the "SMOOTHIE" button once: the blender runs automatically.No adjustments to the speed can be made. |
| 2 |  Cleaning Cleaning | For quickly and easily cleaning the jar and blades (see "Cleaning and maintenance"). | Press the "CLEANING" button: the blender runs automatically.No adjustments to the speed can be made. |
| 3 | [28HY]Crushed ice | For crushing ice | Press the "CRUSHED ICE" button: the blender runs automatically.No adjustments to the speed can be made.For best results, we recommend that you crush 8 to 10 ice cubes at a time. |
* "Smoothies" are thick drinks made by mixing fresh or fruit with fresh fruit juices (sometimes accompanied by ice cream or yoghurt).
Cleaning and maintenance
WARNING!
- Before cleaning your blender, make sure that the "ON/OFF" knob is in the "OFF" position and that the appliance is unplugged from the power point.
- Never immerse the motor unit, power cord or plug in water or any other liquid.
- There is a potential risk of injury if used improperly.
- The blades are sharp. It is essential that you take special precautions when handling them to avoid injury.
- Never use scouring pads or abrasive detergents for cleaning.
GENERAL CLEANING RECOMMENDATIONS
- Immediately rinse all the parts after use for easy cleaning.
- The removable parts (lid, measuring cap, blender jar, blade block) can be hand washed with water and washing-up liquid or placed in the dishwasher.
- Be sure to clean the seal of the lid and the seal of the blade block thoroughly. When they are clean and dry, put them back correctly on the appliance.
JAR AND BLADE SELF-CLEANING FUNCTION
Your appliance has a self-cleaning program that simplifies the process of cleaning the blades and jar.
- After using your appliance and finishing a recipe, place the blender jar on the motor unit.
- Pour 400 to 500 ml of warm water with a little non-abrasive cleaning product (e.g. washing-up liquid).
- Set the control knob to the ON position and press the "CLEANING" button. The corresponding indicator light comes on and the appliance starts up. The cleaning cycle operates automatically.
- Once the cleaning is finished, the appliance stops automatically and the 3 indicator lights start to flash.
- Unplug the appliance, remove the mixing bowl from the motor unit and rinse it with clear water.
- Turn the mixing bowl over and unscrew the blade unit (turn from position to position).
- You can now clean the blade assembly and bowl contours.
- Dry the parts thoroughly with a soft cloth.
- Screw the blade unit back on, making sure you tighten it to avoid leaks the next time you use it.
MOTOR UNIT
- Wipe the motor unit with a sponge, and then thoroughly dry it with a soft cloth.
- Stubborn stains can be removed with a damp sponge and, if necessary, a little non-abrasive cleaning product (e.g. washing-up liquid).
- Do not immerse the motor unit in water or any other liquid.
STORAGE
- Make sure the appliance is completely dry before storing it.
- Store the appliance in a cool, dry place.
- Be careful not to completely close the lid to allow air to circulate and to prevent odours from forming.
- You can store the cable by slipping it inside the motor unit ( ).
Troubleshooting
If the information in this table does not help you solve your specific problem, do not carry out repairs yourself, but take your appliance to your retailer's after-sales service. Repairs carried out by unauthorised personnel are not covered by the warranty.
| Problem Possible causes and solutions | |
| The appliance is not working. • Make sure | the appliance is assembled correctly.Make sure that the power plug is properly connected.Check to see if there is a power failure or if the socket used is working. |
| The motor is running but the parts are not turning. | Make sure that the motor unit is correctly installed on a flat, stable surface. |
| The device is leaking. • Make sure that the | blade assemblyis installed correctly and screwed in sufficiently. |
Su producto
CONTENIDO DE LA CAJA
text_image
P + OFF + MIN MAXtext_image
P OFF MIN MAXtext_image
P+ OFF MIN MAXtext_image
P OFF MIN MAXtext_image
P QFF MIN MAXtext_image
P OFF MIN MAXAll information, designs, drawings and pictures in this document are the property of SOURCING & CREATION. SOURCING & CREATION reserves all rights to its brands, designs and information. Any copy and reproduction through any means shall be deemed and considered as counterfeiting.
Tested in our laboratories
Warranty valid from the date of purchase (receipt as proof of purchase). This warranty does not cover defects or damage caused by improper set up, incorrect use, or normal wear and tear of this product.
Customer Relations Department /
Please behave responsibly towards
the environment. Recycle this product
at the end of its life.
Protection of the environment
This symbol attached to the product means that it is an appliance whose disposal is subject to the directive on waste from electrical and electronic equipment (WEEE). This appliance may not in any way be treated as household waste and must be subject to a specific type of removal for this type of waste. Recycling and recovery systems are available in your area (waste removal) and by distributors. By taking your appliance at its end of life to a recycling facility, you will contribute to environmental conservation and prevent any harm to your health.