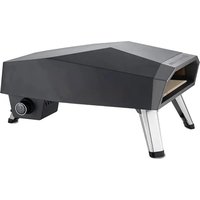
FPG12D - Pizza oven Le Marquier - Free user manual and instructions
Find the device manual for free FPG12D Le Marquier in PDF.


User questions about FPG12D Le Marquier
0 question about this device. Answer the ones you know or ask your own.
Ask a new question about this device
Download the instructions for your Pizza oven in PDF format for free! Find your manual FPG12D - Le Marquier and take your electronic device back in hand. On this page are published all the documents necessary for the use of your device. FPG12D by Le Marquier.
USER MANUAL FPG12D Le Marquier
INSTRUCTIONS D'ALLUMAGE
POUR ALLUMER LE BRULEUR

To reduce risk of fire, burns or other injuries, read this safety manual carefully and in full before using this appliance.
1IMPORTANT
Before cleaning, make sure the gas is turned off, that the control button is in the OFF position and that the burner and the oven have cooled.
1IMPORTANT
Never leave this appliance in operation unsupervised. In the event of fire, keep away from the appliance and call the fire brigade immediately. Do not try to extinguish an oil or fat fire with water.
Failure to follow these instructions can entail a risk of fire, explosion or burns leading to material damage, injury or death.
IMPORTANT
For outdoor use only.
Do not keep this appliance indoors, except if the gas canister is disconnected.
Do not store gas canisters in a building, a garage or any other closed place. Always keep them out of the reach of children.
This appliance is not intended to be installed in or on leisure vehicles or boats.
IMPORTANT
Check the tightness of all the gas connections before use.
Do not use this appliance until you have checked all the connections and are sure there are no leaks. Do not smoke while testing the tightness. Never test the tightness with a naked flame
DANGER
If you smell gas:
- Turn off the appliance's gas supply.
- Extinguish any naked flame.
- If the smell persists, keep away from the appliance and immediately call your gas supplier or the fire brigade.
IMPORTANT
- Keep the gas supply hose away from hot surfaces.
- Consumption of alcohol, prescription or over-the-counter medicines can affect your ability to set up the appliance correctly or use it safely.
- Always keep children and pets away from the appliance.
- Do not move the appliance during use.
- This appliance is not designed to work as a heating appliance and should never be used as such.
IMPORTANT
When you use a match to light the appliance, make sure you use the included match-holder. When you light the appliance, keep your face and hands as far away from the appliance as possible.
IMPORTANT
The minimum clearance between the sides of the appliance and a combustible structure is 609 mm (24 inches).
The minimum clearance between the rear of the appliance and a combustible structure is 914 mm (36 inches)
IMPORTANT
Spiders and insects can nest inside the appliance's burner and obstruct the gas flow. Inspect the burner at least once a year.
BEFORE LIGHTING THE appliance
Inspect the gas supply hose before lighting the gas. If you observe cuts, signs of wear or abrasion you must replace it before use.
Connect the regulator to the gas canister. Before lighting the appliance, inspect the hose and regulator connections and check there are no leaks with a soapy water solution.
Use the gas regulator and hose only with this appliance.
PROpane GAS CANISTER WARNING
- Do not store the spare propane gas canister under or near to this appliance.
- Never fill the canister to more than 80% capacity.
The propane gas canister must be fitted with an OVERFLOW PREVENTION appliance. - Failure to follow these instructions can entail fire risks that could lead to death or serious injury.
SAFETY RULES TO AVOID INJURIES
When it is well maintained, your oven will give you a safe, reliable service. However, you must be extremely careful when using it, as the oven produces intense heat that can heighten the risk of accident.
When using this oven, the basic safety rules must be followed, including, non-exhaustively:
-
Do not repair or replace any part of the oven unless this is specifically recommended in this manual. Any maintenance operation should be carried out by a qualified technician.
-
Never leave children alone or unattended near to or in contact with a hot surface or a burner before it cools down.
-
For your own personal safety, wear suitable clothing. Never wear loose clothes or sleeves when using the oven. Some synthetic fabrics are highly inflammable and should not be worn while you are cooking. The fabric could catch fire and cause serious injury.
-
Do not heat closed food containers as the build-up of pressure could lead to them exploding.
-
When using the oven, do not touch the outer shell, the pizza stone or their immediate surrounds as these areas get extremely hot and could cause burns.
-
Don't use the oven to cook extremely fatty meats or other foods that heighten the combustion.
-
Keep the surroundings of the oven free of combustible material, including fluids, waste and vapours such as petrol or flame-igniting liquid.
-
Never block the combustion air flow nor the ventilation.
-
Never use the oven in extremely windy weather.
The temperature under the oven is high. Don't place it on a table with inflammable tablecloths, plastic or any other inflammable material.
LIST OF PARTS
ACCESSIONS SOLD SEPARATELY
-
Pizza Oven FPG12D
-
Pizza stone
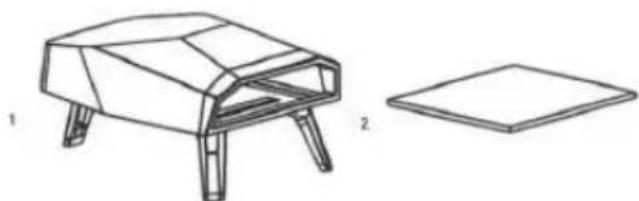
| API001 | PM Pizza Peel |
| API002 | GM Pizza Peel |
| API003 | Pizza wheel |
| API004 | Slicing board |
ASSEMBLY
Before assembly, make sure you have all the parts. If a part is missing or damaged do not try to assemble the appliance. Contact customer services to get spare parts.
- Unfold the legs
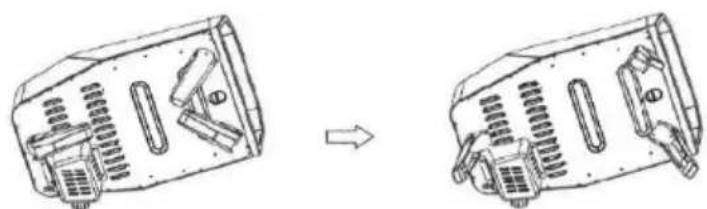
- Insert the pizza stone
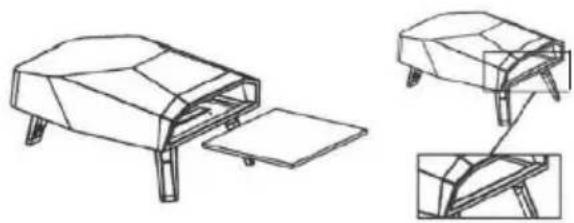
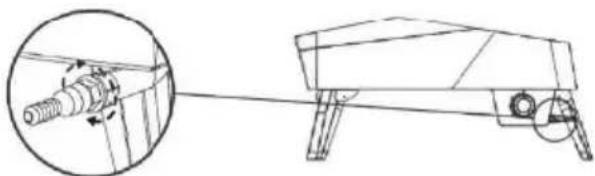
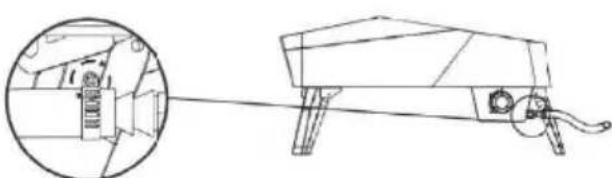
- Connect the gas hose to the pizza oven
3a. Direct connection of the gas hose to the pizza oven
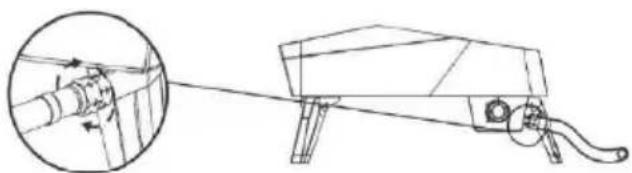
3b. Connection of the barbed connector to the pizza oven
3c. Connection of the gas hose to the barbed connector. Tighten using the appropriate spanners.
- Connect to the gas canister
LEAK DETECTION
GENERAL
Although the appliance's gas connectors undergo a leak detection test before packaging and shipment, a full test must be carried out on site where the appliance is set up.
Before each use, check the tightness of all the gas connectors following the below procedure. If you detect gas odour at any time, you must immediately stop using the oven and check the tightness of the entire system.
BEFORE THE TEST
Make sure all the packaging has been removed from the appliance.
Prepare a mixture of liquid detergent and water in equal parts. You will need a spray bottle, a brush or a cloth to apply the solution to the connectors.
TO CARRY OUT THE TEST
- Turn the oven's control button to the OFF position.
- Open the valve of the propane canister by turning it anticlockwise.
- Apply the soapy water solution to the gas connectors. In the event of a leak, soap bubbles form.
- If you detect a leak, turn off the gas supply immediately and retighten the leaking connectors.
- Re-open the gas valve and check it again.
If gas continues to escape from one of the connectors, turn the gas off and contact customer services.
USING THE OVEN
- Make sure the oven has been leak-tested and that it has been positioned correctly.
- Remove all the packaging.
- Light the burner following the LIGHTING INSTRUCTIONS below.

LIGHTING INSTRUCTIONS
TO LIGHT THE BURNER
- Make sure the oven's control button is in the OFF position, then open the gas canister's valve by turning it slowly anticlockwise.
- Push in and slowly turn the control button anticlockwise until you hear a click and the burner lights.
- Keep the control button pushed in for 5 seconds If the burner doesn't light, turn the button to the OFF position, wait 5 minutes and start the lighting again.
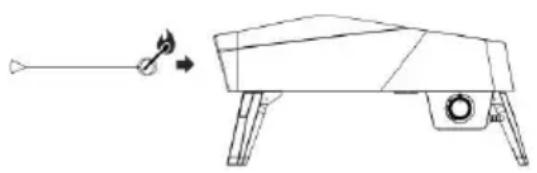
TO LIGHT WITH A MATCH
-
If the burner doesn't light after several tries using the control button, it can be lit with a match.
-
If you have already tried to light the burner with the control button, wait 5 minutes for the gas to disperse.
- Insert a match into the match-holder. Light the match and insert it in the oven's opening until you reach the burner.
- Push in and slowly turn the flame control button: the burner should light immediately.
- If the burner does not light in a few seconds, turn the control button to the OFF position, wait 5 minutes and try again.
CARE AND UPKEEP
Keep the oven out of direct sunlight and indoors insofar as is possible and during long storage periods.
The oven must not be exposed to bad weather such as snow, heavy rain and strong winds.
Wait for the oven to cool down completely before moving it.
The colour of the outer shell of the oven may be altered over time and with use.
This will not affect its performance.
PIZZA STONE
- DO NOT use the stone over a naked flame.
- Avoid extreme temperature changes in the stone. DO NOT place frozen foods on a hot stone.
- The stone is fragile and can break if struck or dropped.
- The stone gets very hot during use and remains hot a long time after use.
- DO NOT cool the stone with water when it is hot.
- After cleaning the stone with water, dry it before using it. This can be done by placing it in a conventional oven at 60^ (140^) for 2 hours.
RECOMMENDATIONS FOR USE
(For easier handling, prepare the pizza directly on a pizza peel)
Before lighting the pizza oven put flour on the pizza stone.
Light the pizza oven and heat it up at maximum power for 10-15 minutes.
- Place the pizza in the centre of the pizza stone using a large pizza peel.
- Turn the pizza regularly using the pizza peel throughout its cooking time (60 seconds).
- Take the pizza out using the pizza peel.
Put the pizza on a plate or on a board to cut it up
| Problem | Possible cause | Prevention / Solution |
| The burner doesn't light | 1. Gas not getting through2. The coupling nut and the regulator are not properly connected3. The gas flow is blocked4. The burner is disconnected from the valve5. Incorrect assembly | 1. Check whether the propane canister is empty2. Turn the coupling nut about another half to three-quarter's turn until it stops completely.Tighten by hand only - don't use tools3. Clean the burner's tube4. Reconnect the burner and the valve5. Check the steps in the assembly instructions |
| Sudden fall in gas flow or low flame | 1. The gas has run out | 1. Check if there is gas in the propane canister.2. Close the gas control button, wait for 30 seconds and relight the oven. If the flames are still low, close the gas control button and the valve on the propane canister.Disconnect the regulator. Re-connect the regulator and carry out a tightness test. Open the valve on the propane canister, wait 30 seconds, then light the oven. |
| The flames go out | 1. Strong or gusty wind2. Low propane level | 1. Place the oven with its back to the wind2. Fill the propane canister3. See "Sudden drop in gas flow" above |
| Flareup/flashover | 1. Build-up of fat2. Excess fat in the meat3. Cooking temperature too high4. Too much flour on the cooking surface | 1. Clean the oven2. Remove fat from the meat before cooking3. Adjust (lower) the temperature accordingly4. Dust the remaining flour off the cooking surface. |
| Flashback (fire in the burner tube, rumbling in the burner) | 1. The burner and/or the burner's tubes are blocked2. Drop in pressure on lighting3. The oven is facing the wind | 1. Close the gas inlet valve. Clean the burner and/or the burner's tubes2. Turn off the oven, make sure the valve on the canister is completely open (where applicable) and relight3. Put the oven with its back to the wind once it has cooled |
| MODEL | HNS - P200 / FPG12D | CE PIN: 2575DM29062 | ||
| Category: | I3+(28-30/37) | I3B/P(30) | ||
| Type of gas | Butane | Propane | Butane, propane or a mixture of the two | |
| Gas pressure | 28-30 mbar | 37 mbar | 28-30 mbar | 50 mbar |
| Maximum heating power | 4.4 kW | |||
| Type of device | A1 | |||
| Injector size | 1.08mm | 1.08mm | 0.94mm | |
| Countries of destination | BE, CH, CY, CZ, ES, FR, GB, IE, IT, LT, LU, LV, PT, SK, SI | AL, CY, DK, EE, FI, HU, IT, LT, | AT, CH, DE, SK | |
| This device must be installed according to the rules and regulations and used only in a well-airied place. See the instructions before setting up and using this device. | ||||
| MODEL | HNS - P200 / FPG12D | |
| Injector size | 1.2mm | C CALORIC VALUE 15000 BTU |
| Type of gas | Propane | |
| Gas pressure | 28 mbar | Intertek |
WARRANTIES
The appliance has a 2-year commercial warranty.
Our after-sales service charter can be viewed online on our Website: lemarquier.com.
Every appliance is inspected at every manufacturing stage.
In the event that anomalies were to be detected, it is important to ensure all the requirements of the manual have been strictly adhered to. In particular, the fact that the safety pressure regulator used is the one that is intended to be used with your gas bottle.
Failure to follow the rules laid down for use of the appliance can lead to its deterioration.
Do not modify the appliance.
Any modification made to the appliance could be dangerous.
In the event of a breakdown or a damaged part, please contact our After-sales Department.
Dimensions of the Pizza Oven appliance (in cm)
| LENGTH | 40 |
| DEPTH | 62 |
| HEIGHT | 30 |
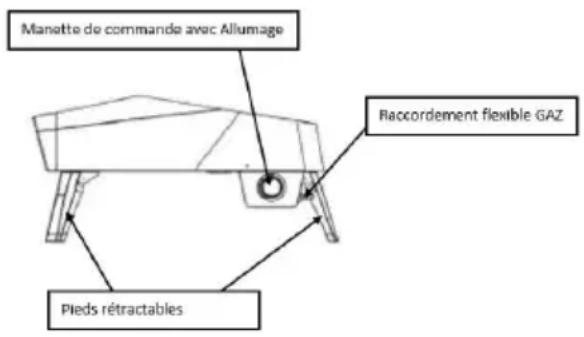
Description of the Pizza Oven (top view)