USER MANUAL AUTOCOFFEE M3 VALBERG
Thank you for choosing this VALBERG product. VALBERG products are chosen, tested, and recommended by ELECTRO DEPOT, so you can be sure you are getting a top-quality, easy-to-use product that won't let you down. We're confident your new device will be a pleasure to use every day!
Welcome to ELECTRO DEPOT.
Table of Contents

Product overview
Parts
Product overview
Intended use
Specifications

Product usage
Setting up the product
Product usage

Cleaning and maintenance
Cleaning and maintenance
Using the milk system cleaning programme
Using the brewing system cleaning programme
Dscaling the coffee machine
Troubleshooting
Storage
Before using the unit, carefully read both the Manual and RegulatoryWarnings booklet. Keep these instructions for future reference and pass them onto any new owners of the unit.
Parts
| Description |
| Touch control panel |
| Espresso button |
| Coffee button |
| Americano button |
| Cappuccino button |
| Latte Macchiato button |
| Milk Foam button |
| Hot Water button |
| Water tank empty indicator |
| Coffee grounds container full indicator |
| Error/Warning indicator |
| Descale machine indicator / Descaling Programme button |
| Brewing system cleaning indicator / Brewing System Cleaning Programme button |
| Brewing System Cleaning Programme started indicator |
| Milk system cleaning indicator / Milk System Cleaning Programme button |
A Product overview
| 13 | | 2-cup Dispense button |
| 14 | | Cup volume adjustment button (=) |
| 15 | | Coffee adjustment button / coffee bean container empty indicator |
| - | To adjust coffee strength |
| - | To brew with pre-ground coffee |
| 16 | | Milk foam amount adjustment button (=) |
| B | | Coffee spout cover (removable) |
| C | | Milk container with lid |
| D | | Milk tube |
| E | | Milk container metal straw |
| F | | Adjustable coffee spout/dispenser (removable), with status indicator light |
| G | | Orange floater (drip tray full indicator) |
| H | | Flip-up lid of the pre-ground coffee chute (removable) |
| I | | Coffee grinder cover |
| J | | Grind Adjustment knob (inside, not shown) |
| K | | Coffee bean container |
| L | | On/Off button |
| M | | Water tank (removable) |
| N | | Water tank handle |
| O | | Service door and removable brewing unit (behind water tank, not shown) |
| P | | Coffee grounds container |
A Product overview
| Q | Drip grid |
| R | Drip tray (removable) |
| S | Folding grid |
| T | Cleaning cloth |
| U | Measuring spoon |
| V | Cleaning brush |
| W | Water hardness test strip |
Product overview
- Unpack and remove all labels from the unit except the nameplate. Please check that all parts are included and intact. If the unit is damaged or faulty, do not use it and take it to your retailer or after-sales service centre.
- Keep all packaging out of the reach of children. There is a risk of accidents if children play with packaging materials.
Intended use
This unit has been designed to exclusively brew coffee. Do not use it to grind, filter or brew other food items.
- Any other use may damage the unit or cause injury.
Specifications
Model: 10007403
Operating voltage: 220-240 V\~, 50-60 Hz
Power consumption: 1450-1725 W
Pressure: 15 bar
Water tank capacity [max.]: 1.8 L
Milk container capacity [max.]: 0.6 L
Coffee bean container capacity [max.]: 250 g
Ground coffee chute capacity (max.): 1 measuring spoon (10 - 12g)
Product net weight: 9.5kg
Dimensions (H × W × D) : 374 × 250 × 469 ~mm
Protection class: Class I
Off mode power consumption: 0.5 W
The period after which the equipment reaches automatically off mode:
30 minutes
Setting up the product
Before first use
- Place the unit on a stable, level, non-slip and heat-resistant surface.
- Do not position the unit near the edge of a countertop where it could accidentally fall off.
- Do not place the unit on a hot surface such as a stove.
- Unwind the power cord fully.
- Clean the unit to remove any residues from the manufacturing process. The unit may give off a slight odour when you start using it. This is normal due to its newness and does not indicate a manufacturing defect or danger.

IMPORTANT: Improper initial setup can damage the unit.
- Only use the unit in a frost-free room.
If the unit has been transported or stored at temperatures below 0^ , wait 3 hours at room temperature before putting it into operation.
Filling the water tank
Fill the water tank when the water level drops below the MIN mark, or when the Water tank empty indicator is flashing.
- Pull the water tank out by the handle towards the front (Fig. 1). You can either pull the water tank halfway out to fill it with water from a jug through the opening in the lid, or pull it out completely to remove the lid and fill it from a tap (Fig. 2/Fig. 3).
- Fill the water tank with room temperature drinking water up to the MAX level mark.
- Slide the water tank back into the unit and push firmly until it clicks into place. The coffee machine will automatically start to pump water into the internal tubes (for 5-6 seconds) before the control panel returns to the main menu.

NOTE: If the water has been standing in the tank for more than 24 hours, rinse the tank first and then fill it with drinking water up to the MAX level mark. The water level should not exceed the MAX level mark.
Filling the coffee bean container and adjusting the grinder
- Turn off the unit.
- Open the coffee grinder cover (Fig. 4).
- Fill the coffee bean container with roasted coffee beans (maximum 250 g) (Fig. 5).
- To adjust the grinder, turn the Grind Adjustment knob to select the desired grind level [settings: 1 (coarse) to 7 (fine), in half increments].
-
Close the coffee grinder cover.
-
Refill the coffee bean container when the coffee bean container empty indicator starts flashing.
B Product usage

IMPORTANT: To avoid damage to the grinder or unit:
- Do not adjust the grinder while the unit is in operation to prevent damage.
- Only use roasted coffee beans.
Do no use coffee beans that have been treated with additives or caramelized.
- Do not fill pre-ground coffee into the coffee bean container.
- Do not pour any liquids into the coffee bean container.
Connecting the milk container
Connect the milk container to the coffee spout if you are going to prepare a coffee with milk, or prepare milk foam:
- Fill the milk container with cold milk from the fridge. Make sure the milk level is not below the MIN mark or above the MAX mark.
- Insert the metal straw into the inside of the milk container lid. Screw the lid onto the container and connect the milk tube to the lid (Fig. 6).
- Connect the other end of the milk tube to the milk inlet on the coffee spout (Fig. 7).
Product usage
- Make sure the coffee machine is properly installed and that all parts are assembled correctly.
- Connect the coffee machine to a suitable mains socket and press the On/Off button to turn the unit on.
Initial configuration (Setting Mode)
When the coffee machine is turned on for the first time, the control panel will automatically enter Setting Mode to set the initial settings on the machine. Only the Cappuccino, Milk Foam, and buttons will be displayed.
You can directly touch , and buttons (Fig. 8) repeatedly to set the initial setting for water hardness level, coffee temperature and hot water temperature.

NOTE:
- To save the initial configuration setting, you can touch and hold the Cappuccino and Milk Foam buttons for 3 seconds. After that, the unit will preheat, run a rinsing cycle and then return to the main menu.
- If no button is touched within 30 seconds, the unit will automatically save the setting, preheat and run a rinsing cycle and then return to the main menu.
Thereafter, you can follow the three sections below to access Setting Mode manually to adjust the settings.
Setting the water hardness
Set the water hardness correctly on the coffee machine to allow the unit to accurately remind you when to run the Descaling Programme.
B Product usage
- Check the water hardness in your area using the included test strip: Fill a cup with tap water (or the drinking water you will use to make your coffees). Dip the test strip briefly into water for 2 seconds and allow the test strip to dry for 10 seconds. After that, compare the result with the colour chart on the test strip package to determine the hardness level of the water.
- Turn on the unit.
- To access Setting Mode, touch and hold the Cappuccino and Milk Foam buttons at the same time for 3 seconds.
- Touch the button repeatedly to set the water hardness level:
| Setting Water hardness level °dh |
| 1 (very soft) < 3 |
| 2 (soft) > 4 |
| 3 (medium) > 7 |
| 4 (hard) > 14 |
| 5 (very hard)* > 21 |
Setting the coffee temperature
- To access Setting Mode, touch and hold the Cappuccino and Milk Foam buttons at the same time for 3 seconds.
- Touch the button repeatedly to set the preferred coffee temperature:
| Setting | Coffee temperature |
| - | Normal |
| - | High |
| - | Maximum |
B Product usage
- Adjust the other two settings on the screen if needed.
- Touch and hold the Cappuccino and Milk Foam buttons for 3 seconds to save your settings and return to the main menu.
Setting the hot water temperature
- To access Setting Mode, touch and hold the Cappuccino and Milk Foam buttons at the same time for 3 seconds.
- Touch the button repeatedly to set the preferred hot water temperature:
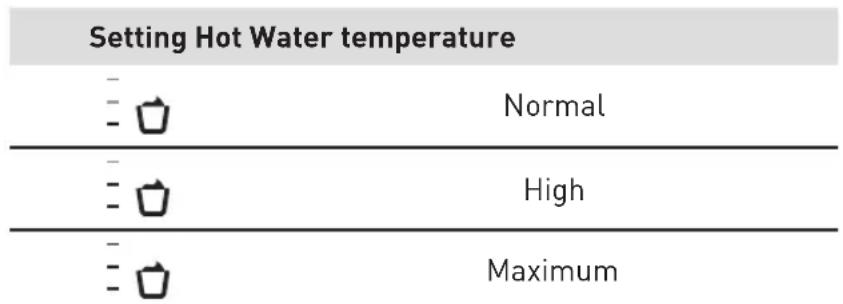
- Adjust the other two settings on the screen if needed.
- Touch and hold the Cappuccino and Milk Foam buttons for 3 seconds to save your settings and return to the main menu.

NOTE: While in Setting Mode, if no button is touched within 30 seconds, the unit will automatically save the settings on the screen and return to the main menu.
Automatic rinse cycle
For added convenience, the coffee machine is designed to automatically perform a rinse cycle (70-80 seconds) after turning on and before turning off.
Turning the coffee machine On/Off
Turning On
Press the On/Off button to turn the unit on.
- The coffee machine will heat up and automatically perform a rinse cycle to warm the internal tubes.
- When all the beverage icons light up in the control panel (main menu), the unit enters standby mode and is ready for operation.
Turning Off
Press the On/Off button to turn the unit off.
- The coffee machine will automatically perform a rinse cycle before turning off.
Auto-off function
If no button is touched within 30 minutes of preparing the last beverage, the coffee machine will automatically perform a rinse cycle and turn off (Setting the standby time).
B Product usage
Preparing coffee with coffee beans
CAUTION - Risk of scalding or burns!
- Do not touch hot surfaces. The coffee spout, drip tray and some accessible surfaces of the unit become hot during use and remain hot for some time after use.
-
Do not adjust the height of the coffee spout with bare hands.
This unit dispenses hot water and emits steam during use. Keep your face and hands at a safe distance.
-
Turn on the unit. The coffee machine will automatically perform a rinse cycle.
- Place a cup under the coffee spout.
- Make sure the grinder is filled with sufficient coffee beans and is adjusted correctly Filling the coffee bean container / Adjusting the grinder).
- If you are preparing a coffee with milk (Cappuccino / Latte Macchiato / Milk Foam), connect the milk container (Connecting the milk container).
- To brew coffee with coffee beans: Touch the button repeatedly to select
- Customize your coffee:
- Set the desired coffee strength by touching the button repeatedly.
Setting Coffee strength
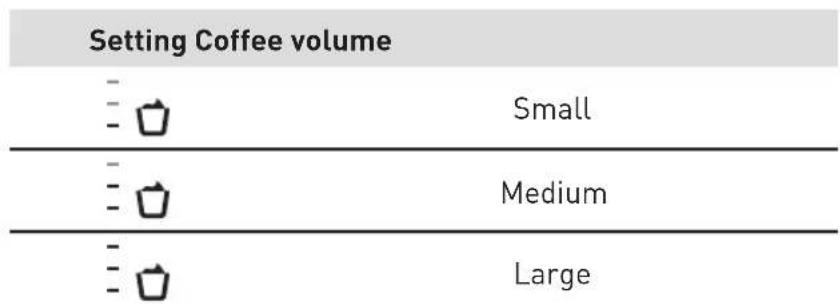
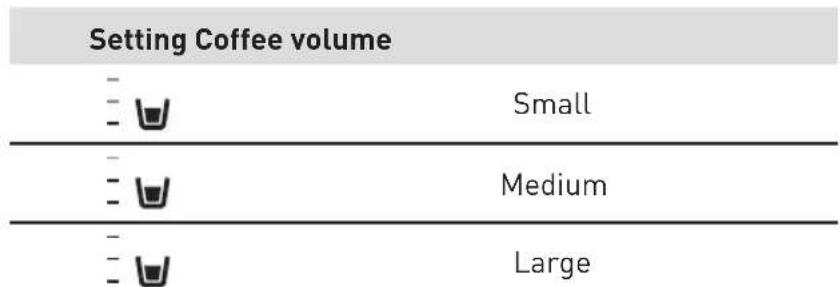
- Set the desired coffee volume by touching the button repeatedly.
Setting Coffee volume
- Set the desired amount of milk foam by touching the button repeatedly.
B Product usage
- To dispense 2 cups, touch the button to activate the function (not available in Americano). The button will remain lit when activated. Place 2 cups under the coffee spout.
- Touch the desired coffee beverage button at the top of the control panel. The unit will automatically grind, brew and dispense the selected coffee and then stop.
- If you need to stop the preparation process, touch the beverage button again.
The milk system cleaning indicator will start to flash if coffee with milk was prepared (Using the Milk System Cleaning Programme).
Preparing coffee with pre-ground coffee

IMPORTANT: Improper operation can damage the unit.
- Only add pre-ground coffee when the unit is turned on.
- Do not add more than 1 measuring spoon (included) of pre-ground coffee into the pre-ground coffee chute.
- Turn on the unit. The coffee machine will automatically perform a rinse cycle.
- Place a cup under the coffee spout.
- To brew coffee with pre-ground coffee: Touch the button repeatedly until Lights up.
- If you are preparing a coffee with milk (Cappuccino / Latte Macchiato / Milk Foam), connect the milk container (Connecting the milk container).
- Open the lid of the pre-ground coffee chute (Fig. 9).
- Add 1 measuring spoon [10 - 12g] of pre-ground coffee into the pre-ground coffee chute (maximum 1 spoon!) and close the lid (Fig. 10).
- Customize your coffee:
- Set the desired coffee volume by touching the button repeatedly.
- Set the desired amount of milk foam by touching the button repeatedly.
B Product usage
Setting Milk foam

Low

Normal

High

NOTE: Coffee strength adjustment and 2-cup dispensing are not available when preparing coffee with pre-ground coffee.
-
Touch the desired coffee beverage button at the top of the control panel. The unit will automatically brew and dispense the selected coffee and then stop.
-
If you need to stop the preparation process, touch the beverage button again.
- The milk system cleaning indicator will start to flash if coffee with milk was prepared (Using the Milk System Cleaning Programme)
Preparing milk foam
You can prepare milk foam with the coffee machine for milk beverages.
- Place a cup under the coffee spout.
- Connect the milk container to the coffee spout ( Connecting the milk container).
- Set the desired amount of milk foam by touching the button repeatedly.
Setting Milk foam

Low

Normal

High
- Touch the Milk Foam button. The unit will automatically dispense then milk foam and then stop.
- If you need to stop the preparation process, touch the Milk Foam button again.
- The C + V milk system cleaning indicator will start to flash ( Using the Milk System Cleaning Programme).

Warning: Please use whole milk, do not use plant-based milk, skim milk or milk with sediment.
B Product usage
Preparing hot water
- Place a cup under the coffee spout.
- Set the desired volume by touching the button repeatedly (small / medium / large cup).
- Touch the Hot Water button. The unit will automatically dispense hot water and stop.
- If you need to stop dispensing, touch the Hot Water button again.

Warning: 2-cup dispensing are not available when preparing hot water.
Adjusting the height of the coffee spout / Lifting the folding grid
- The height of the coffee spout can be adjusted by sliding it up or down to suit different cup sizes. The spout becomes hot during use! Use a dry cloth to hold it to avoid burns.
- To prepare coffee in a tall to-go cup, you can lift the folding grid on the drip tray (Fig. 11, Fig. 12).
Setting the standby time
The coffee machine turns off automatically if no button is pressed in standby mode within the set standby time. To set the desired standby time:
- Turn on the unit.
- Touch and hold the Espresso and Americano buttons at the same time for 3 seconds. Only the and buttons will be displayed.
- Touch the button repeatedly to set the standby time:

* Factory setting.
B Product usage

Warning: This action will increase energy consumption. The power consumption increases if the time is set to over 30 minutes.
- Touch and hold the Espresso and Americano buttons for 3 seconds to save your settings and return to the main menu.

NOTE: If no button is touched within 30 seconds, the unit will automatically save the settings on the screen and return to the main menu.
Cleaning and maintenance

WARNING!
- Before cleaning or maintaining the unit, make sure that it has been switched off and unplugged from the mains socket. Then let it cool completely.
- Never immerse the unit, power cord or plug in water or any other liquid.
-
Never use corrosive cleaners, wire brushes, abrasive scouring pads or metal/sharp tools to clean your unit.
-
Empty the drip tray daily or as soon as the orange floater is visible.
- Clean the external surfaces of the unit with a soft, moist cloth. Dry thoroughly with a soft, dry cloth.
- Clean the coffee bean container compartment, the drip tray compartment and the brewing chamber with a soft damp cloth (included) (Fig. 4, Fig. 14 and Fig. 20).
- To disassemble and clean the removable parts and to use the cleaning programmes when prompted, follow the instructions in the table and sections below.
C Cleaning and maintenance
| Part | Dishwasher-safe
(Only cleaning programmes below 60°C/140°F) | Cleaning method | Cleaning frequency / Remark |
| Drip tray, folding grid, drip grid | ✓ | | Daily, or as soon as the orange floater is visible. |
| Orange floater (drip tray full indicator) | ✓ | | Daily, or as soon as the orange floater is visible. |
| Coffee grounds container | ✓ | | Daily. |
| Water tank and lid | × | | Every 1-2 days. |
| Milk container and lid | × | Rinse the parts thoroughly | Daily. |
| Milk tube | × | under running water and allow them to air dry completely. | After dispensing coffee with milk or foaming milk. |
| Coffee spout (dispenser) | ✓ | | After dispensing coffee with milk or foaming milk. |
| Coffee spout cover | × | | Frequently. |
| Brewing unit Weekly. | × | | |
| Pre-ground coffee chute | × | | Weekly. |
| Coffee bean container lid | × | | Weekly. |
Cleaning the drip tray and coffee grounds container
Empty the drip tray daily or as soon as the orange floater is visible.
- Remove the drip tray (Fig. 13).
- Empty the drip tray and the coffee grounds container.
- Clean the drip tray compartment with a soft cloth (Fig. 14).
- Clean the drip tray components with soapy water, rinse and dry thoroughly (Fig. 15).
- Reassemble to the unit.
C Cleaning and maintenance
Cleaning the brewing unit
In addition to automatic rinsing cycle, the brewing unit should be removed weekly for cleaning.
- Disconnect the coffee machine from the mains socket.
- Pull out the water tank by the handle.
- Open the service door by pulling the clip towards the back of the unit (Fig. 16).
- Push and hold the orange locking mechanism to the right to unlock and remove the brewing unit (Fig. 17, Fig. 18).
- Clean the brewing unit under running water, shake off excess water and allow to dry (Fig. 19).
- Clean the brewing chamber with a damp cloth and allow to dry (Fig. 20).
- Reattach the brewing unit to the coffee machine.
Cleaning the coffee spout (dispenser)
- Remove the cover by pressing on both sides and pull it out (Fig. 21).
- Open the metal bracket and remove the coffee spout (Fig. 22).
- Disassemble the top and bottom halves of the coffee spout (Fig. 23).
- Clean the coffee spout under running water (Fig. 24).
- Dry thoroughly. Reassemble the two halves of the coffee spout by aligning them and pressing them firmly together.
- To reattach the coffee spout to the machine, insert the coffee spout into the spout holder, close the metal bracket, and close the cover.
Cleaning the pre-ground coffee chute
The pre-ground coffee chute must be cleaned every 3-5 days.
- Remove the pre-ground coffee chute.
- Clean the pre-ground coffee chute under running water (Fig. 25).
- Pull out the water tank and remove the brewing unit.
- Use the cleaning brush to dislodge the pre-ground coffee powder remaining in the chamber (Fig. 26).
- Clean the inside of the brewing chamber with a damp cloth.
C Cleaning and maintenance
- Insert the brewing unit into the brewing chamber.
- Close the service door.
- Insert the water tank into the appliance.
- Dry the pre-ground coffee chute thoroughly.
- Insert the pre-ground coffee chute into the pre-ground coffee chute chamber.
Using the milk system cleaning programme
When lights up and starts flashing:
- Remove the milk tube and clean it.
- Connect the milk tube to the coffee spout and connect the other end of the milk tube to the opening on the drip tray (Fig. 27).
- Fill the water tank with lukewarm water up to the MAX mark and reinsert it into the unit.
- To start the Milk System Cleaning Programme, touch the button. The programme will start. Once the cleaning programme is finished, the unit will return to the main menu.
- If you need to cancel the programme, touch the button again.
Using the brewing system cleaning programme
Programme duration: 20 minutes.
- Requires: One cleaning tablet for espresso machines (not included).
Before using, please ensure the ±b -Brewing system cleaning indicator lights up:
- Remove the milk tube and clean it.
- To start the Brewing System Cleaning Programme, touch and hold the button for 3 seconds. The indicator will light up and the programme will start.
- If you need to cancel the programme, touch the button again within 3 seconds.
C Cleaning and maintenance
- When the Coffee grounds container full indicator flashes, empty the drip tray and the coffee grounds container and reinsert them into the unit (Fig. 13).
- When the indicator flashes, fill the water tank with lukewarm water up to the MAX level mark and reinsert it into the unit.
- Place a container with a capacity of at least 1.5 litres under the coffee spout (Fig. 28).
- Put a cleaning tablet into the pre-ground coffee chute (Fig. 29).
- To resume the cleaning programme, touch the button. Once the cleaning programme is finished, the unit will return to the main menu.
- Remove the container under the coffee spout and discard the contents.
- Empty the water tank and fill it with room temperature drinking water.
Dscaling the coffee machine
Programme duration: 40 minutes.
- Requires: A descaler for espresso machines (not included).
- To avoid damage to the coffee machine, do not descale the unit with pure citric acid, vinegar or any vinegar-based agent.
When the Descale machine indicator is at 50% intensity, you have the option to descending the machine if desired, but you may continue using it normally at that point. However, when the descale machine indicator reaches 100% intensity, the machine must be descaled before it can be used again.
- Remove the milk tube and clean it.
- To start the Descaling Programme, touch and hold the button for 3 seconds. The programme will start.
- When the Coffee grounds container full indicator flashes, empty the drip tray and the coffee grounds container and reinsert them into the unit (Fig. 13).
- When the indicator flashes, fill the water tank with 1 litre lukewarm water.
C Cleaning and maintenance
- Add the descaler for espresso machines into the water tank and follow the instructions on the package.
- Mix well and reinsert the water tank into the unit.
- Place a container with a capacity of at least 1.5 litres under the coffee spout (Fig. 28).
- Connect the milk tube to the coffee spout and place the other end of the milk tube into the container (Fig. 30).
- To resume the descaling programme, touch the button. Allow the programme to run.
- When the indicator flashes, empty the water tank and rinse it thoroughly.
- Fill the water tank with room temperature drinking water up to the MAX level mark and reinsert it into the unit.
- To resume the descending programme, touch the button.
- When the Coffee grounds container full indicator flashes, empty the drip tray and the coffee grounds container and reinsert them into the unit (Fig. 13).
- Once the descaling programme is finished, the unit will return to the main menu.
- Remove the container under the coffee spout and discard the contents.
- After descaling is completed, please remove the brewing unit for cleaning the residue descaling agent (Fig. 16 to Fig. 20).
Troubleshooting
Problem Possible Cause Solution
is flashing.
lights up.
C
Cleaning and maintenance
Problem Possible Cause Solution
| ·continues to flash even though the water level is above the MIN level. | ·The magnetic floater is stuck at the bottom of the water tank. | ·Remove the water tank and clean it thoroughly.
·Make sure the magnetic floater is floating freely inside the water tank. |
| ·is flashing. | ·The coffee grounds container is full. | 1. Empty the coffee grounds container.
2. Wait at least 5 seconds.
3. Reinsert the coffee grounds container. |
| ·lights up. | ·The coffee grounds container is not inserted correctly. | ·Reinsert the coffee grounds container. |
| ·continues to flash even though the coffee grounds container is empty. | ·If the unit is turned off, the unit will not detect the emptying of the coffee grounds container. | NOTE: Always empty the coffee grounds container when the unit is turned on.
1. Turn on the unit.
2. Remove the empty coffee grounds container and wait 5 seconds.
3. Reinsert the coffee grounds container. |
| The coffee grounds container is full but does not light up. | ·The drip tray was removed for more than 5 seconds without the coffee grounds container being emptied. | 1. Empty the coffee grounds container when you remove the drip tray, even if it only contains a few coffee pucks.
2. The coffee grounds counter will reset to 0 and begin counting the coffee pucks correctly again. |
| ·is flashing in white. | ·Too much or too little coffee was used. | ·Clean the brewing unit. →Cleaning the brewing unit) |
| ·lights up in white. | ·The brewing unit is not inserted correctly. | ·Reinsert the brewing unit.
(→Cleaning the brewing unit) |
| ·is flashing in red and the beverage indicator lights up. | ·The unit has an error. | ·Unplug the unit from the mains socket and contact your retailer or after-sales service centre. |
| ·lights up and ·is flashing. | ·The coffee spout needs to be cleaned. | ·Use the Milk System Cleaning Programme. (→Using the Milk System Cleaning Programme) |
| ·is flashing. | ·The unit needs to be descaled. | ·Use the Descaling Programme.
(→Descaling the coffee machine) |
C
Cleaning and maintenance
Problem Possible Cause Solution

is flashing.
- The coffee bean container is almost empty.
The coffee machine no longer responds.
The coffee machine has a fault.
-
Refill the coffee bean container.
-
Unplug the power cord from the mains socket and wait 1 minute.
-
Plug the power cord.
-
Press the On/Off button to turn on the unit.
-
Clean the coffee spout (Cleaning the coffee spout).
Coffee is not dispensed or is only dispensed in drips.
The coffee spout holder is blocked.
-
The grind level is set too fine.
-
The brewing unit is dirty.
-
Limescale buildup in the machine.
-
Adjust the grinder to a coarser setting (Filling the coffee bean container and adjusting the grinder).
Clean the brewing unit.
- Use the Descalging Programme (→Descalging the coffee machine).
No coffee comes out of one or both spouts.
When the beverage is dispensing, liquid escapes from the coffee spout and sprays all over the coffee spout.
The two halves of the coffee spout are not properly assembled.
The quality of the coffee varies considerably. / The set amount is not reached.
C
Cleaning and maintenance
Problem Possible Cause Solution
The quality of the milk foam varies considerably. / The set amount is not reached, or milk is not sucked into the machine.
- Limescale buildup in the machine.
The coffee spout or the coffee spout holder is dirty.
The type of milk used is not suitable for preparing milk foam.
The coffee spout or the milk tube is not properly assembled.
- The milk tube is blocked.
Use the Descaling Programme (Descaling the coffee machine).
- Clean the coffee spout Cleaning the coffee spout].
- Do not use pre-boiled milk.
- Use cold milk with a fat content of at least 1.5% .
- Check the assembly of the coffee spout and milk tube.
- Clean the milk tube.
The coffee has no "crema" or is too weak.
The coffee beans are not suitable for the machine.
The coffee beans are no longer fresh.
The grind level is set too coarse.
The coffee strength is set too low.
- Use coffee beans suitable for espresso machines.
- Use a type of coffee with a higher proportion of robusta beans.
- Use freshly roasted coffee beans.
- Adjust the grinder to a finer setting (Filling the coffee bean container and adjusting the grinder).
- Set the coffee strength to a higher level.
The coffee is not hot enough.
The coffe temperature is set too low.
The cup is cold.
- Set the coffee temperature to a higher level.
- Preheat the cups by rinsing them with hot water.
The pre-ground coffee blocks the pre-ground coffee chute.
-
The pre-ground coffee chute is damp.
The pre-ground coffee is compressed too much.
-
Remove the pre-ground coffee chute, clean and dry it thoroughly.
- Reinsert the pre-ground coffee chute.
- Do not press the pre-ground coffee too firmly into the measuring spoon.
C
Cleaning and maintenance
Problem Possible Cause Solution
| The coffee grounds are not compact and are too wet. | ·The grind setting is too fine or too coarse.
·Not enough pre-ground coffee has been used. | ·Adjust the grinder to a finer or coarser setting.
·Add a full measuring spoon (spoon included) of pre-ground coffee. |
| The service door does not close properly. | ·The brewing unit is not inserted correctly.
·There is too much coffee in the brewing chamber. | ·Insert the brewing unit again (→Cleaning the brewing unit).
·Clean the brewing unit (→Cleaning the brewing unit). |
| The grind setting is difficult to adjust. | ·There are too many beans in the grinder. | ·Make a coffee with coffee beans. Then adjust the grind setting.
·Adjust the grind level gently. |
| The unit seems to be leaking. | ·The drip tray is too full and is overflowing.
·The water tank is not inserted correctly.
·The unit is not placed on a level surface. | ·Empty the drip tray daily or as soon as the floater is visible.
·Make sure the water tank is inserted correctly.
·Place the unit on a level and stable surface. |
| The coffee machine suddenly goes back to the main menu. | ·The unit is too hot. ·Turn off the unit for 30 minutes. |
| The beverage indicator lights up and the highlight suddenly starts to move from left to right through the beverage indicators while the beverage is being prepared. | ·The drip tray or water tank was removed during the preparation. | CAUTION: Do not remove the drip tray or the water tank while the beverage is being prepared.
1. Put the drip tray and water tank back into the unit.
2. Wait until the unit returns to the main menu. |
C
Cleaning and maintenance
Problem Possible Cause Solution
| Very frequent display that descending is necessary. | ·The water hardness level is set too high. | ·Set the water hardness level to a lower setting (Setting the water hardness). |
| The unit makes unusually loud noises. | ·The water tank is not inserted correctly.
·There is not enough milk in the milk container. | ·Make sure the water tank is inserted correctly.
·Fill the milk container with more milk. |
| The coffee bean container is empty but did not light up. | ·Oil from the coffee beans has soiled the detection window of the coffee bean container. | ·Use the cleaning brush (included) to clean the detection window of the coffee bean container regularly. |
| The coffee bean container still contains beans but lights up. | ·The coffee beans are not falling into the grinder. | ·Use the cleaning brush (included) to gently push the coffee beans so that they begin to fall into the grinder. |
| The unit dispensed liquid coffee during the automatic rinsing cycle. | ·Pre-ground coffee was added into the chute before the unit was turned on.
·Ground coffee fell into the brewing unit. | ·Only add pre-ground coffee into the chute when the unit is turned on.
·Clean the brewing unit (Cleaning the brewing unit). |
Storage
- Always unplug the unit before storing it.
- Store the unit in a fresh, dry and dust-free place, out of the reach of children and pets.
- Please retain the packaging and use it to store your unit when it is not in use for an extended period of time.
Merci!