DR 521 - Audio Receiver ALBRECHT - Free user manual and instructions
Find the device manual for free DR 521 ALBRECHT in PDF.


User questions about DR 521 ALBRECHT
0 question about this device. Answer the ones you know or ask your own.
Ask a new question about this device
Download the instructions for your Audio Receiver in PDF format for free! Find your manual DR 521 - ALBRECHT and take your electronic device back in hand. On this page are published all the documents necessary for the use of your device. DR 521 by ALBRECHT.
USER MANUAL DR 521 ALBRECHT
natural_image
Diagram of a device connection showing two devices connected to an external panel with labeled ports (no text or symbols present)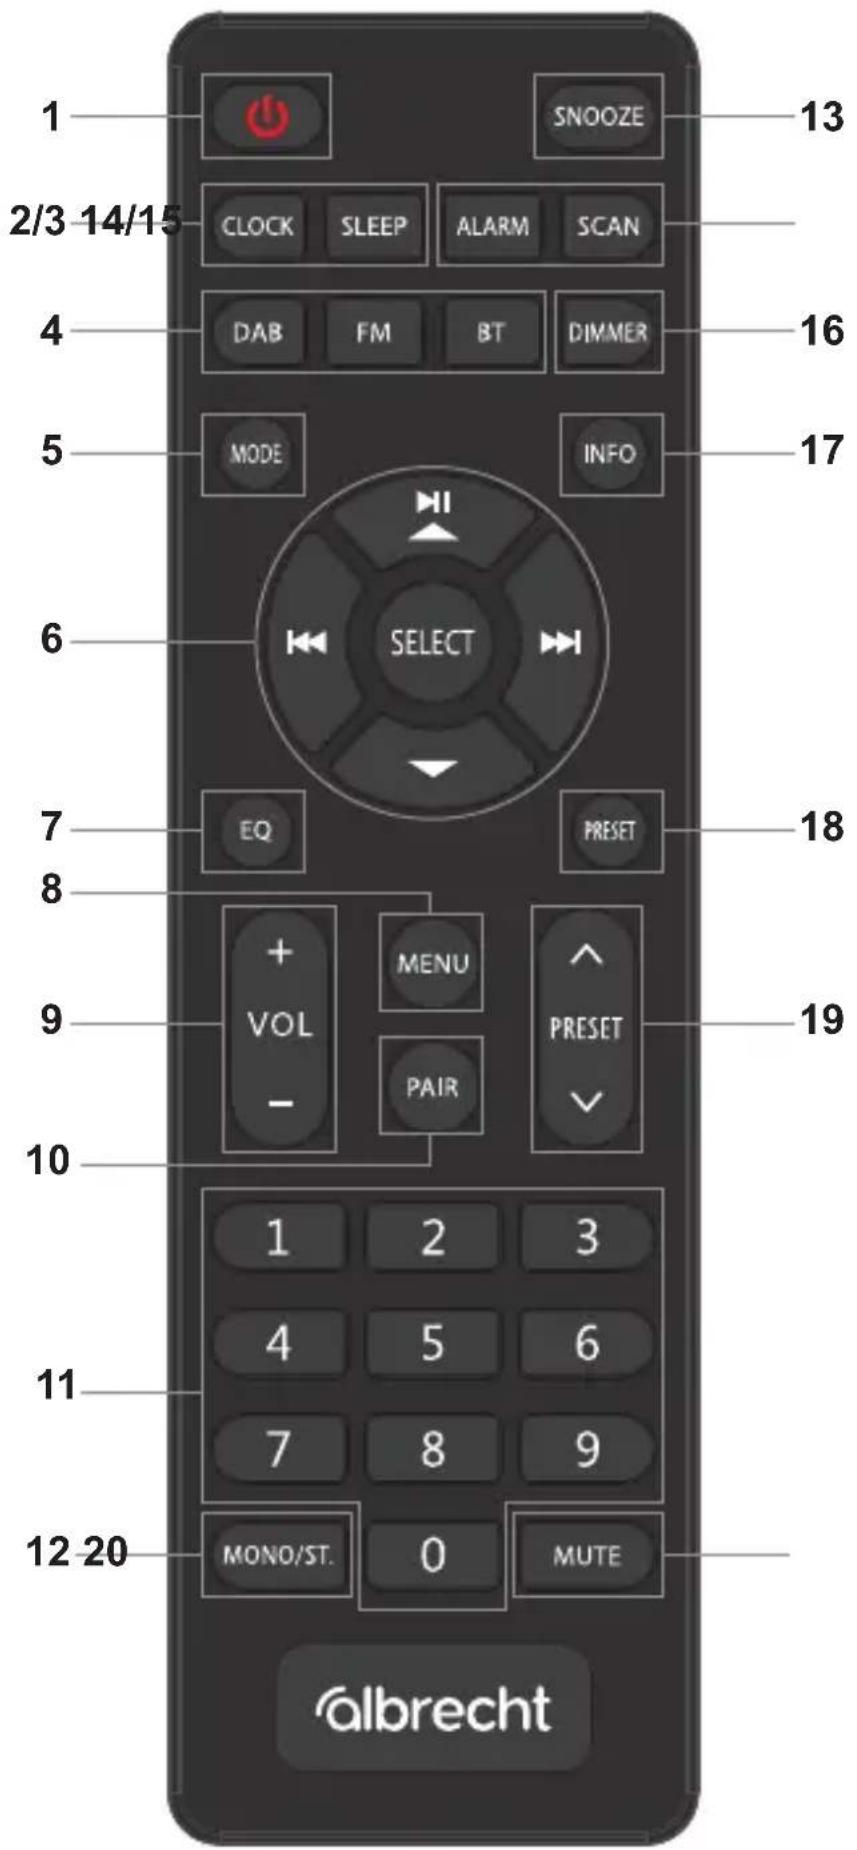
text_image
1 SNOOZE 13 2/3 14/15 CLOCK SLEEP ALARM SCAN 4 DAB FM BT DIMMER 5 MODE INFO 6 SELECT 7 EQ PRESET 8 + MENU 9 VOL - PAIR 10 1 2 3 11 4 5 6 7 8 9 12-20 MONO/ST. 0 MUTE albrechtnatural_image
Simple line drawing of a trash bin with crossed lines indicating no waste or restriction (no text or symbols)Operating instructions
English
Table of contents
- Scope of delivery ...... 19
- First steps....19
- Operating elements and connections....20
- Initial setup ......24
- Operating modes....24
5.1. Standby....24
5.2. DAB+ radio....24
5.3.FM radio 25
5.4. Bluetooth....25
- Favourites (station memory)....25
- System settings ......26
7.1.BestTune 26
7.2. Sleep (timer)......26
7.3. Alarm clock....26
7.4. Equalizer 26
7.5. Clock settings....27
7.6. Language 27
7.7. Reset to factory settings 27
7.8. Software version ......27
- Display brightness 27
- Radio specifications....28
9.1. Specifications power adapter 28
-
Troubleshooting....29
-
Safety instructions 30
- Warranty and recycling information 30
- CE Declaration of Conformity .... 31
- EEAG and recycling ....31
- Service address 32
1. Scope of delivery
- DR 521 DAB+ adapter
- Plug-in power supply
- Remote control
- Antenna
- Analogue audio cable (3.5 mm jack)
- Instructions
2. First steps
- Set up the DR 521 at the desired location.
- Unwind the cable antenna completely and connect it to the antenna input on the back of the device. For the best reception, lay the antenna in a straight line and as vertically as possible (e.g. behind a shelf).
- Connect the supplied mains adapter to the DC IN socket on the back of the radio and then plug the mains adapter into a socket.
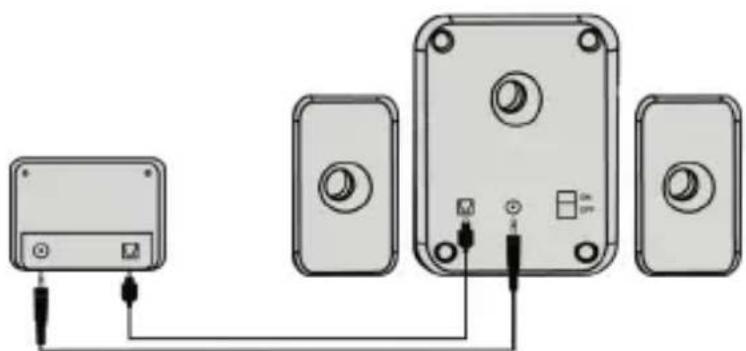
- Connect the device to your stereo system or active loudspeakers. To do this, use either the analogue audio output (3.5 mm jack) or the optical digital output (Toslink).
- The radio is now ready for use. Carry out the initial setup (see chapter „4. Initial setup“ on page 24).
natural_image
Diagram showing three electronic devices connected to a terminal block, with no visible text or symbols.3. Operating elements and connections
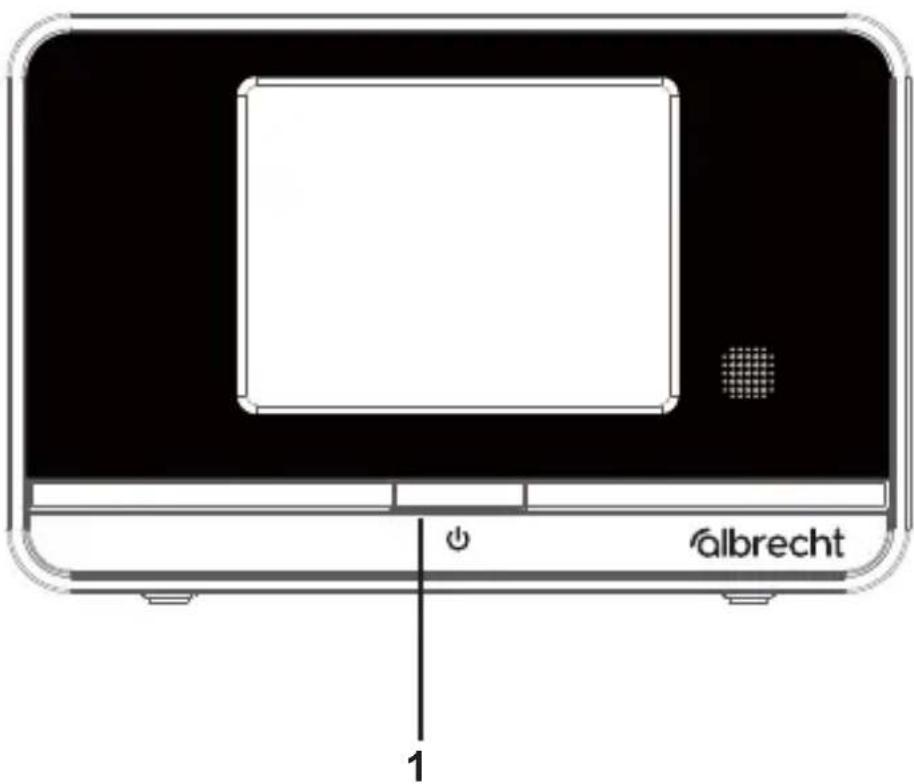
text_image
albrecht 1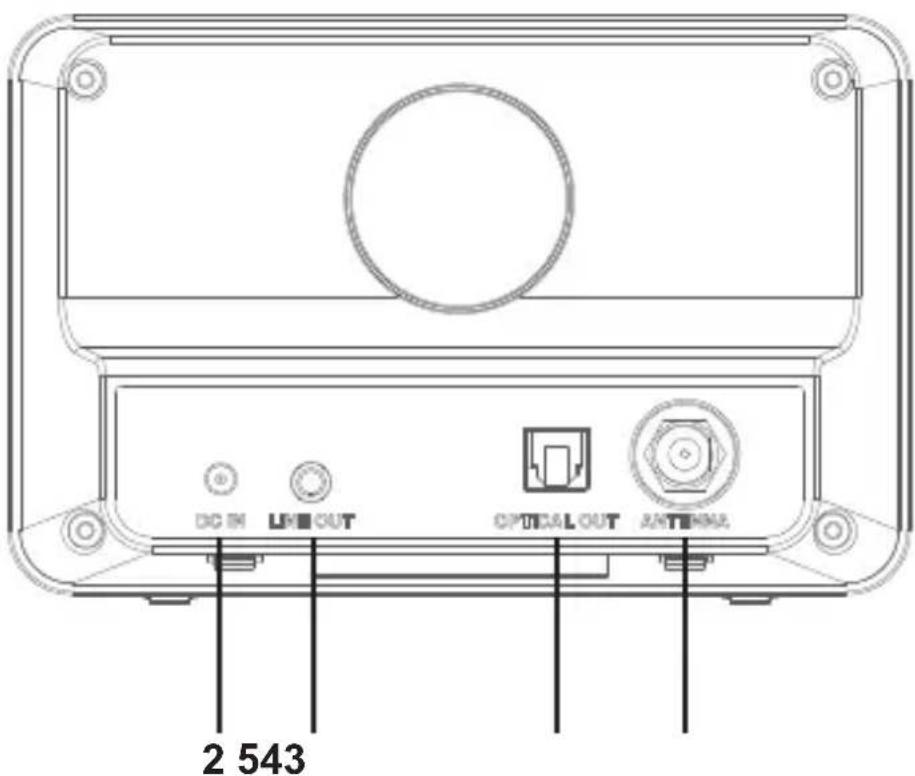
text_image
DC IN LIF OUT OPTICAL OUT ANTenna 2 543| Function | |
| 1 | Switches between standby and active operation |
| 2 | Connection for the power supply unit |
| 3 | Analogue audio output (3.5 mm jack) |
| 4 | Digital audio output (Toslink) |
| 5 | Antenna connection |
text_image
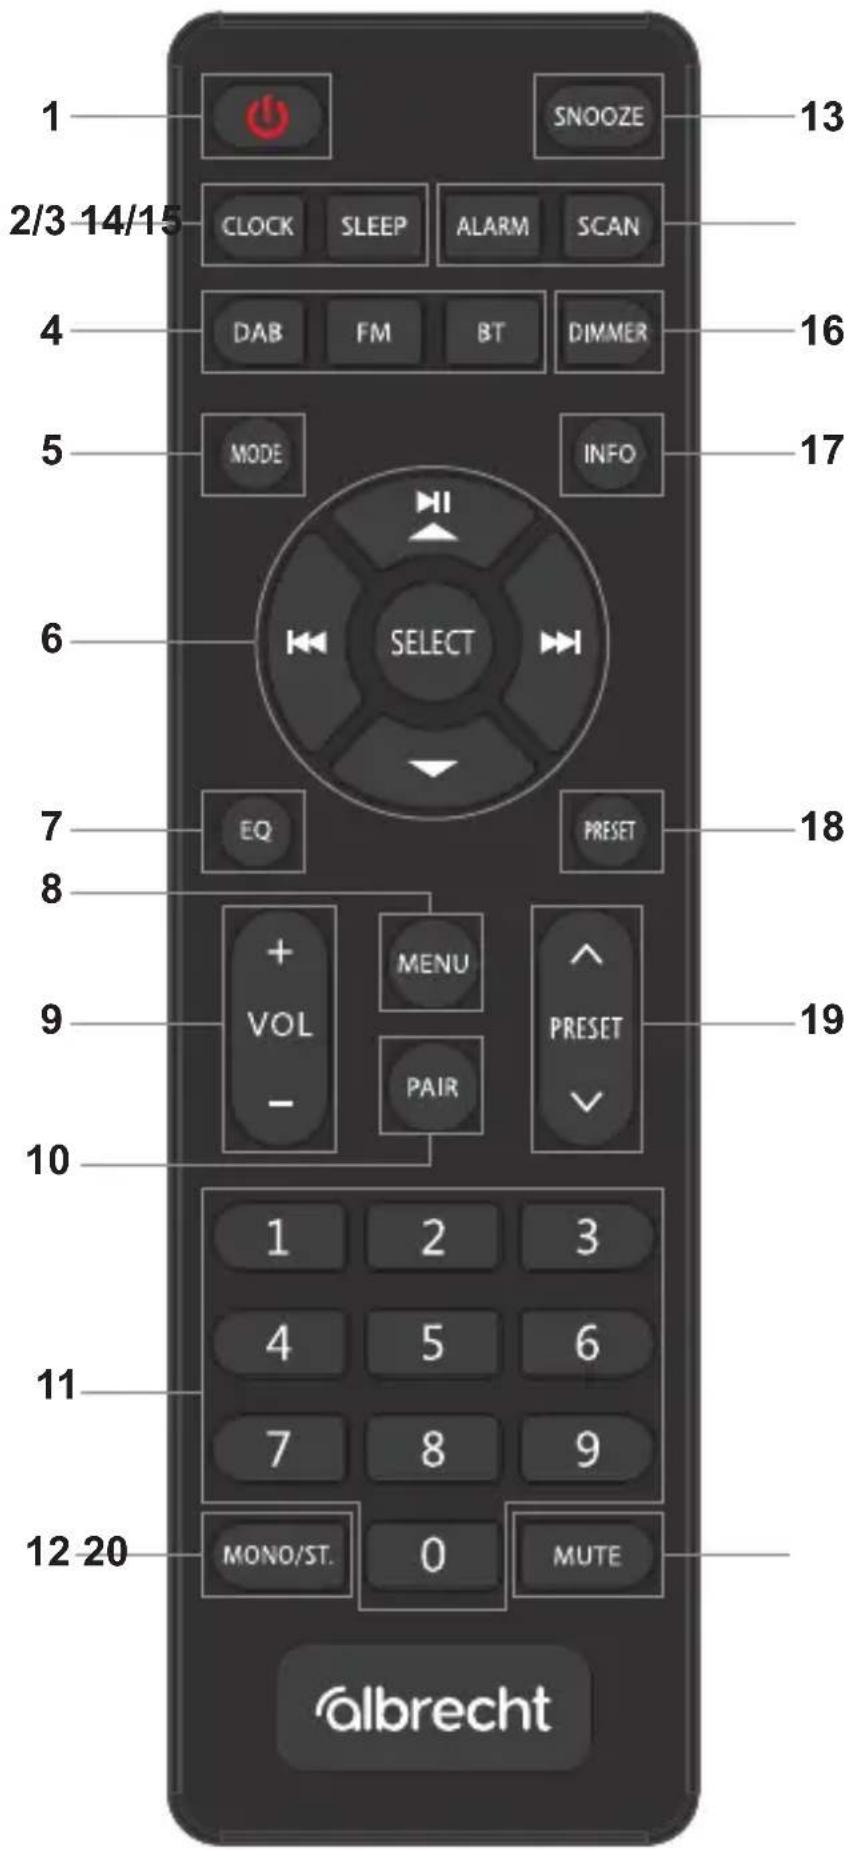
1 SNOOZE 13 2/3 14/15 CLOCK SLEEP ALARM SCAN 4 DAB FM BT DIMMER 5 MODE INFO 6 SELECT 7 EQ PRESET 8 + MENU 9 VOL - PAIR 10 1 2 3 11 4 5 6 7 8 9 12-20 MONO/ST. 0 MUTE albrecht| Function | |
| 1 | Switch between standby and active operation |
| 2 | Set the time |
| 3 | Set the sleep timer |
| 4 | Select the operating mode: DAB+ / FM / BT |
| 5 | Switch to the next operating mode |
| 6 | To select and confirm settings |
| 7 | Equalizer setting |
| 8 | Open the main menu |
| 9 | Volume setting |
| 10 | Start Bluetooth pairing |
| 11 | Direct selection buttons for station presets |
| 12 | Switch between stereo and mono (FM only) |
| 13 | Snooze button for the alarm clock |
| 14 | Alarm clock setting |
| 15 | Start a Full scan to find available stations |
| 16 | Set the display brightness |
| 17 | Display the information of the current channel |
| 18 | Open the station memory list to call up or save favourites |
| 19 | Jump to the next or previous station memory |
| 20 | Mute the device |
4. Initial setup
When the DR 521 is started for the first time or after a factory reset, the device starts with the initial setup.
First select the desired menu language and confirm it.
The device now automatically performs a full scan to find available radio stations.
5. Operating modes
5.1. Standby
In standby mode, the device displays the current time.
Press the power button on the device or on the remote control(1) to switch the device on and also to switch it back to standby mode.
5.2. DAB+ radio
Switch to DAB+ mode with the DAB button (4).
Digital radio (DAB+) is played in this mode. When you use this mode for the first time, a search for all available stations is started automatically.
Once the search is complete, you can use the navigation buttons (6) to switch through the channels. Left / Right jumps to the previous / next channel and Up / Down opens the list with all available channels.
Open the DAB menu with the Menu button (8). Here you can trigger a new DAB scan, set a DAB ensemble manually and clear the station list of stations that are no longer available.
Note: In normal use, you do not need to perform the DAB scan every time you use the DAB+ radio. Perform a new scan if you want to use the radio in a different broadcasting area or if there are new stations.
5.3. FM radio
Switch to FM mode with the FM button (4).
In FM mode, you can listen to classic, analogue radio stations. Set the desired frequency using the navigation buttons (6). A long press on the arrow keys automatically searches for the next available station.
Open the FM menu with the Menu button (8). Here you can specify whether only particularly strong stations should be included in the automatic search and whether stereo or only mono stations should be found.
5.4. Bluetooth
Switch to Bluetooth mode with the BT button (4).
In Bluetooth mode, you can play music from other devices such as smartphones.
Activate pairing mode with the pair button (10). Search for the Bluetooth device "Albrecht DR 521" in your mobile device.
6. Favourites (station memory)
There are 30 memory locations each for DAB+ and FM.
The first ten favourites each have a direct selection button (11) on the remote control. Press the button briefly to call up the favourite. Press and hold the button to save the current channel to this favourite.
To access the remaining memory locations, press the preset button (18). Then select the desired memory location. If you press and hold the preset button (18), you save the current station to the selected memory location instead.
You can overwrite a memory location with a new station at any time.
7. System settings
Select the System settings entry in the DAB or FM menu to make general settings.
7.1. BestTune
This menu item activates the BestTune function. BestTune combines all available DAB and FM stations in a common station list.
If BestTune is active, it is no longer possible to switch manually between DAB and FM. Depending on the reception situation, the best source is automatically selected for each station.
BestTune has a separate favourites list with 30 memory locations.
7.2. Sleep (timer)
If you want to fall asleep to music, you can set a time period here after which the device automatically switches to standby mode. You can also call up this function directly using the Sleep button (3).
7.3. Alarm clock
You can set two alarms to wake you up with radio music or a buzzer. Please note that your stereo system or speakers must be switched on for the alarm clock to sound. You can also call up this function directly using the alarm button (14).
7.4. Equalizer
You can use the equalizer to adjust the sound to your taste. There are various presets and a customisable setting to choose from. You can also call up this function directly using the EQ button (7).
7.5. Clock settings
You can choose between 12-hour and 24-hour display and change the date format from day-month-year to month-day-year.
You can specify whether the radio should set the time automatically (via DAB, FM, both or not at all).
If you have deactivated the automatic time setting or there is no radio reception, you can also set the time and date manually. If a time signal is received and the automatic setting is active, your manual time will be overwritten.
You can customise the style of the clock on the standby screen here.
7.6. Language
Here you can set the menu language of the device. The following languages are available: German, English, Dutch, French, Italian, Spanish, Portuguese, Polish, Turkish, Danish, Swedish, Norwegian, Finnish.
7.7. Reset to factory settings
Select this menu item to reset the device to factory settings. The process must be confirmed once again. All channels and settings are deleted and the device restarts with the initial setup.
7.8. Software version
Here you can see the current software version of the device. Please include this information with all service requests.
8. Display brightness
Press the dimmer button (16) to adjust the display brightness between bright, medium, dark and off.
You can set different brightness levels for active operation and standby mode.
9. Radio specifications
| 1 Model: DR 521 |
| 2 Supported radio format: DAB+, FM |
| 3 DAB+ frequency: Band III (174.00 - 240.00 MHz) |
| 4 FM frequency: 87.5-108.0 MHz |
| 5 BT frequency / power: 2.4 GHz / < 10 mW |
| 6 Analogue output: 3.5 mm stereo jack |
| 7 Digital output: Toslink |
| 8 Antenna: F-type |
| 9 Power supply: 5.0 V, max. 1.0 A, max. 5.0 W |
| 10 Operating temperature: 0 - 40 °C |
9.1. Specifications power adapter
| Manufacturer's name and address: DONGGUAN DONGNIU ELECTRONIC TECHNOLOGY CO.,LTD; 3th floor, NO.8, HengLing Street, HengJiao Industrial Park, ShiJie Town, Dongguan City, Guangdong,P.R. China | |
| Model No. DNS051-0501000 | -AV |
| Input Voltage / Freq. 100-240V ~ 50-60Hz 0.2A max. | |
| Output Voltage DC 5.0 V | |
| Output Current 1.0 A | |
| Output Power 5.0 Watt | |
| Avg. Active Efficiency 73.7% | |
| Power Cons. Standby 0.09 Watt | |
10. Troubleshooting
Poor DAB reception in some locations.
As the DAB network is not yet fully developed, this can lead to poor reception, especially in rural areas that are not yet fully developed. You should therefore test the DR 521 radio at a different location before sending it in for repair due to poor reception.
No indication on the display
- Make sure that the display brightness is not switched off. Press the dimmer button(16) to adjust the brightness.
- check that the power supply unit is plugged in at both ends and is firmly seated.
Unexpected behaviour / display
- Restart the appliance completely by unplugging the mains plug, waiting 10 seconds and then plugging it back in.
- Carry out a factory reset (see „7.7. Reset to factory settings“ on page 27).
- Contact our customer support.
11. Safety instructions
- Only clean the appliance with a dry cloth.
- Do not block any ventilation openings.
- Only use the accessories supplied by the manufacturer.
- Do not expose this radio to rain or moisture.
- Do not expose the radio to excessive heat.
12. Warranty and recycling information
We are required by law to include disposal and warranty information with each device, as well as an EU Declaration of Conformity with instructions for use in various countries. This information can be found on the following pages.
2-year guarantee from date of purchase
The manufacturer/retailer provides a two-year warranty for this product from the date of purchase. This warranty covers all failures due to defective components or faulty functions within this period, with the exception of wear and tear such as scratches on the display, defective housing, defective antenna and defects due to external influences such as corrosion, overvoltage due to improper external power supply or the use of unsuitable accessories. Defects caused by improper use are also excluded from the warranty.
In the event of a warranty claim, please contact your dealer. The dealer will repair or replace the device or forward it to an authorised service centre.
You can also contact our service partner directly. Please enclose your proof of purchase with the device and describe the malfunction as precisely as possible.
13. CE Declaration of Conformity
Standards and guidelines
CE Hereby, Alan Electronics GmbH declares that the radio equipment model DR 521 is in compliance with Regulation 2014/53/EU. The full text of the EU Declaration of Conformity can be found at the
following internet address:
http://service.alan-electronics.de/CE-Papiere/
14. EEAG and recycling
natural_image
Simple line drawing of a trash bin with crossed x- and y-axes, no text or symbols present.European legislation prohibits the disposal of old or defective electrical or electronic appliances with household waste. To dispose of the appliance, take it to a collection centre in your municipality for recycling. This system is financed by the industry and ensures environmentally friendly disposal and the recycling of valuable raw materials.
15. Service address
Technical hotline (for devices sold in Germany)
Please call our service hotline on +49 (0) 6103/9481 - 66 (normal rate on the German landline network) or send us an e-mail:
service@albrecht-midland.de
Before returning the device, please read chapter
„10. Troubleshooting“ on page 29.
There you will find some tips and tests. Alternatively, you can contact our hotline.
Subject to printing errors.
The information in these operating instructions is subject to change without prior notice.
albrecht
DR 521