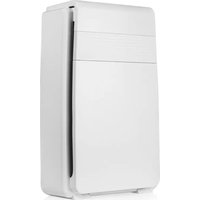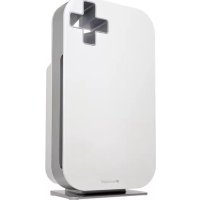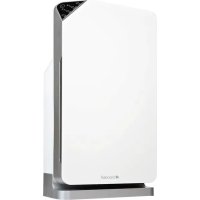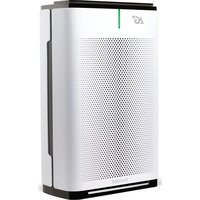
Pro P700 - Air purifier Brondell - Free user manual and instructions
Find the device manual for free Pro P700 Brondell in PDF.


User questions about Pro P700 Brondell
0 question about this device. Answer the ones you know or ask your own.
Ask a new question about this device
Download the instructions for your Air purifier in PDF format for free! Find your manual Pro P700 - Brondell and take your electronic device back in hand. On this page are published all the documents necessary for the use of your device. Pro P700 by Brondell.
USER MANUAL Pro P700 Brondell
WITH AG+ TECHNOLOGY BY AURABEAT
MODELS P700BB/P7004C/APP60/CANP700BB
natural_image
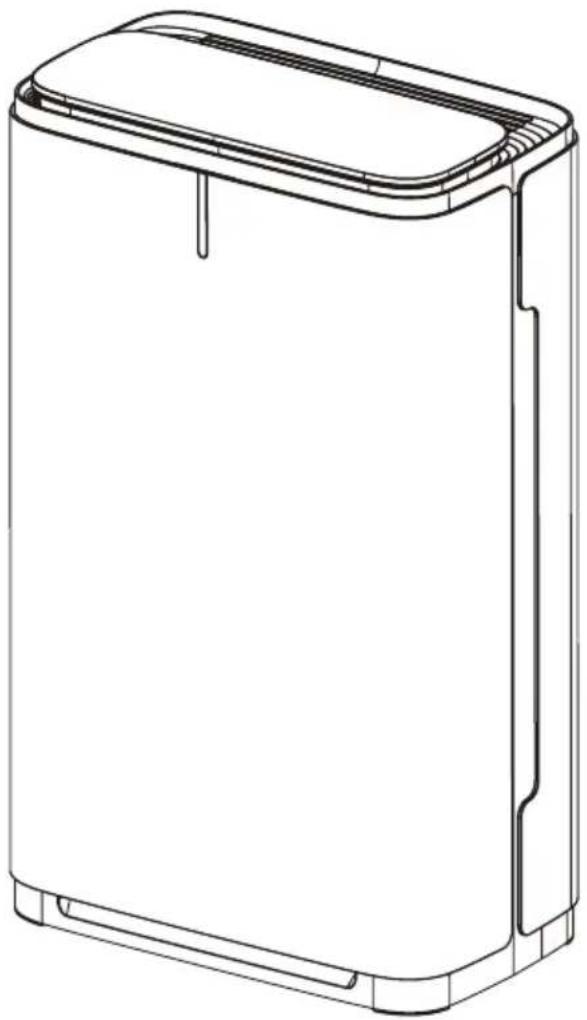
Line drawing of a rectangular electronic device with a lid and side connectors (no text or symbols)BRONDELL PRO SANITIZING AIR PURIFIER WITH AG+ TECHNOLOGY BY AURABEAT OWNER'S MANUAL
Contents
Read this Owner's Manual for correct installation, use, and maintenance of this product. After reading and completing installation, keep this manual in a place that is easily accessible.
SAFETY INFORMATION
3 Important Safeguards
PRODUCT FEATURES
6 Main Features
7 Control Panel Detail
8 Five-Stage Purification
OPERATION
9 Preparing for First Use
10 Product Operation
MAINTENANCE
12 Filter Life and Cleaning Schedule
13 Cleaning the Air Sensor
14 Replacing the Filters
TECHNICAL INFORMATION
15 Troubleshooting
17 Product Specifications
18 Warranty
19 Contact Information
TRANSLATIONS
20 Spanish
38 French
READ ALL INSTRUCTIONS BEFORE USING
BE CAREFUL TO KEEP THIS SAFETY INFORMATION. PLEASE READ THIS INFORMATION TO PREVENT PROPERTY LOSS AND ENSURE SAFETY.

DANGER: If not observed, serious injury or even death may occur as a result.

- Do not use a damaged power plug or plug into a loose electric outlet.
- Please connect the power plug to a grounded electrical outlet rated for 120 V \~ 60 Hz.
- Do not move the product by pulling on the power cord.
- Do not handle the product or power plug with wet hands.
- Do not forcefully bend the power cord or place heavy objects on it to prevent it from being damaged or deformed.
- Do not connect and pull out the power plug or cord repeatedly.
- If the electric outlet is wet, carefully unplug the product and let the electric outlet dry completely before subsequent use.
- Unplug the product before cleaning, repairing, inspecting, or replacing parts.
- Remove any dust or water from the power plug prior to plugging in.
- Do not plug the product into an electrical outlet or power strip that is being used by too many other products. Use an electrical outlet adequate for the wattage of the product.
- Unplug the product if it is not going to be used for a long time.
- If the power cord is damaged – do not operate the product and do not attempt to repair, modify, or replace the cord yourself. Contact the Brondell Service Center toll free at 888-542-3355 or email us through our website.
-
Do not insert any wires or sharp objects into any product gaps. This may result in electric shock, fire, or product damage.
-
If the product produces a strange noise, a burning smell, or emits smoke, unplug it immediately from the electrical outlet and contact Brondell. Failure to do so may result in electric shock or fire.
- Do not place an electronic or gas heater near the product or place near heating vent. This may result in fire or product deformation. Do not place any containers filled with water or other liquids, food, metallic objects, or any flammable material on top of the product. If foreign material enters the product, this may result in electric shock or fire.
- Do not use the product in locations exposed to excessive moisture or rain and do not splash water onto the product. Never place the product in or near water.
- Do not use the product in areas where flammable gases or combustible materials are used or stored.
- Do not spray any flammable materials such as insecticides or air fragrances near or into the air inlet.
- Do not disassemble, repair, or modify the product yourself. If repair is needed please contact the Brondell Service Center toll free at 888-542-3355 or email us through our website.
- Clean the exterior with a damp cloth. Do not clean the product using benzene, thinner, or abrasives.
- Do not use the product in a factory or industrial setting where machine oil may be present in the air.
READ ALL INSTRUCTIONS BEFORE USING
BE CAREFUL TO KEEP THIS SAFETY INFORMATION. PLEASE READ THIS INFORMATION TO PREVENT PROPERTY LOSS AND ENSURE SAFETY.

WARNING: To reduce the risk of fire, electric shock or injury, read and understand this user guide before operating this product.

- Do not insert fingers or foreign objects into the air inlet or air outlet.
- Do not let children play with the product or climb on it. Children should be supervised to ensure that they do not play with the product.
- When removing the front cover, exercise caution that no clothing or body parts become stuck in the top vent of the product.
- This product can be used by children, age 8 years and up, and persons with reduced physical or mental capabilities if they have been given supervision or instruction concerning use of the product in a safe way and understand the hazards involved.
- Cleaning and user maintenance shall not be performed by children without supervision.
- Do not run cord under carpeting. Do not cover cord with throw rugs, runners, or similar coverings. Do not route cord under furniture or appliances. Arrange cord away from traffic area and where it will not be tripped over.
- Lack of proper cleaning and maintenance may result in fire, electric shock, or injury.
- Unplug or disconnect the product from the power supply before servicing.
- This product has a polarized plug (one blade is wider than the other). To reduce the risk of electric shock, this plug is intended to fit in a polarized outlet only one way. If the plug does not fit fully in the outlet, reverse the plug. If it still does not fit, contact a qualified electrician. Do not attempt to defeat this safety feature.
READ ALL INSTRUCTIONS BEFORE USING
BE CAREFUL TO KEEP THIS SAFETY INFORMATION. PLEASE READ THIS INFORMATION TO PREVENT PROPERTY LOSS AND ENSURE SAFETY.

CAUTION: If not observed, minor physical injury or property damage may occur as a result.

- Do not install the product on a sloped or uneven surface.
- Do not apply force or impact to the product.
• Install the product so that no obstacles block the circulation of air around the product.
• Install the product away from strong artificial lighting or direct sunlight. Do not install the product in a location exposed to direct sunlight. - Replace the filters according to the filter replacement cycle.
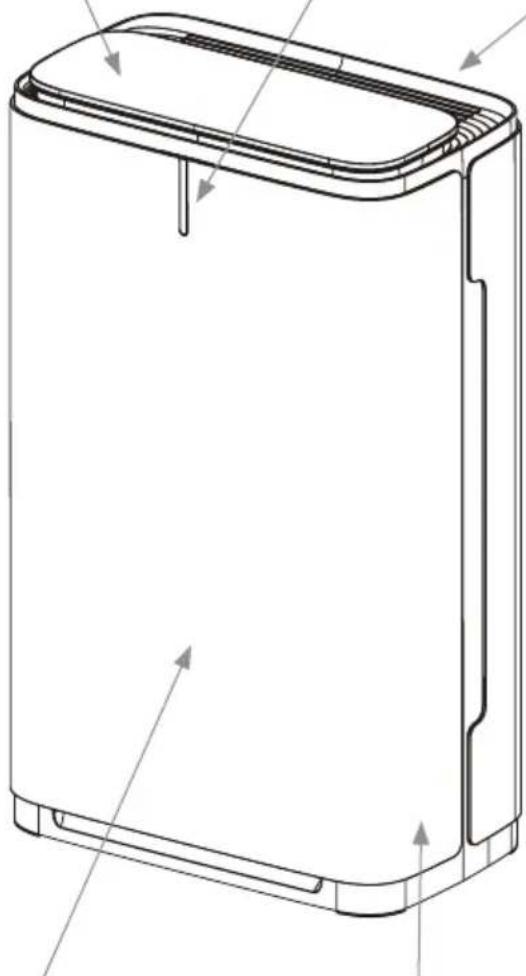
Control Panel
Allows user to control all functions of the air purifier
Air Quality Indicator
Color spectrum indicates the air quality
Air Outlet
Clean, filtered air is expelled from the unit
Handle
Allows the user to carry the air purifier from room to room as needed
natural_image
Technical line drawing of a rectangular electronic device with internal components and mounting feet (no text or symbols)Air Intake Grille
Air in the room is taken into the unit through the vent holes in the front panel
Remove this to change the filters
Front Panel
natural_image
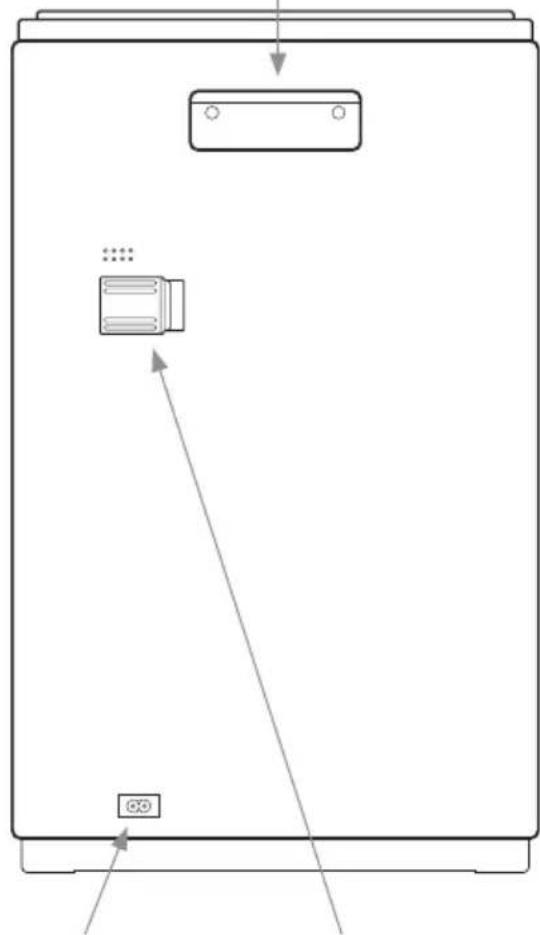
Pure technical diagram of a device casing with no text, numbers, or symbolsPower Cord Port
Port to insert the power cord
Measures the air quality
Air Quality Sensor
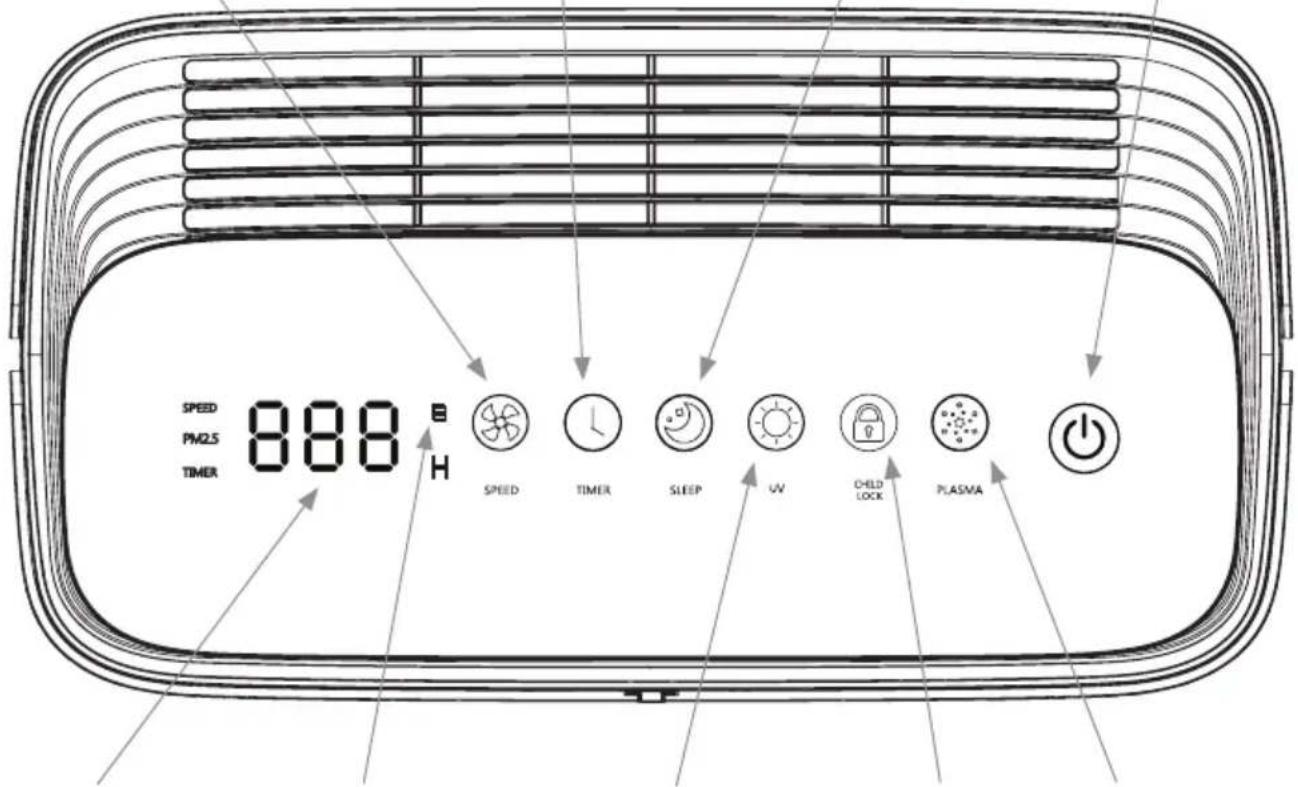
Air Speed Selector
The unit powers on in Auto Mode (P0). Touch to select between three air speed modes: LOW (P1), MEDIUM (P2), HIGH (P3). To reselect Auto Mode, touch the button a fourth time.
Timer
Touch to activate the Timer. User can set the unit to stay on for 1 to 12 hours.
Sleep Mode
Touch to engage Sleep Mode.
Power Button
Touch to turn power on/off.
text_image
SPEED PM25 TIMER 888 B H SPEED TIMER SLEEP UV CHILD LOCK PLASMA POWERDigital Display
Displays PM2.5 level, timer hours, fan speed, filter usage.
Filter Check Indicator
The red filter check icon will appear when it is time to check the health of the filters.
UV
Touch to turn UV on/off.
Child Lock
Touch to lock/ unlock all control panel buttons.
Plasma
Touch to turn the Plasma function on/off.
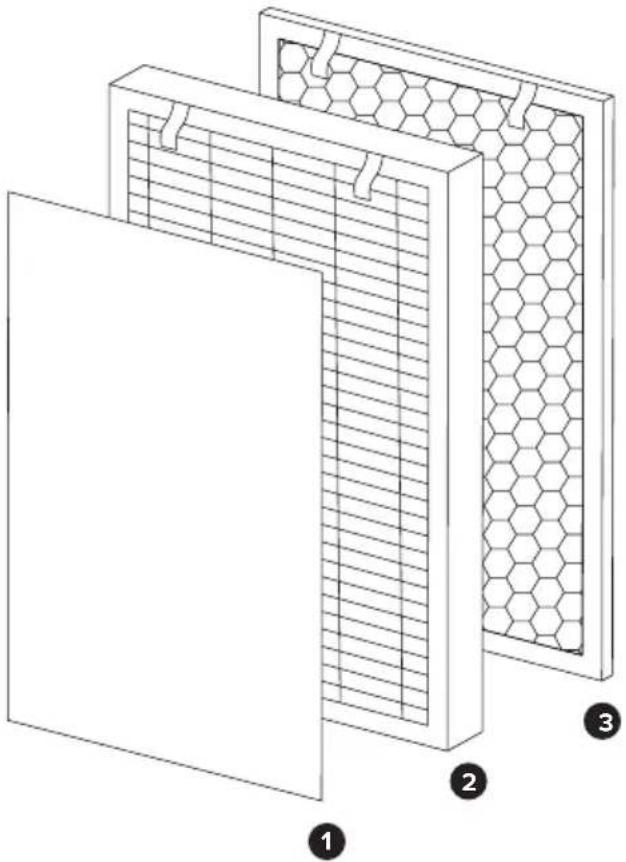
Five-Stage Air Purification
STAGES 1-3: FILTER PURIFICATION
1. Pre-Filter
Prevents large particles such as dander, hair and lint from passing through the system.
2. High Efficiency AG+ Air Filter
This HEPA Grade effectively filters small particles such as dust, smoke, pollen and mold, allergens and harmful PM2.5 as small as 0.01 microns, which includes viruses and bacteria.
3. Nanocrystalline Air Filter
Natural nanocrystalline minerals absorb harmful gases, formaldehyde, benzene, ammonia, VOCs and other odor-rich pollutants between 0.4 – 0.62 nanometers.
STAGE 4: UV DISINFECTION
UV lamp helps to sanitize the air and the insides of the unit.
STAGE 5: PLASMA SANITIZATION
Generates positive and negative ions that, when released into the air, change the air's energy, effectively destroying microorganisms.
natural_image
Diagram of a three-layered industrial air filter structure with hexagonal mesh pattern (no text or symbols)Preparing for First Use

Be sure to remove all plastic packaging from the filters before use.

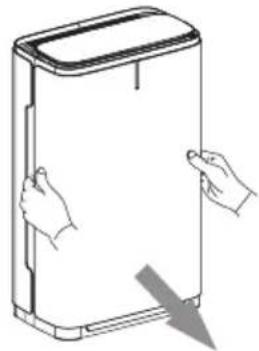
- Remove the front panel by pulling it away from the base unit.
- Remove all the plastic packaging from the filters.
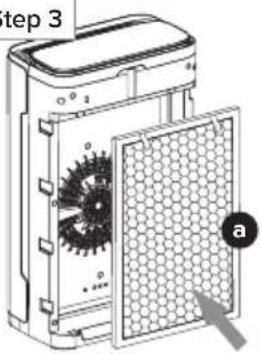
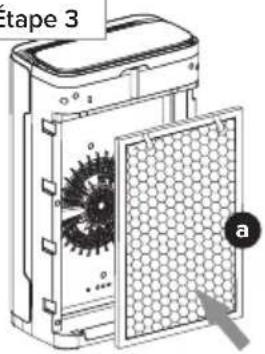
- Put the filters back in the unit in the following order:
a) Nanocrystalline Filter
b) High Efficiency AG+ Air Filter
Note: Make sure the cloth tabs on both filters that indicate "Front" are facing outward.
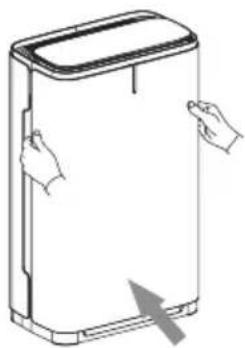
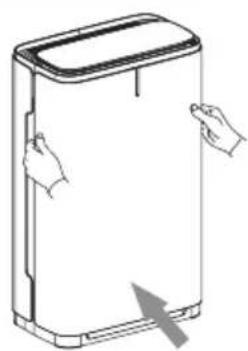
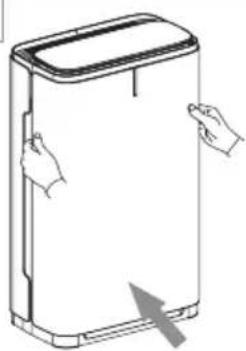
- Re-attach the front panel by inserting the tabs on the bottom of the front panel into the slots at the bottom base of the unit. Push the top of the panel towards the unit; a magnetic closure ensures the front panel clicks securely into place.
Note: If the unit is plugged in, it will chime and the Power button will begin blinking red when the front panel is secured into place.
Step 1
natural_image
Line drawing of a hand holding a rectangular device with a downward arrow indicating compression or disassembly (no text or symbols)Step 3
text_image
step 3 a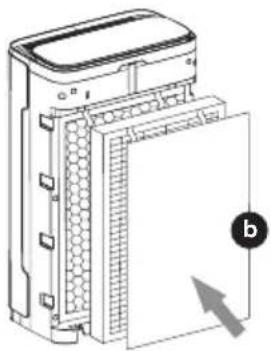
natural_image
Diagram of a device with a door and panel, showing internal components without any text or symbols.Step 4
natural_image
Line drawing of a rectangular device with hands pointing at its side, showing internal components and a directional arrow (no text or symbols)
Place the air purifier on a flat, solid surface. Do not block the Air Outlet with objects, and remove any heat sources and/or open flames near the unit.

Turning the Brondell Pro Sanitizing Air Purifier On
-
Insert the power cord into the power cord port on the back of the unit and plug the unit into the nearest power outlet.
-
Touch the red blinking Power button on the top of the control panel to turn the unit on. The unit will chime and the control panel will illuminate.
The unit will start in Auto Mode and begin to sense the air quality in the room. Once the air quality has been determined, the PM2.5 value will display on the control panel and the unit will regulate to an appropriate fan speed.
The airflow is adjusted according to PM2.5. Auto Mode is set as follows:
| PM2.5 Value | Air Quality Level | Air Quality Light Color | Airflow Level |
| 10-79 Good | Green 1 | ||
| 80-199 Fair | Blue 2 | ||
| 200-500 Bad | Red 3 |
- To turn the Brondell Pro Sanitizing Air Purifier off, press the Power button. The unit will chime and power off.
Selecting the Operating Mode
Air Speed – Touch the Speed button to toggle between 3 fan speeds: P1 (LOW), P2 (MEDIUM), and P3 (HIGH). Touch the Speed button a fourth time for Auto Mode (P0).
Sleep Mode – Touch the Sleep button to enter Sleep Mode. Fan speed will power down to the lowest level, the air quality indicator light will turn off, and all lights on the control panel will turn off except for the Sleep button. Touch the Sleep button again to disengage Sleep Mode.

UV – Touch the UV button to activate UV sanitization. The UV light inside the machine will turn on. To turn off UV sanitization, touch the UV icon.
Plasma – Touch the Plasma button to initiate the unique Plasma generation. The unit will emit positive and negative ions into the air, creating enough energy to disturb bonds and dest microorganisms. These negative remove smoke, dust, and odors for while improving air quality and h

Place the air purifier on a flat, solid surface. Do not block the Air Outlet with objects, and remove any heat sources and/or open flames near the unit.

Setting the Timer
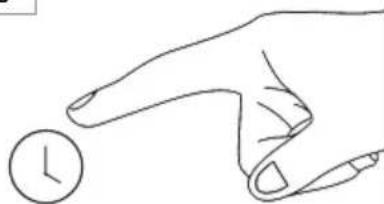
- Touch the clock icon to initiate a timer duration between 1 and 12 hours.
-
Continue to touch the clock icon until you reach the timer duration desired.
-
To disengage the Timer before the end of the set duration, touch the clock icon until the Control Panel displays 0.
Setting the Child Lock
- Touch the lock icon to engage the Child Lock. When Child Lock is on, all other buttons will chime twice when touched and will not respond to touch commands.

- Touch and hold the lock icon for 3 seconds to disengage the Child Lock.
Note: Icon names will only be displayed when its function is activated. In Sleep mode, only Sleep will be displayed even if other functions are activated.
Filter Life and Cleaning Schedule

Cleaning the unit while it is plugged in may result in electric shock, electric spark and serious injury. Unplug the unit before cleaning or performing maintenance.

To check the number of hours your filter set has been in use at any time, touch and hold the lock icon for 3 seconds while Child Lock is not in use. The Air Quality Sensor display will show the amount of hours the current filter set has been active.
The Filter Check Indicator light on the Brondell Pro Sanitizing Air Purifier is programmed to illuminate every 2000 hours the unit is in use, however, filters lasts 8-12 months and should be replaced at least once annually. If the filters are cleaned properly and on schedule, the Filter Check Indicator light could go on 3 or more times before you actually have to replace filters. Regular cleaning when air quality is extremely poor is needed.
Proper care and maintenance of the Brondell Pro Sanitizing Air Purifier is critical to performance. The following chart shows recommended cleaning intervals for each part of the unit.
| Part Time Method | ||
| External body As needed | Wipe with clean damp cloth. | |
| Air Intake Every two months | Clean with soft brush or cloth. | |
| Air Outlet Every two months | Clean with soft brush or cloth. | |
| Air Sensor Every two months | Months | First, wipe with a damp cotton swab.Then wipe dry with a dry cotton swab. |
| Woven Pre-Filter | Every two to four weeks | Vacuum or rinse thoroughly in warm water.Do not use heat to dry the woven pre-filter. |
| Nanocrystalline Filter | Every two months Expose to sunlight for one to three hours. | |
| High Efficiency AG+ Filter | Every two months | Check the filter color. If the filter is light grey, you can reuse another 2000 hours.If the filter is dark or black, it is time to replace it. |
| UV Light Bulbs Every twelve months | Check the UV bulbs to ensure they are functioning. Follow instructions on page 14. | |
Filter life may vary according to usage and environment.
Filters sealed in original packaging, unopened, have a shelf life of 5 years.
Replacement filters are available for purchase at brondell.com.
Cleaning the Air Sensor
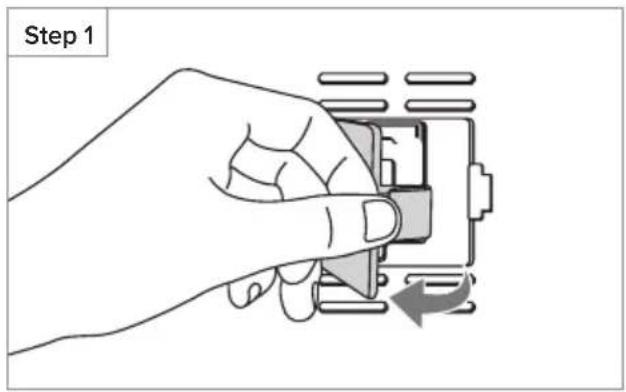
- Remove the Air Sensor Cover by pinching the tab towards the cover to release it.
- Clean the Air Inlets (a) and Outlet Vents (b) with a small brush or cotton swab.
- Wet a cotton swab lightly and clean the Lens (a), Dust Inlet (b), and Dust Outlet (c). After cleaning, use a dry cotton swab to remove any moisture.
- Re-attach the Air Sensor Cover.
Note: Without regular cleaning of the Air Sensor, the Brondell Pro Sanitizing Air Purifier will decline in performance.
text_image
Step 1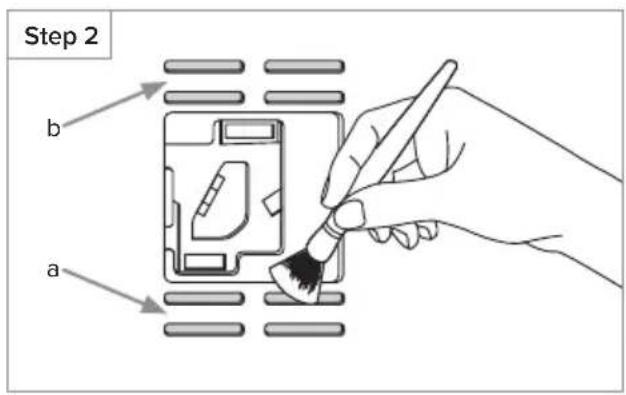
text_image
Step 2 b a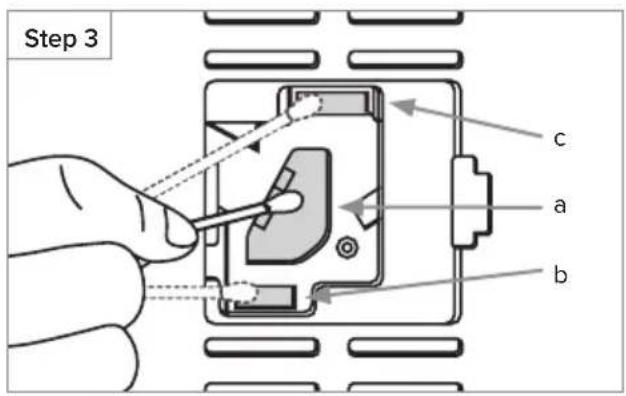
text_image
Step 3 a b cReplacing the Filters

Be sure to remove all plastic packaging from the filters before use.

- Ensure the Brondell Pro Sanitizing Air Purifier is powered off.
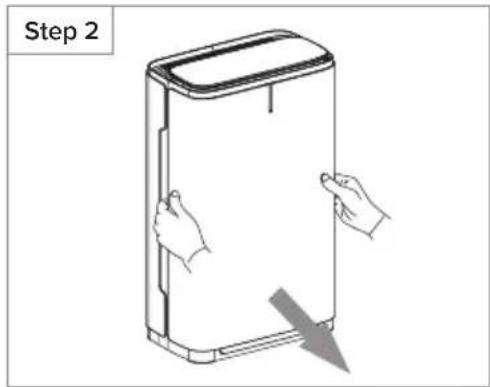
- Remove the front panel by grasping the top sides of the panel and pulling it away from the unit.
- Remove the existing filters.
- Remove all plastic packaging from the replacement filters. With the front tabs facing out, install filters in the following order:
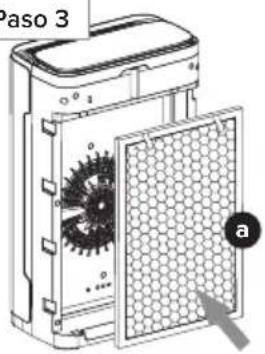
a) Insert the Nanocrystalline filter by laying its bottom edges flush against the filter cabinet then pushing the filter firmly in place.
b) Insert the High Efficiency AG+ Air Filter, with the front tabs and the woven pre-filter facing out in the same manner.
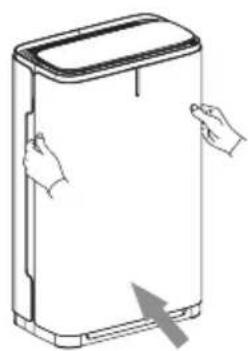
- Re-attach the front panel by inserting the tabs on the bottom of the front panel into the slots at the bottom base of the unit. Push the top of the panel towards the unit. A magnetic closure ensures the front panel clicks securely into place.
- Touch and hold the clock icon for 3 seconds to reset the Filter Check Indicator light.

WARNING:

UV light is harmful to your eyes. Always place the front panel on the unit before checking the UV light bulbs and do not look directly at the bulbs for an extended period of time.
Check the Status of the UV Light Bulbs
While replacing the filters, you may check to ensure all of the UV Light Bulbs are functioning.
After removing the existing filters (step 3), re-attach the front panel and power the unit on. At the bottom of the front panel the blue UV light from 5 UV bulbs will emanate through the grille. If all bulbs are functioning, power the unit off and continue to step 4 of the filter replacement process.
If a bulb is out, please call the Service Center at 888-542-3355 or email us at support@brondell.com.
text_image
Step 2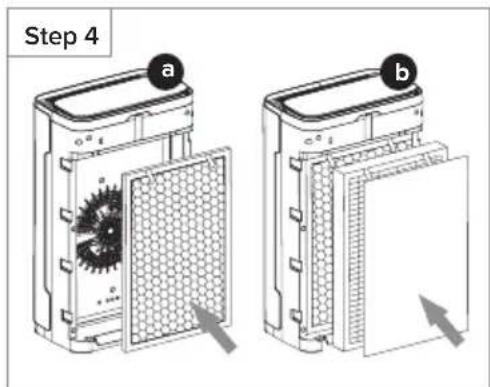
text_image
Step 4 a b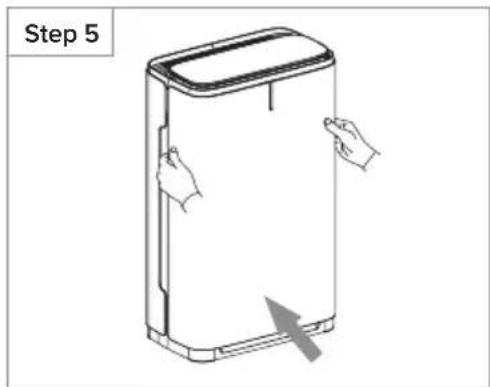
text_image
Step 5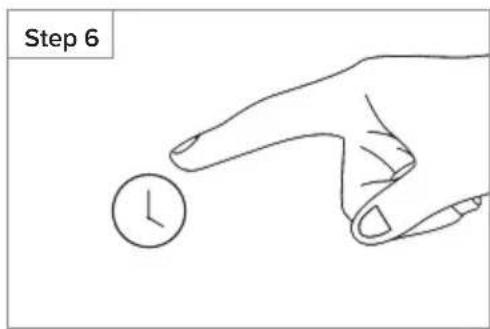
text_image
Step 6If the Brondell Pro Sanitizing Air Purifier appears to be operating abnormally, please review the troubleshooting tips before calling the Brondell Service Center as most issues are easily resolved with a few simple steps. If you are unable to resolve the issue after checking the following items, please call the Service Center at 888-542-3355, Mon-Fri, 9am-5pm PST (English and Spanish spoken), or email us at support@brondell.com.
| Problem Possible | Cause(s) Solution(s) | |
| Unit will not power on or The Control Panel does not display any icons | 1. The front panel is not installed correctly.2. Power cord is not inserted correctly into the unit's cable port.3. Power cord is not properly inserted into the electrical outlet.4. Power cord or plug is damaged. | 1. Remove the front panel and attach it to the unit again.2. Ensure that the power cord is properly inserted into the cable port on the back of the unit.3. Unplug the unit and plug it back into the electrical outlet.4. Contact Brondell Customer Service. |
| Fan is not working | 1. Unit is not switched on.2. Motor requires servicing. | 1. Ensure that the power cord is properly inserted into the cable port and properly plugged into the outlet. Touch the Power button.2. Contact Brondell Customer Service. |
| Fan does not automatically adjust when the unit is in Auto Mode | 1. Auto Mode is not selected.2. Air Sensor is dirty.3. Air Sensor is broken or malfunctioning. | 1. Touch the Speed button until the display shows “PO”.2. Follow the steps on page 13 to clean the Air Sensor.3. Contact Brondell Customer Service. |
| When in Auto Mode, the Air Sensor or PM2.5 indicator is always red or high | 1. The unit may be impacted by moisture, oil residue, smoke, fumes, or aerosolized spray.2. The Air Sensor is dirty.3. Power cord is not properly inserted into the electrical outlet.4. Power cord or plug is damaged. | 1. Move the unit to another location.2. Follow the steps on page 13 to clean the Air Sensor.3. Unplug the unit and plug it back into the electrical outlet.4. Contact Brondell Customer Service. |
If the Brondell Pro Sanitizing Air Purifier appears to be operating abnormally, please review the troubleshooting tips before calling the Brondell Service Center as most issues are easily resolved with a few simple steps. If you are unable to resolve the issue after checking the following items, please call the Service Center at 888-542-3355, Mon-Fri, 9am-5pm PST (English and Spanish spoken), or email us at support@brondell.com.
| Problem Possible | Cause(s) Solution(s) | |
| Poor performance, or not purifying at optimum capacity or Unit is running unusually loud | 1. Pre-filter needs cleaning.2. One or more filters is due for replacement.3. Plastic packaging on filters was not removed.4. Clearance around the purifier is not adequate for air ventilation.5. Missing filters or the filters were installed in the wrong order.6. Recommended room size has been exceeded.7. Blockage at Air Inlet or Air Outlet. | 1. Vacuum the pre-filter. Review the cleaning schedule for all filters on page 12.2. Replace the filters.3. Remove the plastic packaging and put the filters back in.4. Ensure that there is clearance of 20 inches on each side and 4 inches behind in the front of the unit.5. Ensure the filters are installed in the correct order and facing the proper direction. See step 4 on page 14 of this manual.6. Coverage area is 413 sq ft at 4 air changes per hour and 827 sq ft at 2 air changes per hour. Move the unit to a smaller room or purchase an additional unit to cover a larger area.7. Contact Brondell Customer Service. |
| Unpleasant odor cannot be eliminated | 1. Filters need cleaning.2. Filters need replacement. | 1. The Nanocrystalline filter can be reused after exposure to sunlight. Review the cleaning process for all filters on page 12.2. Replace the filters. |
| A red rectangular icon has appeared on the control panel near the PM2.5 air quality display | 1. The small red rectangular icon is the Filter Check Indicator light. | 1. Power off the machine and check the health of the filters. Refer to the maintenance schedule on page 12. To reset the Filter Check Indicator, turn the machine on and touch and hold the Clock icon for 3 seconds. |
| Types Specifications | |
| Product Name | Brondell Pro Sanitizing Air Purifier with AG+ Technology by Aurabeat |
| Model P700BB/P7004C/APP60 | |
| Voltage 120 V | |
| Frequency 60 Hz | |
| Power 95W | |
| Filtration Grade H12 | |
| Room Coverage | 1655 sq ft at 1 air exchange per hour827 sq ft at 2 air exchanges per hour538 sq ft at 3 air exchanges per hour413 sq ft at 4 air exchanges per hour |
| Casing Material High Quality ABS | |
| Airflow 247.2 ft | ^3 /min (CFM) |
| Dimensions 24.7 in x 15.4 in x 8.3 in | |
| Weight 19.2 lbs. | |
| Sensor Type PM2.5 Sensor | |
| Max. Noise ≤62 dB | |
This air cleaner complies with the Federal Ozone Emissions Limit.
ARB CERTIFIED


Intertek 5018735

VERIFIED ZERO OZONE
NOTES UL 2010 DOCS NOT ENT MORE THAN 0.005 PPM AS TESTED FOR UL 067
Brondell products are backed by some of the most comprehensive warranties in the industry. Brondell warrants that the Brondell Pro Sanitizing Air Purifier with AG+ Technology by Aurabeat shall be free from defects in material and workmanship under normal use and service.
Residential & Commercial Warranty for Brondell Pro Sanitizing Air Purifier with AG+ Technology by Aurabeat – 3-year limited warranty.
Includes Base Model numbers: P700BB, P7004C, and APP60
100% Coverage of defects or malfunctions of all electronic parts and labor for the entire product excluding consumable filters for the first three years from original date of purchase.
Exclusions and Limitations
- BRONDELL warrants its products to be free from manufacturing defects under normal use and service. This warranty is extended only to the ORIGINAL PURCHASER.
- BRONDELL's obligations under this warranty are limited to repairs or replacement, at BRONDELL's option, of products or parts found to be defective, provided that such products were properly installed and used in accordance with instructions. BRONDELL reserves the right to make such inspections as may be necessary in order to determine the cause of the defect. BRONDELL will not charge for labor or parts in connection with warranty repairs for the first three years from the date of purchase on all products except those that may be subject to heavy commercial use limitations.
-
BRONDELL is not responsible for the cost of removal, return (shipping) and/or reinstallation of products. This warranty does NOT apply to:
-
Damage or loss which occurs during shipment.
- Damage or loss sustained through any natural or man-made causes beyond the control of BRONDELL, including but not limited to fire, earthquake, floods, etc.
- Damage or loss resulting from negligent or improper installation including installation of a unit in a harsh or excessively hazardous environment.
- Damage or loss resulting from removal, improper repair, modification of the product, or improper maintenance including damage caused by improper cleaning and exchanging of filters
- Damage or loss resulting from acts which are not the fault of BRONDELL or which the Product is not specified to tolerate.
-
Normal wear and tear usage on the appliance or damages and wear to the filter during use or maintenance.
-
This warranty gives you specific legal rights. You may have other rights which vary from state to state.
THIS WRITTEN WARRANTY IS THE ONLY WARRANTY MADE BY BRONDELL. REPAIR OR REPLACEMENT AS PROVIDED UNDER THIS WARRANTY SHALL BE THE EXCLUSIVE REMEDY AVAILABLE TO THE PURCHASER. BRONDELL SHALL NOT BE RESPONSIBLE FOR LOSS OF USE OF THE PRODUCT OR FOR OTHER INCIDENTAL, SPECIAL, OR CONSEQUENTIAL DAMAGES OR EXPENSES INCURRED BY THE PURCHASER OR FOR LABOR OR OTHER COSTS DUE TO INSTALLATION OR REMOVAL OR COSTS OF REPAIRS BY OTHERS, OR FOR ANY OTHER EXPENSE NOT SPECIFICALLY STATED ABOVE. EXCEPT TO THE EXTENT PROHIBITED BY APPLICABLE LAW, ANY IMPLIED WARRANTIES, INCLUDING THAT OF MERCHANTABILITY, ARE EXPRESSLY LIMITED TO THE DURATION OF THIS WARRANTY. SOME STATES DO NOT ALLOW LIMITATIONS, SO THE ABOVE LIMITATION AND EXCLUSION MAY NOT APPLY TO YOU.
How to Obtain Service
To obtain repair service under this warranty, you must contact an authorized Brondell Service Center to obtain an RMA (Return Merchandise Authorization) number. Proof of purchase in the form of a copy of the original receipt must accompany the returned unit for the warranty to be valid. Take or ship the unit pre-paid to the closest Brondell authorized service center along with the RMA number and proof of purchase. To obtain an RMA number, contact the Brondell Service Center at 1-888-542-3355 or by email support@brondell.com.
brondell®
a healthy home experience
Brondell, Inc.
PO Box 470085
San Francisco, CA
94147-0085
support@brondell.com
www.brondell.com
For questions, contact:
Brondell Customer Service: 1-888-542-3355
Monday – Friday, 9am – 5pm PST
Manufactured by
Brondell, Inc.
PO Box 470085
San Francisco, CA
94147-0085
Research and Development
in Hong Kong
Made in China
Please retain receipt records for any warranty claims.
Replacement Filter:
PP-41 Pro AG+ Replacement Filter Pack
MANUAL DEL PROPIETARIO DEL BRONDELL PRO SANITIZING AIR PURIFIER CON TECNOLOGÍA AG+ DE AURABEAT
Índice
natural_image
Technical line drawing of a rectangular electronic device with internal components and mounting feet (no text or symbols)Rejilla de toma de aire
natural_image
Pure technical diagram of a device casing with no text, numbers, or symbolsTouch to turn the Plasma function on/off.
natural_image
Diagram of a multi-panel material structure with hexagonal lattice and grid patterns, labeled 1 to 3 (no text or symbols beyond labels)natural_image
Line drawing of a door with hands holding the lid and a downward arrow indicating compression (no text or symbols)Paso 3
text_image
Paso 3 a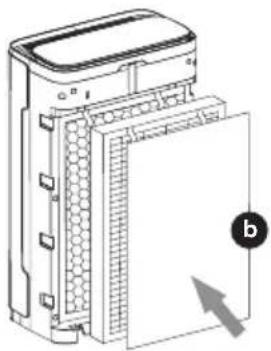
natural_image
Diagram of a device with a panel and internal structure, showing no text or symbolsPaso 4
natural_image
Line drawing of a rectangular device with hands holding its lid, showing internal structure and a directional arrow (no text or symbols)
This air cleaner complies with the Federal Ozone Emissions Limit.
ARB CERTIFIED


Intertek 5018735

VERIFIED ZERO OZONE
NOTES: WL 2030 DOCS NOT ENT MORE THAN 0.005 PPM AS TESTED FOR UA 667
a healthy home experience
Brondell, Inc.
PO Box 470085
San Francisco, CA 94147-0085
support@brondell.com
www.brondell.com
San Francisco, California
94147-0085
CARACTÉRISTIQUES DU PRODUIT
natural_image
Technical line drawing of a rectangular electronic device with internal components and mounting feet (no text or symbols)natural_image
Pure technical line drawing of a device casing with no text, numbers, or symbolsnatural_image
Diagram of a multi-panel material structure with hexagonal lattice and grid patterns, labeled 1, 2, and 3 (no text or symbols beyond labels)natural_image
Line drawing of a door with hands holding the lid, showing a downward arrow indicating compression or disassembly (no text or symbols)Étape 3
text_image
tape 3 a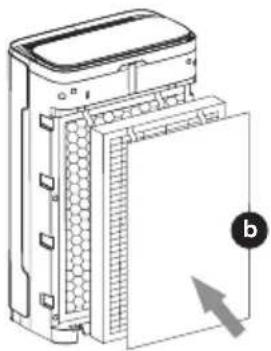
natural_image
Diagram of a device with a door and panel, showing internal components and a directional arrow (no text or symbols)Étape 4
natural_image
Line drawing of a rectangular device with two hands pointing at its side, showing internal structure and a directional arrow (no text or symbols)
natural_image
Diagram of two views (a and b) showing internal components with no visible text or symbolsÉtape 5
natural_image
Line drawing of a rectangular device with two hands pointing at it, showing no text or symbols.Étape 6
natural_image
Line drawing of a hand pointing at a circular object (no text or symbols)This air cleaner complies with the Federal Ozone Emissions Limit.
ARB CERTIFIED


Intertek 5018735

VERIFIED ZERO OZONE
NOTES: UL 2030 DOCS NOT OVER MORE THAN 0.005 PPM AS TESTED PER UL 667
Garantie
a healthy home experience
Brondell, Inc.
PO Box 470085
San Francisco, CA 94147-0085
support@brondell.com
www.brondell.com