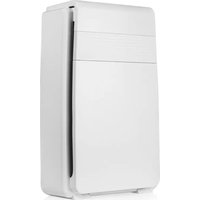
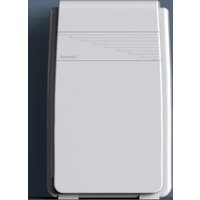
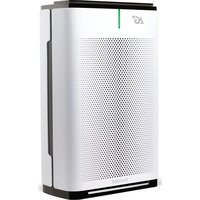
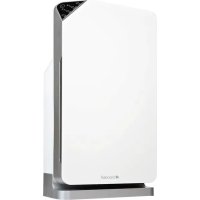
Source P300 - Air purifier Brondell - Free user manual and instructions
Find the device manual for free Source P300 Brondell in PDF.
| Product Type | Air Purifier |
| Brand | Brondell |
| Model | Source P300 (P300-B, P300-W) |
| Power Supply | 110V / 60Hz |
| Power Consumption | 70 Watts |
| Suggested Coverage Area | 24 to 28 m² |
| Filtration | 3 stages: Mesh Pre-filter, Activated Carbon Filter, True HEPA Filter |
| HEPA Efficiency | 99.97% of particles larger than 0.3 microns |
| Filter Life | Approx. 8,760 hours (1 year) |
| Air Quality Indicator | Blue (excellent), Green (good), Violet (moderate), Red (poor) |
| Operating Modes | Auto, Night, Eco, Manual Speed (1, 2, 3, Turbo) |
| Control | Touch control panel with dedicated buttons |
| Sensors | Air quality, Ambient light |
| Warranty | 3-year limited (residential) |
| Maintenance | Clean pre-filter with vacuum; replace HEPA and activated carbon filters |
| Safety Fuse | 125V, 2.5A (replaceable) |
| Replacement Parts | HEPA Filter PF-30, Activated Carbon Filter PF-30, Fuse 125V/2.5A |
| Repairability | Contact Brondell service center (1-888-542-3355, support@brondell.com) |
| Safety | Polarized plug; do not use with a dimmer; keep 51 cm clearance around the unit |
Frequently Asked Questions - Source P300 Brondell
User questions about Source P300 Brondell
0 question about this device. Answer the ones you know or ask your own.
Ask a new question about this device
Download the instructions for your Air purifier in PDF format for free! Find your manual Source P300 - Brondell and take your electronic device back in hand. On this page are published all the documents necessary for the use of your device. Source P300 by Brondell.
USER MANUAL Source P300 Brondell
natural_image
Black electronic device with a white cross-shaped logo and 'brondell' branding, no visible text or symbols on the device itself.OWNER'S MANUAL
Please read and save these instructions for future reference

natural_image
Blank white rectangular frame with gray border and corner corner (no text or symbols)TABLE OF CONTENTS
- Important Safety Instructions 1-2
- Product Info and Specifications 3-5
-
Preparing the Filters for First Use 6-7
-
Operation
4.1 Turn the O2+ Source On/Off 8
4.2 Modes and Indicators
4.2.1 Auto Mode 8
4.2.2 Night Mode 8
4.2.3 Eco Mode 8
4.2.4 Fan Speed Mode 9
4.2.5 Indicator Light Mode 9
4.2.6 Filter Replacement Indicator 9
-
Filter Replacement 10
-
Maintenance
6.1 Body Maintenance 11
6.2 Filter Maintenance 11
6.3 Air Quality Sensor Maintenance 11
6.4 Plug Fuse Replacement 12
-
Troubleshooting 13-14
-
Warranty Info 15-16
Spanish Translation 17-34
French Translation 35-52


true HEPA

1 IMPORTANT SAFETY INSTRUCTIONS
⚠️ DANGER: If not observed, serious injury or even death may occur as a result.
WARNING: If not observed, serious physical injury or property damage may occur as a result.
CAUTION: If not observed, minor physical injury or property damage may occur as a result.
For safety precaution, please read all of the following safety instructions before using. The appliance is designed for domestic use and may only be operated in accordance with these instructions.
▲DANGER
- Read all instructions before using this appliance.
- Ensure that the voltage indicated on the appliance corresponds with the voltage of your electrical outlet.
- Do not use the appliance near gas appliances, heating devices, fireplaces, lighting devices or direct sunlight.
- If the power cord is damaged, do not attempt to repair, modify, or replace the cord yourself. Call the Brondell Service Center.
- Do not expose the appliance to water or handle the power plug with wet hand.
- Do not clean or spray the appliance with water, liquid, detergent or any flammable materials such as insecticides or fragrances to avoid electric shock or fire hazard.
- Do not obstruct the air inlet and/or outlet.
- Do not use an extension cord unless it has been approved by a competent authority.
- Do not use the appliance when it is damaged or performs abnormally.
- Do not use the appliance when indoor smoke-type insect repellents are used or in places with oily residues, burning incense or chemical fumes.
- Do not use the appliance in a location with major temperature change to avoid condensation inside the appliance.
- Do not use the appliance in humid or high temperature environment such as bathroom or kitchen.
- If the appliance produces a strange noise, burning smell or smoke, unplug the power plug from the electrical outlet and call our service center.
- Do not use the appliance for anything other than its intended use.
- TO REDUCE THE RISK OF FIRE OR ELECTRIC SHOCK, DO NOT USE THIS PRODUCT WITH ANY SOLID-STATE SPEED CONTROL DEVICE (FOR EXAMPLE, A DIMMER SWITCH).
- This appliance has a polarized plug (one blade is wider than the other). To reduce the risk of electric shock, this plug is intended to fit in a polarized outlet only one way. If the plug does not fit fully in the outlet, reserve the plug. If it still does not fit, contact a qualified electrician. Do not attempt to defeat this safety feature.
1 IMPORTANT SAFETY INSTRUCTIONS (cont.)
WARNING
- The appliance is not a substitute for proper ventilation, regular vacuum cleaning or extractor hood or fan during cooking.
- Ensure the power plug to be in good condition and good connection; whether the appliance properly connected or not; the plug is not overloaded or overheated.
• Always place and use the appliance on a dry, stable and level surface.
• Leave at least 20 inch gap distance away from walls or adjacent objects. - Do not push or lean against, exert excessive force or shock any part of the appliance or stick sharp or hard objects such as screw driver into any part of the appliance.
• If any filter or Front Panel casing is not properly installed, the appliance will not operate correctly. - Maintain good air circulation when using the appliance.
- Unplug the appliance from electrical outlet when not in use, before assembling or taking off parts, and before cleaning.
• Do not use the appliance for anything other than its intended use.
2 PRODUCT INFORMATION AND SPECIFICATIONS
Air Quality Sensor
SPECIFICATIONS
Product Name: O2+ Source
Product Models: P300-B, P300-W
Voltage / Frequency: 110V / 60Hz
Power Consumption: 70 Watts
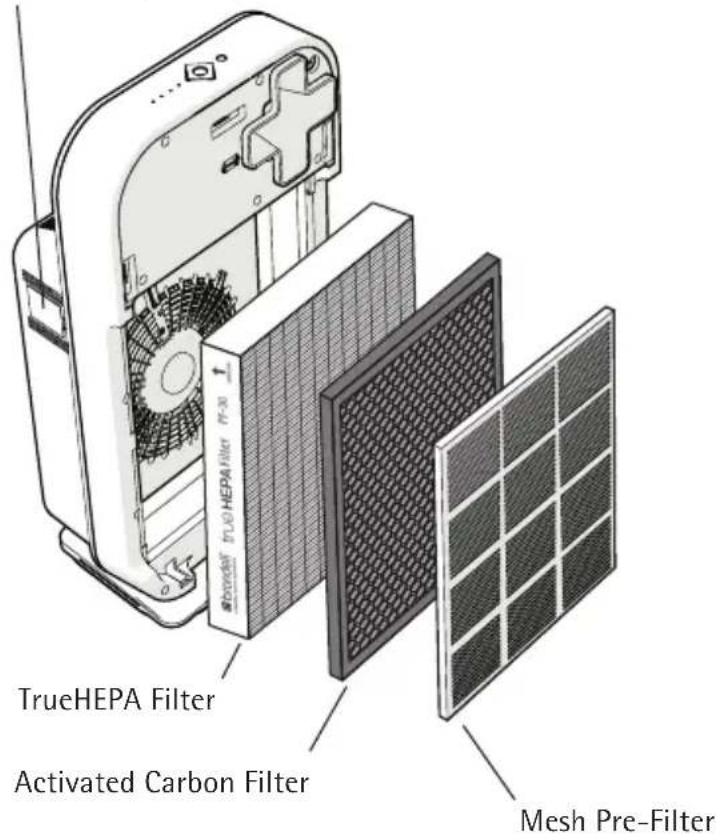
PACKAGE CONTAINS
- 02+ Source Air Purifier
-
Filters
-
Mesh Pre-Filter
- Activated Carbon Filter
- TrueHEPA Filter
- Owner's Manual
2 PRODUCT INFORMATION AND SPECIFICATIONS (cont.)
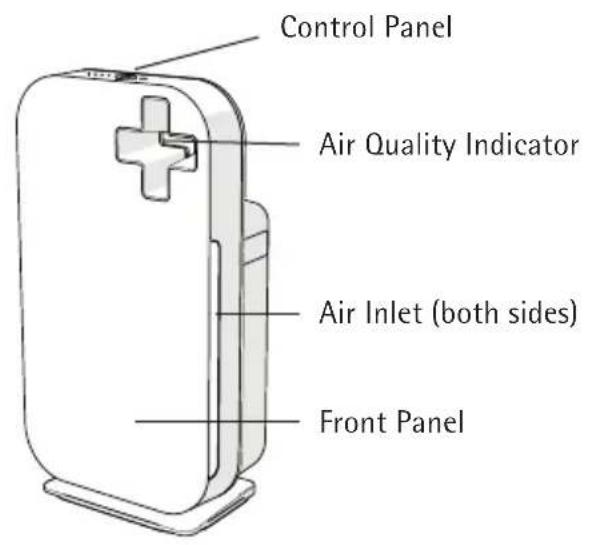
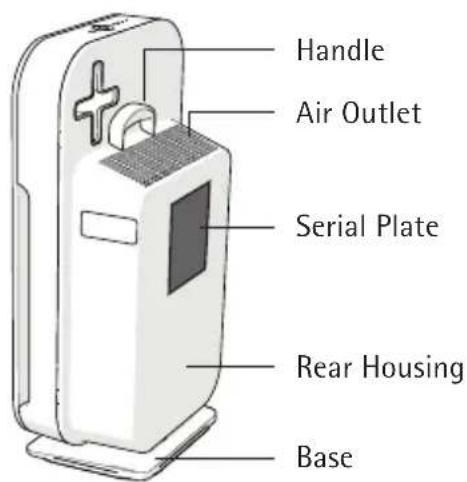
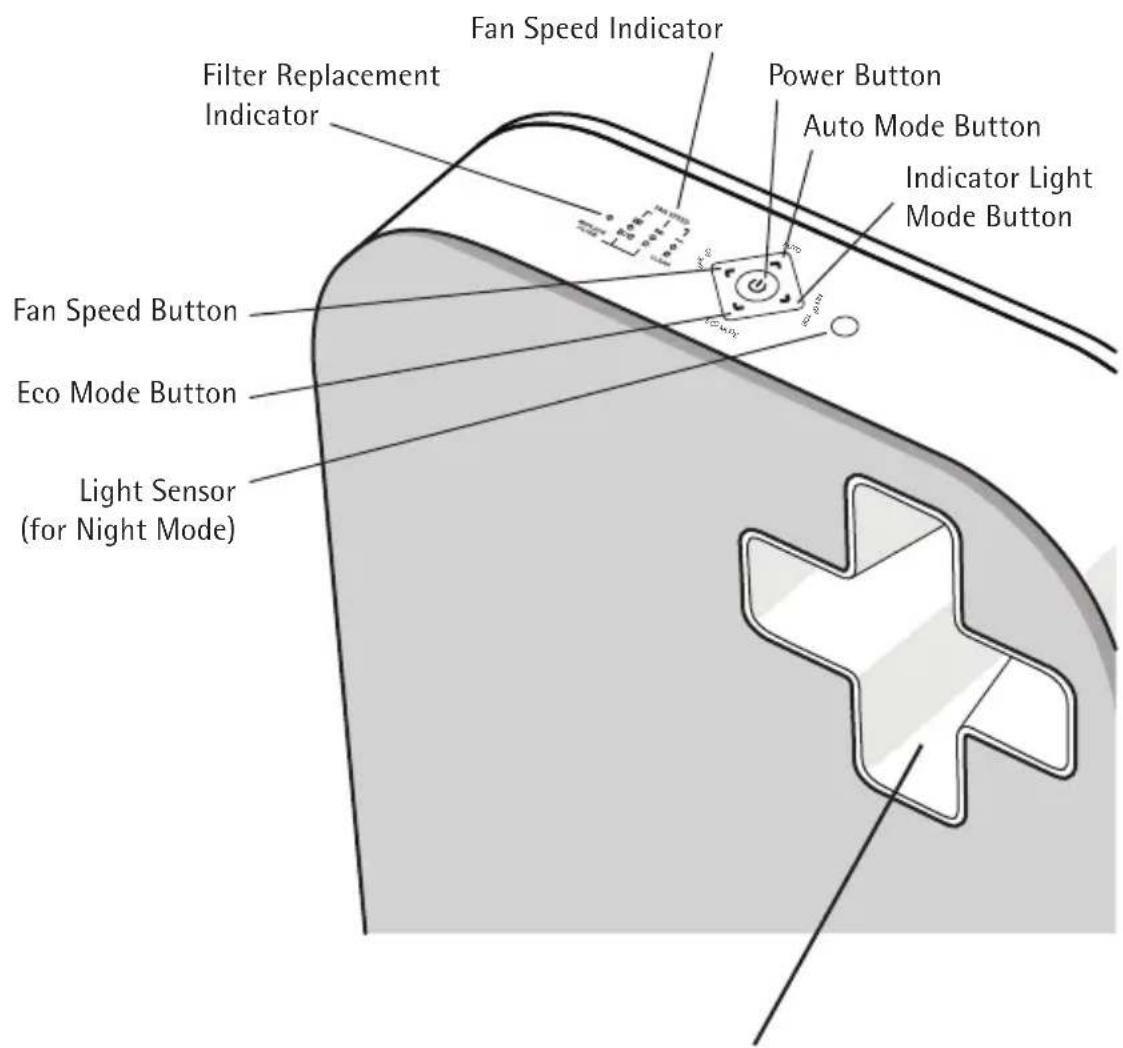
CONTROL PANEL
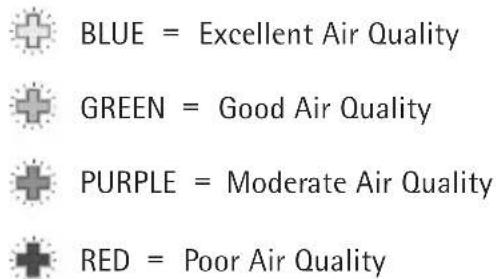
AIR QUALITY INDICATOR
2 PRODUCT INFORMATION AND SPECIFICATIONS (cont.)
flowchart
graph LR
    A["Input Image"] --> B["Image Filter"]
    B --> C["Output Positive Charge"]
    style A fill:#f9f,stroke:#333
    style B fill:#ccf,stroke:#333
    style C fill:#cfc,stroke:#333
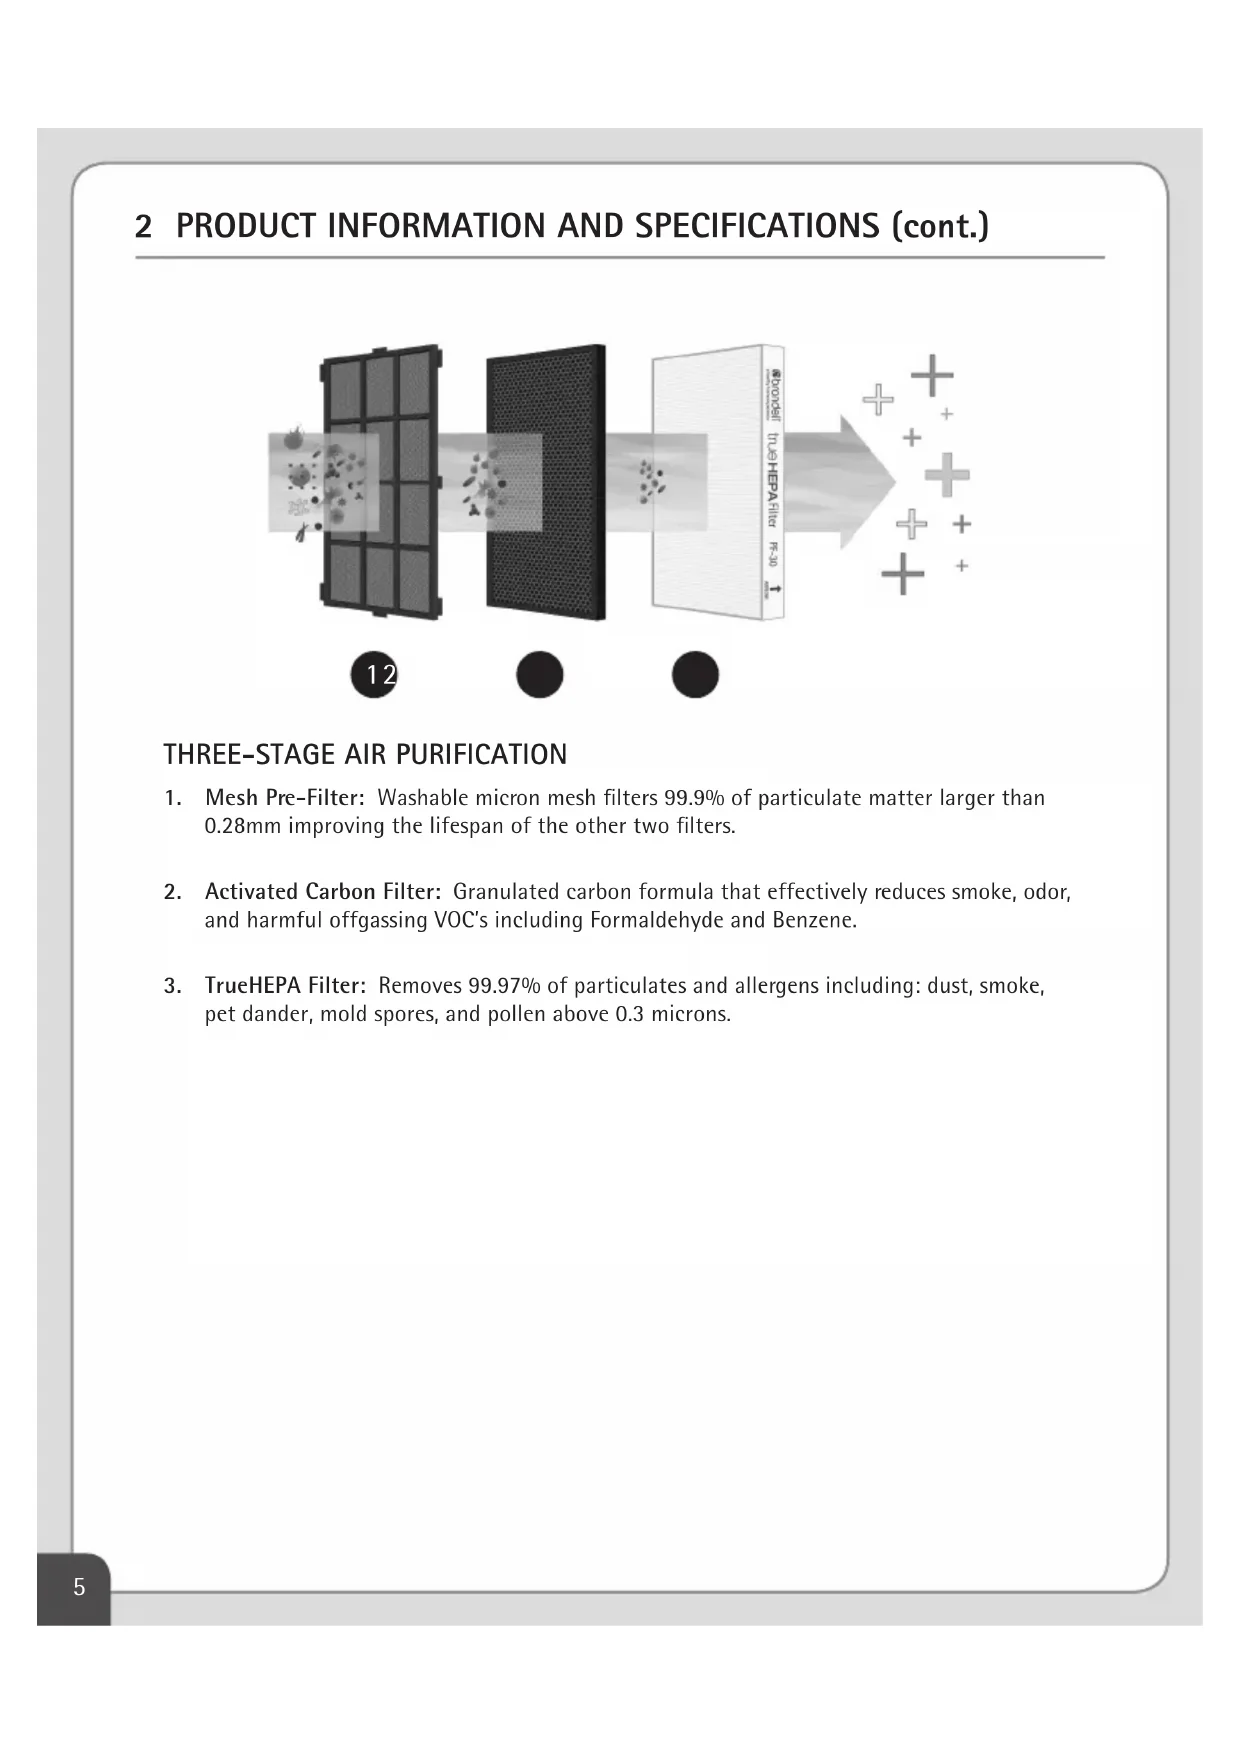
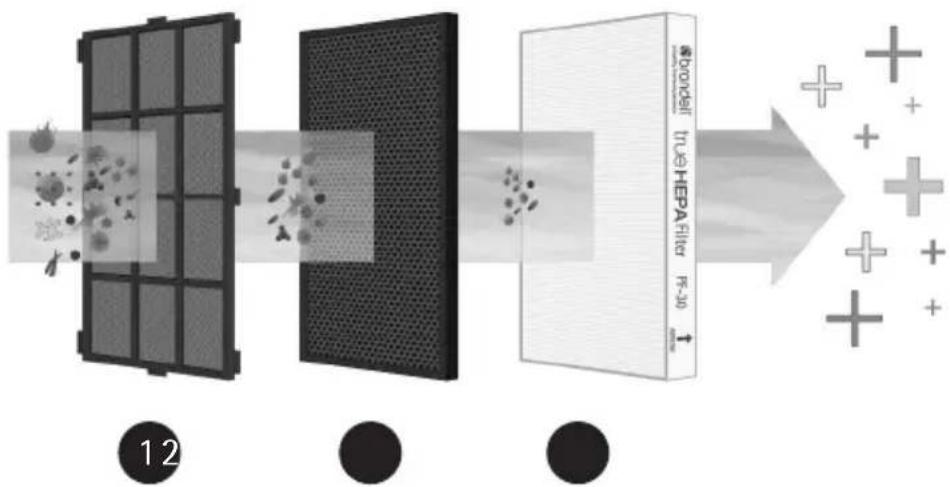
THREE-STAGE AIR PURIFICATION
-
Mesh Pre-Filter: Washable micron mesh filters 99.9% of particulate matter larger than 0.28mm improving the lifespan of the other two filters.
-
Activated Carbon Filter: Granulated carbon formula that effectively reduces smoke, odor, and harmful offgassing VOC's including Formaldehyde and Benzene.
-
TrueHEPA Filter: Removes 99.97% of particulates and allergens including: dust, smoke, pet dander, mold spores, and pollen above 0.3 microns.
3 PREPARING THE FILTERS FOR FIRST USE
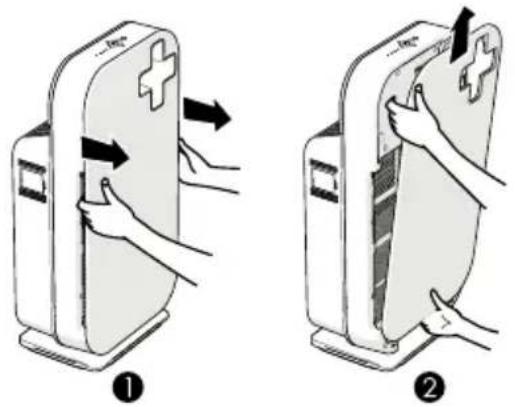
The O2+ Source comes with the filters installed, however it is necessary to remove the plastic wrap on each filter prior to using the appliance. Follow the instructions below to prepare your O2+ Source filters for use.
natural_image
Diagram of a device's internal structure showing a grid array and fan assembly (no text or symbols)-
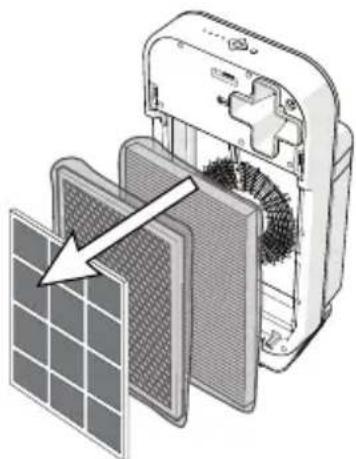
Grasp the side recesses and gently pull the top part of the Front Panel towards you. Then lift the hooks at the bottom of the panel.
-
Remove all the filters from the appliance.
natural_image
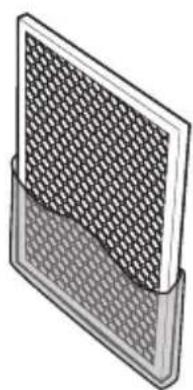
Illustration of a grid-patterned panel mounted on a stand (no text or symbols)- Remove filters from plastic wrap material.
natural_image
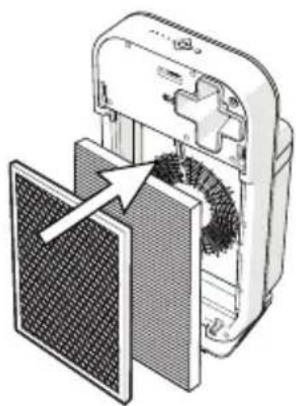
Diagram of a device with a mesh panel and internal components, showing no text or symbols.- Put the TrueHEPA and Activated Carbon filters back into the appliance in the appropriate order (see Page 3). NOTE: Make sure that the white tab on each filter faces you.
3 PREPARING THE FILTERS FOR FIRST USE (cont.)
- Place the Mesh Pre-Filter in the appliance.
NOTE: Make sure that the side with the two middle tabs are pointing towards you. Slide all of the side tabs into their corresponding slots in the frame of the unit.
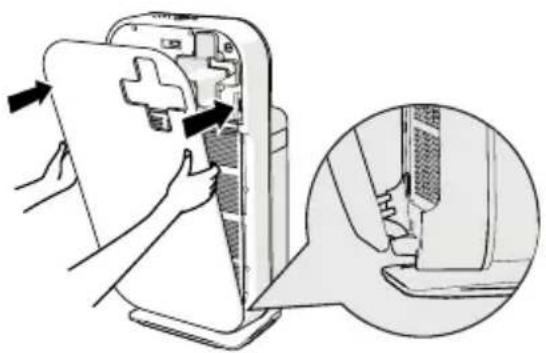
natural_image
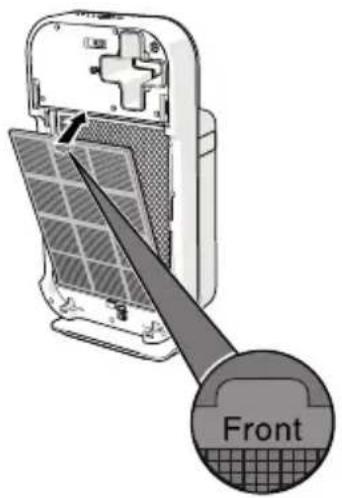
Illustration of a hand inserting a device into a device panel, with an inset showing the close-up of the component (no text or symbols present)- To reattach the Front Panel, insert the bottom hooks into the bottom of the appliance first. Then push the panel against the body of the appliance until the magnets catch.
4 OPERATING YOUR O2+ SOURCE AIR PURIFIER
4.1 TURN THE O2+ SOURCE ON/OFF
- To turn on the O2+ Source, first plug it into an electric outlet. The control panel lights will flash twice and you will hear a beep.
- Press the Power Button to switch the appliance ON. The control panel lights and Air Quality Indicator light will power on, and you will hear a beep. Once powered on, the Source will be in AUTO mode with the fan speed setting at 2 and air quality indicator colored green for the first 2 minutes, then it will adjust automatically.
- To turn OFF, press and hold the Power Button for about 5 seconds, the appliance will beep and the lights will power off.
4.2 MODES AND INDICATORS
4.2.1 AUTO MODE
The Air Quality Sensor measures the ambient air quality. When Auto Mode is activated, the appliance automatically utilizes the Air Quality Sensor to select the most appropriate fan speed for the measured air quality in the room.
To turn on Auto Mode, press the Auto Mode Button (the Auto light will illuminate)
If the air quality in the room is Good (Green indicator light), the appliance will operate at a low fan speed. If the air quality is Excellent (Blue indicator light), the fan may completely stop running. The appliance will automatically adjust the fan speed according to detected changes in the air quality.
NOTE: When the humidity level in the room is very high, it is possible that condensation can develop on the Air Quality Sensor on the side of the appliance. This may cause the 02+ Source to believe the air quality is lower and cause the fan speed to operate at a higher level. If the room has very high humidity, you may prefer to run the appliance in Fan Speed Mode rather than Auto Mode.
4.2.2 NIGHT MODE
If the Source is in AUTO mode and the room has been dark for 3 minutes, the appliance will automatically switch into Night Mode. In Night Mode, the air quality indicator and control lights will turn off and the fan speed and noise level are reduced.
Once the room becomes light for 5 minutes or more, the appliance will resume normal light indicators and operation. You may also press Fan Speed to manually take the unit out of Night Mode.
4.2.3 ECO MODE
If the appliance is operating in either Auto Mode or Fan Speed Mode, you can press the Eco Mode Button. Eco Mode automatically turns the fan speed to the lowest setting to conserve energy.
4 OPERATING YOUR O2+ SOURCE AIR PURIFIER (cont.)
4.2.4 FAN SPEED MODE
If you prefer not to use the Auto Mode, you can manually change the fan speed by pushing the Fan Speed Button.
- Press the Fan Speed Button until the light indicates the desired fan speed; 1, 2, 3 or Turbo (all three lights lit).
- The appliance will remain in the chosen fan speed until a new fan speed is chosen or the Auto Mode is activated.
4.2.5 INDICATOR LIGHT MODE
The Air Quality Indicator light will change color according to the air quality:
Blue = Excellent
Green = Good
Purple = Moderate
Red = Poor
Please note that the air quality indicator will remain Green for the first 2 minutes when powering on, then will automatically adjust. If you'd like to turn off the Air Quality Indicator light, press the Indicator Light Mode button on the unit.
4.2.6 FILTER REPLACEMENT INDICATOR
The filter life is good for approximately 1 year (8,760 hours of use). Once the life of the filters has expired, the Filter Replacement Indicator will let you know it's time to change the filters. The Fan Speed lights double as the Filter Replacement Indicator lights and the machine will beep to remind you.
- If the Fan Speed light is solid and blue, it is indicating the current fan speed.
- If the Fan Speed lights are red or flashing, that is an indication that the filters need to be cleaned or replaced. The machine may also beep until filters are replaced.
a. The Mesh Pre-Filter can be cleaned with a vacuum on the lowest setting.
b. All other filters must be replaced with the O2+ Replacement Filter Pack (model #PF-30) - If the Filter Replacement Indicator has been on, and the filters have not been replaced for 168 hours of use, the appliance will shut down and go into Lock Mode. The appliance will not power on after Lock Mode has activated until the filters are replaced and the Filter Reset Button has been pressed.
See the next section on how to replace the filters.
5 FILTER REPLACEMENT
| Part Number Filter Name Usable period** | ||
| PF-30 | Activated Carbon Filter 8,760 hours | |
| TrueHEPA Filter 8,760 hours | ||
** The filter replacement schedule may be accelerated in situations where air quality is consistently poor.
The Filter Replacement Indicator will notify you when it is time to change the filters. To change the filters, follow these steps:
- Turn the unit off by pushing the Power Button, then unplug the power cord.
-
Gently pull the top part of the Front Panel towards you using the side recesses. Lift the hooks of the Front Panel out of the bottom of the appliance.
-
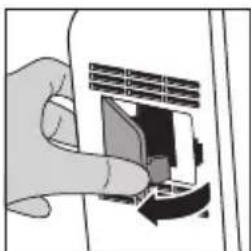
To remove the Mesh Pre-Filter, hold both pull-tabs in the center of the filter and pull towards you.
-
Pull the white tab on the top of each of the following filters to remove them.
-
Make sure to remove the plastic on the new replacement filter before installing, and be sure to put them in the following order:
a. TrueHEPA Filter goes in first
b. The Activated Carbon filter goes in second
c. Finally, replace the Mesh Pre-Filter as the last step
-
Replace the Front Panel by putting the hooks in the bottom first and closing.
-
Plug the unit back in and press the Power Button.
-
Press the Filter Reset button to reset the filter use timer. The Filter Reset button is located inside the appliance body, next to the Air Quality Sensor.

natural_image
Illustration of a hand inserting a card into a device, with an inset showing a mechanical component (no text or symbols)HELPFUL TIP
You may need a small thin object, like a paper clip to push the reset button
6 MAINTENANCE
WARNING: Always unplug the O2+ Source before cleaning or performing other maintenance. Never immerse the appliance in water or any other liquid.
Do not use harsh chemicals or cleaning agents such as bleach or alcohol to clean any part of the appliance.
Only the Pre-Filter can be cleaned and reused. The other filters are NOT reusable.
6.1 BODY MAINTENANCE
Regularly clean the inside and outside of the body of the O2+ Source to prevent dust from collecting on the unit.
- Wipe away dust with a soft dry cloth from the body of the appliance. Use a damp cloth or mild cleanser to remove heavy dirt
- Clean the Air Inlet and the Air Outlet with a soft brush or vacuum cleaner
6.2 FILTER MAINTENANCE
Make sure to change the filters when the Filter Replacement Indicator notifies you. In addition to changing the filters as needed, you will also want to clean the Mesh Pre-Filter.
To clean the Mesh Pre-Filter, use a vacuum on the low speed to clear any buildup. Do not rinse or soak the filter in water or any other liquid. The Mesh Pre-Filter is the only filter that can be cleaned and reused, all other filters need to be replaced.
6.3 AIR QUALITY SENSOR MAINTENANCE
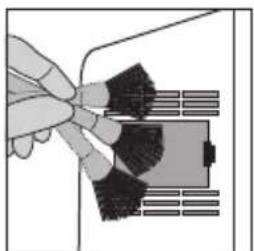
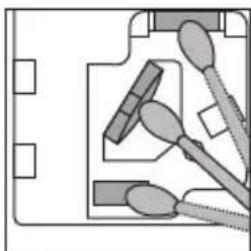
Use a damp swab or soft brush to clean the Air Quality Sensor every 2 months or as needed to ensure the best performance of the O2+ Source. Follow the below steps to clean the Air Quality Sensor:
natural_image
Illustration of a hand holding a tool interacting with a device (no text or symbols visible)- Use a soft brush to clean the vents above and below the Air Quality Sensor.
natural_image
Hand inserting a card into a microphone (no text or symbols visible)- Remove the protective cover of the Air Quality Sensor.
natural_image
Pure electrical circuit lines without any symbols- Use a damp swab to clean the Air Quality Sensor and vents. Use a dry swab to dry them if necessary.
natural_image
Hand inserting a card into a device (no text or symbols visible)- Reattach the protective cover of the Air Quality Sensor.
WARNING: Always unplug the O2+ Source prior to attempting to replace the fuse. Use only 125 Volt, 2.5 Amp max fuse as a replacement.
6.4 PLUG FUSE REPLACEMENT
The Source comes with a safety fuse built into the plug head, which helps protect the machine from any power surges. If the fuse is blown and needs replacing, there is a spare already provided for you on the plug. If the spare is lost or missing, use only a 125 Volt, 2.5 Amp max fuse.
natural_image
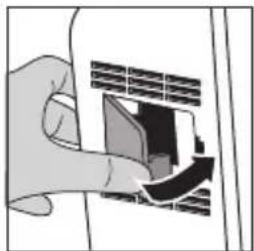
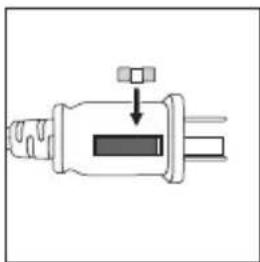
Pure mechanical diagram showing a lever mechanism with no text or symbols- Remove spare fuse housing with a small "micro type" screwdriver (or similar item).
natural_image
Pure electrical plug diagram without any text, numbers, or symbols- Separate from the plug head.
natural_image
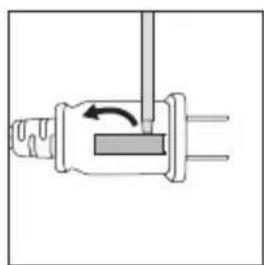
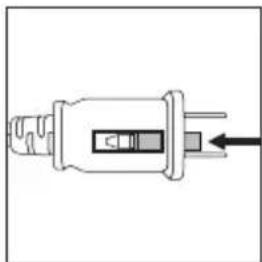
Pure electrical connector diagram without any text or symbols- Using the same small screwdriver, slide open the fuse compartment on the plug head by pushing away from the cord.
natural_image
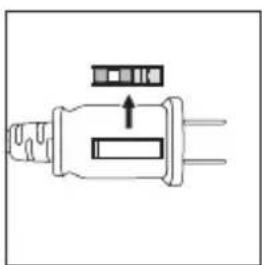
Pure electrical plug diagram without any text, numbers, or symbols- Use the screwdriver to pop out the old fuse and replace with the spare fuse provided.
natural_image
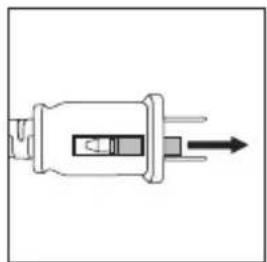
Pure electrical connector diagram without any text or symbols- Lastly, discard the blown fuse, close the fuse compartment, and replace spare fuse holder onto the plug head.
7 TROUBLESHOOTING
CONDITION POSSIBLE CAUSE POSSIBLE SOLUTION
| Unit cannot be switched on. | Front Panel is not placed properly. Remove the Front Panel and reattach it onto the unit again. | |
| Power plug is not properly inserted into the electrical outlet. | Unplug the unit and plug it back into the electrical outlet. | |
| Power plug or cord is damaged. Contact the Brondell Service Center. | ||
| Unit is in Lock Mode and stops operation because exhausted filters are not replaced. | Clean the Mesh Pre-Filter, replace HEPA and carbon filters with a new set, and reset filter change indicator. Refer to Filter Replacement on page 10 of this manual. | |
| Safety fuse is blown. Replace safety fuse. See Section 6.4 on page 12 for instructions. | ||
| Fan not working. Unit is not switched on. Ensure the unit is properly plugged into the outlet. | ||
| Fan speed does not automatically adjust when the Auto Mode is activated. | Air Quality Sensor is faulty and alarm will be heard. Air Quality Indicator will flicker in green. | Contact the Brondell Service Center. |
| Night Mode is activated when the ambient light is dimmed for 3 minutes. | Press Auto Mode or Fan Speed Button. Unit will resume its normal operation when light sensor detects ambient light for 5 minutes. | |
| Machine is beep-ing. | Filters need to be changed and the filter change indicator reset. | Refer to filter replacement instructions on page 10 |
7 TROUBLESHOOTING (cont.)
CONDITION POSSIBLE CAUSE POSSIBLE SOLUTION
| Poor performance, or not purifying at optimum capacity. | Filter is due for replacement. Replace with new filter set. | |
| Blockage at Air Inlet or Air Outlet. Contact the Brondell Service Center. | ||
| Plastic wrap on filters not removed. Remove the plastic wrap and put filters back in. | ||
| Clearance around appliance not adequate for air ventilation. | Ensure that there is clearance of 20" on each side and 4" in the back of the appliance. | |
| Missing filters or filters were inserted in the wrong order. | Ensure all 3 filters are placed in the correct order (see Page 3 of this manual). | |
| Exceeded expected room coverage area. | Suggested room coverage area is approximately 260-300 square feet. | |
8 BRONDELL WARRANTY POLICY
Brondell products are backed by some of the most comprehensive warranties in the industry. Brondell warrants that all products (excluding consumable items) shall be free from defects in material and workmanship under normal use and service.
Residential Warranty for Source O2+ Air Purifiers – 3 year limited warranty
What this Limited Warranty Covers
100% Coverage of defects or malfunctions of all electronic parts and labor for the entire product excluding consumable filters for the first three years from original date of purchase.
Commercial Warranty: Warranty period 1 year from original purchase date for O2+ Air Purifiers. Warranties may not apply to products that are used for heavy commercial, hospital, or other high use non-residential applications.
Exclusions and Limitations
- BRONDELL warrants its products to be free from manufacturing defects under normal use and service. This warranty is extended only to the ORIGINAL PURCHASER and is not transferable if you sell or otherwise transfer the product.
-
BRONDELL's obligations under this warranty are limited to repairs or replacement, at BRONDELL's option, of products or parts found to be defective, provided that such products were properly installed and used in accordance with instructions. BRONDELL reserves the right to make such inspections as may be necessary in order to determine the cause of the defect. BRONDELL will not charge for labor or parts in connection with warranty repairs for the first three full years from date of purchase on all products except those that may be subject to commercial use limitations.
-
BRONDELL is not responsible for the cost of removal, return (shipping) and/or re-installation of products. This warranty does NOT apply to:
-
Any and all replacement filters and consumable parts.
- Damage or loss which occurs during shipment.
- Damage of loss sustained through any natural or man-made causes beyond the control of BRONDELL, including but not limited to fire, earthquake, floods, etc.
- Damage or loss resulting from negligent or improper installation including installation of a unit in a harsh or hazardous environment.
- Damage or loss resulting from removal, improper repair, modification of the product, or improper maintenance including damage caused by cleaning products.
- Damage or loss resulting from electrical surges, electrical outages, lightning strikes or other acts which are not the fault of Brondell or which the Product is not specified to tolerate.
-
Damages as a result of normal wear and tear will not be considered defects.
-
This warranty gives you specific legal rights. You may have other rights which vary from state to state.
8 BRONDELL WARRANTY POLICY (cont.)
THIS WRITTEN WARRANTY IS THE ONLY WARRANTY MADE BY BRONDELL. REPAIR OR REPLACEMENT AS PROVIDED UNDER THIS WARRANTY SHALL BE THE EXCLUSIVE REMEDY AVAILABLE TO THE PURCHASER. BRONDELL SHALL NOT BE RESPONSIBLE FOR LOSS OF USE OF THE PRODUCT OR FOR OTHER INCIDENTAL, SPECIAL, FOR CONSEQUENTIAL DAMAGES OR EXPENSES INCURRED BY THE PURCHASER OR FOR LABOR OR OTHER COSTS DUE TO INSTALLATION OR REMOVAL OR COSTS OF REPAIRS BY OTHERS, OR FOR ANY OTHER EXPENSE NOT SPECIFICALLY STATED ABOVE. EXCEPT TO THE EXTENT PROHIBITED BY APPLICABLE LAW, ANY IMPLIED WARRANTIES, INCLUDING THAT OF MERCHANTABILITY, ARE EXPRESSLY LIMITED TO THE DURATION OF THIS WARRANTY. SOME STATES DO NOT ALLOW LIMITATIONS, SO THE ABOVE LIMITATION AND EXCLUSION MAY NOT APPLY TO YOU.
HOW TO OBTAIN SERVICE
To obtain repair service under this warranty, you must contact an authorized BRONDELL Service Center to obtain an RMA (Return Merchandise Authorization) number. Proof of purchase in the form of a copy of your original receipt must accompany the returned unit for the warranty to be valid. Take or ship the unit pre-paid to the closest Brondell authorized service center along with your RMA number and proof of purchase. To obtain your RMA number and locate the BRONDELL Service Center location nearest you, call us toll free at 1-888-542-3355 or contact us at support@brondell.com
For questions, contact Brondell Customer Service: 1-888-542-3355
CONTACT INFORMATION
Brondell, Inc.
PO Box 470085
San Francisco, CA
94147-0085
WARRANTY
For detailed warranty information and product registration, please visit our website at www.brondell.com. Please retain receipt records for any warranty claims.
Phone: 1-888-542-3355
Email: support@brondell.com
Web: www.brondell.com
SOURCE
natural_image
Black electronic device with a white cross symbol on top, labeled 'brondell' at the bottom (no other text or symbols visible)MANUAL DEL USUARIO
natural_image
Diagram of a device's internal structure showing a grid array and fan assembly (no text or symbols)natural_image
Illustration of a grid-patterned panel or filter device with a base (no text or symbols)natural_image
Diagram of a device with a mesh panel and internal gear mechanism (no text or symbols)natural_image
Illustration of a hand inserting a device into a device, with an inset showing the close-up of the component (no text or symbols present)natural_image
Hand inserting a small electronic component into a device, with an inset showing a microchip or sensor array (no text or symbols visible)SUGERENCIA ÚTIL
natural_image
Pure mechanical diagram showing a piston-cranked joint with an arrow indicating rotational motion (no text or symbols)natural_image
Pure electrical circuit lines without any symbolsnatural_image
Pure electrical connector diagram without any text or symbolsExclusions and Limitations
natural_image
Black electronic device with a white cross symbol on top, labeled 'brondell' at the base (no other text or symbols visible)MANUEL DE L'UTILISATEUR
natural_image
Diagram of a device's internal structure showing a grid array and fan assembly (no text or symbols)natural_image
Illustration of a grid-patterned panel or filter device with a base (no text or symbols)natural_image
Diagram of a device with a mesh panel and internal gear mechanism (no text or symbols)natural_image
Illustration of a hand inserting a device into a device panel, with an inset showing the close-up of the component (no text or symbols present)natural_image
Hand inserting a card into a device, with an inset showing a grid of components (no text or symbols visible)CONSEILS PRATIQUES
natural_image
Illustration of a hand holding a device with black waves, next to a grid of rectangular blocks (no text or symbols)natural_image
Hand inserting a card into a device (no text or symbols visible)natural_image
Pure electrical circuit lines without any symbolsnatural_image
Illustration of a hand inserting a card into a device (no text or symbols visible)natural_image
Pure mechanical diagram showing a valve or connector with internal components and an arrow indicating rotation (no text or symbols)natural_image
Pure electrical connector diagram without any text or symbolsnatural_image
Pure electrical connector diagram without any text or symbolsÉTAT CAUSE POSSIBLE SOLUTION POSSIBLE
ÉTAT CAUSE POSSIBLE SOLUTION POSSIBLE