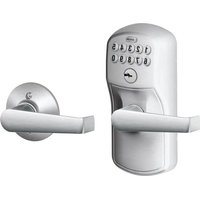
FE575 - Electronic lock Schlage - Free user manual and instructions
Find the device manual for free FE575 Schlage in PDF.


| Brand | Schlage |
| Model | FE575 |
| Product Type | Electronic keypad lock (lever, Auto Lock) |
| Power Supply | 9V alkaline battery (annual replacement recommended) |
| Main Functions | Lock/unlock by code, emergency key, vacation mode, code deletion, lock and leave function |
| Number of User Codes | Up to 19 codes (4 digits each) |
| Programming Code | 6 digits, changeable |
| Security | Backlit keypad, privacy lock (disables keypad), mechanical emergency key |
| Maintenance | Change battery annually, clean with a soft cloth |
| Spare Parts | 9V battery, emergency key |
| Warranty | Lifetime warranty on mechanism and finish, 3 years on electronics |
| Compatibility | Standard doors (preparation for lever lock) |
| Protection Rating | Residential indoor use |
| Customer Service | United States/Canada: 888-805-9837, Mexico: 018005067866, Website: answers.schlage.com |
Frequently Asked Questions - FE575 Schlage
User questions about FE575 Schlage
0 question about this device. Answer the ones you know or ask your own.
Ask a new question about this device
Download the instructions for your Electronic lock in PDF format for free! Find your manual FE575 - Schlage and take your electronic device back in hand. On this page are published all the documents necessary for the use of your device. FE575 by Schlage.
USER MANUAL FE575 Schlage
natural_image
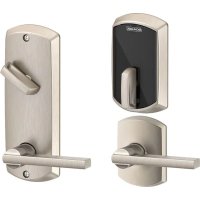
Illustration of a door lock and door door with keypad and handle (no text or symbols)BE365FE575/FE595
PLEASE KEEP THIS GUIDE
You will need these codes to operate your lock!
CONSERVE ESTA GUÍA
Locking and Unlocking....6
Changing the Battery 6
Key Override 7
Lock Override....7
Keypad Locks 8
Locking and Unlocking....8
Key Override 8
Changing the Battery 9
Programming Guide......10
Schlage Button Signals....10
Codes....10
Default Code Locations....10
Basic Controls....11
Enhanced Controls 12
Record Your Codes 13
User Codes 13
Troubleshooting 14
Restore Factory Settings 15
Warranty
Lifetime Limited Mechanical and Finish Warranty and 3-Year Limited Electronics Warranty
Subject to the terms and conditions of the warranty, Schlage extends a lifetime limited mechanical and finish warranty and a three-year limited electronics warranty to the original consumer user ("Original User") of our Schlage brand product ("Product") against defects in material and workmanship, as long as the Original User occupies the residential premises upon which the Product was originally installed. See answers.schlage.com for specific warranty details and limitations, or contact Schlage Customer Service at (888) 805-9837 in the U.S., 800-997-4734 in Canada or 018005067866 in Mexico for assistance.
Register your Product
PLEASE KEEP THIS GUIDE
This guide contains important information about your lock!
- Default User Codes and Programming Code are located on the sticker on the back of this guide! You will need these if you ever need to reset your lock back to factory default settings!
- The sticker also contains your serial number, which may be needed for warranty and customer service support.
- Instructions for adding and deleting User Codes, changing the lock behavior, troubleshooting, customer service and more are explained in this guide!
WHY DO I NEED KEYS IF THIS IS A KEYLESS LOCK?
Good question! In the event that the battery is dead, or no User Code is known, you can use the key to gain access by employing the emergency key override.

UNLOCK YOUR SOLUTION
Browse to answers.schlage.com and click on Electronic Keypad Locks in the menu on the right side for videos, troubleshooting, FAQ and more.
Questions about your
new keypad lock?
Please don't return it to the store!
Let us help you first!
Need Help?

For technical documents and videos, visit answers.schlage.com
U.S.A.: 888-805-9837 Canada: 800-997-4734 Mexico: 018005067866
LOCK PARTS
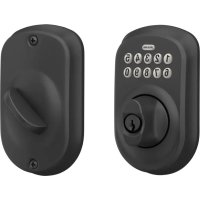
Keypad Deadbolt
Model BE365
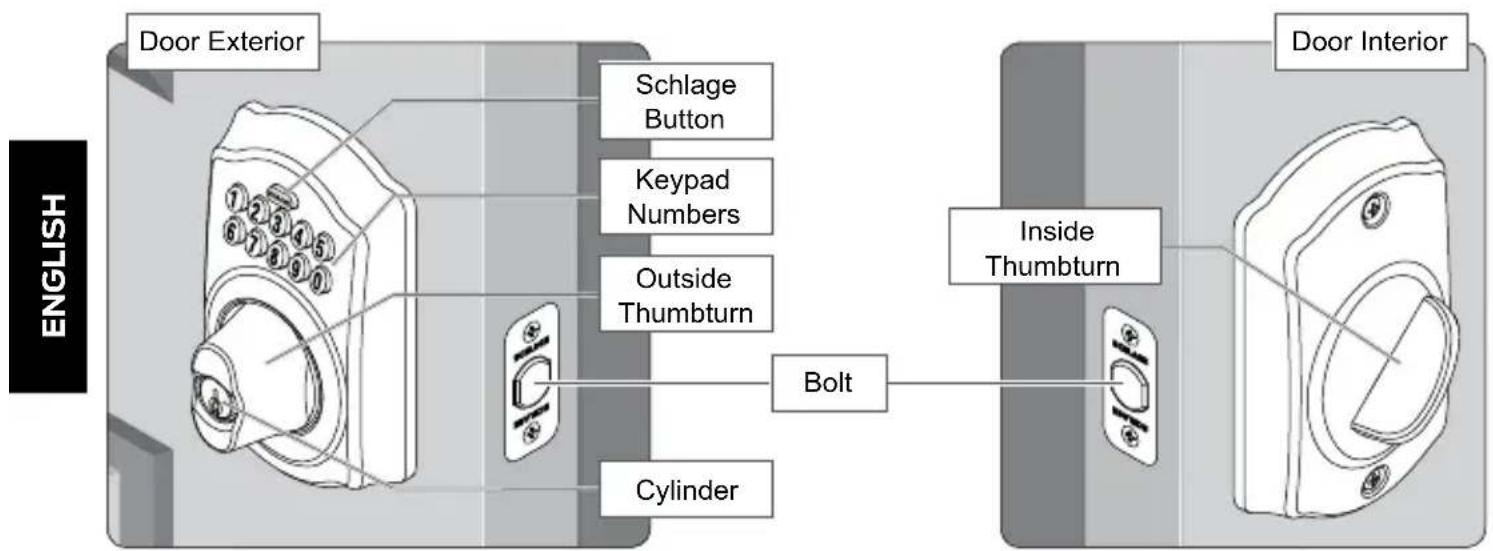
Keypad
- Used to enter codes for programming and unlocking. See Programming Guide on page 10 and Locking and Unlocking on page 6 for more information.
Outside Thumbturn
- Used to unlock the lock after a valid User Code has been entered, or to lock the lock after the Schlage button has been pressed.
Cylinder
• Used only in emergency situations to unlock the lock. See Key Override on page 7.
Inside Thumbturn
• Used to lock or unlock the lock.
Keypad Lever
Models FE575 (Auto Lock) and FE595 (Flex Lock)
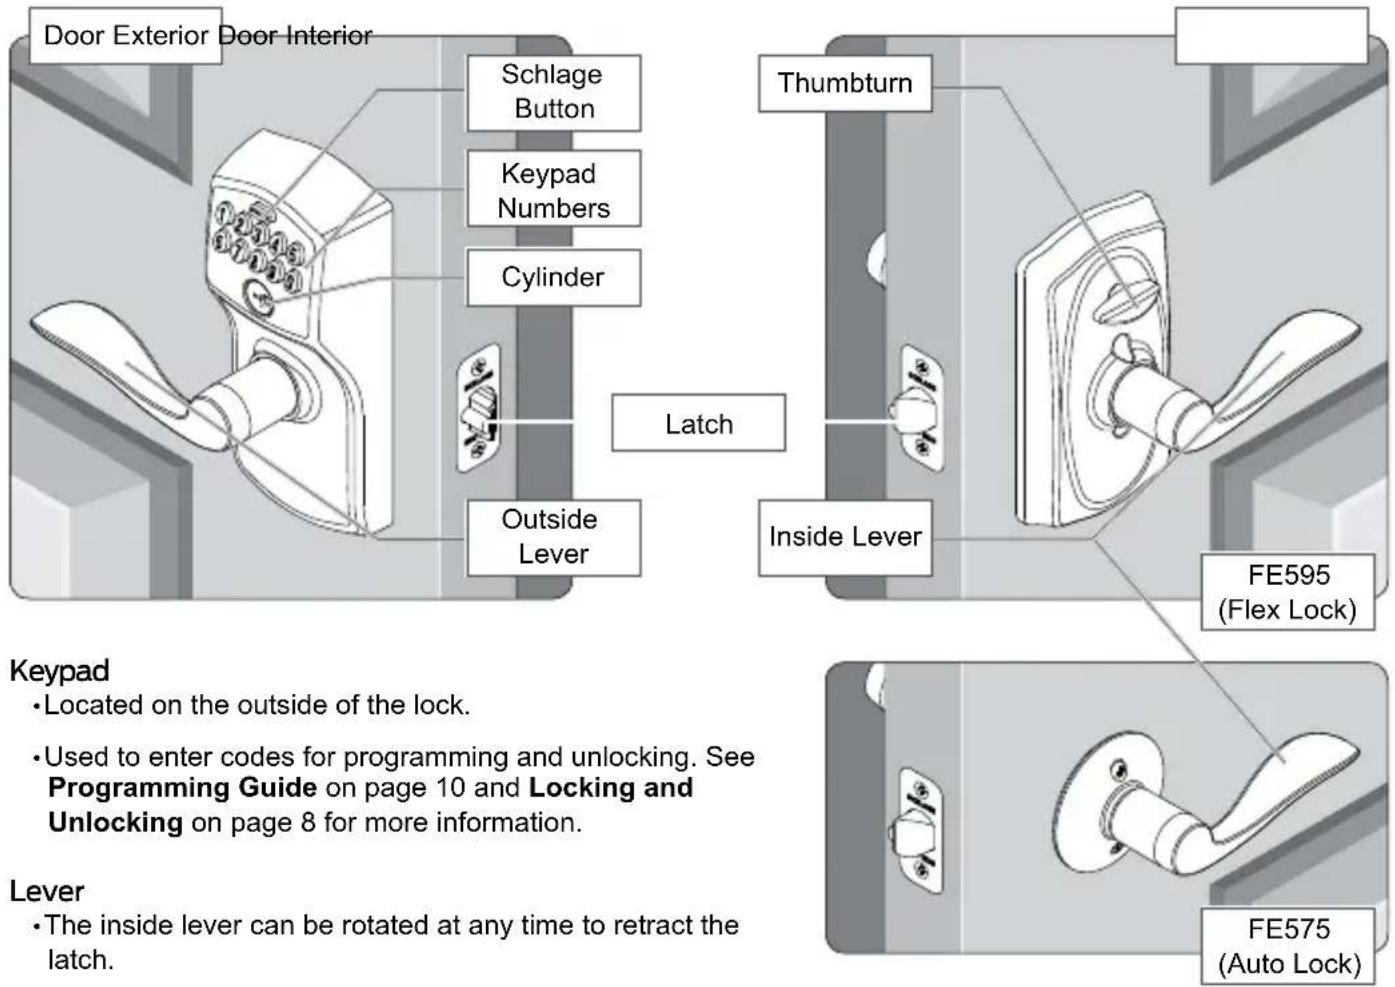
Keypad
- Located on the outside of the lock.
• Used to enter codes for programming and unlocking. See Programming Guide on page 10 and Locking and Unlocking on page 8 for more information.
Lever
- The inside lever can be rotated at any time to retract the latch.
- The outside lever can be rotated at any time, but will only retract the latch when the lock is unlocked.
Cylinder
- Located on the outside of the lock.
• Used only in emergency situations to unlock the lock. See Key Override on page 8.
Thumbturn
• FE595 ONLY: Used to put the lock in a locked or unlocked state.
KEYPAD DEADBOLT
MODEL BE365
Locking and Unlocking
From the outside:
To Lock
-
Press the Schlage button.*
-
Rotate the thumbturn away from the hinges.
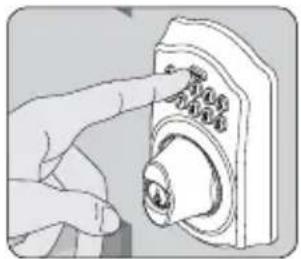
natural_image
Illustration of a hand pressing a button on a doorbell (no text or symbols visible)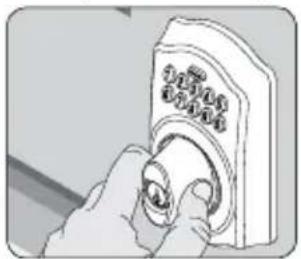
natural_image
Illustration of a hand holding a doorbell with a knob (no text or symbols visible)* If the Turn Lock feature is disabled, a valid User Code must be entered to lock the door. See Enable or Disable Lock & Leave on page 12.
To Unlock
If lighting is low, press the Schlage button to illuminate the keypad before beginning.
-
Enter a User Code into the keypad.
-
Rotate the thumbturn toward the hinges.
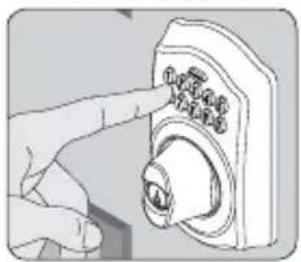
natural_image
Illustration of a hand pressing a button on a device (no text or symbols visible)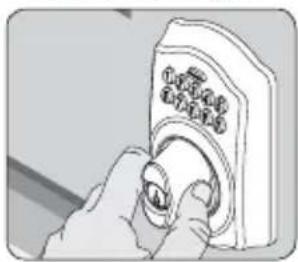
natural_image
Illustration of a hand inserting a button into a device (no text or symbols visible)Changing the Battery
Replace the batteries in your lock at the same time each year that you test and replace the batteries in your smoke alarms. This will ensure continued reliable operation. Use a high-quality alkaline 9 volt battery for replacement.
-
Remove the inside cover.
-
Replace the battery.
-
Re-tuck wires so they will not be crimped. Replace the cover.
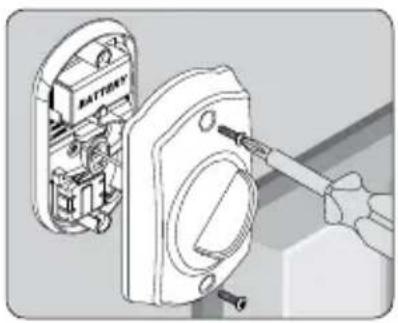
natural_image
Illustration of a battery mounted on an electrical socket with a screwdriver inserted (no text or symbols visible)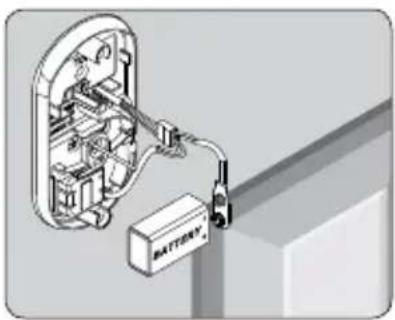
natural_image
Diagram of an electrical switch or battery assembly with internal components and wiring (no text or symbols)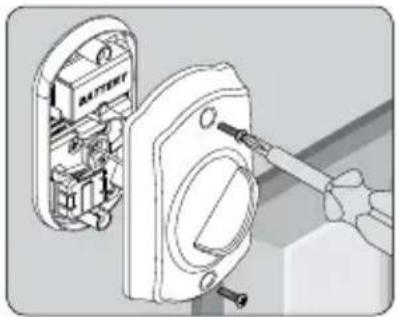
natural_image
Illustration of a hand using a screwdriver to adjust or install a battery component (no text or symbols visible)Lithium Batteries?
6
Lithium batteries may have a longer life, but when they begin to fail, they fail quickly. We don't recommend them because they don't give you a lot of time to change your batteries before the lock is completely dead.
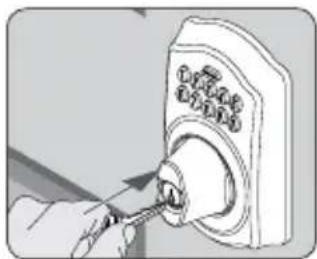
Key Override
Key Override can be used to gain access when the battery is completely dead, when no valid User Code is known or when Lock Override is engaged.
-
Insert the key into the cylinder.
-
Rotate the key 90° toward the hinges.
-
Push the key and cylinder into the thumbturn.
-
Rotate the thumbturn 90° toward the hinges. ^†
natural_image
Illustration of a hand using a tool to adjust or install a door lock (no text or symbols visible)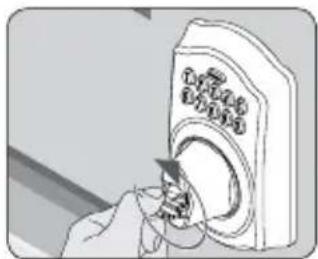
natural_image
Illustration of a hand inserting a device into a container with a cartoon character (no text or symbols visible)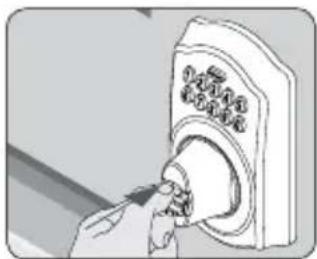
natural_image
Illustration of a hand inserting a button into a doorbell (no text or symbols visible)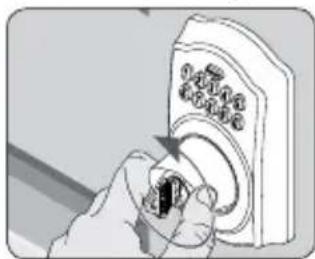
natural_image
Hand inserting a small black object into a white doorbell (no text or symbols visible)† Reverse steps to relock. Hold the thumbturn still while removing the key. See Changing the Battery on page 6 or Restore Factory Settings on page 15 for more information.
Lock Override
Lock Override can be used to completely disable the keypad. When engaged, a key must be used to unlock the lock.
-
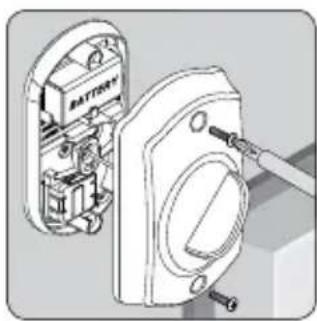
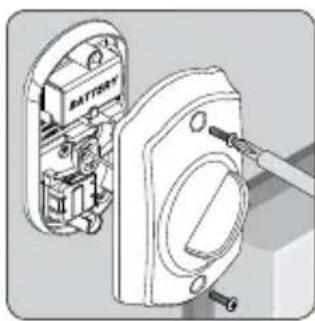
Remove the inside cover.
-
Disconnect and remove the battery.
-
Use a small flathead screwdriver to rotate the lock override slot to LOCKOUT.
-
Re-tuck wires so they will not be crimped. Replace the cover.
natural_image
Technical illustration of a battery assembly with internal components and wiring (no text or symbols)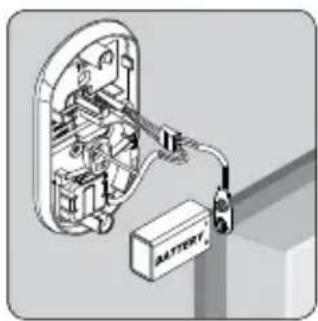
natural_image
Diagram of an electrical enclosure with wiring and a battery, no text or symbols present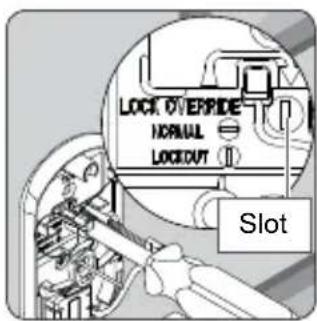
natural_image
Technical illustration of an electrical switchgear assembly with no visible text or symbolsKEYPAD LOCKS
MODELS FE575— AUTO LOCK AND FE595— FLEX LOCK
Locking and Unlocking
Keypad locks are always locked from the outside, by default. Only the FE595 can be set to unlocked.
To Temporarily Unlock
If lighting is low, press the Schlage button to illuminate the keypad before beginning.
-
Enter a User Code into the keypad.
-
Rotate the lever to open the door. Door will automatically re-lock.
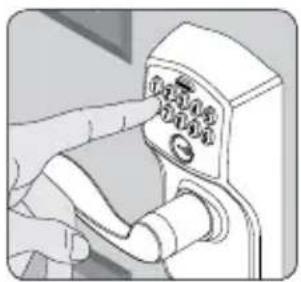
natural_image
Illustration of a hand pressing down on a control panel with buttons (no text or symbols visible)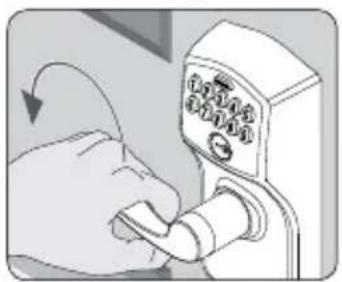
natural_image
Illustration of a hand inserting a lock into a doorbell (no text or symbols visible)To Set to Unlocked (FE595 Only)
-
Rotate the inside thumbturn to the vertical position.*
-
Rotate the thumbturn back to the horizontal position to re-lock.
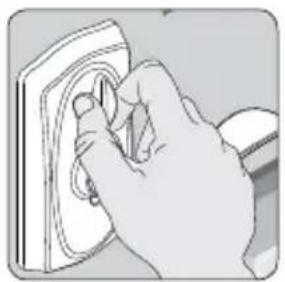
natural_image
Hand using a power tool to clean or install a wall-mounted component (no text or symbols visible)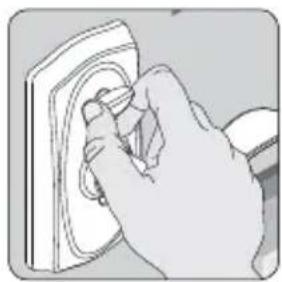
natural_image
Hand inserting a plug into a socket (no text or symbols visible)* No User Code is required to open the door when the lock is set to unlocked.
Key Override
Key Override can be used when the battery is completely dead, or when no valid User Code is known.
- Insert key.
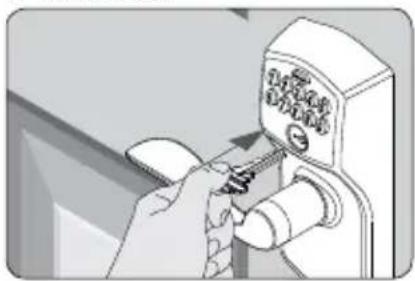
natural_image
Hand using a screwdriver to adjust or install a wall-mounted device (no visible text or symbols)- Rotate key 270^ to unlock.
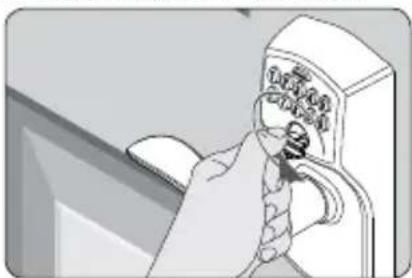
natural_image
Illustration of a hand inserting a device into a door (no text or symbols visible)- Rotate knob/lever to open door.*

natural_image
Hand inserting a spring into a door lock (no text or symbols visible)* Rotate the key back to starting position to relock. The key cannot be removed from the cylinder while the lock is unlocked. See Changing the Battery on page 9 or Restore Factory Settings on page 15 for more information.
What is the difference between the Auto Lock and the Flex Lock?

The Auto Lock (FE575) is always locked from the outside. The Flex Lock (FE595) is normally locked from the outside, but can be set to unlocked by putting the thumbturn in the vertical position.
Changing the Battery
Replace the batteries in your lock at the same time each year that you test and replace the batteries in your smoke alarms. This will ensure continued reliable operation. Use a high-quality alkaline 9 volt battery for replacement.
FE595
- Remove the inside cover.
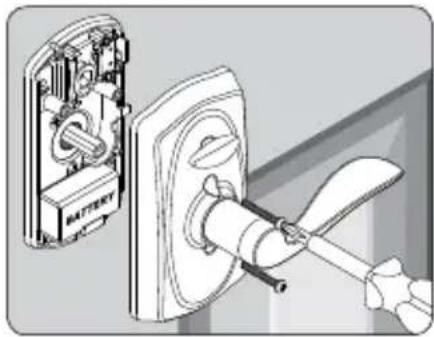
natural_image
Diagram showing battery installation process with switch and power plug (no text or symbols)- Replace the battery.
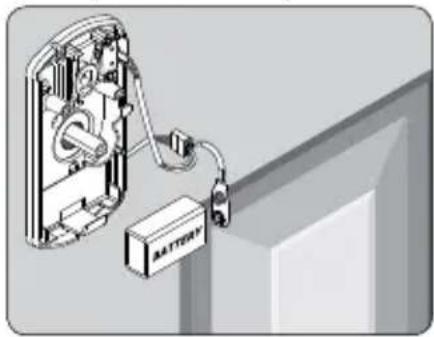
natural_image
Diagram of a battery mounted on a wall-mounted device, showing internal components and wiring (no text or symbols)- Replace the cover.
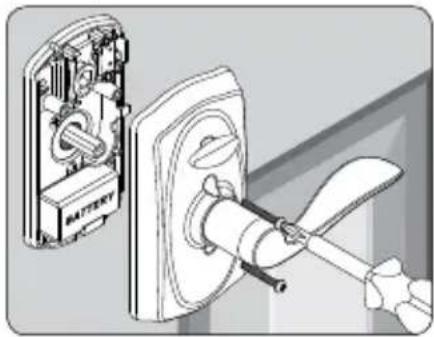
natural_image
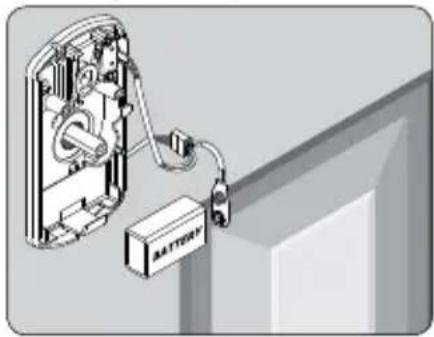
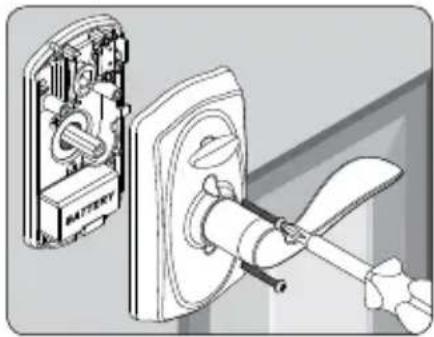
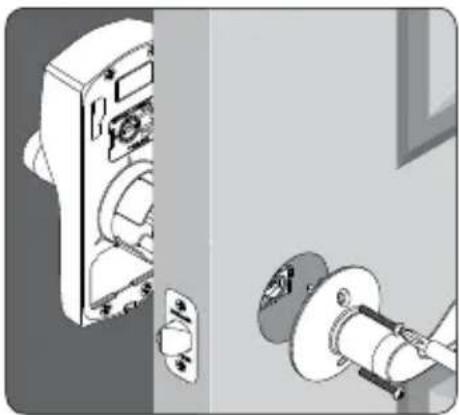
Diagram showing a battery mounted on a wall-mounted switch, with no visible text or symbolsFE575
-
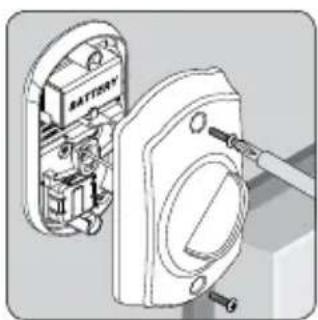
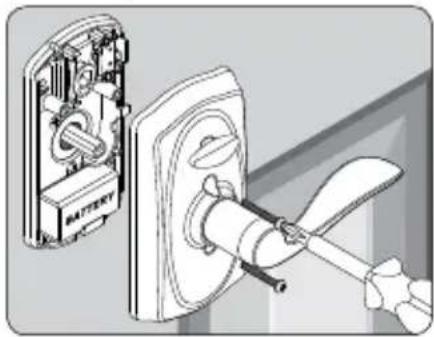
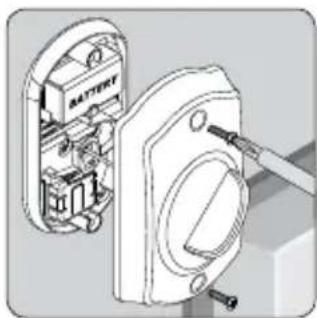
Remove the lock from the door.
-
Open the battery compartment and replace the battery.
-
Reinstall the lock on the door.
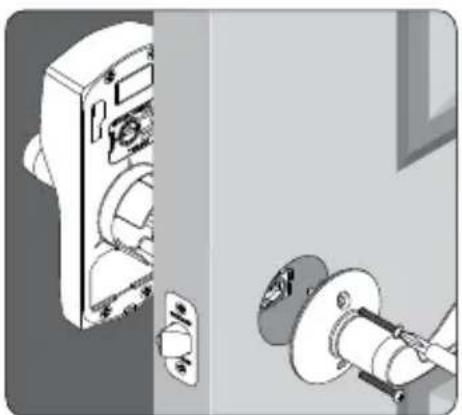
natural_image
Illustration of a door lock mechanism with a close-up view of the lock (no text or symbols present)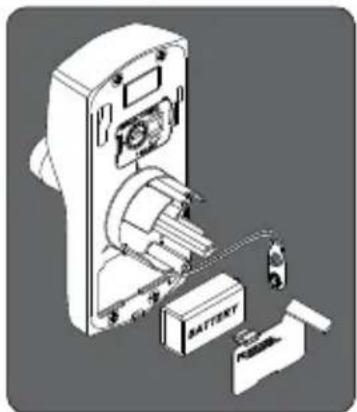
natural_image
Exploded view diagram of a battery pack assembly (no text or symbols visible)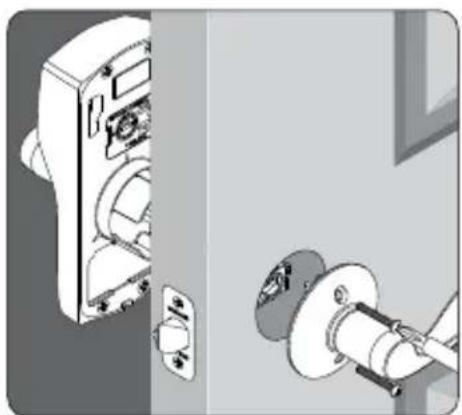
natural_image
Illustration of a door lock mechanism with a close-up view of the lock (no text or symbols present)Lithium Batteries?
Lithium batteries may have a longer life, but when they begin to fail, they fail quickly. We don't recommend them because they don't give you a lot of time to change your batteries before the lock is completely dead.
PROGRAMMING GUIDE
The color of the Schlage button indicates the status of the lock.
Orange
• the lock is in programming mode
Green
- a correct user code was entered
• the programming process is complete
Red
- an incorrect user code was entered
• there was an error in programming
- low batteries
- red blinking indicates critically low battery
Codes
Control of the lock is simply managed via a six-digit Programming Code and four-digit User Codes.
PROGRAMMING CODE
(Six Numbers)
- The lock comes preset with one unique default Programming Code. It can be found on the stickers, one on the back of the keypad assembly and one on the front of this User Guide.
• Used to put the lock in programming mode.
•DOES NOT unlock the lock.
- The first four numbers must be different from all of the User Codes currently in the lock.
- If you forget the Programming Code, you can reset the lock to factory settings, which restores the default Programming Code. See Restore Factory Settings on page 15.
USER CODES
(Four Numbers)
- The lock comes preset with two unique default User Codes. They may be found on the stickers, one on the back of the keypad assembly and one on the front of this User Guide.
• Used to unlock the lock.
• These four numbers must be different from the first four numbers of the Programming Code.
- Up to 19 possible User Codes can be stored in the lock at one time.
Default Code Locations
The Default User Codes and Programming Code are located in two places:
Back of the Keypad
» You must remove the Keypad from the door to see this sticker.
Front of this User Guide
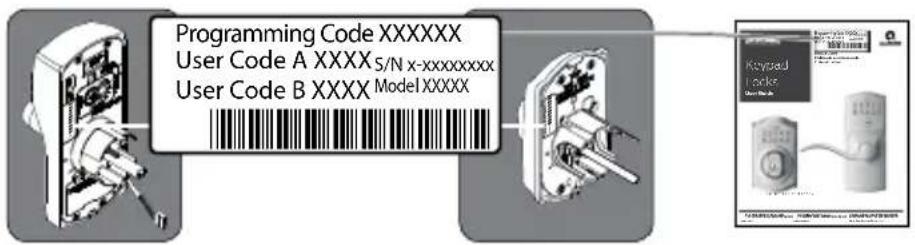
flowchart
graph LR
    A["User Code A XXXX S/N x-xxxxxxxx"] --> B["User Code B XXXX Model XXXXX"]
    B --> C["Keysaud Lock"]
Basic Controls
Write your programming code here for easy access. Also see Record Your Codes on page 13 for space to record User Codes.
| PROGRAMMING CODE | |||||
If you make a mistake during programming, press the Schlage button repeatedly until the keypad lights blue. Then start over.
ADDING USER CODES*
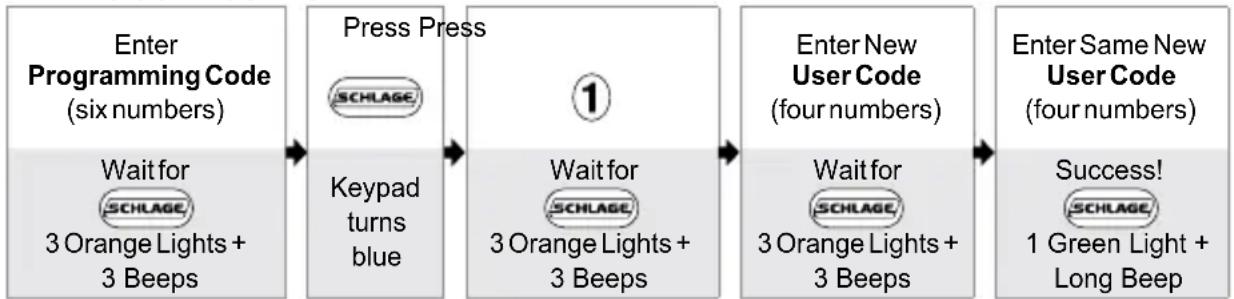
flowchart
graph LR
    A["Enter Programming Code (six numbers)<br>Wait for SCHLAGE<br>3 Orange Lights + 3 Beeps"] --> B["Press Press"]
    B --> C["1"]
    C --> D["Enter New User Code (four numbers)<br>Wait for SCHLAGE<br>3 Orange Lights + 3 Beeps"]
    D --> E["Enter Same New User Code (four numbers)<br>Success!<br>SCHLAGE<br>1 Green Light + Long Beep"]
    B --> F["Keypad turns blue"]
* These four numbers must be different from the first four numbers of the Programming Code.
DELETING USER CODES
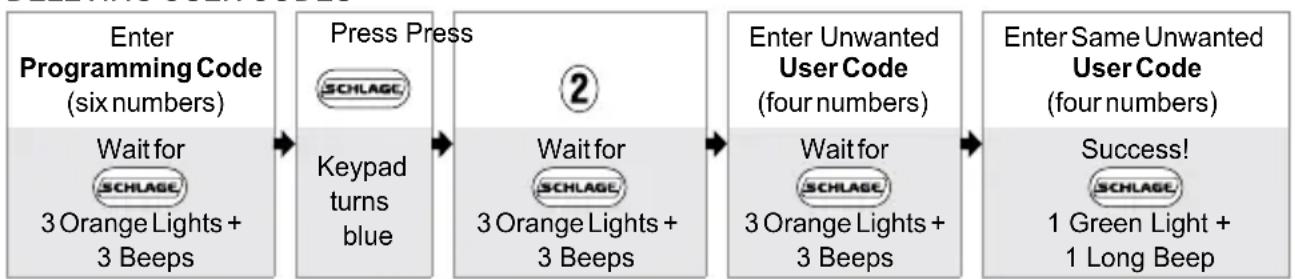
flowchart
graph LR
    A["Enter Programming Code (six numbers)<br>Wait for SCHLAGE<br>3 Orange Lights + 3 Beeps"] --> B["Press Press<br>SCHLAGE"]
    B --> C["2"]
    C --> D["Wait for SCHLAGE<br>3 Orange Lights + 3 Beeps"]
    D --> E["Enter Unwanted User Code (four numbers)<br>Wait for SCHLAGE<br>3 Orange Lights + 3 Beeps"]
    E --> F["Enter Same Unwanted User Code (four numbers)<br>Success!<br>SCHLAGE<br>1 Green Light + 1 Long Beep"]
CHANGING THE PROGRAMMING CODE*
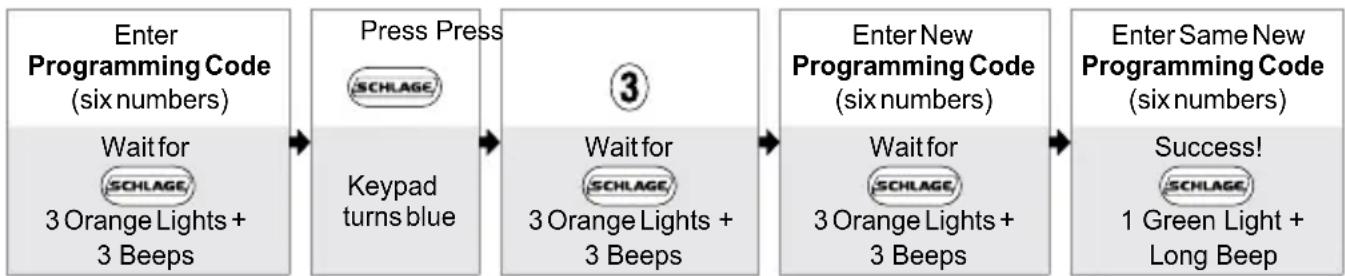
flowchart
graph LR
    A["Enter Programming Code (six numbers)<br>Wait for SCHLAGE,<br>3 Orange Lights + 3 Beeps"] --> B["Press Press<br>SCHLAGE"]
    B --> C["3"]
    C --> D["Enter New Programming Code (six numbers)<br>Wait for SCHLAGE,<br>3 Orange Lights + 3 Beeps"]
    D --> E["Enter Same New Programming Code (six numbers)<br>Success!<br>SCHLAGE<br>1 Green Light + Long Beep"]
    C --> F["Keypad turns blue"]
* The first four numbers must be different from all of the User Codes currently in the lock.
Want to see a video?

Browse to answers.schlage.com and search on "How to Program Keypad Lock" for a video. Other videos and information are also available.
Enhanced Controls
Schlage's keypad locks were designed with added features that allow you to adapt the lock to your needs. Additional features that you can choose to use include:
ENABLE VACATION MODE DISABLE VACATION MODE
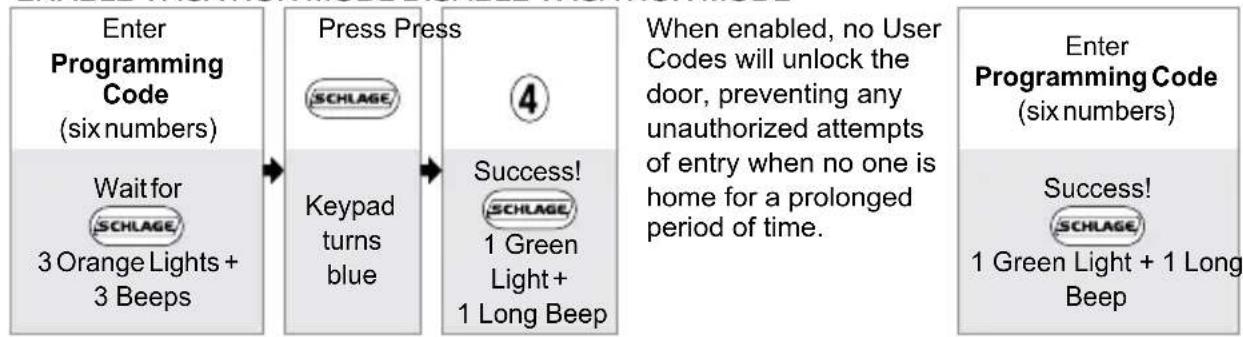
flowchart
graph LR
    A["Enter Programming Code (six numbers)"] --> B["Wait for SCHLAGE 3 Orange Lights + 3 Beeps"]
    B --> C["Press Press SCHLAGE"]
    C --> D["Keypad turns blue"]
    D --> E["4 Success! SCHLAGE 1 Green Light + 1 Long Beep"]
    E --> F["When enabled, no User Codes will unlock the door, preventing any unauthorized attempts of entry when no one is home for a prolonged period of time."]
    F --> G["Enter Programming Code (six numbers)"]
    G --> H["Success! SCHLAGE 1 Green Light + 1 Long Beep"]
ENABLE OR DISABLE BEEPER
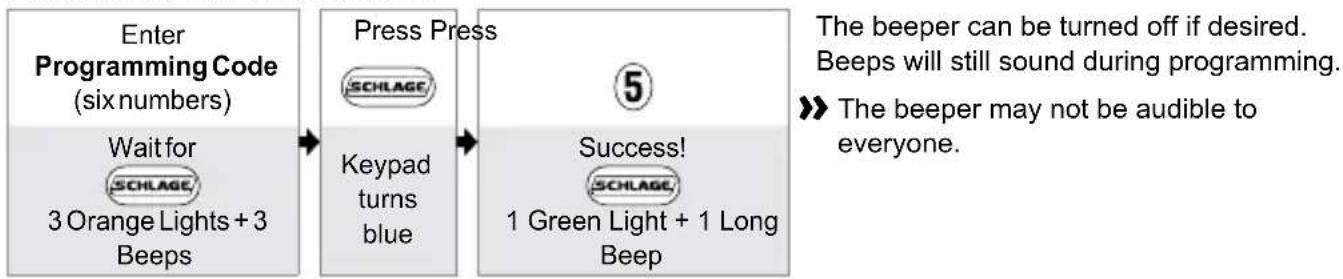
flowchart
graph LR
    A["Enter Programming Code (six numbers)"] --> B["Press Press"]
    B --> C["Success!"]
    C --> D["The beeper can be turned off if desired. Beeps will still sound during programming."]
    style A fill:#f9f,stroke:#333
    style B fill:#ccf,stroke:#333
    style C fill:#cfc,stroke:#333
    style D fill:#fcc,stroke:#333
DELETE ALL USER CODES
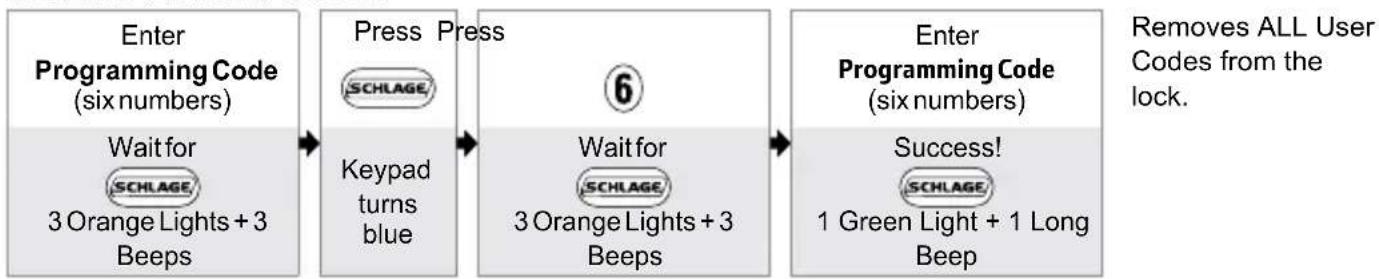
flowchart
graph LR
    A["Enter Programming Code (six numbers)"] --> B["Press Press"]
    B --> C["6"]
    C --> D["Enter Programming Code (six numbers)"]
    D --> E["Success!"]
    D --> F["1 Green Light + 1 Long Beep"]
    A --> G["Wait for SCHLAGE 3 Orange Lights + 3 Beeps"]
    B --> H["Wait for SCHLAGE 3 Orange Lights + 3 Beeps"]
    C --> I["Removes ALL User Codes from the lock."]
ENABLE OR DISABLE LOCK & LEAVE
KEYPAD DEADBOLT (BE365) ONLY
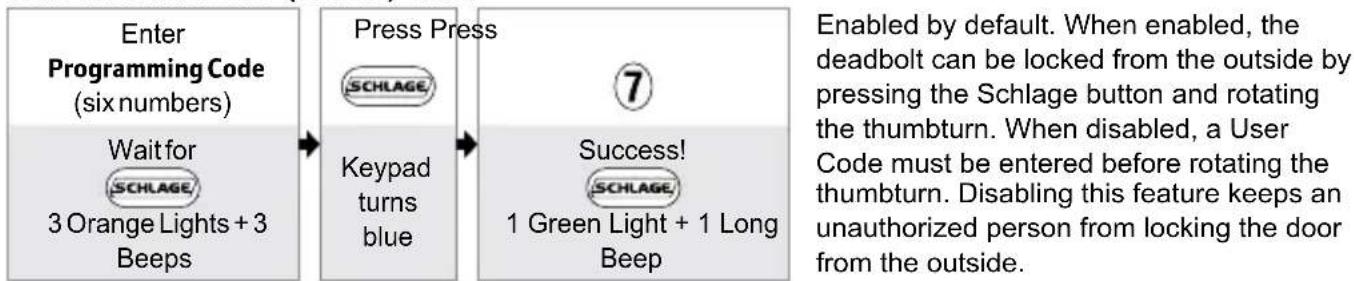
flowchart
graph LR
    A["Enter Programming Code (six numbers)"] --> B["Wait for SCHLAGE 3 Orange Lights + 3 Beeps"]
    B --> C["Press Press SCHLAGE"]
    C --> D["Keypad turns blue"]
    D --> E["7 Success! SCHLAGE 1 Green Light + 1 Long Beep"]
    E --> F["Enabled by default. When enabled, the deadbolt can be locked from the outside by pressing the Schlage button and rotating the thumbturn. When disabled, a User Code must be entered before rotating the thumbturn. Disabling this feature keeps an unauthorized person from locking the door from the outside."]
RECORD YOUR CODES

KEYPAD WEAR
Consider changing your codes on a periodic basis so buttons wear evenly.
PROGRAMMING CODE
User Codes

Up to 19 User Codes can be stored in the lock at one time.
NAME USER CODE
EXAMPLE: JOHN SMITH
1 2 3 4
TROUBLESHOOTING
Browse to answers.schlage.com and click on Electronic Keypad Locks in the menu on the right side for videos, troubleshooting, FAQ and more.
* Number of beeps if beeper is turned on.
| Lock Issue Beeps* Lights Solution | ||||
| KEYPAD DEADBOLT ONLY | I can unlock my deadbolt by simply pushing the Schlage button. I don't need a code. | 1 High | Green Blinking | Your lock has been installed incorrectly and is not secure. Repeat the installation process. Ensure the cam and bolt positions are correct, as referenced in the installation instructions. Browse to answers.schlage.com and search on “Installing BE365” for a video. |
| After pushing and rotating thumbturn, the deadbolt does not extend. | None None | Lock and Leave feature is disabled. See Enable or Disable Lock & Leave on page 12. | ||
| After entering my User Code, the lock flashes green, but I cannot unlock the lock. | 1 High | Green Blinking | Lock Override is enabled and should be disabled. See Lock Override on page 7. | |
| Outside thumbturn does not freely spin after deadbolt is thrown. | None None | Lock is malfunctioning. Disable the keypad by enabling Lock Override. See Lock Override on page 7. Call Customer Service. | ||
| I forgot my Programming Code. | None None | Check the front of this guide or the back of the keypad assembly for the default Programming Code. | ||
| If needed, restore lock to factory settings. See Restore Factory Settings on page 15. | ||||
| I need to delete a User Code that I don't remember. | None None | Delete all User Codes. Then add all needed User Codes back into the lock. See Programming Guide on page 10. | ||
| User Code does not unlock lock. | 2 Red User Code | entered is not a valid User Code. | ||
| 1 High, 1 Low | Green then Red | Vacation Mode is enabled. See Disable Vacation Mode on page 12. | ||
| SCHLAGE does not light when numbers are pressed. | None None | Too many incorrect User Codes have been entered. Wait 30 seconds and try again. | ||
| If keypad does not respond after 30 seconds, then replace battery. See Changing the Battery on page 6 for Keypad Deadbolt or Changing the Battery on page 9 for Keypad Lock. | ||||
| There is a delay before unlock after a valid User Code is entered. | High/ Low, then 1 | Red then Green | Battery is low and should be replaced. See Changing the Battery on page 6 for Keypad Deadbolt or Changing the Battery on page 9 for Keypad Lock. | |
| SCHLAGE blinking red but no codes have been entered. | None | Quick Red Blinking | Battery is dead and MUST be replaced. See Changing the Battery on page 6 for Keypad Deadbolt or Changing the Battery on page 9 for Keypad Lock. | |
| Lock Issue Beeps* Lights Solution | ||||
| Cannot add a new User Code. | High/ Low | Red | 19 User Codes already exist. Delete a User Code before adding a new one. See Deleting User Codes on page 11. | |
| 2 Red | Second User Code entered did not match first User Code entered. See Adding User Codes* on page 11. | |||
| The User Code matches the first four digits of the existing Programming Code. | ||||
| Cannot delete a User Code. 2 | Red | Second User Code entered did not match first User Code entered. | ||
| Cannot change Programming Code. | 2 Red | Second Programming Code entered did not match first Programming Code entered. See Changing the Programming Code* on page 11. | ||
| First four digits of new Programming Code match an existing User Code. | ||||
| Cannot delete all User Codes. | 2 Red | Programming Code entered second time is incorrect. | ||
| Lock will not stay in programming mode. | 2 Red | Any key other than SCHLAGE was pressed immediately after programming mode was entered. | ||
| An incorrect entry was made during the programming process. | ||||
If you lose or forget your Programming Code, you can restore the factory settings, which will restore the default Programming code.
- Disconnect the battery.
- Press and release the Schlage button.
-
The following steps must occur within 10 seconds:
a. Reconnect the battery. The Schlage button will light green for one second.
b. Then, press and hold the Schlage button until it lights green and the lock beeps. -
Try entering one of the default User Codes. If it does not unlock the lock, start over at step 2.
WARNING
Locate the default Programming and User Codes on the front of this guide or the back of the Keypad Assembly before beginning! Default Programming and User Codes will be restored. All existing User Codes and current Programming Code will be erased.
CUSTOMER SERVICE CANNOT RETRIEVE LOST DEFAULT CODES! DO NOT RESTORE FACTORY SETTINGS UNLESS YOU CAN LOCATE THE DEFAULT CODES.
Once you've done this, you can change the programming code to a personalized number. See Changing the Programming Code* on page 11.

bar
| Category | Value | |---|---| | Category 1 | 100 | | Category 2 | 100 | | Category 3 | 100 | | Category 4 | 100 | | Category 5 | 100 | | Category 6 | 100 | | Category 7 | 100 | | Category 8 | 100 | | Category 9 | 100 | | Category 10 | 100 | | Category 11 | 100 | | Category 12 | 100 | | Category 13 | 100 | | Category 14 | 100 | | Category 15 | 100 | | Category 16 | 100 | | Category 17 | 100 | | Category 18 | 100 | | Category 19 | 100 | | Category 20 | 100 | | Category 21 | 100 | | Category 22 | 100 | | Category 23 | 100 | | Category 24 | 100 | | Category 25 | 100 | | Category 26 | 100 | | Category 27 | 100 | | Category 28 | 100 | | Category 29 | 100 | | Category 30 | 100 | | Category 31 | 100 | | Category 32 | 100 | | Category 33 | 100 | | Category 34 | 100 | | Category 35 | 100 | | Category 36 | 100 | | Category 37 | 100 | | Category 38 | 100 | | Category 39 | 100 | | Category 40 | 100 | | Category 41 | 100 | | Category 42 | 100 | | Category 43 | 100 | | Category 44 | 100 | | Category 45 | 100 | | Category 46 | 100 | | Category 47 | 100 | | Category 48 | 100 | | Category 49 | 100 | | Category 50 | 100 | | Category 51 | 100 | | Category 52 | 100 | | Category 53 | 100 | | Category 54 | 100 | | Category 55 | 100 | | Category 56 | 100 | | Category 57 | 100 | | Category 58 | 100 | | Category 59 | 100 | | Category 60 | 100 | | Category 61 | 100 | | Category 62 | 100 | | Category 63 | 100 | | Category 64 | 100 | | Category 65 | 100 | | Category 66 | 100 | | Category 67 | 100 | | Category 68 | 100 | | Category 69 | 100 | | Category 70 | 100 | | Category 71 | 100 | | Category 72 | 100 | | Category 73 | 100 | | Category 74 | 100 | | Category 75 | 100 | | Category 76 | 100 | | Category 77 | 100 | | Category 78 | 100 | | Category 79 | 100 | | Category 80 | 100 | | Category 81 | 100 | | Category 82 | 100 | | Category 83 | 100 | | Category 84 | 100 | | Category 85 | 100 | | Category 86 | 100 | | Category 87 | 100 | | Category 88 | 100 | | Category 89 | 100 | | Category 90 | 100 | | Category 91 | 100 | | Category 92 | 100 | | Category 93 | 100 | | Category 94 | 100 | | Category 95 | 100 | | Category 96 | 100 | | Category 97 | 100 | | Category 98 | 100 | | Category 99 | 100 | | Total (Total) |SCHLAGE
natural_image
Close-up of a metallic door lock with keypad and central knob (no visible text or symbols)BE365FE575/FE595
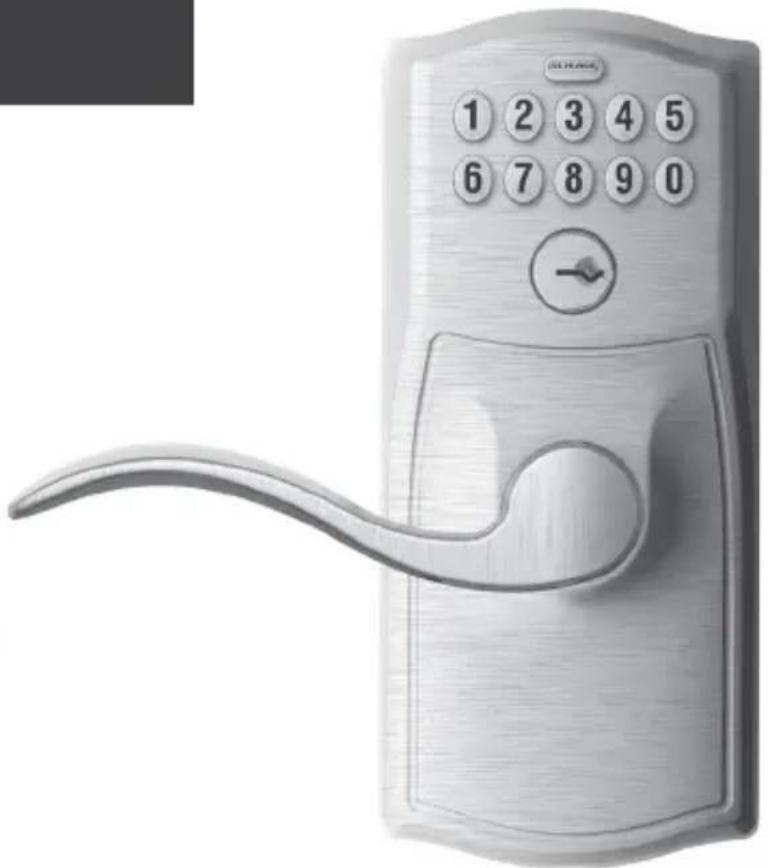
natural_image
Illustration of a classic white door keychain with keypad and handle (no text or symbols)natural_image
Illustration of a hand pressing down on a doorbell (no text or symbols visible)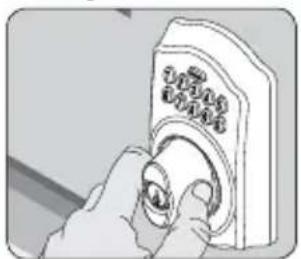
natural_image
Illustration of a hand turning a doorbell with a knob (no text or symbols visible)natural_image
Illustration of a hand pressing a button on a wall-mounted device (no text or symbols visible)natural_image
Hand inserting a button into a device (no text or symbols visible)natural_image
Diagram of a battery mounting mechanism with a hand holding a screwdriver (no text or symbols present)natural_image
Diagram of an electrical enclosure with battery and wiring, no text or symbols presentnatural_image
Illustration of a hand using a screwdriver to adjust or install electronic components inside a battery casing (no text or symbols visible)¿Baterías de litio?
22
natural_image
Illustration of a hand using a tool to adjust or install a door lock (no text or symbols visible)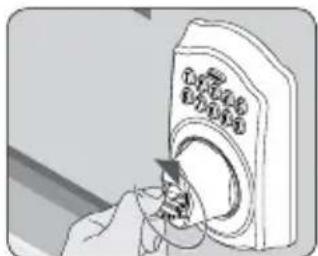
natural_image
Illustration of a hand inserting a device into a washing machine (no text or symbols visible)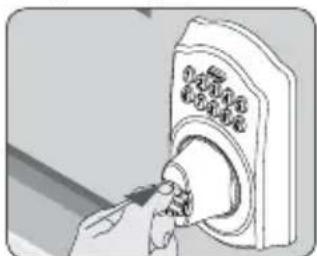
natural_image
Illustration of a hand inserting a button into a doorbell (no text or symbols visible)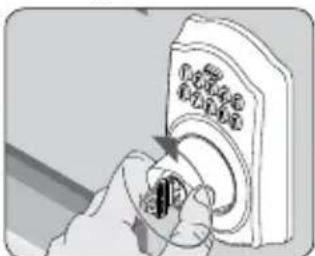
natural_image
Hand inserting a small component into a device (no visible text or symbols)natural_image
Technical illustration of a battery mounting mechanism showing internal components and wiring (no text or symbols)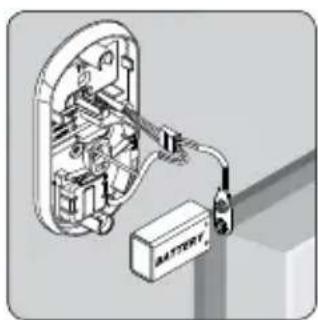
natural_image
3D diagram of an electrical enclosure with wiring and a battery, no text or symbols present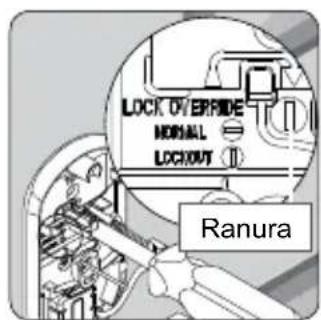
natural_image
Technical illustration of an electrical switchgear assembly with labeled components (no readable text or symbols)natural_image
Illustration of a hand using a doorbell to press or install a button (no text or symbols visible)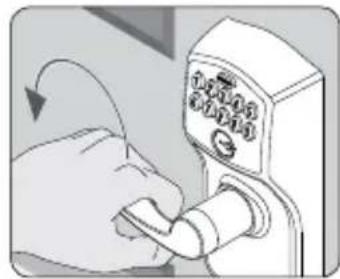
natural_image
Illustration of a hand using a finger to press a door lock (no text or symbols visible)natural_image
Hand using a power switch to clean or install a wall socket (no text or symbols visible)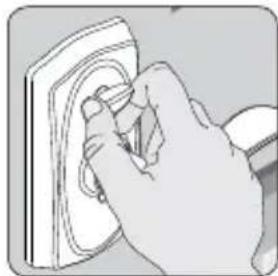
natural_image
Hand holding a small object with a curved surface, possibly a device or component (no text or symbols visible)natural_image
Hand using a tool to adjust or install a wall-mounted device (no visible text or symbols)natural_image
Illustration of a hand inserting a device into a door (no text or symbols visible)natural_image
Hand inserting a switch into a digital timer (no text or symbols visible)natural_image
Diagram showing a battery mounted on an electrical outlet with a tool inserted (no text or symbols present)natural_image
Diagram of an electrical switch connected to a battery, showing internal components and wiring (no text or symbols)- Reemplace la cubierta.
natural_image
Diagram showing a battery mounted on a wall-mounted switch, with a hand holding the switch (no text or symbols present)FE575
natural_image
Illustration of a door lock mechanism with a close-up view of the lock (no text or symbols present)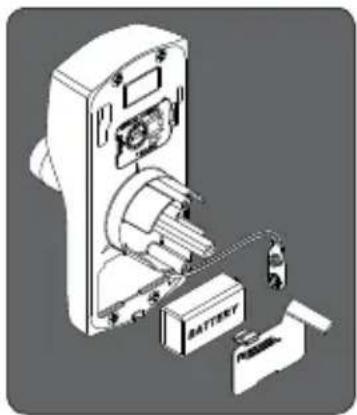
natural_image
Technical illustration of a battery mounted on an electrical panel (no text or symbols visible)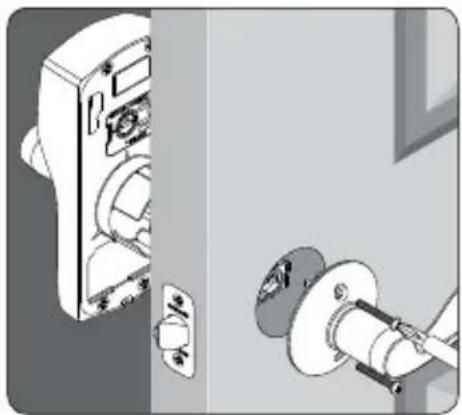
natural_image
Illustration of a door lock mechanism with a close-up view of the lock (no text or symbols present)¿Baterías de litio?
Ingrese a answers.schlage.com y busque "How to Program Keypad Lock"
natural_image
Illustration of a hand pressing down on a doorbell (no text or symbols visible)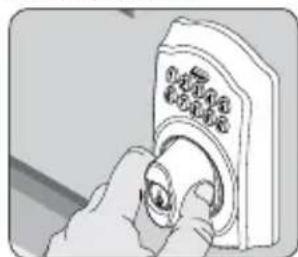
natural_image
Illustration of a hand pressing down on a doorbell (no text or symbols visible)natural_image
Illustration of a hand pressing a button on a doorbell (no text or symbols visible)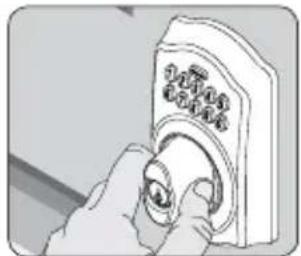
natural_image
Illustration of a hand inserting a button into a device (no text or symbols visible)natural_image
Illustration of a hand using a screwdriver to adjust or install an electrical component, showing internal components without any text or symbols.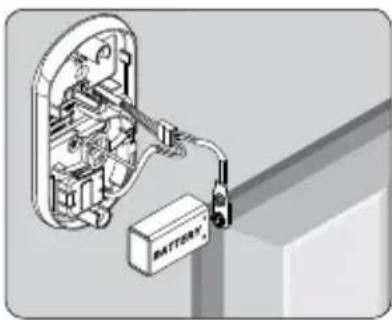
natural_image
Diagram of an electrical switch connected to a battery pack, showing internal components and wiring (no text or symbols)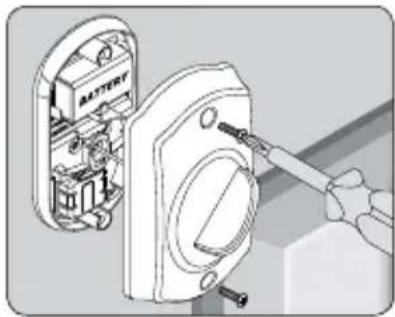
natural_image
Illustration of a battery assembly with a hand using a screwdriver to adjust the internal components (no text or symbols visible)natural_image
Illustration of a hand using a tool to adjust or install a door lock (no text or symbols visible)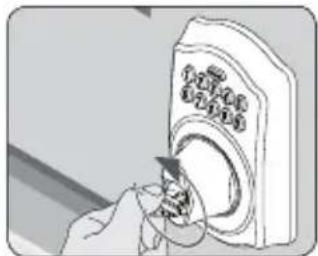
natural_image
Illustration of a hand inserting a device into a circular device (no text or symbols visible)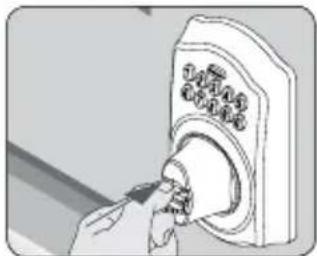
natural_image
Illustration of a hand inserting a small component into a wall-mounted device (no text or symbols visible)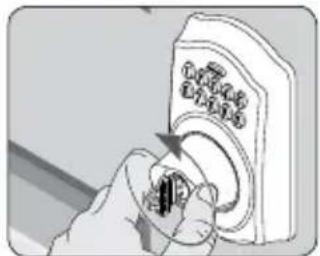
natural_image
Hand holding a device with a knob, showing mechanical adjustment (no text or symbols visible)natural_image
Technical illustration of an electrical switchgear assembly (no text or symbols visible)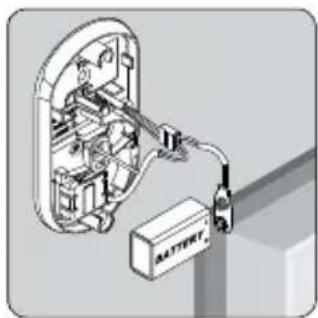
natural_image
3D diagram of an electrical enclosure with battery and wiring, no text or symbols present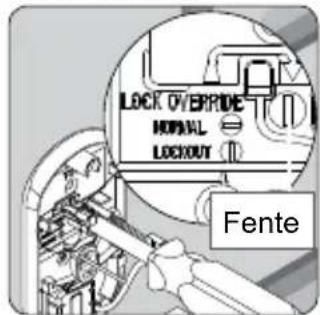
natural_image
Technical illustration of a battery mounting mechanism with visible components and wiring (no text or symbols)SERRURES À CLAVIERS NUMÉRIQUES
MODÈLES FE575— SERRURE AUTO ET FE595— SERRURE FLEX
natural_image
Illustration of a hand holding a doorbell with control panel (no text or symbols visible)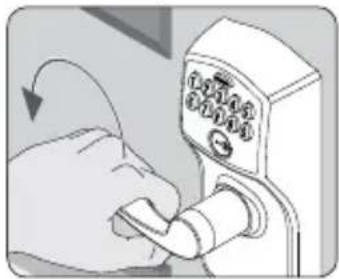
natural_image
Hand inserting a digit into a lock mechanism (no text or symbols visible)natural_image
Hand holding a wall socket with a circular button, no text or symbols visible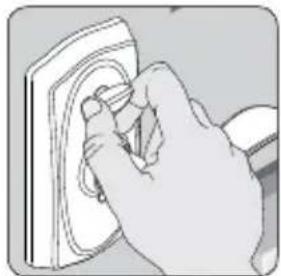
natural_image
Hand inserting a small component into a wall socket (no text or symbols visible)natural_image
Hand using a tool to adjust or install a door lock (no text or symbols visible)natural_image
Illustration of a hand inserting a device into a control panel (no text or symbols visible)natural_image
Hand inserting a switch into a digital timer (no text or symbols visible)natural_image
Diagram showing battery installation process with switch and tool (no text or symbols)- Remplacez la pile.
natural_image
Diagram of an electrical switch connected to a battery, showing internal components and wiring (no text or symbols)- Replacez le couvercle.
natural_image
Diagram showing a battery mounted on a wall-mounted switch, with a hand holding the switch (no text or symbols present)FE575
- Retirez la serrure de la porte.
natural_image
Illustration of a door lock mechanism with a close-up view of the lock (no text or symbols present)natural_image
Diagram of a battery pack assembly with labeled components (no text or symbols present)natural_image
Illustration of a door lock mechanism with a close-up view of the lock (no text or symbols present)If you have questions about any part of installation or programming, don't return the Keypad Lock to the store. Our Schlage Customer Service representatives are ready to help.
Toll-free: 888-805-9837
answers.schlage.com
24508517
© Allegion 2014
Printed in U.S.A.
24508517 Rev. 07/14-b

ALLEGION
- PLEASE KEEP THIS GUIDE
- CONSERVE ESTA GUÍA
- Warranty
- Register your Product
- WHY DO I NEED KEYS IF THIS IS A KEYLESS LOCK?
- UNLOCK YOUR SOLUTION
- Please don't return it to the store!
- Need Help?
- LOCK PARTS
- Keypad Deadbolt
- Keypad
- Outside Thumbturn
- Cylinder
- Inside Thumbturn
- Keypad Lever
- Lever
- Thumbturn
- MODEL BE365
- Locking and Unlocking
- To Lock
- To Unlock
- Changing the Battery
- Lithium Batteries?
- Key Override
- Lock Override
- KEYPAD LOCKS
- MODELS FE575— AUTO LOCK AND FE595— FLEX LOCK
- To Temporarily Unlock
- To Set to Unlocked (FE595 Only)
- What is the difference between the Auto Lock and the Flex Lock?
- FE595
- FE575
- PROGRAMMING GUIDE
- Orange
- Green
- Red
- Codes
- PROGRAMMING CODE
- (Six Numbers)
- USER CODES
- (Four Numbers)
- Default Code Locations
- Back of the Keypad
- Front of this User Guide
- Basic Controls
- Want to see a video?
- Enhanced Controls
- RECORD YOUR CODES
- TROUBLESHOOTING
- WARNING
- SCHLAGE
- ¿Baterías de litio?
- SERRURES À CLAVIERS NUMÉRIQUES
- MODÈLES FE575— SERRURE AUTO ET FE595— SERRURE FLEX
Brand : Schlage
Model : FE575
Category : Electronic lock