WCO100 - Surveillance Camera Schlage - Free user manual and instructions
Find the device manual for free WCO100 Schlage in PDF.
| Product Type | Outdoor Surveillance Camera |
| Brand | Schlage |
| Model | WCO100 |
| Dimensions (L x W x H) | 103 x 94 x 37 mm (4.1 x 3.7 x 1.5 in) |
| Weight | 900 g (2 lb) |
| Power Supply | 12 V DC, max 4.8 W, power adapter included |
| Lens Type | Fixed focal length, aperture F2.0 |
| Night Vision | 8 IR LEDs, optical sensor, range > 5 meters |
| Minimum Illumination | 0 Lux (with IR LED) |
| Wired Connectivity | Ethernet RJ45 10/100 Base-T, Auto MDIX |
| Wireless Connectivity | WiFi IEEE802.11b/g/n, WEP64/128, WPA/WPA2, WPS |
| Operating Temperature | -10°C to 45°C (14°F to 113°F) |
| Storage Temperature | -20°C to 70°C (-4°F to 158°F) |
| Operating Humidity | 10% to 80% |
| Storage Humidity | 10% to 90% (non-condensing) |
| Certifications | CE, FCC, UL (power adapter) |
| Package Contents | Camera, external antenna, power adapter, Ethernet cable, power extension cable, swivel bracket, mounting base, screws and anchors |
| Compatibility | Nexia Home Intelligence system (account required) |
| Care and Cleaning | Clean with a soft, dry cloth. Do not use abrasive products or solvents. |
| Safety | Compliant with FCC Part 15. Do not modify without approval. |
| Repairability | No user-serviceable parts. Contact Nexia support. |
Frequently Asked Questions - WCO100 Schlage
User questions about WCO100 Schlage
0 question about this device. Answer the ones you know or ask your own.
Ask a new question about this device
Download the instructions for your Surveillance Camera in PDF format for free! Find your manual WCO100 - Schlage and take your electronic device back in hand. On this page are published all the documents necessary for the use of your device. WCO100 by Schlage.
USER MANUAL WCO100 Schlage
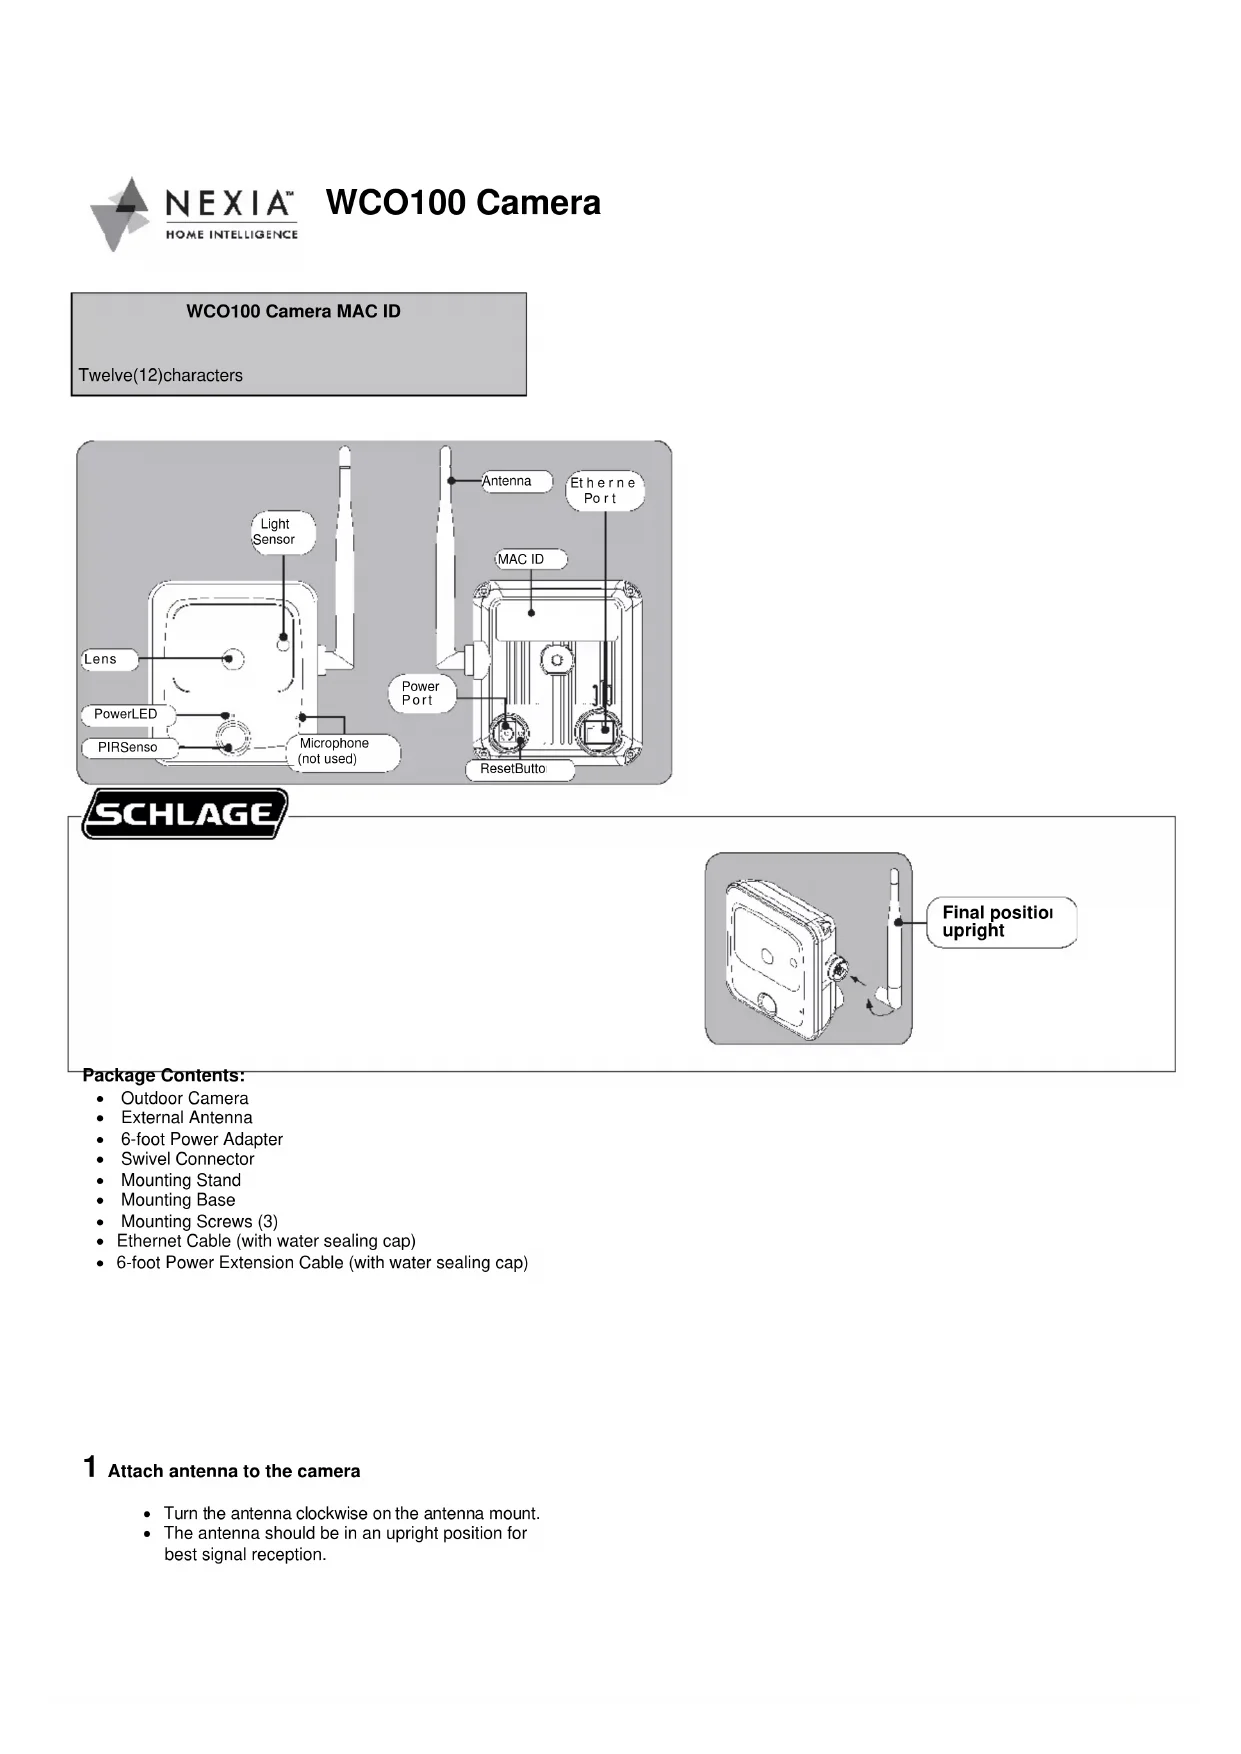
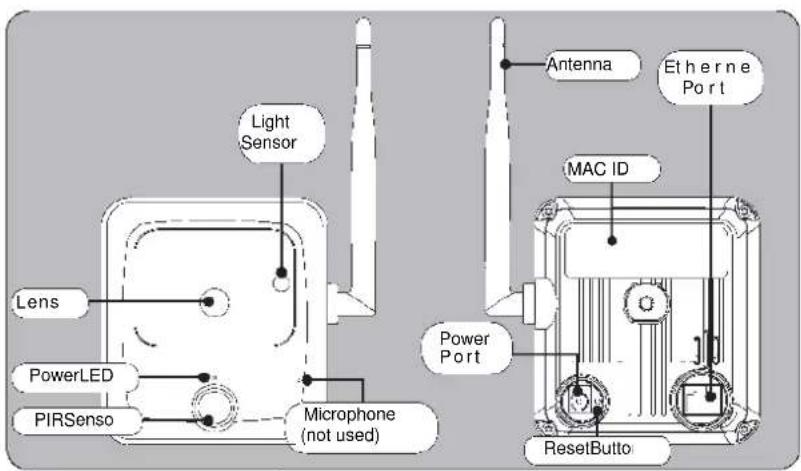
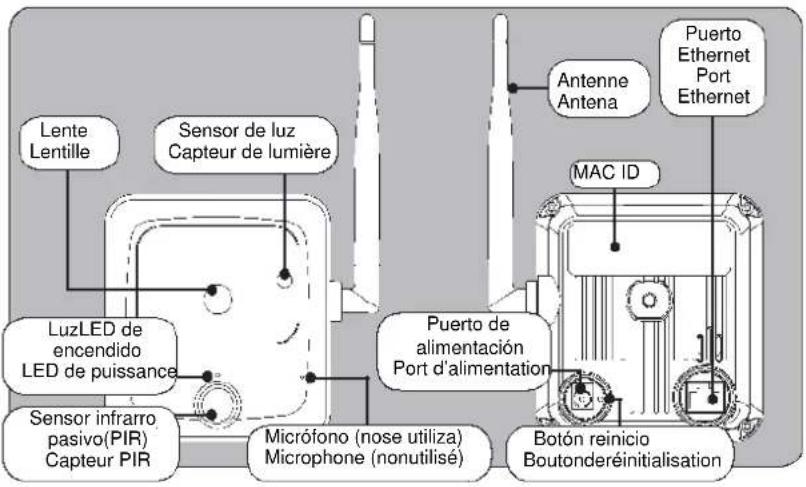
WCO100 Camera MAC ID
Twelve(12)characters
SCHLAGE
Package Contents:
- Outdoor Camera
- External Antenna
- 6-foot Power Adapter
- Swivel Connector
- Mounting Stand
- Mounting Base
- Mounting Screws (3)
- Ethernet Cable (with water sealing cap)
- 6-foot Power Extension Cable (with water sealing cap)
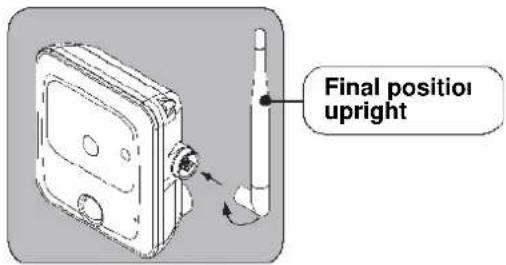
1 Attach antenna to the camera
- Turn the antenna clockwise on the antenna mount.
- The antenna should be in an upright position for best signal reception.
2 Locate MAC ID, Ethernet and Power.
Write the MAC ID in the box at the top of this page for later reference.

DO NOT plug in Ethernet or power before enrolling!
3 Log into your account at www.mynexia.com
Camera can be used only with Nexia Home Intelligence system.
Account must be active before continuing. See nexiahome.com for more information.
4
Enroll the Camera
a. Make sure Ethernet and power are NOT plugged into camera before you begin.
b. On www.mynexia.com, click the Cameras tab.
c. Click the Add Camera button.
d. Follow the on-screen instructions.
e. Click on Edit Camera Settings to complete wireless setup.
Verify and Prepare Camera Mounting Location
! Installation in a covered area is recommended.
! Consult the NEC and local electrical codes for information on electrical requirements.
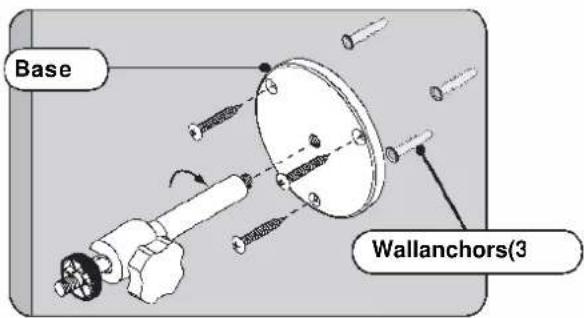
a. Attach the base to the wall with three (3) screws and wall anchors (included).
b. Attach the power cable to AC power outlet. Make sure the water seal is secure on the wall.
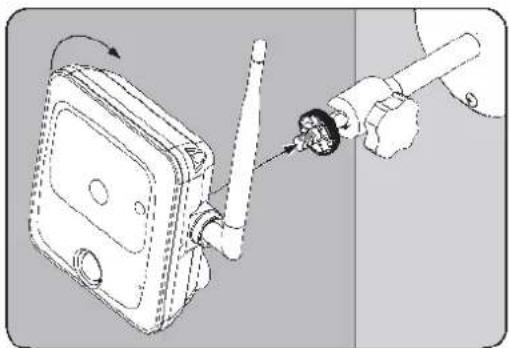
Attach Camera to Stand
Turn Camera clockwise to attach threaded mount on back of camera to the swivel connector.
natural_image
Diagram showing a hand inserting a plug into a device with a rotating arrow (no text or symbols)Test the camera view using your Nexia Account.
If necessary, loosen the knob on the swivel connector and adjust the camera angle.
Product Specifications
Lens: Board Mount Type, Fixed-Focal, Aperture F2.0
Night Vision: IR LED x8, Light Sensor x 1, Auto IR CUT Switcher, Range: Above 5 meters
Minimum Illumination: 0 Lux (with IR LED)
Connectors: RJ45 for Ethernet, DC Power Jack
Power Consumption: 12V DC, Max 4.8W
Compliance: CE, FCC, Power supply: UL
Dimensions (H x W x D): 103 x 94 x 37 mm (4.1" x 3.7" x 1.5")
Weight: 900g (2 lbs)
Operating Temperature: -10°–45°C (14°–113°F); Humidity: 10%–80% (non-condensing)
Storage Temperature: -20°–70°C (-4°–158°F); Humidity: 10%–90% (non-condensing)
Ethernet: 10/100 Base-T, Auto MDIX
Wireless: IEEE802.11b/g/n, WEP64/128 bit, WPA/WPA2 Personal, WPS
FCC Statement
This device complies with part 15 of the FCC rules. Operation is subject to the following two conditions: (1) This device may not cause harmful interference, and (2) this device must accept any interference received, including interference that may cause undesired operation.
Changes or modifications to this equipment not expressly approved by the Schlage Lock Company could void the user's authority to operate the
equipment. FCC ID: P2GBE369 IC: 7654A-BE369
natural_image
Diagram showing a mechanical assembly with a device and a tool, no visible text or symbols