VDP-IR Smart 900HD - Video projector Irradio - Free user manual and instructions
Find the device manual for free VDP-IR Smart 900HD Irradio in PDF.


User questions about VDP-IR Smart 900HD Irradio
0 question about this device. Answer the ones you know or ask your own.
Ask a new question about this device
Download the instructions for your Video projector in PDF format for free! Find your manual VDP-IR Smart 900HD - Irradio and take your electronic device back in hand. On this page are published all the documents necessary for the use of your device. VDP-IR Smart 900HD by Irradio.
USER MANUAL VDP-IR Smart 900HD Irradio
natural_image
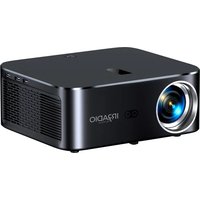
Black IR radio projector with a circular lens and external ventilation grille (no visible text or symbols on the device body)
Manuale d'uso | User manual
text_image
Diagram of a device with labeled parts, showing a circular component and three connected wires marked 1, 2, and 3.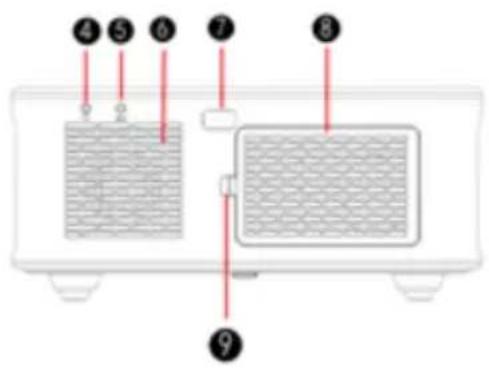
text_image
Diagram of a microwave oven with numbered parts indicating internal components and wiring connections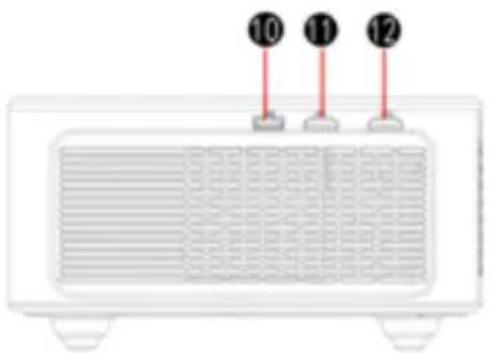
text_image
10 11 12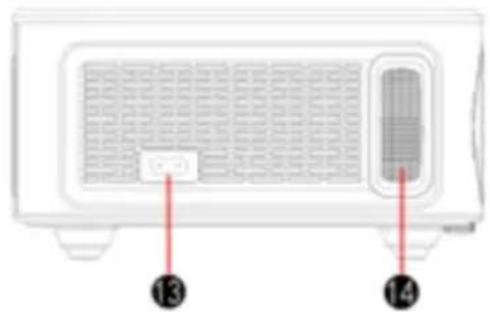
natural_image
Front view of a microwave oven with ventilation grilles and a door, labeled with numbers 13 and 14 pointing to the side (no text or symbols on the device itself)natural_image
Technical diagram of a rectangular electronic component with four corner holes and a central square (no text or symbols)1
text_image
Diagram of a remote control with numbered labels pointing to key function keys like OK, F+, and F-natural_image
Line drawing of a rectangular electronic device with mounting holes and a central hub (no text or symbols)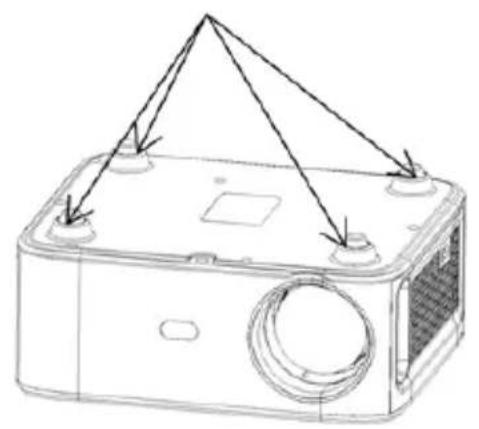
natural_image
Line drawing of a rectangular electronic device with mounting holes and a central circular component (no text or symbols)natural_image
Line drawings of a remote control unit, a wall-mounted air conditioner, and a remote control device with a red button labeled 'OK' (no text or symbols on the devices themselves)text_image
Screenshot of a software interface with Chinese menu items and icons for functions like 'LOGIC', 'TOLERANCE', and 'MAXIM'text_image
Screenshot of a software interface with Chinese UI elements and a highlighted 'OK' buttontext_image
Projection Settings Projection < Run Devices Progr. > Draw Settings > Auto Focus Auto Forward Auto dynamic rendering Auto dynamic system >text_image
Projection Settings Auto Focus Auto Trapezoid Auto obstacle avoidance Auto cross screen 4-point Trapezoid 4-side Trapezoidtext_image
SEARCH HOME APPS VIDEO HOME NETTER N/A/C DO NOT AM NETWORK PRODUCTION EDIT WORK MEDIA LOG SOFTWARE BEUT SWITCH ONT BOARD LANGUAGE SYSTEM MEMORY CO.text_image
Projection Settings Projection < Front-Desktop Project > Zoom Settings > Auto Focus Auto Targeted Auto obstacle avoidance Auto access screen >text_image
Auto access screen Please make sure that the corners of the screen are all in the white area around! STARTConnessione Wireless:
text_image
Refresh & Accurriculars Off coursetext_image
Bluetooth Speaker Mode Name:Projector Connecting...natural_image
Technical line drawing of a portable air conditioner unit with ventilation grilles and indicator lights (no text or symbols)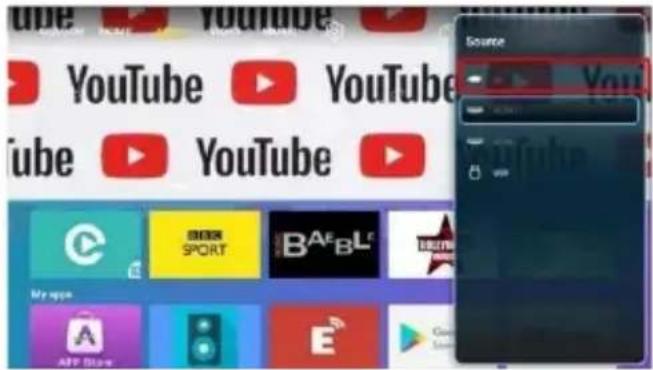
text_image
YouTube YouTube YouTube YouTube YouTube My own APP Store E Source wwwtext_image
Mobile app interface screenshot showing app icons and a 'Music' tab with playback controls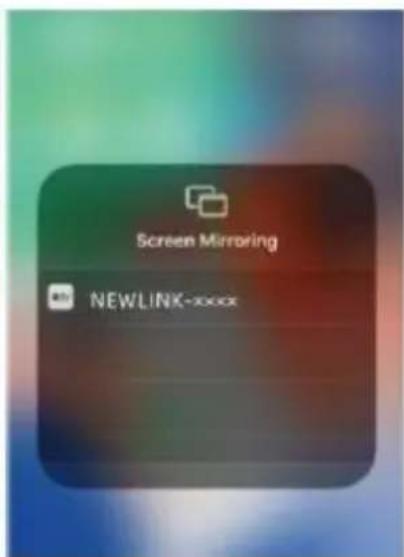
text_image
Screen Mirroring NEWLINK-xxxx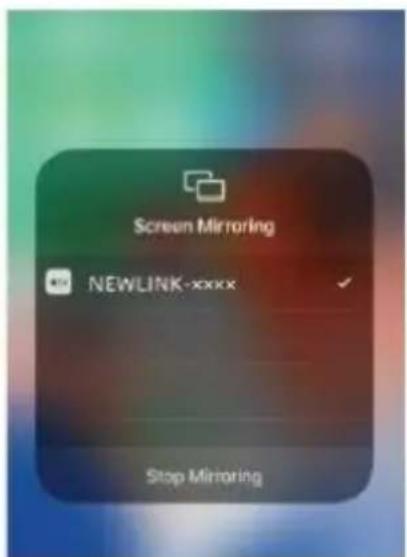
text_image
Screen Mirroring NEWLINK-xxxx Stop MirroringIrradio thanks you for purchasing this appliance and for the trust you have placed in our brand. We are confident that we are able to fully meet your every need thanks to our constant commitment to finding innovative and environmentally friendly technological solutions.
Please read this manual in its entirety before installing and using the appliance. It contains important information that may be essential for achieving its full potential and for its safe use, and it should be kept for future reference.
Irradio technical service is at your disposal for any questions, suggestions or clarifications.
2. IMPORTANT SAFETY INFORMATION
- Check the conditions of the appliance before proceeding with installation. If you find any anomalies or damage, do not use it in any way and contact the retailer where you purchased it.
- The appliance is intended for use in residential, commercial and service environments and in any case in a closed environment. Safety is not guaranteed if used in environments exposed to the elements.
- Before proceeding with installation, make sure that the mains voltage corresponds to the nominal value allowed by the appliance, which can be found on the label affixed to it.
- The appliance can be installed on a flat surface or on the ceiling. In the latter case, it is necessary to be equipped with the necessary safety devices, which must be installed by specialised personnel in accordance with industry standards. Approximate, inaccurate or poorly executed installation can cause falls and result in damage to the appliance, with the possibility of serious injury or trauma to people or animals.
- When installing on a flat surface, make sure that there are no obstacles nearby that could make operation difficult or dangerous.
- In case of prolonged inactivity, disconnect the appliance from the mains and remove the batteries from the remote control.
- The appliance is not a toy and can be dangerous for children even after it has been switched off. Some parts may be swallowed if dismantled or can cause injury.
- Avoid installing or using the appliance in excessively hot or cold, excessively dusty or humid places, in atmospheres saturated with substances such as gas or smoke, and do not expose it to direct sunlight, even through glass.
-
During operation, the appliance emits intense light from the optical lens located at the front: absolutely avoid looking directly at the beam emitted to avoid injury or damage to eyesight.
-
Adequate supervision must be ensured if used by children or persons with reduced cognitive and/or motor skills.
- If the appliance emits unusual noises, smoke or unpleasant odours, or if you notice any abnormal deformations, swelling or cracks in the housing: disconnect the power supply using the switch on the electrical panel, disconnect the appliance from the mains and only then restore the power supply from the switch. Have it checked by qualified technical personnel.
- The appliance must only be used with original accessories. The use of non-original accessories may cause malfunction and/or damage, as well as the loss of technical safety requirements and loss of the warranty.
- Carefully avoid any contact between the appliance and liquids and take steps to prevent this from happening, even accidentally. Do not place the appliance near taps, pressurised piping, steam vents, tanks, automatic or manual sprinklers, surfaces subject to heavy condensation, plants or flower pots. Do not place objects containing water near or on top of the appliance.
- Cleaning operations must be carried out after disconnecting the appliance from the power supply. Refer to the following chapter for the relevant requirements.
- The appliance must not be dismantled, even after it has been taken out of service. Any type of technical check or repair must absolutely be carried out by competent, specialised technical personnel. Disassembling the appliance will invalidate the warranty and may be very dangerous for the user's safety.
- When installing on the ceiling, pay close attention to the quality of the ceiling bracket and appliance attachment to the bracket, verifying the suitability of the masonry and the tightness of any anchors and fixing screws. Slow, inaccurate or incorrect installation may cause the appliance to fall, resulting in damage to the appliance itself and serious injury or trauma to people or animals.
- Make sure that the appliance is not installed in a way that interferes with the opening of doors and windows and that, if installed on the ceiling, the bottom edge is not less than 2.50m from the floor.
- Appliance installation must not interfere with elements such as air conditioners or fans. It is also essential not to place the appliance near lamps, spotlights or other lighting devices, especially if subjected to intense heat, or in the beam of light emitted.
- Connecting the appliance to controlled sockets, timers, electromechanical actuators, power strips, multi-socket adapters or extension cords is not recommended.
- Do not insert thin or metallic objects into the sound emission or ventilation grilles, power or signal connectors; use only suitable connectors. Do not obstruct the ventilation grilles.
- Do not use the appliance for purposes other than those described in this manual. The appliance is intended for residential use and is not suitable for professional use.
- Do not leave the appliance unattended during operation.
3. THE CONTENTS OF THE PACKAGE AND THE PARTS OF THE APPLIANCE
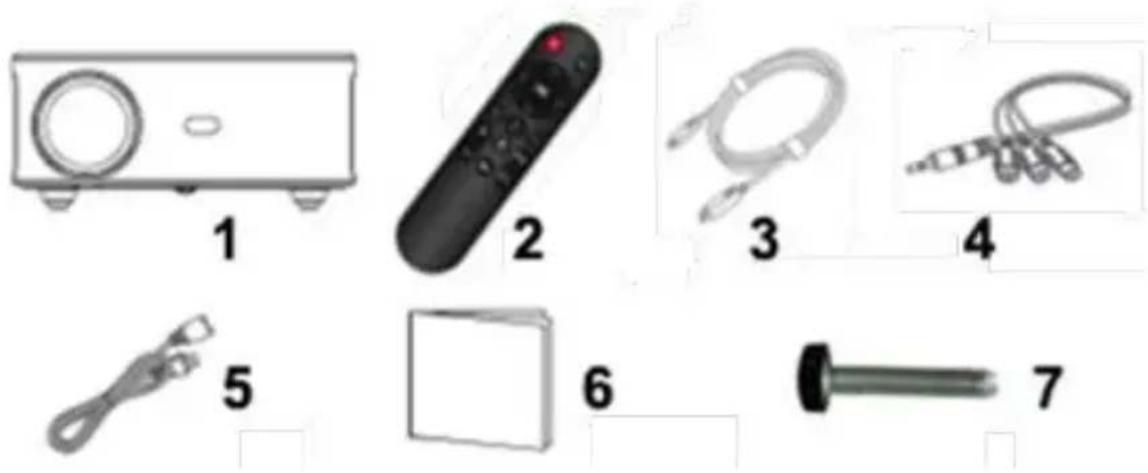
1= Appliance body
2 = Remote control (batteries not included)
3= HDMI cable
4 = A/V cable
5 = Power cord
6 = This manual
7 = Adjustable foot
Appliance body:
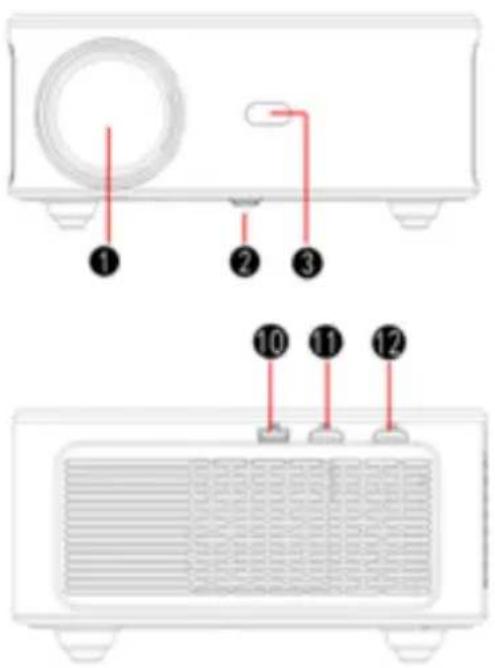
text_image
Diagram showing labeled components of a device with numbered parts, likely indicating parts of a fan or air conditioner panel.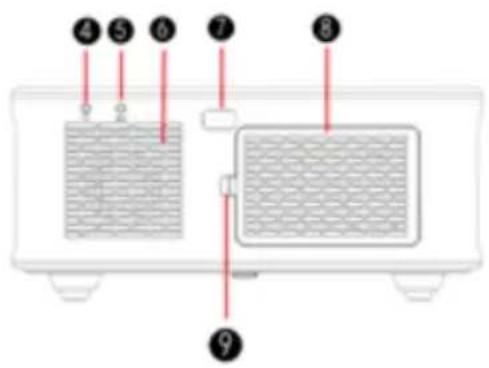
text_image
Diagram of a microwave oven with numbered components and internal structure, likely for labeling or assembly instructions.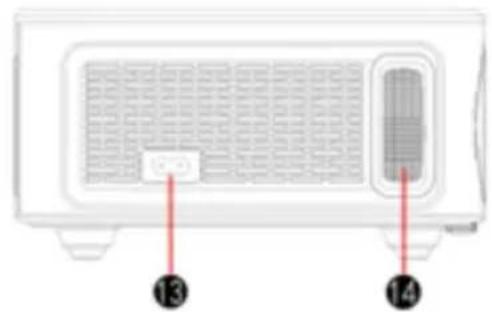
natural_image
Front view of a microwave oven with labeled ports (no text or symbols beyond labels)| 1 | Lens |
| 2 | Adjustable foot |
| 3 | Front infrared receiver |
| 4 | Analogue audio output |
| 5 | A/V audio-video input |
| 6 | Speaker |
| 7 | Rear infrared receiver |
| 8 | Air intake grille |
| 9 | Filter holder opening clip |
| 10 | USB port |
| 11 | HDMI1 signal input |
| 12 | HDMI2 signal input |
| 13 | Power connector |
| 14 | Focus ring (DO NOT TOUCH) |
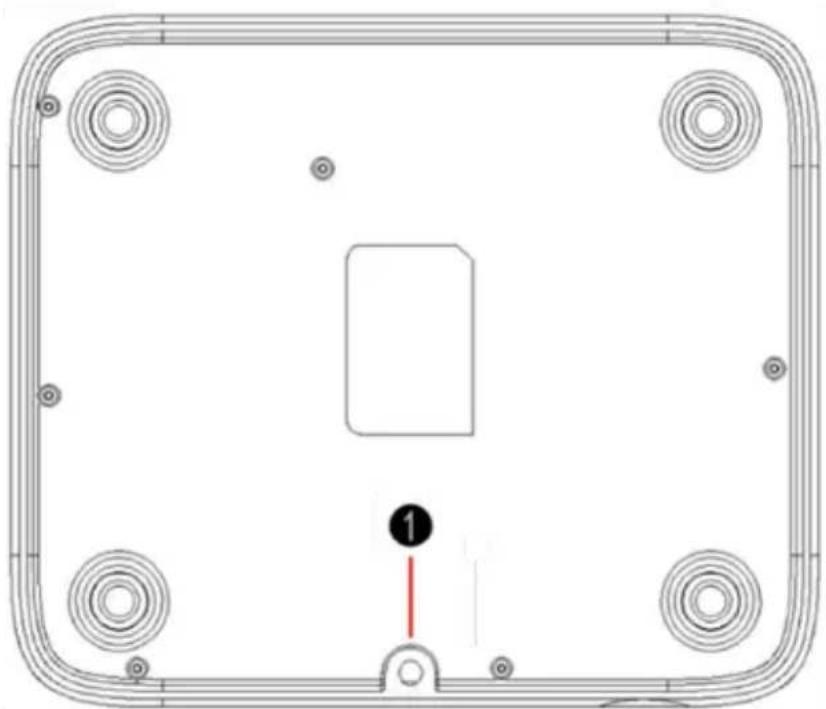
Lower panel:
natural_image
Technical diagram of a rectangular electronic component with four corner holes and a central square (no text or symbols)1
Adjustable foot insertion hole
Remote control:
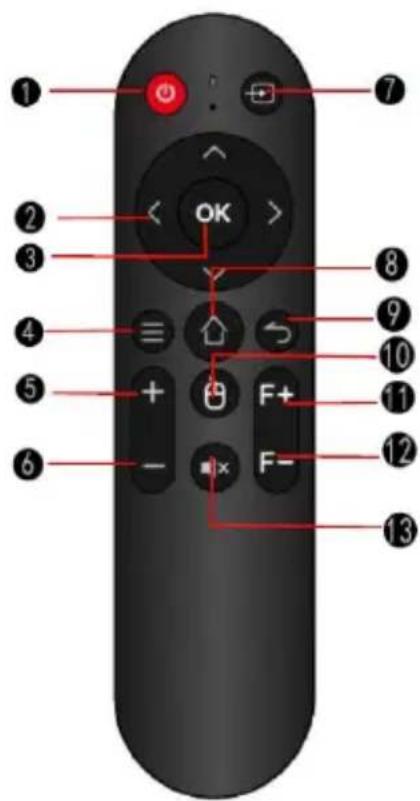
text_image
Diagram of a remote control with numbered labels pointing to key buttons and function keys- Power button
- Direction buttons
- Confirmation button (OK)
- Menu button (short press) or settings button (long press)
- Volume increase button
- Volume decrease button
- Source selection button
- Homepage access button
- Previous menu button
- Mouse mode button
- Positive focus adjustment
- Negative focus adjustment
- Audio mute button
4. FIRST INSTALLATION AND COMMISSIONING
Installation methods:
The appliance can be used in accordance with one of the four configurations described below, selecting the correct installation type from the corresponding menu. It is useful to consider the following points prior to installation:
- During installation, do not connect the power supply or use electrical tools to avoid the risk of electric shock and damage to the projector circuit.
- Keep a distance of at least 30 cm from the wall. Do not cover or block the projector air inlets. Make sure the projector is sufficiently ventilated to ensure performance and maintain reliability.
- If you have a projector screen and it needs to be mounted on the ceiling, the projector should not be higher than the top edge of the screen, in order to avoid image edge distortion.
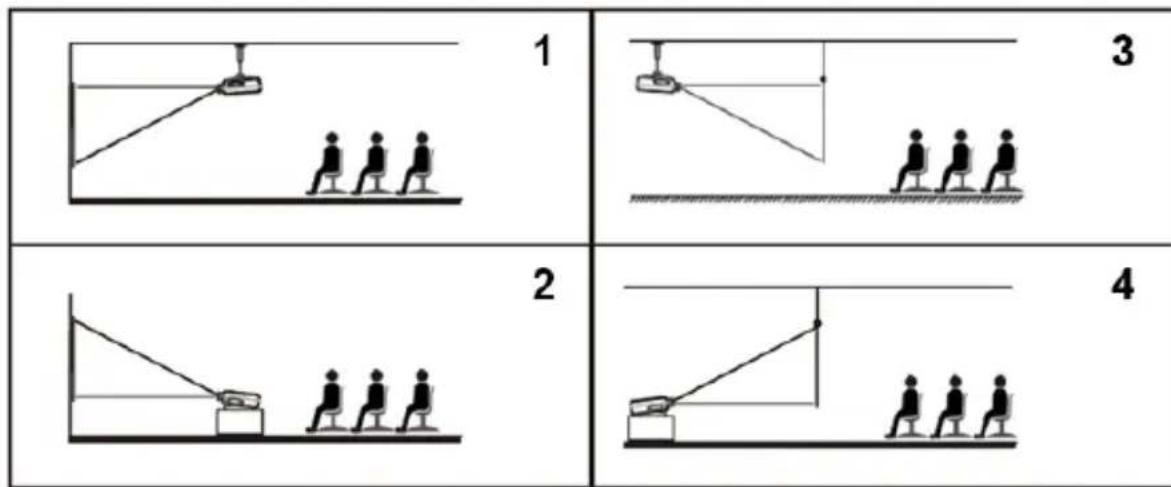
- Ceiling mount for front projection
-
Tabletop mount for front projection
-
Ceiling mount for rear projection
-
Tabletop mount for rear projection
For tabletop installation, the appliance must be positioned upright (not upside down) and the screw (12) must be extracted to the correct level so that the image is centred on the screen and covers as much of the screen as possible while remaining inside its edges.
Ceiling installation requires the use of a special bracket, sold separately, whose screw fasteners must be inserted into the threaded holes under the feet of the base, which can be reached by removing the feet themselves with the help of a thin screwdriver or a toothpick.
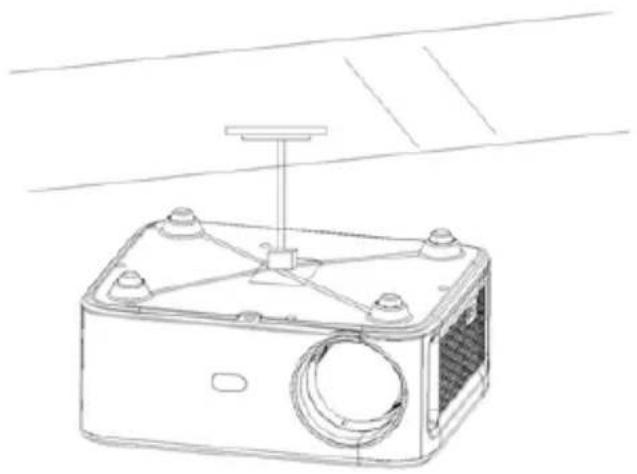
natural_image
Line drawing of a rectangular electronic device with mounting holes and a central hub (no text or symbols)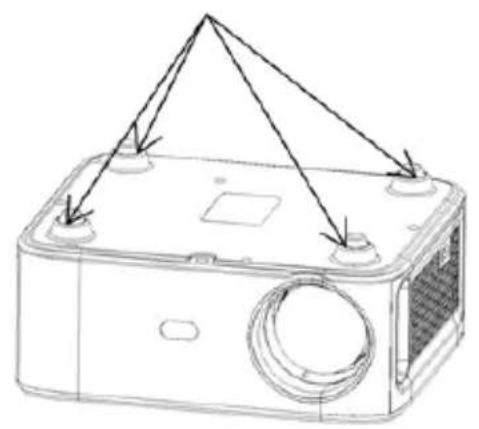
natural_image
Line drawing of a rectangular electronic device with mounting holes and a central circular component (no text or symbols)Distance from the screen:
The diagram below shows the change in screen diagonal size as the distance between the lens and the screen increases:
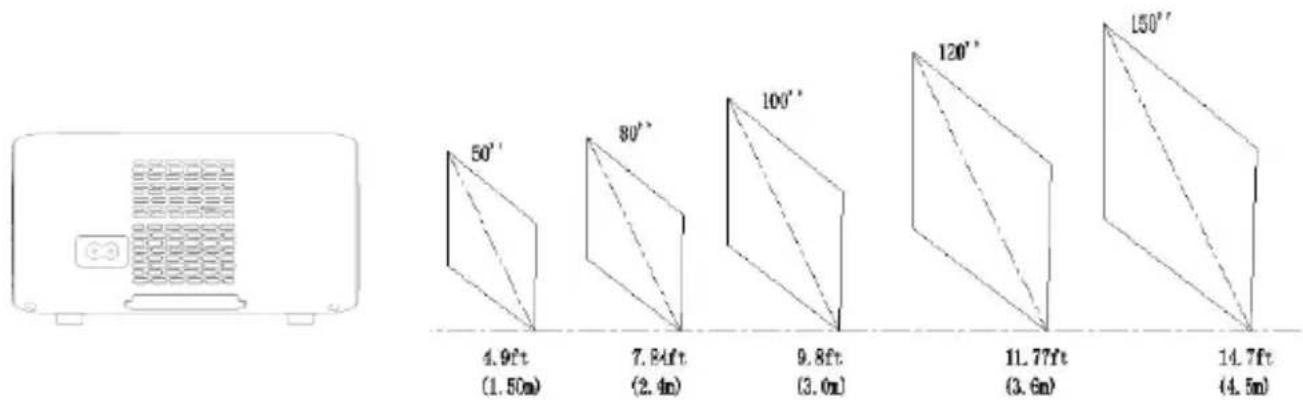
bar
| Window Name | Height (ft) | | :--- | :--- | | 4.9ft (1.50m) | 50' | | 7.84ft (2.4m) | 80' | | 9.8ft (3.0m) | 100' | | 11.77ft (3.6m) | 120' | | 14.7ft (4.5m) | 150' || Lens-screen distance | Image diagonal | Image diagonal | Image width | Image height |
| 1,56 m | 50” | 127 cm | 81 cm | 49 cm |
| 2,50 m | 80” | 203 cm | 130 cm | 78 cm |
| 3,13 m | 100” | 254 cm | 163 cm | 98 cm |
| 3,76 m | 120” | 305 cm | 195 cm | 117 cm |
| 4,70 m | 150” | 381 cm | 244 cm | 147 cm |
Switching on the appliance:

natural_image
Line drawings of a microwave oven, a front-mounted air conditioner, and a remote control (no text or symbols)| 1. Connect the power cord to the outlet (13) | 2. Remove the lens cover | 3. Press the power button on the remote control |
Image focus:
After adjusting the distance from the screen and the image size, press and hold the buttons (11) or (12) until you obtain a fixed and stable image that is perfectly in focus and free of blurring around the edges.
Automatic exclusion of obstacles:
This function lets you reduce the projection size in order to prevent any objects in the path of the light beam from blocking part of it.
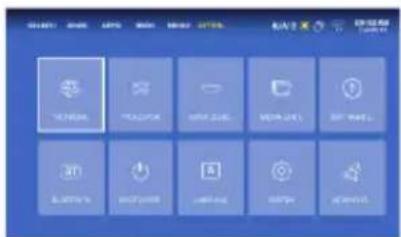
text_image
Screenshot of a software interface with Chinese menu items and icons for functions like 'OK', 'Cancel', and 'Paste'.1: Press the Homepage access button (8) and use the direction buttons (2) to go to the gear icon
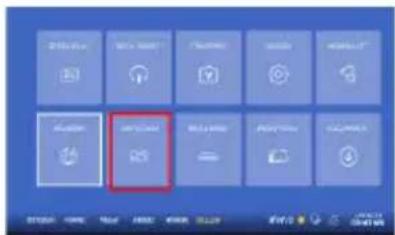
text_image
Screenshot of a software interface with Chinese UI elements and a highlighted 'OPEN' button.2: Use the direction buttons (2) to go to "Projection", then confirm with OK (3)
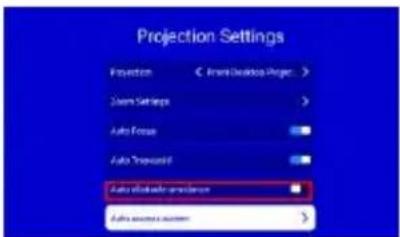
text_image
Projection Settings Projection < Draw Devices Page: > Draw Settings > Auto Focus Auto Truressort Auto Absolute projection Auto Truressor version >3: Use the direction buttons (2) to go to "Automatic obstacle exclusion", then confirm with OK (3)
The selector moves to the right and turns blue: the function is now started and the appliance activates a process to reposition the optical devices, which takes a few seconds. Once this process is complete, the setting is finalised.
Four-point trapezoid:
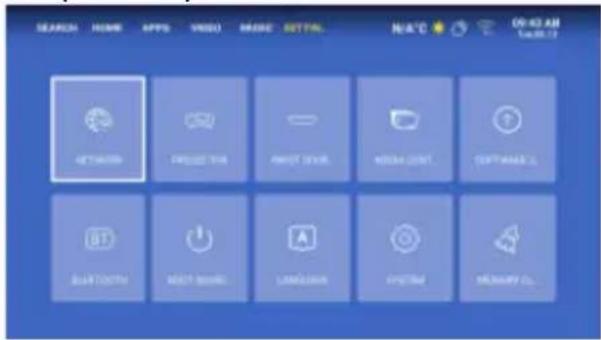
text_image
SEARCH HOME APPS VIDEO MORE SETTING NO.AT°C ON/OAM COLOR 17 GETTING CREATE TV PRINT YOUR MEDIA LIST SOFTWARE 2 BUTTER NEXT BOOKS LANGUAGE ORIGINAL MEMORY CO.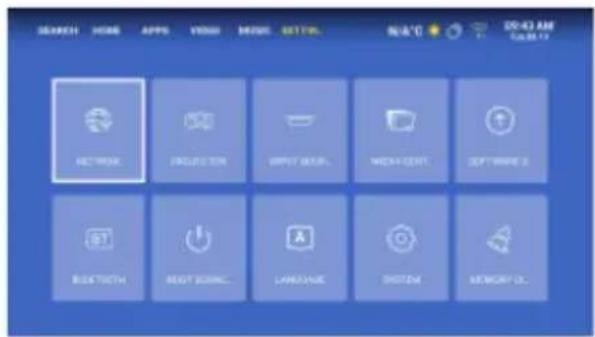
text_image
SEARCH HOME APPS VOLUME MESSAGE OPTIONAL BEETC DRUG DUAL DRUG METH METH/CENT OPT/WAVE 2 BEETC NEXT/SMC LANGUAGE SYSTEM MEMORY 2L1: Press the Homepage access button (8) and use the direction buttons (2) to go to "Settings"
2: Use the direction buttons (2) to go to "Projection", then confirm with OK (3)
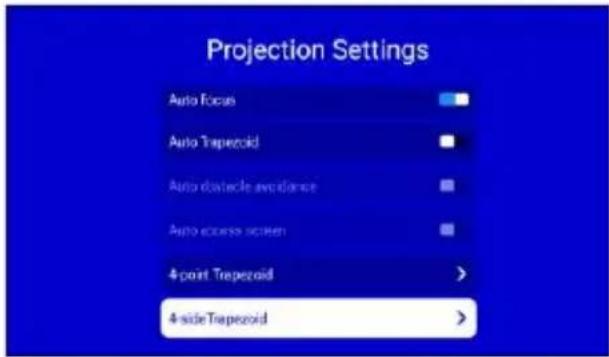
text_image
Projection Settings Auto Focus Auto Trapezoid Auto obstacle avoidance Auto cross screen 4-point Trapezoid 4-side Trapezoid3: Use the direction buttons (2) to go to "Automatic obstacle exclusion", then confirm with OK (3)
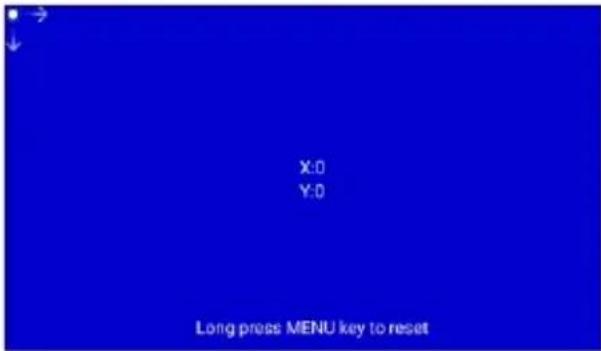
text_image
X:0 Y:0 Long press MENU key to reset4: Use the direction buttons (2) to move each of the four points so that you have four right angles on the sides. To go to the next point, press OK (3)
When you have finished adjusting the fourth and last point, press OK (3) to confirm your selections.
F"Auto access screen" function:
The “auto access screen” function uses optical sensors to automatically adjust the projection, focus and four-point frame. This function is more convenient and accurate than the various manual functions, although it may be less reliable in less than ideal positioning conditions (extreme angles or bright lighting).
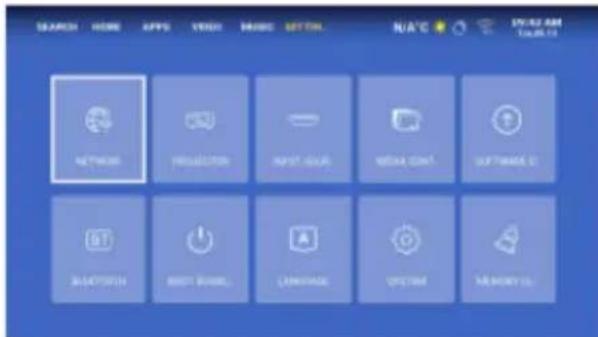
text_image
SEARCH HOME APPS VIDEO MUSIC SETTOL N/A/C ON/OAM COLOR 12 NETWORK PROJECTOR APPRO XLAB MEDIA CONT SOFTWARE C BIOPRISH RIGHT ROUND LANGUAGE OPTION MEMORY1: Press the Homepage access button (8) and use the direction buttons (2) to go to "Settings"
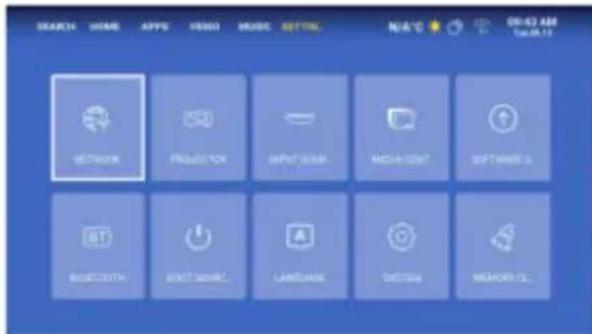
text_image
SEARCH HOME APPS MENU MODE SETTING N/A°C OR:42 AM SELECTOR PROJECTOR INPUT YEAR MEDIA CONTENT SOFTWARE BEETROOT DIRECT WORK LANGUAGE BUTTON MEMORY2: Use the direction buttons (2) to go to "Projection", then confirm with OK (3).
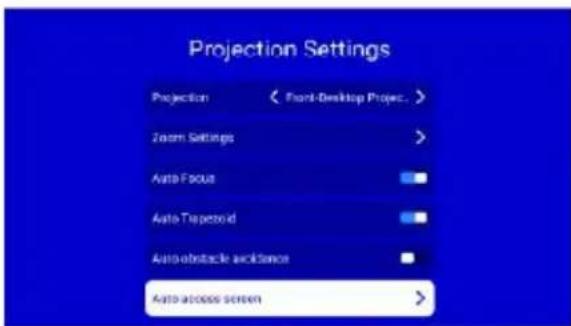
text_image
Projection Settings Projection < Front-Desktop Propec. > Zoom Settings > Auto Focus Auto Taperoid Auto obstacle avoidance Auto access screen >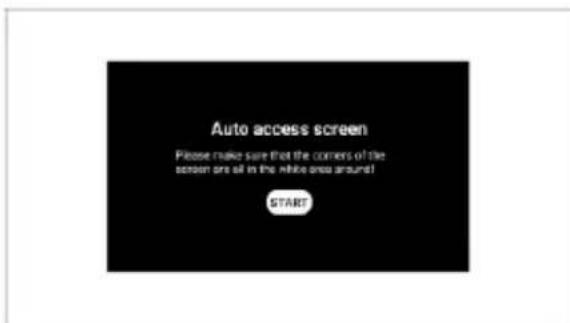
text_image
Auto access screen Please make sure that the corners of the screen are all in the white area around! START3: Use the direction buttons (2) to go to "Auto access screen", then confirm with OK (3).
4: Make sure that all four corners of the projected image, even if not correctly arranged, are within the projection area of the screen, otherwise the setting will fail. Start the procedure with OK (3)
The function is now started and the appliance activates a process to reposition the moving parts, which takes a few seconds. Once this process is complete, the setting is finalised.
Signal connections:
| # | Type | Connection |
| 4 | Audio stereo | Headphones, earphones, audio amplifiers, home theatre systems, analogue recorders |
| 5 | Audio/Video | Video recorders, consoles and outdated sources equipped with Scart or RCA connections |
| 10 | USB | USB flash drives containing multimedia files |
| 11 | HDMI 1 | Video sources such as DVD players, PCs, video game consoles, streamers, decoders, etc. |
| 12 | HDMI 2 | Video sources such as DVD players, PCs, video game consoles, streamers, decoders, etc. |
| 13 | Power supply | 220 V power cord |
Connection to the Wi-Fi network:
The appliance can be connected to a home Wi-Fi network to enjoy audiovisual content available on the network without the help of additional equipment, as well as to activate the "mirroring" function, which allows you to play content from a smartphone, tablet or PC connected to the same Wi-Fi network.
For best performance, it is necessary to ensure that the connection is as stable and free as possible and that data traffic on the network is as limited as possible, even if only during the transmission period. The use of a “saturated” connection could result in a typically and particularly unpleasant “jerky” viewing experience as well as sometimes frequent disconnections: during wireless playback, the appliance should be the only device with video streaming running on the entire local network.

text_image
SEARCH HOME APPS VIDEO MUSIC 96:13 AM TAPLINK PROSLATOR APPS COM INFOLOG SOFTWARE BEETYOU BOOTBOOK LANGUAGE OPTION MEMORY1: Press the Homepage access button (8) and use the direction buttons (2) to go to "Settings", then press OK (3). Press OK (3) again on "Network".
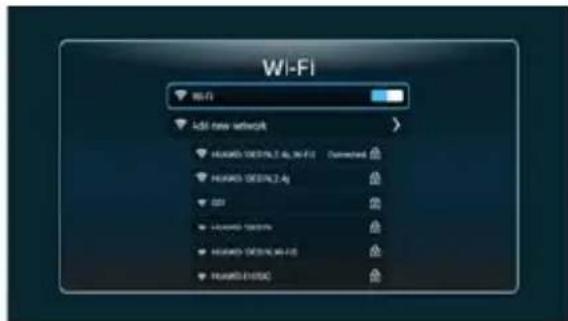
text_image
Wi-Fi Hi-Fi I-6L new network HUAWEI DISCU/2.4L 3x-4x HUAWEI DISCU/2.4L HUAWEI DISCU/2.4L HUAWEI DISCU/2.4L HUAWEI DISCU/2.4L HUAWEI DISCU/2.4L Connected GSS HUAWEI DISCU/2.4L HUAWEI DISCU/2.4L HUAWEI DISCU/2.4L2: Click on Wi-Fi, then activate the function by pressing OK (3) on the corresponding button
The appliance will attempt to connect automatically to the first available network among those previously used, if available. If not possible, select "Add new network", select the network to which you intend to connect using the direction buttons (2), confirm it with OK (3), enter the Wi-Fi password with the virtual keyboard, move the letter selected using the direction buttons (2) and confirm the letter displayed with OK (3). When you have finished typing, confirm with OK (3), go to "Connect" and start the connection with OK (3). In the event of an incorrect password or other connection problems, these will be reported and you will need to repeat the operation.
Wireless connection:
The appliance can be connected to a Wireless speaker or can itself act as a Wireless speaker when connected to an external source.
Connection to an external playback device:
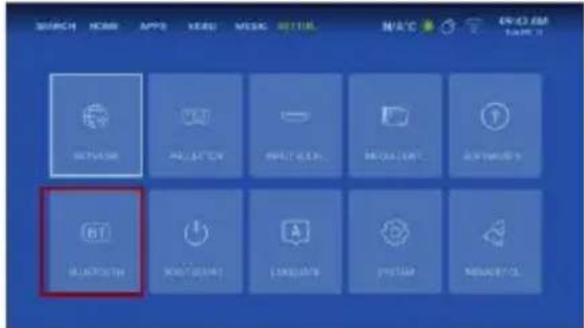
text_image
SEARCH HOME APP XERI MUSIC BETTER N/A°C ON/OAM 61 62 63 64 65 66 67 68 69 70 71 72 73 74 75 76 77 78 79 80 81 82 83 84 85 86 87 88 89 90 91 92 93 94 95 96 97 98 99 1001: Press the Homepage access button (8) and use the direction buttons (2) to go to the gear icon, then press OK (3). Press OK (3) again on the red-highlighted icon
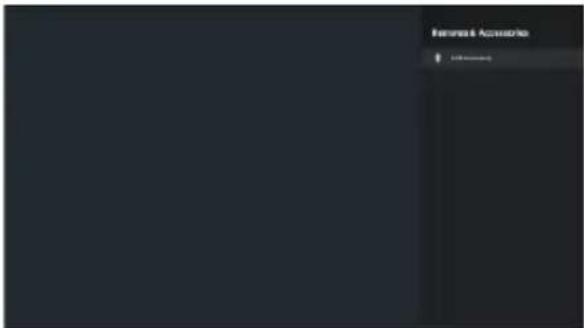
text_image
Internal Accessories USB Currency2: Select the appliance to connect to from the list on the right, moving with the direction arrows (2) and confirming with OK (3).
Connection as an external speaker:
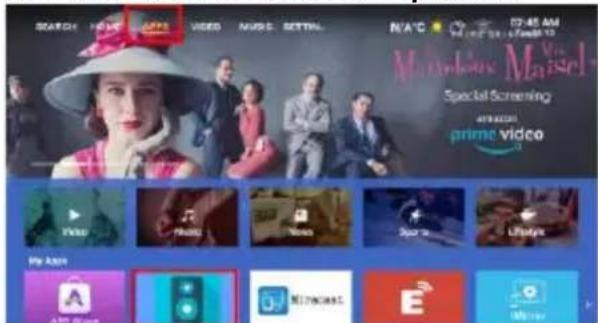
text_image
SEARCH INFO APPS VIDEO MUSIC SETTAL N/A/C EYES AM Mimbaus Musicl Special Screening AMRAXIS prime video Video Music News Sport Liptics My own A#N 2023 MIPKORE E Mater1: Press the Homepage access button (8) and use the direction buttons (2) to go to "Apps", then press OK (3). Use the direction buttons to select the "Speaker" app and press OK (3).
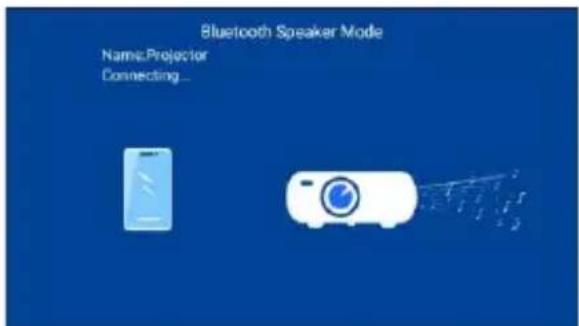
text_image
Bluetooth Speaker Mode Name:Projector Connecting...2: From the mobile device, activate a Bluetooth connection with the "VDP-IR900HD" appliance. Confirm the subsequent screens and use a suitable media player. Audio will be played by the appliance.
5. USING THE APPLIANCE
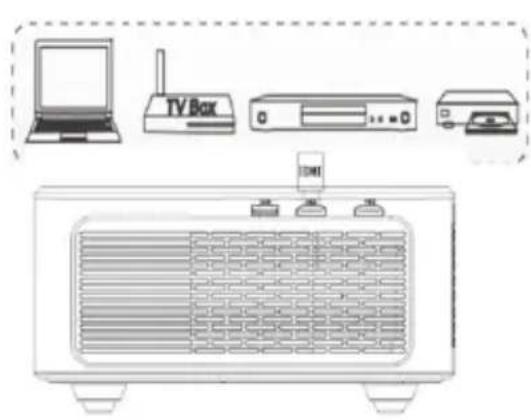
Selecting the HDMI input (11) and (12):
text_image
Diagram showing front view of a TV box connected to a computer and printer, with a monitor displaying the same device.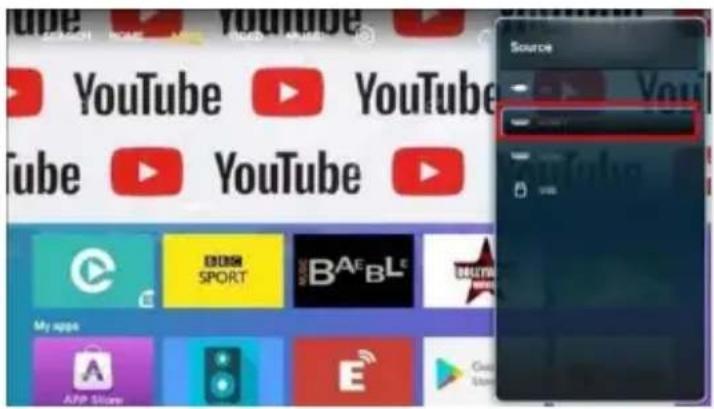
text_image
YouTube YouTube YouTube YouTube My apps APP Store E B A E B L C EDISH SPORT SourceBy selecting the HDMI1 or HDMI2 input, you can view images from the appliance connected to the respective input (11) or (12) using a standard HDMI cable of suitable length and shielding.
To select the desired HDMI input, press the button (7) repeatedly until the "HDMI1" or "HDMI2" option is selected in the right menu box: confirm the choice with OK (3). The appliance automatically switches over to the selected input and starts playback from the source connected to it.
A/V input selection:
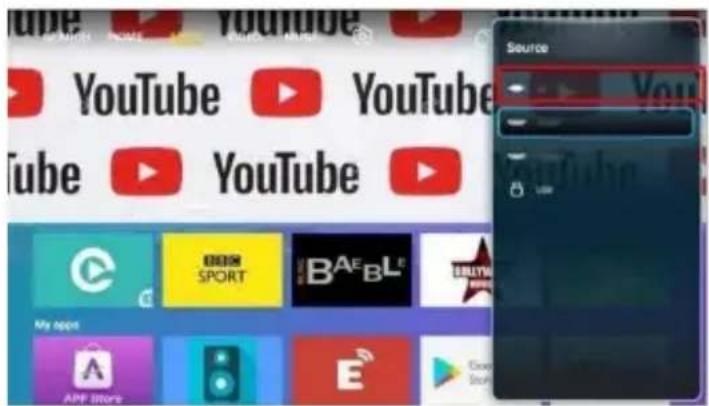
By selecting the A/V input, you can view the images of the device connected to the 3.5 mm jack input (5) using a standard 3.5 mm jack-Scart cable or 3.5 mm jack-RCA cable.
To select the A(V input, press the button (7) repeatedly until the "AV" option is selected in the right menu box: confirm the choice with OK (3). The appliance
text_image
YouTube YouTube YouTube YouTube YouTube My apps APP Store Sourceautomatically switches over to the selected input and starts playback from the source connected to it.
natural_image
Top-down schematic of a heating unit with heat exchangers and a temperature label (no text or symbols beyond basic labels)Selecting the USB input:
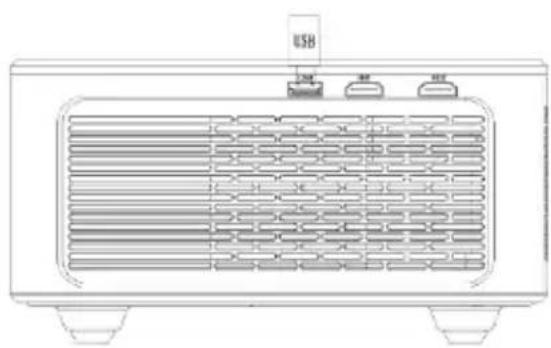
By selecting the USB input, you can browse the contents of the USB flash drive connected to it using a folder and icon interface: the contents are divided into images, audio files, videos and other documents. Pressing OK (3) on a folder icon allows you to explore its contents, while pressing OK (3) on a file icon will play it.
Access to the contents of the USB flash drive will be automatic when it is inserted into the relative port (10) with the appliance switched on. To switch to the USB flash drive during playback from another source, press the button (7) repeatedly until the “MEDIA” option is selected in the right menu box: confirm your selection with OK (3).
Screen mirroring function:
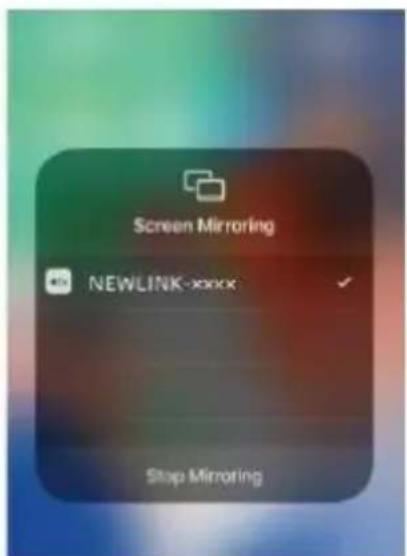
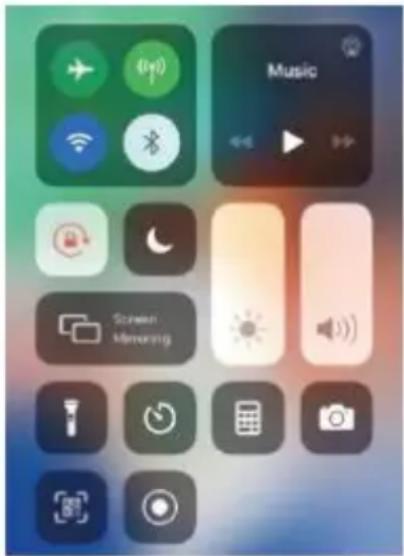
The screen mirroring function allows the contents of the display and the audio signal to be played through the appliance from a smartphone, tablet or PC connected to the same Wi-Fi network to which the appliance was previously connected, as described in the previous chapter.
text_image
Music Screen Viewing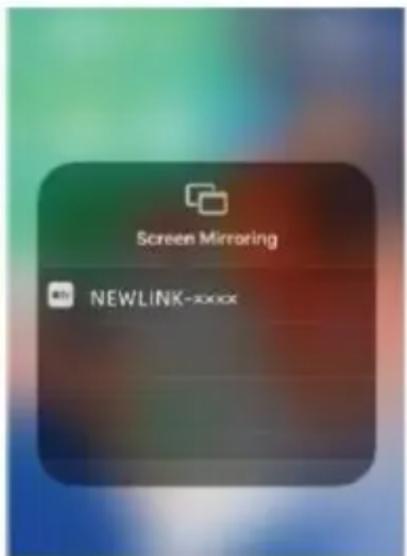
text_image
Screen Mirroring NEWLINK-xxxx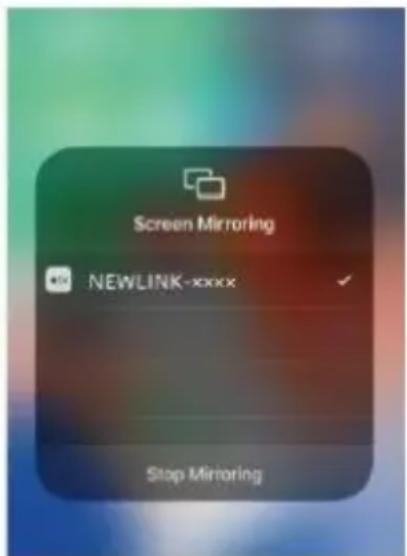
text_image
Screen Mirroring NEWLINK-xxxx Stop MirroringIOS sources: On the appliance, select "APPS" from the menu on the top row and launch the "iMirror" app. On a mobile device, start "Duplicate Screen" and select the "EShare-XXXX" unit.
Android sources: On the appliance, select “APPS” from the menu on the top row and launch the “EShare” app. On a mobile device, install the “EShare” app, launch it and tap “Mirroring” at the bottom of the display.
MacBook PC: On a MacBook PC, enter the settings, locate the AirPlay options and select the "EShare-XXXX" unit from the list of available options.
Windows PC: Open your browser and connect to the address "http://h.eshare.app"; click on "Windows – Download for PC". At the end of the download, install EShare, start it, select the "EShare-XXXX" unit from the list of available devices and start playing by clicking on "Start Sharing". Subsequent playback can be performed directly from the already installed application.
Use with pre-installed apps:
The Homepage screen, accessed by pressing the button (8), offers a series of pre-installed applications related to audiovisual streaming services, sometimes for a fee. To access each of them, use the direction buttons (2) to go to the corresponding icon, then start it with the OK button (3). Each application will provide the following installation and operating instructions in-app; some of them may require registration or payment methods.
Appliance power-off:
To switch off the appliance, press the button (1), followed by OK (3): within a few seconds, playback will stop and, after a few moments, ventilation stops and the appliance will be effectively switched off.
6. MAINTENANCE AND CLEANING
The appliance does not require routine maintenance involving the replacement of components or consumable parts: normal maintenance consists only of any cleaning operations.
All maintenance operations must be carried out with the projector is switched off, cooled down and disconnected from the power mains: if the projector has been used recently, perform maintenance only at least one hour after switching it off. Periodic cleaning of the air flow accesses is necessary: proceed gently using an extremely soft brush, in any case avoiding vacuuming.
The lens does not require cleaning, as it is unlikely to come into contact with any type of material: if necessary, simply remove dust by means of light blowing of dry air, using for example a canister of compressed air from a considerable distance.
To clean structural parts, use a damp, non-abrasive cloth, avoiding solvents or excessively aggressive detergents. Wait until it is completely dry before reconnecting the projector to the power supply. The presence of dust on the internal mirror is conceivable only if the image has rather demarcated darker areas: this can be cleaned by qualified technical personnel.
Clean the air filter regularly at least twice a year: once the door has been removed, pull the cord inside to remove the filter, then brush it gently with a long-bristled brush. To replace it, follow the same steps in reverse order. Remember to position it so that the cord remains accessible.
7. TECHNICAL DATA
| Display technology | LCD |
| Light source | LED |
| Native resolution | 1920 x 1080 pixels (1080P, 1080i) |
| Resolutions in emulation | 576i, 576P, 720i, 720P, 4K (3840 x 2160 pixels) |
| Video formats | 3GP / AVI / FLV / MP4 / MPG /VOB / TS / M2TS / RMVB / MKV |
| Image formats | JPG / JPEG / PNG / BMP |
| Audio formats | MP3 / AAC / FLAC / OGG / WAV/ WMA / MID / DTS / M4A |
| Available connections | 1 x HDMI, 1 x USB, 1 x Audio stereo |
| Projection distance | 1.5 to 4.5 m (greater distances with noticeable loss of performance) |
| Projection dimensions | 50 to 150 inches |
| Focusing | Electronic |
| Aspect ratio | 16/9, 4/3 and automatic |
| Internal speaker | Dual, 2x2.5 W power, stereo |
| Electronic keystone | ±25° (28%) |
| Installation | Front or rear tabletop projection, front or rear ceiling projection |
| Power supply voltage | 100- 240 V AC 50 – 60 Hz |
| Dimensions | 25.6 x 21.9 m x 101.5 mm |
| Weight | 2.6 Kg |
8. COMPLIANCE
The device is equipped with an operating system based on the Android Open Source Project (AOSP). Proprietary Google services are not included.
The producer Melchioni Spa declares that the product Smart 900 ANSI, Full HD 1080p projector and Android 12 OS Model VDP-IR Smart 900 HD (code 558100432) is in compliance with Directive 2014/35/EU of the European Parliament and of the Council, of 26 february 2014, on the harmonisation of the laws of the Member States relating to the making available on the market of electrical equipment designed for use within certain voltage limits.
SIMPLIFIED EU DECLARATION OF CONFORMITY
Hereby, manufacturer Melchioni Spa declares that the radio equipment type Smart 900 ANSI, Full HD 1080p projector and Android 12 OS Model VDP-IR Smart 900 HD (code 558100432) is in compliance with Directive 2014/53/EU.
The full text of the EU declaration of conformity is available at the following internet address: http://www.melchioni.com
The producer Melchioni Spa declares that the product Smart 900 ANSI, Full HD 1080p projector and Android 12 OS Model VDP-IR Smart 900 HD (code 558100432) is in compliance with Directive 2009/125/EC of the European Parliament and of the Council, of 21 october 2009, establishing a framework for the setting of ecodesign requirements for energy-related products.
The producer Melchioni Spa declares that the product Smart 900 ANSI, Full HD 1080p projector and Android 12 OS Model VDP-IR Smart 900 HD (code 558100432) is in compliance with Directive 2011/65/EU of the European Parliament and of the Council, of 8 June 2011 and subsequent Commission Delegated Directive 2015/863, on the restriction of the use of certain hazardous substances in electrical and electronic equipment.
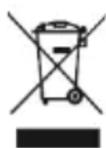
According to Directive 2012/19/EU of the European Parliament and of the Council, of 4 July 2012, on waste electrical and electronic equipment (WEEE), the presence of the crossed-out bin symbol indicates that this appliance is not to be considered as urban waste: its disposal must therefore be carried out by separate collection. Disposal in a non-separate manner may constitute a potential harm to the environment and health. This product can be returned to the distributor when purchasing a new device. Improper disposal of the appliance constitutes misconduct and is subject to sanctions by the Public Security Authority. For further information,
9. WARRANTY
Melchioni Spa, based in Milan (Italy), via Colletta 37, recognizes a conventional guarantee on the product for a period of two years from the date of the first purchase by the consumer. This guarantee does not affect the validity of the legislation in force concerning consumer goods (Legislative Decree 6 September 2005 n. 206 art. 128 and following), of which the consumer remains the owner. This guarantee applies to the entire territory of the European Union.
The components or parts that are found to be defective for ascertained manufacturing causes will be repaired or replaced free of charge through the dealer, during the above warranty period. Melchioni Spa reserves the right to make a complete replacement of the device, if repairability is impossible or excessively expensive, with another device of similar characteristics (Legislative Decree 6 September 2005 no. 206 art. 130) during the warranty period. In this case, the validity of the warranty remains that of the original purchase: the service provided under warranty does not extend the warranty period.
In any case, this appliance will not be considered defective in terms of materials or manufacture should it be adapted, changed or adjusted, in order to comply with national or local safety and / or technical standards, in force in a country other than that for which it is was originally designed and manufactured. This appliance has been designed and built for domestic use only: any other use will invalidate the benefits of the guarantee.
The warranty does not cover:
- parts subject to wear or tear, nor those parts that require periodic replacement and / or maintenance
• professional use of the product - malfunctions or any defects due to incorrect installation, configuration, software / BIOS / firmware update not performed by authorized Melchioni Spa
- repairs or interventions carried out by persons not authorized by Melchioni Spa
- manipulation of assembly components or, where applicable, of the software
• defects caused by fall or transport, lightning, voltage fluctuations, liquid infiltration, opening of the appliance, bad weather, fire, public disturbances, inadequate ventilation or incorrect power supply - any accessories, for example: boxes, bags, batteries, etc. used with this product
- home interventions for convenience checks or presumed defects
The recognition of the guarantee by Melchioni Spa is subject to the presentation of a tax document that proves the actual date of purchase. The same must not show any tampering or deletions, in the presence of which Melchioni Spa reserves the right to refuse the provision of treatment under warranty.
The warranty will not be recognized if the serial number or model of the appliance is non-existent, abraded or modified.
This warranty does not include any right to compensation for direct or indirect damage, of any nature, to people or things, caused by any inefficiency of the appliance. Any extensions, promises or services in this regard, insured by the retailer, will be borne by the latter.
1. NOTA INTRODUCTORIA
text_image
Diagram of a device with labeled parts, showing a circular component and three connected wires marked ①, ②, and ③.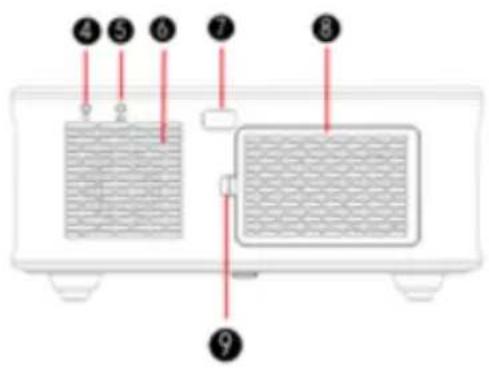
text_image
Diagram of a microwave oven with numbered components and internal structure, likely for labeling or assembly instructions.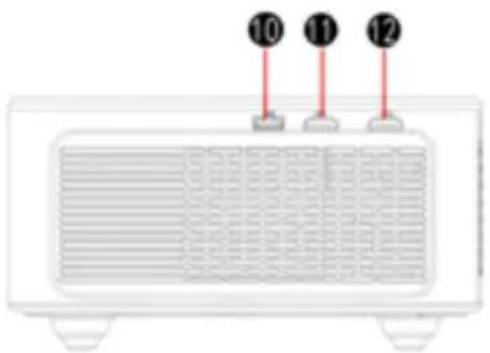
text_image
10 11 12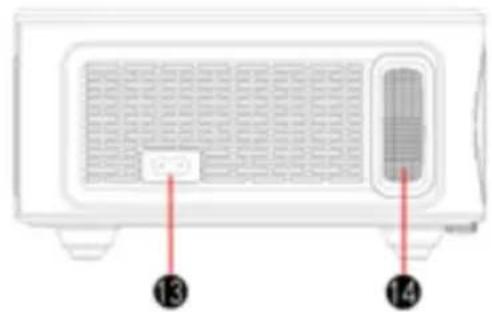
natural_image
Front view of a microwave oven with ventilation grilles and a door, labeled with numbers 13 and 14 pointing to the side (no text or symbols on the device itself)natural_image
Technical diagram of a rectangular electronic component with four circular mounting holes and a central square (no text or symbols)1
text_image
Diagram of a remote control with numbered labels pointing to key buttons and function keysnatural_image
Line drawing of a rectangular electronic device with mounting holes and a central hub (no text or symbols)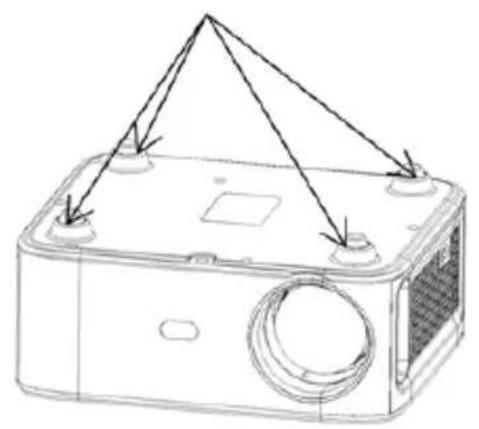
natural_image
Line drawing of a rectangular electronic device with mounting holes and a central circular component (no text or symbols)natural_image
Line drawings of a remote control unit, a wall-mounted air conditioner with plug, and a remote control device (no text or symbols)text_image
Screenshot of a software interface with Chinese menu items and icons for functions like 'OK', 'Cancel', and 'Paste'.text_image
Screenshot of a software interface with a highlighted button labeled '安全' (Safety) in red.text_image
Projection Settings Projection: < Frontierless Project: > Zoom Settings > Auto Focus Auto Trackload Auto obstacle removal Auto Security updatetext_image
SEARCH HOME APPS VIEW MUSIC SYSTEM NETWORK PROSYSTEM PRINT WORK MEDIA EDIT SOFTWARE BUSTROOT ROOT ROOT LANGUAGE SYSTEM INFOLOGYtext_image
Projection Settings Auto Focus Auto Trapezoid Auto obstacle avoidance Auto cross screen 4-point Trapezoid 4-side Trapezoidtext_image
SEARCH HOME APPS FEND MUSIC SETTING N/A°C ON:43 AM NETWORK PROJECT NAME MEDIA CONTENT SOFTWARE BEETROOT ABOUT SMART LANGUAGE BUTTON MEMORYtext_image
Projection Settings Projection < Front-Desktop Projec. > Zoom Settings > Auto Focus Auto Taperoid Auto obstacle avoidance Auto access screen >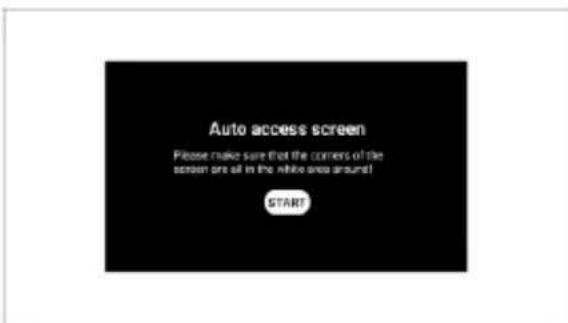
text_image
Auto access screen Please make sure that the corners of the screen are all in the white area around! STARTtext_image
Wi-Fi HUAWEI Add new network HAWAOS DENTAL AV 34/410 Download HAWAOS DENTAL AV 220 HAWAOS DENTAL HAWAOS DENTAL AV-15 HAWAOS DENTAL HAWAOS DENTAL HAWAOS DENTAL HAWAOS DENTAL HAWAOS DENTAL HAWAOS DENTAL HAWAOS DENTAL HAWAOS DENTAL HAWAOS DENTAL HAWAOS DENTAL HAWAOS DENTAL HAWAOS DENTAL HAWAOS DENTAL HAWBtext_image
Forward & Accuracy 100% errortext_image
Bluetooth Speaker Mode Name:Projector Connecting...text_image
Diagram showing front panel layout with TV box, printer, and monitor components labeled in English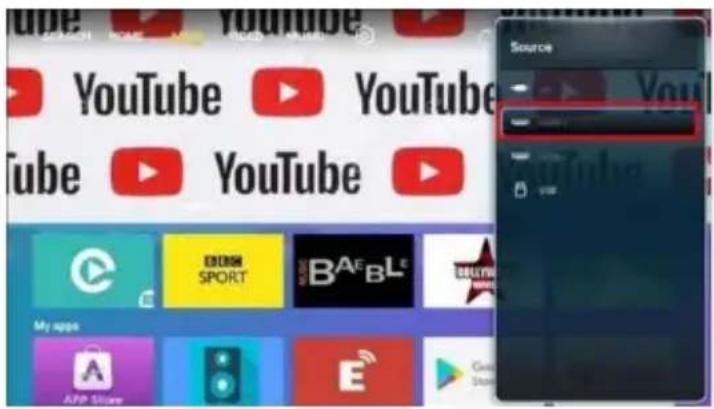
text_image
YouTube YouTube YouTube YouTube My apps APP Store Sourcenatural_image
Technical line drawing of a rectangular electronic device with heat exchangers and ventilation grilles (no text or symbols)text_image
Music Screen Marketing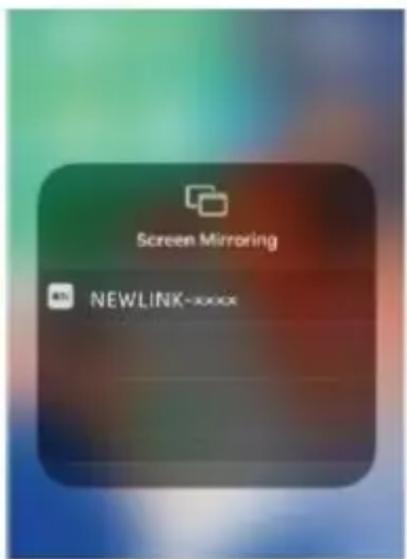
text_image
Screen Mirroring NEWLINK-xxxx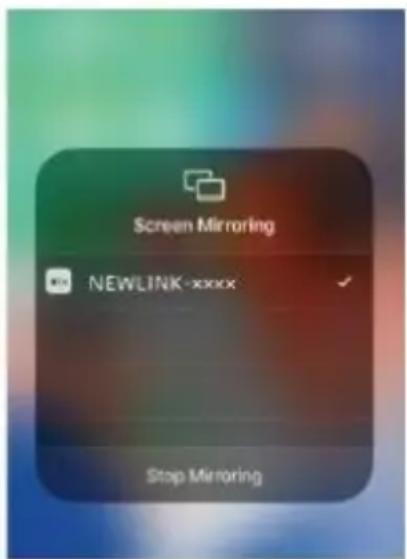
text_image
Screen Mirroring NEWLINK-xxxx Stop Mirroringtext_image
Diagram of a device with labeled parts, showing a circular component and three connected wires marked ①, ②, and ③.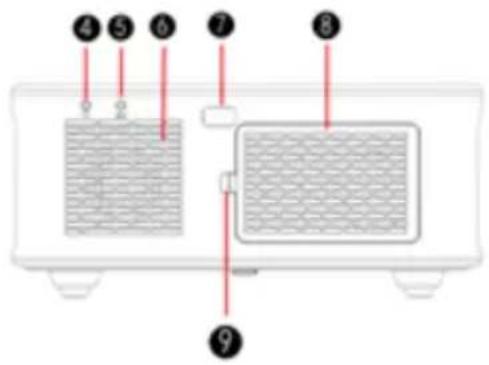
text_image
Diagram of a microwave oven with numbered parts indicating internal components and wiring connections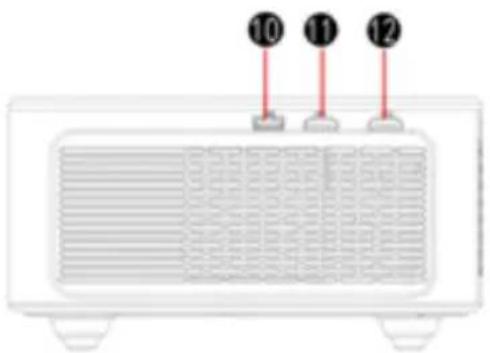
text_image
10 11 12
natural_image
Front view of a microwave oven with ventilation grilles and a door, labeled with numbers 13 and 14 pointing to the side (no text or symbols on the main body)natural_image
Technical diagram of a rectangular electronic component with four circular holes and a central square (no text or symbols)1
text_image
Diagram of a remote control with numbered labels pointing to key function keys like OK, F+, and F-natural_image
Line drawing of a rectangular electronic device with mounting holes and a central hub (no text or symbols)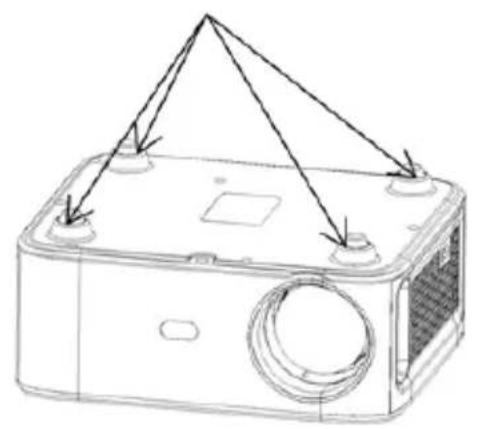
natural_image
Line drawing of a rectangular electronic device with mounting holes and a central circular component (no text or symbols)natural_image
Line drawings of a microwave oven, a front-mounted air conditioner, and a remote control (no text or symbols)text_image
Screenshot of a software interface with Chinese menu items and icons for functions like 'OK', 'Cancel', and 'Paste'.text_image
Screenshot of a mobile app interface with Chinese UI icons and a highlighted 'OK' buttontext_image
SEARCH HOME APPS VIEW IMAGE SETTINGS NETWORK PROJECTS INFO TEXT MEDIA CAT SOFTWARE BLUETEXT ROOT ROOT LANGUAGE SYSTEM MEMORY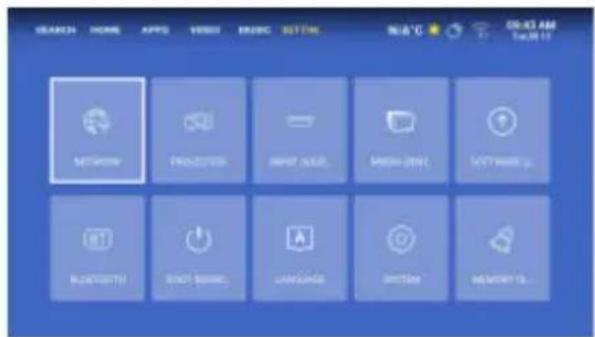
text_image
SEARCH HOME APPS VIDEO MUSIC HTML NATMOM PROJETICS INFO TEXT MEDIA WWW TEXT NAME BLOOMOTUS Book Now! Uniscale Printers MEMORYtext_image
Projection Settings Auto Focus Auto Trapezoid Auto obstacle avoidance Auto access screen 4-point Trapezoid 4-wide Trapezoidtext_image
Projection Settings Projection < Font-Desktop Project > Zoom Settings > Auto Focus Auto Tapezoid Auto obstacle avoidance Auto access screen >text_image
Auto access screen Please make sure that the corners of the screen are all in the white area around! STARTtext_image
Personal Accessories UserTestingtext_image
SEARCH HOME LIFE VIDEO MUSO SETTAL N/A/C 02:45 AM MACHINE Maisel Special Screening APRAXIS prime video Video Music News Sports Lifetime My Music APP Store KLINECHAC E Winetext_image
Bluetooth Speaker Mode Name:Projector Connecting...natural_image
Technical line drawing of a portable air conditioner unit with ventilation grilles and indicator lights (no text or symbols)text_image
Music Screen Marketing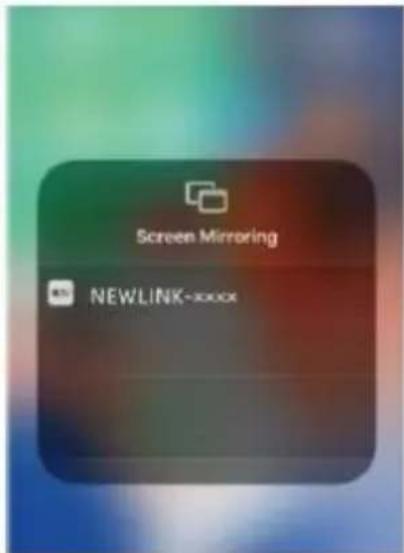
text_image
Screen Mirroring NEWLINK-xxxx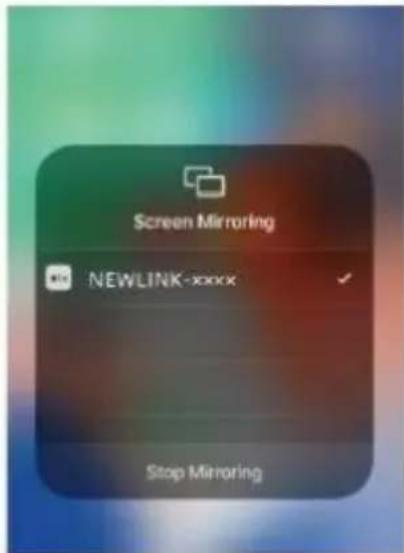
text_image
Screen Mirroring NEWLINK-xxxx Stop Mirroringtext_image
Diagram of a device with labeled parts, showing a circular component and three connected wires marked ①, ②, and ③.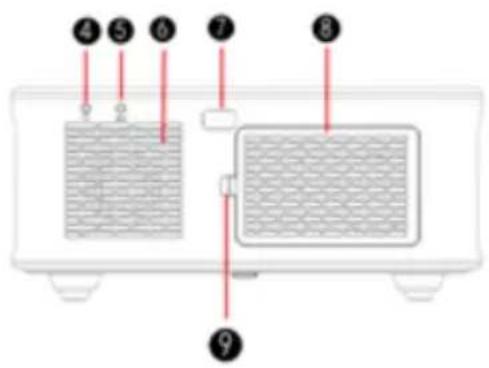
text_image
Diagram of a microwave oven with numbered components and internal structure, likely for labeling or assembly instructions.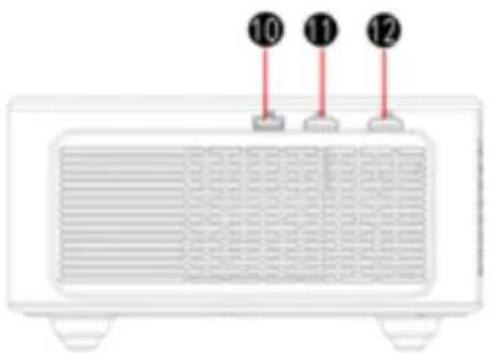
text_image
10 11 12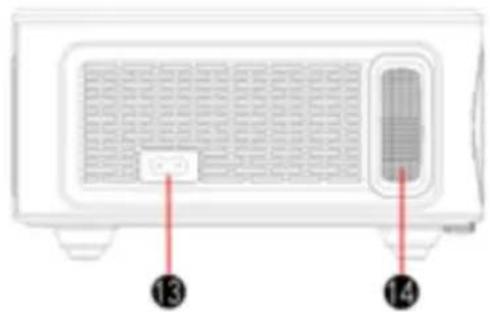
natural_image
Front view of a microwave oven with ventilation grilles and a door, labeled with numbers 13 and 14 pointing to the side (no text or symbols on the device itself)natural_image
Technical diagram of a rectangular electronic component with four circular holes and a central square (no text or symbols)1
natural_image
Line drawing of a rectangular electronic device with mounting holes and a central hub (no text or symbols)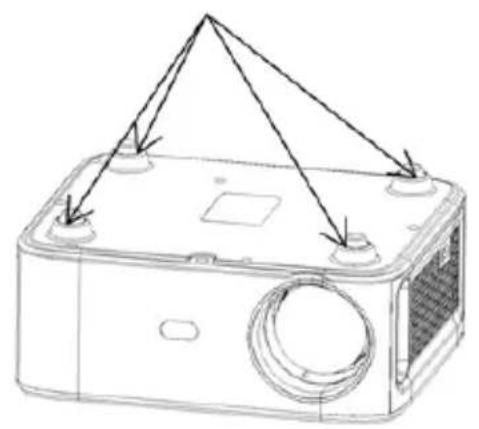
natural_image
Line drawing of a rectangular electronic device with mounting holes and a central circular component (no text or symbols)natural_image
Line drawings of a remote control unit, a wall-mounted air conditioner, and a remote control device (no text or symbols)text_image
Screenshot of a software interface with Chinese menu items and icons for functions like 'OK', 'Cancel', and 'Paste'.text_image
Screenshot of a mobile app interface with Chinese UI icons and a highlighted 'OK' buttontext_image
Projection Settings Projection < Book/Desktop Page... Zoom Settings > Auto Focus Auto Support Auto default aversion Auto source version >text_image
SEARCH HOME APPS VIEW IMAGE SETTINGS NETWORK PROGRESS INFO MEDIA GET SOFTWARE BLUETEXT ROOT ROOTS LANGUAGE WINDOW MEMORY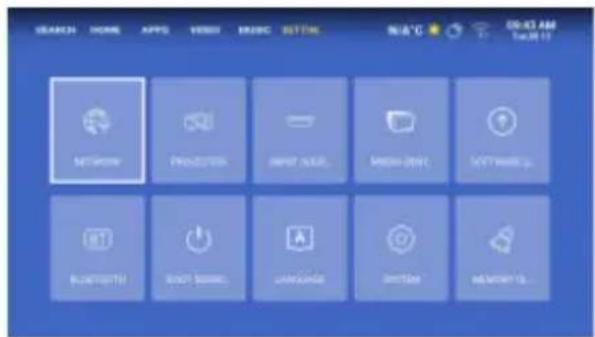
text_image
SEARCH HOME APPS VIDEO MUSIC HTML NETSLOW PRODUCTION OUTPUT WORK MEDIA WORK BUTTER WITH ROOT ITEMS ONLINE EDITOR MEMORYtext_image
Projection Settings Auto Focus Auto Trapezoid Auto obstacle avoidance Auto cross screen 4-point Trapezoid 4-side Trapezoidtext_image
Projection Settings Projection < Font-Desktop Project > Zoom Settings > Auto Focus Auto Tapezoid Auto obstacle avoidance Auto access screen >text_image
Auto access screen Please make sure that the corners of the screen are all in the white area around! STARTtext_image
Refresh & Accurriculars Off coursetext_image
Bluetooth Speaker Mode Name:Projector Connecting...natural_image
Line drawing of a portable air conditioner unit with ventilation grilles and indicator lights (no text or symbols)text_image
Music Screen Monitoring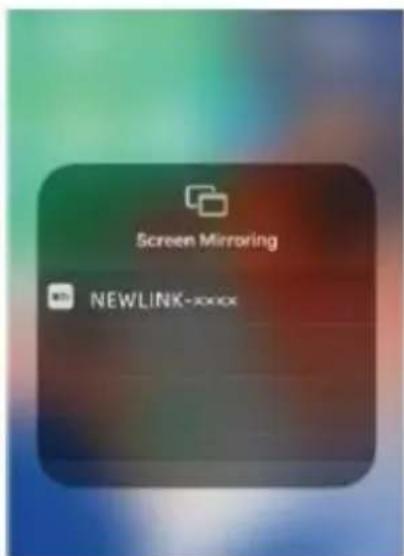
text_image
Screen Mirroring NEWLINK-xxxx