GrassConnect - Lawn mower Blumfeldt - Free user manual and instructions
Find the device manual for free GrassConnect Blumfeldt in PDF.

User questions about GrassConnect Blumfeldt
0 question about this device. Answer the ones you know or ask your own.
Ask a new question about this device
Download the instructions for your Lawn mower in PDF format for free! Find your manual GrassConnect - Blumfeldt and take your electronic device back in hand. On this page are published all the documents necessary for the use of your device. GrassConnect by Blumfeldt.
USER MANUAL GrassConnect Blumfeldt
natural_image
Abstract green circular logo with three curved segments (no text or symbols)
natural_image
Abstract green circular logo with two leaf-like shapes (no text or symbols)
natural_image
Abstract green circular logo with three leaf-like shapes forming a Y-shape (no text or symbols)Grass Connect
Mähroboter
Robot Mower
Robot tondeuse
Robot tagliaerba
Robot cortacésped
10046916
text_image
QR code image containing encoded data, no visible human-readable textINHALT
Technische Daten 4
natural_image
Line drawing of a mechanical robotic device with no visible text or symbolsMäher x 1

natural_image
Illustration of a mechanical device with ribbed structure and cable, no text or symbols presentLadestation x 1
natural_image
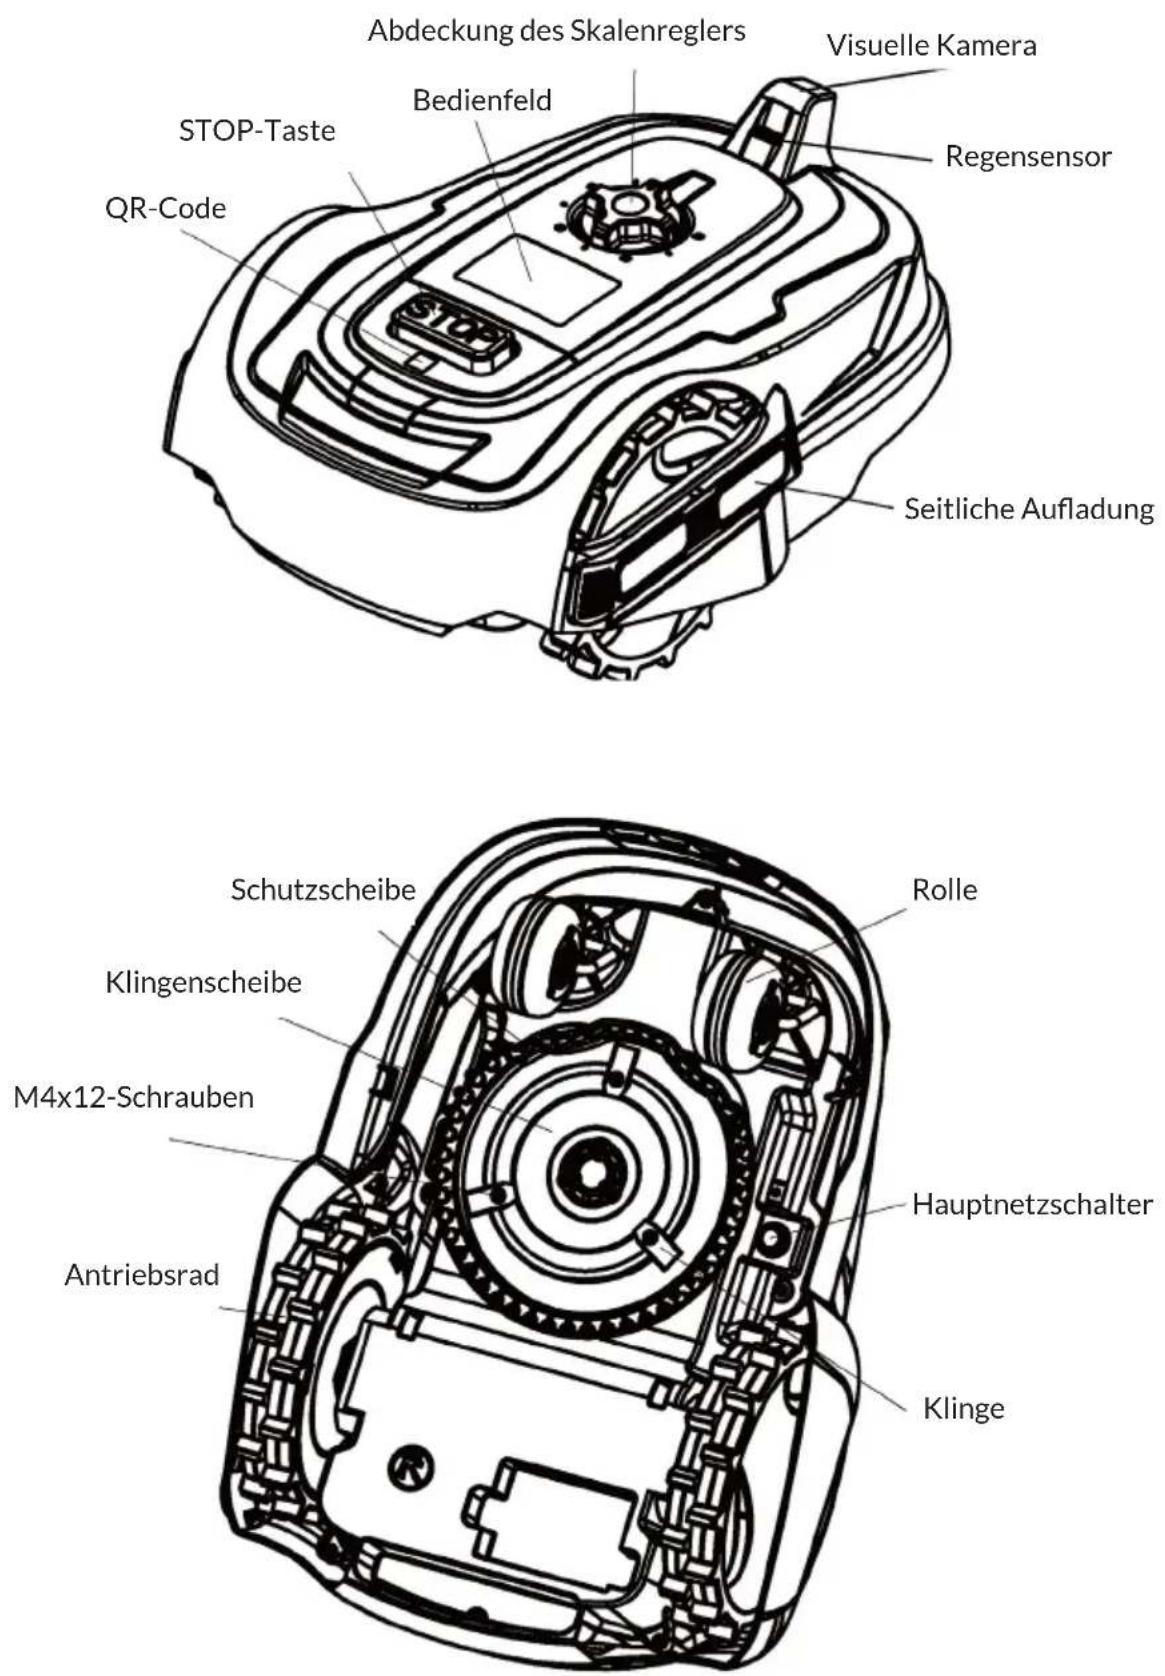
Exploded view diagram of a mechanical assembly showing internal components like gears, motors, and housing (no text or labels)GERÄTEÜBERSICHT

flowchart
graph TD
    A["WLAN-Anzeigeleuchte"] --> B["Entriegelungsanzeige"]
    B --> C["Batterieanzeige"]
    C --> D["Störungsanzeige"]
    D --> E["Betrieb 4H"]
    D --> F["Betrieb 2H"]
    D --> G["Betrieb 6H"]
    E --> H["2H"]
    E --> I["4H"]
    E --> J["6H"]
    E --> K["8H"]
    E --> L["10H"]
    F --> M["Power icon"]
    G --> N["Security icon"]
    H --> O["Rückkehr zur Ladestation"]
    I --> P["Mähens"]
    J --> Q["Play button"]
    K --> R["OK button"]
    L --> S["OK-Taste"]
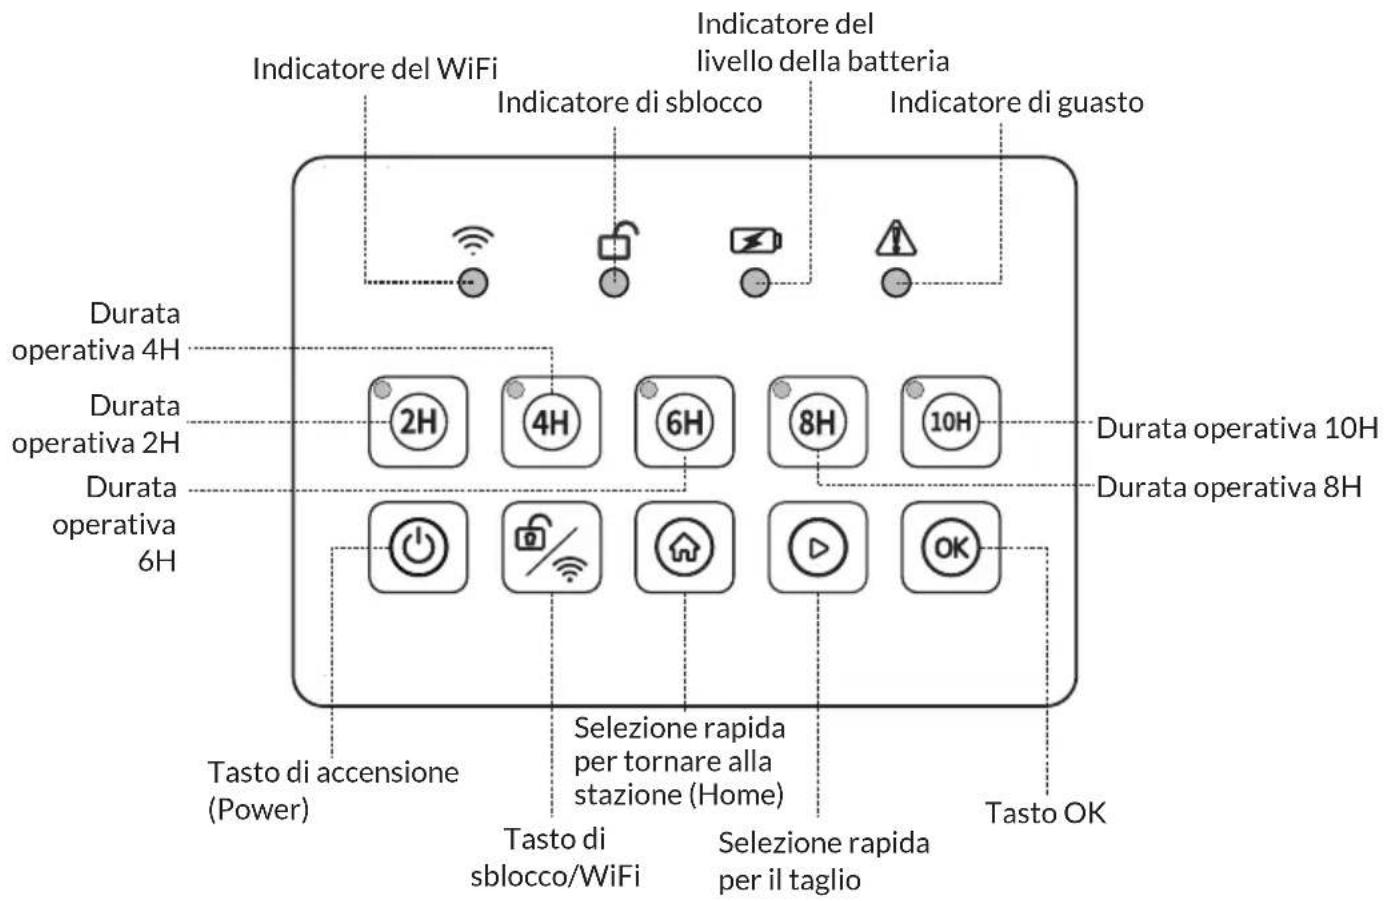
Panel-Indikatoren
WLAN-Taste
natural_image
Technical line drawing of a mechanical component with internal channels and mounting holes (no text or symbols)natural_image
Technical line drawing of a mechanical component with no visible text or symbolsnatural_image
Technical line drawing of a mechanical device with gears and housing (no text or symbols)natural_image
Symbol of a trash bin crossed with a diagonal line, no text or numbers presentBerlin Brands Group UK Limited PO Box 42 272 Kensington High Street London, W8 6ND United Kingdom
Congratulations on purchasing this device. Please read the following instructions carefully and follow them to prevent possible damages. We assume no liability for damage caused by disregard of the instructions and improper use. Scan the QR code to get access to the latest user manual and more product information.

text_image
QR code image containing encoded data, no visible human-readable textCONTENTS
Technical Data 32
Explanation of the Warning Symbols 33
Safety Instructions 34
Scope of delivery 38
Exploded view 39
Appliance overview 40
Installation 43
Operation 46
Device Control by Smartphone 50
Cleaning and Maintenance 52
Troubleshooting 54
Disposal Considerations 55
Declaration of Conformity 55
TECHNICAL DATA
| Item number 10046916 | |
| Input power 100-240 V AC, 50/60 Hz | 48 W |
| Output power | 20 V, 2 A |
| Water proof level | IPX4 |
| Cutting area | 1000 m2 |
| WiFi Standard 802.11 b/g/n | |
| WiFi frequency 2.4 GHz | |
| WiFi transmission power (max.) < 20 dBm | |
| Battery | |
| Battery type Lithium-ion battery | |
| Rated voltage 20 V | |
| Battery capacity 4000 mAh | |
| Charging time 140 min. | |
| Average working time 100 min. | |
| Functions | |
| Intelligent Scheduling | √ |
| Boundary Collision | √ |
| Rain Sensor | √ |
| Rain Sensor Delay | √ |
| Gulling height 20–60 mm | |
| Gulling diameter 180 mm | |
| Hill capability Max slope 20 degrees | |
| APP control IOS or Android | |
| Upgrade Interface | √ |
| Motor Type BLDC | √ |
| Multi-language | √ |
| Time synchronisation | √ |
| Gyroscope | √ |
| Emergency stop switch | √ |
| Cuts to Edge | √ |
| Self-Charging Management | √ |
| Intelligent obstacle avoidance | √ |
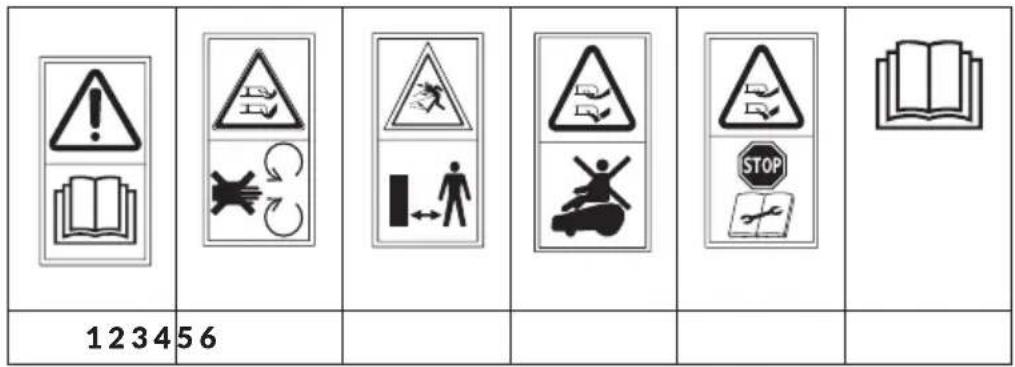
EXPLANATION OF THE WARNING SYMBOLS
Symbols on the robot mower
text_image
123456| 78910 | 11 12 |
RoHS
1 WARNING Read the instruction manual before operating the machine.
2 WARNING Beware of severing toes or hands. Do not put hands or feet near a rotating blade.
3 WARNING Keep a safe distance from the machine when it is operating.
4 WARNING Do not ride on the machine.
5 Remove (or actuate) the locking device before working on or lifting the machine. Ensure the mower is locked with the PIN code before lifting or operating.
6 Read the instruction manual.
7 Class II appliance
8 SMPS with short-circuit proof safety isolating transformer (inherent or non-inherent)
9 SMPS (Switch mode power supply unit)
10 Direct current
11 Alternating current
12 This product complies with the Restriction of Hazardous Substances.
SAFETY INSTRUCTIONS

WARNING
Risk of fire, electric shock and injury! Basic safety precautions should always be observed when using an electrical appliance to reduce the risk of fire, electrical shock or serious injury.
- Read all instructions before use. Retain instructions for future reference.
- Please read this manual carefully. Familiarise yourself thoroughly with the controls and proper use of this machine. You should know how the machine works and how to immediately switch it off.
- Never let children use this robot mower. Never let adults work with this robot mower if not properly trained.
- Do not let any persons, especially small children, or pets near you while the robot mower is in operation.
Personal safety
- Only use the robot mower on grass and lawns, as described in this manual.
- Keep the appliance out of reach of children and animals at all times.
- Do not use the appliance while there are other people, especially children, nearby.
- Stay alert, watch what you are doing and use common sense when operating the robot mower.
- Do not use the robot mower while you are tired or under the influence of drugs, alcohol or medication. This may result in serious personal injury.
- Use protective personal equipment such as safety glasses, non-skid safety shoes, sturdy gloves to reduce the risk of personal injury.
- Do not operate when barefoot or wearing open toed shoes.
- Dress appropriately. Do not wear loose clothing or jewellery and keep hair, clothing and gloves away from moving parts.
- Never touch the rotating blade.
- Never operate the robot mower over gravel, as this risks flicking stones.
- Check the area where the robot mower is to be used and remove any objects that could jam or be thrown by the robot mower, such as stones and sticks.
- Avoid operating the robot mower on wet grass.
- Remove any dog mess before mowing.
- Visually check the cutting tools and their fasteners for any damage before each use.
- To prevent imbalance, any damaged or worn-out parts should be replaced.
- Do not operate the robot mower if it is incomplete or has unauthorised modifications.
- Keep all body parts, especially hands and feet, away from the blade at all times.
WARNING
Risk of injury! The blade will continue to move after the motor is switched off.
- Ensure that the blade has fully stopped before:
– clearing a blockage,
- adjusting the cutting height,
- lifting or carrying the robot mower,
- tilting the robot mower to move,
- checking or cleaning the robot mower,
- carrying out any maintenance.
- If the robot mower vibrates intensively, stop the motor fully and identify the cause.
- The operator is responsible for accidents or hazards occurring to other people at their property.
- This appliance is not intended for use by persons (including children) with reduced physical, sensory or mental capabilities or lack of experience or knowledge.
- Never modify the robot mower in any way.
- It is recommended to program the appliance for use during hours when the area is free from activity, e.g. at night. But consider that certain animals, e.g. hedgehogs and moles are active at night. They can potentially be harmed by the appliance.
- The appliance must never be allowed to collide with persons or other living creatures. If a person or other living creature comes in the way of the appliance, it shall be stopped immediately.
- Do not put anything on top of the appliance or its charging station.
- Do not allow the appliance to be used with a defective guard, blade disc or body. Neither should it be used with defective blades, screws, nuts or cables. Never connect a damaged cable, or touch a damaged cable before it is disconnected from the supply.
- Do not use the appliance if the STOP button does not work.
- Always switch off the appliance when it is not in use. The appliance can only start when the correct PIN code has been entered.
- The appliance must never be used at the same time as a sprinkler. Use the Schedule function so the appliance and sprinkler never run simultaneously.
- Metal objects in the ground (for example buried electrical cables) can result in a stoppage. The metal objects can cause interference with the loop signal which then can lead to a stoppage.
- Be aware that pets may dig or disrupt the perimeter wire, so check regularly.
- The manufacturer does not guarantee full compatibility between the appliance and other types of wireless systems such as remote controls, radio transmitters, hearing loops, underground electric animal fencing or similar.
Electrical safety
- Do not operate the robot mower in explosive atmospheres, such as in the presence of flammable liquids, gases or dust. Mowers can sometimes create sparks, which may ignite the dust and fumes.
- Avoid body contact with earthed or grounded surfaces, such as pipes. There is an increased risk of electric shock if your body is earthed or grounded.
- In the event of a thunderstorm: To reduce the risk of damage to electrical components in the appliance and the charging station, we recommend that all connections to the charging station are disconnected (power supply, boundary wire and guide wire) if there is a risk of a thunderstorm.
- Do not handle the charge station or the robot mower with wet hands.
- Regularly check the power supply and charge station cables for signs of damage or ageing.
- Do not expose the robot mower to temperatures exceeding 80 °C, for example leaving the robot mower in direct sunlight or in the hot boot of a car for prolonged periods.
Battery safety
- This appliance contains Li-ion batteries. Do not incinerate batteries or expose to high temperatures, as they may explode.
- After heavy use or in high temperatures the battery may become warm. Allow the appliance to cool for 30 minutes before charging.
- Operation and storage temperature is 1-50 °C (32-122 °F). Temperature range for charging is 0-45 °C (32-113 °F). Too high temperatures might cause damage to the appliance.
Maintenance
- Check all visible fixing screws and nuts, especially on the cutter disc, to ensure they are tightened properly.
- The robot mower and its charge station should be periodically checked and cleaned and kept free of debris and obstructions. Note that some garden creatures such as spiders, insects, snails and slugs can nest or hibernate within crevices of the robot mower. These can attract small creatures/rodents that can damage the robot mower if not deterred.
- Before using the robot mower and after any impact, check for signs of wear and damage and repair or replace as necessary.
- Use only genuine replacement parts. This will ensure that the safety of the robot mower is maintained.
- Do not attempt to repair any damaged parts on the robot mower unless you are qualified to do so.
Description
Robot mowers work by making regular small cuts of the grass to maintain a set height. To do this they must be able to mow the grass multiple times per day every day. This will keep the grass level constantly in check. As it is cutting small amounts regularly the clipping will fall to the ground and are not collected. Over time these small clippings will compost and add nitrogen to the lawn. Eventually this will leave the lawn looking more green and lush and enhance the general health of the lawn.
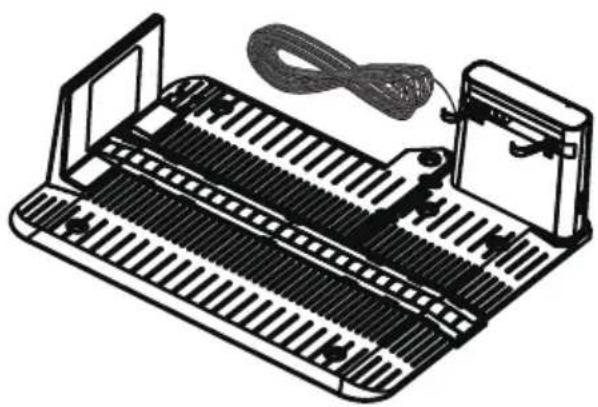
SCOPE OF DELIVERY
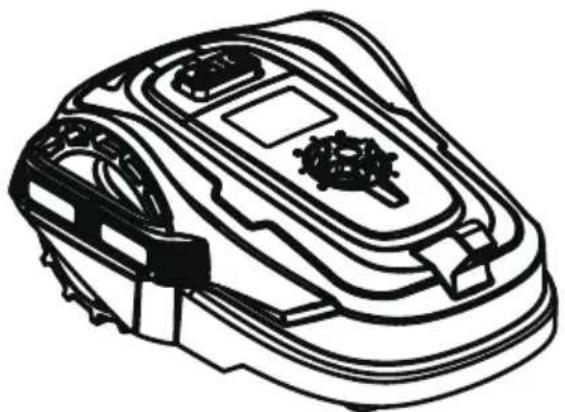
natural_image
Line drawing of a mechanical robotic device with no visible text or symbolsMower x 1

natural_image
Illustration of a mechanical device with ribbed structure and cable, no text or symbols presentCharging station x 1
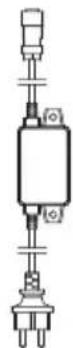
power Adapter x 1 charging Station

fixing screw x 5
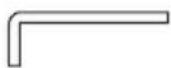
hex key x1
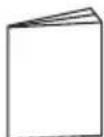
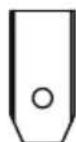
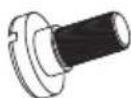
instruction manual x 1 blade x 3 M4*10 screws forblade x 3
EXPLODED VIEW
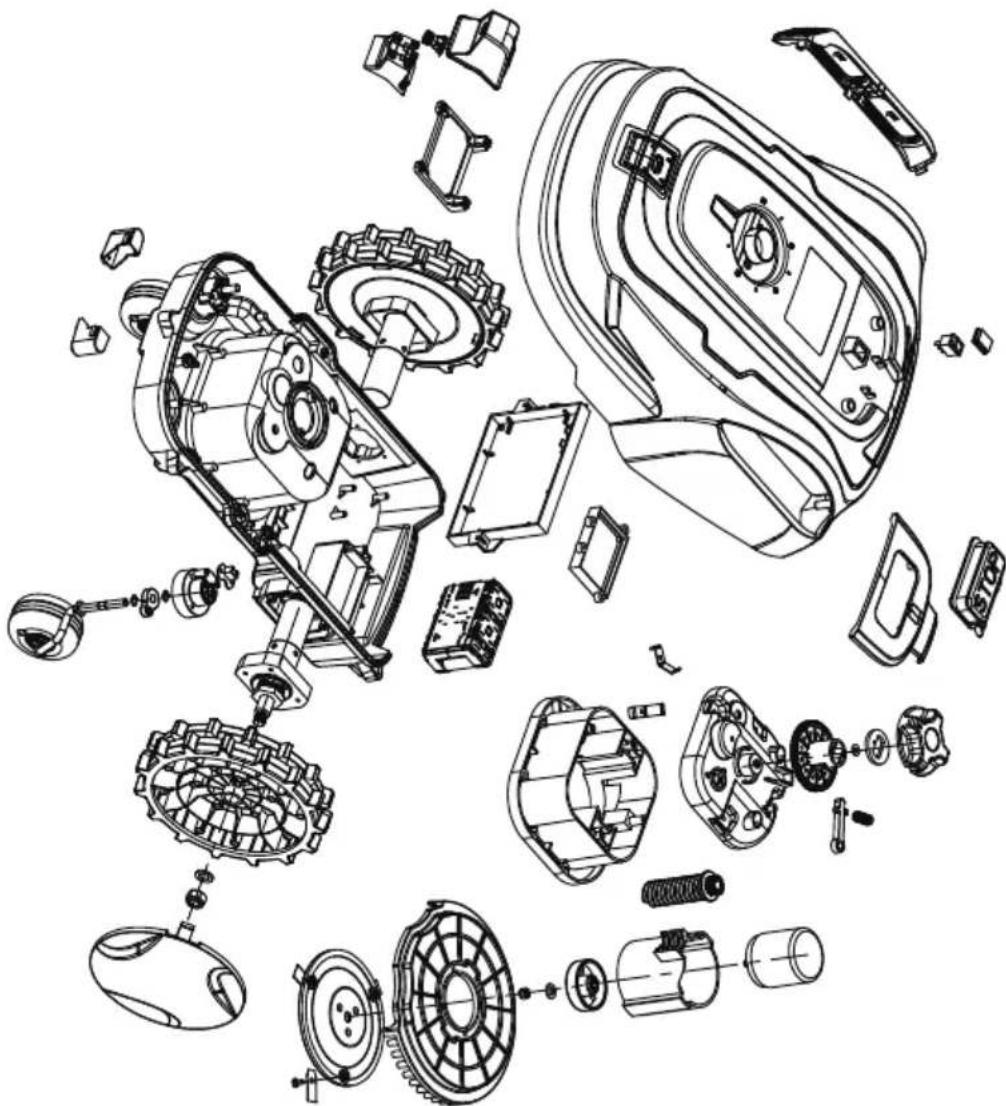
natural_image
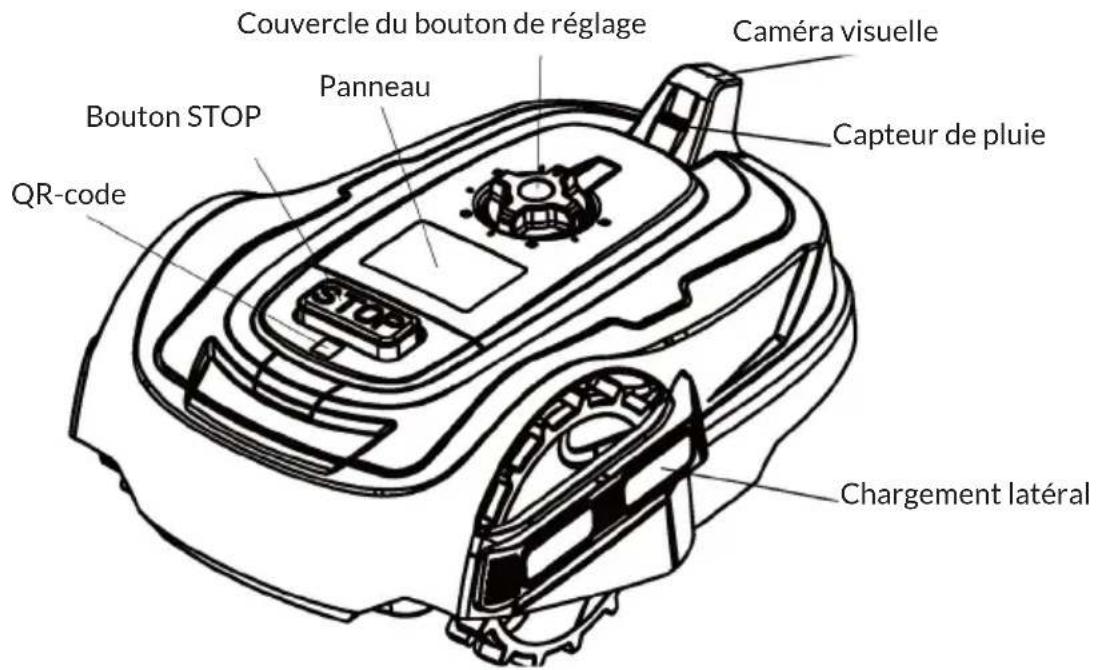
Exploded view diagram of a mechanical assembly showing internal components like gears, motors, and housing (no text or labels)APPLIANCE OVERVIEW
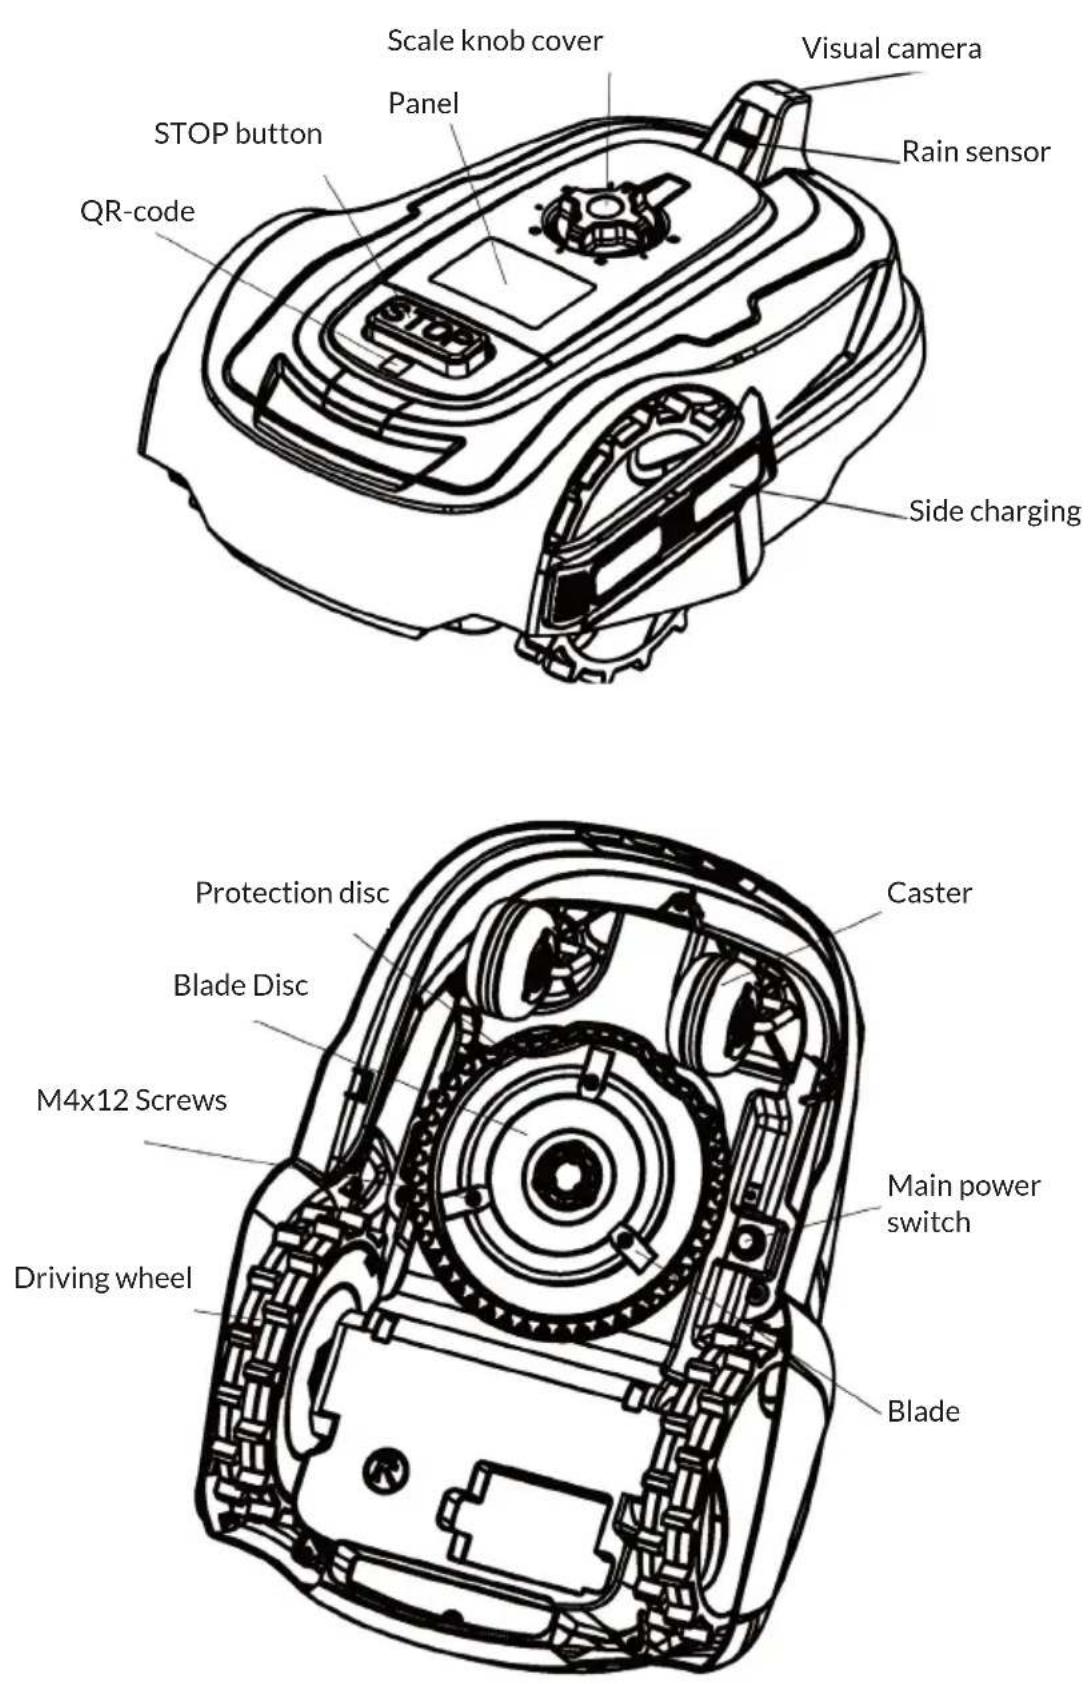
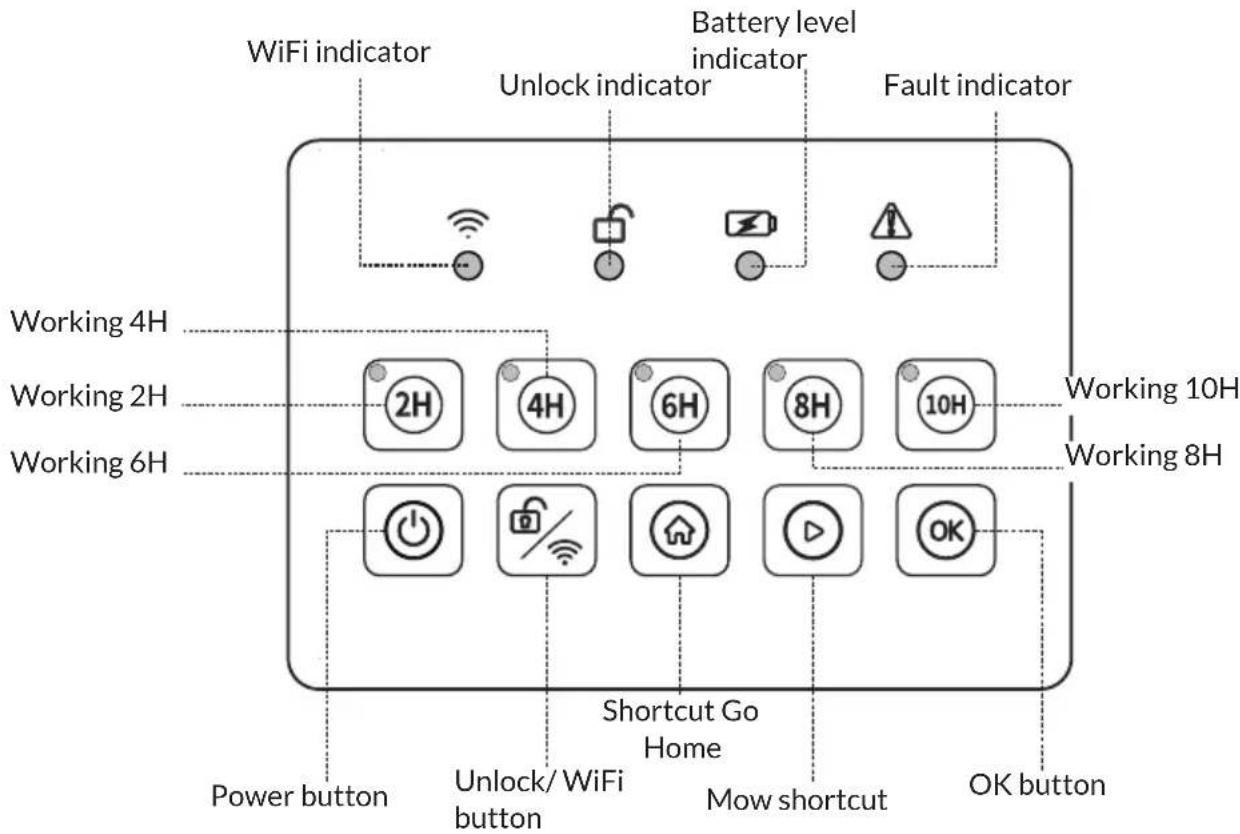
text_image
WiFi indicator Battery level indicator Unlock indicator Fault indicator Working 4H Working 2H Working 6H Working 10H Working 8H Power button Unlock/ WiFi button Shortcut Go Home Mow shortcut OK buttonPanel indicators
Wi-Fi button
- Long press for 3-5 seconds resets Wi-Fi settings - Activates EZ mode or AZ mode.
- If already connected to the application, a long press on the Wi-Fi button will release the connection.
- If not previously connected, a long press on the Wi-Fi button should put the device in either EZ or AZ mode.
Wi-Fi LED (indicates Wi-Fi connection status)
- When connected: Stays solid and ON
- When flashing twice per sec: Ready to connect (EZ)
- When flashing once per sec: ready to connect (AZ)
- When off: the Wi-Fi module is idle
Unlock indicator
• Continuous green light- Unlocked
- Green light flashing - Locked
Battery level indicator (on charger)
• Steady green light - Fully charged
- Flashing green light - charging (not on charger) Steady green - Battery capacity 25%.
- Steady red light - Battery capacity <25% (if capacity is below 20%, automatically charge at charger.)
Fault indicator
- The number of times the red and green lights flash indicates the fault code.
INSTALLATION
Read this entire section before starting the installation. Plan the installation carefully as improper installation can affect the performance of the mower. The main tasks of the installation process are as follows:
Planning and preparation
Ensure that the following conditions are met in the working area of the mower:
- The height of the grass does not exceed 60 mm.
Note: If the original grass is higher than 60 mm, please use a manual mower to cut your lawn beforehand.
- No stones, loose pieces of wood, wires, live cables or other foreign objects in the area.
- The working area must be level and flat and should not contain ditches, trenches or slopes of more than 30%.
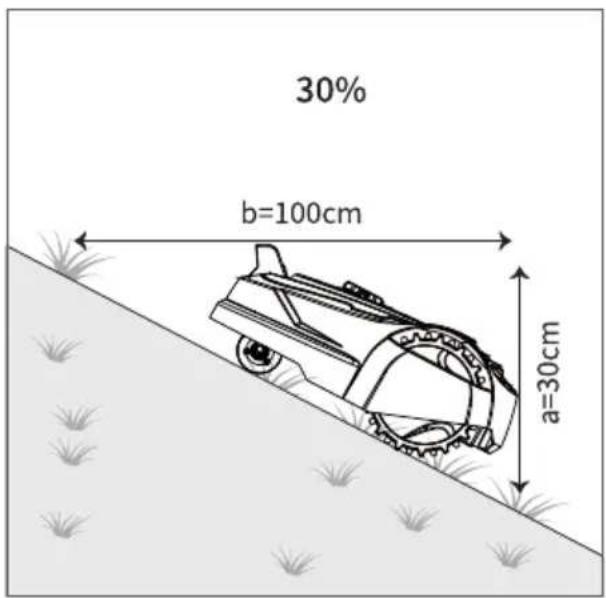
text_image
30% b=100cm a=30cmThe following tools are required for installation:
- Hammer (to drive the pegs into the ground to secure the boundary lines).
• Hex key (for fixing the Base Station).
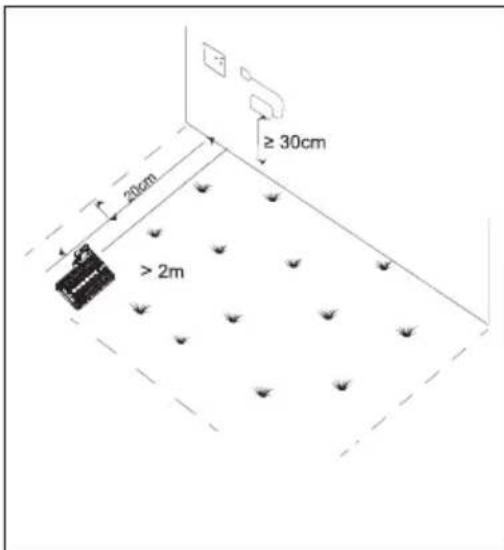
Selecting the correct location and fixing the Base Station
The location of the Base Station should be as follows:
- A relatively flat and level area of the lawn.
• Near the edge of the lawn. - Near the wall socket. (Low voltage cable 6 m long, cool and dry place for the adapter and out of direct sunlight).
- There should be at least 2m of unobstructed space in front of the charger.
- It is recommended that the charging station is placed in a dry and sheltered location.
• The charger must be 30 cm off the ground. - Fix the charging station to the ground using 6 fixing screws (use Allen wrench to tighten).
Note: Do not step or walk on the charging station plate and do not make new holes in the charging station plate. Only use the existing holes in the charging station to secure it to the floor.
text_image
≥ 30cm 20cm > 2m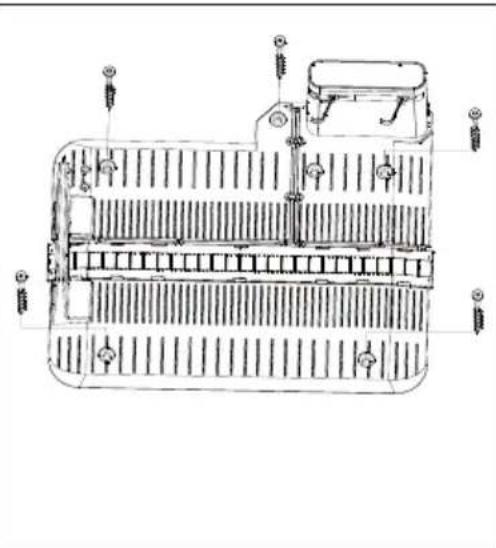
natural_image
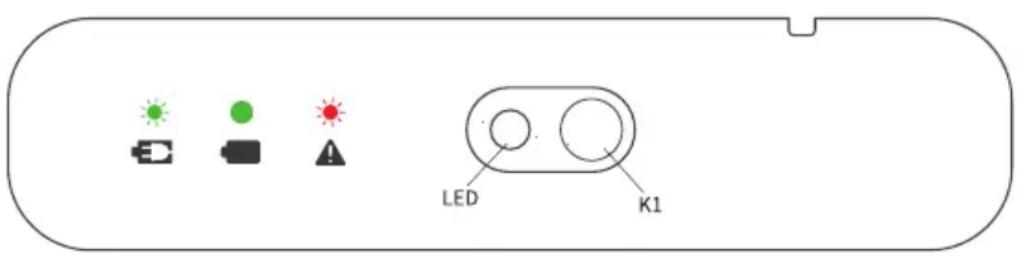
Technical line drawing of a mechanical component with internal channels and mounting holes (no text or symbols)Initial power up of the charging station
- Connect the mains plug to a 100-240V mains socket.
-
Check the LED status on the charger:
-
Green, steady: Successful connection (currently not charged or fully charged)
- Green, flashing: The mower is charging.
- Off: The usual fault is "No 100-240V power supply" or "Failure to connect to the power supply".
Note: If the battery is too low to switch on, try to activate the battery pack with a long press on the KI button (operate under the guidance of a qualified professional).
text_image
LED K1OPERATION
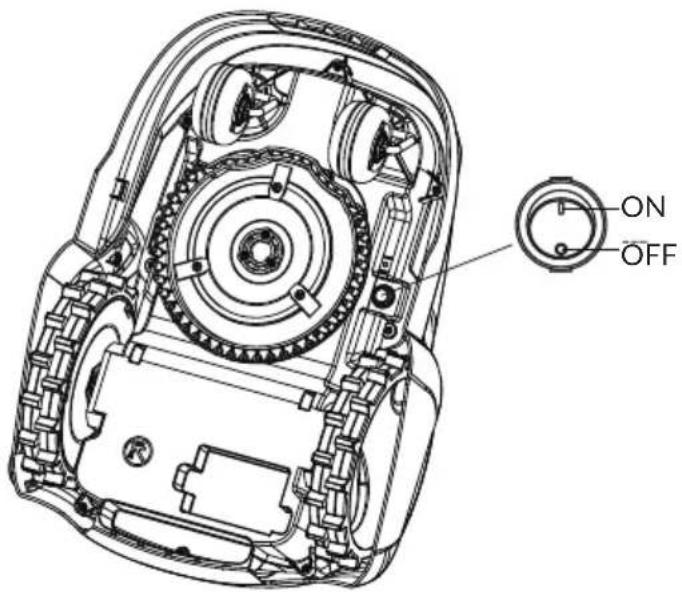
Switching the main power on/off
Turn the switch to the "O" position to turn off the main power. 2. Turn the switch to the "I" position to turn the main power on.
text_image
ON OFFStart/stop the mower
Start:
- Switch on the main power.
- Open the control panel, press and hold the power button to start.
Note: Do not shake the mower when starting as this may cause the mower to fail. If it fails (all indicators are lit), please start again.
Stop:
Press the STOP button on the mower.
Switching off the mower
First press the STOP button to stop the mower, then press and hold the ON/OFF button to stop the mower, then switch off the main power supply.
Adjusting the cutting height
Before mowing for the first time, set the cutting height to 60mm and then adjust to the desired height when the whole lawn is relatively flat.
- Turn clockwise to increase the cutting height and counterclockwise to decrease the cutting height.
- The cutting height of the mower can be adjusted from MIN (20 mm) to MAX (60 mm).
Carrying the mower
There is a lifting handle under the mower for easy one-handed handling of the mower.
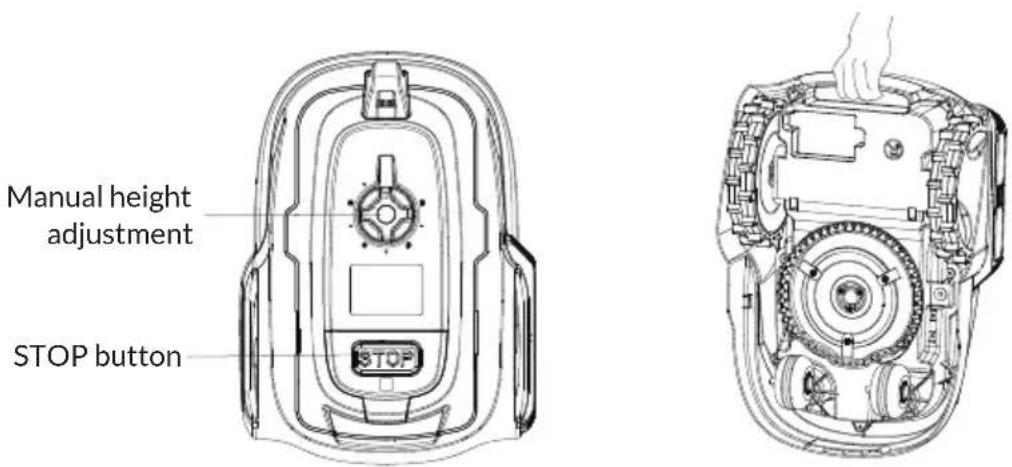
text_image
Manual height adjustment STOP buttonUnlock
The Startup password is 4H+6H+8H+10H
Note: The Unlock indicator flashes green to indicate that it is locked.
Permanent green light of the unlock indicator, indicating that it is unlocked.
The unlocking procedure is as follows:
- Press the password in the sequence 4H+6H+8H+10H
- Press the unlock button
Note: If the entry is incorrect, try again.
Setting the daily working hours
The set default working hour is 6H.
Note: The working hours include mowing time and charging time.
The modifications are as follows:
- Unlocked
- Press the buttons 2H or 4H or 6H or 8H or 10H (the corresponding working hours indicator is always on, indicating that the time settings are completed.)
Mowing
- Unlocked
- Press the mow shortcut button.
- Then press the OK button (the daily working hours are started afterwards).
Home button
- Unlocked
- Press the HOME button
- Then press the OK button.
Note: If there is a working task during the current time period the mower will still go out again and continuing to work aftre it has gone home and was fully charged.
DEVICE CONTROL BY SMARTPHONE
If you integrate the device into your home WiFi, you can conveniently operate it via the associated Blumfeldt app. The app not only allows you to remotely control the device via your smartphone, but also gives you access to recipes and additional information.
Follow these steps to connect your smartphone to your Blumfeldt device:
1 Download the Blumfeldt app first by scanning the QR code with your smartphone (see below), or download it directly from App Store or Google Play.
2 Make sure your smartphone is connected to the same WiFi network that your Blumfeldt device is to be connected to.
3 Open the Blumfeldt app.
4 Sign in to your account. If you do not have an account, sign up in the Blumfeldt app.
5 Follow the instructions from the app.
App Download
Use the scan function of your smartphone to scan the QR code and save the app on your smartphone.
Note: The app provides further information on how to use the app and help on how to connect to your device as soon as you open it for the first time.

text_image
iOS AndroidTroubleshooting connection problems
If your Blumfeldt device cannot be found in the WLAN, check the following:
1 The device is not plugged in. Make sure that your device is plugged into an electric socket.
2 The device is not in pairing mode. Make sure that the WiFi indicator (LED) on the smart device control panel is blinking as described in the 'Reset WiFi settings' instruction of your smart device (instructions are usually available on device connection process).
3 The WiFi access point does not operate on 2.4 GHz. Make sure that your access point operates on 2.4 GHz band and you have a separate SSID on 2.4 GHz band. If you are not sure about the operating band of your access point, please contact your internet provider company.
Important: please note that if your WiFi router is dual band - operating on both 2.4 GHz and 5 GHz band - you need to separate the SSIDs for each band and use the 2.4 GHz SSID for connection.
4 Firewall settings of your WiFi network; the firewall setting of your WiFi network may not allow the Blumfeldt app to configure the WiFi settings on your smart device. Please make sure that you are not using a public WiFi network, e.g. airports, dormitories, companies, etc.
5 Different credentials used in smartphone and the app. Make sure that the WiFi credentials entered in the Blumfeldt app are the same as the ones that your smartphone is connected to.
Following the above mentioned points, if your smart device still fails to connect to the app, please contact us via email for support: appsupport@go-bbg.com
CLEANING AND MAINTENANCE
Maintenance
- Check bolts and nuts regularly for tightness. Repair or replace defective parts to ensure safety.
- Check the blades regularly to ensure they rotate freely.
Note: When turning the mower over, place it on the lawn or a softer surface to avoid wearing and scratching the cover.

WARNING
Always switch the mower of before Cleaning and Maintenance. Unplug the power supply before cleaning and maintaining the charging station and always wear protective, heavy gloves when changing the blades and cleaning the underside of the mower.
Cleaning
- Use a pressure washer and a soft brush or towel to clean the front section.
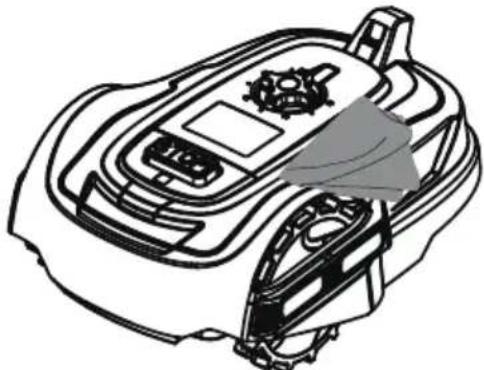
natural_image
Line drawing of a robotic car with visible engine and dashboard components (no text or symbols)- Use a hard brush to remove grass clippings and debris from the blades, wheels and other parts on the underside.
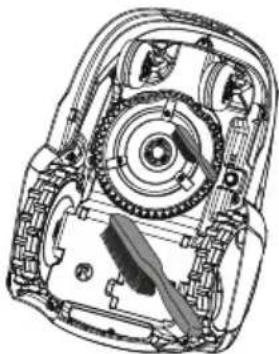
natural_image
Technical line drawing of a mechanical assembly with gears and shafts (no text or symbols)- Check the rain sensors and wheels regularly for mud or grass clippings and clean them with a brush.
Note: Do not wash the underside of the mower with water, regularly clean weeds from the underside of the mower so as not to affect the efficiency of the mowing, and regularly clean dust and other debris from the camera surface to prevent the mower from misjudging.
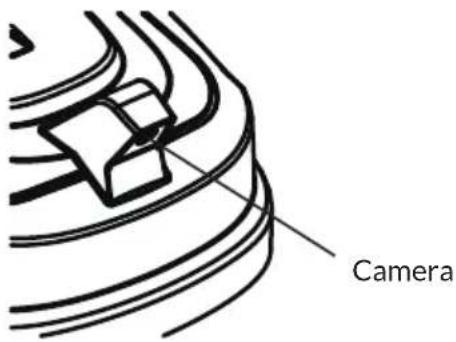
text_image
CameraReplacing the blades
- When replacing the blades, replace all three blades and their screws at the same time.
- Use a screwdriver to loosen or tighten the screws.
• Make sure that the new blades rotate freely.

WARNING
Turn off the main switch and put on protective gloves. Use only the original and approved blades.
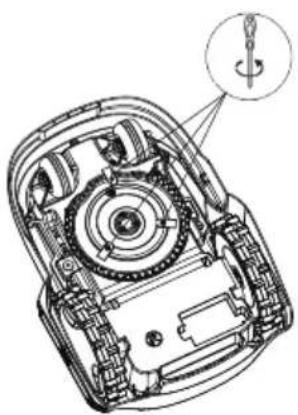
natural_image
Technical line drawing of a mechanical device with internal components and a magnified inset showing a screwdriver (no text or symbols)TROUBLESHOOTING
| Issue Possible causes Solutions | ||
| The mower has difficulty docking into the charging station. | The charging station is not installed correctly. | See the Exploded View section. |
| The machine runs outside the lawn. | The lawn boundary is not clearly defined. | Establish clear boundaries or install fencing. |
| Abnormal vibration or noise from the mower. | Blade is damaged or missing. | Replace the blade. |
| The blade holder is loose. | Check and repair blade fixing screws. |
DISPOSAL CONSIDERATIONS
natural_image
Symbol of a trash bin crossed with a diagonal line, no text or numbers presentIf there is a legal regulation for the disposal of electrical and electronic devices in your country, this symbol on the product or on the packaging indicates that this product must not be disposed of with household waste. Instead, it must be taken to a collection point for the recycling of electrical and electronic equipment. By disposing of it in accordance with the rules, you are protecting the environment and the health of your fellow human beings from negative consequences. For information about the recycling and disposal of this product, please contact your local authority or your household waste disposal service.
This product contains batteries. If there is a legal regulation for the disposal of batteries in your country, the batteries must not be disposed of with household waste. Find out about local regulations for disposing of batteries. By disposing of them in accordance with the rules, you are protecting the environment and the health of your fellow human beings from negative consequences.
DECLARATION OF CONFORMITY

Manufacturer:
Chal-Tec GmbH, Wallstrasse 16, 10179 Berlin, Germany. info@electronic-star.de
Importer for Great Britain:
Berlin Brands Group UK Limited PO Box 42 272 Kensington High Street London, W8 6ND United Kingdom
Hereby, Chal-Tec GmbH declares that the radio equipment type Grass Connect is in compliance with Directive 2014/53/EU. The full text of the EU declaration of conformity is available at the following internet address: use.berlin/10046916
For Great Britain: Hereby, Chal-Tec GmbH declares that the radio equipment type Grass Connect is in compliance with the relevant statutory requirements. The full text of the declaration of conformity is available at the following internet address: use.berlin/10046916
Chère cliente, cher client,
text_image
QR code image containing encoded data, no visible human-readable textSOMMAIRE
Fiche technique 58
natural_image
Line drawing of a mechanical robotic device with no visible text or symbolstondeuse x 1

natural_image
Line drawing of a mechanical device with a coiled cable and attached housing (no text or symbols)Station de charge x 1
natural_image
Exploded view diagram of a mechanical assembly showing internal components like gears, motors, and housing (no text or labels)FR
VUE D'ENSEMBLE DE L'APPAREIL
natural_image
Technical line drawing of a mechanical component with no visible text or symbolsnatural_image
Line drawing of a car interior with dashboard and steering wheel (no text or symbols)natural_image
Technical line drawing of a mechanical assembly with gears and shafts (no text or symbols)natural_image
Technical line drawing of a mechanical device with internal components and a magnified inset showing a screwdriver (no text or symbols)DÉPANNAGE
natural_image
Symbol of a trash bin crossed with a diagonal line, no text or numbers presentDÉCLARATION DE CONFORMITÉ

Fabricant :
Chal-Tec GmbH, Wallstraße 16, 10179 Berlin, Allemagne.
info@electronic-star.de
Berlin Brands Group UK Limited PO Box 42
272 Kensington High Street
London, W8 6ND
United Kingdom
text_image
QR code image containing encoded data, no visible human-readable textINDICE
Dati tecnici 84
natural_image
Line drawing of a mechanical robotic device with no visible text or symbolsRobot tosaerba x 1
natural_image
Illustration of a mechanical device with ribbed structure and cable, no text or symbols presentnatural_image
Exploded view diagram of a mechanical assembly showing internal components like gears, motors, and housing (no text or labels)IT
DESCRIZIONE DEL DISPOSITIVO
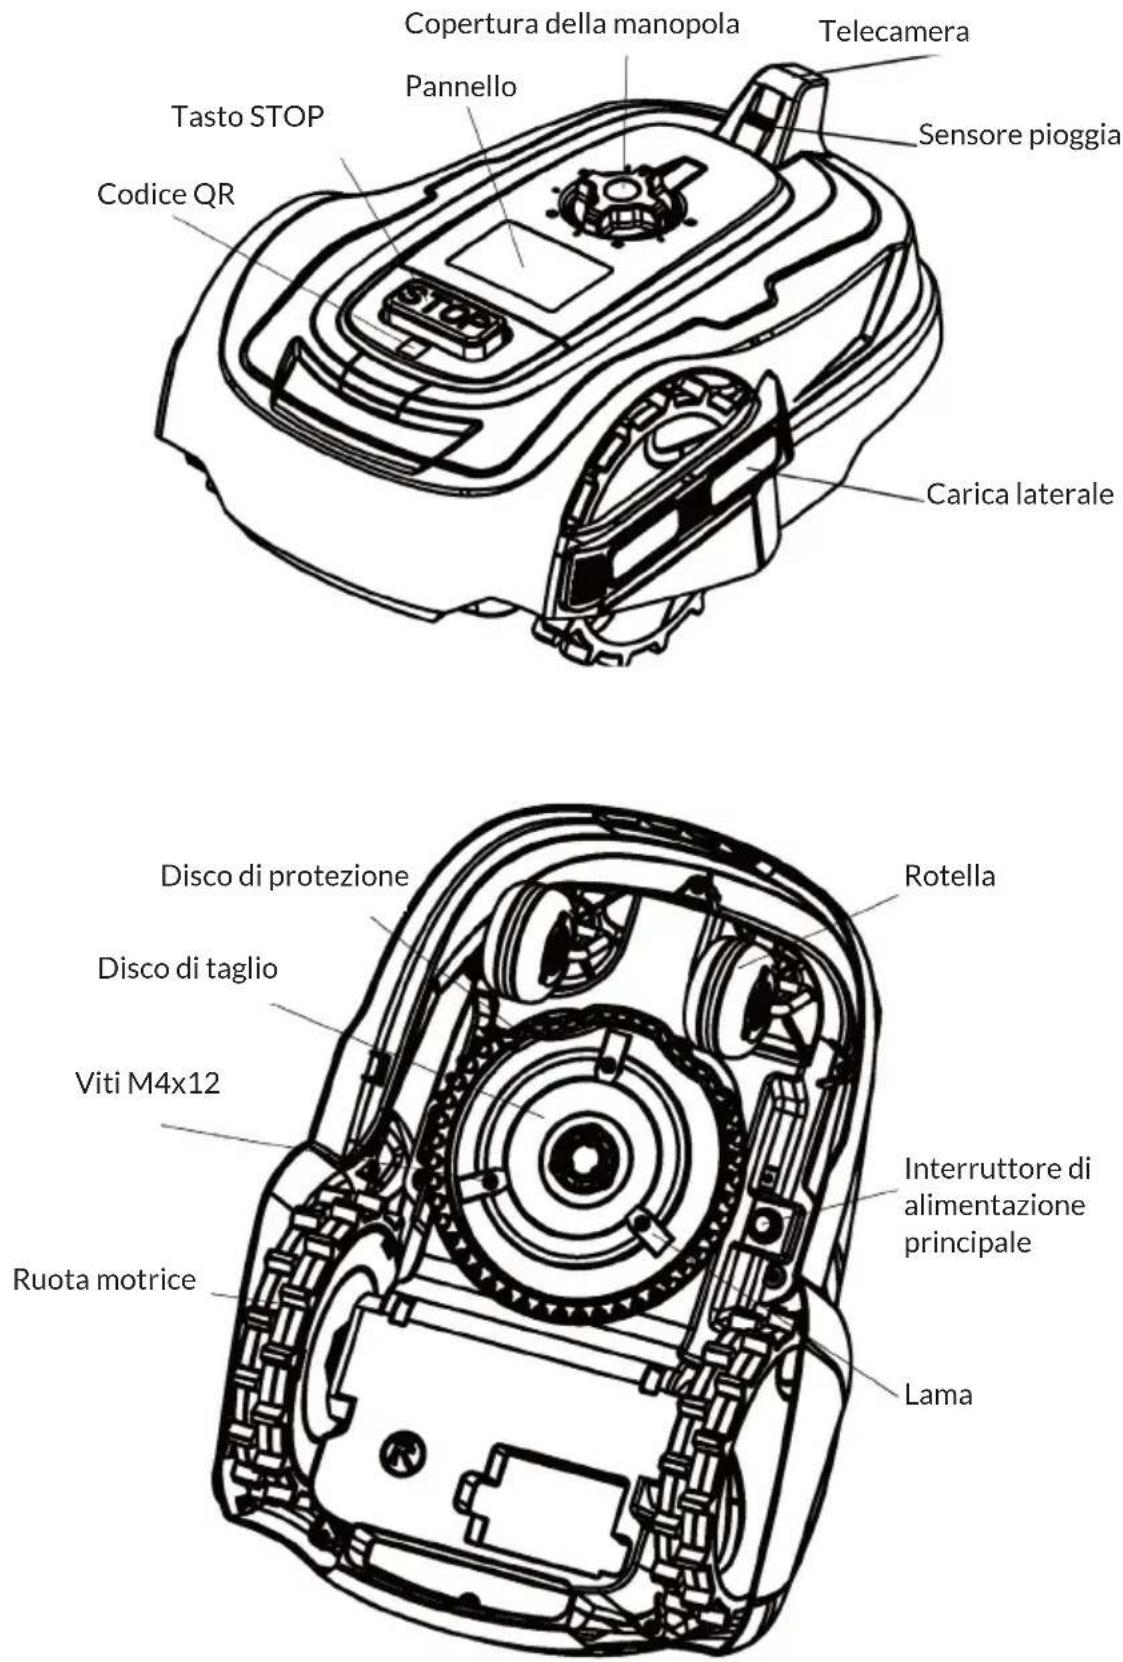
natural_image
Technical line drawing of a vehicle chassis with heat exchangers and structural ribs (no text or labels)natural_image
Technical line drawing of a mechanical device with no visible text or symbolsnatural_image
Technical line drawing of a mechanical assembly with gears and shafts (no text or symbols)text_image
Telecameranatural_image
Technical line drawing of a mechanical device with internal gears and a screwdriver (no text or symbols)natural_image
Symbol of a trash bin crossed with a diagonal line, no text or numbers presentBerlin Brands Group UK Limited PO Box 42 272 Kensington High Street London, W8 6ND United Kingdom
text_image
QR code image containing encoded data, no visible human-readable textÍNDICE
Datos técnicos 110
natural_image
Line drawing of a mechanical robotic device with no visible text or symbolsCortacésped x 1

natural_image
Illustration of a mechanical device with ribbed structure and cable, no text or symbols presentnatural_image
Exploded view diagram of a mechanical assembly showing internal components like gears, motors, and housing (no text or labels)natural_image
Technical line drawing of a mechanical component with no visible text or symbolsnatural_image
Line drawing of a robotic car with visible control panel and gear mechanism (no text or symbols)natural_image
Technical line drawing of a mechanical device with gears and housing (no text or symbols)natural_image
Technical line drawing of a mechanical device with internal components and a screwdriver icon (no text or symbols)natural_image
Symbol of a trash bin crossed with a diagonal line, no text or numbers presentBerlin Brands Group UK Limited PO Box 42 272 Kensington High Street London, W8 6ND United Kingdom