
Verticalo SE DAB - Turntable Auna - Free user manual and instructions
Find the device manual for free Verticalo SE DAB Auna in PDF.

| Product type | Turntable with DAB+/FM radio, Bluetooth, USB |
| Brand | Auna |
| Model | Verticalo SE DAB |
| Power supply | 230 V ~ 50 Hz, 12 W |
| Dimensions (approx.) | 430 x 350 x 120 mm |
| Weight (approx.) | 3 kg |
| Speeds | 33⅓, 45, 78 RPM |
| FM radio | 88 – 108 MHz |
| DAB+ radio | 174,928 – 239,200 MHz |
| Bluetooth | 2400 – 2483.5 MHz, max power 4 dBm |
| Connections | USB (MP3), AUX input, headphone jack |
| Built-in speaker | Yes |
| Functions | Vinyl playback, DAB/FM radio, Bluetooth, USB, AUX, alarm, auto standby |
| Date and time setting | Yes, via system menu |
| Alarm | Dual alarm with snooze, choice DAB/FM/BUZZER |
| Night mode | Sleep timer (15/30/45/60/90 min) |
| Auto-off | After 20 min without audio signal |
| Cleaning and care | Soft non-abrasive cloth; avoid liquids |
| Safety | Do not use near water, do not block ventilation openings, min. 5 mm clearance around |
| Batteries | Not specified (mains powered) |
| Spare parts and repairability | Contact customer service for any repairs |
| General information | EU Declaration of Conformity available at use.berlin/10034590 |
Frequently Asked Questions - Verticalo SE DAB Auna
User questions about Verticalo SE DAB Auna
0 question about this device. Answer the ones you know or ask your own.
Ask a new question about this device
Download the instructions for your Turntable in PDF format for free! Find your manual Verticalo SE DAB - Auna and take your electronic device back in hand. On this page are published all the documents necessary for the use of your device. Verticalo SE DAB by Auna.
USER MANUAL Verticalo SE DAB Auna
INHALTSVERZEICHNIS
Technische Daten 4
Geräteübersicht 6
Berlin Brands Group UK Limited
PO Box 42
272 Kensington High Street
London, W8 6ND
United Kingdom
Rückseite
natural_image
Symbol of a trash bin crossed out by a diagonal line, with no text or labels present.Congratulations on purchasing this device. Please read the following instructions carefully and follow them to prevent possible damages. We assume no liability for damage caused by disregard of the instructions and improper use. Scan the QR code to get access to the latest user manual and more product information.

CONTENTS
Technical Data 18
Declaration of Conformity 18
Safety Instructions 19
Device Overview 20
Commissioning and Operation 21
Phono Mode 22
Radio 23
BT Mode 24
USB Mode 24
AUX IN 24
Setting the Time and Date 25
Alarm 25
Cleaning and Care 27
Disposal Considerations 28
TECHNICAL DATA
| Item number 10034590 | |
| Power supply | 230 V ~ 50 Hz |
| Max. power consumption (Watt) | 12 W |
| Turntable speed | 33^1/3 , 45, 78 rpm |
| FM radio | 87.5 – 108 MHz |
| DAB+ radio 174.928 – 239.200 MHz | |
| BT frequency 2400 – 2483.5 MHz | |
| BT radio-frequency power (max.) 4 dBm | |
| Connections USB (for MP3 playback);AUX;Headphone jack |
DECLARATION OF CONFORMITY

Manufacturer:
Chal-Tec GmbH, Wallstrasse 16, 10179 Berlin, Germany.
Importer for Great Britain:
Berlin Brands Group UK Limited
PO Box 42
272 Kensington High Street
London, W8 6ND
United Kingdom
Hereby, Chal-Tec GmbH declares that the radio equipment type Verticalo SE DAB is in compliance with Directive 2014/53/EU. The full text of the EU declaration of conformity is available at the following internet address: use.berlin/10034590
For Great Britain: Hereby, Chal-Tec GmbH declares that the radio equipment type Verticalo SE DAB is in compliance with the relevant statutory requirements. The full text of the declaration of conformity is available at the following internet address: use.berlin/10034590
SAFETY INSTRUCTIONS
- Observe all notes listed in the operating instructions.
- Do not use the unit near water or in a humid environment.
- Make sure that no liquid is spilled over the unit and the unit openings.
- Move the unit carefully to avoid damaging it.
- Do not block the device outputs.
- Do not place the unit near heat sources (e.g. heating). Do not expose the device to direct sunlight.
- Plug the power plug of the unit into the power outlet in the manner intended.
- The device is equipped with overload protection. Should this need to be replaced, contact customer service or a similarly qualified person.
- Unplug the unit from the wall outlet if it will not be used for a long period of time.
- Do not attempt to service or repair the unit yourself.
- The mains plug is used to disconnect the device from the mains after it has been switched off. Make sure that the mains plug is always freely accessible.
- Do not expose the device to splash water or place objects filled with liquid, such as vases, on the device.
- Do not expose the batteries to extreme heat such as sunlight or fire.
- Do not obstruct the ventilation of the unit by blocking the ventilation openings with objects such as newspapers, tablecloths, curtains, etc..
- Ensure that a minimum distance of 5 mm to all sides of the unit is maintained.
- Do not place sources of open flame ignition, such as lit candles, on the unit.
- Dispose of used batteries in an environmentally friendly manner.
- Use the device only in temperate climate, not in tropical climate.
This device may be only used by children 8 years old or older and persons with limited physical, sensory and mental capabilities and / or lack of experience and knowledge, provided that they have been instructed in use of the device by a responsible person who understands the associated risks.
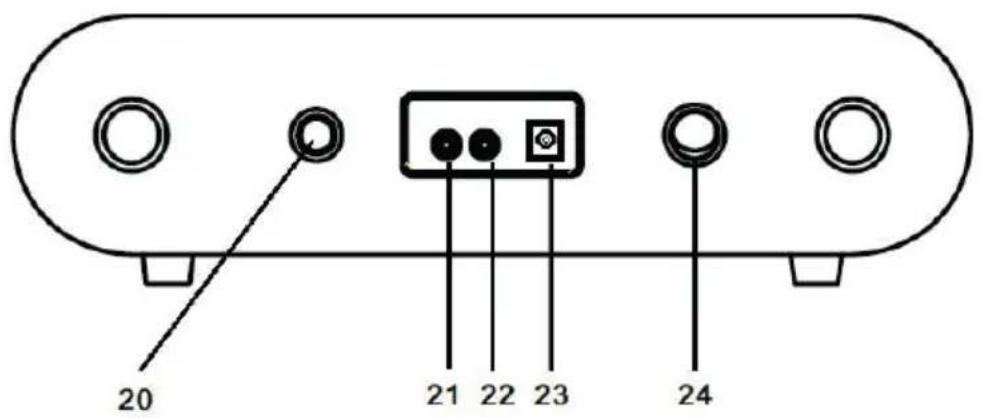
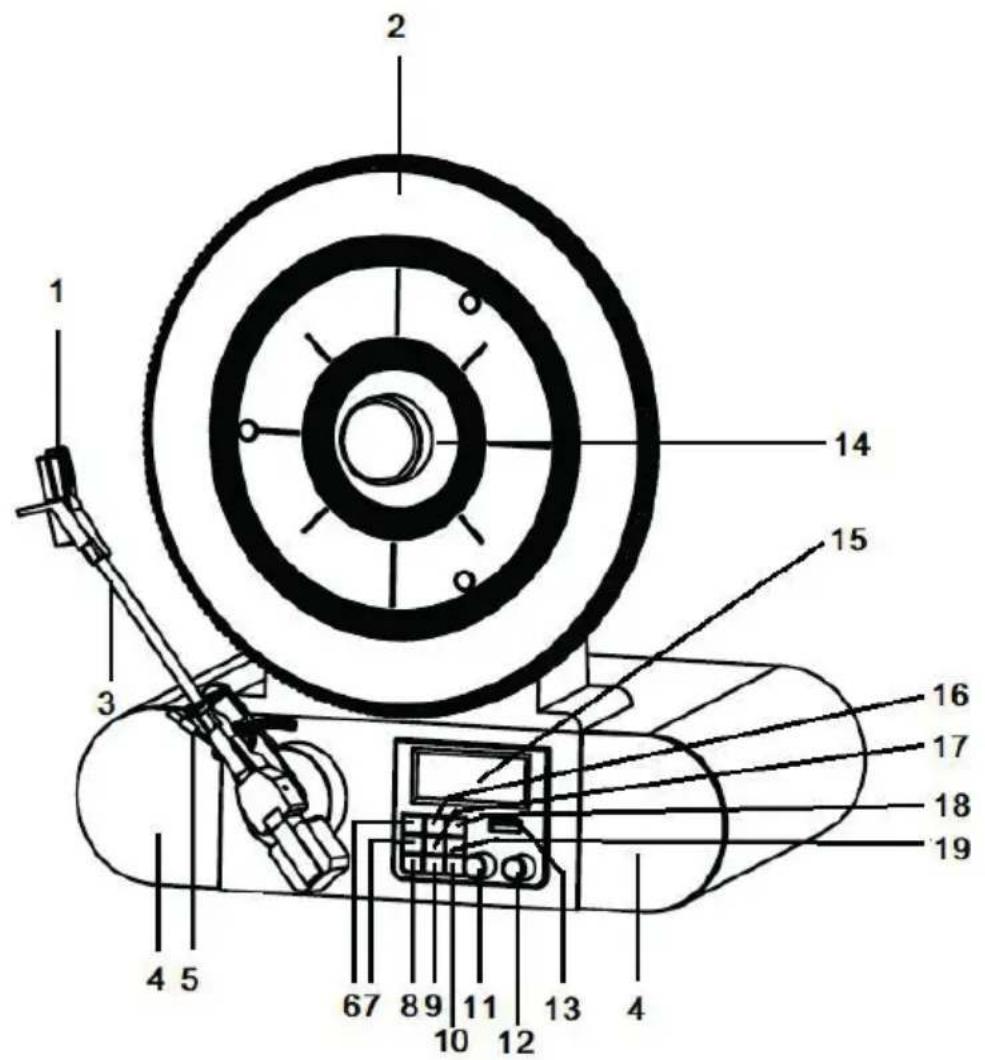
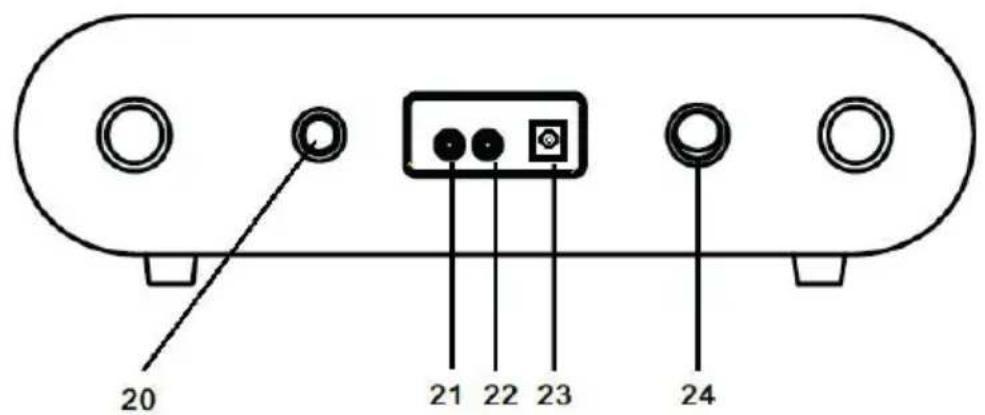
DEVICE OVERVIEW
Front view
Rear
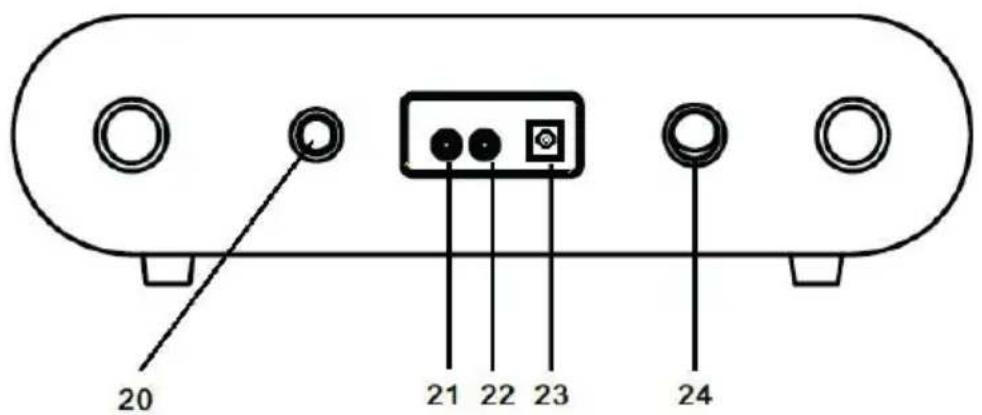
1 Cartridge and Stylus 13 USB socket
2 Turntable 14 Magnetic Adapter
3 Tone Arm 15 LCD Screen
4 Speakers 16 MENU/INFO Button
5 Cue Level 17 ENTER/SNOOZE Button
6 PLAY/PAUSE Button 18 PRESET Button
7 PAIR/SCAN Button 19 MODE Button
8 ALARM Button 20 Speed Control Knob
9 SLEEP Button 21 AUX IN Jack
10 STANDBY Button 22 EARPHONE Jack
11 TUNE Knob
23 Power Jack
12 VOLUME Knob
24 Power Switch
COMMISSIONING AND OPERATION
Before start-up
- Carefully remove the device from its packaging and completely remove the packaging material.
- Unwind the power cord completely.
- Place the product on a stable, flat surface near a wall outlet and away from strong magnetic fields.
Start-up
- Connect the mains plug of the device to the socket.
- Remove the white plastic cover from the turntable pin by pulling it in the direction of the arrow.
- When using the unit, be careful not to damage the turntable pin.
- This product is designed to work with an AC adapter (12 V 1 A). Using this product with any other AC adapter may cause damage.
NOTE: The device is equipped with a standard mains plug. If this power plug does not fit into your outlet, do not attempt to file it. If this plug does not fit into your outlet, your outlet is probably obsolete and not polarized. You should have your outlet replaced by a qualified electrician.
Switch on the device
- Turn on the unit: press the POWER button (on the back of the unit) to position "I", and then press the STANDBY button at the front panel. "Power On" will be shown on the screen.
- Turn off the unit: press the POWER button (on the back of the unit) to position "O".
NOTE: To help save power consumption, if there is no audio signal input for about 20 minutes while the unit is powered on, the unit will power off automatically. To turn power back on and resume playing, you will need to turn off the power first, after 5 seconds turn it back on to continue.
PHONO MODE
- Turn on the unit.
- Press the MODE button to select the PHONO mode. "PHONO" will be shown on the screen.
- Rotate the SPEED CONTROL KNOB (on the back of the unit) to the correct speed (33^1/_3, 45 or 78 rpm) for the track you have selected.
- Remove the stylus protector from the stylus assembly.
- Relase the tone arm lock. Use the Cue lever to lift up the tone arm.
- Move the tone arm over the record where play is desired to begin. Use the Cue Lever back to the down position. The tone arm will descend slowly onto the record and begin to play.
- Rotate the volume control knob to get desired sound level.
- At the end of the record, the tone arm will stop automatically.
NOTE: Do not turn or stop the turntable manually. Moving or jarring the turntable without securing the tone arm clamp could result in damage to the tone arm.
RADIO
- Turn on the unit
- Press the MODE button to select the FM mode. "FM" will be shown on the screen.
- Press the PAIR/SCAN to start auto-search the FM stations. Or rotate the TUNE knob to select the desired FM stations. If you tune to a FM stereo station, the "St" will be shown on the display.
- During FM working mode, press the MENU/INFO button to see the following information on the screen: Radio Text / Program Type / Signal strength / Time / Date, etc.
- When you finished listening, press the POWER button to turn off the unit.
DAB Mode
- Turn on the unit.
- Press the MODE button to select the DAB mode. "DAB" will be shown on the screen. And the unit will scan the DAB station automatically until it receives the DAB station.
- During DAB working mode, press the MENU/INFO button once, "Station scan" will be shown on the screen, press the ENTER/SNOOZE button and rotate the TUNING knob, "Local scan" "Full scan" and "Manual tune" will be shown on the screen orderly, you can choose the scan type, press the SELECT button to confirm.
- In Manual tune mode, rotate the TUNING knob to select the DAB station manually. Select the desired DAB station and press the ENTER/SNOOZE button to confirm the playing. If you tune to a DAB stereo station, the "St" will be shown on the display.
- In Scan mode, press the PAIR/SCAN button to start auto-search the DAB stations.
- When you finished listening, press the POWER button to turn off the unit.
Memory Function in DAB/FM Mode
- In DAB/FM playing mode, rotate the TUNE knob to choose the desired radio station that you would like to saved.
- Press the PRESET button, "Preset 1 empty" will be shown on the screen.
- Press the ENTER button to confirm and "Preset 1 saved" will be shown on the screen.
- Repeat the steps 1-3 for additional radio station you like to saved. A maximum of 20 stations can be saved in DAB or FM mode.
- Play the saved stations, press the PRESET button, rotate the TUNE knob to select the desired saved station, then press the ENTER button to confirm the play.
BT MODE
- Turn on the unit.
- Press the MODE button to select the BT mode. "BT Connecting" will be shown on the screen.
- Turn on your BT device and search for "Verticalo SE DAB+" and pair.
- Once your BT device is successfully paired with the unit, you will hear a short confirmation sound from the unit. The display will show "BT connected".
- Select and play the audio files though your BT device.
- To skip to the next or previous track, rotate the "TUNE" of the unit or select from your BT device.
- To stop this function, switch to other mode or shut down your BT of your BT device.
USB MODE
- Turn on the unit.
- Press the MODE button to select the USB mode. "USB" will be shown on the screen.
- Insert a USB disk into the USB socket. "Reading" will be shown for a few seconds, playback will start automatically. If no USB disk, "NO USB" will be shown on the screen.
- During the playback, press the PLAY/PAUSE button to pause, press it again to resume playback.
- To skip to the next or previous track by rotating the TUNE knob.
AUX IN
- Turn on the unit.
- Connect the 3.5 mm audio cable between your external device and the AUX jack of the back of the unit.
- Press the MODE button to select the AUX IN mode. "AUX IN "will be shown on the screen.
- Play the music from your external device from the unit.
SETTING THE TIME AND DATE
- In DAB playing mode, press the MENU/INFO button to choose SYSTEM by rotating the TUNE knob, "Main menu" will be shown on the screen.
- Press the ENTER/SNOOZE button, "Time setup" will be shown on the screen.
- Press the ENTER/SNOOZE button again, "Set clock" will be shown on the screen.
- Press the ENTER/SNOOZE button again, "Set clock 00:00"(hour:minute) will be shown on the screen. Rotate the TUNE knob and press the ENTER/SNOOZE button to set and confirm the time.
- Rotate the TUNING knob again, "Set date" will be shown on the screen, press ENTER/SNOOZE button to enter setting date mode, "01-01-2016" will be shown on the screen. Rotate the TUNING knob and press the ENTER/SNOOZE button to set and confirm the date.
- Rotating the TUNE knob again, "Auto update" will be shown on the screen, press the ENTER/SNOOZE button to enter the setting mode. "From radio" or "No update" will be shown on the screen by rotating the TUNE knob. You may choose the desired update mode by pressing the ENTER/SNOOZE button to confirm.
- Rotate the TUNE knob once again, Set 12/24 hour " will be shown on the screen, press the ENTER/SNOOZE button to enter the setting mode. "Set 12 hour" or "Set 24 hour" will be shown on the screen by rotating the TUNE knob. You may choose the desired mode by pressing the ENTER/SNOOZE button to confirm.
ALARM
- Press the ALARM button to enter the alarm detail menu, rotate the TUNE knob for below details, and press the ENTER/SNOOZE button to set the Alarm detail:
A. Alarm1 / Alarm2: Rotate the TUNE knob to select, press the ENTER/SNOOZE button to confirm.
B. Alarm activation: To set the alarm clock on, press the ALARM button, "Alarm1 :off" or "Alarm2 :off" will be shown on the screen. Press the ENTER/SNOOZE button, "Alarm detail off" will be shown on the screen, press the ENTER/SNOOZE button again, "Alarm detail on" will be shown on the screen, rotate the TUNE knob to set alarm time.
C. Set alarm time: Press the ENTER/SNOOZE button, "Time: 00:00" (hour:minute) will be shown on the screen. Rotate the TUNE knob and press the ENTER/SNOOZE button to set and confirm the time.
D. Repeat alarm (Days): Turn the TUNE button to select between „Daily/Once“ and confirm your selection with the ENTER/SNOOZE button. If „Daily“ is selected, the alarm icon will remain permanently on the screen unless the alarm is disabled.
E. Alarm type (Mode): Turn the TUNE knob to select between DAB/FM/BUZZER and press the ENTER/SNOOZE button to confirm.
F. Set alarm volume: Rotate the TUNE knob to the expected volume, press the ENTER/SNOOZE button to confirm.
G. Off/Save: Rotate the TUNE knob to the desired function, press the ENTER/SNOOZE button to confirm.
NOTES:
- It is very importance to set the alarm to be ON position, and the alarm symbol will be shown on the display.
- Once the alarm has been set and activated, when the time on the clock is the same as the alarm time that has been set, the unit will ring.
- When the alarm clock is ringing, press the ENTER/ SNOOZE button to activate the snooze function. 5 minutes later the alarm will ring again.
- To turn off the alarm function permanently, follow the step G "Off/Save" (in the section above) to set it to the Off position, the alarm is now turned off and the alarm symbol disappears.
- If a daily alarm has been set, the alarm symbol will remain on the screen and the alarm will sound again on the next set day unless the alarm has been turned off.
- If you unplug the unit from the wall outlet, the time and alarm settings will be cleared. You must reset both when you turn the power back on.
Sleep Mode
- Press the SLEEP button, it will show "Sleep time off" on the screen. Then üress the SLEEP button again to select the time interval after which the unit will automatically enter sleep mode. You can select from 15, 30, 45, 60, 90 minutes. The time symbol will be displayed on the screen after your selection.
- To cancel the SLEEP function, press the SLEEP button, it will show the current sleep time. Press the SLEEP button again, the time symbol will disappear and "Sleep time off" is shown on the screen.
CLEANING AND CARE
Case cleaning
- You should treat the case as carefully as any of your furniture.
- When the cabinet is dusty, rub it with a soft, abrasion-resistant cloth. If the case is contaminated with fingerprints, you can remove them with a high-quality commercial dust remover and polishing spray. Be careful not to spray any plastic or metal parts on the unit. We therefore recommend that you spray the cleaner directly onto the dust cloth to prevent accidental spraying of plastic and metal parts. We therefore recommend that you spray the cleaner directly onto the dust cloth to prevent accidental spraying of plastic and metal parts.
Furniture protection
- This unit is equipped with anti-slip rubber feet to prevent the unit from moving during operation. These feet are made of non-slip rubber which is designed to leave no scratches or stains on the furniture. However, it is possible that some oil-based furniture polishes, wood preservatives and cleaning sprays may soften the rubber feet, leaving stains or rubber residue on the furniture. To avoid damage to your furniture, it is recommended that you purchase self-adhesive felt pads and stick them under the rubber feet before placing the appliance on exclusive wooden furniture.
DISPOSAL CONSIDERATIONS
natural_image
Symbol of a trash bin crossed with a diagonal line, no text or labels presentIf there is a legal regulation for the disposal of electrical and electronic devices in your country, this symbol on the product or on the packaging indicates that this product must not be disposed of with household waste. Instead, it must be taken to a collection point for the recycling of electrical and electronic equipment. By disposing of it in accordance with the rules, you are protecting the environment and the health of your fellow human beings from negative consequences. For information about the recycling and disposal of this product, please contact your local authority or your household waste disposal service.
Chère cliente, cher client,
SOMMAIRE
Fiche technique 30
DÉCLARATION DE CONFORMITÉ

Fabricant :
Chal-Tec GmbH, Wallstraße 16, 10179 Berlin, Allemagne.
Berlin Brands Group UK Limited
PO Box 42
272 Kensington High Street
London, W8 6ND
United Kingdom
Dos de l'appareil
natural_image
Symbol of a trash bin crossed with a diagonal line, no text or numbers presentÍNDICE
Datos técnicos 42
Berlin Brands Group UK Limited
PO Box 42
272 Kensington High Street
London, W8 6ND
United Kingdom
Parte posterior

natural_image
Symbol of a trash bin crossed with a diagonal line, no text or numbers presentINDICE
Dati tecnici 54
Berlin Brands Group UK Limited
PO Box 42
272 Kensington High Street
London, W8 6ND
United Kingdom
Parte posteriore

natural_image
Symbol of a trash bin crossed with a diagonal line, no text or numbers presentnatural_image
Abstract white logo design on dark background, resembling stylized letter 'S' or wave form (no text or symbols)

- INHALTSVERZEICHNIS
- CONTENTS
- TECHNICAL DATA
- DECLARATION OF CONFORMITY
- Manufacturer:
- Importer for Great Britain:
- SAFETY INSTRUCTIONS
- DEVICE OVERVIEW
- COMMISSIONING AND OPERATION
- Before start-up
- Start-up
- Switch on the device
- PHONO MODE
- RADIO
- DAB Mode
- Memory Function in DAB/FM Mode
- BT MODE
- USB MODE
- AUX IN
- SETTING THE TIME AND DATE
- ALARM
- NOTES:
- Sleep Mode
- CLEANING AND CARE
- Case cleaning
- Furniture protection
- DISPOSAL CONSIDERATIONS
- Chère cliente, cher client,
- SOMMAIRE
- DÉCLARATION DE CONFORMITÉ
- Fabricant :
- ÍNDICE
- INDICE
Brand : Auna
Model : Verticalo SE DAB
Category : Turntable