TT-Play Prime - Turntable Auna - Free user manual and instructions
Find the device manual for free TT-Play Prime Auna in PDF.

User questions about TT-Play Prime Auna
0 question about this device. Answer the ones you know or ask your own.
Ask a new question about this device
Download the instructions for your Turntable in PDF format for free! Find your manual TT-Play Prime - Auna and take your electronic device back in hand. On this page are published all the documents necessary for the use of your device. TT-Play Prime by Auna.
USER MANUAL TT-Play Prime Auna
text_image
QR code image containing encoded data, no visible human-readable textINHALT
Technische Daten 3
text_image
Technical diagram of a mechanical device with numbered components for identification
text_image
11 15 12 13 14 15 11natural_image
Mechanical device with mounted components and a cylindrical top (no visible text or symbols)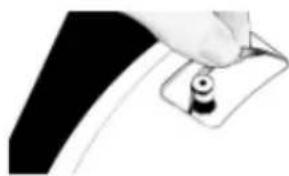
natural_image
Close-up of a hand holding a small object with a black circular button, against a dark background (no text or symbols visible)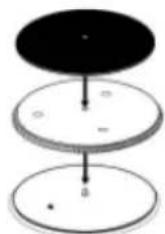
natural_image
Mechanical component with articulated shaft and circular base (no visible text or symbols)Member of Berlin Brands Group
Handwerkerstr. 11
15366 Dahlwitz-Hoppegarten
Deutschland
natural_image
Symbol of a trash bin crossed with a diagonal line, representing no waste or discharge (no text or labels)Congratulations on purchasing this equipment. Please read this manual carefully and take care of the following hints to avoid damages. Any failure caused by ignoring the items and cautions mentioned in the instruction manual are not covered by our warranty and any liability. Scan the QR code to get access to the latest user manual and other information about the product.

text_image
QR code image containing encoded data, no visible human-readable textCONTENTS
Technical Data 15
Safety Instructions 16
Product Overview 18
Operating Instructions 19
Tonearm Counterweight Adjustment for Stylus Pressure 21
Disposal Considerations 22
Declaration of Conformity 22
TECHNICAL DATA
| Item number 10040093, 10040094 | |
| Power supply 230 V~ 50/60 Hz | |
| RMS-Leistung 2 x 15 W RMS | |
| BT specificationsBT versionFrequency bandMax. radio-frequency power | 5.02402–2480 MHz<20 dBm |
| Record speeds 33 1⁄3 / 45 | |
SAFETY INSTRUCTIONS
Read these instructions. All uses guidelines must be read before using the device. Keep the instructions for future use.
- Attention, use and security guidelines must be respected.
- The device must not be used near water or be put in contact with moisture.
- Make sure has no liquid is spilled on device and device openings.
- Move device carefully, avoid shocks.
- Do not block the breakdown of the device outputs.
- Do not place the device near from a heat source (e.g. radiator). Do not expose it to the Sun.
- Plug the device as indicate on this information form.
- This device has a connection with overload protection. Replacement should only be done by an experienced technician or the device manufacturer.
- For cleaning the device, please follow the recommendations of the notice.
- The power cord should be unplugged when not using for a long period of time.
• Device shall be repaired by a qualified person when:
a. the power cord is damaged,
b. objects have fallen into the apparatus or a liquid has been spilled into device,
c. device was exposes to the rain,
d. device does not work correctly without notable exterior change,
e. device is broken.
- The user shall not try to maintain device beyond that which is described in this information form.
- The apparatus shall not be exposed to dripping or splashing and that no objects filled with liquids, such as vases, shall be placed on apparatus.
- To be completely disconnect the power input, the mains plug of apparatus shall be disconnected from the mains." as the disconnect devices is the mains plug of apparatus.
- The mains plug of apparatus should not be obstructed OR should be easily accessed during intended use.
- Battery shall not be exposed to excessive heat such as sunshine, fire or the like.
- Excessive sound pressure form earphones and headphones can cause hearing loss.
- Minimum distance (8 cm) around the apparatus for sufficient ventilations;
- The ventilation should not be impeded by covering the ventilation opening with items such as newspaper, table-cloths, curtain etc;
- No naked flame sources such as lighted candles should be placed on the apparatus;
- Attention should be drawn to the environmental aspects of battery disposal;
- The use of apparatus in moderate climates.
- Danger of explosion if battery is incorrectly replaced.
- Replace only with the same or equivalent type.
- The main plug shall remain readily operable.
PRODUCT OVERVIEW
text_image
Technical diagram of a mechanical device with numbered components for identification
text_image
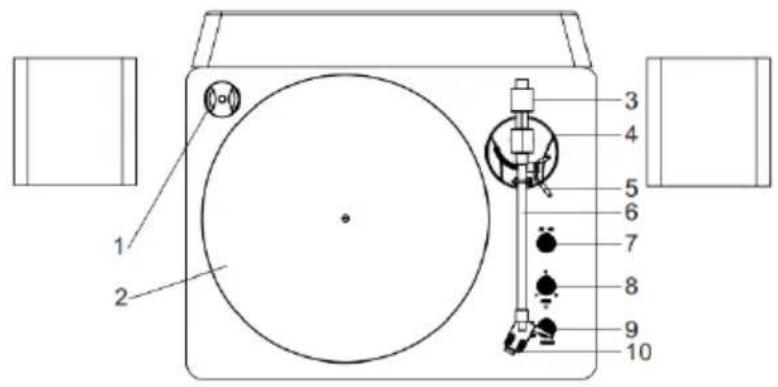
11 15 12 13 14 15 111 Record adapter (for 45-rpm records)
2 Turntable platter
3 Tonearm counterweight
4 Tonearm holder
5 Lift lever
6 Tonearm
7 33/45 rpm speed selector
8 Pitch adjust switch
9 Power Switch/Volume Control/BT Control
10 Stylus needle
11 Stereo speakers
12 Power socket
13 Speaker wire terminal
14 Dust cover
15 Hinge
OPERATING INSTRUCTIONS
Unpacking the turntable
- Carefully remove unit from its package and take it out of the plastic bag.
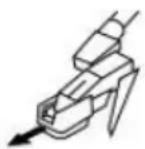
- Remove black tie-wrap by untwisting and gently sliding out from under tone arm.
- Remove white protective needle cover by gently pulling towards front of unit.
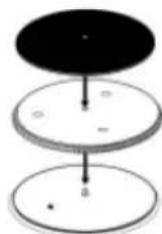
Assembling the turntable
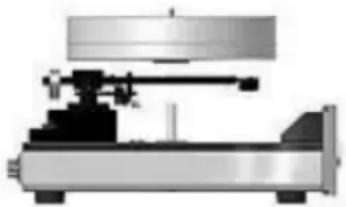
- Very carefully centre the vertical bearing ceramic shaft with the vertical bearing opening on the bottom of the turntable platter. Lower the platter onto the ceramic shaft while keeping the platter parallel with the top surface of the turntable.
- Hold the belt on the circumference of the platter from one of the vertical bearing openings and then place the belt onto the pulley of the motor.
- Put the slip mat on the turntable platter, lining up its centre hole with the centre spindle.
- Insert the speaker cable ends (exposed wires) into the terminals located on the back of the main unit to connect the speakers with the turntable.
natural_image
Mechanical device with mounted components and a cylindrical top (no visible text or symbols)
natural_image
Close-up of a hand holding a small black object with a circular hole, against a dark background (no text or symbols visible)
Connecting the AC power cord
After connecting the speakers unwind the AC power cord fully and connect it to any convenient household 220 V\~ 50 Hz AC outlet.
Turntable operation
Switch the unit on by turning the POWER SWITCH (9) located on the front panel.
- Set the SPEED SELECTOR (7) to desire speed (33 13 or 45 rpm). Place the record on the slip mat. For 45-rpm records, place the 45 rpm adapter on the centre spindle before placing the record on the platter.
- Remove the tie-wrap on the tonearm and unlock it. Push the lift lever backward to raise the tonearm and gently move the tonearm towards the desired position over the record. Lower the tone arm by moving
the tone arm lift control lever to the DOWN position. The tone arm descends slowly onto the record and play begins.
-
Adjust the VOLUME control (9) to the desired level.
-
If desired, switch the PITCH ADJUST SWITCH (8) to +/- direction to make pitch adjustments. (Note: The pitch adjust switch has centre detent position for 0% pitch variation.)
-
At the end of the record, the tone arm will stop automatically by the centre and the unit will switch to BT mode. Lift the tone arm from the record and return it to the rest.
-
To stop manually, gently lift the tone arm from the record and return it to the rest.
BT Function
- Turn on the power switch knob. The default mode is BT mode. (When lifting the tone arm on the record, it automatically switches to Phono mode.)
- Turn on the BT function on your mobile phone or tablet PC and search device name 'TT-Play Prime'. After pairing and connection, you can play your music from your mobile phone or tablet PC through this turntable player.
Turn the VOLUME CONTROL KNOB to adjust the volume. The mobile phone or tablet PC's volume control also impact the overall volume level. Please adjust that as well if necessary.
Tips for better performance
- Do not touch the stylus tip with your fingers; avoid bumping the stylus on the turntable mat or a record's edge.
- Clean the stylus tip frequently, using a soft brush and a back-to-front motion.
- If you use a stylus cleaning fluid, use it sparingly.
- Wipe the dust cover and turntable housing gently with a soft cloth. Use only a small amount of mild detergent solution to clean the turntable
- Never apply harsh chemicals or solvents to any part of the turntable system.
- Prior to moving the turntable, always unplug it from the AC.
TONEARM COUNTERWEIGHT ADJUSTMENT FOR STYLUS PRESSURE
- Remove the stylus protector from the cartridge and avoid touch the stylus tip during the adjustment.
- Release the tonearm hold down clip, gently hold the tonearm and move it away from the Tonearm Rest. At this point, the tonearm is unbalance and free to swing.
- While gently holding the tonearm, carefully rotate the Counterweight towards the front of the turntable until the tonearm is horizontally balanced and hovers freely just above the platter without the stylus touching the platter surface.
- Return the tonearm to the tonearm rest and lock the hold down clip.
- While holding the counterweight steady without any rotation, rotate carefully only the Downforce Scale Dial until the "0" on the scale lines up with the centerline marked along the top of the tonearm.
- Rotate the counterweight including the downforce scale dial counterclockwise (as seen from the front of the turntable) until the scale shows the recommended pressure value for stylus.
Note: The recommended pressure for the factory-installed cartridge is 3.5g. The cartridge only goes up to 2g. You will need to make one full rotation and set it to 1.5 g to reach 3.5 g.
Pitch control
The turntable speed can be increased or decreased by approximately 10% by rotating the pitch control knob. To increase the speed, turn the Pitch Control knob clockwise. To decrease the speed, turn the knob counterclockwise.

natural_image
3D rendering of a mechanical assembly with a cylindrical component mounted on a circular base (no visible text or symbols)DISPOSAL CONSIDERATIONS

natural_image
Symbol of a trash bin crossed with a diagonal line, representing no waste or discharge (no text or labels)If there is a legal regulation for the disposal of electrical and electronic devices in your country, this symbol on the product or on the packaging indicates that this product must not be disposed of with household waste. Instead, it must be taken to a collection point for the recycling of electrical and electronic equipment. By disposing of it in accordance with the rules, you are protecting the environment and the health of your fellow human beings from negative consequences. For information about the recycling and disposal of this product, please contact your local authority or your household waste disposal service.
DECLARATION OF CONFORMITY

text_image
CE UK CAManufacturer:
Chal-Tec GmbH, Wallstrasse 16, 10179 Berlin, Germany.
Importer for Great Britain:
Berlin Brands Group UK Ltd PO Box 1145
Oxford, OX1 9UW
United Kingdom
Hereby, Chal-Tec GmbH declares that the radio equipment type TT-Play Prime is in compliance with Directive 2014/53/EU. The full text of the EU declaration of conformity is available at the following internet address: use.berlin/100400093
For Great Britain: Hereby, Chal-Tec GmbH declares that the radio equipment type TT-Play Prime is in compliance with the relevant statutory requirements. The full text of the declaration of conformity is available at the following internet address: use.berlin/100400093

bar
| Category | Value | |---|---| | Category 1 | 100 | | Category 2 | 100 | | Category 3 | 100 | | Category 4 | 100 | | Category 5 | 100 | | Category 6 | 100 | | Category 7 | 100 | | Category 8 | 100 | | Category 9 | 100 | | Category 10 | 100 | | Category 11 | 100 | | Category 12 | 100 | | Category 13 | 100 | | Category 14 | 100 | | Category 15 | 100 | | Category 16 | 100 | | Category 17 | 100 | | Category 18 | 100 | | Category 19 | 100 | | Category 20 | 100 | | Category 21 | 100 | | Category 22 | 100 | | Category 23 | 100 | | Category 24 | 100 | | Category 25 | 100 | | Category 26 | 100 | | Category 27 | 100 | | Category 28 | 100 | | Category 29 | 100 | | Category 30 | 100 | | Category 31 | 100 | | Category 32 | 100 | | Category 33 | 100 | | Category 34 | 100 | | Category 35 | 100 | | Category 36 | 100 | | Category 37 | 100 | | Category 38 | 100 | | Category 39 | 100 | | Category 40 | 100 | | Category 41 | 100 | | Category 42 | 100 | | Category 43 | 100 | | Category 44 | 100 | | Category 45 | 100 | | Category 46 | 100 | | Category 47 | 100 | | Category 48 | 100 | | Category 49 | 100 | | Category 50 | 100 | | Category 51 | 100 | | Category 52 | 100 | | Category 53 | 100 | | Category 54 | 100 | | Category 55 | 100 | | Category 56 | 100 | | Category 57 | 100 | | Category 58 | 100 | | Category 59 | 100 | | Category 60 | 100 | | Category 61 | 100 | | Category 62 | 100 | | Category 63 | 100 | | Category 64 | 100 | | Category 65 | 100 | | Category 66 | 100 | | Category 67 | 100 | | Category 68 | 100 | | Category 69 | 100 | | Category 70 | 100 | | Category 71 | 100 | | Category 72 | 100 | | Category 73 | 100 | | Category 74 | 100 | | Category 75 | 100 | | Category 76 | 100 | | Category 77 | 100 | | Category 78 | 100 | | Category 79 | 100 | | Category 80 | 100 | | Category 81 | 100 | | Category 82 | 100 | | Category 83 | 100 | | Category 84 | 100 | | Category 85 | 100 | | Category 86 | 100 | | Category 87 | 100 | | Category 88 | 100 | | Category 89 | 100 | | Category 90 | 100 | | Category 91 | 100 | | Category 92 | 100 | | Category 93 | 100 | | Category 94 | 100 | | Category 95 | 100 | | Category 96 | 100 | | Category 97 | 100 | | Category 98 | 100 | | Category 99 | 100 | | Total (Total) |
natural_image
Abstract white logo design on dark background, resembling stylized letter 'S' or wave form (no text or symbols)Cher client, chère cliente,
text_image
QR code image containing encoded data, no visible human-readable textSOMMAIRE
Fiche technique 25
text_image
Technical diagram of a mechanical device with numbered components for identification
text_image
11 15 12 13 14 15 11natural_image
Mechanical device with mounted components and a cylindrical top (no visible text or symbols)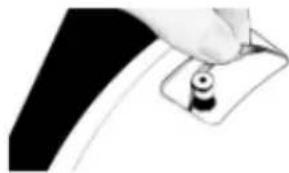
natural_image
Close-up of a hand holding a small black object on a curved surface (no text or symbols visible)
natural_image
Mechanical component with articulated shaft and circular base (no visible text or symbols)natural_image
Symbol of a trash bin crossed with a diagonal line, representing no waste or discharge (no text or labels)DÉCLARATION DE CONFORMITÉ

text_image
CE UK CAFabricant :
text_image
QR code image containing encoded data, no visible human-readable textINDICE
Dati tecnici 35
text_image
Technical diagram of a radio receiver with numbered parts labeled 1 through 10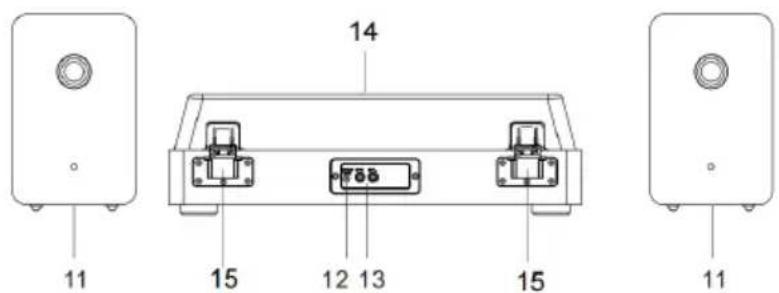
text_image
11 15 12 13 14 15 11natural_image
Mechanical device with mounted components and a cylindrical top (no visible text or symbols)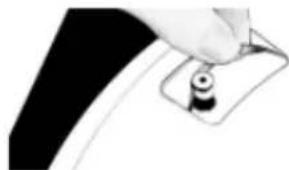
natural_image
Close-up of a hand holding a small black object with a circular hole, against a dark background (no text or symbols visible)
natural_image
Mechanical component with articulated shaft and cylindrical head (no visible text or symbols)natural_image
Symbol of a trash bin crossed with a diagonal line, representing no waste or discharge (no text or labels)Berlin Brands Group UK Ltd
PO Box 1145
Oxford, OX1 9UW
United Kingdom
text_image
QR code image containing encoded data, no visible human-readable textCONTENIDO
Datos técnicos 45
natural_image
Mechanical device with mounted components and a cylindrical top (no visible text or symbols)
natural_image
Close-up of a hand holding a small black object on a curved surface (no text or symbols visible)