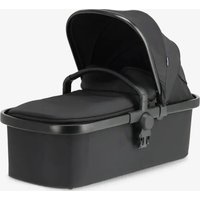
Carry Cot - Stroller Deryan - Free user manual and instructions
Find the device manual for free Carry Cot Deryan in PDF.


User questions about Carry Cot Deryan
0 question about this device. Answer the ones you know or ask your own.
Ask a new question about this device
Download the instructions for your Stroller in PDF format for free! Find your manual Carry Cot - Deryan and take your electronic device back in hand. On this page are published all the documents necessary for the use of your device. Carry Cot by Deryan.
USER MANUAL Carry Cot Deryan
natural_image
Line drawing of a mechanical device with a triangular component and lever mechanism (no text or symbols)IMPORTANT FOR FUTURE REFERENCE.
Read the following instructions carefully before use.
IMPORTANT ! À CONSERVER POUR TOUTE RÉFÉRENCE ULTÉRIEURE.
Cleaning (EN-NL-DE-FR) 14
Parts list
Assembly
Tandem assembly
Pram configuration
Raincover
Company info
WARNINGS
- Read these instructions carefully before assembly and use and keep for future reference. The child may be hurt if you do not follow these instructions.
- Before using, remove and dispose of any plastic bags and other packaging (e.g. fasteners, fixing ties, etc.) and keep them out of reach of children.
- This product is suitable for one child from birth who cannot sit up unaided, roll over and cannot push itself up on their head and knees (max weight 9 kg).
- The overall load on the vehicle may not exceed 47 kg (including the basket).
• Never leave the child unattended. - Ensure that all locking device are engaged before use.
- To avoid injury ensure that your child is kept away when unfolding and folding this product.
- Do not let your child play with this product.
- Do not add additional mattress to the pram.
• Always use the harness restraint system. - Always use the crotch strap in combination with the waist belt section of the harness.
- Check that the pram body or seat unit attachment devices are correctly engaged before use.
• This product is not suitable for running or skating. - The seat unit is not suitable for children under 6 months.
- Do not let other children play unattended near the product.
- Any load attached to the handle affects the stability of the stroller.
- Do not use this product if any part is broken, torn or missing.
- Do not place the product near an open fire or other source of strong heat.
- Use only on a firm, horizontal level and dry surface.
- When using as a tandem, load primary child into the mean seat first. After child is secured in the main seat, place second child into the lower seat. DO NOT place a child in the lower seat without a child in the main seat.
- Not all tandem seat positions may be available in all configurations. Do not force the tandem seat into an unsuitable position or damage may occur.
- Your child's safety is your responsibility.
• Adult assembly is required. -
When in use, the head of the child in the product should never be lower than the body of the child.
-
Ensure that the parking brake is engaged during the loading and unloading of the children.
- The handles and the bottom of carrycot should be inspected regularly for signs of damage and wear.
- Do not add another mattress on top of the mattress provided or recommended by the manufacturer.
- If a mattress is purchased separately, the carrycot depth from the top of the mattress to the top of the carrycot side must be at least 150mm.
- The basket can carry a maximum load of 10 kg.
- The cup holder can carry a maximum load of 0.5 kg.
- The organiser can carry a maximum load of 2 kg.
- Any load attached to the handle and/or on the back of the backrest and/or on the sides will affect the stability of the product.
- Before carrying or lifting, make sure that the handle is in the correct position of use.
- Do not overload the pram with additional children, goods or accessories.
• Always apply the parking brake when the pram is stationary.
• Take care when going up or down on kerbs. - Use only replacement parts supplied or approved by the manufacturer.
- Any additional or replacement parts should only be obtained from the manufacturer or distributor.
- Never substriture parts.
- Keep the plastic packaging away from children to avoid danger of suffocation.
• Take extra care in windy conditions. - Remove your child and fold the pram when going up or down stairs or escalators.
- Do not use this pram near an open fire or exposed flame.
- For car seats used in conjunction with a chassis, this vehicle does not replace a cot or a bed. Should your child need to sleep, then it should placed in a suitable cot or bed.
• To prevent damage, always remove the raincover before folding the pram. - Do not place anything on top of the raincover.
- Never leave a raincover, hood or apron on the product indoors in a hot atmosphere or near a heat source, as the child may overheat.
• This product conforms to EN 1466:2014
WAARSCHUWINGEN
- This product required regular maintenance to ensure correct and safe performance.
- All assembly fittings are to be tightened properly.
- Always check your pram for loose screw, worn parts, torn material or stitching.
- Replace or adjust parts as needed.
- Lubricate moving parts regularly, especially the wheels.
- Wipe metals and plastics clean with a damp cloth.
- Sponge clean fabrics with warm soapy water. Rinse well with clean water to avoid staining. Dry in shade.
- Do not bleach.
- Do not iron.
- Do not dry clean.
- Do not use abrasive pads, bleach or strong household cleaners.
SCHOONMAAK
natural_image
Five abstract line drawings with geometric and symbolic patterns, no text or symbols presentREINIGUNG
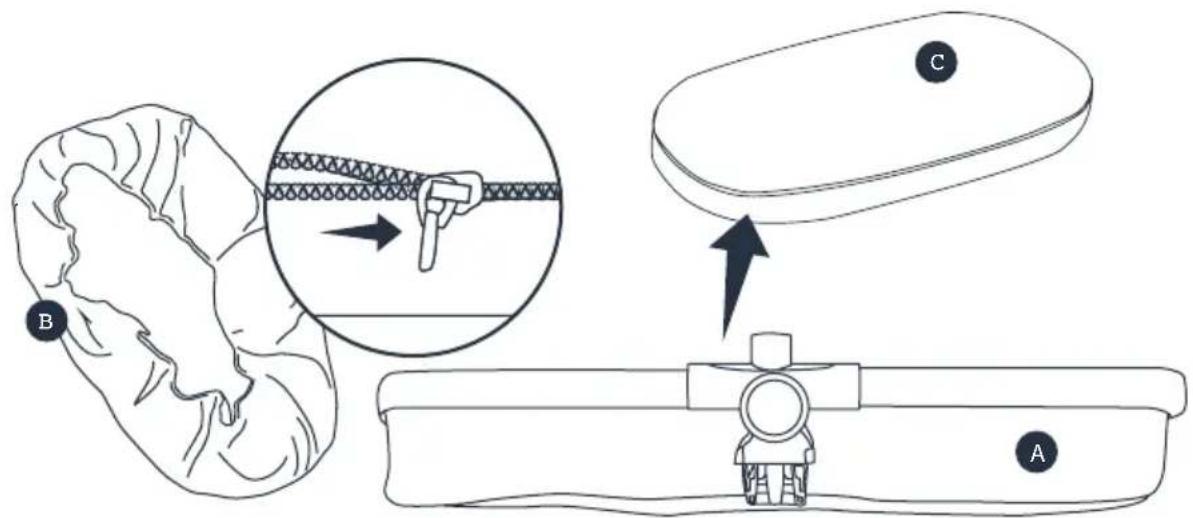
- Remove the carrycot mattres (C) and unzip the carrycot lining (B) to remove from the tandem carrycot (A).
text_image
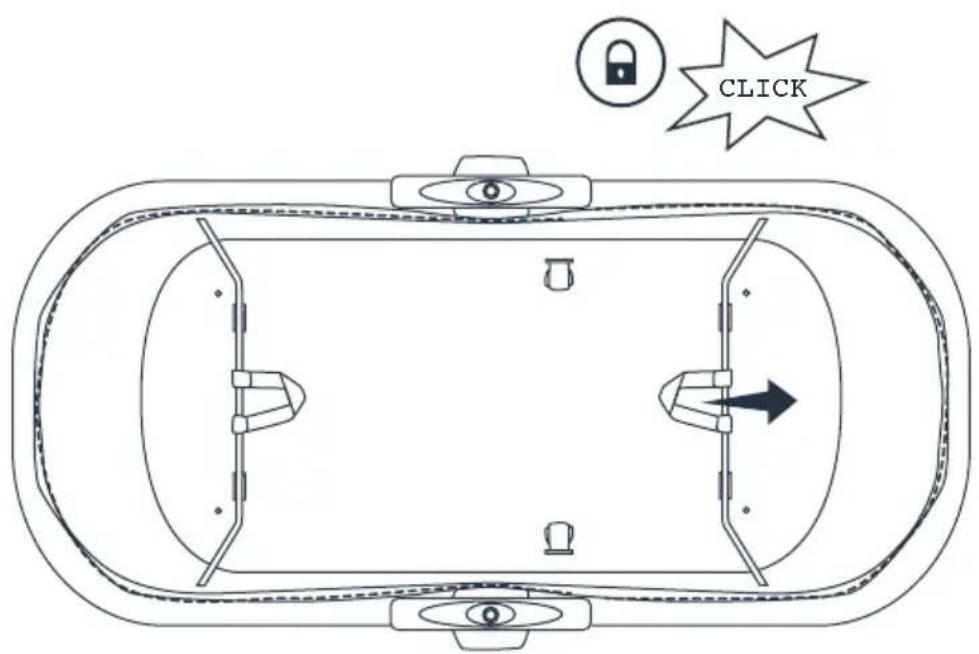
Diagram illustrating a medical or surgical procedure with labeled parts A, B, and C, showing a close-up of a zipper mechanism.- Pull the metal rods into place as shown. The metal rods should engage with the plastic holders in the carrycot base board. This will give your tandem carrycot its structure. Warning! Ensure metal rods are fully engaged before continuing. Failure to do so could cause collapse and fatality.
text_image
CLICKASSEMBLY
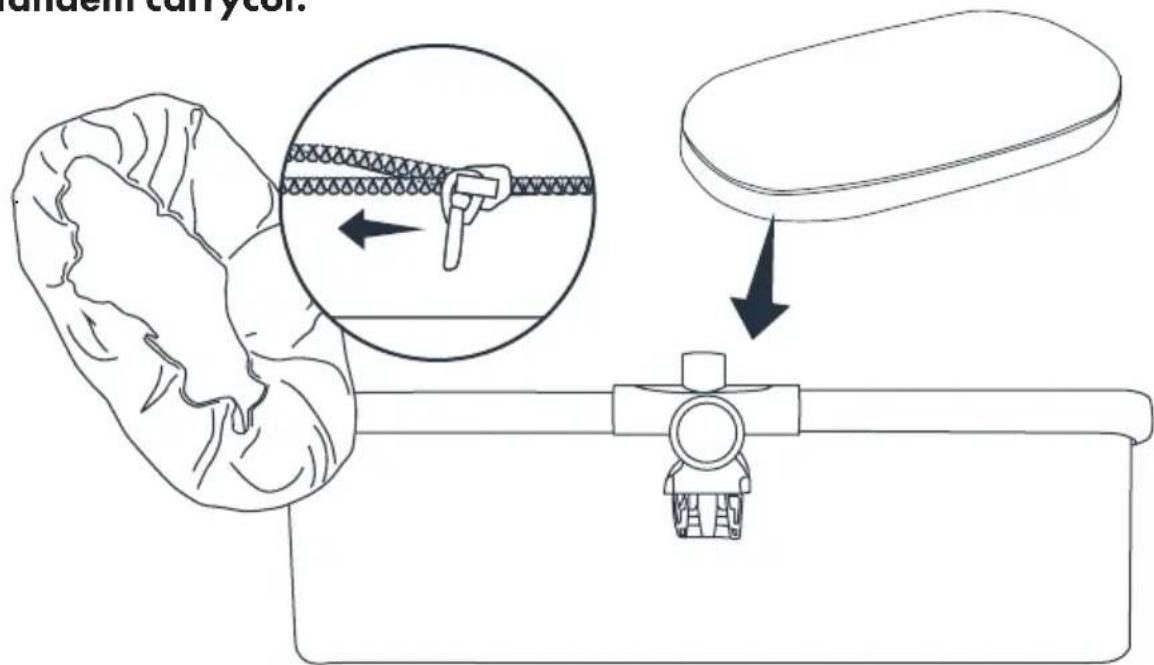
- Re-zip the carrycot lining (B) onto the tandem carrycot frame and re-insert the carrycot mattress (C). Warning! Do not add an additional mattress to the tandem carrycot.
text_image
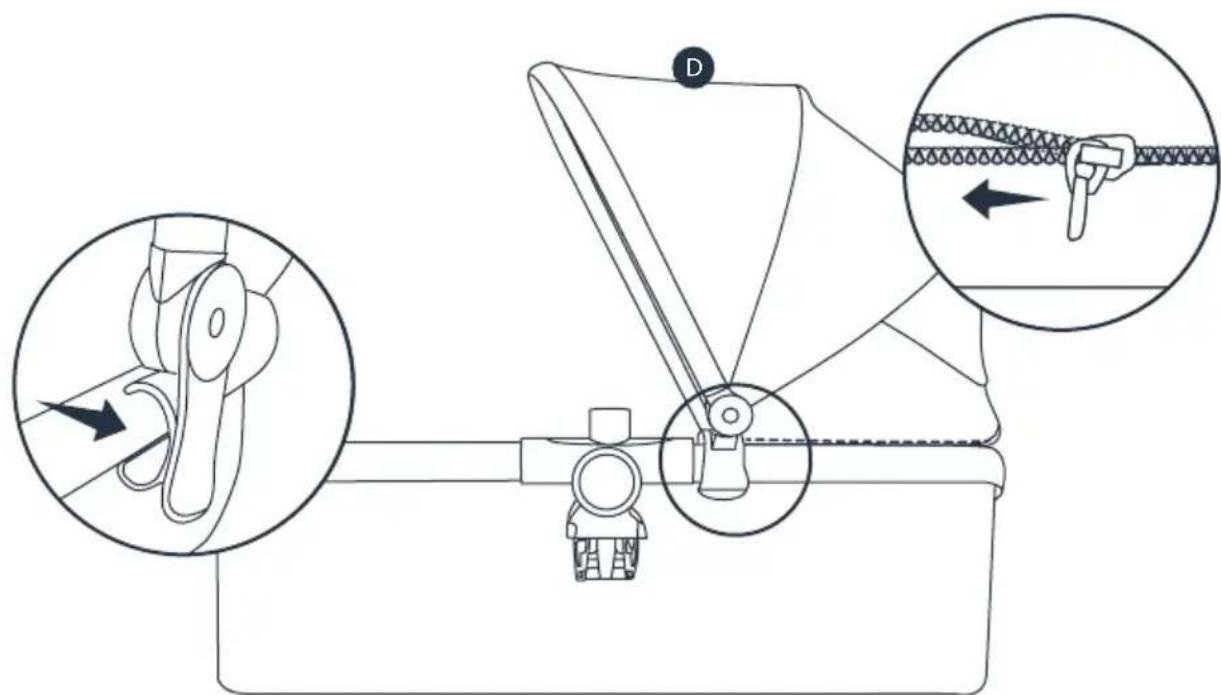
andem carrycol.- Attach the canopy (D) to the tandem carrycot. First attach th plastic canopy clips to their respective sides. And then do the zip around the back.
text_image
Technical diagram illustrating mechanical assembly with labeled parts and magnified views of a componentASSEMBLY
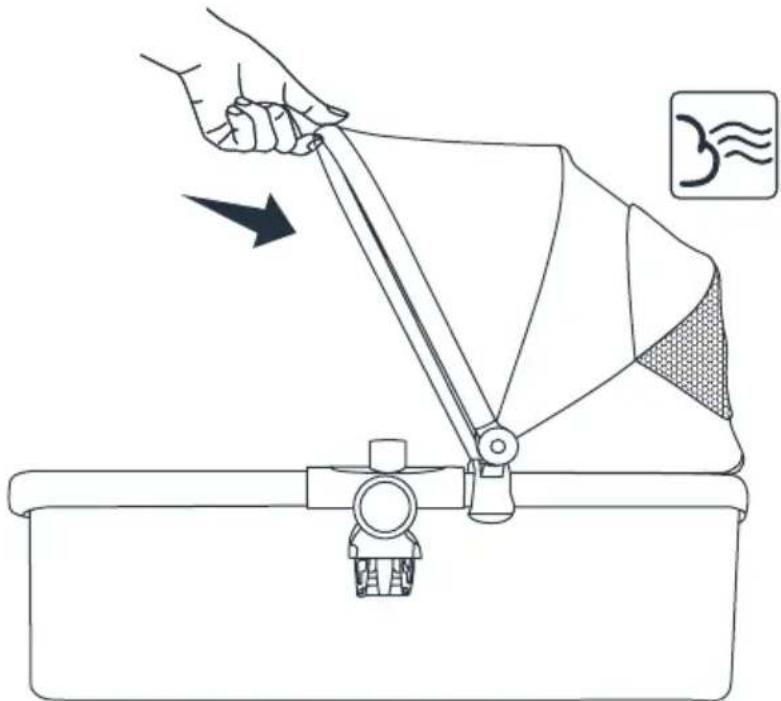
5a. The canopy can be opened or closed by pulling forward or backward on the canopy rim.
5b. There is also a mesh air vent for maximum circulation. Lift up the fabric panel at the base of the canopy to reveal the mesh panel.
natural_image
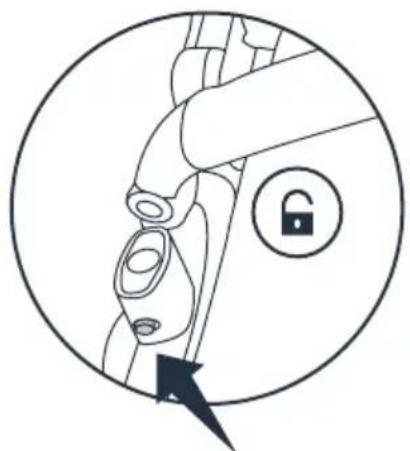
Line drawing of a hand using a tool to lift a container, with no text or symbols present.6a. Attach the bumper bar (E) onto the connection posts. Listen for the 'click' signalling correct assembly. Give the bumper bar a tug to ensure it is secured in place.
6b. To remove the bumper bar, simply press te release buttons on either or both sides and lift up.
natural_image
Diagram of a mechanical device with a lock and arrow indicating left-hand rule (no text or symbols)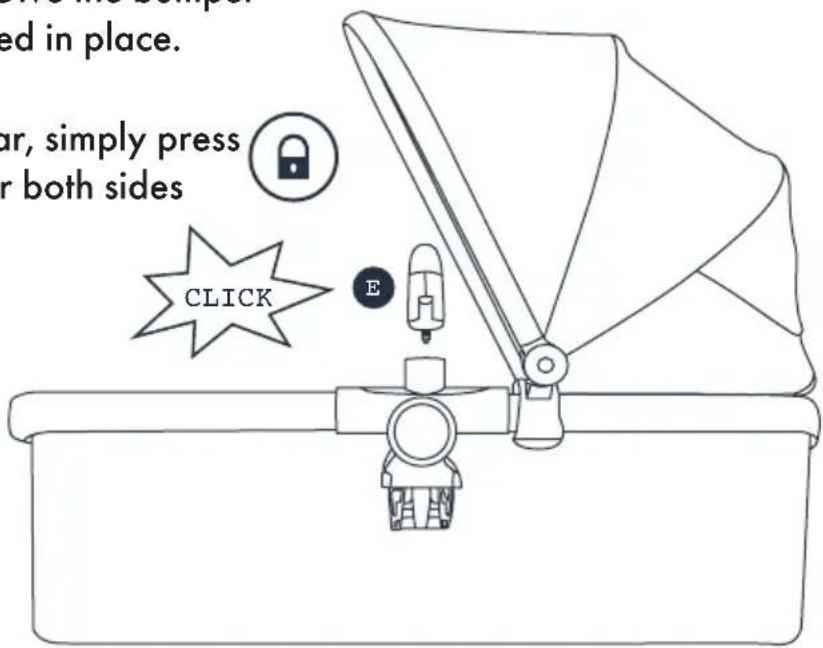
text_image
ed in place. ar, simply press or both sides CLICK EASSEMBLY
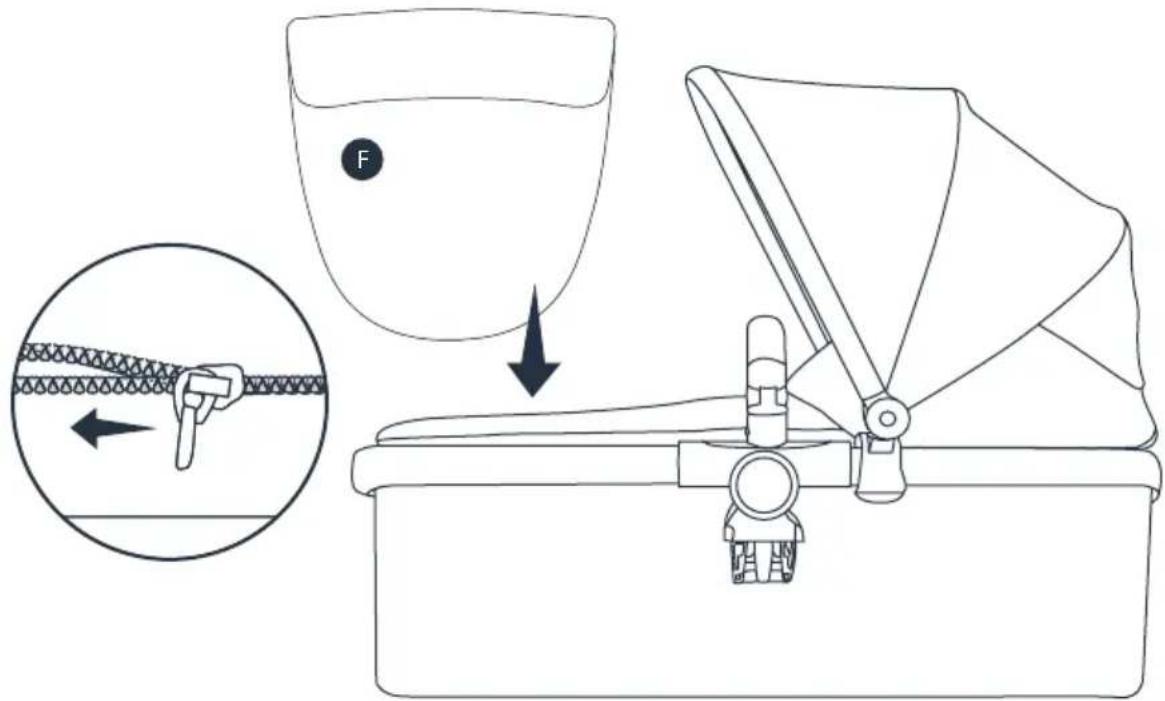
- Starting from the right, zip the apron (F) onto the tandem carrycot. Fasten the press studs to the inside of the canopy frame.
text_image
Diagram illustrating a mechanical device with a magnified inset showing the internal structure of a zipper or meshing tool.Warning! The tandem carrycot is not suitable for overnight sleeping.
TANDEM ASSEMBLY
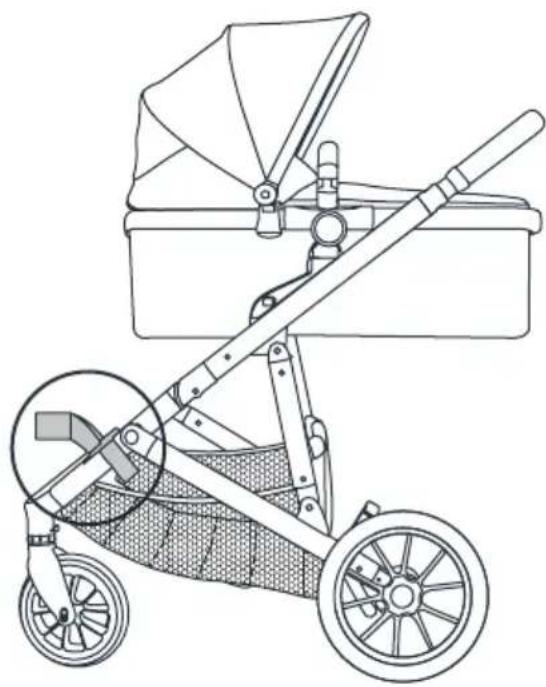
A set of tandem adaptors are included when you purchase the chassis, main seat unit and carrycot. Note! When using as a tandem always use the elevate adaptors, which are also included with the main travel system (sold separately) Refer to main travel system instruction manual to fit the elevate adaptors.
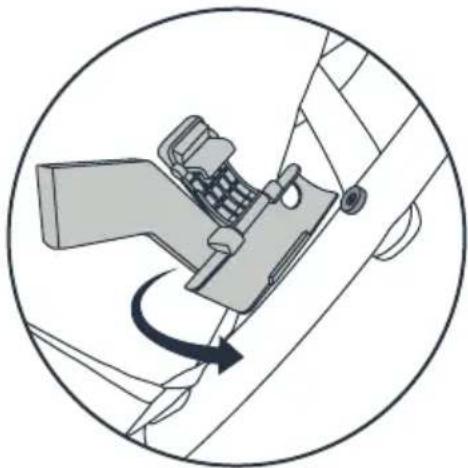
- Hook the tandem adaptors onto the chassis ensuring the rivet inserts into the allocated hole.
natural_image
Line drawing of a baby stroller with front wheel, backrest seat, and decorative frame (no text or symbols)- Fasten the clip around the frame to secure the tandem adaptor to the chassis. Listen for a 'click' to signal correct assembly.
natural_image
Mechanical assembly diagram showing a lever mechanism with a curved arrow indicating rotational motion (no text or symbols present)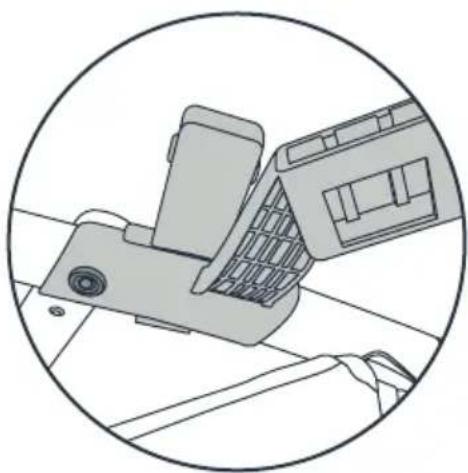
natural_image
Top-down line drawing of a mechanical device with a grid and mounting bracket, enclosed in a circular frame (no text or symbols)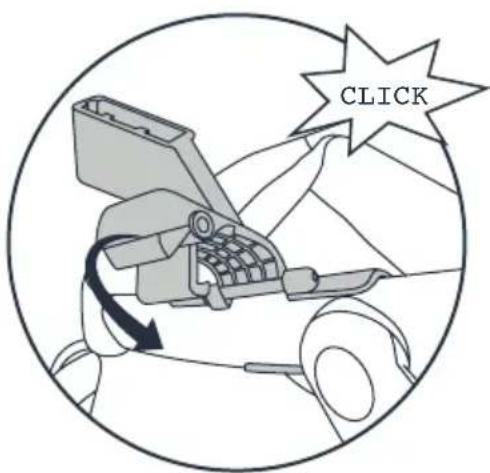
text_image
CLICKTANDEM ASSEMBLY
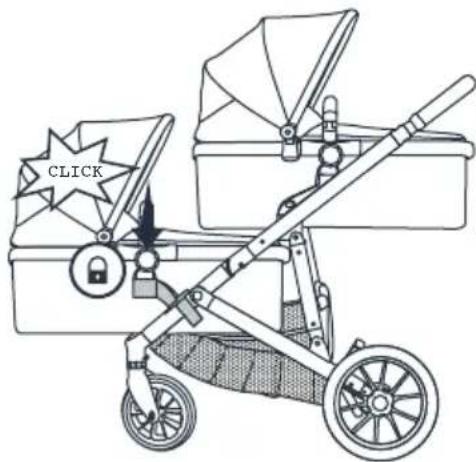
- To attach the tandem carrycot to the chassis, line up the connectors with the tandem adaptors and press downwards. Listen for a 'click' to signal correct assembly.
Warning! Always use tandem carrycot parent facing.
Warning! When using as a tandem, load primary child into the main seat first. After child is secured in the main seat, place the second child into the lower seat. DO NOT place a child in the lower seat without a child in the main seat.
- Press the button both sides of the seat connectors to remove the tandem carrycot from the tandem adaptors.
text_image
CLICK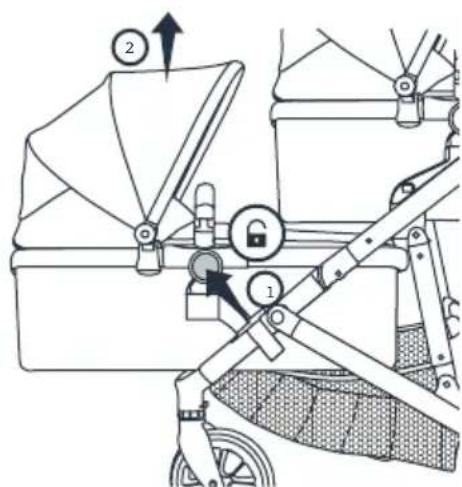
text_image
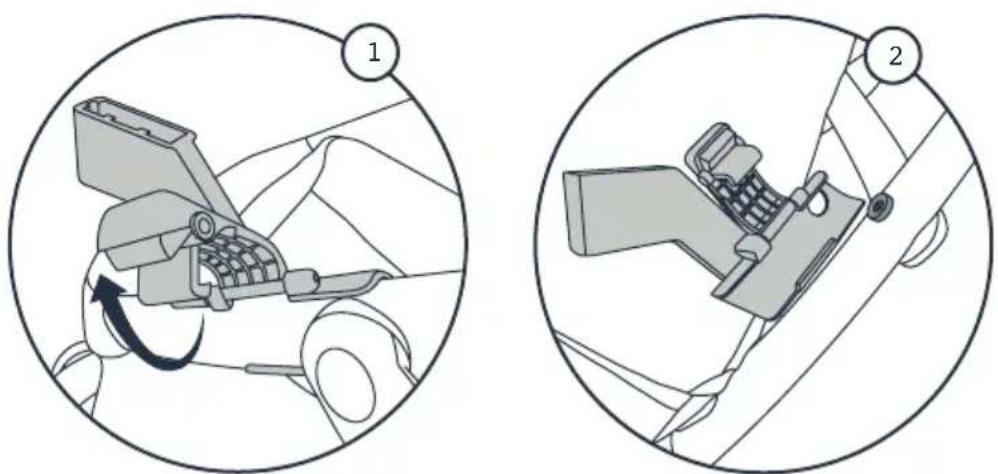
Technical diagram of a bicycle steering mechanism with labeled parts and directional arrows- To remove the tandem adaptors, pull up on the clip lever and gently pull the tandem adaptors away from the chassis frame.
text_image
Technical diagram showing two mechanical assembly steps with labeled components and directional arrows indicating motion or movement.PRAM CONFIGURATION
Tandem carrycot x1 (included)
Carrycot x1
Elevate adaptors 1x set
Tandem adaptors x1 set
Chassis x1

natural_image
Line drawing of a two-wheeled baby stroller with two baby buntingers (no text or symbols)Company address
DERYAN B.V.
Marithaime 8
6662 WD Elst
The Netherlands
Telephone
+31 481 351 070
team@deryan.com
Website
www.deryan.com