Noa - Stroller Deryan - Free user manual and instructions
Find the device manual for free Noa Deryan in PDF.


User questions about Noa Deryan
0 question about this device. Answer the ones you know or ask your own.
Ask a new question about this device
Download the instructions for your Stroller in PDF format for free! Find your manual Noa - Deryan and take your electronic device back in hand. On this page are published all the documents necessary for the use of your device. Noa by Deryan.
USER MANUAL Noa Deryan
natural_image
Line drawing of a baby stroller with four wheels and a canopy cover (no text or symbols)Noa
User manual
Important: Read the following instructions carefully before use and keep them for future reference.
Canopy adjustment 29
Swivel wheels 30
Brakes 31
Handle/footrest adjustment 32
Seat liner 33
Travel system 34
Pram configurations 36
Folding 37
Care and maintenance (ENG) 39
Read these instructions carefully before assembly and use and keep for future reference. The child may be hurt if you do not follow these instructions.
Before using, remove and dispose of any plastic bags and other packaging (e.g. fasteners, fixing ties, etc.) and keep them out of reach of children.
WARNING! This product is suitable for one child from birth up to 22kg or 4 years of age, whichever comes first.
WARNING! Suitable from birth in pram mode up to a maximum weight of 9kg or until the child can sit up unaided, roll over or push itself up on its hands and knees.
WARNING! Not suitable for children under 6 months in pushchair mode. WARNING! The overall load on the vehicle may not exceed 32kg (including the basket).
WARNING! Follow suitability recommendations given in the separate infant car seat instruction manual.
WARNING! Never leave the child unattended.
WARNING! Ensure all locking devices are engaged before use.
• Always apply the parking brake when the product is stationary.
- Ensure the parking brake is engaged during the loading and unloading of the child.
• Take extra care in windy conditions.
- Be careful when going up or down kerbs.
WARNING! To avoid injury ensure that your child is kept away when unfolding and folding this product.
WARNING! Do not let your child play with this product.
WARNING
WARNING! ALWAYS USE THE HARNESS AS SOON AS YOUR CHILD CAN SIT UP UNAIDED.
WARNING! Always use the crotch strap in combination with the waist belt section of the harness.
WARNING! Check that the pram body or seat unit attachment devices are correctly engaged before use.
WARNING! The bumper bar is not a handle. Never lift or carry the seat unit by the bumper bar.
WARNING! This product is not suitable for running or skating.
WARNING! Do not let other children play or hang on the product.
WARNING! Do not use this product if any part is broken, torn or missing.
WARNING! Do not add an additional mattress to the pram/pushchair.
WARNING! Do not place the product near an open fire or other source of strong heat.
- YOUR CHILD'S SAFETY IS YOUR RESPONSIBILITY.
• Adult assembly is required.
- Do not use parts or accessories which are not approved by the manufacturer.
- Do not allow your child to climb unassisted into the product.
- Remove your child and fold the product when going up or down escalators.
- Stroller can tip if child attempts to hang from stroller handle.
- If this product is used by someone unfamiliar with it e.g. grandparents, always show them how it works.
- The large basket for the carriage can carry a maximum load of 10kg with items evenly distributed
WARNING
- Additional bags and other items should not be hung from the handles as this can affect stability of the product.
- Infant car seats should not be used in place of cot or cot bed, should your child need to sleep, it should be placed in a suitable cot or cot bed.
• Overloading, incorrect folding and the use of non-approved accessories is unsafe and may damage or break this product. - never leave the raincover, hood or apron on indoors, in a hot atmosphere or near a heat source as your child may overheat
- To prevent damage, remove raincover before folding the pushchair.
- Do not place anything on top of the raincover.
This product conforms to EN 1888-2:2018
WAARSCHUWING WAARSCHUWING
WAARSCHUWING WARNUNG
text_image
J I-Size infant carrier x 1 K Car seat adaptors x 1 setCHASSIS ASSEMBLY
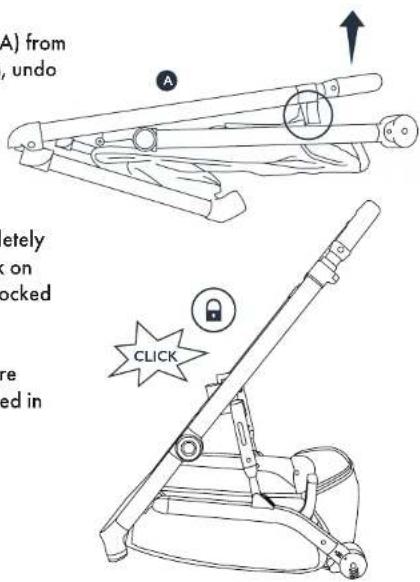
- To release the chassis (A) from the locked folded position, undo the locking catch.
When the chassis is completely open, you will hear a click on both sides indicating it is locked into place
WARNING! Always ensure the opened chassis is locked in place before you use it.
text_image
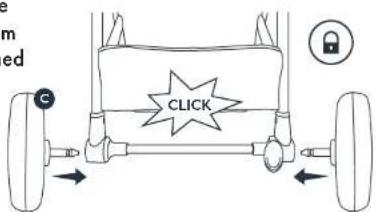
(A) from , undo A letely on locked re ed in CLICK- Push each rear wheel (C) into the sides of the rear wheel axle until you hear a click. Give them a tug to ensure they are attached securely.
text_image
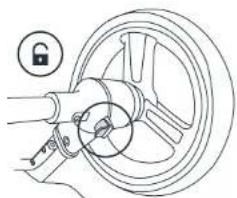
e m ed C CLICK2.1. To remove rear wheels, simplu pull and hold the metal latch located underneath the rear wheel axle and pull the wheel out.
natural_image
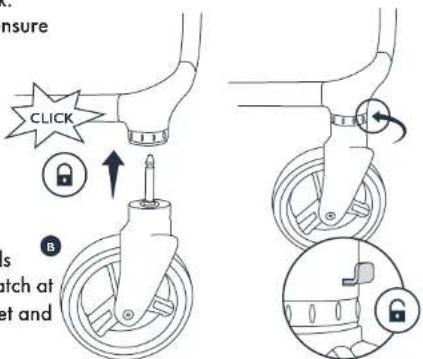
Diagram of a hand holding a steering wheel with a lock icon (no text or symbols)- Insert each of the front wheel (B) pins into the centre of the socket until you hear a click. Give each wheel a tug to ensure they're securely attached.
text_image
ensure CLICK B is watch at set and3.1. To remove front wheels simply push and hold the latch at the back of the wheel socket and pull the wheel out.
PRAM MODE
- Undo the fabric strap clips. Then, on the back of the seat unit (E), fasten the hook and loop panels over the metal bar as illustrated.
WARNING! The fabric must cover the metal bracket.
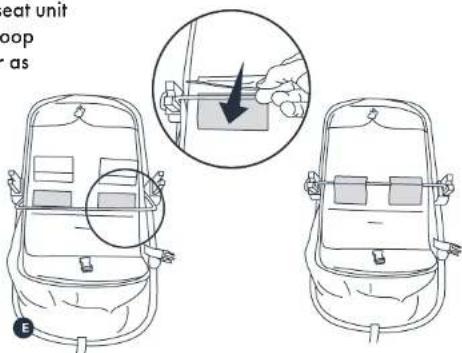
text_image
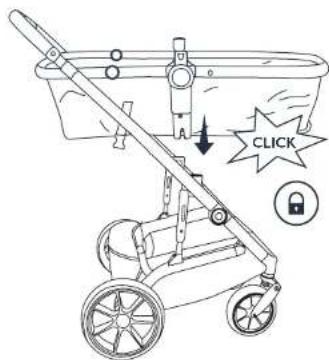
eat unit pop as E1.2. Attach the seat unit to the chassis. Line up the seat connectors with the chassis housing and press downwards. Listen for a "click" to signal correct assembly.
Ensure the seat unit frame is completely straight by straightening the footrest adjusters on both sides.
Ensure the seat unit is horizontal by using the lever at the end of the seat unit.
1.3. Insert the seat liner (I) into the seat unit to add extra comfort for the baby.
text_image
CLICK1.4. To remove the seat unit from the chassis, press the buttons located both sides of the seat connectors and pull up.
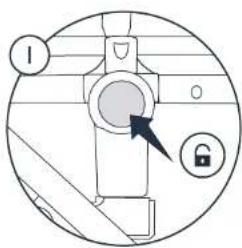
text_image
Diagram of a mechanical device with labeled parts and an arrow pointing to a circular component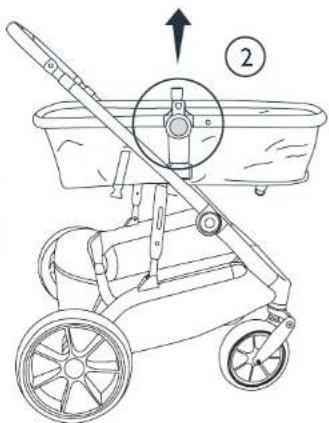
text_image
Diagram of a stroller with labeled parts and directional arrow, showing components like wheel rim and bucket- Insert the bumper bar (D) into the seat unit slots ensuring that the release buttons are on the outside and you hear a "click" signalling correct assembly. Give the bumper bar a tug to ensure it's securely in place.
To remove the bumper bar, simply press the release buttons on either or both sides and lift up.
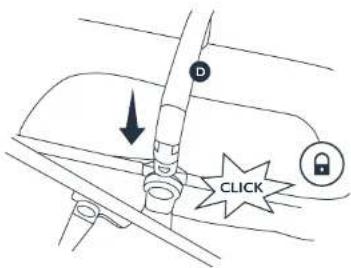
text_image
D CLICK- Fasten the apron (H), secure the zip around the side and attach the hook and loop fasteners over the bumper bar.
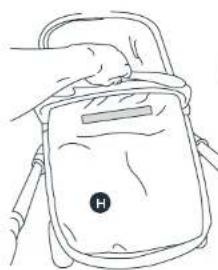
natural_image
Line drawing of a hand holding a backpack with a label 'H' on the cover (no text or symbols beyond the label)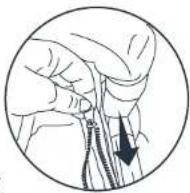
- Attach the canopy (G) to the seat unit. First attach the plastic canopy clips to their respective sides.
Next, secure the canopy to the frame with the zip. Start with the right side (when facing the seat).
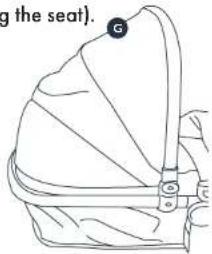
text_image
g the seat).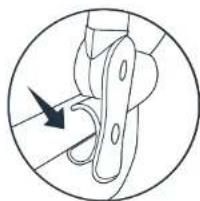
natural_image
Diagram of a mechanical joint or bracket with an arrow indicating direction (no text or symbols present)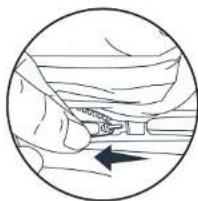
natural_image
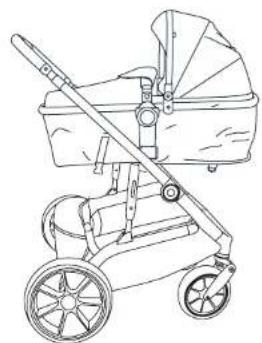
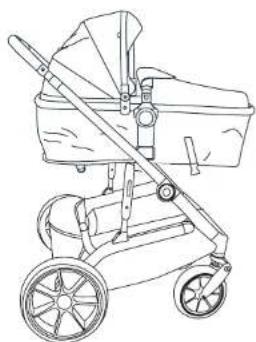
Illustration of a hand adjusting a car seatbelt with a black arrow indicating left motion (no text or symbols)Suitable from birth in pram mode up to a maximum weight of 9kg or until the child can sit up unaided, roll over or push itself up on its hands and knees.
WARNING! Never use the pram mode with seat unit forward facing.

natural_image
Line drawing of a baby stroller with a broom and wheels (no text or symbols)
natural_image
Line drawing of a baby stroller with wheels and handle (no text or symbols)PUSHCHAIR MODE
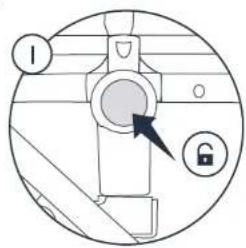
- Press the buttons located both sides of the seat connectors and pull up to remove the seat unit from the chassis.
text_image
I 0 0 0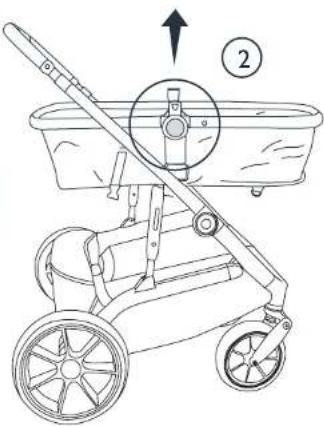
text_image
Diagram of a baby stroller with labeled parts and directional arrow indicating motion or force1.2. Fasten the webbing belts located on the rear side of the seat unit footrest. Listen for the "click" to signal buckles are secure.
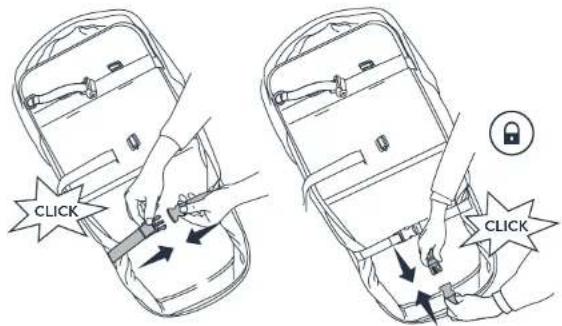
text_image
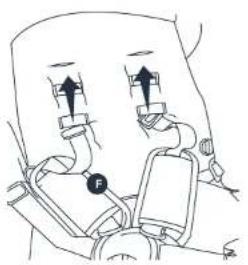
CLICK CLICK- Attach the harness (F) to the seat unit. Thread the shoulder strap retainers under the webbing holders and out through the horizontal slots in the seat unit backrest.
2.1. Thread the waist strap retainers through the vertical slots in the seat unit backrest and thread the crotch strap retainer through the horizontal slot at the centre of the seat unit.
WARNING! Ensure the strap retainers are fully through and secure at the rear of the seat unit.
To remove reverse the above process
natural_image
Diagram of a car's seatbelt mechanism with arrows indicating movement (no text or labels)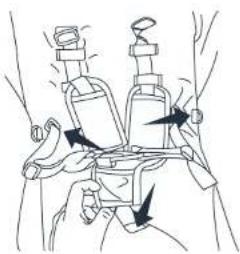
natural_image
Illustration of a person using a device to interact with another person (no text or symbols present)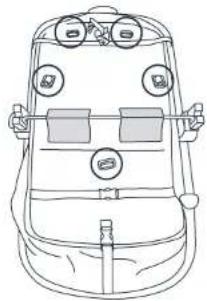
natural_image
Line drawing of a backpack with buttons and straps (no text or symbols)- Re-attach the seat unit to the chassis. Locate the backrest adjustment mechanism at the rear of the seat unit. Squeeze the clip on the reclining harness and gently pull up the backrest.
text_image
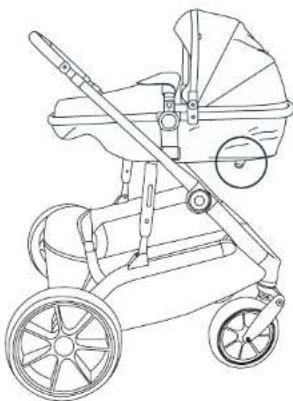
Diagram showing a hand holding a tool with labeled parts 1 and 2, indicating a mechanical or electrical component.3.1. Lift the lever at the back of the seat unit to adjust the seat unit recline. Ensure you hear a "click" as the seat engages at your desired position.
WARNING! The seat unit is not suitable in pushchair for children under 6 months
natural_image
Line drawing of a baby stroller with wheels and a seat (no text or symbols)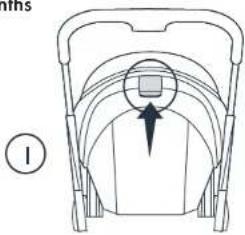
natural_image
Diagram of a person sitting in a chair with an arrow pointing to the backrest, no text or symbols present.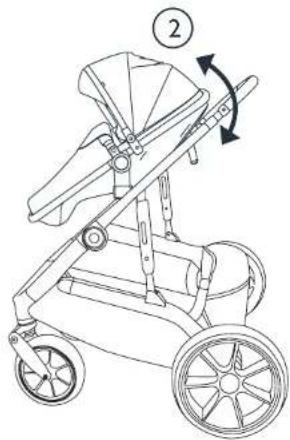
natural_image
Line drawing of a baby stroller with a handwheel and wheel, showing motion direction (no text or symbols)The seat unit is reversible in pushchair mode. It can be forward or parent facing.
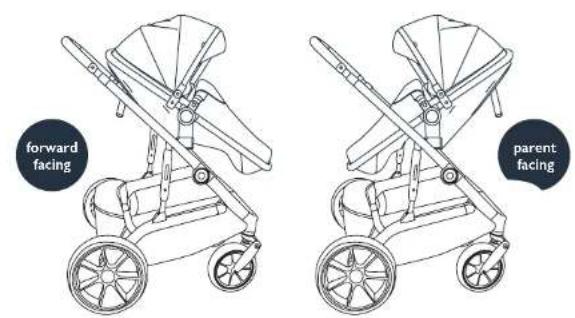
text_image
forward facing parent facingPress the buttons located both sides of the seat connectors and pull up to remove the seat unit from the chassis. To re-attach the seat unit to the chassis, line up the seat connectors with the chassis housing and press downwards. Listen for a "click" to signal correct assembly.
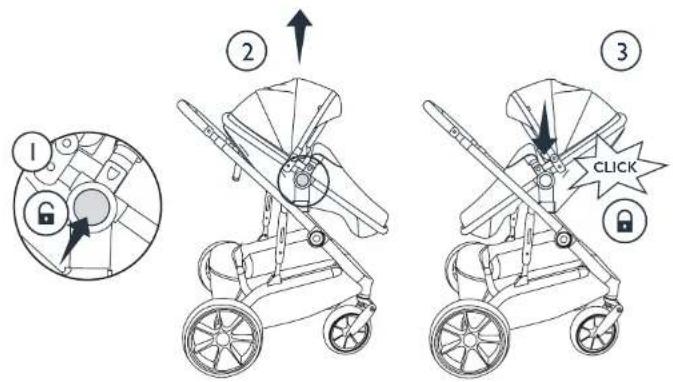
text_image
Diagram illustrating a stroller with lock mechanism and click button, showing step-by-step instructions for navigation.HARNESS
- Insert all buckle clips into the buckle housing until they engage securely in place. Listen for the "click".
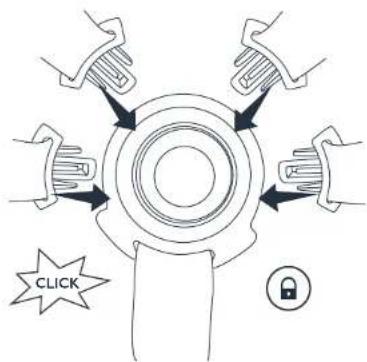
text_image
CLICK- Press the centre button to release child from harness.
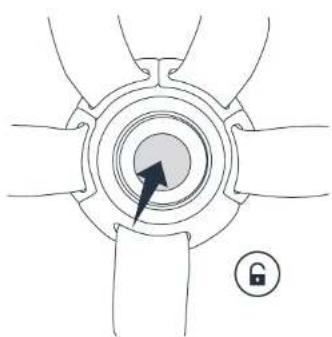
natural_image
Diagram of a mechanical component with a central circular feature and radial arms, marked with an arrow and a lock icon (no text or symbols present)- To adjust the harness move the slides as shown
WARNING! Always adjust the harness to fit your child correctly. for their comfort and safety. A loose fitting harness can be very dangerous.
- There are 3 shoulder height positions. Undo the harness and rethread to adjust the shoulder height.
WARNING! Always adjust the shoulder strap height accoring to baby height and ensure that both straps are at the same height
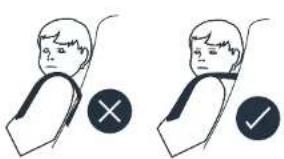
natural_image
Two identical line drawings of a person in different poses, each marked with a checkmark and an 'X' symbol (no text or labels present)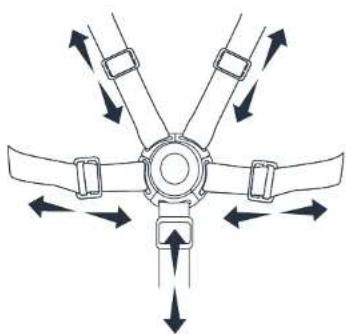
natural_image
Diagram of a mechanical assembly with five arms and directional arrows indicating motion (no text or symbols)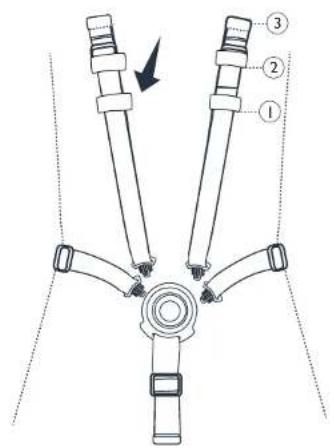
text_image
Diagram of a mechanical device with labeled parts and directional arrow indicating motion or forceCANOPY ADJUSTMENT
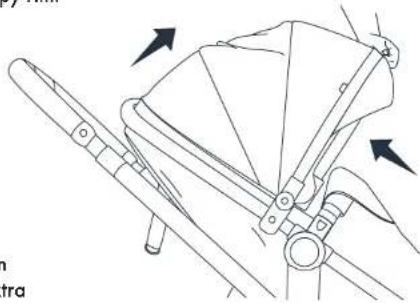
The canopy can be opened or closed by pulling forward or backward on the canopy rim.
natural_image
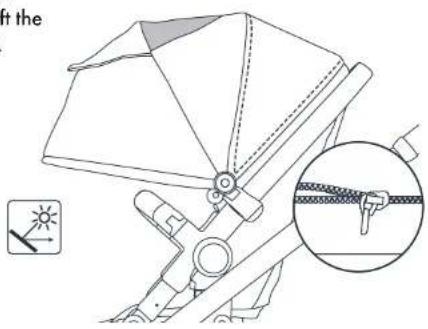
Technical line drawing of a mechanical device with arrows indicating motion or assembly (no text or symbols)The canopy features an extending panel for extra sun protection and a window to keep an eye on baby in forward facing position.
Unzip the canopy to reveal the extension panel and lift the flap to reveal the window.
text_image
ft the lightSWIVEL WHEELS
BRAKES
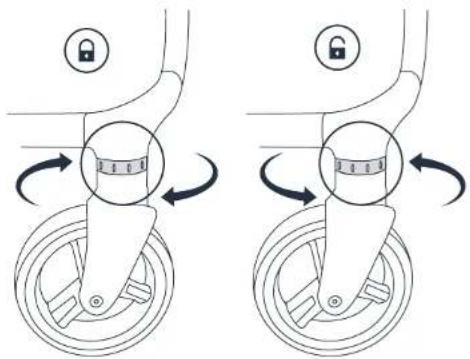
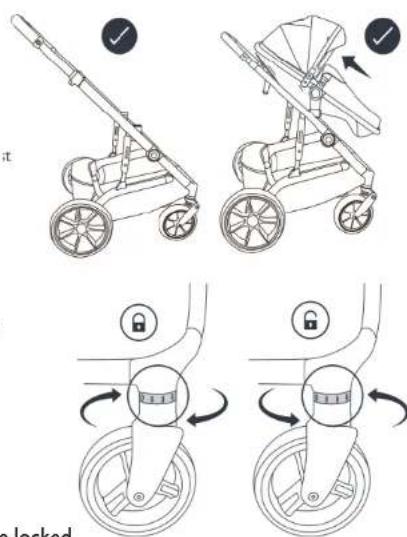
When travelling along straight surfaces or uneven terrain, the front wheels may spin.
To lock the front swivel wheels into place, twist the ridged locking mechanism at the top of the front wheels
natural_image
Diagram showing two identical mechanical components with rotating arms and a lock icon, no text or symbols present.To go back to 360° swivel mode, twist the ridged locking mechanism at the top of the front wheels back.
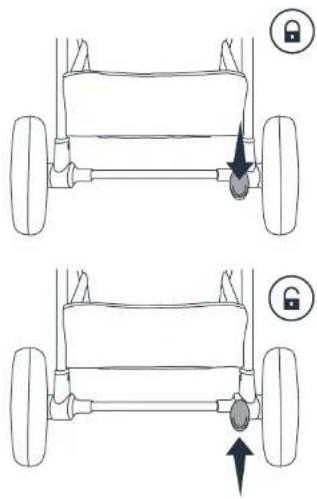
Press down on the brake pedal on the rear axle to engage the brake. Listen for the "click" signalling that the brake is locked.
Push the brake pedal upwards to disengage the brake.
WARNING! Always apply the parking brake when the pram is not moving.
WARNING! Always apply the brake when you are placing your child and removing the child.
WARNING! Always apply the brake when you are making adjustments to the pram (e.g. changing seat direction).
natural_image
Diagram showing two vehicle chassis scenarios with lock icons and directional arrows indicating movement or force (no text or symbols)HANDLE ADJUSTMENTS
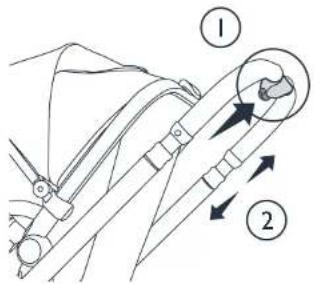
Push the button in the middle of the handle bar and pull or push the handle to your desired height. The handle will "click" into place.
text_image
Technical diagram showing mechanical assembly with numbered components and directional arrows indicating motion or force directions.FOOTREST ADJUSTMENTS
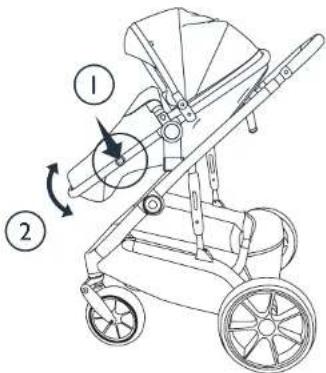
Press both footrest buttons simultaneously and adjust the footrest to the desired position. Listen for the "click" signalling that the footrest is locked into position.
text_image
Technical diagram of a baby stroller with labeled parts and rotation arrowsSEAT LINER
There is a seat liner (I) included for the seat unit.
-
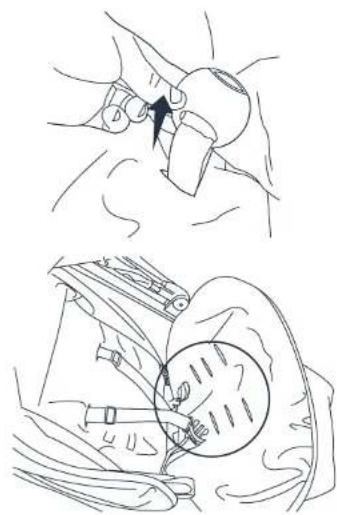
To attach the liner, undo the harness and remove the chest pads and crotch pad.
-
Thread the harness through the slots in the seat liner allocated for the waist, shoulder and crotch straps.
WARNING! Ensure to thread the shoulder harness through the corresponding slot height of the seat unit.
WARNING! Ensure the strap retainers are fully through and secure at the rear of the seat unit.
- Re-attach the chest pads and the crotch pad. Repeat the process to remove the seat liner.
natural_image
Medical procedure illustration showing hand placement and lap angle technique (no text or labels)TRAVEL SYSTEM
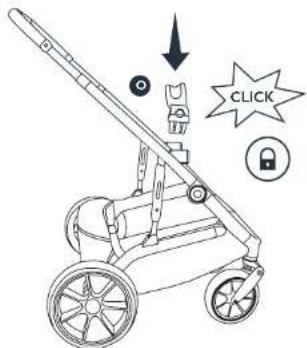
A car seat (M) and set of car seat adaptors (O) are included to complete the travel system.
- Remove the seat unit from the chassis to fit the car seat adaptors.
Line up the car seat adaptors with the chassis housing and press downwards. Listen for a "click" to signal correct assembly.
1.2. Place the car seat (M) onto the adaptors. Push down to "click" into place. Pull handle to ensure car seat is secure. Alternatively, attach the adaptors to the car seat first and then attach the car seat to the chassis.
WARNING! Never attach the car seat forward facing.
IMPORTANT: Refer to the car seat manual for full details of use.
text_image
CLICK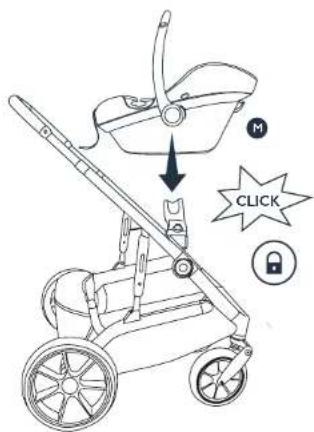
text_image
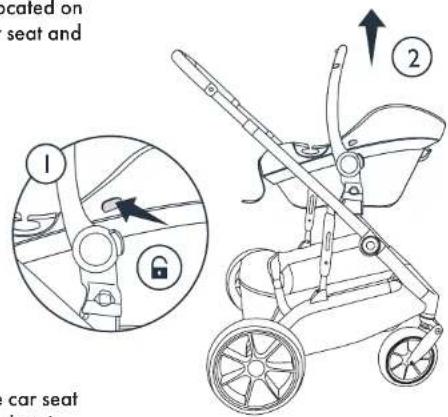
Diagram of a baby stroller with labeled buttons and a directional arrow indicating rotation or movement.- To remove the car seat, press the buttons located on the sides of the car seat and pull upwards.
text_image
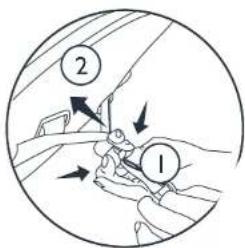
located on seat and ① ② car seat2.1. To remove the car seat adaptors from the chassis, press the buttons on both sides of the adaptors and pull upwards.
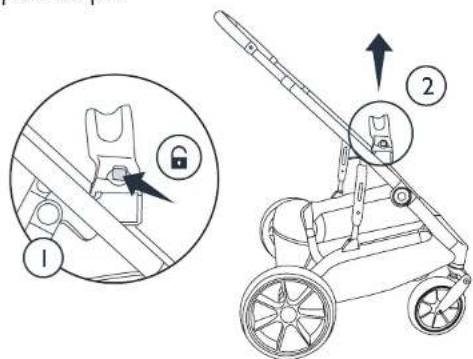
text_image
Technical diagram showing a stroller mechanism with labeled parts and a magnified inset highlighting the lock mechanism.PRAM CONFIGURATIONS
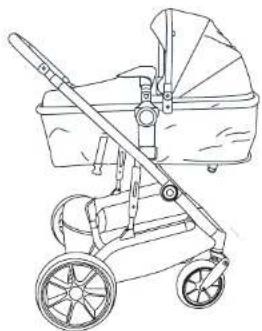
natural_image
Line drawing of a baby stroller with wheels and a basket (no text or symbols)Pram unit x l Chassis x l
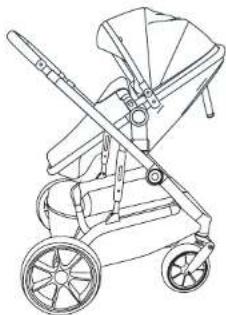
natural_image
Line drawing of a baby stroller with two wheels and a canopy (no text or symbols)Seat unit x I Chassis x I
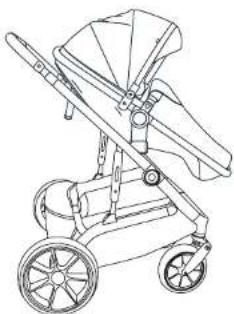
natural_image
Line drawing of a baby stroller with wheels and seat (no text or symbols)Seat unit x I Chassis x I

natural_image
Line drawing of a baby stroller with wheels and a diagonal brim (no text or symbols)Infant carrier x I Car seat adaptors x I set Chassis x I
FOLDING
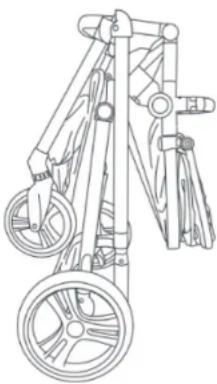
- For more compact fold, remove the seat unit before folding. Otherwise, the chassis can only fold with the seat unit assembled forward facing.
NEVER fold chassis with the car seat attached. ALWAYS fold the canopy, apply the brakes, and lower handle to shortest height before folding.
text_image
check a locked-
If the swivel wheels are locked, twist the ridged locking mechanism at the top of the front wheel to unlock. This will ensure the wheels can move and do not touch the bar when the chassis is folded.
-
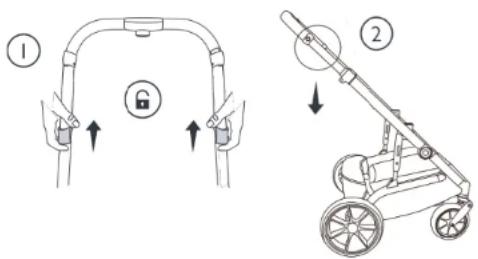
Pull both release triggers towards you and push the handle downwards to fold the chassis.
text_image
Diagram illustrating two different types of bicycle seatbelting: one with a lock mechanism and the other a stroller.- If the seat unit is assembled, adjust the footrest for a more compact fold.
WARNING! To avoid injury ensure that your child is kept away from unfolding and folding this product
natural_image
Line drawing of a two-wheeled cart with wheels and handle (no text or symbols)CARE AND MAINTENANCE
- Spot or sponge clean fabrics with mild detergent. Use mild soap or upholstery shampoo. NEVER use bleach. Dry in shade thoroughly before reuse and avoid direct heat and sunlight. Do not iron. Do not dry clean.
- Wipe clean plastics and metals with a damp cloth.
- Never clean any part of the product with abrasive, ammonia based, bleach based or spirit type cleaners.
- Ensure the product is fully dry before use or storage.
- Always ensure the product is stored in a dry place to prevent mold or mildew developing.
- The product requires regular maintenance to ensure correct and safe performance.
- Regularly inspect the wheels, locks, brakes, harness, catches, seat adjusters, joints and fixings to ensure they are clean, operating correctly and in full working order.
- Replace tyres if they are excessively worn.
- Do not use this product if any part is broken, torn or missing and use only spares provided by the manufacturer.
- If parts become stiff or difficult to operate, ensure dirt is not the cause, then try light application of a silicon lubricant, ensuring it penetrates between the components. Regular lubrication of maving parts will extend the life of your product and make opening and folding easier.
- After exposure to damp conditions, dry off with a soft cloth and leave fully open in a warm environment. Storing damp will encourage mildew to form.
- Store in a dry place.
- Do not leave in sunlight for prolonged periods as some fabrics may fade.