GAWU16PSPK - Power Supply Gladiator - Free user manual and instructions
Find the device manual for free GAWU16PSPK Gladiator in PDF.

User questions about GAWU16PSPK Gladiator
0 question about this device. Answer the ones you know or ask your own.
Ask a new question about this device
Download the instructions for your Power Supply in PDF format for free! Find your manual GAWU16PSPK - Gladiator and take your electronic device back in hand. On this page are published all the documents necessary for the use of your device. GAWU16PSPK by Gladiator.
USER MANUAL GAWU16PSPK Gladiator
PowerStrip Bar Safety 2
Recommended Grounding Method 4
PowerStrip Bar Parts. 4
PowerStrip Bar Features 5
Over-Current Circuit Protection 5
Protected/Grounded LED Indicator. 6
Installation Instructions 7
Unpack the PowerStrip Bar 7
Removing the PowerStrip Bar from the Universal Mounting Bracket (UMB) 7
Mounting the Universal Mounting Bracket (UMB) to the GearTrack® Channels or
GearWall® Panels 7
Mounting the Universal Mounting Bracket (UMB) Directly to the Wall. 8
Attaching the PowerStrip Bar to the Universal Mounting Bracket (UMB) 8
Mounting the PowerStrip Bar to a Steel Surface 8
Mounting Options 9
When Using Gladiator GearTrack® Channels or GearWall® Panels 9
When Using Rear Facing Magnets 9
Product Specifications 10
User-Maintenance Instructions 10
Troubleshooting 11
Accessories 11
Warranty 11
POWERSTRIP BAR SAFETY
Your safety and the safety of others are very important.
We have provided many important safety messages in this manual and on your appliance. Always read and obey all safety messages.

This is the safety alert symbol.
This symbol alerts you to potential hazards that can kill or hurt you and others.
All safety messages will follow the safety alert symbol and either the word "DANGER" or "WARNING." These words mean:
DANGER
You can be killed or seriously injured if you don't immediately follow instructions.
WARNING
You can be killed or seriously injured if you don't follow instructions.
All safety messages will tell you what the potential hazard is, tell you how to reduce the chance of injury, and tell you what can happen if the instructions are not followed.
IMPORTANT SAFETY INSTRUCTIONS
WARNING: When using the PowerStrip Bar, basic safety precautions should always be followed, including the following:
- Read all safety warnings and instructions. Failure to follow the warnings and instructions may result in death, fire, or electrical shock.
This product is not intended for use by children or by persons with reduced physical, sensory, or mental capabilities, or lack of experience and knowledge. Close supervision is necessary when the PowerStrip Bar is used near children. Always supervise children to ensure that they do not play with the PowerStrip Bar. - Unplug and turn the PowerStrip Bar Off before cleaning. To unplug the Power Cable, grasp the plug end and pull from the outlet. Never pull from the Power Cord.
- Do not modify or attempt to repair the PowerStrip Bar except as indicated in the "User-Maintenance Instructions."
-
Do not use PowerStrip Bar if it is damaged or malfunctions. Return the Powerstrip Bar to the nearest Authorized Service Center for examination, repair, or replacement.
The use of accessories/attachments not recommended or sold by Gladiator may cause death, fire, or electric shock.
Refer to the "User-Maintenance Instructions" section for instructions on cleaning the PowerStrip Bar. -
Do not use PowerStrip Bar if it is damaged or modified.
Service of PowerStrip Bar should only be performed by the manufacturer or an Authorized Service provider, using only identical replacement parts. This will ensure that the safety of the product is maintained.
- Do not use PowerStrip Bar in rain or wet conditions. Do not expose to rain—store indoors.
SAVE THESE INSTRUCTIONS
USE REQUIREMENTS
Intended for use in the garage.
Use in a dry location.
- There are five electrical outlets on the PowerStrip Bar. All outlets are connected to the over-current protection switch.
WARNING

Electrical Shock Hazard
Plug into a grounded 3 prong outlet.
Do not remove ground prong from the power cord plug.
Do not use an adapter.
Do not use an extension cord.
Failure to follow these instructions can result in death, fire, or electrical shock.
NOTE: A 115 V, 60 Hz, AC only, 15 A, fused, grounded electrical supply is required. Use an outlet that cannot be turned Off by a switch. Do not use an extension cord.
POWERSTRIP BAR PARTS
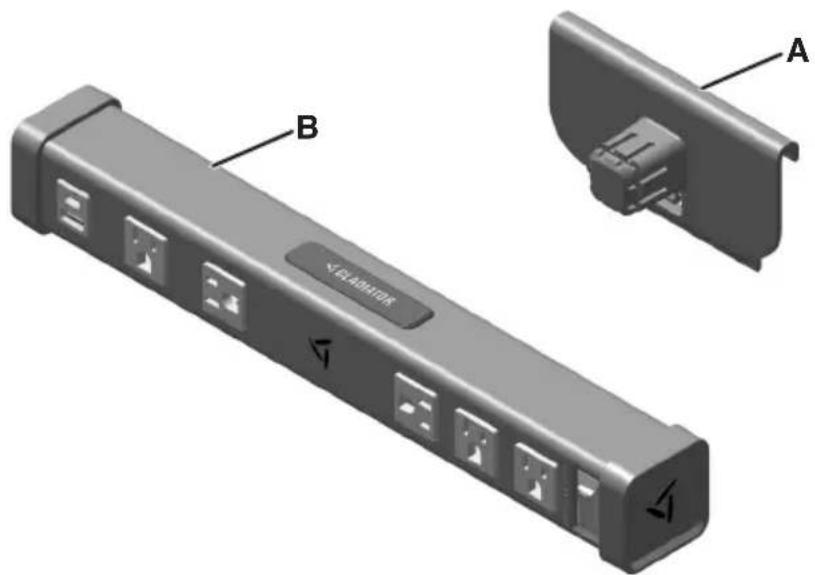
A. Universal Mounting Bracket (UMB)
B. PowerStrip Bar
POWERSTRIP BAR FEATURES
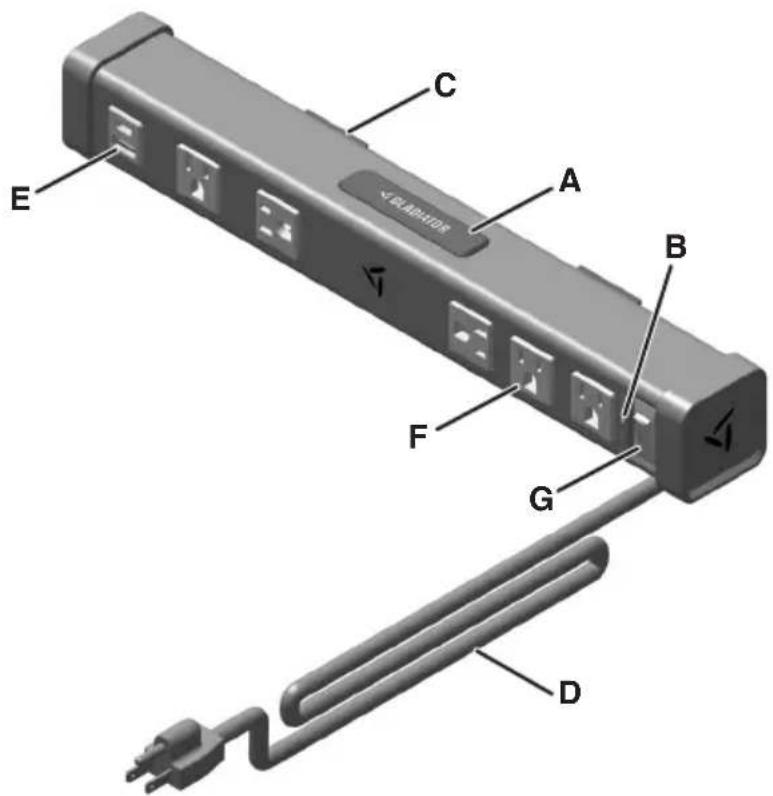
A. Push Button
B. LED for Protected/Grounded Status. Two Color - See "Protected/Grounded LED Indicator."
C. Rear Mounting Magnets
D. 8 ft Grounded Power Cable
E. USB-A and USB-C Utility Outlets for Charging Phones, Powering Equipment, etc.
F. Five Power Outlets, With Two Positioned Sideways for Use With Larger Power Adapters.
G. Illuminated Power Switch with Built-In Over-Current Protection
OVER-CURRENT CIRCUIT PROTECTION
The PowerStrip Bar is designed with a visual over-current protection switch that operates as follows:
Over-current protection switch is in the Reset position and the red light is lit:
The circuit has not tripped and the PowerStrip Bar can be used.
Over-current switch has been tripped:
The red light will go out. Move the over-current protection switch to the Off position. Unplug all items from the PowerStrip Bar. To restore power, push the over-current protection switch back to the Reset position. Plug the items back in, one at a time, while watching to see if the red light goes out. If it does, unplug all the items until you are sure that the red light remains lit and the over-current protection switch remains in the Reset position.
WARNING
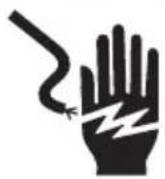
Electrical Shock Hazard
Plug into a grounded 3 prong outlet.
Do not remove ground prong from the power cord plug.
Do not use an adapter.
Do not use an extension cord.
Failure to follow these instructions can result in death, fire, or electrical shock.
PROTECTED/GROUNDED LED INDICATOR
- When the PowerStrip Bar is turned On, the Protected/Grounded LED light, next to the power switch, will light GREEN. This indicates that the Surge Protection feature is functional and the PowerStrip Bar has a proper ground connection.
If the LED light turns RED, the Surge Protection feature has become non-functional. The PowerStrip Bar will still operate as normal, however, the Surge Protection feature is no longer available.
If the LED light fails to light, the PowerStrip Bar may not have a proper ground connection or is not plugged into a wall outlet. Check all wiring and electrical connections to the PowerStrip Bar and make sure the red over-current circuit protection light is On. If the red over-current circuit protection light is On, and the LED light still fails to light then contact a certified electrician to correct a missing ground within the outlet being used to connect the PowerStrip Bar.
NOTE: If the LED light fails to light, relocate the PowerStrip Bar to another outlet, with a good ground, to check the functionality of the LED.
LED STATUS
GREEN: Surge Protected and Grounded
RED: Unprotected (Surge Protection feature non-functional)
Off: Ungrounded
NOTE: If the green light is on when the PowerStrip Bar is turned Off, then a reversed polarity condition exists at the outlet being used to power the PowerStrip Bar (Neutral and Line are reversed). Contact a certified electrician to correct.
INSTALLATION INSTRUCTIONS
- Remove and verify the contents as shown in "POWERSTRIP BAR PARTS."
- Dispose of or recycle all packaging materials.
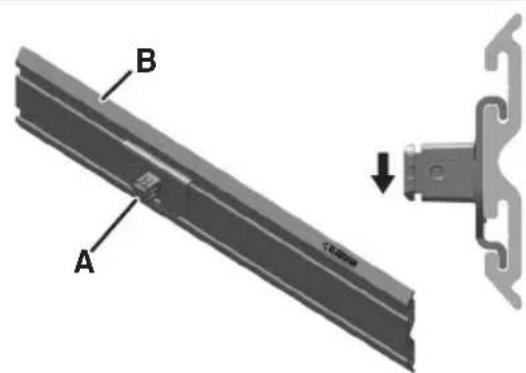
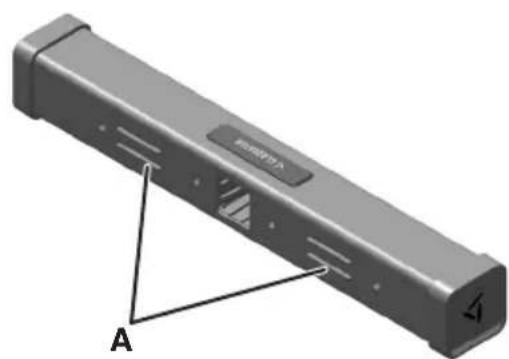
REMOVING THE POWERSTRIP BAR FROM THE UMB
Remove the PowerStrip Bar from the UMB
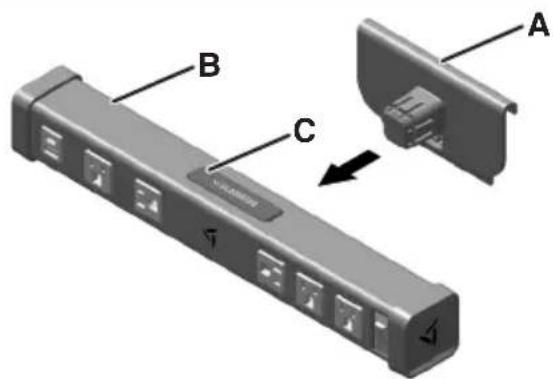
A. Universal Mounting Bracket (UMB)
B. PowerStrip Bar
C. Push Button
Press down on the Push Button and pull the UMB straight out.
NOTE: PowerStrip Bar can be attached in three ways:
- Universal Mounting Bracket to GearTrack Channels or GearWall® Panels.
- Universal Mounting Bracket directly to the Wall.
- Using Rear Mounting Magnets on a Steel Surface.
TOOLS REQUIRED
NOTE: No tools are required if using Gladiator® GearTrack® Channels or GearWall® Panels.
MOUNTING THE UMB TO THE GEARTRACK® CHANNELS OR GEARWALL® PANELS
NOTE: Gladiator® GearTrack® Channels and GearWall® Panels are sold separately. For installation of the Gladiator® GearTrack® channels and GearWall® panels to a Wall, refer to "Instruction Manual" included with the Gladiator® GearTrack® Channels and GearWall® Panels.
1. Align to GearTrack Channels or GearWall Panels
A. Universal Mounting Bracket (UMB)
B. GearTrack® Channels or GearWall® Panels
Align the hook on the UMB into the slots.
2. Slide onto GearTrack Channels or GearWall® Panels
A. Universal Mounting Bracket (UMB)
B. GearTrack Channels or GearWall Panels
- Slide the UMB down into slots until it "Snaps" into place.
NOTE: Bottom tab on the Universal Mounting Bracket will be over the bottom edge of the center strip.
MOUNTING THE UMB DIRECTLY TO THE WALL
TOOLS REQUIRED
Gather the required tools before starting installation.
2 Phillips head screwdriver (not included)
- #8 Phillips head screws with threaded drywall anchors (not included)
Level (not included)
Tape measure (not included)
1. Place Marking on the Wall
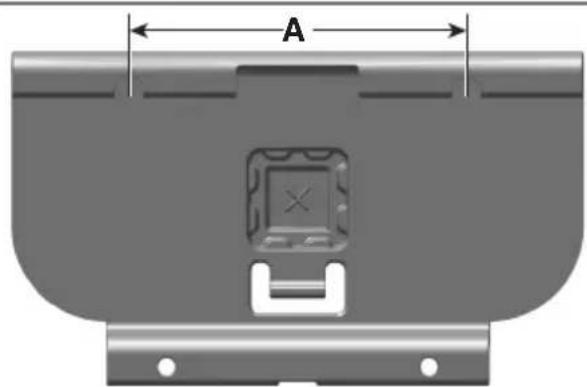
A. 5 inches
- Make a mark on the Wall.
- Measure 5 inches horizontally and place another mark.
- Place the Screws in the Wall where the marks are present, leaving them out enough to hang the UMB.
NOTE: Make sure to use a Level for the best results.
2. Attach the UMB to the Wall
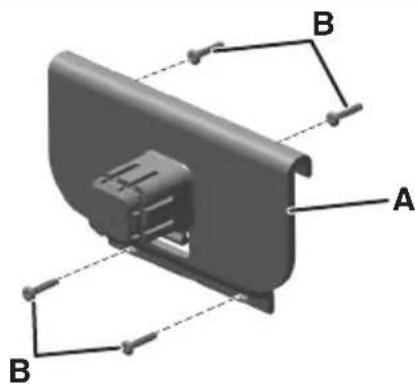
A. Universal Mounting Bracket (UMB)
B. Screws
NOTE: It is recommended to use threaded anchors when mounting to drywall.
- Place the UMB over the top two Screws.
- Place the Screws into the two remaining holes.
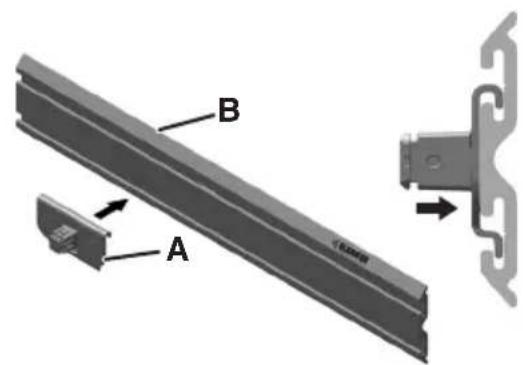
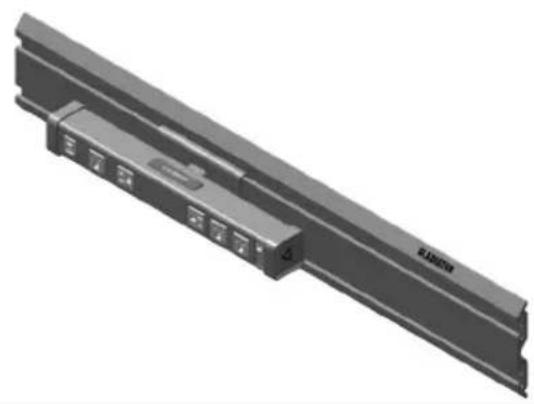
ATTACHING THE POWERSTRIP BAR TO THE UMB
Attach PowerStrip Bar to the UMB
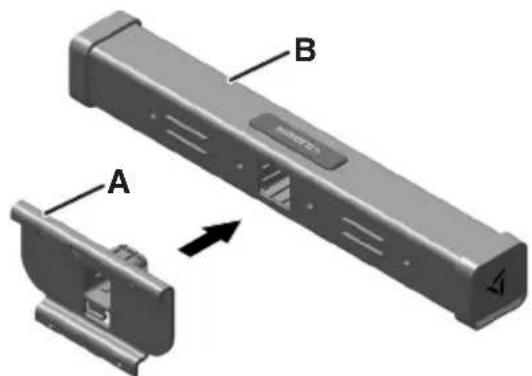
A. Universal Mounting Bracket (UMB)
B. PowerStrip Bar
- Insert the UMB into the PowerStrip Bar as shown.
IMPORTANT: Make sure that the rails and the grooves line up. - Press firmly until the PowerStrip Bar locks in place.
MOUNTING THE POWERSTRIP BAR TO A STEEL SURFACE
Place Magnets against the Steel Surface
A. Rear Mounting Magnets
Place the Rear Mounting Magnets against Steel Surface.
NOTE: It is recommended to use a Steel Surface at least 0.5 mm thick.
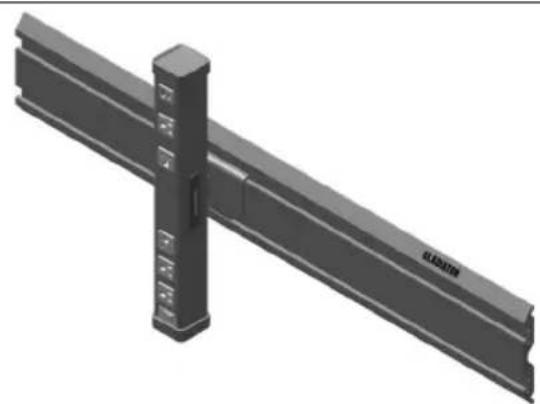
MOUNTING OPTIONS
WHEN USING GLADIATOR GEARTRACK CHANNELS OR GEARWALL PANELS
Horizontal Vertical
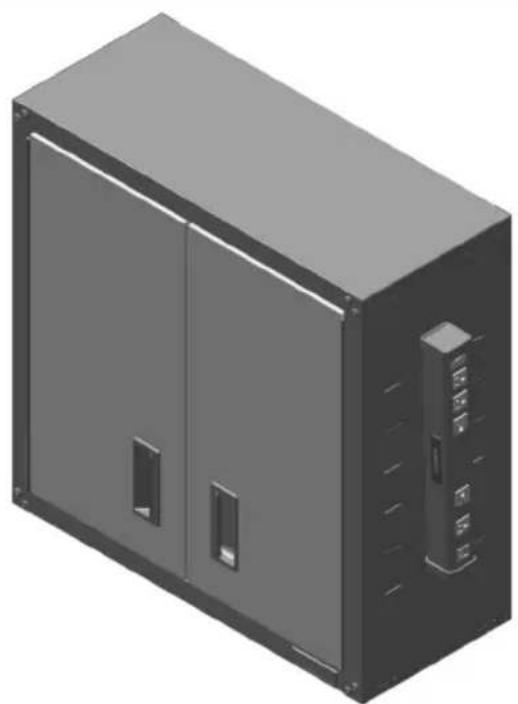
WHEN USING REAR FACING MAGNETS
Securely Attach Your Gladiator® Powerstrip Bar to Most Flat Steel Surfaces Using the Powerful Rear Mounting Magnets.
PRODUCT SPECIFICATIONS
USER-MAINTENANCE INSTRUCTIONS
| POWER CABLE | |
| Length 8 ft (3 wire, Grounded) | |
| Connector Type ANSI/NEMA 5-15P | |
| USB CONVENIENCE OUTLETS | |
| Connector Type USB-A and USB-C | |
| Output 5 V/2 A | |
| RATINGS | |
| Input 120 V AC, 15 A, 60 Hz | |
| Output 120 V AC, 15 A, 1875 W Maximum | |
| Surge Protection 1600 J, Class 3, 600 V (L-N, L-G, N-G) | |
| Overcurrent Protection 125 V, 15 A | |
| STANDARDS | |
| Certification | Certified to UL-1310, UL-1363, and UL-1449Confirms to CSA STD.C22.2 No. 308 |
| ENCLOSURE | |
| Drop Protection 10 ft | |
IMPORTANT: Unplug before cleaning.
Use mild dish soap to clean surfaces.
Wipe with damp cloth.
Do not immerse in water.
- Do not use abrasive cleaners.
Make sure product is thoroughly dry before reuse.
TROUBLESHOOTING
WARNING
Electrical Shock Hazard
Plug into a grounded 3 prong outlet.
Do not remove ground prong from the power cord plug.
Do not use an adapter.
Do not use an extension cord.
Failure to follow these instructions can result in death, fire, or electrical shock.
■ Is the power cord unplugged? Plug into a grounded 3 prong outlet.
- Has a household fuse blown or has a circuit breaker tripped? Replace the fuse or reset the circuit breaker, if the problem continues, call an electrician.
■ Is the over-current protection on the PowerStrip Bar tripped? If the power On/Off switch is not lit, the over-current protection may be tripped. See "Over-Current Circuit Protection."
ACCESSIONS
To order accessories, call 1-866-342-4089 and ask about available accessories, contact your authorized Gladiator® dealer or visit our website at www.gladiatorgarageworks.com In Canada, call 1-800-807-6777 or visit our website at www.gladiatorgarageworks.ca
WARRANTY
For warranty information:
In the U.S.A. call 1-866-342-4089 or visit our website at
www.gladiatorgarageworks.com
In Canada call 1-800-807-6777 or visit our website at
www.gladiatorgarageworks.ca
TABLE DES MATIÈRES
www.gladiatorgarageworks.com
www.gladiatorgarageworks.ca
INDICE
www.gladiatorgarageworks.ca
GARANTÍA
www.gladiatorgarageworks.com
www.gladiatorgarageworks.ca