
P-ES140 - Grinder SCHEPPACH - Free user manual and instructions
Find the device manual for free P-ES140 SCHEPPACH in PDF.

| Product Type | Disc Sander |
| Brand | Scheppach |
| Model | P-ES140 |
| Supply Voltage | 230 V / 50 Hz |
| Motor Power | 140 W |
| Sanding Disc Diameter | 125 mm |
| Rotational Speed (variable) | 1150 - 3600 min⁻¹ |
| Sanding Table Dimensions | 136 x 98 mm |
| Table Tilt | -10° to +50° |
| Angle Adjustment of Stop | 180° |
| Dust Extraction Connection | Ø 35 mm |
| Weight (net / gross) | 2.9 kg / 3.5 kg |
| Sound Pressure Level (L_pA) | 58 dB(A) |
| Sound Power Level (L_WA) | 71 dB(A) |
| Protection Class | II (double insulation) |
| Intended Use | Sanding wood and similar materials |
| Included Accessories | Angle stop, clamp, adapter, reducer, abrasive papers (2x80, 2x150, 2x240), 6 storage films, hex key, instruction manual |
| Recommended Maintenance | Clean with a damp cloth and mild soap; store in a dry place between 5 and 30 °C |
| Wear Parts | Abrasive paper, carbon brushes |
| Repair | Entrust to a qualified electrician |
Frequently Asked Questions - P-ES140 SCHEPPACH
User questions about P-ES140 SCHEPPACH
0 question about this device. Answer the ones you know or ask your own.
Ask a new question about this device
Download the instructions for your Grinder in PDF format for free! Find your manual P-ES140 - SCHEPPACH and take your electronic device back in hand. On this page are published all the documents necessary for the use of your device. P-ES140 by SCHEPPACH.
USER MANUAL P-ES140 SCHEPPACH
Explanation of the symbols on the equipment
Symbols are used in this manual to draw your attention to potential hazards. The safety symbols and the accompanying explanations must be fully understood. The warnings themselves will not rectify a hazard and cannot replace proper accident prevention measures.
| Read the operating instructions to reduce the risk of inquiry! |
| Wear hearing protection! Excessive noise can result in a loss of hearing. |
| Wear a dust mask to protect your respiratory system |
| Wear protective goggles. Sparks created during work or fragments, chippings and dust ejected by the device can case sight loss. |
| Important! Risk of injury. Never reach into the running saw blade! |
| Protection class II - double insulation |
| We have marked points in these operating instructions that impact your safety with this symbol. |
Table of contents: Page:
- Introduction 15
- Device description 15
- Scope of delivery 15
- Intended use 15
- Safety instructions 16
- Remaining hazards 17
- Technical data 18
8.Unpacking 18
9.Before use 18 - Operation 19
- Cleaning 20
- Storage 20
- Maintenance 20
- Disposal and recycling 20
- Trouble shooting 21
1. Introduction
Manufacturer:
scheppach
We hope your new tool brings you much enjoyment and success.
Note:
According to the applicable product liability laws, the manufacturer of the device does not assume liability for damages to the product or damages caused by the product that occurs due to:
- Improper handling,
- Non-compliance of the operating instructions,
- Repairs by third parties, not by authorized service technicians,
- Installation and replacement of non-original spare parts,
Application other than specified, - A breakdown of the electrical system that occurs due to the non-compliance of the electric regulations and VDE regulations 0100, DIN 57113 / VDE0113.
We recommend:
Read through the complete text in the operating instructions before installing and commissioning the device. The operating instructions are intended to help the user to become familiar with the machine and take advantage of its application possibilities in accordance with the recommendations. The operating instructions contain important information on how to operate the machine safely, professionally and economically, how to avoid danger, costly repairs, reduce downtimes and how to increase reliability and service life of the machine.
In addition to the safety regulations in the operating instructions, you have to meet the applicable regulations that apply for the operation of the machine in your country. Keep the operating instructions package with the machine at all times and store it in a plastic cover to protect it from dirt and moisture. Read the instruction manual each time before operating the machine and carefully follow its information. The machine can only be operated by persons who were instructed concerning the operation of the machine and who are informed about the associated dangers. The minimum age requirement must be complied with.
In addition to the safety notices contained in this operating manual and the particular instructions for your country, the generally recognised technical regulations for the operation of identical devices must be complied with.
We accept no liability for damage or accidents which arise due to non-observation of these instructions and the safety information.
2. Device description
- Mains plug
- On/Off switch
- Speed control
- Angle scale
- Rotary knob
- Sanding table holder
- Hex socket screw
- Sanding table
- Table groove
- Sanding disc
- Extraction nozzle
- Angle stop
- Screw clamp
- Adapter
- Reducer piece
- Sandpaper
- Hex key
- Angle stop bolt
- Angle stop angle scale
- Guide rail
3. Scope of delivery
Disc sander 1x
Angle stop 1x
- Crew clamp 1x
- Adapter 1x
- Reducer piece 1x
- Sandpaper 2x80 / 2x150 / 2x240
Storage covers 6x
- Hex key 1x
- Operating manual 1x
4. Intended use
The disc sander is used for sanding all types of wood, depending on the size of the machine.
The machine may only be used in the intended manner. Any use beyond this is improper. The user/operator, not the manufacturer, is responsible for damages or injuries of any type resulting from this.
An element of the intended use is also the observance of the safety instructions, as well as the assembly instructions and operating information in the operating manual.
Persons who operate and maintain the machine must be familiar with the Operating Manual and must also familiarise themselves with potential hazards.
In addition, the applicable accident prevention regulations must be strictly observed.
Other general occupational health and safety-related rules and regulations must be observed.
The liability of the manufacturer and resulting damages are excluded in the event of modifications of the machine.
The machine may only be operated with original parts and original accessories from the manufacturer.
The safety, operating and maintenance specifications of the manufacturer, as well as the dimensions specified in the operating manual, must be observed.
Please observe that our equipment was not designed with the intention of use for commercial or industrial purposes. We assume no guarantee if the product is used in commercial or industrial applications, or for equivalent work.
5. Safety instructions
WARNING: Read all safety warnings, instructions, illustrations and specifications provided with this power tool. Failure to follow all instructions listed below may result in electric shock, fire and/or serious injury.
Save all warnings and instructions for future reference.
The term "power tool" in the warnings refers to your mains-operated (corded) power tool or battery-operated (cordless) power tool.
1) Work area safety
a) Keep work area clean and well lit. Cluttered or dark areas invite accidents.
b) Do not operate power tools in explosive atmospheres, such as in the presence of flammable liquids, gases or dust. Power tools create sparks which may ignite the dust or fumes.
c) Keep children and bystanders away while operating a power tool. Distractions can cause you to lose control.
2) Electrical safety
a) Power tool plugs must match the outlet. Never modify the plug in any way. Do not use any adapter plugs with earthed (grounded) power tools. Unmodified plugs and matching outlets will reduce risk of electric shock.
b) Avoid body contact with earthed or grounded surfaces, such as pipes, radiators, ranges and refrigerators. There is an increased risk of electric shock if your body is earthed or grounded.
c) Do not expose power tools to rain or wet conditions. Water entering a power tool will increase the risk of electric shock.
d) Do not abuse the cord. Never use the cord for carrying, pulling or unplugging the power tool. Keep cord away from heat, oil, sharp edges or moving parts. Damaged or entangled cords increase the risk of electric shock.
e) When operating a power tool outdoors, use an extension cord suitable for outdoor use. Use of a cord suitable for outdoor use reduces the risk of electric shock.
f) If operating a power tool in a damp location is unavoidable, use a residual current device (RCD) protected supply. Use of an RCD reduces the risk of electric shock.
3) Personal safety
a) Stay alert, watch what you are doing and use common sense when operating a power tool. Do not use a power tool while you are tired or under the influence of drugs, alcohol or medication. A moment of inattention while operating power tools may result in serious personal injury.
b) Use personal protective equipment. Always wear eye protection. Protective equipment such as a dust mask, non-skid safety shoes, hard hat or hearing protection used for appropriate conditions will reduce personal injuries.
c) Prevent unintentional starting. Ensure the switch is in the off-position before connecting to power source and/or battery pack, picking up or carrying the tool. Carrying power tools with your finger on the switch or energising power tools that have the switch on invites accidents.
d) Remove any adjusting key or wrench before turning the power tool on. A wrench or a key left attached to a rotating part of the power tool may result in personal injury.
e) Do not overreach. Keep proper footing and balance at all times. This enables better control of the power tool in unexpected situations.
f) Dress properly. Do not wear loose clothing or jewellery. Keep your hair and clothing away from moving parts. Loose clothes, jewellery or long hair can be caught in moving parts.
g) If devices are provided for the connection of dust extraction and collection facilities, ensure these are connected and properly used. Use of dust collection can reduce dust-related hazards.
h) Do not let familiarity gained from frequent use of power tools allow you to become complacent and ignore power tool safety principles. A careless action can cause severe injury within a fraction of a second.
4) Power tool use and care
a) Do not force the power tool. Use the correct power tool for your application. The correct power tool will do the job better and safer at the rate for which it was designed.
b) Do not use the power tool if the switch does not turn it on and off. Any power tool that cannot be controlled with the switch is dangerous and must be repaired.
c) Disconnect the plug from the power source and/or remove the battery pack, if detachable, from the power tool before making any adjustments, changing parts of insert tools, or storing power tools. Such preventive safety measures reduce the risk of starting the power tool accidentally.
d) Store idle power tools out of the reach of children and do not allow persons unfamiliar with the power tool or these instructions to operate the power tool. Power tools are dangerous in the hands of untrained users.
e) Maintain power tools and insert tools. Check for misalignment or binding of moving parts, breakage of parts and any other condition that may affect the power tool's operation. If damaged, have the power tool repaired before use. Many accidents are caused by poorly maintained power tools.
f) Keep cutting tools sharp and clean. Properly maintained cutting tools with sharp cutting edges are less likely to bind and are easier to control.
g) Use the power tool, accessories and tool bits etc. in accordance with these instructions, taking into account the working conditions and the work to be performed. Use of the power tool for operations different from those intended could result in a hazardous situation.
h) Keep handles and grasping surfaces dry, clean and free from oil and grease. Slippery handles and grasping surfaces do not allow for safe handling and control of the tool in unexpected situations.
5) Service
a) Have your power tool serviced by a qualified repair person using only identical replacement parts. This will ensure that the safety of the power tool is maintained.
Warning! This electric tool generates an electromagnetic field during operation. This field can impair active or passive medical implants under certain conditions. In order to prevent the risk of serious or deadly injuries, we recommend that persons with medical implants consult with their physician and the manufacturer of the medical implant prior to operating the electric tool.
Additional safety rules for the disc sanding machine
Warning: Do not use your machine until it is completely assembled and installed according to the instructions.
- If you are not familiar with the operation of the sanding machine, ask the head of the department, your teacher, or any other qualified person.
-
Attention: This machine has only been designed for sanding wood or similar materials. The sanding of other materials can cause fire, injuries, or damage the product.
Always wear safety goggles. -
This machine may only be operated indoors.
- Important: Mount and use the machine on a horizontal surface. A non-horizontal surface can damage the motor.
- If the machine tends to tilt or walk (especially when sanding long and heavy panels), it must be fastened to a solid surface of sufficient carrying force.
- Firmly hold the workpiece when sanding.
- Always hold the workpiece firmly to the table when using the sanding disc.
- Always hold the workpiece to the side of the sanding disc running downwards, in order to maintain the workpiece pressed to the table. By using the upward-running side of the sanding disc, the workpiece could be ejected and cause injury to persons.
- Always keep a minimum distance of about 1.5mm or less between the table or fence and the sanding belt or disc.
- Do not wear gloves. Do not hold the workpiece with a cloth during sanding.
- Use sanding disc of the correct grit corresponding with the wood.
- Never sand workpieces too small to be held safely.
- Avoid awkward hand positions where a sudden slip could cause your hand to touch the sanding disc.
- When sanding a large piece of material, provide an additional support at table height.
- Never sand an unsupported workpiece. Secure the workpiece with the table or the fence. Exceptions are the sanding of curved workpieces on the outside of the sanding disc.
- Always clear the table, fence or sandpaper of scraps or other objects, before turning the machine on.
- Do not perform any layout assembly or set-up work on the table while the sanding machine is in operation.
- Switch the machine off and pull the power plug from the socket when fitting or removing accessories.
- Never leave the working area of the sanding machine while the tool is running, or as long as it has not come to an absolute standstill.
6. Remaining hazards
The machine has been built using modern technology and in accordance with recognized safety rules.
Some hazards, however, may still remain.
- The grinding wheel poses a danger of injury to fingers and hands by improper feeding or placement of tools.
- Danger of injury from thrown tools due to improper holding or feeding.
- The use of incorrect or damaged mains cables can lead to electrical injuries.
- Although having regarded all considerable rules there may still remain not obvious remaining hazards.
- Minimize remaining hazards by following the instructions in "Safety Rules", "Use only as authorized" and in the entire operating manual.
7. Technical data
| Motor 230 V / 50 Hz | |
| Motor power 140 W | |
| Ø Disc 125 mm | |
| Disc speed 1150 - 3600 min | -1 |
| Table dimensions | 136 x 98 mm |
| Table tilt | -10° - 50° |
| Angle stop tilt | 180° |
| Suction connection Ø | 35 mm |
| Weight | 2,9 / 3,5 kg |
Subject to technical changes!
Noise
Warning: Noise can have serious effects on your health. If the machine noise exceeds 85 dB (A), please wear suitable hearing protection.
Noise data
Sound power level L_WA 71 dB (A)
Sound pressure level L_pA 58 dB (A)
Uncertainty K_wa/pA 3 dB(A)
8. Unpacking
Open the packaging and carefully remove the device.
Remove the packaging material, packaging and transport safety devices (if applicable).
Make sure that the delivery is complete.
Check the device and the accessories for transport damage. In the event of complaints the carrier must be informed immediately. Later claims will not be recognised.
If possible, keep the packaging until the end of the warranty period.
Familiarise yourself with the product by means of the operating instructions before using for the first time.
With accessories as well as wearing parts and replacement parts use only original parts. Replacement parts can be obtained from your dealer.
When ordering please provide our article number as well as type and year of manufacture for your equipment.
Attention!
The device and packaging materials are not toys! Children must not be allowed to play with plastic bags, film and small parts! There is a risk of swallowing and suffocation!
9. Before use
ATTENTION!
Always make sure the device is fully assembled before commissioning!
- Prior to commissioning, all covers and safety devices must be mounted correctly.
The grinding disc must be able to run freely. - In case of previously machined wood, be aware of any foreign bodies, such as nails or screws, etc.
- Before pressing the on/off switch, make sure that the sandpaper is correctly fitted, and that moving parts run smoothly.
Appliance position (Fig. 4)
The appliance can be set horizontally or vertically.
Fix the supplied screw clamp (13) using the screw clamp mounting to a table edge to prevent the appliance tipping over.
Assembling/disassembling the sanding table (8)with sanding table holder (6). (Fig. 5)
- Undo and remove the hex socket screw (7) underneath the sanding table holder (6).
- Now pull the sanding table holder (6) together with the sanding table (8) off towards the front.
- To refit the sanding table (8), push the sanding table holder (6) with the sanding table (8) back into the normal position.
After this, reinsert the hex socket screw (7) and tighten the screw.
Replacing or attaching the sanding paper
ATTENTION! Ensure the appliance has been disconnected from the power in order to prevent it from being accidentally switched on during the replacement process and causing injuries.
- Before replacement, dismantle the sanding table holder (6) with the sanding table (8) in order to access the disc (10) more easily.
- Select the sanding paper (16) you require and remove the backing film.
- Stick the sanding paper (16) to the sanding disc (10) making sure not to trap any air underneath.
NOTE:
Stick sanding paper (16) you have already used to one of the storage covers supplied so that you can reuse it.
Adjusting the angle stop (Fig. 6)
- Undo the rotary knobs (5) fixed to both sides of the sanding table holder (6).
-
Using the angle scale (4) you can adjust the sanding table (8) to the required angle.
The angle can be adjusted to anything from -10 to +50 degrees. -
Next, tighten the rotary knobs (5) so that the sanding table (8) remains in the required position.
Adjusting the angle stop (12)
- Undo the angle stop bolt (18) and use the scale (19) to adjust it to the required angle. The marking on the scale (19) must match the marking on the guide rail (20).
- Retighten the stop bolt (18) to retain the angle.
- Push the guide rail (20) into the table groove (9) in the sanding table (8).
Connecting the dust ex5traction unit (Fig. 8 + 9)
- Insert the adapter (14) for outside dust extraction into the extraction nozzle (11). When doing so, note the guidance aid on the appliance and on the adapter.
To lock, turn the adapter (14) clockwise. - If necessary, use the reducer piece (15) by pushing it onto the adapter (14).
10. Operation
Switching on and off
- To switch the appliance on, plug the mains plug (1) into a wall socket and press the on/off switch (2) "l".
- Now set the required sanding paper speed using the speed control (3) on the side of the appliance. The speed is infinitely variable.
- To switch the appliance off again press the on/off switch (2) "0" and pull the mains plug (1) out of the power socket.
Grinding
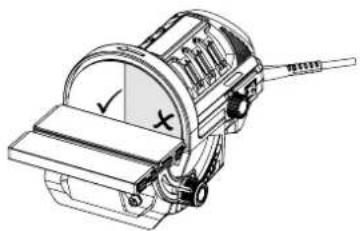
- The arrow on top of the appliance shows you the sanding disc (10) rotation direction (in this case, anticlockwise).
- The sanding speed can be adjusted using the speed control (3) on the side of the appliance. This allows you to process the material optimally according to you requirements.
Warning! Do not work in the grey working area!
ATTENTION! Always make sure the device is fully assembled before commissioning!
Electrical connection The electrical motor installed is connected and ready for operation. The connection complies with the applicable VDE and DIN provisions.
The customer's mains connection as well as the extension cable used must also comply with these regulations.
Damaged electrical connection cables
The insulation on electrical connection cables is often damaged.
This may have the following causes:
- Pressure points, where connection cables are passed through windows or doors.
- Kinks where the connection cable has been improperly fastened or routed.
- Places where the connection cables have been cut due to being driven over.
Insulation damage due to being ripped out of the wall outlet. - Cracks due to the insulation ageing.
Such damaged electrical connection cables must not be used and are life-threatening due to the insulation damage.
Check the electrical connection cables for damage regularly. Ensure that the connection cables are disconnected from electrical power when checking for damage.
Electrical connection cables must comply with the applicable VDE and DIN provisions. Only use connection cables of the same designation.
The printing of the type designation on the connection cable is mandatory.
For single-phase AC motors, we recommend a fuse rating of C 16A or K 16A for machines with a high starting current (from 3000 watts)!
11. Cleaning
Attention! Disconnect the mains plug before carrying out any cleaning work!
We recommend that you clean the device directly after every use.
Wipe swarf and dust off the machine from time to time with a cloth.
Clean the device at regular intervals using a damp cloth and a little soft soap. Do not use any cleaning products or solvents; they could attack the plastic parts of the device. Make sure that no water can penetrate the device interior.
12. Storage
Store the device and its accessories in a dark, dry and frost-free place that is inaccessible to children. The optimum storage temperature lies between 5 and 30^ .
Store the tool in its original package.
Cover the device to protect it from dust or moisture. Store the operating manual with the device.
13. Maintenance
Attention! Disconnect the mains plug before carrying out any maintenance work.
Connections and repairs
Connections and repairs of electrical equipment may only be carried out by an electrician.
The device is maintenance-free!
Please provide the following information in the event of any enquiries.
Type of current for the motor
Machine data - type plate
- Engine data - type plate
Service information
With this product, it is necessary to note that the following parts are subject to natural or usage-related wear, or that the following parts are required as consumables.
Wearing parts*: Grinding medium, carbon brushes
- may not be included in the scope of supply!
14. Disposal and recycling
The equipment is supplied in packaging to prevent it from being damaged in transit. The raw materials in this packaging can be reused or recycled. The equipment and its accessories are made of various types of material, such as metal and plastic. Defective components must be disposed of as special waste. Ask your dealer or your local council.
Old devices must not be disposed of with household waste!
This symbol indicates that this product must not be disposed of together with domestic waste in compliance with the
Directive (2012/19/EU) pertaining to waste electrical and electronic equipment (WEEE). This product must be disposed of at a designated collection point. This can occur, for example, by handing it in at an authorised collecting point for the recycling of waste electrical and electronic equipment. Improper handling of waste equipment may have negative consequences for the environment and human health due to potentially hazardous substances that are often contained in electrical and electronic equipment.
By properly disposing of this product, you are also contributing to the effective use of natural resources. You can obtain information on collection points for waste equipment from your municipal administration, public waste disposal authority, an authorised body for the disposal of waste electrical and electronic equipment or your waste disposal company.
15. Trouble shooting
The following table shows fault symptoms and describes remedial measures in the event of your machine failing to work properly. If you cannot localise and rectify the problem with this, please contact your service workshop.
| Problem Possible cause Remedy | ||
| Motor does not start | ON/OFF switch damaged. Rep | face all damaged parts before you use your machine again. |
| ON/OFF cable damaged. | ||
| ON/OFF relay damaged. | ||
| Fuse blown. Contact your local | service centre. Every attempt to carry out a repair, can be dangerous if it is not done by skilled personnel. | |
| Motor burnt. | ||
| Machine gets slower during work. | Too much pressure put on the workpiece. | Reduce the pressure on the workpiece. |
| The wood gets burnt during sanding. | Sanding disc covered with grease. | Replace disc. |
| Excessive pressure on workpiece. | Reduce pressure on workpiece. | |
CE - Declaration of Conformity
| 2014/29/EU | 2004/22/EC | 89/686/EC_96/58/EC | 2000/14/EC_2005/88/EC | |||
| 2014/35/EU | 2014/68/EU | 90/396/EC | Annex V | |||
| X | 2014/30/EU | X 2011/65/EU* | Annex VI Noise: measured LWA= xx dB(A); guaranteed LWA= xx dB(A) P = xx KW; L/Ø = cm Notified Body: Notified Body No.: | |||
| X 2006/42/EC | ||||||
| Annex IV Notified Body: Notified Body No.: | 2010/26/EC | |||||
| Certificate No.: | Emission. No: | |||||
Standard references:
EN 62841-1:2015; EN 55014-1:2017; EN 55014-2:2015; EN 61000-3-2:2014; EN 61000-3-3:2013
This declaration of conformity is issued under the sole responsibility of the manufacturer.
The object of the declaration described above fulfils the regulations of the directive 2011/65/EU of the European Parliament and Council from 8th June 2011, on the restriction of the use of certain hazardous substances in electrical and electronic equipment.
Subject to change without notice
Documents registrar: Dawid Hudzik
Günzburger Str. 69, D-89335 Ichenhausen
Garantiebedingungen
Revisionsdatum 20. August 2018


- Explanation of the symbols on the equipment
- Table of contents: Page:
- Introduction
- Manufacturer:
- Note:
- We recommend:
- Device description
- Scope of delivery
- Intended use
- Safety instructions
- Save all warnings and instructions for future reference.
- 1) Work area safety
- 2) Electrical safety
- 3) Personal safety
- 4) Power tool use and care
- 5) Service
- Additional safety rules for the disc sanding machine
- Remaining hazards
- Technical data
- Noise
- Noise data
- Unpacking
- Attention!
- Before use
- Appliance position (Fig. 4)
- Assembling/disassembling the sanding table (8)with sanding table holder (6). (Fig. 5)
- Replacing or attaching the sanding paper
- ATTENTION! Ensure the appliance has been disconnected from the power in order to prevent it from being accidentally switched on during the replacement process and causing injuries.
- Adjusting the angle stop (Fig. 6)
- Adjusting the angle stop (12)
- Connecting the dust ex5traction unit (Fig. 8 + 9)
- Operation
- Switching on and off
- Grinding
- Warning! Do not work in the grey working area!
- ATTENTION! Always make sure the device is fully assembled before commissioning!
- Cleaning
- Attention! Disconnect the mains plug before carrying out any cleaning work!
- Storage
- Maintenance
- Connections and repairs
- The device is maintenance-free!
- Please provide the following information in the event of any enquiries.
- Service information
- Disposal and recycling
- Old devices must not be disposed of with household waste!
- Trouble shooting
- CE - Declaration of Conformity
- Standard references:
- Garantiebedingungen
Brand : SCHEPPACH
Model : P-ES140
Category : Grinder