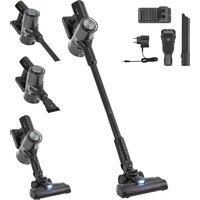
VC2101 - Vacuum Cleaner Juskys - Free user manual and instructions
Find the device manual for free VC2101 Juskys in PDF.


User questions about VC2101 Juskys
0 question about this device. Answer the ones you know or ask your own.
Ask a new question about this device
Download the instructions for your Vacuum Cleaner in PDF format for free! Find your manual VC2101 - Juskys and take your electronic device back in hand. On this page are published all the documents necessary for the use of your device. VC2101 by Juskys.
USER MANUAL VC2101 Juskys
natural_image
Technical line drawing of two vacuum cleaner components (no text or symbols)2in1 cordless handheld vacuum cleaner VC2101
EN Operating and assembly instructions bla
Thank you for your trust. We are glad that you have chosen our product and wish you much pleasure with it.
FRANÇAIS Bienvenue à Juskys Gruppe GmbH
1.1 For your safety.... 10
1.2 Use as intended 10
1.3 Improper use 10
1.4 Target group.... 10
1.5 Warning levels....10
1.6 Symbols....11
1.7 Safety instructions .... 11
2. Description and function ...... 11
3. Unpack and check 11
4. Mounting....12
4.1 Place of installation for wall bracket 12
4.2 Fitting the wall bracket.... 12
4.3 Assembling the device 12
5. Use 12
5.1 Charging the battery 12
5.2 Fitting the floor nozzle and crevice/brush nozzle 12
5.3 Switching the hoover on and off 12
5.4 Using the floor nozzle 13
5.5 Using the crevice/brush nozzle 13
5.6 Emptying the dust container 13
6. Store 13
7. Maintenance and schedule.... 13
7.1 Cleaning 13
7.2 Maintenance plan.... 13
7.3 Cleaning the floor socket 13
7.4 Cleaning the filter 13
8. Repairing 14
9. Technical data....14
- EU Declaration of Conformity 14
- Disposing 14
- Part list 34
- Overview 35
1. For your safety
1.1 For your safety
▶Read this document carefully and completely
▶ Follow the instructions and safety information in this document and on the product.
▶ Only use the product in perfect technical condition and in a safety-conscious and risk-aware manner.
▶ Keep this document for future reference and forwarding, as well as available near the product.
1.2 Use as intended
The product has been developed exclusively for private use.
This product is only suitable for indoor use.
▶ Only use the product as a hoover to remove loose and dry dirt from floor coverings or upholstery in the home or car.
▶ Only use the product in its original condition, with the original parts supplied and/or spare parts approved by the producer.
▶ Only have repairs carried out by qualified personnel.
Any other use is considered improper use and can result in severe personal injury and damage to property.
We accept no liability for non-compliance with instructions, safety instructions and improper use or any resulting damage to persons or property.
1.3 Improper use
The product is not suitable for commercial purposes.
The product is not a toy.
▶ Do not use the product in damp rooms such as bathrooms or saunas.
▶ Do not alter or modify the product.
▶ Do not use the product with defective parts.
▶ Never drop the hoover.
▶Keep small children and animals away from the product.
▶Do not operate the product with wet hands.
▶ Never use the hoover for the following:
- Harmful, sharp-edged, pointed, hot or glowing materials and substances
- damp or liquid substances
- ash, soot from ovens and heating systems
- Toner dust from printers and photocopiers
- Highly flammable or explosive substances and gases
1.4 Target group
Users are adults and children over 8 years under adult supervision, who have read and understood these instructions and the markings on the product or have received comparable instruction with regard to use and safety instructions.
Only they are allowed to use the product.
Persons with physical or mental disabilities/children/pregnant women may only use the product under the supervision of an adult.
Assembly work, maintenance work and cleaning may not be carried out by the aforementioned persons.
Users may only use the product when they are in full physical, mental and sensoric abilities, i.e. when they are awake and sober.
Skilled personnel are people who have received specialist mechanical training, such as trained craftsmen, metalworkers etc.
1.5 Warning levels

DANGER
Warning of dangers that will lead directly to death or serious injuries if the measures are ignored.

WARNING
Warning of dangers that can result in death or serious injury if the measures are ignored.

CAUTION
Warning of dangers that can lead to injuries if the measures are ignored.
NOTICE
Warning of dangers that can lead to material damage if the measures are ignored.
1.6 Symbols
Symbol Description
 | This symbol indicates that the user should have read and understood the instructions before use. |
| CE | Products marked with the CE mark meet the fundamental applicable regulations of the European Union. |
 | Indoor use only means that the product can only be used indoors dry in-door use. |
 | The crossed-out waste bin with a bar indicates waste electrical and electronic equipment that must not be disposed of with household waste.. |
 | The crossed-out garbage can without a bar indicates old batteries or accumulators that must not be disposed of with household waste. |
 | Protection class II devices have reinforced or double insulation. Even if devices have electrically conductive housing parts, these are protected against contact with live parts. |
 | The international recycling symbol indicates recyclable material. |
1.7 Safety instructions
| WARNING | |
 | Risk of strangulation due to charging cable.►Lay the cables of the power supply unit in a safe manner.►Keep small parts out of the reach of children. |
 | CAUTION |
 | Injuries and property damage.Modification of the product may result in personal injury and property damage and will void the warranty.►Only use the product with the original po supplied and in the original condition.►Only use spare parts approved by the manufacturer.►Do not vacuum people or animals with the hoover.►Do not block the ventilation openings ►Protect the product fromdirect sunlightExcessive external dust |
| CAUTION | |
| Battery/rechargeable battery hazard!The rechargeable batteries included can-not be removed.Only replace the battery with a bat-ry of the same type.Leave leaking, deformed or corroded cells in the product.Dispose of them together with the pro-duct using suitable protective devices. | |
2. Description and function
This product is a handy hoover for home use. It is lightweight, cordless and has a powerful rechargeable battery. Thanks to the swivel-tilt joint and the different nozzles, the vacuum cleaner is versatile and very flexible to use. The product is supplied with a practical wall bracket as a charging station with power supply, see „13. Overview“ on page 35.
3. Unpack and check
 |
WARNING
 |
| Store the packaging and small parts required for repackaging away from moisture and out of reach of children. |
NOTICE
Material damage. Pointed, sharp and scratching objects can damage the product when opening the packaging.
Material damage. Pointed, sharp and scratching objects can damage the product when opening the packaging.
Material damage. Pointed, sharp and scratching objects can damage the product when opening the packaging.
Material damage. Pointed, sharp and scratching objects can damage the product when opening the packaging.
Material damage. Pointed, sharp and scratching objects can damage the product when opening the packaging.
Material damage. Pointed, sharp and scratching objects can damage the product when opening the packaging.
Material damage. Pointed, sharp and scratching objects can damage the product when opening the packaging.
Material damage. Pointed, sharp and scratching objects can damage the product when opening the packaging.
Material damage. Pointed, sharp and scratching objects can damage the product when opening the packaging.
Material damage. Pointed, sharp and scratching objects can damage the product when opening the packaging.
Material damage. Pointed, sharp and scratching objects can damage the product when opening the packaging.
Material damage. Pointed, sharp and scratching objects can damage the product when opening the packaging.
Material damage. Pointed, sharp and scratching objects can damage the product when opening the packaging.
Material damage. Pointed, sharp and scratching objects can damage the product when opening the packaging.
Material damage. Pointed, sharp and scratching objects can damage the product when opening the packaging.
Material damage. Pointed, sharp and scratching objects can damage the product when opening the packaging.
Material damage. Pointed, sharp and scratching objects can damage the product when opening the packaging.
Material damage. Pointed, sharp and scratching objects can damage the product when opening the packaging.
Material damage. Pointed, sharp and scratching objects can damage the product when opening the packaging.
Material damage. Pointed, sharp and scratching objects can damage the product when opening the packaging.
Material damage. Pointed, sharp and scratching object can damage the product when opening the packaging.
Material damage. Pointed, sharp and scratching object can damage the product when opening the packaging.
Material damage. Pointed, sharp and scratching object can damage the product when opening the packaging.
Material damage. Pointed, sharp and scratching object can damage the product when opening the packaging.
Material damage. Pointed, sharp and scratching object can damage the product when opening the packaging.
-
Pull off tape and tie-down straps by hand or use scissors.
-
Pull off tape and tie-down straps by hand or use scissors.
-
Pull off tape and tie-down straps by hand or use scissors.
-
Pull off tape and tie-down straps by hand or use scissors.
-
Pull off tape and tie-down straps by hand or use scissors.
-
Pull off tape and tie-down straps by hand or use scissors.
-
Pull off tape and tie-down straps by hand or use scissors.
-
Pull off tape and tie-down straps by hand or use scissors.
-
Pull off tape and tie-down straps by hand or use scissors.
-
Pull off tape and tie-down straps by hand or use scissors.
-
Pull off tape and tie-down straps by hand or use scissors.
-
Pull off tape and tie-down straps by hand or use scissors.
-
Pull off tape and tie-down straps by hand or use scissors.
-
Pull off tape and tie-down straps by hand of use scissors.
-
Pull off tape and tie-down straps by hand or use scissors.
-
Pull off tape and tie-down straps by hand or use scissors.
-
Pull off tape and tie-down straps by hand or use scissors.
-
Pull off tape and tie-down straps by hand or use scissors.
-
Set the box up with the directional arrows pointing up.
-
Set the box up with the directional arrows pointing up.
-
Set the box up with the directional arrows pointing up.
-
Set the box up with the directional arrows pointing up.
-
Set the box up with the directional arrows pointing up.
-
Set the box up with the directional arrows pointing up.
-
Set the box up with the directional arrows pointing up.
-
Set the box up with the directional arrows pointing up.
-
Set the box up with the directional arrows pointing up.
-
Set the box up with the directional arrows pointing up.
-
Set the box up with the directional arrows pointing up.
-
Set the box up with the directional arrows pointing up.
-
Set the box up with the directional arrows pointing up.
-
Set the box up with the directional arrows pointing up.
-
Set the box up with the directional arrows pointing up.
-
Set the box up with the directional arrows pointing up.
-
Set the box up with the directional arrows pointing up.
-
Set the box up with the directional arrows pointing up.
-
Open the packing carton.
-
Open the packing carton.
-
Open the packing carton.
-
Open the packing carton.
-
Open the packing carton.
-
Open the packing carton.
-
Open the packing carton.
-
Open the packing carton.
-
Open the packing carton.
-
Open the packing carton.
-
Open the packing carton.
-
Open the packing carton.
-
Open the packing carton.
-
Open the packing carton.
-
Open the packing carton.
-
Open the packing carton.
-
Open the packing carton.
-
Open the packing carton.
-
Open the packing carton.
4. Mounting
4.1 Place of installation for wall bracket
▶Select a suitable installation location that meets the following requirements:
- The installation location is dry and can be ventilated regularly.
- The installation site is not permanently exposed to the sun and strong temperature fluctuations.
- The subsurface of the installation site is level and non-slip.
4.2 Fitting the wall bracket

WARNING

Danger to life due to electric shock and damage to property.
▶Reposition the wall bracket if there are cables near the drill holes and these could be damaged by drilling.
- Insert the plug of the power supply unit into the wall bracket.
- Secure the cable in the cable guide.
- Before drilling, use a cable tester to check whether there are any cables near the drill holes.
- Measure the height for the wall bracket and mark the fixing height.
- Hold the hoover with the suction pipe and floor nozzle attached at the height to ensure that the hoover can hang properly when fully equipped.
- Then hold the wall bracket in place. The two holes for the drill holes can now be marked so that the wall bracket can hang horizontally.
- Put the wall bracket aside and start drilling the holes.
- Insert both wall plugs into the drill holes.
- Mount the wall bracket to the wall using 2 screws.
4.3 Assembling the device
▶Connect the suction pipe to the hand-held appliance. Then connect the suction pipe to the floor brush.
5. Use

CAUTION

Risk of injury due to improper use.
▶ Use the product in accordance with its intended use, see chapter „1.2 Use as intended“ on page 10.
▶ Fully charge the hoover battery once every 6 to 12 weeks to avoid deep discharge and thus the destruction of the battery pack.

CAUTION

Risk of injury due to negative pressure!
▶ Do not allow children to play with the appliance.

CAUTION

Risk of mould growth when vacuuming up damp or wet dirt.
▶ Empty the dust container regularly
5.1 Charging the battery
The battery should be charged at around 25%.
- Switch off the device.
- Connect the device to the power supply unit either directly or via the wall bracket.
- Before connecting, ensure that the mains voltage and mains frequency of the device are identical to those of the mains supply.
- Connect the power supply unit to a power socket.
▶ The hoover battery is charging.
▶ The LED charge indicator lights now show the charge status (25%, 50% and 100%).
The appliance has an electronic charge control that prevents overcharging.
The charging process is complete when all 3 LEDs light up.
5.2 Fitting the floor nozzle and crevice/brush nozzle
The nozzle attachment can either be attached directly to the hand-held appliance or connected via the suction pipe.
▶Insert the nozzle attachment into the handheld appliance or the suction pipe with the marking facing upwards until you hear it click into place.
5.3 Switching the hoover on and off
- Press the multifunction button to switch the vacuum cleaner on.
▶ The vacuum cleaner starts to vacuum at the lowest power level.
▶ The LEDs on the handset for the battery charge status and the LEDs on the floor nozzle start to light up.
-
Press the multifunction button again to select the next power level.
-
After the multifunction button is pressed at the highest power level, the vacuum cleaner switches off again.
-
Then hang the hoover on the wall bracket, if fitted.
5.4 Using the floor nozzle
The floor nozzle is suitable for all common floor coverings, such as carpet or parquet, tiles or laminate. In dark areas, the built-in LEDs also ensure better visibility. This makes it much easier to see whether the area is really clean or whether there is still coarse dirt there.
5.5 Using the crevice/brush nozzle
The brush attachment has an integrated 2-in-1 function. Without the brush attachment, you can vacuum specific corners.
With the brush attachment, you can vacuum more sensitive surfaces effortlessly.
The nozzle attachment can be moved effortlessly at the touch of a button.
▶ Make sure that it engages again with an audible click.
5.6 Emptying the dust container
- Hold the appliance with the base plate of the dust container over a waste bin.
- Press the slider of the opener downwards.
- Empty the contents of the dust container.
- Close the base plate again.
▶ The lock engages with an audible click.
6. Store
NOTICE
Damage to the product due to incorrect storage.

▶ Store the product in a dark, cool, dry and well-ventilated place.
▶ Protect the product from dust and moisture.
7. Maintenance and schedule
7.1 Cleaning

WARNING
Danger to life due to electric shock.

▶ Use a dry or slightly damp cloth for cleaning.
▶ Do not rinse the appliance with water.
▶ Do not wipe the electrical contacts.
NOTICE
Damage caused by incorrect cleaning agents.

▶Check the compatibility of the cleaning agent with the surface on an inconspicuous area.
▶ Do not use any organic solvents, boiling water, strong acids or alkaline cleaning agents for cleaning.
▶ Remove dust and light dirt with a damp cloth or a soft brush.
▶ Use a mild, non-flammable and food-safe cleaning agent or a cloth dampened with water for heavy soiling. Regular maintenance increases the safety and longevity of your product.
▶ Empty the collection container when it is full.
▶ Allow the appliance to air dry completely after cleaning.
7.2 Maintenance plan
Before each use
Condition
▶Check the overall condition of the product.
▶ Check the hoover for dirt and damage.
▶ Remove accumulated dust from the hoover.
▶ Check the power supply unit for damage.
Attachment parts
▶Check whether attachment parts have become loose or distorted.
every 6 months
▶Replace the filter.
▶ Fully recharge the battery if it is not used for a longer period of time.
7.3 Cleaning the floor socket
- Separate the suction pipe from the floor brush by pressing the release button.
- There is a small rotary knob on the left-hand side that can be turned with a coin or a screwdriver.
- Turn the rotary knob to the „Lock open“ position
- Remove the brush roller.
- Then remove all dirt.
- Reinsert the brush roller after it has been carefully cleaned.
- Close the lock. You will hear it click into place.
- Turn the rotary knob back to the „Lock closed“ position.
7.4 Cleaning the filter
NOTICE
Damage to property.
▶ Never wash the filter unit in the washing machine or dishwasher!
▶ Do not use a hairdryer or similar hot air appliances for drying.
▶ Only operate the hoover when it is completely dry and correctly installed.
The filter unit must always be inserted correctly so that dust sucked in does not get into the motor housing and damage the hoover.
- Press down the dust container release button and remove the dust container.
- Remove the filter and the filter housing from the dust container.
- Wash the filter and the filter housing with cold water.
- Allow both to dry completely.
- Replace the filter in the filter housing.
- Place the filter housing in the dust container.
- Reconnect the dust container to the hoover.
8. Repairing
NOTICE

Damage due to improper repair
▶ Only use spare parts approved by the manufacturer or original ones.
▶ Only have repairs carried out by qualified personnel.
9. Technical data
Designation Value
| Item number: | black: 300405green: 300406red: 300407gold: 300408 |
| Materials: Metal, plastic | |
| Volume dust container: 0,8 l | |
| Total length: 105 cm | |
| Hand-held hoover length: | 55 cm |
| Rated power: 150 W (motor power) | |
| Floor nozzle: | 22.2 V= | 20 W |
| Max/Eco vacuum suction pressure: | 12/8/6 KPa |
| Noise level max. 68 dB | |
| AirWatt: 90 W | |
| Airflow 0.9 m3/min. | |
| Weight: | 2.9 kg |
| Power supply unit | |
| Input: | 100-240 V~, 50/60 Hz,0.5 A |
| Output: | 30 V= , 0.5 A, 15 W |
Battery
| Type: | 18650 |
| Technology | 21,6 V= |
| Battery voltage | Li-ion |
| Battery capacity | 2200 mAh (47.52 Wh) |
| Battery life | 20/30/40 minutes |
10. EU Declaration of Conformity
The distributor hereby declares that the named product meets the applicable European minimum requirements.
The full text of the EU declaration of conformity is available at the following internet address: https://www.juskys.de.
11. Disposing
Packaging
The packaging material is recyclable.
▶ Dispose of the packaging in an environmentally friendly manner and take it to the regional collection of recyclables.
Product in general
This product does not belong in household waste. At the end of its service life, return it free of charge to the producer, point of sale or public collection points set up for this purpose. Details of disposal are regulated by the respective national law. Valuable materials are fed into the recycling cycle in order to gain new raw materials from them. The following recyclables are collected in municipal collection points:
- Waste glass, plastics, scrap metal, sheet metal and much more.
With this type of recycling of old products you make an important contribution to the protection of our environment.
Table des matières
4.2 Monter le support mural
- power switch
- speed "+" button
- speed "-" button
- base unit
- cover
- dust container
- lid of the dust container
- button for opening the dust container
- battery
- unlocking button for the dust container
- upper extension tube
- extension tube
- motorised brush
- LED headlight
- floor nozzle
- crevice nozzle
17.2 in 1 dust brush - wall bracket adapter
- power supply unit
FRANÇAIS
text_image
Labeled diagram of a vacuum cleaner with numbered parts for identification and assembly reference.DE: Technische Änderungen, Druckfehler und Irrtümer vorbehalten.
EN: Technical changes, misprints and errors excepted.
FR: Sous réserve de modifications techniques, de fautes d'impression et d'erreurs.
IT: Con riserva di modifiche tecniche, refusi ed errori.
ES: Salvo cambios técnicos, erratas y errores.
ww
www