Kebab Master - Grill plate OneConcept - Free user manual and instructions
Find the device manual for free Kebab Master OneConcept in PDF.

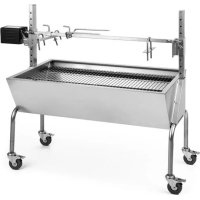
| Product type | Vertical grill plate with rotisserie |
| Brand | oneConcept |
| Model | Kebab Master |
| Article number | 10009355 |
| Power supply | 220 V ~ 50 Hz |
| Power | 1500 W |
| Dimensions (approx.) | 40 x 30 x 35 cm |
| Weight (approx.) | 8 kg |
| Included accessories | Rotisserie, kebab holder, fish basket, drip tray |
| Main functions | Rotisserie cooking, kebab preparation, grill with fish basket |
| Control type | Mechanical timer (Timer) with "Stay On" position |
| Door | Glass door with handle |
| Interior light | Yes, turns off automatically when door is closed |
| Drip tray | Removable, for collecting cooking juices |
| Body material | Stainless steel and glass |
| Care and cleaning | Clean the body with a damp cloth; accessories washable in soapy water or dishwasher |
| Safety | Do not immerse in water; use protective gloves; do not touch hot surfaces |
| Minimum distance to walls | 10 cm on the sides, 30 cm above |
| Recommended cooking temperature | Varies by food (see cooking guide) |
| Spare parts and repairability | Spare parts available from manufacturer; repairs by a professional only |
| Disposal instructions | Do not dispose of with household waste; take to an approved collection point |
Frequently Asked Questions - Kebab Master OneConcept
User questions about Kebab Master OneConcept
0 question about this device. Answer the ones you know or ask your own.
Ask a new question about this device
Download the instructions for your Grill plate in PDF format for free! Find your manual Kebab Master - OneConcept and take your electronic device back in hand. On this page are published all the documents necessary for the use of your device. Kebab Master by OneConcept.
USER MANUAL Kebab Master OneConcept
INHALTSVERZEICHNIS
Berlin Brands Group UK Limited
PO Box 42
272 Kensington High Street
London, W8 6ND
United Kingdom
SICHERHEITSHINWEISE
natural_image
Hand holding a black rectangular device with red arrows indicating downward motion (no text or symbols visible)DEN GRILL ALS BRÄTER VERWENDEN
VORSICHT
natural_image
Illustration of a blender with various kitchen utensils arranged in vertical columns (no text or symbols visible)natural_image
Symbol of a trash bin crossed with a diagonal line, no text or numbers presentCongratulations on purchasing this device. Please read the following instructions carefully and follow them to prevent possible damages. We assume no liability for damage caused by disregard of the instructions and improper use. Scan the QR code to get access to the latest user manual and more product information.

CONTENTS
Safety Instructions 14
Product Overview 15
Before First Use 15
Using the Grill as a Roaster 16
Preparing Kebabs with the Grill 18
Using Your Grill with Fish Basket 19
Cleaning and Care 20
Disposal Considerations 20
TECHNICAL DATA
| Item number 10009355 | |
| Power supply 220 V ~ 50 Hz | |
| Power consumption 1500 W |
MANUFACTURER & IMPORTER (UK)
Manufacturer:
Chal-Tec GmbH, Wallstrasse 16, 10179 Berlin, Germany.
Importer for Great Britain:
Berlin Brands Group UK Limited
PO Box 42
272 Kensington High Street
London, W8 6ND
United Kingdom
SAFETY INSTRUCTIONS
- Connect the device so that the mains plug is easily accessible at all times.
- Inspect the power cord regularly for damage. If the power cord is damaged, it must be replaced by the manufacturer or an authorized service center or a similarly qualified person.
- Repairs may only be carried out by qualified personnel, do not attempt to repair the device yourself.
- Do not connect the unit to a timer or a remote control power outlet.
- Never immerse the appliance, power cord or plug in water or other liquids.
- Do not handle the plug with wet hands.
- Do not pull the plug out of the socket by the cable, but hold it firmly by hand when pulling it off.
- Do not use the cable as a handle.
- Lay the cable in such a way that no one will trip over it.
- Do not let the cable run over sharp edges.
- Do not use the unit in wet rooms or in the rain.
- Place the appliance in such a way that it cannot fall into water. If it does fall into water, immediately unplug the appliance from the wall outlet and only then touch the appliance.
- Unplug the appliance from the wall outlet when it is no longer in use.
- Keep the appliance away from open fire and heat sources.
- This device may be only used by children 8 years old or older and persons with limited physical, sensory and mental capabilities and / or lack of experience and knowledge, provided that they have been instructed in use of the device by a responsible person who understands the associated risks.
- Keep children away from the grill and do not leave the appliance unattended during operation.
- Place the appliance on a stable, level surface.
- Make sure that there are no easily inflammable objects or materials around the grill.
- Keep at least 30 cm away from walls.
- Do not touch the grill grate or other hot surfaces during operation.
- Do not move the appliance until it has cooled down completely. Only touch the appliance by the handles provided for this purpose.
- Only place the appliance on surfaces that are insensitive to heat. Position the appliance so that it is not too close to the edge.
- To avoid heat build-up, do not place the appliance directly under kitchen cabinets or shelves.
- Do not place the appliance on or near a stove.
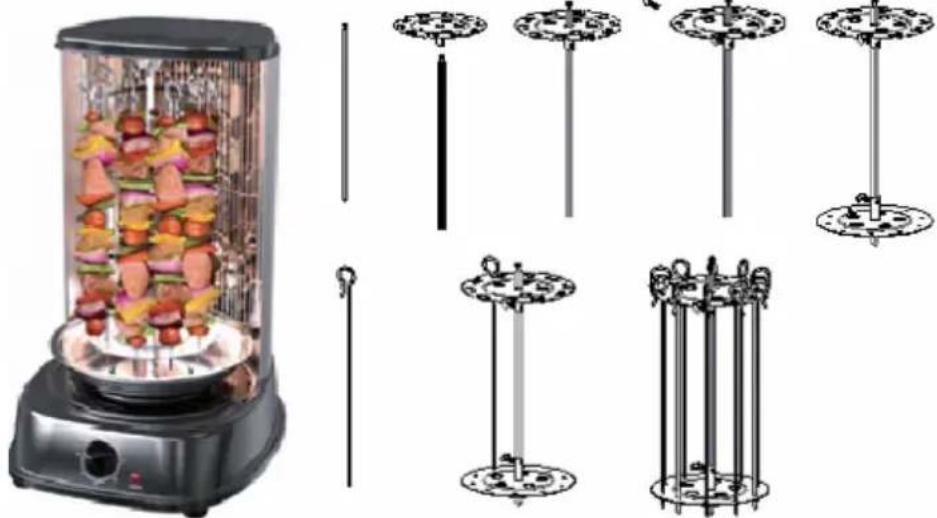
PRODUCT OVERVIEW
| A: Top housingB: Base stationC: Heating elementD: Door handleE: Glass doorF: TimerG: Indicate lightH: Rotisserie spitI: KabobJ: Upper support (Kabob)K: Lower support (Kabob)L: Drip pan | 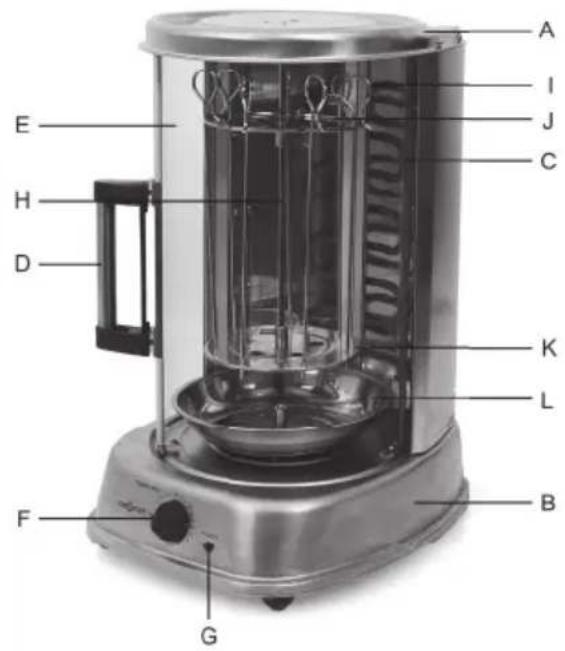 |
BEFORE FIRST USE
Read the instructions carefully. This information is necessary for using the vertical grill.
Place the grill on a fl at surface, such as a kitchen worktop or table. Around the appliance, keep a distance of 10 cm from walls, cupboards or other objects. Remove all stickers from the appliance. Remove the drip tray, spit, forks and kebab holders and wash them in warm water with some detergent or in the dishwasher. Dry them thoroughly before use.
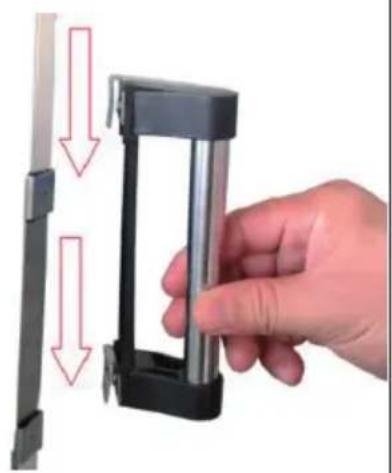
Note: The door handle is removable, in order to let you take it out and clean the inside of unit. Before you use the oven, please assem- bly the handle yourself by the following assembly instruction picture.
When you are ready to use the grill, be sure that the TIMER Control is in the "Off" position and unplugged. We recommend a trial run to familiarize yourself with your grill and to eliminate any protective substance or oil that may have been used for pa- cking and shipping. Plug the cord into a 120-volt AC outlet. Set the TIMER Control to "20" minutes. A small amount of smoke and odor may be detected. This is normal. To avoid scratching, marring, discoloration or fire hazard, do not store anything on top of the oven, especially during operation.
natural_image
Hand holding a black rectangular device with two red arrows pointing downward, next to a vertical panel (no text or symbols visible)USING THE GRILL AS A ROASTER

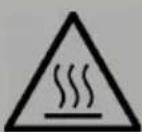
CAUTION
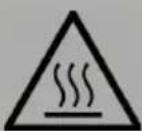
The surfaces of the device become hot during use and remain hot afterwards! Do not place anything on the appliance. Always wear protective, insulating oven gloves when placing or removing objects from the appliance. Never use the appliance without the drip tray.
Note: Do not switch on the grill until the door is closed and the light has gone out.
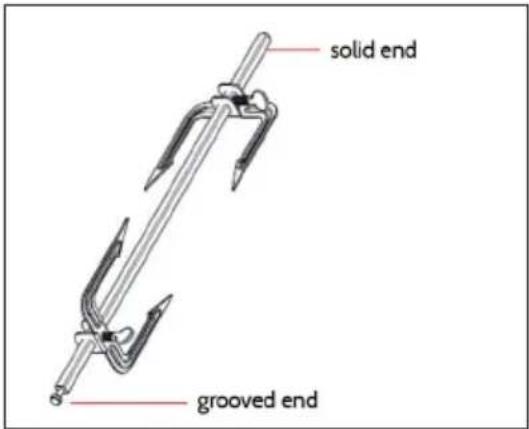
- Place one rotisserie fork on the end of the rotisserie spit opposite the point with the tines facing the cen- ter and tighten the screw slightly.
- Slide the pointed end of the rotisserie spit through the center of the food to be cooked. Place the other rotisserie fork on the other end of the rotisserie spit with the tines facing the roast.
- Adjust the roast so that it is centered on the rotisserie spit. Make sure the forks are secure on the roast and on the spit and tighten the screws. When cooking poultry, it may be necessary to secure legs and wings to the body with butchers twine to make the roast as compact as possible for smooth movement of the rotisserie spit.
- Season or baste the roast as desired. IMPORTANT! Place the round drip pan into the receptacle at the bottom of the oven to catch the drippings.
- Put the solid end of the rotisserie spit in the drive socket on located in the center of the drip pan. Place the grooved end on the spit support on located on the top interior of the oven.
- Close the glass door and the inner light will be off automatically.
- Set the TIMER Control to the time according to RECIPE. If more than 1 hour, set to "Stay On" and check after the setting time. When the roast is done, turn the TIMER Control to "Off" and unplug the oven.
CAUTION
Risk of burns! The grill sides and top are hot, use oven mitts or temperature resistant gloves when removing the chicken. You can also use a carving fork and set of tongs to remove the roast.
- Remove the rotisserie from the top by lifting up and out towards you. Pull the bottom part of the spit out of the drip pan receptacle and place onto a carving station. 14. Place the roast on a cutting board or platter and allow standing for 10-15 minutes, this allows the juices to redistribute throughout the roast making for a moister, flavorful roast.
- Using a pot holder, loosen the screws on the rotisserie forks and remove the rotisserie spit from the roast. Carefully remove the rotisserie forks and carve the roast.
PREPARING KEBABS WITH THE GRILL
If a kebab holder is included, follow these instructions for use.
CAUTION
The surfaces of the device become hot during use and remain hot afterwards! Do not place anything on the appliance. Always wear protective, insulating oven gloves when placing or removing objects from the appliance. Never use the appliance without the drip tray.
natural_image
Illustration of a kitchen blender with various standers and food items, no text or symbols present.- Assemble the kebab holder as shown in the pictures.
- Place the round drip tray at the bottom of the appliance to catch the drops.
- Insert the fixed end of the rotating spit into the drive opening in the middle of the drip tray.
- Insert the grooved end into the holder at the top inside the oven.
- Set the TIMER control according to the recipe (see Recipes). If the time is more than 1 hour, set the controller to „Stay On“ and check the appliance after the preparation time has expired.
- When the food is ready, set the controller to „Off“ and unplug the appliance.
USING YOUR GRILL WITH FISH BASKET
If your grill comes with 2 pieces of Fish Basket, please follow the instructions for use.
CAUTION
The surfaces of the device become hot during use and remain hot afterwards! Do not place anything on the appliance.
Always wear protective, insulating oven gloves when placing or removing objects from the appliance. Never use the appliance without the drip tray.
Note: The unit will never start before you close the door well and the inner light is off.
- Place the bottom kabob support on the end of the rotisserie spit opposite the point and tighten the screw slightly. It is as the holder of the basket, and then let the spit go through the grid that bulged out of the basket.
- Put fi sh or other roast into the baskets. Make sure the roast will not touch sides or top of grill.
- Place the round drip pan into the receptacle at the bottom of the oven to catch the drip-pings.
- Put the solid end of the rotisserie spit in the drive socket on located in the center of the drip pan.
- Place the grooved end on the spit support on located on the top interior of the grill.
- Close the door and the inner light is off automatically.
- Set the TIMER Control to the time according to recommended Recipe. If more than 1 hour, set to "Stay On" and check after the shortest time.
- When the roast is done, turn the TIMER Control to "Off" and unplug the grill.
Cooking times
- Chicken, duck 30-45 minutes
- Steak 45-60 minutes
- Kebab 20-30 minutes
- Fish 20-32 minutes
• Vegetables 15-20 minutes
CLEANING AND CARE
- Pull the power plug out of the socket. Let the grill cool down completely. Remove all accessories.
- Use a damp and/or soft cloth to clean the housing. NEVER IMMERSE THE APPLIANCE IN WATER. Clean the insides with water and a dry cloth. Do not use strong cleaners. All accessories can be cleaned with soapy water.
- Rub the walls with a damp cloth.
DISPOSAL CONSIDERATIONS

natural_image
Symbol of a trash bin crossed with a diagonal line, no text or numbers presentIf there is a legal regulation for the disposal of electrical and electronic devices in your country, this symbol on the product or on the packaging indicates that this product must not be disposed of with household waste. Instead, it must be taken to a collection point for the recycling of electrical and electronic equipment. By disposing of it in accordance with the rules, you are protecting the environment and the health of your fellow human beings from negative consequences. For information about the recycling and disposal of this product, please contact your local authority or your household waste disposal service.
Chère cliente, cher client,
SOMMAIRE
Berlin Brands Group UK Limited
PO Box 42
272 Kensington High Street
London, W8 6ND
United Kingdom
CONSIGNES DE SÉCURITÉ
natural_image
Hand holding a black plastic device with two arrows pointing downward (no text or symbols visible)UTILISER LE GRIL COMME RÔTISSOIRE
ATTENTION
natural_image
Illustration of a kitchen blender with various stand holders and food items, no text or symbols present.natural_image
Symbol of a trash bin crossed with a diagonal line, no text or numbers presentÍNDICE
Berlin Brands Group UK Limited
PO Box 42
272 Kensington High Street
London, W8 6ND
United Kingdom
natural_image
Hand holding a black plastic device with red arrows indicating downward motion (no text or symbols visible)natural_image
Illustration of a blender with various kitchen utensils arranged in vertical arrangements (no text or symbols visible)natural_image
Symbol of a trash bin crossed with a diagonal line, no text or numbers presentINDICE
PRODUTTORE E IMPORTATORE (UK)
Produttore:
Chal-Tec GmbH, Wallstraße 16, 10179 Berlino, Germania.
Berlin Brands Group UK Limited
PO Box 42
272 Kensington High Street
London, W8 6ND
United Kingdom
AVVERTENZE DI SICUREZZA
natural_image
Hand holding a black plastic device with two red arrows pointing downward, against a white background (no text or symbols)UTILIZZARE LA GRIGLIA PER ARROSTIRE
ATTENZIONE
natural_image
Illustration of a kitchen blender with various stand holders and food items, no text or symbols present.natural_image
Symbol of a trash bin crossed with a diagonal line, no text or numbers presentINHOUDSOPGAVE
Berlin Brands Group UK Limited
PO Box 42
272 Kensington High Street
London, W8 6ND
United Kingdom
VEILIGHEIDSINSTRUCTIES
natural_image
Hand holding a black plastic device with red arrows indicating downward motion (no text or symbols visible)DE GRILL ALS BRAADROOSTER GEBRUIKEN
LET OP!
natural_image
Illustration of a blender with various kitchen utensils arranged in vertical columns (no text or symbols visible)INSTRUCTIES VOOR AFVOER