
STEAMY800 - Steamer Sommertal - Free user manual and instructions
Find the device manual for free STEAMY800 Sommertal in PDF.

| Product type | Steamer |
| Brand | Sommertal |
| Model | STEAMY800 |
| Power supply | 230 V ~ 50 Hz, 800 W |
| Water capacity | 0.2 to 1.2 L |
| Number of baskets | 3 cooking baskets + 1 rice basket |
| Material of baskets | Food-grade plastic |
| Dimensions (L x W x H) | Approx. 30 x 30 x 35 cm |
| Weight | Approx. 2.5 kg |
| Timer | Mechanical up to 60 minutes |
| Automatic shut-off | Yes, at the end of time and overheating protection |
| Functions | Steaming, egg cooking, rice cooking, preparing complete meals |
| Safety | Overheating protection, insulated handles, automatic shut-off |
| Cleaning | Removable parts hand washable; base wiped with a damp cloth |
| Maintenance | Regular descaling with vinegar or descaler |
| Included accessories | 3 steaming baskets, 1 rice basket, 1 lid, 1 drip tray, 1 steam tube |
| Warranty | 24 months |
| Protection class | I |
Frequently Asked Questions - STEAMY800 Sommertal
User questions about STEAMY800 Sommertal
0 question about this device. Answer the ones you know or ask your own.
Ask a new question about this device
Download the instructions for your Steamer in PDF format for free! Find your manual STEAMY800 - Sommertal and take your electronic device back in hand. On this page are published all the documents necessary for the use of your device. STEAMY800 by Sommertal.
USER MANUAL STEAMY800 Sommertal
natural_image
Line drawing of a multi-tiered steamer or cooking vessel (no text or symbols)230V\~50Hz, 800W


WEEE Reg No.DE43021155
Deutsch....2
Français 21
Italiano....42
English 62
Español 81
Übersicht / Aperçu de l'appareil / Panoramica / Overview/ Resumen
Inhalt
natural_image
Simple line drawing of a trash bin with two crossed lines indicating no waste or prohibition (no text or symbols)D-54552 Nerdlen (Germany)
Tel: +49 (0)6592-1730200
Fax: +49 (0)6592-1730209
www.albatros-international.de
info@albatros-international.eu
natural_image
Simple line drawing of a trash bin with two crossed lines indicating no waste or restriction (no text or symbols)D-54552 Nerdlen (Germania)
Tel: +49 (0) 6592-1730200
Fax: +49 (0) 6592-1730209
www.albatros-international.de
info@albatros-international.eu
- Overview 63
- Intended purpose....64
- Safety information....64
- Items supplied 67
- Before using for the first time....68
- Operating the appliance 68
6.1 Cooking....68
6.2 Checking whether the food is cooked....69
6.3 Topping up the water 69
6.4 Ending operation....69
6.5 Thermal cut-out 70
- Hints on cooking with the steamer.... 70
7.1 Using steamer baskets 70
7.2 Boiling eggs 70
7.3 Cooking rice and liquids....70
7.4 Preparing whole meals 71
- Cooking times....71
8.1 Cooking times - vegetables....72
8.2 Cooking times - fish 73
8.3 Cooking times - meat 74
8.4 Cooking times - rice 75
8.5 Cooking times - eggs....75
- Recipes....76
9.1 Kassler ham with sprouts and potatoes 76
9.2 Salmon fillet with vegetables and rice....76
9.3 Filled curd cheese dumplings....77
- Cleaning and storing....77
10.1 Dismantling the appliance....77
10.2 Cleaning the bottom part....77
10.3 Cleaning the accessories 77
10.4 Assembling the accessories....78
10.5 Storing the appliance ....78
10.6 Descaling the appliance....78
- Disposal....78
- Problem-solving....79
- Technical specifications....79
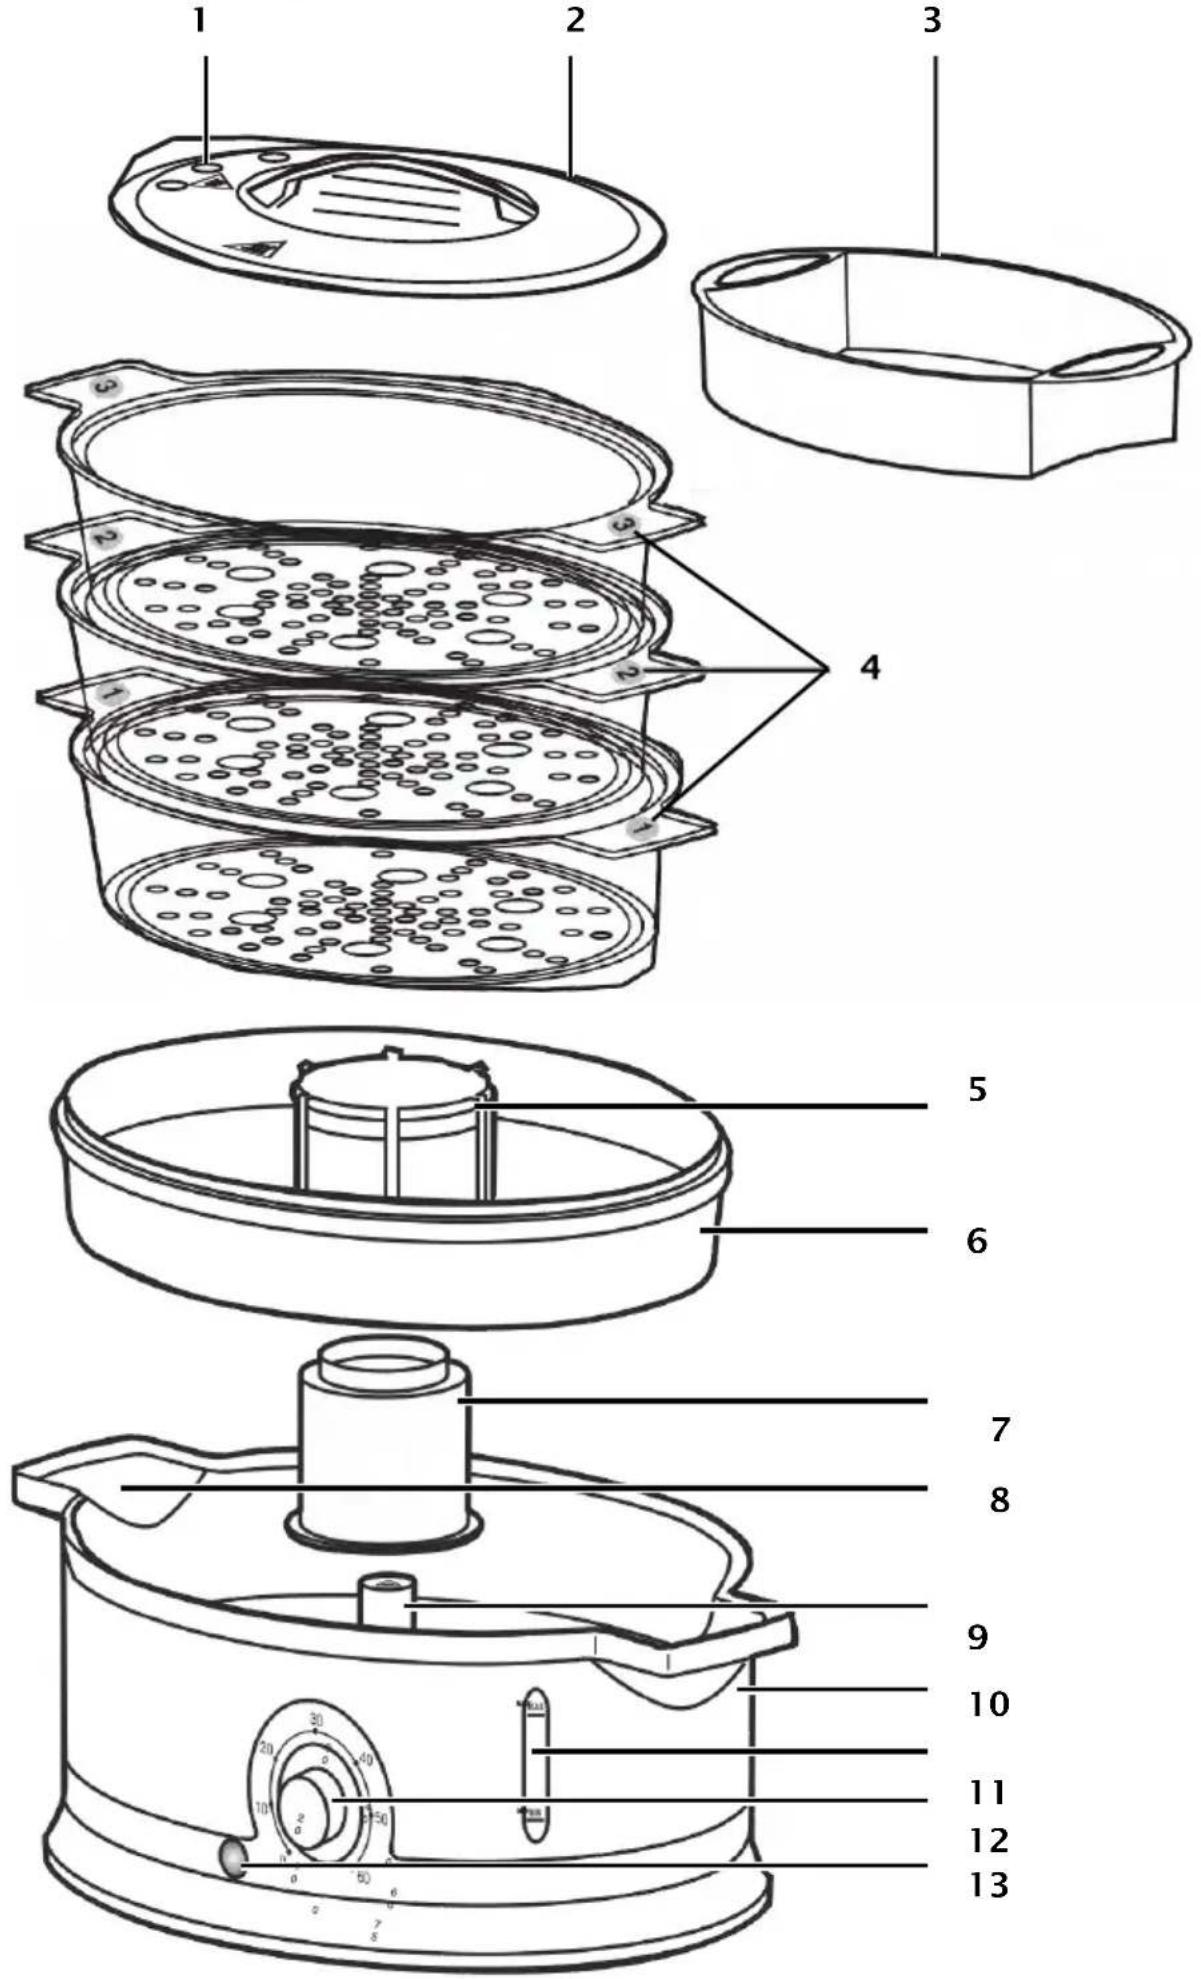
1. Overview
1 Steam vents
2 Lid
3 Rice tray
4 Steamer baskets
5 Steam outlet
6 Collector
7 Steam sleeve
8 Handles with filling opening
9 Steam generator
10 Bottom part
11 Water level indicator
12 Time selector
13 Operating display
Thank you for your trust!
Congratulations on your new steam cooker.
For safe handling of the device and in order to get to know the entire scope of features:
• Thoroughly read these operating instructions prior to first use.
- Above all, observe the safety instructions!
- The device should only be used as described in these operating instructions.
- Keep these operating instructions for reference.
- If you pass the device on to someone else, please include these operating instructions.
We hope you enjoy using your new steam cooker!
Symbols on your appliance

This symbol warns you against touching the hot surface. Only use the handles and control elements provided.

The food-safe material of devices with this symbol will not change the taste or smell of food.
2. Intended purpose
This steam cooker allows you to cook food gently.
The device is designed for private, domestic use. The device must only be used in dry, indoor areas.
This device must not be used for commercial purposes.
Foreseeable misuse

DANGER! Risk of injury through scalding!
0 Do not lean over the steam cooker ... ... when you open the lid and the contents are still hot, and ... when hot steam is coming out of the steam vents.
3. Safety information
Warnings
If necessary, the following warnings will be used in these operating instructions:

DANGER! High risk: failure to observe this warning may result in injury to life and limb.
WARNING! Moderate risk: failure to observe this warning may result in injury or serious material damage.
CAUTION: low risk: failure to observe this warning may result in minor injury or material damage.
NOTE: circumstances and specifics that must be observed when handling the device.
Instructions for safe operation
This device can be used by children from the age of 8 and people with restricted physical, sensory or intellectual abilities or people without adequate experience and/or understanding, if they are supervised or instructed on how to use this device safely and if they are aware of the resulting danger. Children must not play with the device. Cleaning and user maintenance must not be performed by unsupervised children unless they are older than 8 years and supervised.
Children under the age of 8 must be kept away from the deviand the power cable.
The surfaces of the device become very hot during operation. During operation, only touch the time selector and handles of the device. During operation, only grip the steamer baskets and accessories using pot cloths or oven gloves.
Clean all parts and surfaces that will come into contact with food before using the device for the first time (see “Cleaning and storing” on page 81).
If the mains power cable of this device should become damaged, it must be replaced by the manufacturer, the manufacturer's customer service department or a similarly qualified specialist, in order to avoid any hazards.
The base, the mains power cable and the mains plug must not be immersed in water or any other liquids.
Should liquids enter the base, pull out the mains plug immediately.
Have the device checked before reusing.
Do not use any abrasive or corrosive cleaning agents.
This device is not intended to be operated using an external timer clock or a separate remote control system.
This device is equally intended for use in the home and in applications similar to the home, such as for example...
... in kitchens for employees in shops, offices and other commercial areas;
... on agricultural estates;
... by customers in hotels, motels and other residential facilities;
... in bed-and-breakfast establishments.
To prevent overheating, never cover the appliance, otherwise heat may build up in the appliance.
Do not lean over the steam cooker ...
... when you open the lid and the contents are still hot, and
... when hot steam is coming out of the steam vents.
There is a danger of being scalded by escaping steam.

DANGER for children
Packing materials are not children's toys.
Children should not be allowed to play with the plastic bags: there is a risk of suffocation.
Keep the device out of the reach of children.

DANGER to and from pets and livestock
Electrical devices can represent a hazardo pets and livestock. In addition, animals can also cause damage to the device. For this reason you should keep animals away from electrical devices at all times.

DANGER! Risk of electric shock due to moisture
The base, the mains power cable and the mains plug must not be immersed in water or any other liquids.
Protect the base from moisture, water drops and water splashes: Failure to observe this instruction may result in an electrical shock hazard.
Should liquids enter the base, pull out the mains plug immediately. Have the device checked before reusing.
Never touch the device with wet hands.
Make sure that the surface under the device is dry.

DANGER! Risk of electric shock
Never put the device into operation if there are visible damages to the device or the power cable or if the device has been dropped before.
Only connect the mains plug to a properly installed and easily accessible grounded power socket whose voltage corresponds to the specifications on the rating plate. The wall socket must continue to be easily accessible after the device is plugged in.
Ensure that the power cable cannot be damaged by sharp edges or hot surfaces.
When using the device, ensure that the power cable cannot be trapped or crushed.
The device is not fully disconnected from the power supply, even after it is switched off. In order to fully disconnect it, pull out the mains plug.
When removing the mains plug from the wall socket, always pull the plug and never the cable.
Disconnect the mains plug from the wall socket.
... if there is a fault,
... when you are not using the device,
... before you clean the device and
... during thunderstorms.
To avoid any risk, do not make modifications to the product.

FIRE HAZARD
Before turning the device on, place it on a level, stable, dry, heat-resistant surface.
It is not necessary to constantly supervise during operation, but just to check regularly. This applies in particular when very long cooking times are set.

DANGER! Risk of injury through burning
The surfaces of the device become very hot during operation. During operation, only touch the time selector and handles of the device. During operation, only grip the steamer baskets and accessories using pot cloths or oven gloves.
Only transport the device when it has cooled down.
Wait for the device to cool down before cleaning.

DANGER! Risk of injury through scalding
Do not lean over the steam cooker ...
... when you open the lid and the contents are still hot, and
... when hot steam is coming out of the steam vents.
There is a danger of being scalded by escaping steam.
WARNING! Risk of material damage
Never operate the steam cooker without water. This could result in the device overheating.
Ensure that there is never too much or too little water in the device. You can check the water level using the water level indicator. It must always be between MAX (1.2 l) and MIN (0.2 l).
Never place the device directly under a wall-mounted cupboard, as steam comes out from the top and could damage the furniture.
Only ever use clean drinking water for producing steam.
The appliance and accessories may not be put in a microwave oven.
Never place the device on hot surfaces (e.g. hob plates) or near heat sources or open fire.
Only use the original accessories.
The device is fitted with non-slip silicon feet. Because furniture can be coated with a wide variety of varnishes and plastics, and treated with various care products, the possibility cannot be excluded that some of these substances have ingredients that may attack and soften the silicon feet. If necessary, place a non-slip mat under the device.
Do not use any astringent or abrasive cleaning agents.
4. Items supplied
1 bottom part 10
1 collector 6 with steam sleeve 7
3 steamer baskets 4
1 rice tray 3
1 lid 2
1 operating instructions
Unpacking
-
Remove all parts from the packaging.
-
Check that all parts are present and intact.
5. Before using for the first time

FIRE HAZARD!
Before turning the device on, place it on a level, stable, dry, heat-resistant surface.

DANGER! Risk of injury through burning!
The surfaces of the device become very hot during operation. During operation, only touch the time selector 12 and handles 8 of the device.
NOTE: as the appliance is supplied with a thin film of grease, there might be a small amount of smoke and odour the first time it is used. This is not harmful and will stop after a short while. Please ensure adequate ventilation during this process.
- Clean the appliance before using it for the first time (see “Cleaning and storing” on page 81)!
- Place the appliance on a level, dry, non-slip surface so that the appliance can neither fall over nor slide off.
- Pour 0.25 l of clean drinking water into bottom part 10.
- Put steam sleeve 7 on steam generator 9. The narrow end of steam sleeve 7 must face upwards.
- Put collector 6 in bottom part 10.
- Place steamer baskets 4 on bottom part 10.
NOTE: ensure that the steamer baskets 4 are in the right sequence, as they are slightly different sizes. Steamer basket 1 is always on the bottom, steamer basket 2 on top of it and steamer basket 3 right on top. The number of the steamer basket is shown on its handles.
- Place rice tray 3 in the top steamer basket.
- Place lid 2 on the top steamer basket.
- Insert the power supply plug in a suitable earthed power supply socket.
- Select a cooking time of 5 - 10 min. on time selector 12.
- The appliance starts heating up and operating display 13 comes on.
- Allow the appliance to cool down once the set time has elapsed and then clean it again. The appliance is now ready to use.
6. Operating the appli- ance
6.1 Cooking

FIRE HAZARD!
Before turning the device on, place it on a level, stable, dry, heat-resistant surface.

DANGER! Risk of injury through burning!
The surfaces of the device become very hot during operation. During operation, only touch the time selector 12 and handles 8 of the device.
- Take collector 6 out of bottom part 10.
- Pour clean drinking water into bottom part 10:
- the quantity is 0.2 l to 1.2 l;
- ensure that the water level on water level indicator 11 is always between MIN and MAX;
- with collector 6 in place, you can also pour in water via handles with filling opening 8.
-
Put steam sleeve 7 on steam generator 9. The narrow end of steam sleeve 7 must face upwards.
-
Put collector 6 in bottom part 10.
- Put the food for cooking in steamer baskets 4. You can use 1, 2 or 3 steamer baskets. Ensure that not all the holes in the base of the steamer baskets 4 are covered, so that the steam can pass through freely.
- Place steamer baskets 4 on bottom part 10. Ensure that the steamer baskets 4 are in the right sequence, as they are slightly different sizes. Steamer basket 1 is always on the bottom, steamer basket 2 on top of it and steamer basket 3 right on top. The number of the steamer basket is shown on its handles 8.
- Place lid 2 on the top steamer basket.
- Insert the power supply plug in a suitable earthed power supply socket.
- Select the desired cooking time on time selector 12.
- The appliance starts heating up and operating display 13 comes on.
6.2 Checking whether the food is cooked

DANGER! Risk of injury through scalding!
Do not lean over the steam cooker ...
... when you open the lid 2 and the contents are still hot, and
... when hot steam is coming out of the steam vents 1.
Ensure you do not cook foods for too long, otherwise vegetables become too soft and meat and fish may become overdry and tough.
To check the state of the food during cooking, proceed as outlined below:
- Carefully open the lid 2 by lifting it slightly at the back first, so that the steam can escape away from you.
-
Take the lid 2 right off.
-
Use a relatively long skewer or fork to check the state of the food being cooked:
-
If the food being cooked is ready, turn time selector 12 to "0" to switch off the appliance.
- If the food being cooked is not yet ready, put the lid 2 back on and allow the appliance to continue working.
- If the set time has elapsed before the food being cooked is ready, set time selector 12 to the new time required to continue the cooking process. To be on the safe side, check the water level on water level indicator 11.
6.3 Topping up the water
If the water level on water level indicator 11 drops below the MIN marking during operation, you must top up the water so that the appliance does not run dry and overheat.
- Put clean drinking water in a suitable pouring vessel.
- Pour the water through the filling opening in handles 8 in bottom part 10.
6.4 Ending operation

DANGER! Risk of injury through scalding!
The condensate in collector 6 is hot. Allow it to cool down before you take out collector 6, so that you do not accidentally scald yourself.
- Once the set cooking time has elapsed, an alarm sounds and the appliance switches off.
- If you want to switch off the appliance before the set cooking time has elapsed, turn time selector 12 to "0".
-
Wait briefly until the steam in the appliance has dissipated.
-
Remove steamer baskets 4 with the cooked food.
- Clean the appliance carefully after use (see "Cleaning and storing" on page 81).
6.5 Thermal cut-out
The appliance is protected against overheating. As soon as all the water in bottom part 10 has gone, making the temperature too high, the appliance switches off automatically.
- In this case, disconnect the appliance from the power supply and allow it to cool down.
- You can then run the appliance again with water in it.
7. Hints on cooking with the steamer

DANGER! Risk of injury through scalding!
Do not lean over the steam cooker ... ... when you open the lid 2 and the contents are still hot, and ... when hot steam is coming out of the steam vents 1.
Steaming is one of the healthiest ways of cooking food. Not only are the nutrients and
colour of foods largely retained, the natural flavour and bite of food cooked this way make it a pleasure to eat. This means that salt, fat and seasoning can be used sparingly. Steaming is thus especially recommended for the preparation of baby food.
7.1 Using steamer baskets
Depending on requirements, 1, 2 or all 3 steamer baskets 4 can be used.
The steamer baskets 4 are different sizes and numbered. The relevant number is on the handle of the steamer basket.
For cooking, always put basket 1 on first, number 2 on top of it and finally number 3. The sequence is precisely reversed for storing, when the steamer baskets 4 fit inside one another to save space.
7.2 Boiling eggs
The steamer can also be used to boil eggs. For this purpose, there are 6 depressions in the base of each steamer basket 4 into which you can place the eggs.
If you use all 3 steamer baskets 4, this means you can boil up to 18 eggs at once. Please note when doing this that the eggs in the bottom steamer basket will be ready somewhat sooner than the eggs in the steamer baskets above.
7.3 Cooking rice and liquids
Sauces or other liquids, fruit and rice can be heated and cooked in rice tray 3 supplied.
- Put the rice, the right amount of water and a pinch of salt in rice tray 3.
- Put the rice tray 3 in any steamer basket 4.
NOTE: If you are using several steamer baskets, the rice tray 3 should be placed in the top basket so that nothing drips into the rice.
- Stir the rice occasionally.
7.4 Preparing whole meals
If you are preparing a whole meal and are therefore using several steamer baskets one above the other, please note that:
- the heaviest food for cooking should be cooked in the bottom basket if at all possible;
- as the steam acts most effectively in the bottom steamer basket and less so as it travels upwards, cooking time in the upper baskets is extended by a few minutes. You should therefore follow the instructions in “Checking whether the food is cooked” on page 73.
• stir or rearrange the cooking food occasionally with a long cooking spoon.
-
Put the food which is going to take longest to cook in steamer basket 1. Exception: meat and fish should always be cooked in the bottom steamer basket so that dripping juices do not run over the other foods;
-
Put this steamer basket in the steamer and start cooking (see "Cooking" on page 72).
-
Fill steamer basket 2 with the food which will take a moderate time to cook.
-
Carefully open the lid 2 by lifting it slightly at the back first, so that the steam can escape away from you.
-
Take the lid 2 right off.
-
Put steamer basket 2 on steamer basket 1 and close the lid 2 again.
-
Fill steamer basket 3 with the food which will take the least time to cook.
-
Proceed as for steamer basket 2.
8. Cooking times
The times quoted in the tables are intended as a guide. Actual cooking time depends on:
• the size and freshness of the foods;
• how full the steamer baskets are;
- the position of the steamer basket (top or bottom);
- the temperature of the water (the times quoted assume cold water. Cooking time is slightly reduced with hot water);
- personal preference (food with bite or soft).
NOTES:
- Stir or rearrange the cooking food occasionally with a long cooking spoon.
- Ensure that all the pieces are about the same size. Arrange smaller pieces on top.
- Do not over-fill the steamer baskets by packing food in too tightly or covering all the holes. It must be possible for steam to pass everywhere between the pieces and through the holes in the bases of the steamer baskets.
8.1 Cooking times - vegetables
• Prepare the vegetables by cutting off thick stalks and cutting large vegetables into similar-sized pieces.
- Leafy vegetables should be cooked for as short a time as possible so that they retain their colour.
- Do not season vegetables until they are cooked.
- Frozen vegetables can be cooked like fresh ones. For many vegetables, cooking time is extended by a few minutes when they are frozen.
| Vegetable | Quantity | Cooking time | Comments |
| Broccoli | 400 g | 10 - 15 min | Divide into floretsIncrease cooking time by about 5 min if frozenStir/rearrange half-way through cooking time |
| Cauliflower | 400 g | 15 - 20 min | Divide into floretsIncrease cooking time by about 5 min if frozenStir/rearrange half-way through cooking time |
| French beans | 400 g | 25 - 30 min | Increase cooking time by about 5 min if frozenStir/rearrange half-way through cooking time |
| Sprouts | 400 g | 20 - 25 min | Stir/rearrange half-way through cooking time |
| Cabbage | 400 g | 35 - 40 min | Freshly and shreddedStir/rearrange half-way through cooking time |
| Carrots | 400 g | 20 - 25 min | Freshly and cut into slicesStir/rearrange half-way through cooking time |
| Peas | 400 g | 15 - 20 min | Stir/rearrange half-way through cooking time |
| Courgette | 400 g | 20 - 25 min | Freshly and cut into quartersStir/rearrange half-way through cooking time |
| Spinach | 400 g | 15 - 20 min | Stir/rearrange half-way through cooking time |
| Mushrooms | 200 g | 15 - 20 min | Freshly and cut into slices or very small whole onesStir/rearrange half-way through cooking time |
| Potatoes | 900 g | 30 - 40 min | Freshly, peeled and cut into quartersStir/rearrange half-way through cooking time |
| New or small potatoes | 500 g | 35 - 40 min | Freshly peeled, left whole |
| Asparagus | 400 g | 15 - 20 min | Lay out flat in steamer basket, second layer cross-wise over the top |
| Artichokes | 2 - 3 medium-sized | 50 - 55 min | Place in the steamer basket with the opening facing downwards so that condensation can drain off |
8.2 Cooking times - fish
- Frozen fish can be cooked without being thawed. Ensure that the individual pieces are separated from one another so that the steam can get everywhere. The cooking time may be extended by a few minutes for thicker pieces.
- Keep an eye on cooking time. Under-cooked fish is still glassy inside. Over-cooked fish can become dry.
| Fish | Quantity | Cooking time | Comments |
| Fish fillet | 250 g | 10 - 15 min | - Fresh |
| Fish fillet | 250 g | 15 - 20 min | - Frozen |
| Salmon steak | 400 g | 10 - 15 min | - Increase cooking time by about 5 min if frozen |
| Tuna steak | 400 g | 15 - 20 min | - Increase cooking time by about 5 min if frozen |
| Mussels | 400 g | 10 - 15 min | - Only cook fresh mussels which are closed- The mussels are ready when the shells have opened completely |
| Prawns | 400 g | 10 - 15 min | - Stir/rearrange half-way through cooking time |
| Lobster tails | 2 | 20 - 25 min | |
| Oysters | 6 | 15 - 20 min | - Only cook fresh, closed oysters- The oysters are cooked when the shells have opened completely |
8.3 Cooking times - meat
- Select only lean, soft meat and remove all the fat from it.
- The pieces of meat should not be too thick. Meat suitable for grilling is also good for steaming.
-
Any fat still in the meat is reduced further by the steaming process.
-
Poultry, in particular, needs to be cooked right through to prevent the risk of salmonella infection.
- Pierce sausages to stop them bursting.
- Steam-cooking is not suitable for raw sausage. Sausage needs to have been boiled already (e.g. bockwurst, wieners etc.).
| Meat | Quantity | Cooking time | Comments |
| Beef | 250 g | 10 - 15 min | - In slices, e.g. fillet steak, roasting beef |
| Meatballs | 500 g | 22 - 24 min | - Made of beef or mixed mince |
| Pork | 400 g or 4 pieces | 10-15 min | - In slices, e.g. fillet, tenderloin |
| Lamb | 4 pieces | 15 - 20 min | - Slices, e.g. chop, fillet |
| Sausages | 400 g | 10 - 15 min | - Only boiled sausage such as frankfurters, knackwurst, bockwurst, hot dog sausages etc.- Pierce the skin before cooking |
| Chicken breast | 400 g | 15 - 20 min | - Remove the skin before cooking- Meat must be cooked right through |
| Chicken legs | 2 | 20 - 30 min | - Meat must be cooked right through- Brown under the grill after steaming if desired |
8.4 Cooking times - rice
- Put the rice, the right amount of water and a pinch of salt into rice tray 3.
-
Put the rice tray 3 in the top steamer basket so that no condensation can drip into the tray.
• Stir the rice occasionally. -
When opening the lid, ensure you are not hit by a cloud of hot steam and ensure that no condensation drips into the rice.
- There are many different kinds of rice. Follow the individual cooking instructions as far as the required quantity of water is concerned.
| Rice | Quantity | Cooking time | Comments |
| White rice | |||
| Normal | 1 cup | 45 - 50 min | - Add 1.5 cups of water |
| Long grain | 1 cup | 50 - 55 min | - Add 1.75 cups of water |
| Natural rice (brown) | |||
| Normal | 1 cup | 40 - 45 min | - Add 2 cups of water |
| Parboiled | 1 cup | 45 - 55 min | - Add 1.5 cups of water |
| Mixture of long-grain and wild rice | |||
| Normal | 1 cup | 55 - 60 min | - Add 1.5 cups of water |
| Easy-cook rice | 1 cup | 20 - 25 min | - Add 1.75 cups of water |
| Other rice | |||
| Instant rice | 1 cup | 12 - 15 min | - Add 1.5 cups of water |
| Pudding rice | 100 g + 30 g sugar | 75 - 80 min | - Appropriate quantity of hot milk instead of water |
8.5 Cooking times - eggs
| Eggs | Quantity | Quantity of water | Cooking time | Comments |
| Soft | Max. 6 per steamer basket | 400 ml | 10 - 15 min | - Place eggs in the depressions in the base of the steamer baskets.- Eggs in lower steamer baskets will be ready somewhat earlier than those in upper steamer baskets. |
| Hard | 20 - 25 min |
9. Recipes
9.1 Kassler ham with sprouts and potatoes
Ingredients
• 500 g sprouts, fresh
- 500 g potatoes, fresh, peeled and quartered
• 400 g joint of Kassler ham
- Salt, pepper, nutmeg
Preparation
Total cooking time: 45 minutes
- Wash sprouts and put in basket 3.
- Peel and quarter potatoes and put in basket 2.
- Place Kassler ham in steamer basket 1 and start cooking.
- After 5 - 10 minutes, open the steamer and insert steamer basket 2. Continue cooking.
- 20 minutes from the start of cooking, open the steamer and insert steamer basket 3.
- Continue cooking until the time expires.
- Season the potatoes with a little salt.
- Season the sprouts with salt, pepper and nutmeg.
- Prepare a sauce of your choice and serve with the meal.
9.2 Salmon fillet with vegetables and rice
Ingredients for 2 portions
• 300 g salmon fillet
• 3 spring onions
- 200 g mushrooms
• 3 celery stalks
2 carrots
- Fresh ginger
- Soy sauce, vinegar, oil, cayenne pepper and curry powder for the marinade
• 200 g rice
Salt
Preparation
- Dice the salmon fillet and put in a bowl.
- Sprinkle with lemon juice.
- Scatter over some grated fresh ginger and add a little salt.
- Leave to stand until you are ready to cook to allow the seasoning to be absorbed.
- Clean the spring onions, mushrooms, celery and carrots, cut into roughly equal dice and put in a bowl.
- Make a marinade from 10 ml each of soy sauce, vinegar and oil.
- Season the marinade with cayenne pepper, a little grated ginger, a pinch of salt and curry powder.
- Sprinkle the diced vegetables with the marinade and leave to stand for at least 30 minutes.
- Put the rice, the right amount of water and a pinch of salt in rice tray 3.
- Put rice tray 3 in steamer basket 1.
- Choose the right cooking time for the rice and start cooking.
- Put the vegetables in steamer basket 2.
- Open the steamer 15 minutes before the end of the cooking time, take out rice tray 3 with the rice and put steamer basket 2 with the vegetables on steamer basket 1.
-
Put rice tray 3 in steamer basket 3.
-
Put steamer basket 3 with rice tray 3 on steamer basket 2 and continue cooking.
- 8 minutes before the end of cooking time, open the steamer, remove steamer basket 3 with the rice and steamer basket 2 with the vegetables.
- Put the fish in steamer basket 1.
- Put steamer basket 2 with the vegetables back in, followed by steamer basket 3 with the rice.
- Continue cooking until the time expires.
9.3 Filled curd cheese dumplings
Ingredients
• 250 g low-fat curd cheese
. 1 egg
- 1 pinch salt
• 3 tbsp flour
- 2 tbsp oil
- 5 tbsp breadcrumbs
• Chocolate or hazelnut chocolate spread
Preparation
- Put all the ingredients in a bowl and knead to a smooth dough.
- Roll the dough into a sausage and cut into roughly 25 pieces of equal size.
- Flatten each piece slightly, fill with chocolate or hazelnut chocolate cream and make a small dumpling out of it.
- Arrange the dumplings in the steamer baskets 4.
- Cook in the steamer for 15 minutes.
Tips:
- You can roll the finished dumplings in a crunchy praline coating before cooking them.
- Instead of the crunchy coating, you can also use breadcrumbs gently roasted in butter.
- Custard also tastes good with these.
10. Cleaning and storing
Clean the device prior to its first use!

DANGER! Risk of electric shock!
Pull the mains plug out of the wall socket before you clean the device.

DANGER! Risk of injury through burning!
Allow all the parts to cool down before cleaning.
WARNING! Risk of material damage!
Do not use any astringent or abrasive cleaning agents.
- Clean the device after each use and remove all food residues.
10.1 Dismantling the appliance
- Disconnect the power supply from the socket.
- Take off steamer baskets 4.
- Carefully push the perforated bases out of the steamer baskets.
- Take off collector6.
- Take steam sleeve 7 out of collector 6.
10.2 Cleaning the bottom part
- Clean bottom part 10 with a damp cloth. A little washing-up liquid may also be used.
- Wipe off with clean water.
- Do not use the appliance again until it is completely dry.
10.3 Cleaning the accessories
- Clean the plastic accessories by hand in the sink
10.4 Assembling the accessories
-
Put the bases back in steamer baskets 4:
-
insert the bases so that the small depressions for eggs are pointing downwards;
- the lugs in the steamer baskets must fit precisely in the corresponding openings in the bases;
-
push the bases into the steamer baskets until they engage audibly.
-
Put steam sleeve 7 on steam generator 9. The narrow end of steam sleeve 7 must face upwards.
10.5 Storing the appliance
The steamer baskets 4 of different sizes can be stacked inside one another to prevent the appliance being too tall when stored in a cupboard.
- Wind the power cord around underneath bottom part 10.
- Put collector 6 in bottom part 10.
- Put steamer basket no. 1 in no. 2 and then both in steamer basket no. 3.
- Put rice tray 3 in steamer baskets 4.
- Put on lid 2.
- Put the steamer baskets on bottom part 10.
- Put the appliance away.
10.6 Descaling the appliance
Depending on the hardness of your water, li-mescale may build up in the appliance. You should remove this regularly to save energy, increase the service life of the appliance and for hygiene reasons.
- Wipe over surfaces with limescale using a cloth soaked in a little vinegar.
- If steam generator 9 has severe limescale, pour a commercially-available descaler into the bottom part 10 and leave to stand overnight.
WARNING! Risk of material damage!
The appliance may under no circumstances be switched on whilst being descaled. This could lead to damage.
- Rinse thoroughly afterwards.
- Do not use the appliance again until it is completely dry.
11. Disposal
This product is subject to the provisions of European Directive 2012/19/EC. The symbol showing a wheelie bin crossed through indicates that the product requires separate
refuse collection in the European Union. This applies to the product and all accessories marked with this symbol. Products identified with this symbol may not be discarded with normal household waste, but must be taken to a collection point for recycling electric and electronic appliances. Recycling helps to reduce the consumption of raw materials and protect the environment.
Packaging
When disposing of the packaging, make sure you comply with the environmental regulations applicable in your country.
12. Problem-solving
If your device fails to function as required, please try this checklist first. Perhaps there is only a minor problem, and you can solve it yourself.

DANGER of electric shock!
Do not attempt to repair the device yourself under any circumstances.
| Fault | Possible causes / Action |
| No function | Has the device been connected to the power supply?Check the connection.Has the thermal cut-out switched off the device? (see “Thermal cut-out” on page 74) |
13. Technical specifications
| Model: | STEAMY800 |
| Mains voltage: | 230 V ~ 50 Hz |
| Protection class: | I |
| Power rating: | 800 W |
The components are quality products. They were designed taking into consideration the latest technical knowledge, and carefully constructed using a standard, good quality material.
The warranty period is 24 months from the time of handover, which must be confirmed through a sales receipt, invoice or delivery note. Within the warranty period, any functional defects in the components will be fixed by our customer service team if these can be shown to be the result of a material defect that has arisen despite prudent handling in accordance with our operating instructions.
The warranty will include repairing defective parts or providing properly functioning replacements free of charge and at our discretion. Any parts that are replaced will become our property. The repair or replacement of individual parts does not result in an extension to the warranty period, nor is there a new warranty period for the specific components affected. There is no separate warranty period for built-in spare parts. We offer no warranty for damage or defects affecting components or their parts if these are caused by excessive use, or incorrect handling or maintenance. The same applies for failure to follow the operating instructions and for the installation of spare parts or accessories not listed in our range. Warranty claims shall be void in the event of interference or modifications to components by unauthorised individuals.
The warranty does not cover parts that are subject to natural wear and tear. In the event of a warranty claim, fault, need for a spare part or accessory, please contact the customer support centre specified here:
Customer support centre:
Albatros International GmbH
Konrad-Zuse-Str. 3
D-54552 Nerdlen (Germany)
Tel: +49 (0)6592-1730200
Fax: +49 (0)6592-1730209
www.albatros-international.de
info@albatros-international.eu
Subject to modification.
Model:
Purchased at:
In (town/city, street):
Buyer's name:
Street, building number:
Postcode, town/city:
Telephone:
Date, signature:
Fault description:
Contenido
natural_image
Simple line drawing of a trash bin with two crossed lines indicating no waste or prohibition (no text or symbols)EC-DECLARATION OF CONFORMITY
We herewith declare in our sole responsibility that this product complies with the following standards (1) in accordance with the regulations of the undermentioned Directives (2) test report (3) issuing test office (4)
FR Français
CE-DÉCLARATION DE CONFORMITÉ
Serial No.: 240700001.....240799999
(1) EN 60335-1:2012/A15:2021; EN 60335-2-15:2016/A12:2021; EN 62233:2008; AfPS GS 2019:01 PAK;
EN IEC 55014-1:2021; EN IEC 55014-2:2021; EN IEC 61000-3-2: 2019/A1:2021; EN 61000-3-3:2013/A2:2021;
EN 50564:2011; EN 50242:2016; EN60350-1:2013+A11:2014; EN60350-2:2013+A11:2014
(2) 2014/35/EU; 2014/30/EU; (EC) NO 1275/2008; (EC) 278/2009; (EC) 642/2009; (EU) 617/2013; (EU) NO 801/2013; (EC) No 1935/2004; (EU) 10/2011; EU 2020/1245; 2011/65/EU; (EU) 2015/863
(3) 64110120220306; 64710120220307; 64180120220302; 64165210245601A; 64165210245601B
(4) TÜV SÜD Certification and Testing Co., Ltd.
GB Importer and technical documents responsible
FR Manufacture Conservation des documents techniques
Authorized person for the compilation of the technical documentation:
R.Bunze2
Nerdlen, 02.07.2024 Ralf Bunzel, Head of Purchasing
Albatros International GmbH, Konrad-Zuse-Straße 3, 54552 Nerdlen, Germany


- Inhalt
- Overview
- Thank you for your trust!
- Symbols on your appliance
- Intended purpose
- Foreseeable misuse
- DANGER! Risk of injury through scalding!
- Safety information
- Warnings
- Instructions for safe operation
- DANGER for children
- DANGER to and from pets and livestock
- DANGER! Risk of electric shock due to moisture
- DANGER! Risk of electric shock
- FIRE HAZARD
- DANGER! Risk of injury through burning
- DANGER! Risk of injury through scalding
- WARNING! Risk of material damage
- Items supplied
- Unpacking
- Before using for the first time
- FIRE HAZARD!
- DANGER! Risk of injury through burning!
- Operating the appli- ance
- Cooking
- Checking whether the food is cooked
- Topping up the water
- Ending operation
- Thermal cut-out
- Hints on cooking with the steamer
- Using steamer baskets
- Boiling eggs
- Cooking rice and liquids
- Preparing whole meals
- Cooking times
- NOTES:
- Cooking times - vegetables
- Cooking times - fish
- Cooking times - meat
- Cooking times - rice
- Cooking times - eggs
- Recipes
- Kassler ham with sprouts and potatoes
- Ingredients
- Preparation
- Salmon fillet with vegetables and rice
- Ingredients for 2 portions
- Filled curd cheese dumplings
- Tips:
- Cleaning and storing
- Clean the device prior to its first use!
- DANGER! Risk of electric shock!
- WARNING! Risk of material damage!
- Dismantling the appliance
- Cleaning the bottom part
- Cleaning the accessories
- Assembling the accessories
- Storing the appliance
- Descaling the appliance
- Disposal
- Packaging
- Problem-solving
- DANGER of electric shock!
- Technical specifications
- Customer support centre:
- Model:
- Contenido
- FR Français
Brand : Sommertal
Model : STEAMY800
Category : Steamer