
SP5 Dual - Dishwasher Sommertal - Free user manual and instructions
Find the device manual for free SP5 Dual Sommertal in PDF.

| Brand | Sommertal |
| Model | SP5 Dual |
| Product type | Countertop dishwasher |
| Dimensions (W × D × H) | 428 × 425 × 458 mm |
| Weight | 13 kg |
| Power supply | 220–240 V ~ 50 Hz |
| Power | 950 W |
| Water inlet pressure | 0.04 – 1 MPa |
| Water tank capacity | 5 L |
| Max. number of place settings | 2 |
| Noise level | 60 dB |
| Wash programs | Normal, Rapid, Care, Gentle, Fruits |
| Drying function | DRY (hot air blowing 60 min + auto ventilation) |
| Recommended detergent dosage | 8–12 g per cycle depending on program |
| Water supply | Manual (tank) or direct connection |
| Door material | Glass |
| Display | LCD with indicators |
| Filter | 3-piece set (strainer, main filter, fine filter) |
| Recommended weekly cleaning | Yes (filter and spray arms) |
| Child safety | Do not let children use without supervision |
| Grounding connection | Mandatory (plug with ground conductor) |
| Warranty | 24 months |
Frequently Asked Questions - SP5 Dual Sommertal
User questions about SP5 Dual Sommertal
0 question about this device. Answer the ones you know or ask your own.
Ask a new question about this device
Download the instructions for your Dishwasher in PDF format for free! Find your manual SP5 Dual - Sommertal and take your electronic device back in hand. On this page are published all the documents necessary for the use of your device. SP5 Dual by Sommertal.
USER MANUAL SP5 Dual Sommertal
natural_image
Abstract logo design with stylized letter 'S' surrounded by curved orange and blue lines (no text or symbols)Sommertal
natural_image
Line drawing of a microwave oven with lid and front panel (no text or symbols)

WEEE Reg No.DE43021155
Teileliste
Wasser Zulauf
natural_image
Simple line drawing of a device with a circular inset showing internal components (no text or symbols)connect machine
connect tap
natural_image
Line drawing of a cart filled with coiled clothing items (no text or symbols)3. Programmauswahl:
natural_image
Line drawing of a portable electronic device with a faucet and tubing (no text or symbols)Programme
D-54552 Nerdlen (Germany)
Tel: +49 (0)6592-1730200
Fax: +49 (0)6592-1730209
www.albatros-international.de
info@albatros-international.eu
natural_image
Abstract logo design with stylized letter 'S' surrounded by curved lines (no text or symbols)Sommertal
Sommertal Lave-vaisselle de table Model: SP5 Dual
Mode d'emploi
VAR.ID.: 4083


natural_image
Line drawing of a microwave oven with lid and front panel (no text or symbols)


WEEE Reg No.DE43021155
CONSIGNES DE SÉCURITÉ IMPORTANTES

Liste des pièces
natural_image
Simple line drawing of a device with a circular inset showing internal components (no text or symbols)connect machine
connect tap
natural_image
Line drawing of a cart loaded with coiled and tied plastic sheets (no text or symbols)WEEE Reg No.DE43021155
Elenco delle parti
natural_image
Simple line drawing of a device with a circular inset showing internal components (no text or symbols)connect machine
connect tap
natural_image
Diagram showing a bed with a circular object being lifted by an arrow, alongside a rack of spools and containers (no text or symbols)La funzione DRY (1)

natural_image
Line drawing of a portable electronic device with a faucet and tubing (no text or symbols)Programma
D-54552 Nerdlen (Germania)
Tel: +49 (0) 6592-1730200
Fax: +49 (0) 6592-1730209
www.albatros-international.de
info@albatros-international.eu
natural_image
Line drawing of a microwave oven with lid and front panel (no text or symbols)


WEEE Reg No.DE43021155
Lista de partes
Entrada de agua
natural_image
Simple line drawing of a device with a circular inset showing internal components (no text or symbols)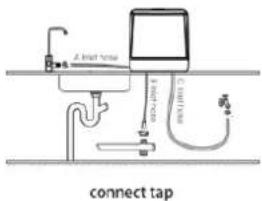
connect machine
natural_image
Line drawing of a cart loaded with coiled and tied plastic sheets (no text or symbols)Read and understand this manual! Take care of the safety instructions!
natural_image
Line drawing of a microwave oven with lid and front panel (no text or symbols)


WEEE Reg No.DE43021155
Albatros International GmbH, Konrad-Zuse-Str. 3, D-54552 Nerdlen
Email: info@albatros-international.eu
IMPORTANT SAFETY INSTRUCTIONS

WARNING! When using the counter top dishwasher, follow the precautions listed
below:
This appliance is intended to be used in household and similar application such as:
- staff kitchen areas in shops, offices and other working environments;
- farm houses;
- by clients in hotels, motels and other residential type environments;
- bed and breakfast type environments.
This appliance can be used by children aged from 8 years and above and persons with reduced physical, sensory or mental capabilities or lack of experience and knowledge if they have been given supervision or instruction concerning use of the appliance in a safe way and understand the hazards involved. Don't let the children operate the machine independently avoiding to any danger. Children shall not play with the appliance.
Cleaning and user maintenance shall not be done by children without supervision.
Packaging material could be dangerous for children!
This appliance is for indoor household use only. Do not place the machine in the environmentally under 0^ C, like outside door in cold weather
To protect against the risk of electrical shock, do not immerse the unit, power cord or plug in the water or in any other liquid.
Please unplug before cleaning and performing maintenance on the appliance.
Use a soft cloth moistened with mild soap, and then use a dry cloth to wipe it again.
Don't place and use the machine in the platform which is not stable, wet, smooth, inflammable avoiding to any damage.
Don't place and use the machine within 150mm far from gas stove or other heating source.

EARTHING INSTRUCTIONS
This appliance must be earthed. In the event of a malfunction or breakdown, earthing will reduce the risk of an electric shock by providing a path of least resistance of electric current. This appliance is equipped with an earthing conductor plug.
The plug must be plugged into an appropriate outlet that is installed and earthed in accordance with all local codes and ordinances.
Improper connection of the equipment-earthing conductor can result in the risk of an electric shock.
Check with a qualified electrician or service representative if you are in doubt whether the appliance is properly grounded.
Do not modify the plug provided with the appliance; If it does not fit the outlet. Have a proper outlet installed by a qualified electrician.
Do not abuse, sit on, or stand on the door or dish rack of the dishwasher.
Do not operate your dishwasher unless all enclosure panels are properly in place.
Open the door very carefully if the dishwasher is operating, there is a risk of water squirting out.
Do not place any heavy objects on or stand on the door when it is open. The appliance could tip forward.
Don't splash water into the machine avoiding to electric shock or fire.
When loading items to be washed:
1). Locate sharp items so that they are not likely to damage the door seal;
2). Warning: Knives and other utensils with sharp points must be loaded in the basket with their points facing down or placed in a horizontal position.
Don't drink the left water in the machine.
Check that the detergent powder is empty after completion of the wash cycle.
Do not wash plastic items unless they are marked "dishwasher safe" or the equivalent. For unmarked plastic items not so marked, check the manufacturer's recommendations. Please use the salt and detergent which is special for automatic dishwasher. Never use soap, laundry detergent, or hand washing detergent in your
dishwasher.
The door should not be left open, since this could increase the risk of tripping.
Any of new parts or spare parts shall be replaced by the manufacturer, it's service or a similar qualified service man to avoid danger or damages.
During installation, the power supply must not be excessively or dangerously bent or flattened. Do not tamper with controls.
The appliance needs to be connected to the main water valve using new hose sets. Old sets should not be reused.
Don't open the door when washing to avoid hot water to flying out and causing any harm;
Don't touch or block the side air outlet;
Don't tilt or move the machine when washing;
Please to be take care of the knife or other objects with sharp point when open the door;
Please stop washing, power off, and close tap when any faults;
Please check and clean the machine time from time in order to the best performance;
Please fix the drain hose avoiding to the stained water outflow;
Don't forcibly pull the power cord, drain hose, press cutlery tray to avoid any damage;
Don't use the machine when your hand is wet to avoid electric shock;
Children should be far from the chemical material such as salt, detergent to avoid any harm.
The maximum number of place settings to be washed is 2.
The maximum permissible inlet water pressure is 1MPa.
The minimum permissible inlet water pressure is 0.04MPa.

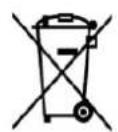
Dispose of the machine in an environmentally friendly manner under local regulations
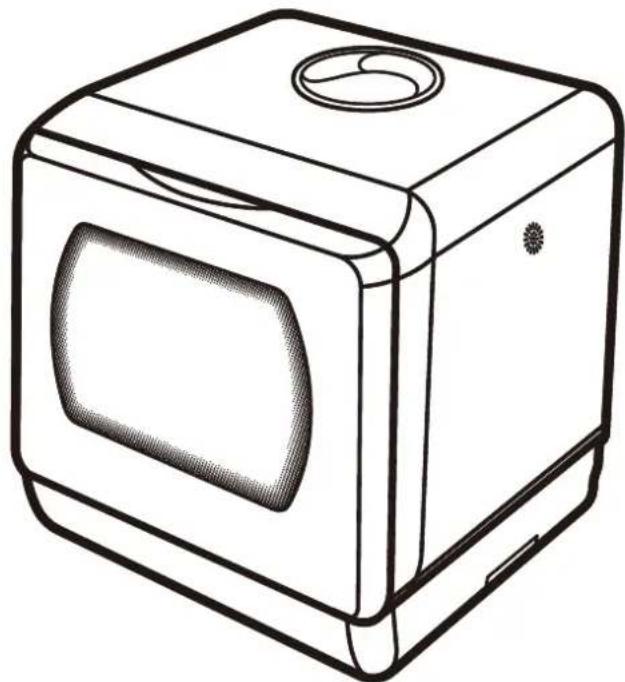
PRODUCT IDENTIFICATION
MACHINE
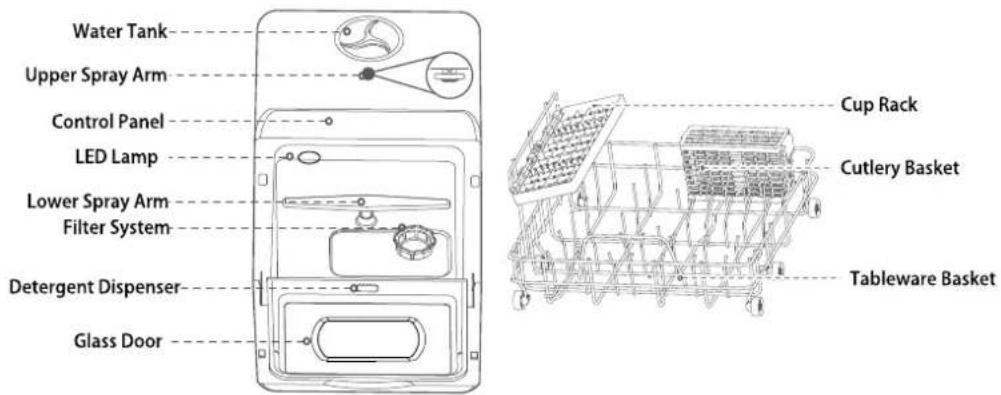
PARTS LIST
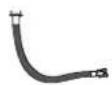
Inlet Hose x1
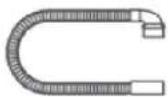
Drain Hose x1
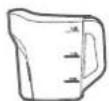
Cup x1
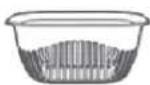
Fruit Basket x1

Hose Collar x1
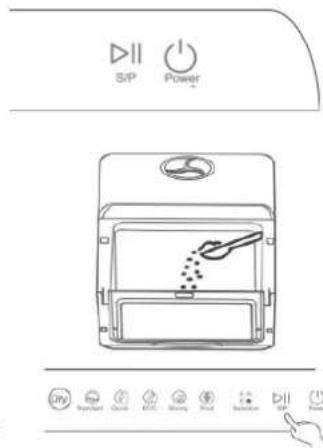
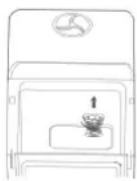
CONTROL PANEL
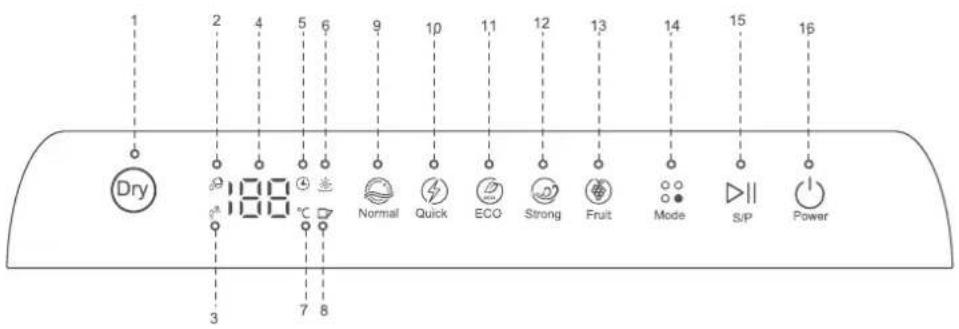
I. Dry
2. Tank Icon
3. Tap Icon
4. Display Screen
- Time Display
- Dry indicator
- Temperature
-
Door Open
-
Program: Normal
- Program: Quick
- Program: ECO
-
Program: Strong
-
Program: Fruit
- Program Option
- Start/Pause
- Power On/Off
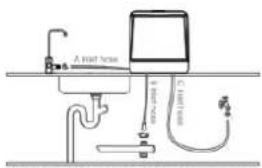
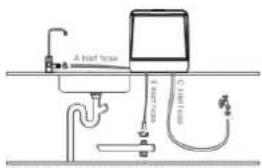
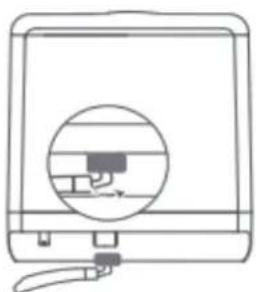
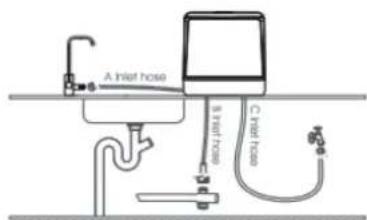
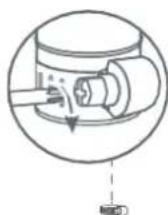
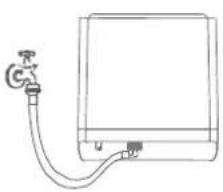
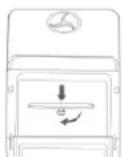
INSTALLATION
- Inlet Hose Installation
A. Connect Machine
Insert inlet hose elbow into the water inlet behind machine and tighten the screw.
B. Connect Tap
A, B, C three options for tap connection, but B and C options need make a hole on or behind cabinet in order the hose can go through cabinet.
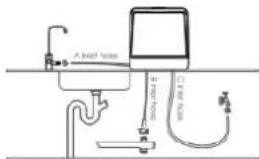
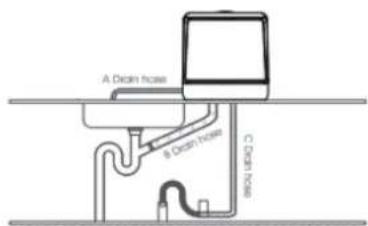
- Drain Hose Installation
A. Connect Machine
Insert drain hose elbow to the water outlet behind machine and tighten the collar.
B. Connect Sewer
A, B, C three options for sewer connection, Band C options need make a hole on or under cabinet in order the hose can go through cabinet.
natural_image
Line drawing of a monitor with a circular inset showing internal components (no text or symbols)connect machine
connect tap
connect machine
connect sewer
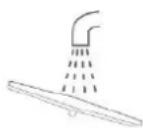
TABLEWARE LOADING
- Please get rid of large food residue on tableware, avoiding to block water hose.
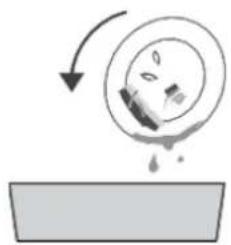
natural_image
Diagram showing a droplet falling from a circular object with arrows indicating motion (no text or symbols)Note: In order to fully clean tableware, please tilt tableware internally or put stained face down.
How to Load the Dishwasher Basket
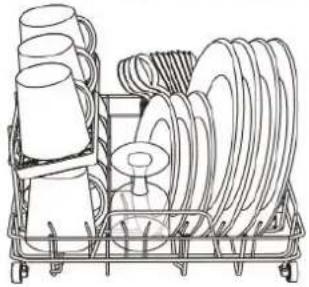
natural_image
Line drawing of a basket containing various household items including mugs, plates, and a sink (no text or symbols)The DRY Function (1)

When this mode is selected, additional hot air is supplied to the dishes for another 60 minutes. For the next 3 days, a 15-minute automatic ventilation starts every 75 minutes. This is useful for keeping your dishes clean and dry for an extended period, preventing bacteria and odors.
Activate the function for any program (except the "Fruit Mode") by pressing the DRY button (1). After that, press the Start/Stop button (15).
You can also use the function separately. Press the Mode button and then the DRY button. Afterward, press the Start/Stop button (15).
If you want to cancel the DRY function, press and hold the "Power On/Off" button (16) for 3 seconds to turn off the dishwasher.
Display during the activated DRY function:
| Function in Addition to the Washing Program | Power on/off (16) Start /Stope (15)Program option (14)Dry indicator (6)Remaining time on display |
| Function Without Additional Washing Program | Power on/off (16) Start /Stop (15) dry indicator (6)Remaining time on display |
DRY-Funktion does not work in "Fruit-Mode"!
Cleaning Program: ECO
Under ECO washing Program, add 16g detergent, then start washing. When 18 minutes left before washing finish, pause washing, open the door and add 2ml rinse aid, then close the door to continue the washing till the washing finishes.
OPERATION
1. Power on
Plug in, touch ○ Power , turn on the machine.
Note: During washing program ∪ing, touch for 3 seconds to force the machine to turn off.
2. Add detergent
Open the door, add moderate detergent powder, or 1pc detergent block into the machine, close the door.
Note: No detergent when fruit washing; The dosage: 8-10g each washing circle
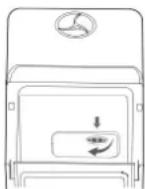
3. Program selection
Touch ']!", each of program indicator will light one by one, select the program you want.
4. Run program
Touch "sp", run selected program, the machine will check water supply automatically.

Note:
- Check tap or tank model automatically after running program,
if the indicato ^1 become red, you need open tap or fill tank with water; - After 5 times checking, there is still no water supply, the machine will enter standby;
- Touch "S/P" to force to pause machine to add tableware during washing;
-
Touch " (i) for 3 seconds to quit program, the machine will drain, then turn off;
-
Touch "①" to add 73 hours' circular wind to keep air fresh inside machine.
Select this program only, you can put wet dishes in the dishwasher and dry their own without running the wash cycle.
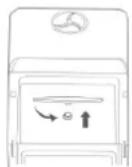
5. Wash
The machine has two water supply models, tap model and tank model.
Note:
a) The indicator ' ☐' is white, means tank model;
b) The indicator "F" is white, means tap model;
c) If tank is full, the machine will
switch into tank model automatically;
d) Fill 3 cups of water into tank, Di, Di, Di will be sound if tank is full
the indicator " 59" will become white.
d) If tap model, please open water tap.
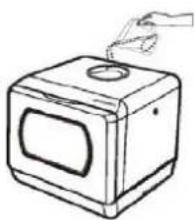
natural_image
Simple line drawing of a square box with a circular top and a window, no text or symbols present.Fill water by hand (For tank model)
natural_image
Line drawing of a portable electronic device with a faucet and cable (no text or symbols)Connect tap [For tap model]
FUNCTION
| Program | Program Execution | Detergent | Temperature | Drying time | Program time |
| Standard | Hot water washingCold water rinsingCold water rinsingHot water washing | 8g | Washing 55°C Rinsing 68°C | 60Min | 69Min |
| Quick | Hot water washingCold water rinsingHot water rinsing | 8g | Washing 50°C Rinsing 62°C | 60Min | 29Min |
| Strong | Hot water washingHot water rinsingCold water rinsingHot water rinsing | 12g | Washing 55°C Rinsing 55°C Rinsing 75°C | 60Min | 89Min |
| ECO | Hot water washingCold water rinsingHot water rinsing | 8g | Washing 55°C Rinsing 68°C | 60Min | 59Min |
| Fruit | Cold water rinsingCold water rinsing | / | 19Min | ||
| Dry | / / | 60Min | Circulating fresh air 73 hours |
CLEANING & MAINTENANCE
Never use the machine without filter!
Clean and maintain the machine once a week!
1. Filter Cleaning
a. Disassemble.
Rotate anticlockwise to disassemble the filter set, Which have 3 parts, filter mesh, main filter and fine filter.
b. Clean
Use water to flush and brush each of filter parts.
c. Assemble
After cleaning, rotated clockwise to close the filter set.

2. Spray-arms Cleaning
a. Disassemble.
Open the door, take out the basket, then pull out up and down spray arm.
b. Clean
Use water to flush and brush each spray arm, use tools with sharp point, like needle to clean holes if needed.
c. Assemble
After cleaning, please press each arms into positions, make sure the arms can move smoothly.
FAULT & PROBLEM
FAULTCODES
| Code | Fault | 1. How to deal with |
| "E2" | Draining | 2. Check drain pipe, be sure the pipe is straight, no bending;3. Power off, check if anything block filer or drain pipe;4. Be sure all pipes are not blocked by something. |
| "E3" | Overflowing | Tilt the machine to 30~45 degree, let water flow out from base of machine, then restart machine, if still fault, contact our serviceman. |
| "E4" | Temperature | Restart machine, if still fault, please contact our serviceman. |
| "ES" | Message | |
| "E6" | Heating | |
| "E7" | Pressure |
TROUBLESHOOTING
| Problem | Reason | How to deal with |
| Tableware is not clean | incorrect tableware loading | be sure enough gap between tableware |
| spray arm trapped | be sure nothing trap the spray arm | |
| blocked spray arm | clean spray arm | |
| blocked filter | clean filter set | |
| incorrect filter installation | correctly assemble filter set | |
| incorrect program selection | select appropriate washing program | |
| no detergent | add detergent (block/powder/liquid) | |
| Machine do not start | water shortage | add water till the indicator light off |
| door do not close fully | check the door if anything stop closing fully | |
| Can not select program | be washing | re-select program after stop in-progress program or wait m-progress program finishing |
| Tableware is not dry | inappropriate program | select appropriate program |
| poor dry effect for plastic tableware | wipe to dry these plastic tableware by hand | |
| incorrect tableware loading | correct tableware setting in accordance | |
| drying program no finishing | wait the dry program finishing | |
| wooden tableware | wipe to dry these wooden tableware by hand | |
| Discoloration of plastic tableware | over high washing temperature | select program with lower temperature |
| Detergent left | trapped sriray arm, no water flush detergent | be sure spray arm move smoothly |
| detergent with poor quality | use qualified detergent | |
| A mount of foam in the machine | use incorrect detergent | 1. Use special deter ent for dishwasher;2. Open machine, wipe out foam by hand;3. Fill 2-3L water into machine, select any pro9ram, after 1-2min, the foam will be i:tramed, can repeat the process if needed |
| Abnormal sound in the machine | spray arm knock tableware | correctly loading the tableware |
| tableware move slightly | fix tableware before washing | |
| Egg custard left on the tableware | protein solidificatio n | wash the tableware with egg custard by hand |
| Water drops left inside of machine | drying time is not enough | select " Dry " program |
TECHNICAL FEATURES
| Model | SP5 Dual |
| Rated Voltage | 220-240V 50Hz |
| Power | 950W |
| Product Size | 428 x 425 x 458mm |
| Net Weight | 13kg |
ENVIRONMENT FRIENDLY DISPOSAL
This appliance is intended to be used in household and similar application areas in shops, offices and other working environments.
Farm houses by clients in hotel, motels and other residential type environments.
Bed and breakfast type environments.
Recycling – European Directive 2012/19/EU
This marking indicates that this product should not be disposed with other household wastes.
To prevent possible harm to the environment or human health from uncontrolled waste disposal, recycle it responsibly to promote the sustainable reuse of material resources. To return your used device, please use the return and collection systems or contact the retailer where the product was purchased.
They can take this product for environmental safe recycling.
The components are quality products. They were designed taking into consideration the latest technical knowledge, and carefully constructed using a standard, good quality material.
The warranty period is 24 months from the time of handover, which must be confirmed through a sales receipt, invoice or delivery note. Within the warranty period, any functional defects in the components will be fixed by our customer service team if these can be shown to be the result of a material defect that has arisen despite prudent handling in accordance with our operating instructions.
The warranty will include repairing defective parts or providing properly functioning replacements free of charge and at our discretion. Any parts that are replaced will become our property. The repair or replacement of individual parts does not result in an extension to the warranty period, nor is there a new warranty period for the specific components affected. There is no separate warranty period for built-in spare parts. We offer no warranty for damage or defects affecting components or their parts if these are caused by excessive use, or incorrect handling or maintenance. The same applies for failure to follow the operating instructions and for the installation of spare parts or accessories not listed in our range. Warranty claims shall be void in the event of interference or modifications to components by unauthorised individuals.
The warranty does not cover parts that are subject to natural wear and tear. In the event of a warranty claim, fault, need for a spare part or accessory, please contact the customer support centre specified here:
Customer support centre:
Albatros International GmbH
Konrad-Zuse-Str. 3
D-54552 Nerdlen (Germany)
Tel: +49 (0)6592-1730200
Fax: +49 (0)6592-1730209
www.albatros-international.de
info@albatros-international.eu
Subject to modification.
Model:
Purchased at:
In (town/city, street):
Buyer's name:
Street, building number:
Postcode, town/city:
Telephone:
Date, signature:
Fault description:
D Deutsch:
EG KONFORMITÄTSERKLÄRUING:
CE-DÉCLARATION DE CONFORMITÉ
DÉCLARATION DE CONFORMITÉ CE
EC-DECLARATION OF CONFORMITY
We herewith declare in our sole responsibility that this product complies with the following standards (1) in accordance with the regulations of the undermentioned Directives (2) test report (3) issuing test office (4).
Countertop dishwasher SP5 Dual
Brand: Sommertal
Var.ID. 4083
(1) EN IEC 55014-1: 2021; EN IEC 55014-2: 2021; EN IEC 61000-3-2: 2019+A1: 2021; EN 61000-3-3: 2013+A1: 2019+A2: 2021; EN 60335-1: 2012+A11: 2014+A13: 2017+A1: 2019+A14: 2019+A2: 2019+A15: 2021; EN 60335-2-5: 2015+A11: 2019+A1: 2020; EN 62233: 2008; AfPS GS 2019:01 PAK; EN 60436: 2020+A11: 2020; EN 50564: 2011; EN 60704-2-3: 2019/A11: 2019
(2) 2014/30/EU; 2014/35/EU; EU 2019/2022; EU 2019/2017; EU 2021/913; 2011/65/EU; (EU) 2015/863
(3) GZEM221000582301; GZES230801483101A1; GZES230801483102A1; 64.181.21.03042.01; CANEC23014511701
(4) SGS-CSTC Standards Technical Services Co., Ltd.; TÜ V SÜ D Certification and Testing (China) Co., Ltd.
EN Importer and responsible for technical documents
Authorized person for the compilation of the technical documentation:
R.Bunze2
Nerdlen, 21.03.2024 Ralf Bunzel, Procurement Manager
Albatros International GmbH, Konrad-Zuse-Str. 3, 54552 Nerdlen, Germany


- Sommertal
- Wasser Zulauf
- Programmauswahl:
- Programme
- Sommertal Lave-vaisselle de table Model: SP5 Dual
- CONSIGNES DE SÉCURITÉ IMPORTANTES
- Programma
- Entrada de agua
- IMPORTANT SAFETY INSTRUCTIONS
- EARTHING INSTRUCTIONS
- PRODUCT IDENTIFICATION
- MACHINE
- INSTALLATION
- TABLEWARE LOADING
- DRY-Funktion does not work in "Fruit-Mode"!
- OPERATION
- Power on
- Add detergent
- Program selection
- Run program
- Note:
- Wash
- FUNCTION
- CLEANING & MAINTENANCE
- Filter Cleaning
- Spray-arms Cleaning
- FAULT & PROBLEM
- ENVIRONMENT FRIENDLY DISPOSAL
- Recycling – European Directive 2012/19/EU
- Customer support centre:
- Model:
- D Deutsch:
Brand : Sommertal
Model : SP5 Dual
Category : Dishwasher