
Amazonia 6 Smart - Dishwasher Klarstein - Free user manual and instructions
Find the device manual for free Amazonia 6 Smart Klarstein in PDF.

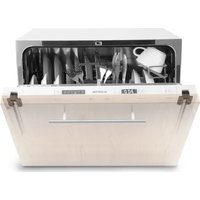
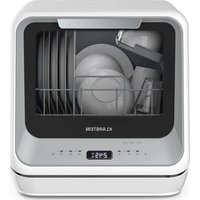
| Product type | 6-place setting dishwasher, freestanding |
| Brand | Klarstein |
| Model | Amazonia 6 Smart |
| Dimensions (H x W x D) | 438 x 550 x 500 mm (door closed); 812 mm depth with door open at 90° |
| Power supply | 220-240 V ~ 50 Hz |
| Capacity | 6 place settings |
| Number of programs | 7: Intensive, Universal, Eco, Glass, 90 min, Quick, Baby care |
| Water consumption (Eco program) | 6.5 L/cycle |
| Energy consumption (Eco program) | 0.613 kWh/cycle |
| Duration of Eco program | 3 h 50 min |
| Noise level | 49 dB(A) |
| Energy efficiency class | F |
| Connectivity | WiFi 2.4 GHz (802.11 b/g/n), Klarstein app |
| Special functions | Delayed start up to 24 h, built-in water softener, 3-stage filtration system |
| Tub material | Stainless steel |
| Control panel | LED display, touch keys |
| Safety | Door lock, overflow protection, child lock |
| Maintenance | Weekly cleaning of filters; removable spray arms |
| Manufacturer warranty | 24 months |
Frequently Asked Questions - Amazonia 6 Smart Klarstein
User questions about Amazonia 6 Smart Klarstein
0 question about this device. Answer the ones you know or ask your own.
Ask a new question about this device
Download the instructions for your Dishwasher in PDF format for free! Find your manual Amazonia 6 Smart - Klarstein and take your electronic device back in hand. On this page are published all the documents necessary for the use of your device. Amazonia 6 Smart by Klarstein.
USER MANUAL Amazonia 6 Smart Klarstein
CLEANINGCI LEANINGLE ANINGLEAN NINGCLEAN NGCLEANINGCI CLEANINGLE LEANINGLE ANINGLEAN
KLARSTEIN
www.klarstein.com

bar
| Category | Value | |---|---| | Category 1 | 100 | | Category 2 | 100 | | Category 3 | 100 | | Category 4 | 100 | | Category 5 | 100 | | Category 6 | 100 | | Category 7 | 100 | | Category 8 | 100 | | Category 9 | 100 | | Category 10 | 100 | | Category 11 | 100 | | Category 12 | 100 | | Category 13 | 100 | | Category 14 | 100 | | Category 15 | 100 | | Category 16 | 100 | | Category 17 | 100 | | Category 18 | 100 | | Category 19 | 100 | | Category 20 | 100 | | Category 21 | 100 | | Category 22 | 100 | | Category 23 | 100 | | Category 24 | 100 | | Category 25 | 100 | | Category 26 | 100 | | Category 27 | 100 | | Category 28 | 100 | | Category 29 | 100 | | Category 30 | 100 | | Category 31 | 100 | | Category 32 | 100 | | Category 33 | 100 | | Category 34 | 100 | | Category 35 | 100 | | Category 36 | 100 | | Category 37 | 100 | | Category 38 | 100 | | Category 39 | 100 | | Category 40 | 100 | | Category 41 | 100 | | Category 42 | 100 | | Category 43 | 100 | | Category 44 | 100 | | Category 45 | 100 | | Category 46 | 100 | | Category 47 | 100 | | Category 48 | 100 | | Category 49 | 100 | | Category 50 | 100 | | Category 51 | 100 | | Category 52 | 100 | | Category 53 | 100 | | Category 54 | 100 | | Category 55 | 100 | | Category 56 | 100 | | Category 57 | 100 | | Category 58 | 100 | | Category 59 | 100 | | Category 60 | 100 | | Category 61 | 100 | | Category 62 | 100 | | Category 63 | 100 | | Category 64 | 100 | | Category 65 | 100 | | Category 66 | 100 | | Category 67 | 100 | | Category 68 | 100 | | Category 69 | 100 | | Category 70 | 100 | | Category 71 | 100 | | Category 72 | 100 | | Category 73 | 100 | | Category 74 | 100 | | Category 75 | 100 | | Category 76 | 100 | | Category 77 | 100 | | Category 78 | 100 | | Category 79 | 100 | | Category 80 | 100 | | Category 81 | 100 | | Category 82 | 100 | | Category 83 | 100 | | Category 84 | 100 | | Category 85 | 100 | | Category 86 | 100 | | Category 87 | 100 | | Category 88 | 100 | | Category 89 | 100 | | Category 90 | 100 | | Category 91 | 100 | | Category 92 | 100 | | Category 93 | 100 | | Category 94 | 100 | | Category 95 | 100 | | Category 96 | 100 | | Category 97 | 100 | | Category 98 | 100 | | Category 99 | 100 | | Total (Total) = [sum of bars] / [values] * (sum of bars + bars) * (sum of bars + bars) * (sum of bars + bars). The values in the table represent the sum of the bars and the corresponding sum of the bars. There is no additional data series or categories specified in the code.INHALTSVERZEICHNIS
natural_image
Line drawing of a hand using a tool to adjust or install a component (no text or symbols present)natural_image
Line drawing of a shopping basket filled with documents and a computer (no text or symbols)natural_image
Illustration of a basket containing various kitchen utensils (no text or symbols)flowchart
graph LR
    A["Foot"] --> B["After 5 Sek."]
    B --> C["Box with lid and brush drop"]
    C --> D["Cleaner with lid and brush drop"]
    D --> E["Bag with bag"]

WARNUNG
natural_image
Technical line drawing of a mechanical device interior with no visible text or symbolsMember of Berlin Brands Group
Handwerkerstr. 11
15366 Dahlwitz-Hoppegarten
Deutschland
natural_image
Symbol of a trash bin crossed with a diagonal line, no text or numbers presentBerlin Brands Group UK Ltd
PO Box 1145
Oxford, OX1 9UW
United Kingdom
Congratulations on the purchase of your device. Please read the following instructions carefully and follow them to prevent potential damage. We accept no liability for damage caused by disregarding the instructions and improper use. Please scan the QR code to access the latest operating instructions and further information about the product.

CONTENTS
Safety instructions 42
Quick guide 44
Device overview 45
Display and button functions 46
Installation 48
Before first use 51
Loading the dishwasher correctly 57
Loading the baskets (EN 60436) 60
Rinsing programmes (EN 60436) 62
Setup and operation 64
Cleaning and care 66
Troubleshooting 69
Device control via smartphone 73
Product data sheet 75
Disposal considerations 76
Declaration of conformity 76
TECHNICAL DATA
| Article number 10041885, 10041886 | |
| Power supply 220-240 V ~ 50 Hz | |
| WiFi standard 802.11 b/g/n20/n40 (channel 1-14) | |
| WiFi frequency 2.4-2.5 GHz | |
| WiFi transmission power (max.) 20 dBm |
SAFETY INSTRUCTIONS

WARNING
Risk of explosion! Under certain conditions, hydrogen gas can form in a hot water system that has not been used for more than two weeks. HYDROGEN GAS IS HIGHLY EXPLOSIVE! If you have not used the dishwasher for a long time, open all hot water taps and let the water flow for a few minutes before using the dishwasher. This causes the accumulated hydrogen gas to escape from the system. As the gas can ignite, avoid naked flames and do not smoke during this time.
- Do not pull on the door. Do not sit or stand on the door and the dish rack.
- Do not touch the heating rod of the dishwasher during or shortly after operation.
- Do not start the dishwasher until the door is firmly closed.
- Open the door very carefully during operation and take care that no water splashes in your direction.
- Do not place anything heavy on the open door, this could cause the machine to tip forward.
- Make sure that plastic objects do not come into contact with the heating element during operation.
• Make sure that the detergent compartment is empty after the washing cycle. - Only wash plastic objects that are dishwasher safe and marked accordingly.
- Only use detergents and rinse aids that are suitable for dishwashers. Do not use soap, detergent or hand wash.
- The building's power supply must include a main switch with a contact gap of at least 3 mm between each pole to allow the circuit to be broken in the event of a malfunction.
- Keep children away from the detergent and rinse aid and make sure they do not steal any detergent from the open door.
• Make sure that children do not play with the device.
• Children, physically and physically impaired persons should only use the appliance if they have been familiarised in detail with the functions and safety precautions by a supervisor. - Dishwashing detergents are strongly alkaline. If they are swallowed, poisoning can occur. Avoid any skin or eye contact and keep children away from the dishwasher when the door is open.
• To make sure no one can trip over it, do not leave the door permanently open. -
If the mains cable is damaged, it must be replaced by the manufacturer or a qualified specialist.
-
Please dispose of the packaging material properly.
- During installation, make sure that the mains cable is neither severely kinked nor squeezed.
- Do not play with the controls.
- When connecting the machine, use new hoses and discard the old ones.
- Make sure that no carpet blocks the openings underneath.
- Use the dishwasher only for the purpose for which it was designed.
- Use the dishwasher indoors only.
- The dishwasher is not intended for commercial use, but only for use in household and similar environments.

CAUTION
Risk of injury! When loading the machine, take special care to place sharp parts in the machine so that they do not damage the door seal. Sharp knives must be placed in the cutlery basket with the handle facing upwards. Knives and other objects with sharp points must be placed in the cutlery basket with the point facing downwards or placed horizontally.

WARNING
Risk of suffocation! Children could injure themselves on the packaging materials and old appliances. When disposing of the old appliance, make sure that you cut off the power cable and render the door lock unusable.
QUICK GUIDE
Read the relevant sections in the operating instructions to find out exactly how to proceed and how it works.

| 2 | 3 |
| Inside Outside | |
| Remove larger food residues from the dishes. Avoid pre-rinsing. | Load the baskets. |
| 4 | 5 |
| Fill the dispenser with detergent and rinse aid. | Select a suitable programme and start the dishwasher. |
DEVICE OVERVIEW
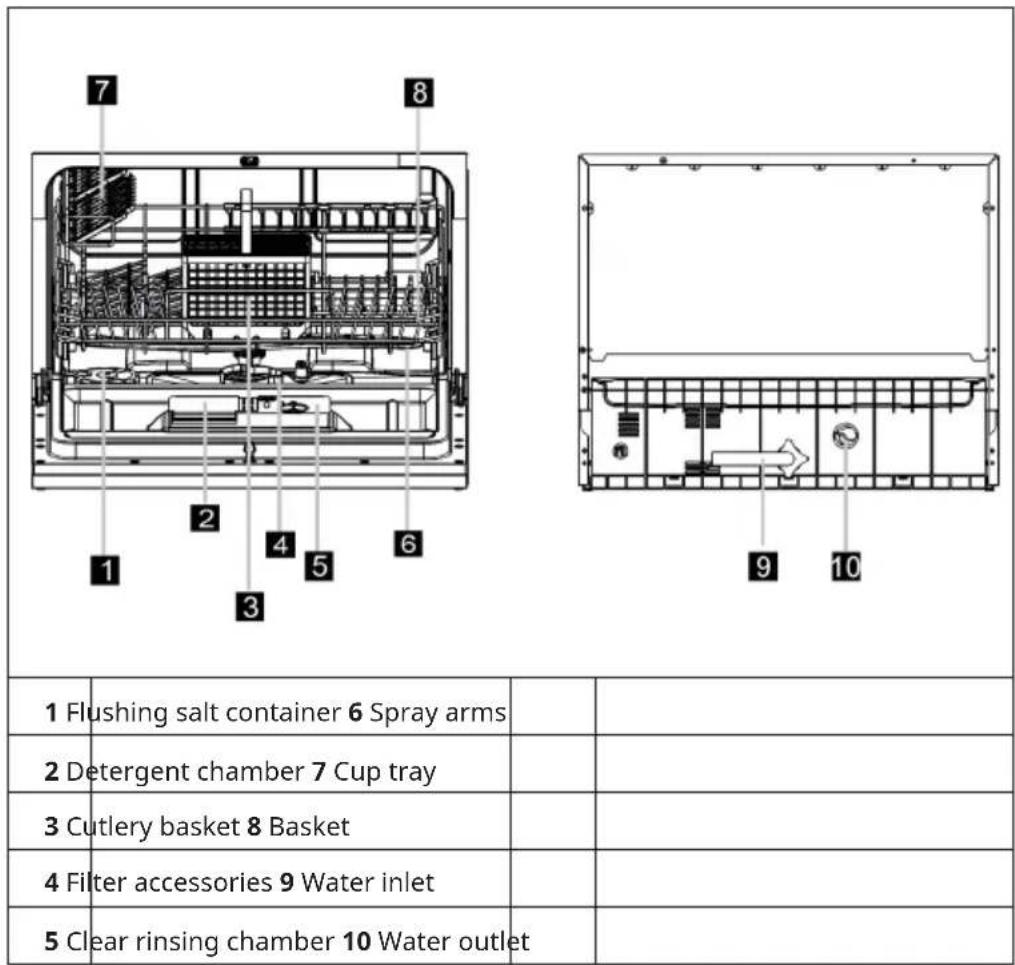
| 1 Flushing salt container 6 Spray arms | ||
| 2 Detergent chamber 7 Cup tray | ||
| 3 Cutlery basket 8 Basket | ||
| 4 Filter accessories 9 Water inlet | ||
| 5 Clear rinsing chamber 10 Water outlet |
DISPLAY AND BUTTON FUNCTIONS
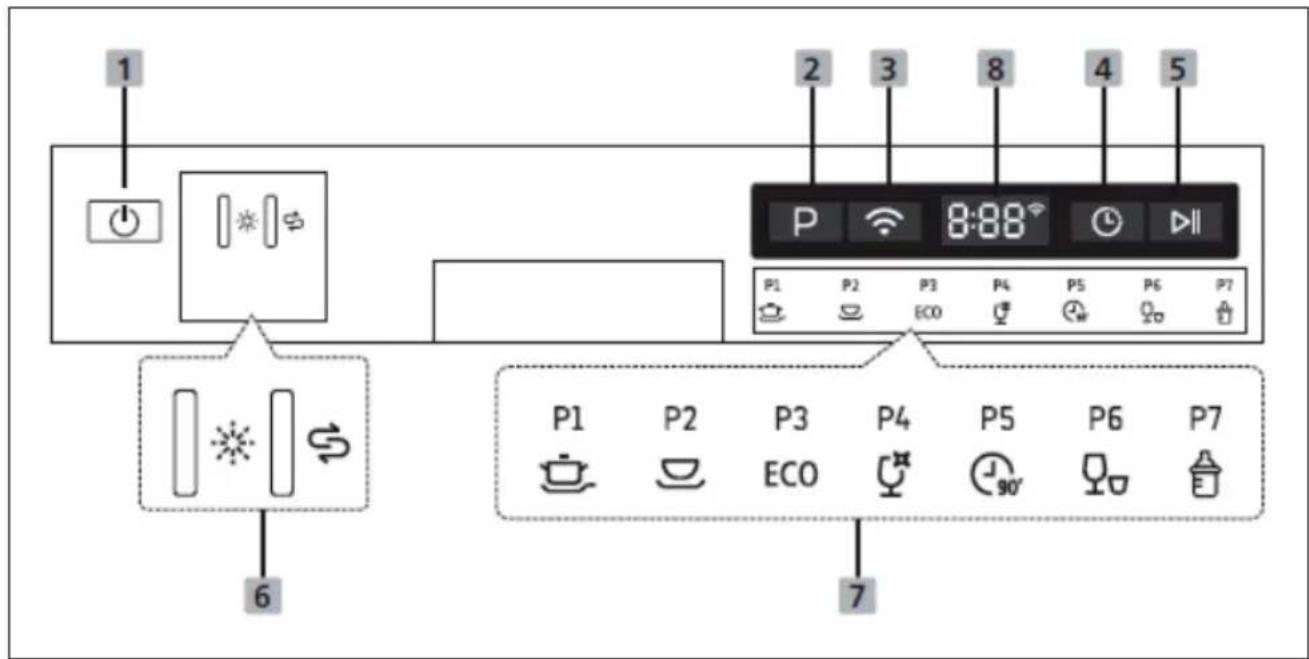
| 1 On/off | Press this button to switch on the dishwasher. The screen lights up. | ||
| 2 Programme | Press this button to select the corresponding washing programme. The indicator for the selected programme lights up. | ||
| 3 WiFi | Switch on the unit and press the WiFi button for more than 3 seconds. When a beep sounds and the icon begins to flash slowly, the unit is connecting to the app. | ||
| 4 Delay | Press this button to set the washing start delay time. You can delay the start of the dishwasher by up to 24 hours. Each press of the button delays the start of the dishwasher by one hour. | ||
| 5 Start/pause | Press this button to start the selected programme or to pause it during operation. | ||
| 6 Warning light |  | Rinse aid: When the corresponding symbol is displayed on the screen, it means that the rinse aid is almost empty and needs to be refilled. | |
 | Rinse salt: When the corresponding symbol lights up on the screen, it means that the dishwashing salt needs to be refilled. | ||
| 7 Programmes |  | Intensive: For heavily soiled pots and pans and for dishes with dried-on food residues. | |
 | Universal: For normally soiled loads, such as pots, plates, glasses and lightly soiled pans. | ||
 | Eco: Standard programme for cleaning dishes with a normal degree of soiling.Environmentally friendly programme, as it is very energy- and water-saving. | ||
 | Glass: For lightly soiled dishes and glasses. | ||
 | 90 minutes: For dishes with a normal degree of soiling that need to be cleaned quickly. | ||
 | Quick: Short wash cycle for dishes with light soiling and dishes that do not need to be dried. | ||
 | Baby care: Programme for cleaning baby bottles. | ||
| 8 Display | Displays the remaining time, delay time, error codes and other information. | ||
INSTALLATION
Preparation
- Place the appliance near a water inlet or drain and a power socket.
- Make sure that the hoses and the plug are accessible at all times.
Setting up the unit
Place the unit in the preferred location. The back should face the wall, the sides towards the built-in cupboard or a wall. The dishwasher is equipped with a water drain that can be directed to the right or the left to facilitate installation.
Power connection
Do not use an extension cord or adapter. Make sure that the socket is earthed and complies with local regulations. Only connect the appliance to sockets that correspond to the specified voltage of the appliance. If the plug does not fit the socket, have it replaced by a professional.
Attach and remove the water inlet
Use new hoses for the connection. Do not use old hoses. The water pressure must be between 0.04-1 MPa. If the pressure is lower than this, ask a specialist company for advice.
- Attach the inlet hose: Completely unwind the safety inlet hose from the bracket on the back of the appliance. Attach the screw to a 3/4 inch water tap. Turn on the water supply fully before use.
- Remove the supply hose: Close the water supply. Unscrew the inlet hose from the water tap.
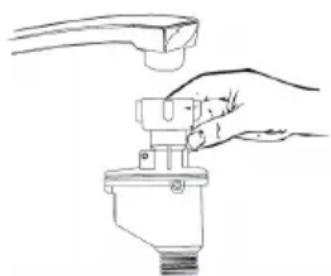
natural_image
Line drawing of a hand using a tool to adjust or install a water level (no text or symbols present)Note: Make sure the screw is tight on the tap. If you have never used the connection before or have not used it for a long time, drain some water beforehand until clear water comes out of the tap. These precautions ensure that the inlet valve does not become clogged or damaged by particles in the water.
Attaching the water drain
Insert the water drain hose into a water drain pipe with a minimum diameter of 4 cm or leave it hanging in the drain. Make sure that the hose is not bent or curved.
Use the supplied hose clamp for fastening. To prevent backflow, the water drain pipe (A) must not be higher than 75 cm and the drain hose (B) must not be immersed in water.

Note: Secure the drain hose firmly to the drain with the supplied hose clamp to prevent it from moving and leaking waste water.
Collecting waste water
If your drain is more than 1 metre below the appliance, you cannot direct the water directly into the drain. In this case, you must collect the waste water in an appropriate collection container, which must be located lower than the water outlet.
Extension hose
If you need an extension hose, use a similar type and make sure it is not longer than 4 metres. Longer hoses can have a negative effect on the cleaning performance of the dishwasher.
Installation dimensions
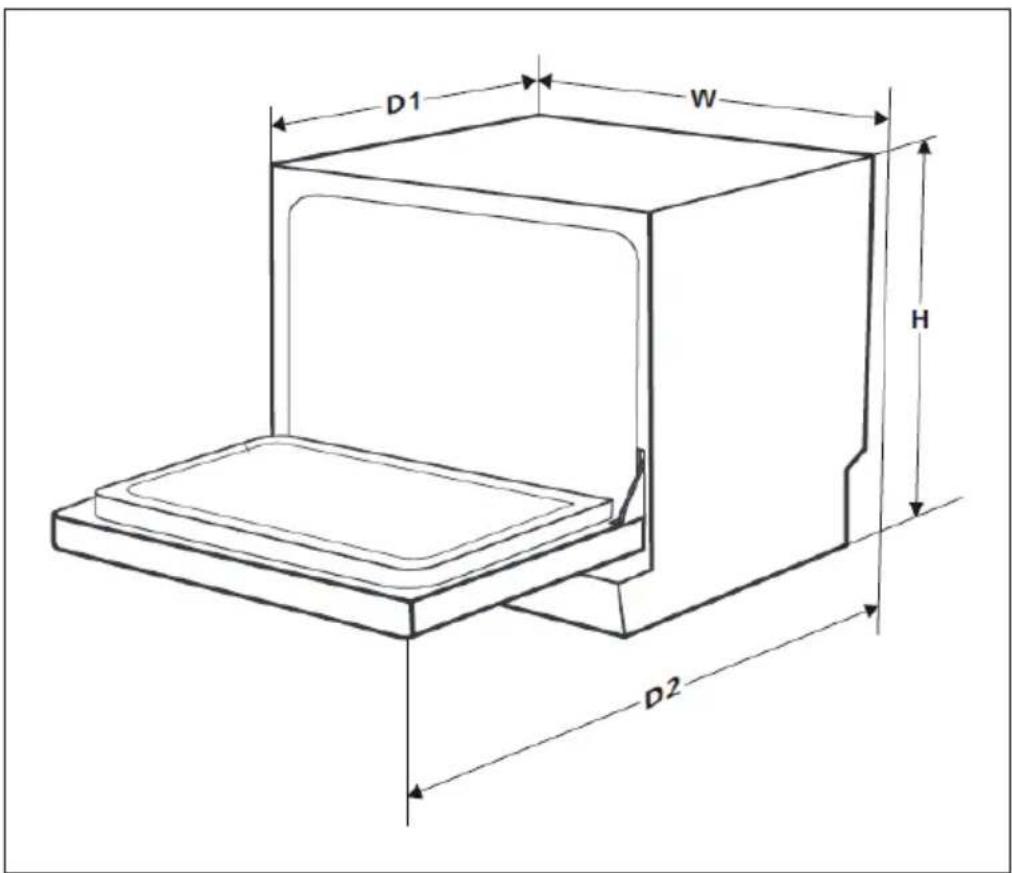
| Height (H) | 438 mm |
| Width (W) | 550 mm |
| Depth (D1) | 500 mm (with closed door) |
| Depth (D2) | 812 mm (with door open 90°) |
BEFORE FIRST USE
Be sure to check the following points before starting the dishwasher for the first time:
• The dishwasher is standing firm and level.
• The inlet tap is open, firmly attached and is not leaking.
- The mains cable is securely plugged into the socket.
• The power is on.
- The packaging material and all stickers have been completely removed.
Fill in salt
- Only use rinsing salt that is suitable for dishwashers. All other types of salt, such as table salt, can damage the appliance. The manufacturer is not liable for damage caused by using the wrong rinsing salt.
- Fill in the rinsing salt before starting a complete rinsing programme. This prevents grains of salt or salt water from remaining at the bottom of the machine and causing corrosion.
The rinsing salt chamber is located under the basket and is filled as follows:
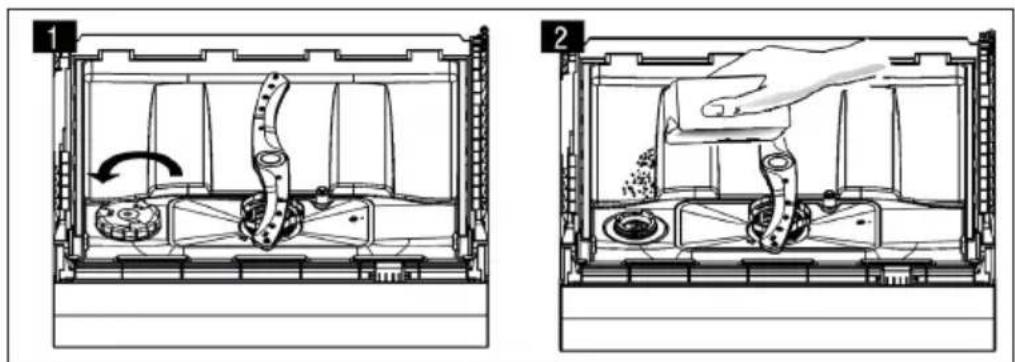
- Remove the basket and unscrew the lid of the salt container (1).
- Before the first wash, add one litre of water to the salt container.
- Put the funnel provided into the salt container and add about 1 kg of rinsing salt (2). It is normal for some water to leak out of the container.
- Screw the cover back on clockwise.
- Normally, the rinsing salt indicator light goes out 2-6 days after filling, when the salt has completely dissolved. Start a washing programme immediately after filling. Otherwise the filter system, the pump or important parts could be damaged by salt water.
Note: The salt container must only be refilled when the indicator light comes on. Depending on how well the salt dissolves, the indicator may light up, even though there is salt in the container. If salt stains remain after rinsing, run a quick or soak programme to remove the excess salt.
Water softener
Note: If your machine model is not equipped with a water softener, you can skip this section.
The hardness of the water varies from place to place. When hard water is used in the dishwasher, deposits form on the dishes and utensils. The appliance is equipped with a special softener that works with a salt container that removes limescale and minerals from the water.
- The water softener must be set manually using the water hardness indicator.
- The water softener is used to remove minerals and salts from the water that would adversely affect the operation of the machine.
- The more minerals there are, the harder your water is.
- The softener should be set according to the water hardness in your area. Your local water authority can advise you on the water hardness in your area.
Setting the salt quantity
The dishwasher is designed in such a way that the amount of salt used can be adjusted to the hardness of the water used. This is to optimise and individually adjust salt consumption.
To adjust the salt consumption, proceed as follows.
- Close the door and switch on the appliance.
- Within 60 seconds after turning on the appliance, press the programme button for more than 5 seconds to start the water softener setting mode.
- Press the programme button again to select the correct setting according to your local environment. The setting changes in the following order: H1 > H2 > H3 > H4 > H5 > H6.
- If you do nothing within five seconds or press the power button to exit setting mode, the programme will save the setting.
| Water hardness | Softener setting | Display indications | Regeneration after X programme sequences 3) | |
| ^^1) | mmol/l 2) | |||
| 0-5 0-0.9 | 1 H1 No regeneration | |||
| 6-11 1.0-2.0 2 H2 10 | ||||
| 12-17 2.1-3.0 3 * H3 5 | ||||
| 18-22 3.1-4.0 4 H4 3 | ||||
| 23-34 4.1-6.1 5 H5 2 | ||||
| 35-45 6.2-8.0 6 H6 1 | ||||
| 1) German unit of measurement for water hardness2) Millimol, international unit for water hardness3) Each cycle with a regeneration process consumes an additional 2.0 litres of water, the energy consumption increases by 0.02 kWh and the programme duration is extended by 4 minutes.* Factory setting | ||||
Rinse aid
The rinse aid is released during the final rinse to prevent water droplets from forming on the dishes, which can leave stains and streaks. It also improves drying by making the water roll off the dishes. Your dishwasher is designed for the use of liquid rinse aids.
Only use branded detergents for dishwashers. Never fill other substances (e.g. dishwasher detergent, liquid detergent) into the rinse aid dispenser. This would damage the device.
When you need to top up the rinse aid
If the rinse aid warning light (※) on the control panel is not lit, you can always estimate the amount by looking at the colour of the visual level indicator next to the lid. When the rinse aid tank is full, the display is completely dark. The size of the dark spot decreases as the rinse aid decreases. The rinse aid level should never be less than 1/4 full.
As the rinse aid level decreases, the size of the black dot on the rinse aid level indicator will change as shown below.

Full 3/4 full

full 1/4 full Empty


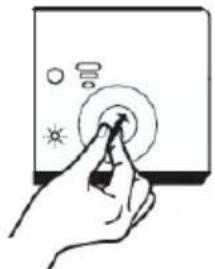
Fill in rinse aid
| 1 | 2 |
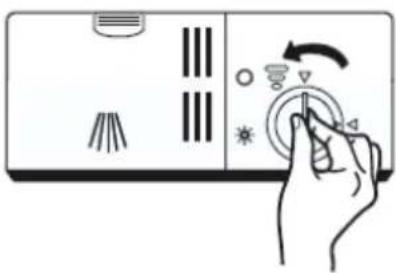 |  |
| Remove the lid of the rinse aid dispenser by turning it anticlockwise. | Carefully fill the rinse aid into the dispenser. Make sure that it does not overflow. |
| 3 |
 |
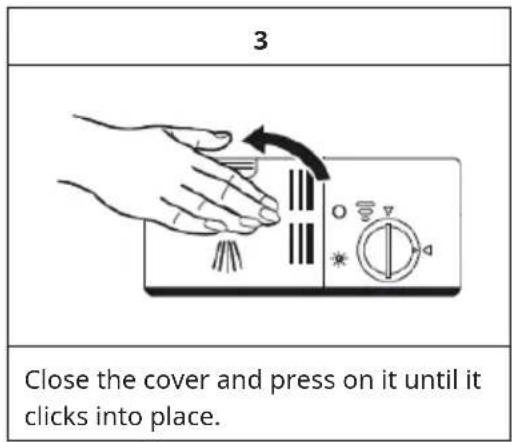
| Close the rinse aid holder lid by turning it clockwise. |
Note: Wipe up spilled rinse aid with an absorbent cloth to avoid excessive foaming during the next wash cycle.
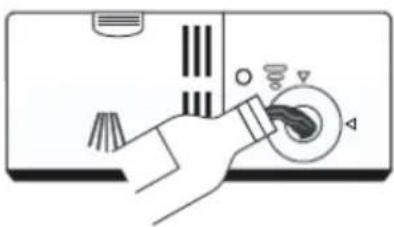
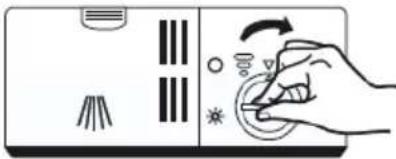
Set the rinse aid quantity
 | Remove the lid of the rinse aid dispenser. Turn the rinse aid indicator to a number. The higher the number, the more rinse aid the dishwasher uses.If the dishes do not dry properly or are stained, turn the knob to the next higher number until your dishes are stain-free. Set the knob to a lower number if sticky whitish stains form on the dishes or a bluish film on glassware or cutlery. |
Types of detergent
The chemical washing substances in the detergent are important for loosening dirt and encrustations and removing them from the machine. Almost all commercial dishwashing detergents are suitable for this.
New detergent powders no longer contain phosphate, which means that the softening effect of phosphate is missing. In this case, you should also fill rinsing salt into the container if the hardness level of your water is 0-6°dH. If you use detergent without phosphate with hard water, white spots may appear on dishes and glasses. In this case, use a larger amount of detergent for each wash. Dishwashing detergents without chlorine only bleach a little, which means that strong discolourations and stains are not removed well. In this case, select a higher rinse temperature.
Washing-up liquid concentrates
Based on their chemical composition, detergents can be divided into two types:
- Conventional alkaline detergents with caustic components
- Weakly alkaline detergents with natural enzymes.
Dishwasher detergent tabs
The dishwasher detergent tabs of different brands dissolve in the machine at different rates. For this reason, they often cannot develop their full cleaning power in short programmes. Therefore, always use the long programmes in combination with detergent tabs to ensure that the tab dissolves completely.
Note: Some detergent tabs are only suitable for models with 3-in-1 function or 3-in-1 programme.
Correct use of dishwashing detergents
- Only use detergents that are specifically suitable for dishwashers. Keep your detergent fresh and dry.
- Only add the detergent to the container when you are ready to start the dishwasher.

WARNING!
Risk of injury! Dishwashing detergent is corrosive! Keep dishwashing detergent out of the reach of children.
Fill in detergent
| 1 | 2 |
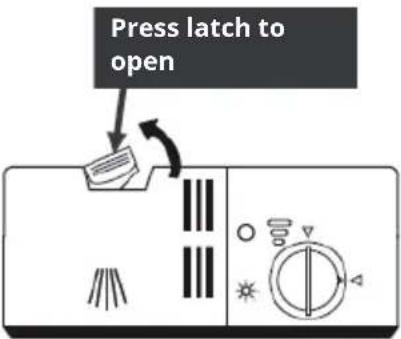 |  |
| Press the release button on the detergent dispenser to open the cover. | Fill the detergent for the main wash cycle into the larger container (A). If the rinse load is more heavily soiled, also add some detergent to the smaller container (B) to distribute it during the pre-wash. |
Note: Follow the manufacturer's recommendations on the detergent packaging.
LOADING THE DISHWASHER CORRECTLY
Note: The equipment and appearance of the baskets and cutlery baskets in the following illustrations may differ from your appliance model.
• We recommend that you only use dishes that are suitable for dishwashers.
- Use only mild detergents as described under "Types of detergent" in the previous chapter.
- For heat-sensitive dishes, we recommend a programme with a lower temperature.
- To prevent damage, do not remove glasses and cutlery from the dishwasher immediately after the programme ends.
Unsuitable crockery and cutlery
| Unsuitable crockery/cutlery Conditionally suitable crockery and cutlery | |
| Cutlery with wooden, horn or mother-of-pearl handlesHeat-resistant plastic tablewareOlder cutlery with glued parts that are not heat resistant.Coated cutlery or crockery.Things made of tin and copper.Crystal glassThings made of non-stainless steelWooden dishesPlastic crockery and cutlery | Certain types of glass, as they can become cloudy over time.Silver and aluminium parts, as they can change colour over time.Glazed crockery, as the glaze disappears over time the more often you wash it. |
What you should bear in mind when loading
Remove larger food scraps. Soak burnt-on residues in pans beforehand. It is not necessary to rinse the dishes until clear beforehand.
Place the items in the dishwasher as follows:
- Place cups, glasses, pots and pans in the dishwasher with the inside facing down.
- Curved items, or items with indentations, should be placed in the dishwasher at an angle to allow the water to drain away.
- Load the objects inside the device in such a way that they cannot fall over.
- Make sure that the spray arms can rotate freely and are not obstructed by dishes or protruding objects.
- Load hollow objects such as cups, glasses, pans, etc. with the opening facing downwards so that no water can collect in the container or on the bottom of the dishes.
- Do not wash small items in the dishwasher as they could easily fall out of the basket.
- Make sure that dishes and cutlery do not overlap or cover each other.
- To avoid glass breakage, glasses must not touch each other.
- The upper basket is intended for more delicate and lighter dishes such as glasses, coffee and tea cups.
- Knives with a long blade stored upright are a potential hazard!
- Long and/or sharp cutlery, such as carving knives, must be placed horizontally in the upper basket.
- For best results and to reduce energy consumption, do not overload the dishwasher.
Note: The washed items are hot! To avoid damage, do not remove glass and cutlery from the dishwasher until about 15 minutes after the end of the programme.
To load the basket correctly
- It is not possible to place all dishes with the top facing upwards. In order to increase the cleaning surface area and improve washing performance, it is recommended to position the dirty side of the dishes towards the spray arm.
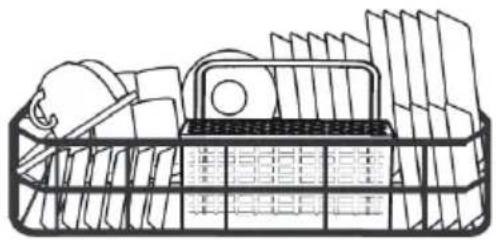
natural_image
Line drawing of a shopping basket filled with documents and a computer (no text or symbols)- Make sure that the dishes do not protrude from the bottom of the basket to ensure that the movement of the spray arm is not obstructed.
- Only plates with a maximum diameter of 19 cm should be placed in front of the detergent dispenser so as not to interfere with the detergent addition.
To load the cutlery basket
Put the cutlery in the basket for your personal safety and for optimal cleaning.
- Make sure that the pieces of cutlery do not get caught in each other.
- Put cutlery into the basket with the handles facing downwards.
- Place knives and other potentially dangerous utensils in the basket, handles up.
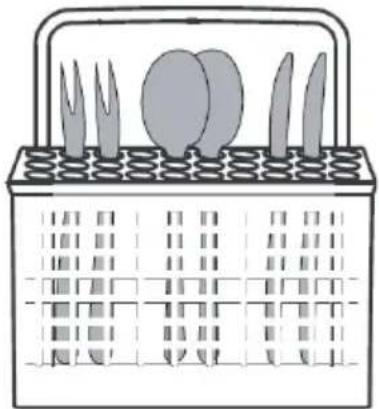
natural_image
Illustration of a basket containing various kitchen utensils (no text or symbols)Important: Make sure that nothing protrudes from the bottom of the cutlery basket. Always place sharp cutlery in the basket with the tip facing downwards and make sure that the cutlery is not too close together.
LOADING THE BASKETS (EN 60436)
Dish basket
With the cup rack Without the cup rack
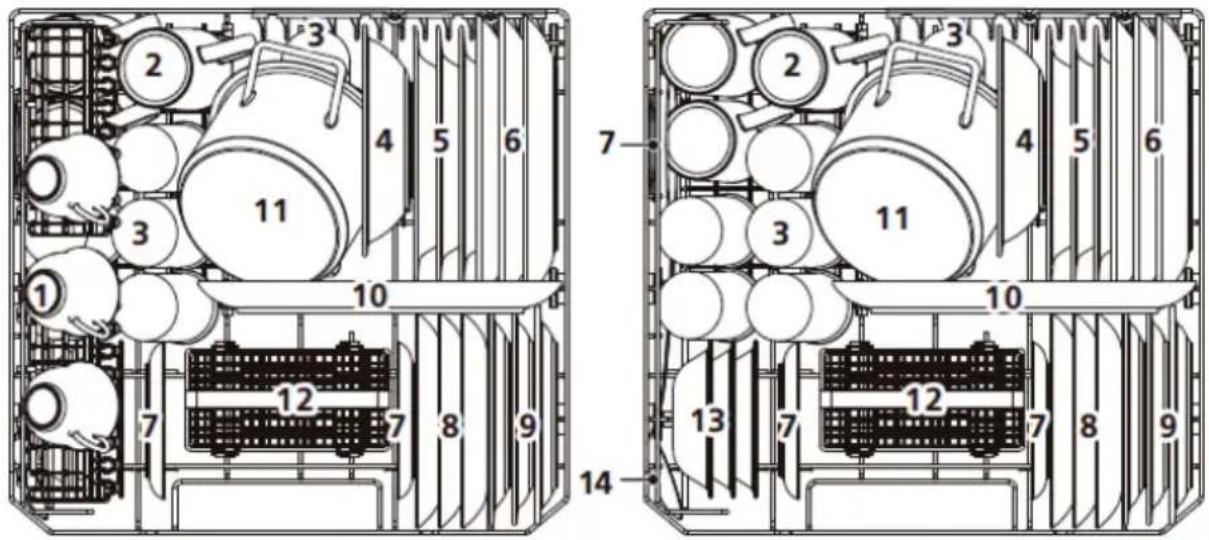
| 1 Cups 6 Dinner plates 11 Small pot | |||||
| 2 Mugs 7 Saucers 12 Cutlery basket | |||||
| 3 Glasses 8 Dessert dishes 13 Dessert bowls | |||||
| 4 | Melamine bowl | 9 | Melamine dessert plates | 14 | Serving spoon |
| 5 Soup plates 10 Oval platter | |||||
Cutlery basket
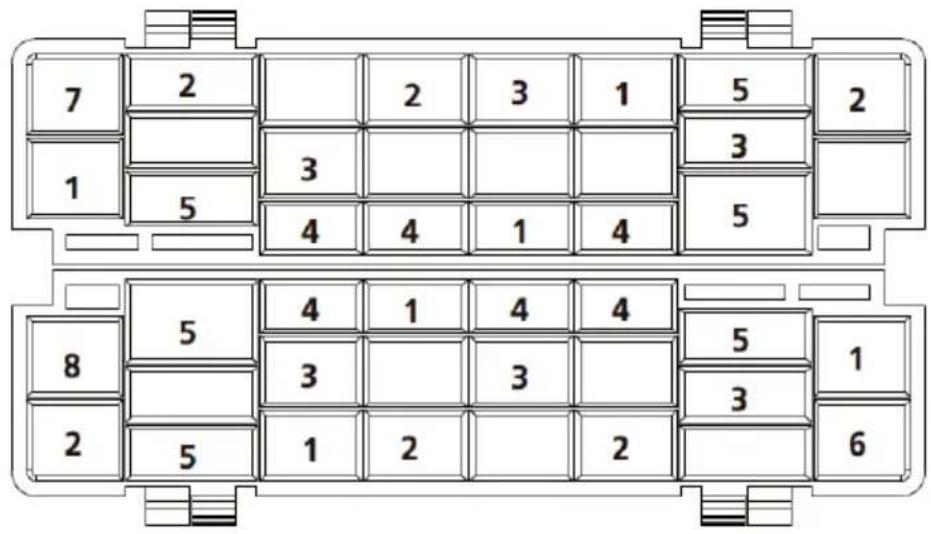
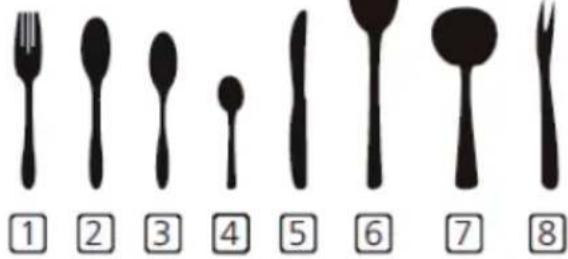
1 Forks
2 Soup spoons
3 Dessert spoons
4 Teaspoons
5 Knives
6 Serving spoons
7 Gravy ladles
8 Serving forks
Information for comparability tests in accordance with EN60436
• Capacity: 6 place settings
- Program: ECO
- Rinse aid setting: Max
- Softener setting: H4
RINSING PROGRAMMES (EN 60436)
The table below shows which programmes work best for each amount of food residue and how much detergent is needed. It also contains various information about the programmes. The consumption values and programme duration are only guide values, except for the ECO programme.
(●) indicates that the programme uses rinse aid during the last rinse.
| Programme | Description Rinsing cycle | Rinse aid front/ main | Time (min) | Energy (KWh) | Water (L) | Rinse aid | |
 Intensive Intensive | For heavily soiled items, like pots, pans and dishes with dried-on food residue. | Pre-wash (50 °C)Wash (70 °C)RinseRinseRinse (70 °CDry | 4+10 g 140 | 1.200 9.6 | ● | ||
 Universal Universal | For insensitive, normally soiled everyday tableware. | Pre-washWash (60 °C)RinseRinse (70 °CDry | 4+10 g 120 | 1.050 7.7 | ● | ||
| ECO (*EN 60436) | For normally soiled items, such as pots, plates, glasses and lightly soiled pans. | Pre-washWash (45 °C)Rinse (65 °CDry | 14 g 230 | 0.613 6.5 | ● | ||
 Glass Glass | For lightly soiled loads, such as glass and fine ceramics. | Wash (45 °C)RinseRinse (60 °CDry | 14 g 75 | 0.650 5.8 | ● | ||
 90 min. 90 min. | For lightly soiled dishes and glass. | Wash (65 °C)RinseRinseRinse (70 °CDry | 14 g 90 | 1.100 6.6 | ● | ||
| Programme | Description Rinsing cycle | Rinse aid front/ main | Time (min) | Energy (KWh) | Water (L) | Rinse aid | |
 Quick Quick | Short programme for lightly soiled dishes that do not need extra drying. | Wash (40 °C) Rinse Rinse | 12 g 30 | 0.500 5.8 | ● | ||
 Baby care Baby care | Programme for cleaning baby bottles. | Wash (65 °C) Rinse Rinse (70 °C) Dry | 14 g 105 | 0.690 5.9 | ○ | ||
| *ECO (EN 60436): The ECO programme is suitable for cleaning normally soiled dishes as it is the most efficient programme for this purpose in terms of combined energy and water consumption and is used to assess compliance with EU eco-design regulations. | |||||||
Saving energy
- Pre-rinsing dishes leads to increased water and energy consumption and is not recommended.
- Washing dishes in a domestic dishwasher typically consumes less energy and water during the usage phase than washing by hand if the domestic dishwasher is used as instructed.
SETUP AND OPERATION
Starting a programme
- Pull out the basket, load the dishes and slide the basket back into the dishwasher.
- Fill in the detergent.
- Plug the power plug into the mains socket. For power supply details, see the "Technical data" section and the product data sheet. Make sure that the water supply is set to full pressure.
- Close the door and press the on/off button to switch on the appliance.
- Select a programme, the indicator light lights up. Then press the start/pause button and the dishwasher will start the selected programme.
Change programme
A programme can only be changed if it has only been running for a short time, otherwise the washing-up liquid may have already been released or the washing-up water with the washing-up liquid may have been drained. In this case, the dishwasher must be reset and the detergent holder refilled. To reset the dishwasher, proceed as follows:
- Press the start/pause button to pause the rinsing process.
- Press the programme button for more than 3 seconds to put the machine in programme selection mode.
- Press the programme button to select the desired programme.
- Press the start/pause button. After 1 second, the dishwasher starts.

flowchart
graph LR
    A["Hand icon"] --> B["3 sec."]
    B --> C["Next Step"]
    C --> D["Hand gesture with 'ECO' label"]
Adding dishes later
Forgotten dishes can be added later at any time as long as the detergent chamber has not yet opened. Proceed as follows:
- Press the start/pause button to pause the washing process.
- Wait 5 seconds and then open the door.
- Add the forgotten dishes.
- Close the door.
- Press the start/pause button. After 10 seconds, the dishwasher starts.

flowchart
graph LR
    A["Foot"] --> B["Brush"]
    B --> C["Bar chart"]
    C --> D["Box"]
    D --> E["Bag"]
    style A fill:#f9f,stroke:#333
    style B fill:#ccf,stroke:#333
    style C fill:#cfc,stroke:#333
    style D fill:#fcc,stroke:#333
    style E fill:#cff,stroke:#333

WARNING
Risk of injury! It is dangerous to open the door while a programme is running as the hot steam can scald you.
Remove dishes at the end of the programme
- Switch off the appliance: Switch off the appliance using the on/off button and turn off the water supply.
- Open the door carefully: Hot dishes are very sensitive and break easily. Therefore, let the dishes cool down for 15 minutes before removing them from the dishwasher. They will also dry better this way.
- Unload the dishwasher: It is normal for the inside of the dishwasher to still be damp at the end of the programme.
CLEANING AND CARE
Filter system
The filter prevents coarse residues and other large food debris from entering the pump. The filter system consists of a coarse filter, a flat filter (main filter) and a fine filter.
| Coarse filter (C):Coarse residues, such as bones or glass splinters, are absorbed by the coarse filter. To remove them from the filter, gently pull the filter out by the feet on the top and empty it.Fine filter (B):Filters dirt and food residues and prevents them from getting back onto the dishes during the washing process.Main filter (A):Food residues and dirt particles are crushed by a special nozzle on the spray arm and discharged through the drain. | 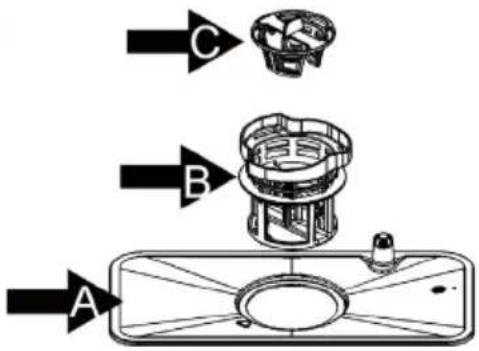 |
Dismantling the filter system for cleaning
The filter system removes dirt and food residues, allowing the clean water to be returned to the circuit for cleaning. In order for the appliance to work at optimum performance, you should clean the filters once a week. We recommend that you remove coarse dirt and food residues after each wash cycle and then rinse the filter under clear water.
Important: Never use the dishwasher without filters. Irregular cleaning of the filters reduces the washing performance and can damage the dishes.
- Turn the coarse filter (C) anticlockwise and remove the filters.
- Take the filters apart.
- When you have cleaned the filters, put them back in place in the order given.
Important filter cleaning instructions
- Clean the coarse filter with a cleaning brush.
- Do not knock on the filters when cleaning, otherwise they may bend, which will have a negative effect on the dishwasher's performance.
Cleaning the dishwasher
- Clean the control panel with a slightly damp cloth and then dry it carefully.
- Maintain the housing with a suitable polishing wax.
- Do not use any sharp objects, scouring pads or aggressive cleaning agents for cleaning.
- Clean the edge of the door with a warm, damp cloth. To prevent water from entering the locking mechanism, do not use spray cleaners.
How to protect the appliance from frost damage
In winter, observe the following precautions to protect the machine from frost. Perform the following steps after each programme run:
- Pull the plug out of the socket.
- Close the water supply and remove the inlet hose from the inlet valve.
- Drain the water from the hose and the valve into a container.
- Reattach the inlet hose to the inlet valve.
- Remove the filter at the bottom of the tub and soak up excess water with a sponge.
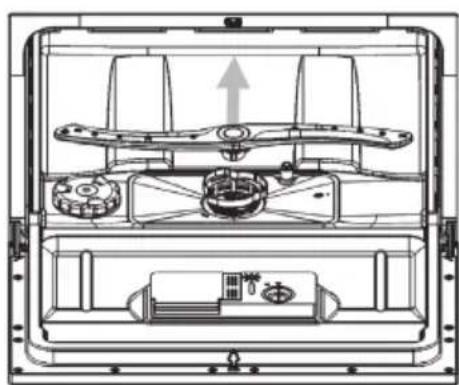
Cleaning the spray arms
You can remove the spray arm for regular cleaning. Grasp the spray arm in the middle and pull it off. Wash it off under running water and put it back in.
After insertion, check that the spray arms can rotate freely. If not, check that they have been reinserted correctly.
natural_image
Technical line drawing of a mechanical device interior with no visible text or symbolsHow to care for your dishwasher properly
• After each wash: Close the water supply and leave the door slightly open to allow the humid air to escape.
- Unplug: Always unplug the appliance before cleaning or performing maintenance on it.
- No solvents or abrasives: Do not use any solvents or abrasives to clean the housing or the rubber seals. Only use a soft cloth and a little soapy water for cleaning. To remove stains or streaks, use a damp cloth with a little vinegar or a special cleaner for dishwashers.
- If you will not be using the appliance for a longer period of time: We recommend that you run a programme without dishes. Then unplug the appliance, close the water supply and leave the door slightly open so that the seals last longer and no unpleasant odours form in the appliance.
- Move the unit: If you need to move the unit, try to keep it upright. If there is no other way, you can also tip it onto its back.
- Door seals: One cause of unpleasant odours is food residue in the door seals. Therefore, clean the seals regularly with a damp sponge.
TROUBLESHOOTING
| Problem Potential cause | Solution | |
| The dishwasher does not start. | The fuse is out or blown. | Replace the fuse or flip the switch again.Remove all other devices that are connected to the circuit themselves. |
| No power. Make sure that | the appliance is switched on, the door is firmly closed and the mains cable is firmly plugged into the socket. | |
| The door is not closed properly. | When closing, make sure that the door lock engages. | |
| No water is pumped out of the dishwasher. | The drain hose is kinked. | Check the hose. |
| The filter is clogged. Check | the coarse filter. | |
| The drain is blocked. Check | your drain and clean it if necessary. If you still have problems. Contact a specialist company. | |
| Rust stains on the cutlery. | The cutlery is not stainless. | Only wash stainless cutlery. |
| No programme was started after the rinsing salt was refilled. | After filling, start the quick programme with an empty dishwasher. | |
| The lid to the rinsing salt container is loose. | Make sure that the lid is firmly closed. | |
| Coloured stains in the tub. | Coloured detergent. Only use detergent without colour. | |
| White film on the inner surfaces. | Mineral residues from hard water. | Clean the inside surfaces with a damp cloth and some dishwasher detergent. Use gloves when doing this and do not use any other detergent. |
| Knocking noises in the interior. | The spray arm hits an object in the basket. | Pause the programme and place the dishes in a way that the spray arm is not obstructed. |
| Rattling noises in the interior. | The dishes are not standing securely. | Pause programme and place dishes so that they are secure. |
| Knocking noise in the water pipe. | Can be caused by crossing the water pipes. | Does not affect the performance of the dishwasher. If you are not sure, contact a specialist company. |
| Foam in the tub. Unsuitable | dishwashing detergent. | Only use detergent that is suitable for dishwashers. If there is still foam in the tub, open the door and allow the foam to evaporate. Pour some cold water into the tub and close the door. Run any washing programme to remove the residue. |
| Rinse aid overflow. Wipe up | any rinse aid that has spilled over immediately. | |
| The dishes are not clean. | The dishes were not loaded properly. | Follow the instructions for loading the dishwasher. |
| The programme was not powerful enough. | Use the intensive programme. | |
| Too little detergent. Use more detergent or use a different detergent. | ||
| Objects are blocking the spray arms. | Place the dishes in the appliance in a way that the spray arms are not obstructed. | |
| The filter system is dirty or incorrectly used. | Clean the filters or insert them correctly. Clean the spray arms. | |
| The dishes do not dry. Incorrect loading. Follow the instructions for loading the dishwasher. | ||
| The glass is fogged up. | Combination of soft water and too much detergent. | Use less detergent and use the shortest programme to wash and clean the glass. |
| Black or grey stripes on dishes | Aluminium parts have rubbed against the dishes. | Use a mild abrasive cleaner. |
| Detergent residues in the chamber. | The dishes are obstructing the dissolution of the detergent. | Load the dishes carefully into the dishwasher. |
Error codes
For some faults, the display shows an error code to warn you:
In the event of a malfunction, the dishwasher displays an error code. The following table lists possible error codes and their causes.
| Code Meaning Potential cause | ||
| E1 Long water inlet time. | The tap is not open, or the water supply is restricted, or the water pressure is too low. | |
| E3 | The required temperature is not reached. | Malfunction of the heating element. |
| E4 Overflow One element of the dishwasher is leaking. | ||
| Ed | Fault in the communication between the main board and the display board. | Open circuit or interrupted wiring for communication. |
- If the appliance overflows, turn off the main water supply before calling the service centre.
- If there is water in the bottom tray due to overfilling or a small leak, the water should be removed before restarting the dishwasher.
- If an error code occurs that cannot be rectified, contact the manufacturer, customer service or a qualified specialist company.
DEVICE CONTROL VIA SMARTPHONE
If you integrate your Klarstein appliance into your home WLAN, you can operate it conveniently via the associated Klarstein app. The app not only allows you to control the appliance remotely via your smartphone, but also gives you access to recipes and further information.
Follow these steps to connect your smartphone to your Klarstein appliance:
- First download the Klarstein app by scanning the QR code with your smartphone (see below) or download it directly from the App Store or Google Play.
- Make sure that your smartphone is connected to the same WiFi network that your Klarstein device is to be connected to.
- Open the Klarstein app.
- Log in with your account. If you don't have an account yet, register in the Klarstein app.
- Follow the instructions in the app.
App download
Use the scan function of your mobile phone to scan the QR code and save the app on your smartphone.
Note: Further instructions on how to use the app and help on how to connect to your device are provided by the app when you open it for the first time.
| iOS Android | |
Troubleshooting connection problems
If your Klarstein device cannot be found in the WLAN, check the following:
- The device is not plugged in. Make sure that your unit is plugged into a power outlet.
- The unit is not in pairing mode. Make sure that the WiFi indicator (LED) on the control panel of the smart device is flashing as described in the "Reset WiFi settings" instruction of your smart device (instructions can usually be found under Device connection).
- The WiFi access point does not operate on 2.4 GHz. Make sure your access point is operating on the 2.4 GHz band and that you have your own SSID on the 2.4 GHz band. If you are unsure about the operating band of your access point, please contact your internet provider.
Important: Please note that if your WiFi router has a dual band - i.e. operates in both the 2.4 GHz and 5 GHz bands - you must separate the SSIDs for each band and use the 2.4 GHz SSID for the connection
-
Check the firewall settings of your WiFi network. The firewall setting of your WiFi network may not allow the Klarstein App to configure the WiFi settings on your smart device. Please ensure that you do not use a public WiFi network, e.g. airports, dormitories, companies, etc.
-
Different login data in the smartphone and in the app. Make sure that the WiFi login details entered in the Klarstein app match those to which your smartphone is connected.
If you have followed the above points and your smartphone still cannot connect to the app, please contact us by email for assistance: appsupport@go-bbg.com
Information according to Regulation (EU) No 2019/2017
| Manufacturer's name or trade mark: Klarstein | ||||
| Manufacturer's address: Wallstraße 16, 10179 Berlin, Germany. | ||||
| Item number: 10041885, 10041886 | ||||
| General product parameters: | ||||
| Parameter Value Parameter Value | ||||
| Standard place settings 6 Dimensions in cm | Height 44 | |||
| Width 55 | ||||
| Depth 50 | ||||
| EEI 61.9 Energy efficiency class ( | a) | F(c) | ||
| Cleaning performance index 1,125 | Drying per | performance index (a) 1,065 | ||
| Energy consumption in kWh [per cycle], based on the eco programme with cold water filling. The actual energy consumption depends on how the unit is used. | 0.613 | Water consumption in litres [per cycle], based on the Eco programme. The actual water consumption depends on the use of the appliance and the water hardness. | 6.5 | |
| Programme duration (h:min) 3:50 | Construction type: Freestanding | |||
| Airborne sound emissions (dB(A) re 1 pW) | 49 | Acoustic emission class | C(c) | |
| Off mode (W) | 0.49 Standby mode (W) | N/A | ||
| Start delay (W) (if applicable) | 1.00 | Networked on-call service (W) (if applicable) | 1.99 | |
| Minimum term of the warranty offered by the manufacturer(b): 24 months | ||||
| Further information: | ||||
| Web link to the website of the supplier where the information according to Annex II point of Commission Regulation (EU) 2019/2022 (1) (b) can be found: www.klarstein.de | ||||
| (a) for the ECO programme.(b) changes to those positions shall not be considered relevant for the purposes of Article 4(4) of Regulation (EU) 2017/1369.(c) If the product database automatically generates the final content of this cell, the supplier does not need to enter this data.(1) Commission Regulation (EU) 2019/2022 of 1 October 2019 setting ecodesign requirements for household dishwashers pursuant to Directive 2009/125/EC of the European Parliament and of the Council amending Commission Regulation (EC) No 1275/2008 and repealing Commission Regulation (EU) No 1016/2010 (see page 267 of this Official Journal). | ||||
DISPOSAL CONSIDERATIONS
natural_image
Symbol of a trash bin crossed with a diagonal line, no text or numbers presentIf there is a legal regulation in your country regarding the disposal of electrical and electronic equipment, this symbol on the product or on the packaging indicates that this product must not be disposed of with household waste. Instead, it must be taken to a collection point for the recycling of electrical and electronic equipment. By disposing of this product in accordance with the regulations, you protect the environment and the health of those around you from negative consequences. For information on recycling and disposal of this product, contact your local government or household waste disposal service.
DECLARATION OF CONFORMITY

Manufacturer:
Chal-Tec GmbH, Wallstrasse 16, 10179 Berlin, Germany.
Importer for Great Britain:
Berlin Brands Group UK Ltd PO Box 1145 Oxford, OX1 9UW United Kingdom
Hereby, Chal-Tec GmbH declares that the radio equipment type Amazonia 6 Smart is in compliance with Directive 2014/53/EU. The full text of the EU declaration of conformity is available at the following internet address: use.berlin/10041885
For Great Britain: Hereby, Chal-Tec GmbH declares that the radio equipment type Amazonia 6 Smart is in compliance with the relevant statutory requirements. The full text of the declaration of conformity is available at the following internet address: use.berlin/10041885
Cher client, chère cliente,
SOMMAIRE
natural_image
Line drawing of a hand using a tool to adjust or install a mechanical component (no text or symbols present)natural_image
Line drawing of a shopping basket filled with documents and a computer (no text or symbols)natural_image
Illustration of a basket containing various kitchen utensils (no text or symbols)flowchart
graph LR
    A["Hand Icon"] --> B["3 sec."]
    B --> C[" eco symbol box with 'ECO' label"]
flowchart
graph LR
    A["Foot"] --> B["Après 5 sec."]
    B --> C["Shrinker with brushstroke pattern"]
    C --> D["Shrinker with hand holding bar inside box"]
    D --> E["Shrinker with lid and handle, down arrow"]
    E --> F["Shrinker with glove, up arrow"]

MISE EN GARDE
natural_image
Technical line drawing of a mechanical device interior with no visible text or symbolsFICHE DE DONNÉES PRODUIT
natural_image
Symbol of a trash bin crossed with a diagonal line, no text or numbers presentDÉCLARATION DE CONFORMITÉ

Fabricant :
Chal-Tec GmbH, Wallstraße 16, 10179 Berlin, Allemagne.
Berlin Brands Group UK Ltd
PO Box 1145
Oxford, OX1 9UW
United Kingdom
ÍNDICE
natural_image
Line drawing of a hand using a tool to adjust or install a light bulb (no text or symbols present)natural_image
Line drawing of a shopping basket filled with books and documents (no text or symbols)natural_image
Illustration of a basket containing various kitchen utensils (no text or symbols)natural_image
Technical line drawing of a mechanical device with internal components and an upward arrow indicator (no text or symbols)natural_image
Symbol of a trash bin crossed with a diagonal line, no text or numbers presentBerlin Brands Group UK Ltd
PO Box 1145
Oxford, OX1 9UW
Reino Unido
INDICE
natural_image
Line drawing of a hand using a tool to press or install a mechanical component (no text or symbols present)natural_image
Line drawing of a shopping basket filled with documents and a computer (no text or symbols)natural_image
Illustration of a basket containing various kitchen utensils (no text or symbols)flowchart
graph LR
    A["Hand gesture"] --> B["3 sec."]
    B --> C["ECO component with icons"]
    C --> D["Hand gesture"]
flowchart
graph LR
    A["Foot with bottle"] --> B["Dopo 5 sec."]
    B --> C["Step 20: Stimulation with bar chart"]
    C --> D["Step 20: Stimulation with bag"]
    D --> E["Step 20: Stimulation with bag"]

AVVERTIMENTO
natural_image
Technical line drawing of a mechanical device with internal components and an upward arrow indicator (no text or symbols)natural_image
Symbol of a trash bin crossed with a diagonal line, no text or numbers presentBerlin Brands Group UK Ltd
PO Box 1145
Oxford, OX1 9UW
United Kingdom

- INHALTSVERZEICHNIS
- WARNUNG
- Member of Berlin Brands Group
- Dahlwitz-Hoppegarten
- CONTENTS
- SAFETY INSTRUCTIONS
- WARNING
- CAUTION
- QUICK GUIDE
- DEVICE OVERVIEW
- DISPLAY AND BUTTON FUNCTIONS
- INSTALLATION
- Preparation
- Setting up the unit
- Power connection
- Attach and remove the water inlet
- Attaching the water drain
- Collecting waste water
- Extension hose
- BEFORE FIRST USE
- Fill in salt
- Water softener
- Setting the salt quantity
- Rinse aid
- When you need to top up the rinse aid
- Fill in rinse aid
- Set the rinse aid quantity
- Types of detergent
- Washing-up liquid concentrates
- Dishwasher detergent tabs
- Correct use of dishwashing detergents
- WARNING!
- LOADING THE DISHWASHER CORRECTLY
- What you should bear in mind when loading
- To load the basket correctly
- To load the cutlery basket
- LOADING THE BASKETS (EN 60436)
- Dish basket
- Information for comparability tests in accordance with EN60436
- RINSING PROGRAMMES (EN 60436)
- Saving energy
- SETUP AND OPERATION
- Starting a programme
- Change programme
- Adding dishes later
- Remove dishes at the end of the programme
- CLEANING AND CARE
- Filter system
- Dismantling the filter system for cleaning
- Important filter cleaning instructions
- Cleaning the dishwasher
- How to protect the appliance from frost damage
- Cleaning the spray arms
- How to care for your dishwasher properly
- TROUBLESHOOTING
- Error codes
- DEVICE CONTROL VIA SMARTPHONE
- App download
- Troubleshooting connection problems
- DISPOSAL CONSIDERATIONS
- DECLARATION OF CONFORMITY
- Manufacturer:
- Importer for Great Britain:
- Cher client, chère cliente,
- SOMMAIRE
- MISE EN GARDE
- FICHE DE DONNÉES PRODUIT
- DÉCLARATION DE CONFORMITÉ
- ÍNDICE
- INDICE
- AVVERTIMENTO
Brand : Klarstein
Model : Amazonia 6 Smart
Category : Dishwasher