
Jet Pressing Healthy 8b - Iron Di4 - Free user manual and instructions
Find the device manual for free Jet Pressing Healthy 8b Di4 in PDF.

| Product type | Steam generator |
| Brand | Di4 |
| Model | Jet Pressing Healthy 8b |
| Ironing programs | AntiShine, Silk/Wool, Cotton, Linen, SmartCare, Healthy |
| Vertical steam function | Yes |
| PulseSteam function | Yes |
| Eco mode | Yes |
| Automatic shut-off | After 8 minutes of inactivity |
| Water tank | Removable, visible max level |
| Anti-scale system | Calc'nClean with removable anti-scale filter |
| Iron lock | SecureLock (depending on model) |
| Safety | Hot surface, automatic shut-off, use by children >8 years with supervision |
| Maintenance | Descaling boiler and iron, soleplate cleaning, filter rinsing |
| Spare parts | Anti-scale filter |
| Warranty | 3 years |
Frequently Asked Questions - Jet Pressing Healthy 8b Di4
User questions about Jet Pressing Healthy 8b Di4
0 question about this device. Answer the ones you know or ask your own.
Ask a new question about this device
Download the instructions for your Iron in PDF format for free! Find your manual Jet Pressing Healthy 8b - Di4 and take your electronic device back in hand. On this page are published all the documents necessary for the use of your device. Jet Pressing Healthy 8b by Di4.
USER MANUAL Jet Pressing Healthy 8b Di4
Jet Pressing Healthy 8b
CENTRO DE PLANCHADO
Centro de engomar
Steam station
Central vapeur
Stazione da stiro
ATENCIÓN
WE WOULD LIKE TO THANKS YOUR FOR CHOOSING DI4, WE WISH THE PRODUCT PERFORMS TO YOUR SATISFACTION AND PLEASURE.
WARNING
PLEASE READ THE INSTRUCTIONS FOR USE CAREFULLY PRIOR TO USING THE PRODUCT. STORE THESE IN A SAFE PLACE FOR FUTURE REFERENCE.
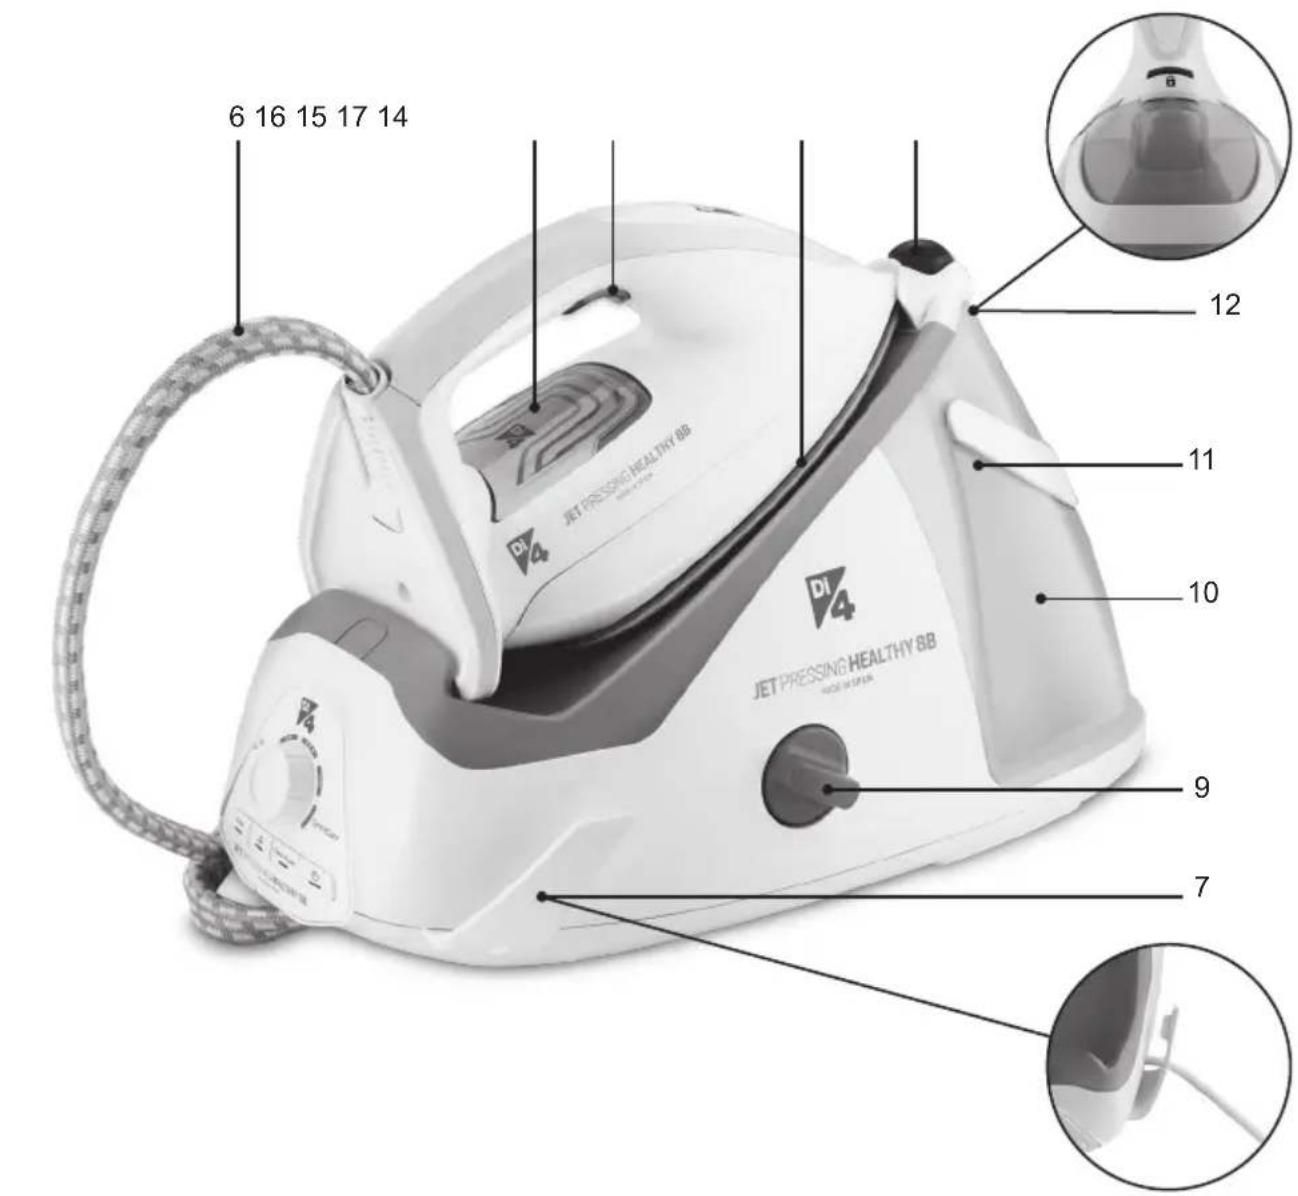
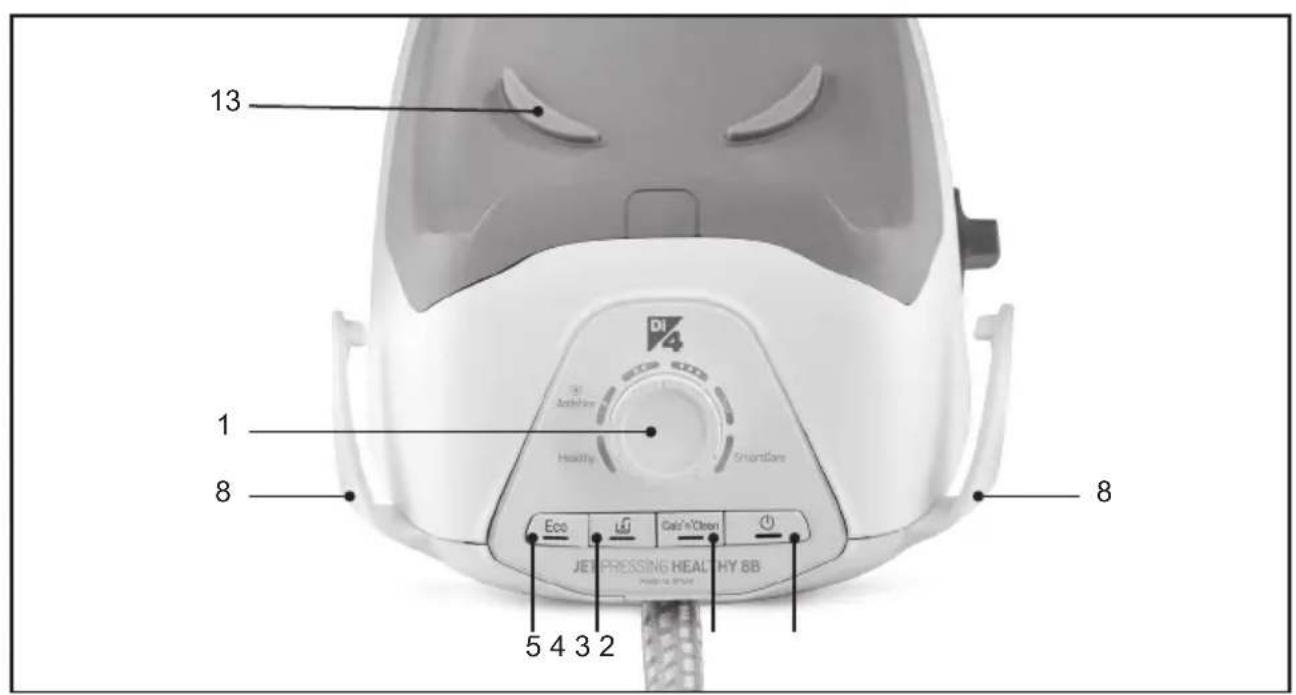
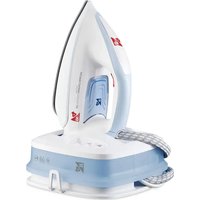
DESCRIPTION
- Programme selector
- "on / off" button with indicator light
- "Calc'nClean" descaling button with indicator light
- "Water tank empty" button with indicator light
- Energy saving "Eco" button with indicator light
- Steam hose
- Mains cable
- Mains cable and steam hose storage holder
- Boiler cap / "Calc'nClean" scale collector *
- Removable water tank
- Level mark for maximum filling
- Filling lid
- Iron pad
- Iron lock system "SecureLock" *
- Steam release button
- Iron indicator light *
- Soleplate
* Model dependent
GENERAL SAFETY INSTRUCTIONS
During the use, the decalcifying or rinsing aperture of the boiler is under pressure and must not be opened.
The appliance must not be left unattended while it is connected to the supply mains.
Remove the plug from the socket before filling the appliance with water or before pouring out the remaining water after use.
The appliance must be used and placed on a stable surface.
When placing the iron on its stand or on its heel, make sure that the surface on which the stand or heel is placed is stable.
The appliance should not be used if it has been dropped, if there are visible signs of damage or if it is leaking water. It must be checked by an authorised Technical Service Centre before it can be used again.
With the aim of avoiding dangerous situations, any work or repair that the appliance may need, e.g. replacing a faulty mains cable, must only be carried out by qualified personnel from an Authorised Technical Service Centre.
This appliance can be used by children aged from 8 years and above and persons with reduced physical, sensory or mental capabilities or lack of experience and knowledge if they have been given supervision or instruction concerning use of the appliance in a safe way and understand the hazards involved. Children shall not play with the appliance. Cleaning and user maintenance shall not be made by children without supervision.
Keep the appliance and its cord out of reach of children under 8 years of age when it is turned on or cooling down. This appliance is designed only for household use up to 2000m above sea level.
CAUTION. Hot surface.
Surface is liable to get hot during use.
IMPORTANT
Carefully read through the operating instructions for the appliance and safeguard them for future reference.
This appliance has been designed exclusively for normal household use in a home environment.
This appliance must be used only for the purposes for which it was designed, i.e. as an iron. Any other use will be considered improper and consequently dangerous. The manufacturer will not be held responsible for any damage arising from misuse or improper use.
This appliance is to be connected and used in accordance with the information stated on its characteristics plate.
This appliance must be connected to an earthed socket. If it is absolutely necessary to use an extension cable, make sure that it is suitable for 16A and has a socket with an earth connection.
The appliance must never be placed directly under the tap to fill the water tank.
The electrical plug must not be removed from the socket by pulling the cable.
Never immerse the iron in water or any other fluid.
Do not leave the appliance exposed to weather conditions (rain, sun, frost, etc.)
This appliance reaches high temperatures and produces steam during use, this could cause scalds or burns if not used properly.
Do not allow the power cable to come into contact with the soleplate when it is hot.
USING YOUR APPLIANCE
1. Filling the water tank
This appliance has been designed to use normal tap water.
Important: Do not use additives! The addition of other liquids, such as perfume, vinegar, starch, condensation water from tumble dryers or air conditioning systems, or chemicals will damage the appliance. Any damage caused by the use of the aforementioned products will make the guarantee void!
- Open the filling lid (12).
- Fill the water tank. Never fill beyond the level "max" (11) for maximum filling!
- Close the filling lid.
Refill the water tank when the indicator light (4) comes on. Three beeps will be heard.
Important: Once refilled, press button (4).
Tip: To prolong the optimum steam function, you may mix tap water with distilled or demineralised water 1:1. If the tap water in your area is very hard, mix tap water with distilled or demineralised water 1:2.
2. Heating
- If your steam station is equipped with an iron lock system (14*), release the iron by pressing the 🔒 button.
- Unwind the steam hose (6) and the mains cable (7). Plug mains cable into an earthed socket.
- Turn programme selector (1) to choose the kind of fabric to be ironed.
- Press the button (2) to switch the appliance on. Indicator lights (2, 16*) will flash indicating that the appliance is heating up.
- When the iron is ready to use, the indicator lights (2, 16*) will remain permanently lit. Two beeps will be heard.
3. Ironing programmes
- Turn the programme selector (1) to choose the kind of fabric to be ironed.
| Programme Suitable for | |
| AntiShine ● | Dark and delicate fabrics. Reduces the risk of shiny marks |
| ●● Silk-Wool | |
| ●●● Cotton | |
| max Linen | |
| SmartCare | All fabrics that can be ironed |
| Healthy |
- Wait until the indicator lights (2, 16*) remain lit permanently. Two beeps will be heard.
"SmartCare" programme
If this program is selected, an appropriate combination of temperature and steam is set, which is suitable for all fabrics that can be ironed (symbols 🐎).
The “SmartCare” program prevents clothes from being damaged due to an unsuitable temperature being selected.
The “SmartCare” program does not apply to fabrics that cannot be ironed (symbol ☒). Please check the garment care label for details or try ironing on a part of the cloth not visible normally.
"Healthy" programme
Suitable for all kinds of fabrics and extremely efficient for both thick and delicate garments. The unique combination of temperature and interval steam provides a sanitizing effect requiring no chemical additives.
- Place the iron on the garment or fabric you want to disinfect.
- Continuously press the steam release button (15) to release powerful shots of hygienic steam. Slowly iron the whole garment to enhance the final result.
Note: The energy saving setting “Eco” cannot be activated while the “Healthy” programme is selected.
Note: The “Healthy” programme changes automatically to “SmartCare” after 20 minutes. The change will be indicated by 3 beeps and the indicator lights (2, 16*) will flash 5 times. If you want to continue using the “Healthy” programme, you would have to change to another programme by turning the programme selector (1) and then coming back to the “Healthy” programme again.
4. Ironing
- Press the steam release button (15) for ironing with steam.
Important: When placing the iron on the pad, be sure to first insert the heel in the upper side of the control panel, as shown in the figure.
Tip: For better ironing results, iron the last strokes without pressing the steam release button (15) to dry the garment.
"PulseSteam" function
This appliance has a special function for tackling difficult creases.
- Press the steam release button (15) two times in quick succession (double-click). Powerful shotsof steam will be released.
Vertical steam
Can be used to remove creases from hanging clothes, curtains, etc.
- Choose the "max" setting by turning the selector (1).
- Hold the iron in an upright position 15 cm away from the garment to be steamed.
- Press the steam release button (15) repeatedly with pauses of at least 5 seconds.
Warning!: never point the steam jet at garments being worn, or at people or animals.
5. Energy saving
If the energy saving setting is selected, you can save energy and water and still achieve good results when ironing most of your garments.
- Press the energy saving button "Eco" (5). The indicator light will come on.
- To switch back to the normal energy setting, press the "Eco" button again. It is advisable to use the normal energy setting to get optimum results on thick and very wrinkled fabrics.
Tips to help you save energy:
- If you tumble dry your fabrics before ironing them, set the tumble drier on the iron dry programme.
- Try to iron the fabrics while they are still damp and reduce the steam setting. Steam will be generated from the fabrics rather than the iron.
6. Auto switch off
For your safety and to save energy, the appliance switches off automatically when it has not been used for 8 minutes.
Three beeps will be heard, and all indicator lights (2,3,4,5) will flash.
- To switch the steam station back on, press the steam release button (15) again.
CLEANING & MAINTENANCE
1. Descaling process
Important: to keep your appliance in good condition for a long time, you should carry out the descaling process after a period of use. The “Calc’nClean” indicator light (3) will flash and three beeps will be heard, indicating that the process should be performed. You may continue ironing, but before the next use, while the appliance is cold, a descaling process should be performed.
Descaling the boiler
- Take special care to ensure that the appliance is cold and unplugged.
- Empty the water tank.
- Remove the iron from the pad (13).
- Unscrew and remove the boiler cap (9) and take it out. Empty the boiler completely.
- Fill the boiler with approximately 300 ml of tap water. Close the boiler cap and shake the base unit for a few moments. Then, empty it completely.
Important: To obtain the best result, we recommend that this operation be performed twice. Before re-closing, make sure no water remains in the boiler. - 8If your appliance is equipped with scale collector (9*), it must be washed (see the "Descaling the scale collector" section).
- Replace and tighten up the cap.
Descaling the limescale collector \*
- Place the limescale collector (9*) under the water tap.
- Wash it up until limescale residues are removed.
EN
Descaling the iron
- Fill the tank (10) with tap water.
- Plug in the mains cable (7) and press the button (2) to switch the appliance on.
- Press the descaling button (3) for 2 seconds. Its indicator light will remain permanently lit.
- Wait until the indicator light (2) stops flashing and remains lit permanently. Two beeps will be heard. Hold the iron in a horizontal position over an empty sink to collect the water.
- Press the steam release button (15) for 2 seconds. The descaling process will start automatically. Warning: boiling water and steam will be released through the soleplate, carrying limescale and/or deposits that may be inside. During the process, a beep will be heard every 5 seconds.
- After approximately 3 minutes, the iron will stop releasing steam. A long beep will be heard, indicating that descaling process has finished. The appliance will switch off automatically.
- To clean the soleplate (17), immediately rub off any residue by running the hot iron over a wet cotton cloth.
2. Cleaning the appliance
Regularly clean your appliance for properly maintenance. Attention! Burn risk!
- If the appliance is only slightly soiled, wipe it with a damp cotton cloth only, and then dry it.
- If the cloth is synthetic, it may melt due to the high temperature on the soleplate. Switch the steam off and rub off any residue immediately with a thickly folded, damp cotton cloth.
- To keep the soleplate smooth, you should avoid contact with hard metal objects. Never use a scouring pad, or chemicals to clean the soleplate.
STORING THE APPLIANCE
- Unplug the appliance and let it cool down. Empty the water tank (10).
- Place the iron on the steam station, standing on the pad (13).
If your steam station is equipped with iron lock system (14 ^* ), fix the iron to it. First insert the heel and then block the tip moving the lock system against the iron. - Store the steam hose (6) and the mains cable (7) on the storage holder (8).
Trouble shooting
| Problem Possible causes Solution | ||
| The iron begins to smoke when switched on. | 1. During first use: certain components on the appliance have been lightly greased at the factory and may produce a small amount of smoke when initially heated.2. During subsequent use: the soleplate may be soiled. | 1. This is completely normal and will stop after a short while.2. Clean the soleplate according to the cleaning instructions in this manual. |
| Water flows through the holes on the soleplate. | 1. The water is condensing inside the tubes because steam is being used for the first time or has not been used for a long time. | 1. Point the iron away from the ironing area and press the steam release button until steam is produced. |
| Dirt comes out through the soleplate. | 1. There is a build up of limescale or minerals in the boiler and iron.2. Chemical products or additives have been used. | 1. Carry out a cleaning cycle (see the “Descaling process” section).2. Never add products to the water (see the “Filling the water tank” section).Clean the soleplate with a damp cloth. |
| The “Calc'nClean” indicator light (3) does not turn off. | 1. The iron descaling process has been stopped before being completed. | 1. Restart and complete the iron descaling process. |
| The ironed garment turns a dark colour and/or sticks to the soleplate. | 1. The selected temperature is too high and has damaged the garment. | 1. Select a suitable temperature for the material being ironed and clean the soleplate with a damp cloth. |
| The appliance makes a pumping sound. | 1. Water is being pumped into the steam tank.2. The sound does not stop. | 1. This is normal.2. If the sound does not stop, do not use the steam station and contact an authorised technical service centre. |
| Loss of pressure during ironing. | 1. The steam release button has been activated for too long a period of time, meaning it has been pressed too frequently. | 1. Use the steam release button at intervals. |
| Water spots appear on the garment during ironing. | 1. May be caused by steam condensed on the ironing board. | 1. Wipe the textile cover of the ironing board, and iron any water drops to dry them. |
| The hose gets hot during use. The hose gets hot during use. | 1. This is normal. It is caused by the steam passing through the hose during steam ironing. | 1. Place the hose on the opposite side so that you do not touch the hose during ironing. |
| Water leakage from the boiler. | 1. Boiler cap (9) is loose. 1. Tighten the cap. | |
| The “Water tank empty” indicator light (4) comes on. | 1. The water tank is empty or not correctly fitted onto the appliance. | 1. Fill the water tank or fit it correctly. |
If the above tips do not solve the problem, get in touch with our customer service.
ADVICE ON DISPOSAL
Our goods come in optimised packaging. This basically consists in using non-contaminating materials which should be handed over to the local waste disposal service as secondary raw materials. Your local town council can give you information about how to dispose of obsolete appliances.
This appliance is labelled in accordance with European Directive 2012/19/EU concerning used electrical and electronic appliances (waste electrical and electronic equipment - WEEE).
The guideline determines the framework for the return and recycling of used appliances as applicable throughout the EU.
ATTENTION
VEUILLEZ LIRE ATTENTIVEMENT LE MANUEL D'UTILISATION AVANT D'UTILISER LE PRODUIT. CONSERVEZ CE MANUEL D'UTILISATION DANS UN ENDROIT SÛR EN VUE DE CONSULTATION FUTURE.
DESCRIPTION
B&B TRENDS, SL. guarantees compliance of this product for the use for which it is intended for a period of three years. In the case of breakdown during the term of this warranty, users are entitled to repair or else the replacement of the product at no charge if the former is unavailable, unless one of these options proves impossible to fulfill or is disproportionate. In this case, you can then opt for a reduction in price or cancellation of the sale, which must be dealt with directly with the sales vendor. This also covers replacement of spare parts provided that the product has been used according to the recommendations specified in this manual for both cases, and has not been tampered with by any third party that is not authorised by B&B TRENDS, SL. The warranty will not cover any parts subject to wear and tear. This warranty does not affect your rights as a consumer in accordance with the provisions in Directive 1999/44/EC for member states of the European Union.
USE OF WARRANTY
Customers must contact a B&B TRENDS, SL., authorised Technical Service for repair of the product. Since any tampering of the same by anyone not authorised by B&B TRENDS, SL., or the careless or improper use of the same shall render this warranty null and void. The warranty must be fully completed and delivered along with the receipt or delivery docket for the effective exercise of rights under this warranty.
This warranty should be retained by the user as well as the invoice, receipt or the delivery docket to facilitate the exercise of these rights. For technical service and after-sales care outside the Spanish territory, please submit your query to the point of sale where you purchased the item.
BOLETIM DE GARANTIA
ANTHONY ALLEN ASHMORE
RODRIGUEZ (ELECT.MON-
TESINOS)
C/ORIHUELA, 43
966703505
e.montesinos2012@yahoo.es
ALMERIA
04867 MACAEL
POL.INDR."DOMENYS I"
NAVE 9
938904852
fred@fredvilafranca.com
URBISAT (BALEAR SERVICE)
C/MATEU OBRADOR,8
971-733886/733879
alanurbisat@gmail.com
7740 MENORCA
ES MERCADAL
SERVEIS MENORCA, S.L.
CARRER NOU N° 53
971375380
serveismenorca@gmail.com
JAÉN
23400 UBEDA
MAGOCA UBEDA
GRANADA 7
953751838
ubedasatmagoca@gmail.com
23001 JAEN
CARRIL DE LAS FLORES, 34-B
982242015
teleservicio@telefonica.net
27400 MONFORTE DE
LEMOS
RAUL E HIJOS.S.L.
CAMPO DE LA COMPAÑÍA, 19
982400711
raulehijos@gmail.com
27850 VIVERO (CASCO
SERVICIO TECNICO SILDO
101, S.L.U.
LODEIRO, 26
982061819
MADRID
28931 MOSTOLES
Valle Inclan 32 Local
917054624
pimaruno@gmail.com
28047 CARABANCHEL
REPARACIONES CARLOS
(CARLOS GOMEZ YUSTE)
GUABAIRO,2
914665369
JESUS MANUEL MONSALVO
MENDO
ANGUSTIAS,42
983810205
sattvc2002@yahoo.es
47002 VALLADOLID
ELECTRICIDAD RINCON, S.A.
LABRADORES, 9 Y 11
983297133
administracion@electricida-
drincon.es
VIZCAYA
48004 BILBAO
SERTEK
C/ PADRE PERNET, 8
944112282
sertek@ya.com
48013 BILBAO
REPARADOMESTICOS, JOSU
URKIXO ZUMARKALEA,79
944 90 41 66
josu@reparadomesticos.com
48011 BILBAO
R.E. ABAD MANUEL GON-
ZALEZ HERVERA
GREGORIO DE LA REVILLA, 34
944215271
mghervera@yahoo.es
48980 SANTURCE
JULEN SAT
LAS VIÑAS 20-22
944617193
juanjosat@gmail.com
ZAMORA
49010 ZAMORA
TERESA PEREZ
DIEGO DE LOSADA, 10
980671386
sat.teresa1@gmail.com
ZARAGOZA
50001 ZARAGOZA
Jet Pressing Healthy 8b
B&B TRENDS, S.L.
C. Cataluña, 24
P.I. Ca N'Oller 08130
Santa Perpètua de Mogoda
(Barcelona) España
C.I.F. B-86880473
www.di4.eu


- Jet Pressing Healthy 8b
- ATENCIÓN
- WARNING
- DESCRIPTION
- GENERAL SAFETY INSTRUCTIONS
- IMPORTANT
- USING YOUR APPLIANCE
- Filling the water tank
- Heating
- Ironing programmes
- "SmartCare" programme
- "Healthy" programme
- Ironing
- "PulseSteam" function
- Vertical steam
- Energy saving
- Tips to help you save energy:
- Auto switch off
- CLEANING & MAINTENANCE
- Descaling process
- Descaling the boiler
- Descaling the limescale collector \*
- EN
- Descaling the iron
- Cleaning the appliance
- STORING THE APPLIANCE
- ADVICE ON DISPOSAL
- ATTENTION
- USE OF WARRANTY
- BOLETIM DE GARANTIA
Brand : Di4
Model : Jet Pressing Healthy 8b
Category : Iron