
MDRU229FZE01 - Freezer MIDEA - Free user manual and instructions
Find the device manual for free MDRU229FZE01 MIDEA in PDF.

| Product type | Freezer |
| Brand | Midea |
| Model | MDRU229FZE01 |
| Net volume | 160 L |
| Defrost type | Manual |
| Freezing capacity | 7.2 kg/24h |
| Temperature rise time | 9 h |
| Dimensions (H × W × D) | 1420 × 550 × 550 mm |
| Rated voltage | 220-240 V ~ |
| Frequency | 50 Hz |
| Rated current | 0.5 A |
| Climate class | SN, N, ST, T (according to rating plate) |
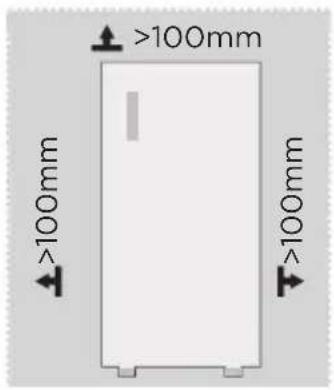
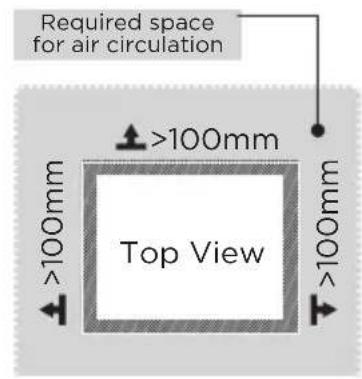
| Required clearances | > 100 mm on each side |
| Leveling | Adjustable feet |
| Door reversal | Possible, tools required |
| Temperature adjustment | Thermostat (MIN-MAX) |
| Shelf material | Metal or plastic grid depending on configuration |
| Interior lighting | Yes, replacement by professional |
| Spare parts available (7 years) | Thermostat, sensors, circuit board, light source, handles, hinges, drawers, baskets, door gaskets (10 years) |
| Energy consumption | Energy class not specified, consult the label |
| Approximate weight | Approx. 40-45 kg (estimate) |
Frequently Asked Questions - MDRU229FZE01 MIDEA
User questions about MDRU229FZE01 MIDEA
0 question about this device. Answer the ones you know or ask your own.
Ask a new question about this device
Download the instructions for your Freezer in PDF format for free! Find your manual MDRU229FZE01 - MIDEA and take your electronic device back in hand. On this page are published all the documents necessary for the use of your device. MDRU229FZE01 by MIDEA.
USER MANUAL MDRU229FZE01 MIDEA
natural_image
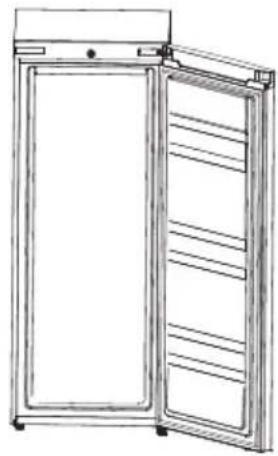
Simple geometric diagram with a vertical rectangle and two corner supports (no text or symbols)Upright Freezer
SSIINNGGLLEE DOOR SERI
USER MANUAL
MDRU229FZE01
LANGUAGES
ENEnglish
FR Français
DE Deutsch
IT Italiano
ES Español
PT Português
GR Ελληνικά
PLPolski
cz Čeština
HUMagyar
LVLatviešu
LT Lietuvių
SKSlovensky
SRSrpski
HRHrvatski
SL Slovenščina
RO Română
BGБългарски
ALShqip
THANK YOU LETTER
Thank you for choosing Midea! Before using your new Midea product, please read this manual thoroughly to ensure that you know how to operate the features and functions that your new appliance offers in a safe way.
EN
CONTENTS
THANK YOU LETTER 01
SPECIFICATIONS 02
PRODUCT OVERVIEW 03
PRODUCT INSTALLATION 04
OPERATION INSTRUCTIONS 11
CLEANING AND MAINTENANCE 13
TROUBLESHOOTING 15
APPENDIX 17
SPECIFICATIONS
| Product model | MDRU229FZE01 |
| Frozen Food Storage Volume 160 L | |
| Defrosting Type Manual-defrost | |
| Temperature Rise Time 9 h | |
| Freezing Capacity | 7.2 kg/24h |
| Rated Voltage 220-240V~ | |
| Frequency 50Hz | |
| Rated Current 0.5A | |
| Overall Dimension (H x W x D) | 1420x550x550 mm |
EN
PRODUCT OVERVIEW
Names of components
EN

1 Thermostat
2 Drawer
3 Leveling foot

ATTENTION
The picture above is only for reference. The actual configuration will depend on the physical product or statement by the distributor.
PRODUCT INSTALLATION
Install Instruction
For refrigerating appliances with climate class
- Depending on the climate class, This refrigerating appliance is intended to be used at ambient temperatures range as specified following table.
- The climate class can be found on the rating plate. The product may not operate properly at temperatures outside of the specific range.
• You can find the climate class on the product label.
Effective temperature range
- The product is designed to operate normally in the temperature range specified by its class rating.
| Class Symbol | Ambient temperature range °C | ||
| IEC 62552 (ISO 15502) ISO 8561 | |||
| Extended temperate SN | + 10 to + 32 | + 10 to + 32 | |
| Temperate N + 16 to + 32 | + 16 to + 32 | ||
| Subtropical ST + 16 to + 38 | + 18 to + 38 | ||
| Tropical T + 16 to + 43 | + 18 to + 43 | ||
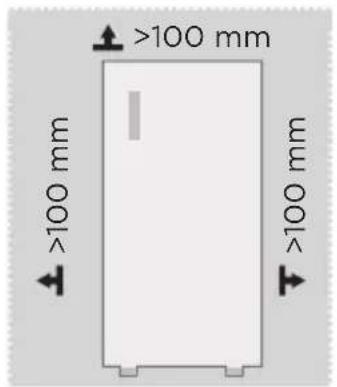
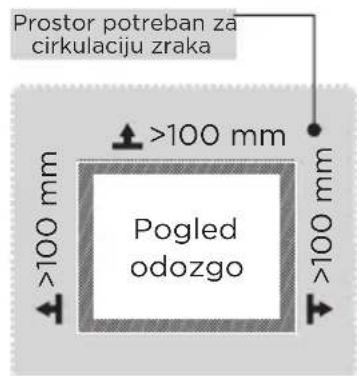
Dimensions and Clearances
- Too small of a distance from adjacent items may result in the degradation of freezing capability and increased electricity costs. Allow over 100 mm of clearance from each adjacent wall when installing the appliance.

ATTENTION
The picture above is only for reference. The actual configuration will depend on the physical product or statement by the distributor.
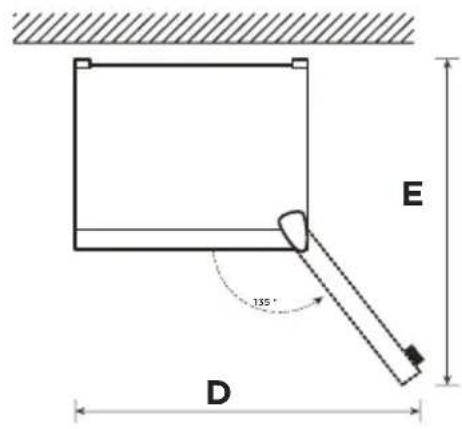
Space requirement diagram (when the door is open and when the door is closed)
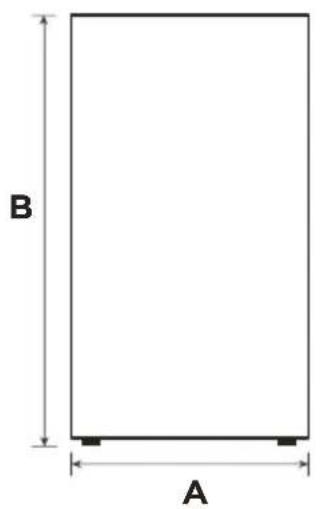
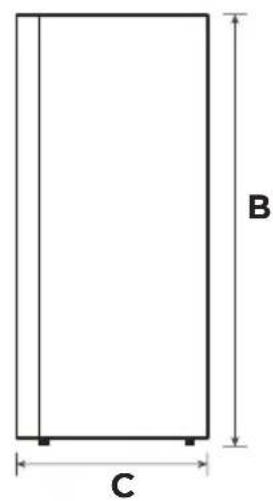
| Width | Overall Height | Depth | Width doors open 135° | Depth doors open 135° |
| A B C D E | ||||
| 550 | 1420 | 550 | 930 910 |
Notice: All dimensions in mm
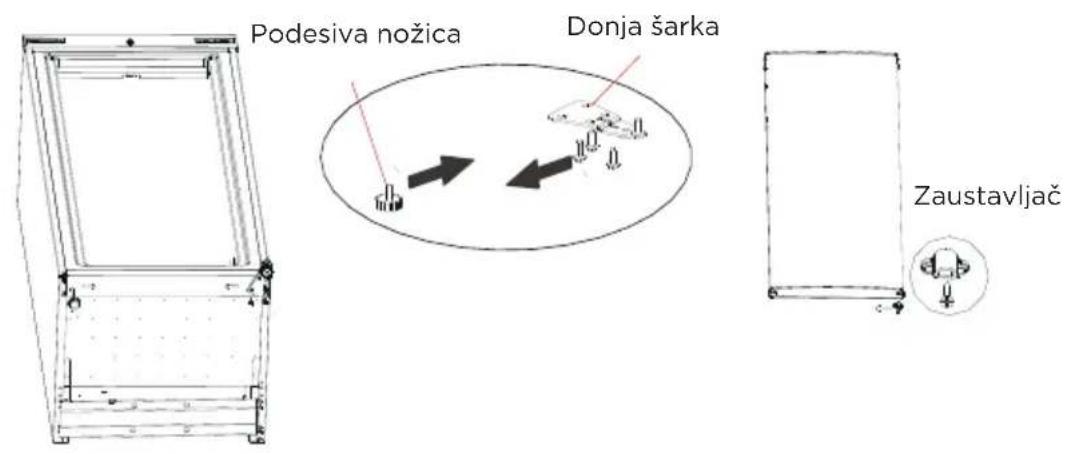
Door right-left change (optional)
Based on the location where you plan to use your refrigerator, you may find it more convenient to reverse the position of the door.

CAUTION
CAUTION: To avoid injury to yourself or your property, we recommend that someone assist you during the door reversal process.
List of tools to be provided by the user
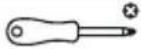 | Cross screwdriver |
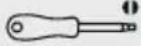 | Thin-blade screwdriver |
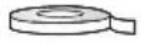 | Masking tape |
STEP
- Remove all food from door shelves. Fix the door by tapes.
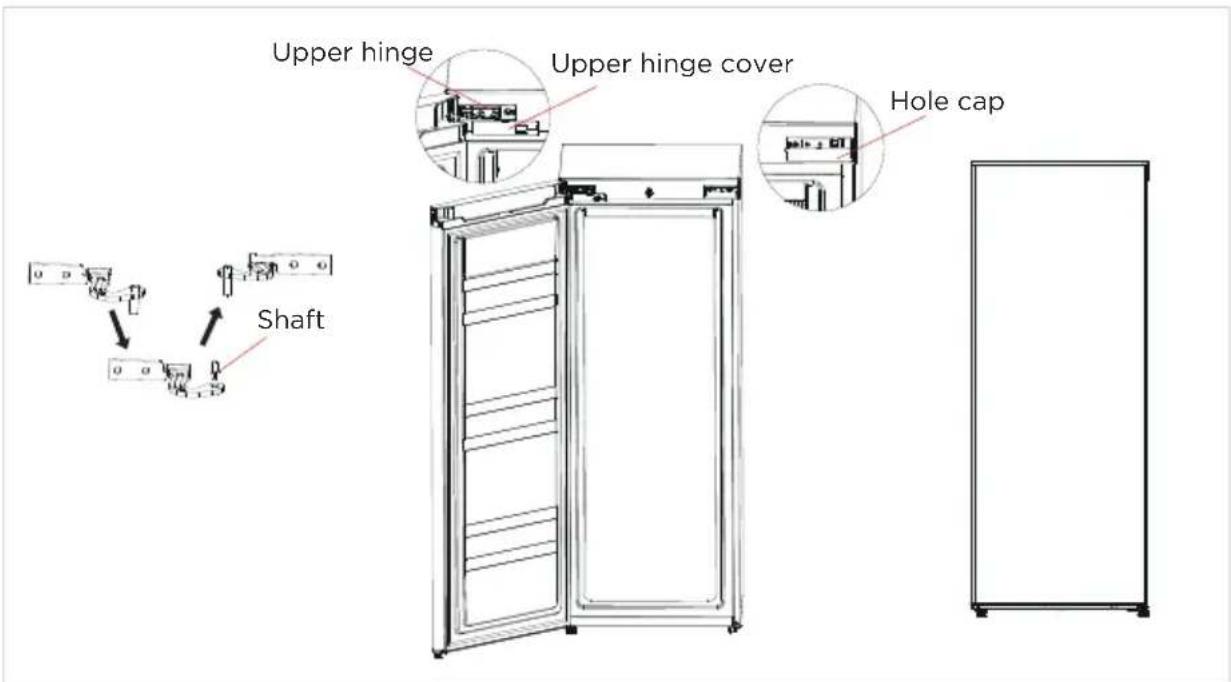
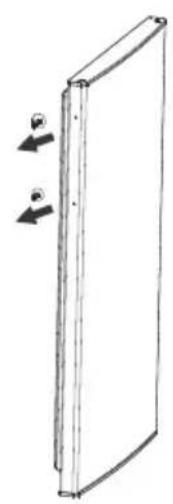
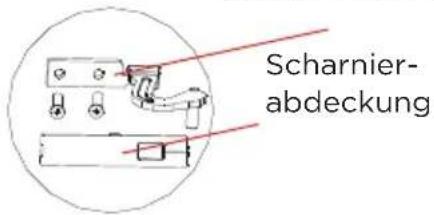
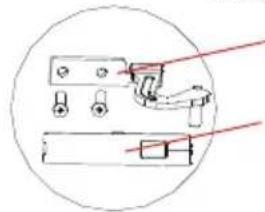
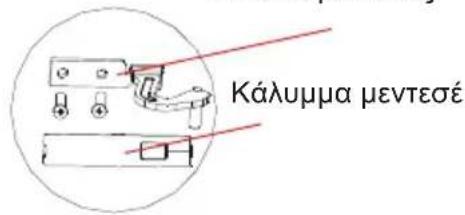
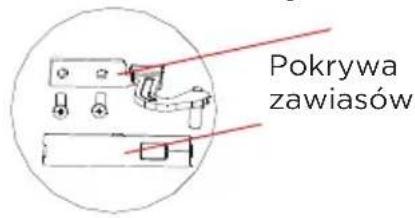
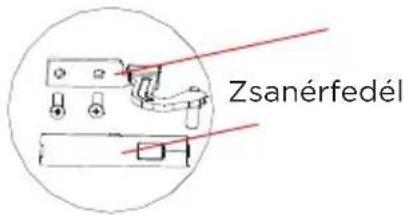
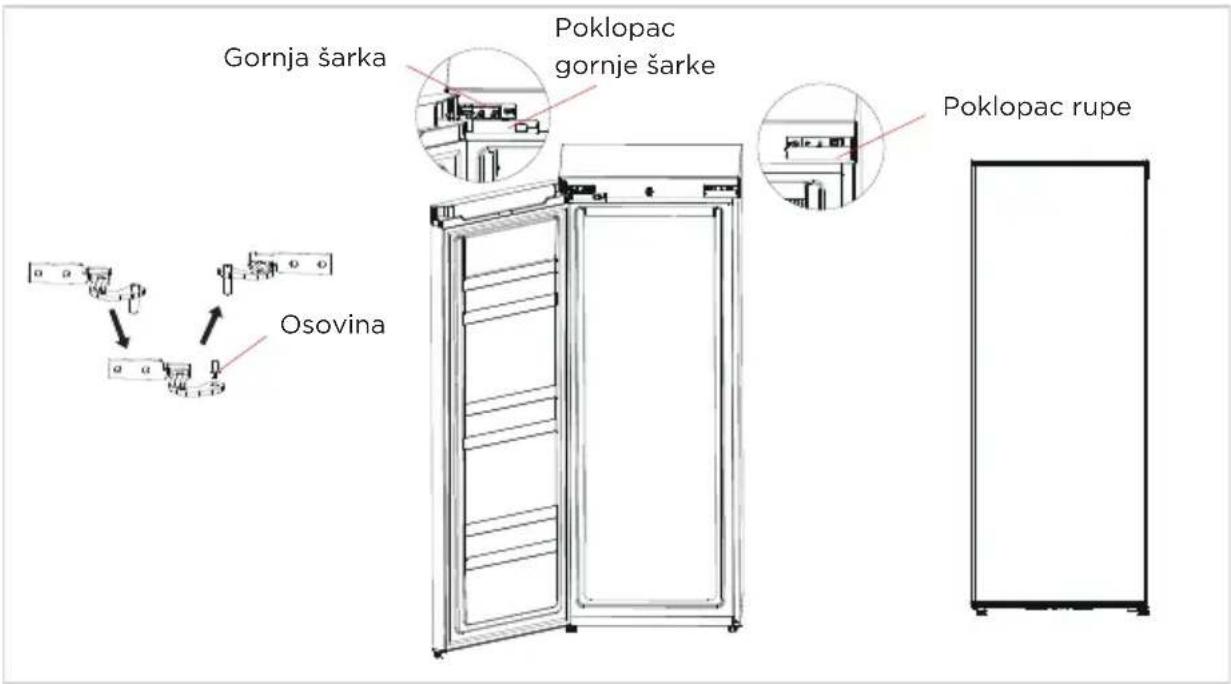
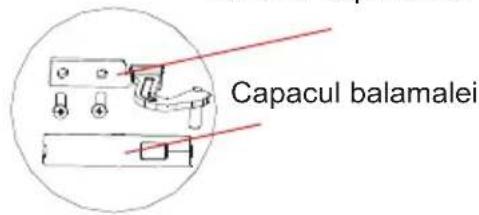
- Dismantle the upper hinge cover, screws and upper hinge, and remove the plastic screw hole cap from the other side.
Hole cap

natural_image
Line drawing of a double-door refrigerator with open doors and slatted windows (no text or symbols)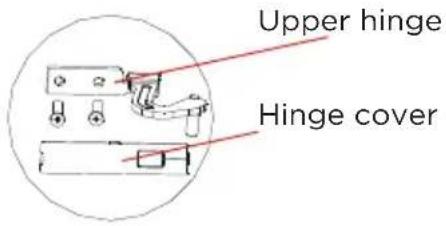
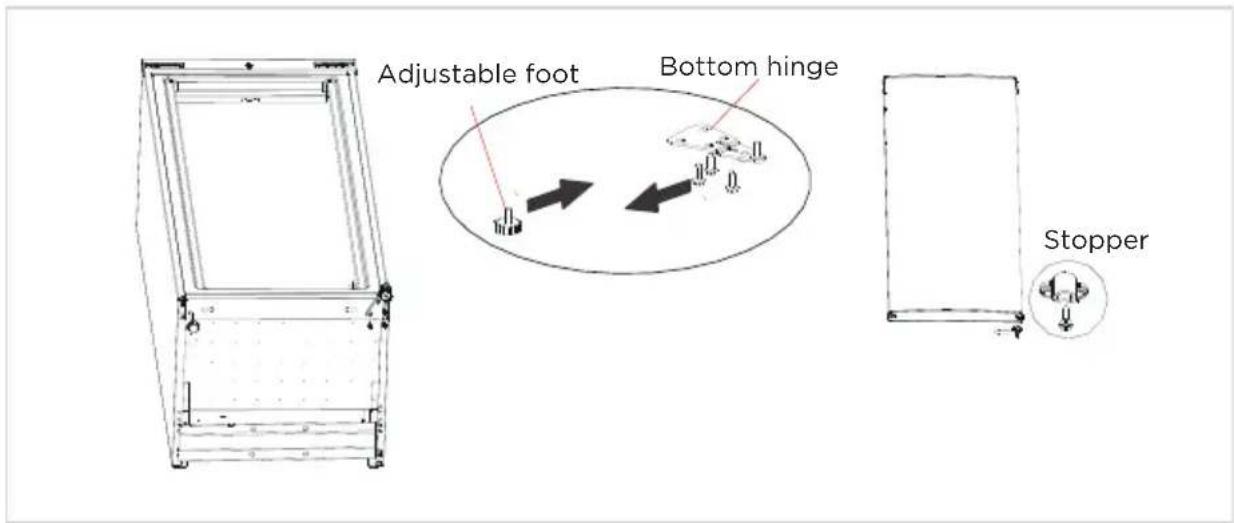
- Dismantle the door and the bottom hinge assembly and adjustable foot, then assemble the bottom hinge assembly and adjustable foot on other side. Dismantle the stopper from the right bottom side of door, and assemble it on other side of the door.
- Put the door on bottom hinge, assemble the shaft of the top hinge as the follow picture and assemble the upper hinge, upper hinge cover and plastic screw hole caps successively.
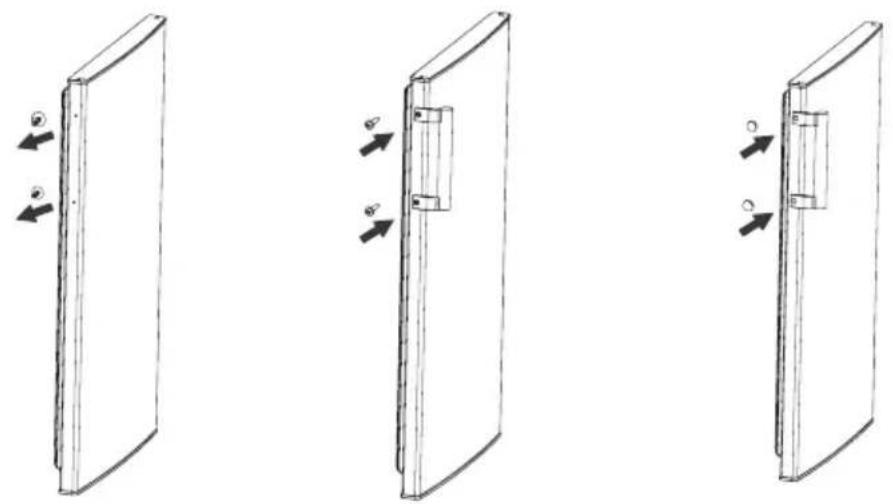
Installing the door handle(Optional)

CAUTION
CAUTION: Figures in the user manual are only for reference. The actual product may differ slightly.
The refrigerator must be disconnected from the source of electrical supply before attempting the installation of accessory.
STEP
- Take out two plug pins from the door (Side of door open).
- Install the door handle to the door and fasten it with screws.
- Cover screw caps of the handle into screw holes.
natural_image
Simple line drawing of a rectangular panel with two arrows indicating direction (no text or symbols)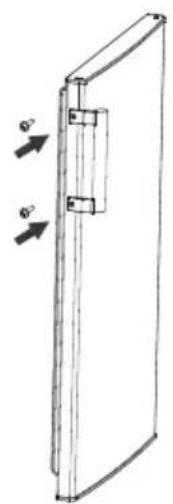
natural_image
Simple line drawing of a door with two arrows indicating force or motion (no text or symbols)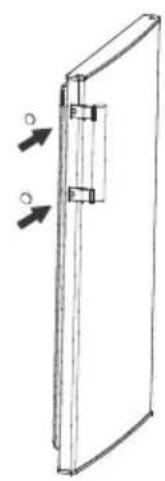
natural_image
Simple line drawing of a door with two arrows indicating direction (no text or symbols)Leveling feet
To avoid vibration, the unit must be leveled.
If required, adjust the leveling screws to compensate for the uneven floor.
The front should be slightly higher than the rear to aid in door closing.
Leveling screws can be turned easily by tipping the cabinet slightly.
Turn the leveling screws counterclockwise 📋 to raise the unit, clockwise 📋 lower it.
Moving the appliance
- Remove all food from inside the appliance.
- Pull the power plug out, insert and fix it into the power plug hook at the rear or on top of the appliance.
- Tape parts such as shelves and the door handle to prevent from falling off while moving the appliance.
- Move the appliance with more than two people carefully. When transporting the appliance over a long distance, keep the appliance upright.
- After installing the appliance, connect the power plug into a socket out to switch on the appliance.

ATTENTION
Precautions before operation:
Before making changes the refrigerator must be disconnected from power.
precautions should be taken to prevent any personal injury.
Connecting the appliance
After installing the appliance, connect the power plug into a socket outlet.

ATTENTION
After connecting the power supply cord (or plug) to the outlet, wait 2 or 3 hours before you put food into the appliance. If you add food before the appliance has cooled completely, your food may spoil.
Placement
- Before use, remove all packing materials, including bottom cushions, foam pads and tapes inside of the refrigerator; tear off the protective film on the doors and the refrigerator body.
- Keep away from heat and avoid direct sunlight. Do not place the freezer in moist or watery places to prevent rust or reduction of insulating effect.
- Do not spray or wash the refrigerator; do not put the refrigerator in moist places easy to be splashed with water so as not to affect the electrical insulation properties of the refrigerator.
- The refrigerator is placed in a well-ventilated indoor place; the ground shall be flat, and sturdy (rotate left or right to adjust the wheel for leveling if unstable).
Tips for energy saving
- Do not place the appliance near cookers, radiators or other heat sources. If the ambient temperature is high, the compressor will run more frequently and for longer, resulting in increased energy consumption.
- Ensure that there is sufficient ventilation at the base of the appliance, on the sides of the appliance and at the back of the appliance. Never cover ventilation openings.
- Please also observe the spacing dimensions in the chapter „Installation“.
- The arrangement of drawers, shelves and racks as shown in the illustration offers the most efficient use of energy and should therefore be retained as far as possible. All drawers and shelves should remain in the appliance to keep the temperature stable and save energy.
- To obtain a larger storage space (e.g. for large refrigerated/frozen goods), the middle drawers can be removed. The top and bottom drawers and shelves should be removed last if necessary.
- An evenly filled refrigerator/freezer compartment contributes to optimal energy use. Therefore, avoid empty or half-empty compartments.
- Allow warm food to cool before placing it in the refrigerator/freezer. Food that has already cooled down increases energy efficiency.
- Allow frozen food to defrost in the refrigerator. The coldness of the frozen food reduces the energy consumption in the refrigerator compartment and thus increases the energy efficiency.
- Operating the dryors briefly as necessary to minimise cold I briefly and closing it properly reduces energy consumption.
- The door seals of your appliance must be perfectly intact so that the doors close properly and energy consumption is not increased unnecessarily.
OPERATION INSTRUCTIONS
Control panel
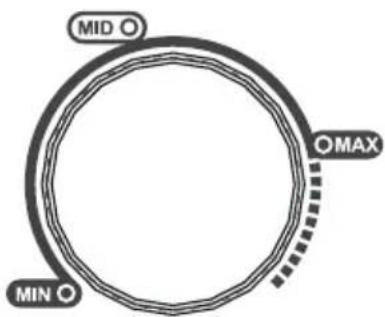
- If the ambient temperature is too high or in summer, according to actual needs, the thermostat adjusted to MAX.
- If the ambient temperature is too low or in winter, according to actual needs, the thermostat adjusted to MIN.

NOTE
please use and adjust between MIN and MAX.

ATTENTION
The actual control panel may differ from model to model.
Tips on storing food
- The low temperature of upright freezer may keep food fresh for a long time and it is mainly used to store frozen foods and making ice.
- The upright freezer is suitable for storage of meat, fish, shrimp, dumplings, rice balls and other foods not to be consumed in short term.
- Chunks of meat are preferably to be divided into small pieces for easy access. Please be noted food shall be consumed within the shelf time.
| Order | Compartments TYPE | Target storage temp. [°C] | Appropriate food |
| 1 Fridge | +2 ~ +8 | Eggs, cooked food, packaged food, fruits and vegetables, dairy products, cakes, drinks and other foods are not suitable for freezing. | |
| 2 (***)-Freezer | ≤-18 | Seafood (fish, shrimp, shellfish), freshwater aquatic products and meat products (recommended for 3 months, the longer the storage time, the worse the taste and nutrition), suitable for frozen fresh food. | |
| 3 ***-Freezer | ≤-18 | Seafood (fish, shrimp, shellfish), freshwater aquatic products and meat products (recommended for 3 months, the longer the storage time, the worse the taste and nutrition), suitable for frozen fresh food. | |
| 4 **-Freezer | ≤-12 | Seafood (fish, shrimp, shellfish), freshwater aquatic products and meat products (recommended for 3 months, the longer the storage time, the worse the taste and nutrition), suitable for frozen fresh food. | |
| 5 *-Freezer | ≤-6 | Seafood (fish, shrimp, shellfish), freshwater aquatic products and meat products (recommended for 3 months, the longer the storage time, the worse the taste and nutrition), suitable for frozen fresh food. | |
| 6 O-star | -6 ~ 0 | Fresh pork, beef, fish, chicken, some packaged processed foods, etc. (Recommended to eat within the same day, preferably no more than 3 days).Partially encapsulated processed foods (non-freezable foods). | |
| 7 Chill | -2 ~ +3 | Fresh/ frozen pork, beef, chicken, freshwater aquatic products, etc. (7 days below 0°C and above 0°C is recommended for consumption within that day, preferably no more than 2 days). Seafood (less than 0 for 15 days, it is not recommended to store above 0°C. | |
| 8 Fresh food | 0 ~ +4 | Fresh pork, beef, fish, chicken, cooked food, etc.(Recommended to eat within the same day, preferably no more than 3 days) | |
| 9 Wine | +5 ~ +20 | Red wine, white wine, sparkling wine, etc. | |

ATTENTION
please store different foods according to the compartments or target storage temperature of your purchased.
CLEANING AND MAINTENANCE
Overall cleaning
- Dusts behind the refrigerator and on the ground shall be timely cleaned to improve the cooling effect and energy saving.
- Check the door gasket regularly to make sure there are no debris. Clean the door gasket with a soft cloth dampened with soapy water or diluted detergent.
- The interior of the refrigerator should be cleaned regularly to avoid odor.
- Please turn off the power before cleaning interior, remove all foods, drinks, shelves, drawers, etc.
- Use a soft cloth or sponge to clean the inside of the refrigerator, with two tablespoons of baking soda and a quart of warm water. Then rinse with water and wipe clean. After cleaning, open the door and let it dry naturally before turning on the power.
- For areas that are difficult to clean in the refrigerator (such as narrow sandwiches, gaps or corners), it is recommended to wipe them regularly with a soft rag, soft brush, etc. and when necessary, combined with some auxiliary tools (such as thin sticks) to ensure no contaminants or bacterial accumulation in these areas.
- Do not use soap, detergent, scrub powder, spray cleaner, etc., as these may cause odors in the interior of the refrigerator or contaminated food.
- Clean the bottle frame, shelves and drawers with a soft cloth dampened with soapy water or diluted detergent. Dry with a soft cloth or dry naturally.
- Wipe the outer surface of the refrigerator with a soft cloth dampened with soapy water, detergent, etc., and then wipe dry.
- Do not use hard brushes, clean steel balls, wire brushes, abrasives (such as toothpastes), organic solvents (such as alcohol, acetone, banana oil, etc.), boiling water, acid or alkaline items, which may damage the fridge surface and interior. Boiling water and organic solvents such as benzene may deform or damage plastic parts.
- Do not rinse directly with water or other liquids during cleaning to avoid short circuits or affect electrical insulation after immersion.

ATTENTION
Please unplug the refrigerator for defrost and cleaning.
Defrosting
• Power off the refrigerator.
- Remove the food from the refrigerator and place it properly to prevent food from melting.
- Clear the drain pipe (to use soft materials to prevent damage to the liner), Prepare the water containers for defrosting. (pay attention to clean the compressor compartment water draining tray, Ovoding overflow to the ground).
- You can also use the appropriate amount of hot water to speed up the defrost, with a dry towel to dry the water after defrosting.
- You can also use the appropriate amount of hot water to speed up the defrost, with a dry towel to dry the water after defrosting.
• After defrosting, put back the foods in cabinet, and power on the refrigerator.
Stop using
Power failure:
In case of power failure, even if it is in summer, foods inside the appliance can be kept for several hours; during the power failure, the times of door opening shall be reduced, and no more fresh food shall be put into the appliance.
Long-time nonuse:
The appliance shall be unplugged and then cleaned; then the doors are left open to prevent odor.
Moving:
Before the refrigerator is moved, take all objects inside out, fix the glass partitions, vegetable holder, freezing chamber drawers and etc. with tape, and tighten the leveling feet; close the doors and seal them with tape. During moving, the appliance shall not be laid upside down or horizontally, or be vibrated; the inclination during movement shall be no more than 45°.

ATTENTION
The appliance shall run continuously once it is started. Generally, the operation of the appliance shall not be interrupted; otherwise the service life may be impaired. Foods can be preserved for a couple of hours even in summer in case of power failure; it is recommended to reduce the frequency of opening door.
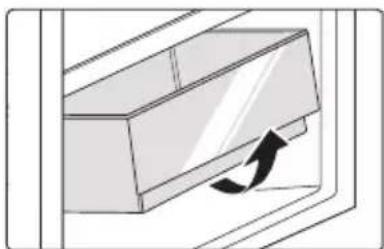
Cleaning the drawer
- Remove the contents of the drawer. Hold the handle of the drawer and pull it out completely until it stops.
- Lift the drawer up and remove it by pulling it out.
natural_image
Diagram of a door handle with an arrow indicating direction (no text or symbols)
ATTENTION
The appliance shall run continuously once it is started. Generally, the operation of the appliance shall not be interrupted; otherwise the service life may be impaired.
TROUBLESHOOTING
The following simple issues can be handled by the user. Please call the after-sale service department if the issues are not solved.
| Problem Possible reason | |
| Failed operation | ·Check whether the appliance is connected to power or whether the plug is in well contact |
| ·Check whether the voltage is too low | |
| ·Check whether there is a power failure or partial circuits have tripped | |
| Odor | ·Odorous foods shall be tightly wrapped |
| ·Check whether there is any rotten food | |
| ·Clean the inside of the refrigerator | |
| Long-time operation of the compressor | ·Long operation of the refrigerator is normal in summer |
| ·When the ambient temperature is high It is not suggestible having too much food in the appliance at the same time | |
| ·Food shall get cool before being put into the appliance | |
| ·The doors are opened too frequently | |
| Light fails to get lit | ·Check whether the refrigerator is connected to power supply and whether the illuminating light is damaged |
| ·Have the light replaced by a specialist | |
| Door can not be properly closed | ·The door is stuck by food packages too much food is placed |
| ·The refrigerator is tilted. | |
| Loud noises | ·Check whether the floor is level and whether the refrigerator is placed stably |
| ·Check whether accessories are placed at proper locations | |
| Door seal fails to be tight | Remove foreign matters on the door seal |
| Heat the door seal and then cool it for restoration (or blow it with an electrical drier or use a hot towel for heating) | |
| Water pan overflows | There is too much food in the chamber or food stored contains too much water, resulting in heavy defrosting |
| The doors are not closed properly, resulting in frosting due to entry of air and increased water due to defrosting | |
| Hot housing | Heat dissipation of the built-in condenser via the housing, which is normal when housing becomes hot due to high ambient temperature, storage of too much food or shutdown of the compressor is shut down, provide sound ventilation to facilitate heat dissipation |
| Surface condensation | Condensation on the exterior surface and door seals of the refrigerator is normal when the ambient humidity is too high. Just wipe the condensate with a clean towel. |
| Abnormal noise | Buzz: The compressor may produce buzzes during operation, and the buzzes are loud particularly upon start or stop. This is normal.Creak: Refrigerant flowing inside of the appliance may produce creak, which is normal. |
EN
APPENDIX
Special for new European standard
The ordered parts in the following table can be acquired from Service provider channel
| Ordered part Provided by | Minimum time required for Provision | |
| Thermostats Professional maintenance personnel | At least 7 years after the last model is launched on the market | |
| Temperature sensors | Professional maintenance personnel | At least 7 years after the last model is launched on the market |
| Printed circuit boards | Professional maintenance personnel | At least 7 years after the last model is launched on the market |
| Light sources Professional maintenance personnel | At least 7 years after the last model is launched on the market | |
| Door handles Professional repairers and final users | At least 7 years after the last model is launched on the market | |
| Door hinges Professional repairers and final users | At least 7 years after the last model is launched on the market | |
| Trays Professional repairers and final users | At least 7 years after the last model is launched on the market | |
| Baskets Professional repairers and final users | At least 7 years after the last model is launched on the market | |
| Door gaskets Professional repairers and final users | At least 10 years after the last model is launched on the market | |
Dear customer
- If you want to return or replace the product, please contact the store where you buy.
(Remember to bring the purchase invoice)
- If your product breaks down which needs to repair, please contact after-sales service provider.

ATTENTION
The model information in the product database, as well as the model identifier, can be obtained througha weblink scanned by a QR code, if any, on the energy efficiency label of the product.
For more information about the energy efficiency of the appliance, visit https://ec.europa.eu and search using the model name.
The model name can be found on the rating label of the appliance.
LETTRE DE REMERCIEMENT
INSTALLATION DU PRODUIT 04
INSTRUCTIONS D'UTILISATION 11
NETTOYAGE ET ENTRETIEN 13
DÉPANNAGE 15
ANNEXE 17
SPÉCIFICATIONS
1 Thermostat
2 Tiroir
INSTALLATION DU PRODUIT
natural_image
Line drawing of a double-door refrigerator with open doors and slats (no text or symbols)natural_image
Diagram of a door handle with an arrow indicating direction (no text or symbols)
ATTENTION
1 Thermostat
2 Schubfach
3 Nivellierfuß
ACHTUNG
natural_image
Line drawing of a double-door refrigerator with open door and side panels (no text or symbols)Oberes Scharnier
natural_image
Diagram of a door handle with an arrow indicating clockwise motion (no text or symbols)ACHTUNG
1 Termostato
2 Cassetto
natural_image
Line drawing of a double-door refrigerator with open doors and slats (no text or symbols)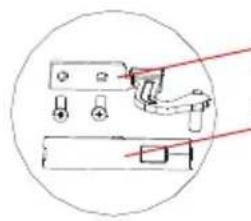
natural_image
Simple line drawing of a mechanical device with a red laser pointer and circular outline (no text or symbols)natural_image
Diagram of a door handle with an arrow indicating clockwise motion (no text or symbols)
ATTENZIONE
1 Termostato
2 Cajón
3 Pie nivelador

ATENCIÓN
natural_image
Line drawing of an open refrigerator with lid and front panel (no text or symbols)Bisagra superior
natural_image
Pure mechanical diagram showing a lever mechanism inside a circle (no text or symbols)natural_image
Simple line drawing of a vertical panel with two arrows indicating direction (no text or symbols)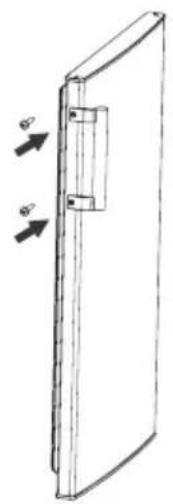
natural_image
Simple line drawing of a door with a handle and two arrows indicating force or motion (no text or symbols)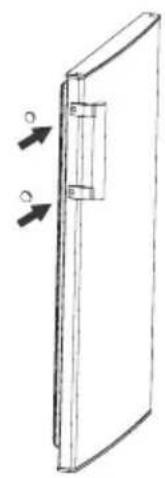
natural_image
Simple line drawing of a door with two arrows indicating direction (no text or symbols)natural_image
Diagram of a mechanical component with an arrow indicating direction (no text or symbols)
ATENCIÓN
1 Termostato
2 Gaveta
3 Pé nivelador
ATENÇÃO
natural_image
Line drawing of a refrigerator with open door and side panel, shown in two views: one with a rectangular cutout on the left (no text or symbols)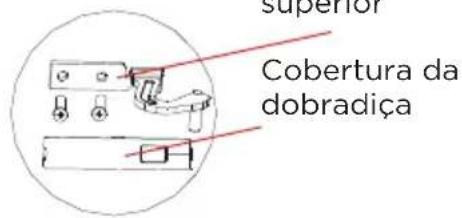
natural_image
Diagram of a mechanical component with an arrow indicating motion (no text or symbols)ATENÇÃO
1 Θερμοστάτης
2 Συρτάρι
3 Πόδι οριζοντίωσης
ΠΡΟΣΟΧΗ
natural_image
Line drawing of a double-door refrigerator with open doors and slatted front panel (no text or symbols)Επάνω μεντεσές
natural_image
Diagram of a door handle with an arrow indicating direction (no text or symbols)
ΠΡΟΣΟΧΗ
1 Termostat
2 Szuflada
3 Nóżka poziomująca
UWAGA
natural_image
Line drawing of a refrigerator with open door and side panel, shown in two views: top-left circle (no text or symbols)Górny zawias
natural_image
Diagram of a door handle with an arrow indicating clockwise motion (no text or symbols)
UWAGA
1 Termostat
2 Šuplík
3 Vyrovnávací noha
UPOZORNĚNÍ
natural_image
Line drawing of a double-door refrigerator with open door and side panels (no text or symbols)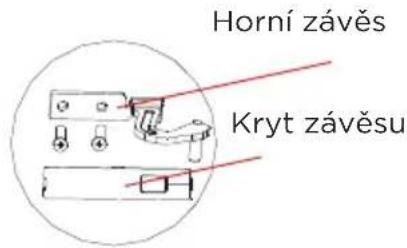
natural_image
Diagram of a door handle with an arrow indicating clockwise motion (no text or symbols)UPOZORNĚNÍ
1 Termosztát
2 Fiók
3 Szintezöláb
FIGYELEM
natural_image
Line drawing of a double-door refrigerator with open door and side panels (no text or symbols)Felső zsanér
natural_image
Simple line drawing of a rectangular panel with two arrows indicating direction (no text or symbols)
natural_image
Simple line drawing of a door with a handle and two arrows indicating force or movement (no text or symbols)
natural_image
Simple line drawing of a door with two arrows indicating direction (no text or symbols)Szintezőláb
natural_image
Diagram of a door handle with an arrow indicating clockwise motion (no text or symbols)
FIGYELEM
PRODUKTA PÄRSKATS 03
PRODUKTA UZSTĀDĪŠANA 04
LIETOŠANAS INSTRUKCIJAS 11
TİRİŞANA UN APKOPE 13
TRAUCĒJUMMEKLĒŠANA 15
PIELIKUMS 17
SPECIFIKĀCIJAS
1 Termostats
2 Atvilkte
3 Regulējama pēda
UZMANĪBU!
natural_image
Line drawing of a double-door refrigerator with open door and side panels (no text or symbols)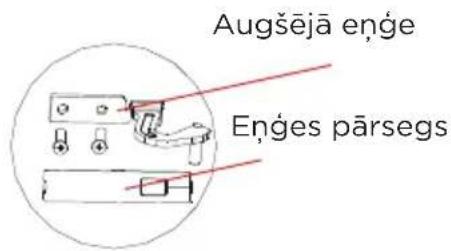
natural_image
Diagram of a mechanical component with an arrow indicating motion (no text or symbols)
UZMANĪBU!
1 Termostatas
2 Stalčius
natural_image
Line drawing of a double-door refrigerator with open door and side panels (no text or symbols)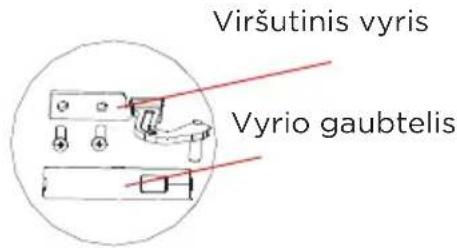
natural_image
Three sequential diagrams showing a door frame with arrows indicating movement, no text or symbols presentLT
natural_image
Diagram of a door handle with an arrow indicating clockwise motion (no text or symbols)
DÈMESIO
1 Termostat
2 Zásuvka
natural_image
Line drawing of a double-door refrigerator with open doors and slatted front panel (no text or symbols)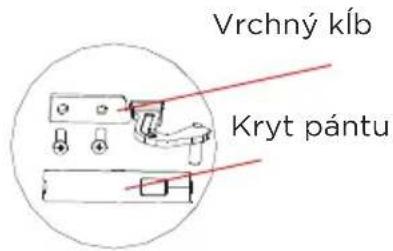
natural_image
Diagram of a door handle with an arrow indicating clockwise motion (no text or symbols)
UPOZORNENIE
1 Termostat
2 Fioka
3 Stopica za nivelisanje
PAŽNJA
Slika iznad služi samo za referencu. Stvarna konfiguracija će zavisiti od kupljenog proizvoda ili izjave distributera.
POSTAVLJANJE PROIZVODA
Uputstvo za postavljanje
natural_image
Line drawing of a double-door refrigerator with open door and side panels (no text or symbols)
- Uklonite vrata, sklop donje šarke i prilagodljivu nožicu, a zatim postavite sklop donje šarke i prilagodljivu nožicu sa druge strane. Uklonite odbojnik sa donje desne strane vrata i postavite ga na drugu stranu vrata.
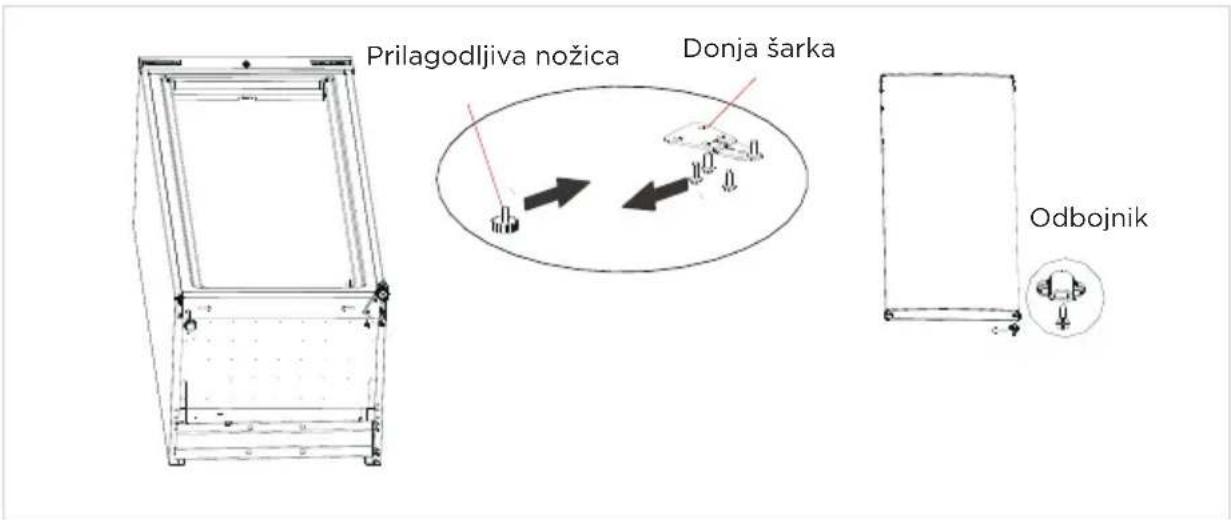
- Stavite vrata na donju šarku, postavite osovinu gornje šarke kao na sledećoj slici i postavite gornju šarku, zatim poklopac gornje šarke i plastične poklopce rupa za zavrtnje.
- Ako je temperatura previsoka ili tokom leta, prema stvarnim potrebama, termostat treba podesiti na MAX.
- Ako je temperatura suviše niska ili tokom zime, prema stvarnim potrebama, termostat treba podesiti na MIN.

NAPOMENA
koristite i podesite između MIN i MAX.

PAŽNJA
Stvarna kontrolna tabla se može razlikovati od modela do modela.
natural_image
Diagram of a mechanical component with an arrow indicating motion or force (no text or symbols)
PAŽNJA
Uređaj će neprekidno raditi nakon što se pokrene. Generalno, rad uređaja ne sme da se prekida, u suprotnom se vek trajanja može smanjiti.
REŠAVANJE PROBLEMA
1 Termostat
2 Ladica
3 Nožica za niveliranje
PAŽNJA
Gornja slika služi samo kao referenca. Stvarna konfiguracija ovisit će o fizičkom proizvodu ili izjavi distributera.
POSTAVLJANJE PROIZVODA
Upute za postavljanje
Za rashladne uređaje s klimatskim razredom
- Ovisno o klimatskom razredu, ovaj rashladni uređaj namijenjen je uporabi u temperaturnim rasponima okoline kako je navedeno u sljedećoj tablici.
- Klimatski razred može se pronaći na natpisnoj pločici. Proizvod možda neće ispravno raditi na temperaturama izvan navedenog raspona.
- Klimatska klasa navedena je na etiketi proizvoda.
Učinkovit temperaturni raspon
• Proizvod je konstruiran za normalan rad u temperaturnom rasponu koji je određen ocjenom razreda.
| Razred Simbol | Raspon temperature okoline °C | ||
| IEC 62552 (ISO 15502) | ISO 8561 | ||
| Prošireni umjereni SN + | 10 do + 32 + | 10 do + 32 | |
| Umjereni N + 16 do + 32 | + 16 do + 32 | ||
| Subtropski ST + 16 do + | 38 + 18 do + | 38 | |
| Tropski T + 16 do + 43 + | 18 do + 43 | ||
Dimenzije i razmaci
- Premala udaljenost od susjednih predmeta može dovesti do smanjenja funkcije zamrzavanja i povećanja troškova električne energije. Prilikom postavljanja uređaja ostavite više od 100 mm slobodnog prostora od svakog susjednog zida.
HR

PAŽNJA
Gornja slika služi samo kao referenca. Stvarna konfiguracija ovisit će o fizičkom proizvodu ili izjavi distributera.
natural_image
Simple line drawing of a rectangular frame with a vertical dimension labeled 'E' (no text or symbols beyond the label)C

| Širina | Sveukupna visina | Dubina | Širina s vratima otvorenim pod kutom od 135° | Dubina s vratima otvorenim pod kutom od 135° |
| A B C D E | ||||
| 550 1420 | 550 930 910 |
Napomena: Sve dimenzije u mm
HR
Promjena vrata desno-lijevo (opcionalno)
natural_image
Line drawing of a double-door refrigerator with open doors and internal compartments (no text or symbols)
- Uklonite vrata, sklop donje šarke i podesivu nožicu, a zatim postavite sklop donje šarke i podesivu nožicu na drugoj strani. Skinite zaustavljač s donje desne strane vrata i postavite ga na drugu stranu vrata.
- Postavite vrata na donju šarku, postavite osovinu gornje šarke kao što je navedeno u nastavku i redom postavite gornju šarku, poklopac gornje šarke i plastične poklopce otvora za vijke.

HR
Postavljanje ručke na vratima (opcija)

OPREZ
OPREZ: Slike u korisničkom priručniku služe samo za referencu. Stvarni proizvod može se lagano razlikovati.
Prije pokušaja ugradnje dodatne opreme hladnjak mora biti odvojen od izvora električne energije.
KORAK
- Izvadite dva čepa utikača s vrata (strana otvaranja vrata).
- Postavite ručku na vrata i pričvrstite je vijcima.
- Postavite čepove vijaka ručke u otvore za vijke.
Nožice za niveliranje
- Ako je temperature okoline previsoka ili je ljeto, termostat možete prema potrebama podesiti na MAX.
- Ako je temperature okoline preniska ili je zima, termostat možete prema potrebama podesiti na MIN.

NAPOMENA
postavite je između MIN i MAX.

PAŽNJA
Stvarna upravljačka ploča može se razlikovati ovisno o modelu.
natural_image
Diagram of a door handle with an arrow indicating direction (no text or symbols)
PAŽNJA
Nakon pokretanja uređaj će neprekidno raditi. Načelno se rad uređaja ne smije prekidati jer se inače vijek njegova trajanja može smanjiti.
RJEŠAVANJE PROBLEMA
1 Termostati
2 Predal
3 Izravnalna noga
POZOR
natural_image
Simple line drawing of a rectangular panel with two arrows indicating direction (no text or symbols)
natural_image
Simple line drawing of a door with a handle and two arrows indicating force or movement (no text or symbols)
natural_image
Simple line drawing of a door with two arrows indicating direction (no text or symbols)SL
Izravnalne noge
Da se izognete vibracijam, mora biti enota poravnana.
- Če je temperatura okolice previsoka ali je poletni čas, se glede na dejanske potrebe termostat prilagodi na MAX.
- Če je temperatura okolice prenizka ali je zimski čas, se glede na dejanske potrebe termostat prilagodi na MIN.

OPOMBA
uporabite in prilagajajte na MIN ali MAX.

POZOR
natural_image
Diagram of a mechanical component with an arrow indicating motion or force (no text or symbols)
POZOR
1 Termostat
2 Sertar
3 Picion de echilibrare
ATENTIE
natural_image
Line drawing of a double-door refrigerator with open door and side panels (no text or symbols)Balama superioară
natural_image
Diagram of a mechanical component with an arrow indicating motion or force (no text or symbols present)
ATENTIE
1 Термостат
2 Чекмедже
natural_image
Simple line drawing of a rectangular frame with a vertical dimension labeled 'E' (no text or symbols beyond the label)C
natural_image
Line drawing of a double-door refrigerator with open door and side panels (no text or symbols)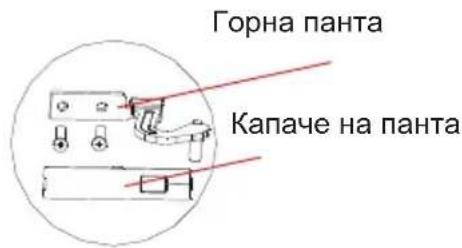
natural_image
Diagram of a door handle with an arrow indicating clockwise motion (no text or symbols)
ЗАБЕЛЕЖКА
INSTALIMI I PRODUKTIT
natural_image
Line drawing of a double-door refrigerator with open doors and slatted front panel (no text or symbols)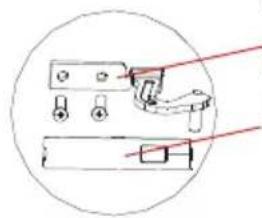
natural_image
Simple line drawing of a mechanical device with no text or symbolsMentesha e sipërme
Kapaku i menteshës
natural_image
Diagram of a door handle with an arrow indicating clockwise motion (no text or symbols)
MBANI PARASYSH
make yourself at home