
X-300 - Ice Maker Vevor - Free user manual and instructions
Find the device manual for free X-300 Vevor in PDF.
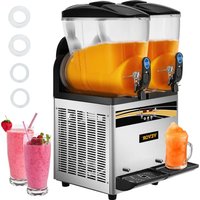


| Product type | Slush machine |
| Brand | Vevor |
| Model | X-300 |
| Number of tanks | 2 |
| Capacity per tank | 5.5 L minimum, max level indicated |
| Adjustable slush temperature | Default -2 °C, adjustable range via panel |
| Adjustable cold drink temperature | Default 5 °C, adjustable range via panel |
| Main functions | Mixing, cooling, slush making, LED lighting, dispensing |
| Control panel | LED, separate buttons for each tank |
| Dispensing | Dispensing handles for each tank |
| Exterior material | Stainless steel (per drawings) |
| Maintenance | Daily cleaning recommended, removable parts (seals, tanks, dispensers) |
| Wear parts | Sealing rings (large and small), gaskets |
| Error codes | Tank freeze (--), sensor (RH), low voltage (LLL), high voltage (LLH) |
| Safety precautions | Grounding, avoid water, 30 cm clearance around, rest 24h before first use |
| Warranty | Electronic warranty, technical support www.vevor.com/support |
Frequently Asked Questions - X-300 Vevor
User questions about X-300 Vevor
0 question about this device. Answer the ones you know or ask your own.
Ask a new question about this device
Download the instructions for your Ice Maker in PDF format for free! Find your manual X-300 - Vevor and take your electronic device back in hand. On this page are published all the documents necessary for the use of your device. X-300 by Vevor.
USER MANUAL X-300 Vevor
Technical Support and E-Warranty Certificate www.vevor.com/support
SLUSH MACHINE
MODEL: X-150 X-300 X-450
We continue to be committed to providing you with tools at competitive prices. "Save Half", "Half Price", or any other similar expressions used by us only represent an estimate of savings you might benefit from buying certain tools with us compared to the major top brands and do not necessarily mean to cover all categories of tools offered by us. You are kindly reminded to verify carefully when placing an order with us if you are actually saving half in comparison with the top major brands.
MODEL: X-150 X-300 X-450
NEED HELP? CONTACT US!
Have product questions? Need technical support? Please feel free to contact us:
Technical Support and E-Warranty Certificate www.vevor.com/support
This is the original instruction. Please read all manual instructions carefully before operating. VEVOR reserves a clear interpretation of the user manual. The appearance of the product shall be subject to the product you received. Please forgive us that we won't inform you if there are any technology or software updates on our product.
 | Warning-To reduce the risk of injury, user must read instructions manual carefully. |
  | CAUTION: Changes or modifications not expressly appro by the party responsible for compliance could void the authority to operate the equipment!This device complies with Part 15 of the FCC Rules. is subject to the following two conditions:1) This product may cause harmful interference.2)This product must accept any interference received, including interference that may cause undesired operation WARNING: Changes or modifications to this product no expressly approved by the party.responsible for compliant could void the user's authority to operate the product.Note: This product has been tested and found to comply the limits for a Class B digital device pursuant to Part FCC Rules, These limits are designed to provide reason protection against harmful interference in a residential installation.This product generates, uses and can radiate radio free energy, and if not installed and used in accordance with instructions, may cause harmful interference to radio communications. However, there is no guarantee that interference will not occur in a particular installation. If product does cause harmful interference to radio or tele reception,which can be determined by turning the product and on, the user is encouraged to try to correct the interference by one or more of the following measures.Reorient or relocate the receiving antenna.Increase the distance between the product and receive Connect the product to an outlet on a circuit differen that to which the receiver is connected.Consult the dealer or an experienced radio/TV technie assistance.This product is subject to the provision of European D 2012/19/EC. The symbol showing a wheelie bin crossed through indicates that the product requires separate refu collection in the European Union. This applies to the p and all accessories marked with this symbol. Products as such may not be discarded with normal domestic w must be taken to a collection point for recycling electri electronic devices. |
IMPORTANT SAFETY CAUTIONS
1. General Safety Precautions
Please read these instructions carefully before using the product.
① Avoid using the product outdoors. Exposure to rain could potentially cause electrical leakage or electric shock. ② Never place the product where it can get wet or splashed with water; the insulation material gets damaged, it might cause electrical leakage or even electric shock. ③ Never directly spray water onto the product. Moisture on the product could lead to electric shock or a short circuit. ④ Make sure you don't pour any volatile or flammable liquids into the product. Containers or areas where these substances are kept could lead to explosions or fires. ⑤ Only trained engineers or maintenance staff should install the product. Trying it yourself could cause gas or liquid leaks, electric shocks, or other hazards. ⑥ Never insert metal objects like iron needles or wires into any vents of the product. Doing so could result in electric shock or personal injury from accidental contact with moving parts. ⑦ Make sure to place the product on a stable, solid surface. Unstable ground could cause damage if the product tips over or falls. ⑧ Always use the designated power supply stated on the product label. Using extension sockets could cause a fire. ⑨ Make sure to firmly plug the power plug into the socket after removing any dust. Dusty sockets or improper insertion could result in a fire.
any dust. Dusty sockets or improper insertion could result in a fire.
⑩ Use a socket with a ground connection to avoid electric shock. If there is no grounded socket, the grounding device must be assembled by qualified engineers and technicians, and the socket should be easily accessible. ⑪ Avoid using the product in areas with high sulfuric acid content, such as hot springs, or in high-salt environments like bays, as this may lead to internal corrosion and potential product failure. ⑫ Do not damage the cooling circuit. ⑬ If any malfunction occurs with the product, please disconnect the power plug. Continued abnormal operation may result in electric shock or fire. ⑭ Please avoid damaging, processing, bundling, stretching, bending, or twisting the power cord forcibly. Otherwise, it may lead to damage, electric shock, or a fire hazard. ⑮ Make sure there are no obstructions near the appliance and avoid blocking the ventilation openings. ⑯ Before cleaning, maintaining, or inspecting the product, disconnect the power supply to prevent electric shock or personal injury. ⑰ If certain models use combustible refrigerants and flammable foaming agents, caution should be taken to prevent fire hazards. In case of abnormalities, it must be repaired by qualified personnel or institutions. ⑱ This product is not intended for use by individuals with physical weaknesses, slow responses, or mental disorders (including children), unless under the guidance or supervision of a guardian. Children should be supervised to prevent them from playing with the product.
2. Electrical Safety Precautions
① Please check the recommended voltage range from the nameplate for the slush machine. If your power voltage is not within this range, purchase a voltage regulator of more than 2000W by yourself. ② Ensure proper grounding; avoid connecting the ground wire to a water pipe or a gas pipe. ③ To protect the compressor, wait 10 minutes after a power outage before
restarting the slush machine.
④ Avoid using the same socket for other electrical appliances.
⑤ For damaged power cords, rely on manufacturer-assigned personnel or qualified professionals for replacement to prevent hazards.
⑥ The electric control system of this product operates above 36V; please do not access or touch the control system when the machine is in use. Seek manufacturer assistance or qualified technicians for maintenance.
3. Warnings
① Avoid operating the product if there is a gas leak in its location. Sparks from unplugging or starting/stopping the machine could ignite a fire. Cut the power, open windows, and allow for proper air circulation in such situations. ② Always use a grounded plug for the product to prevent electric shock in case of leaks. ③ Avoid using water pipes as grounding terminals since plastic pipes are commonly used in plumbing and may not provide proper grounding. ④ Do not ground the product through gas pipes as this may lead to significant risks. ⑤ Never ground the product through telephone lines or lightning protection systems. During thunderstorms, the potential for generating high currents makes this grounding method extremely hazardous. ⑥ When placing the product in a damp environment, it is essential to install a circuit breaker and ground the machine. The circuit breaker should be installed in the power cord. For further guidance, it is advisable to seek advice from the retailer or an electrical technician. ⑦ Ensure to install a disconnect switch. ⑧ Ensure that nothing falls into the area where the product is stored.
4. Environmental Conditions
This product is designed in accordance with the following conditions:
① Intended for indoor use. ② Operable at elevations not exceeding 2000 meters.
③ Operating within an ambient temperature range of 10°C/50°F to 32°C/89.6°F. ④ When the temperature is not higher than 31°C/87.8°F, the maximum relative humidity is 80%. The maximum relative humidity decreases linearly with the increase of temperature. ⑤ The main power supply's voltage fluctuation should not exceed ±10% of the rated voltage. ⑥ In line with the equipment installation level (overvoltage level), transient overvoltage.
This apparatus is used for similar purposes such as:
- The kitchen area of a store, office, or other workplace.
- Customers of farms and hotels, motels, and residential
- Catering and similar non-retail applications.
5. Installation Precautions
① Requirements for transportation and movement: Maintain the box upright and limit the inclination to a maximum of 45 degrees, avoid inverting or laying it horizontally. ② To operate the product correctly and get the best performance, please place it in an environment that meets the following conditions:
● On a solid and level surface - Stay away from the place where the heat source is generated. Avoid putting the machine near heat sources, such as gas flames or stoves, as the heat can diminish the machine's cooling efficiency. - Avoid direct sunlight. Prevent direct exposure to sunlight, which can lead to operational abnormalities and shorten the machine's lifespan. - In a dry area. Keep the machine in a dry area and avoid placing it in wet areas, such as near faucets or sinks.
SAVE THESE INSTRUCTIONS
WHAT'S IN THE BOX
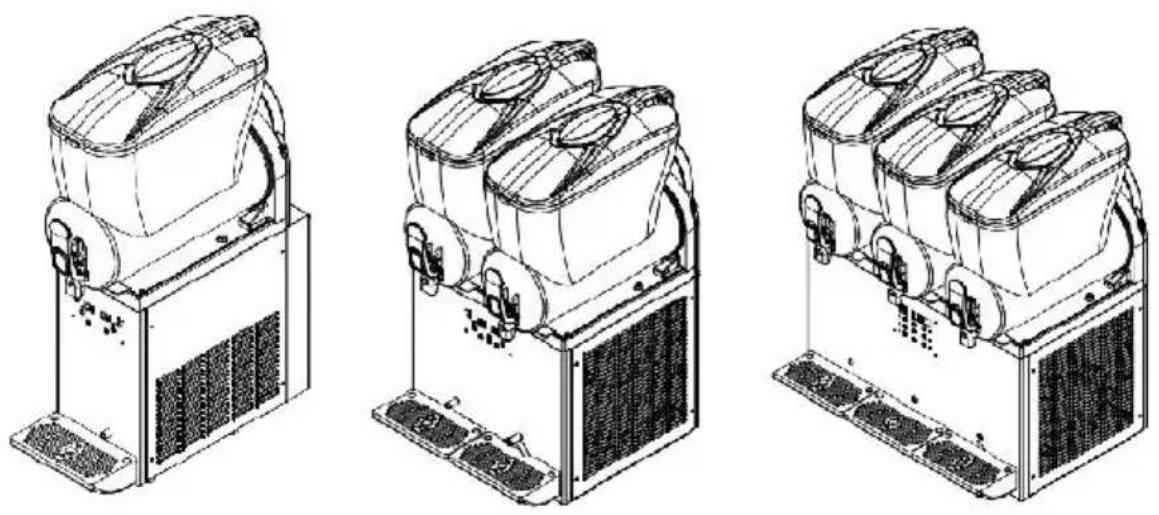
X-150 X-300 X-450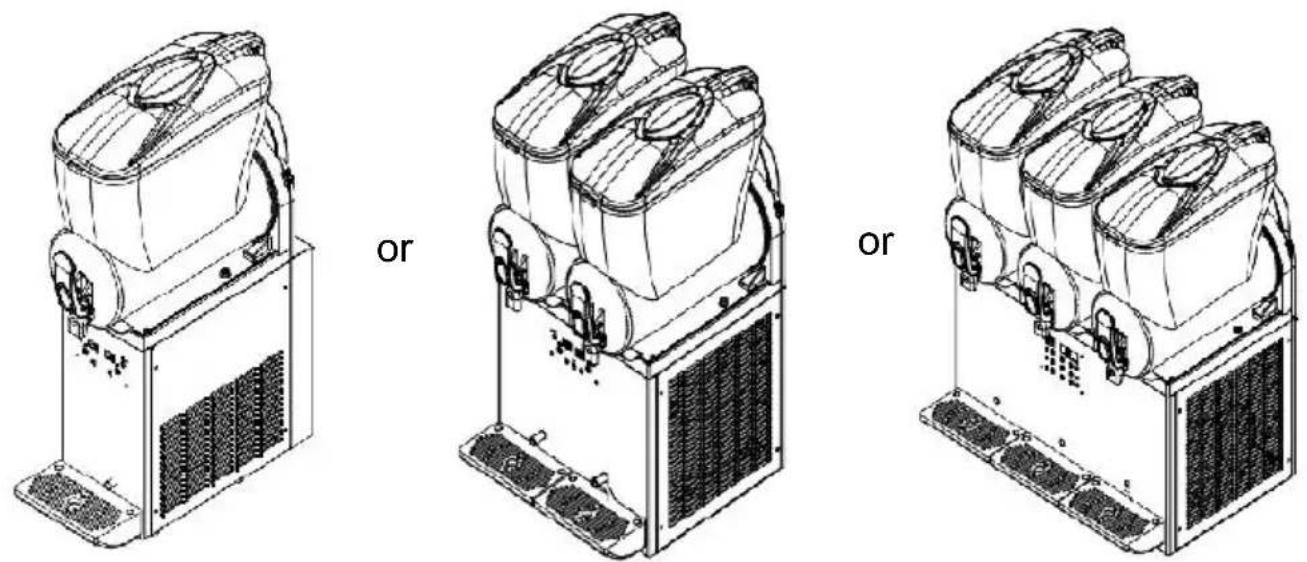
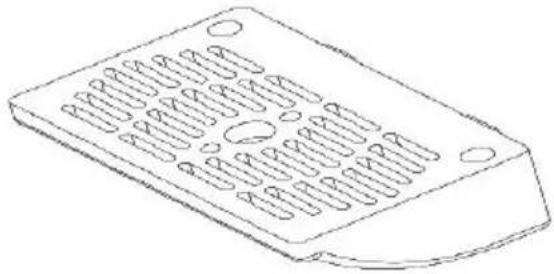 | 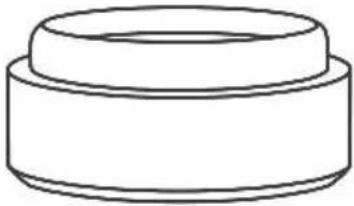 | |
| Drip Tray(1 for X-150, 2 for X 3 for X-450) | Spare Mini-sized Sealing Ring (1 for X-150, 2 for X-300, 3 X-450) | |
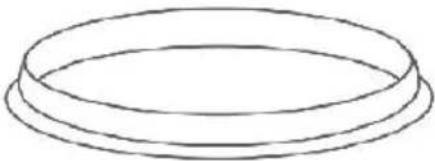 |  | |
| Spare Large-sized Sealing Ring (1 for X-150, 2 for X-300, 3 X-450) | User Manual | |
 | Spare Medium-sized Sealing Ring (1 for X-150, 2 for X-300, 3 for X | |
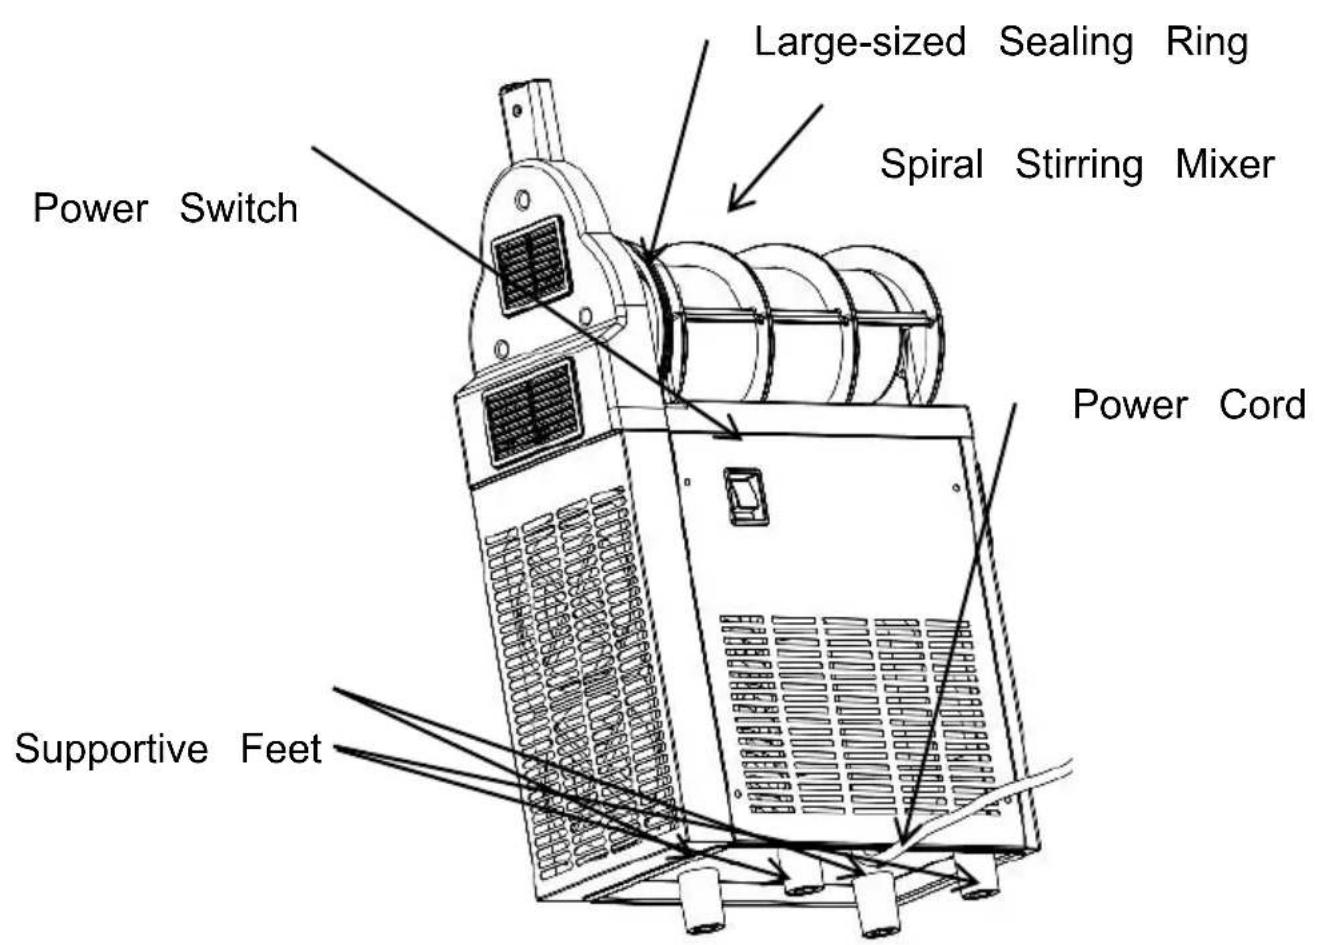
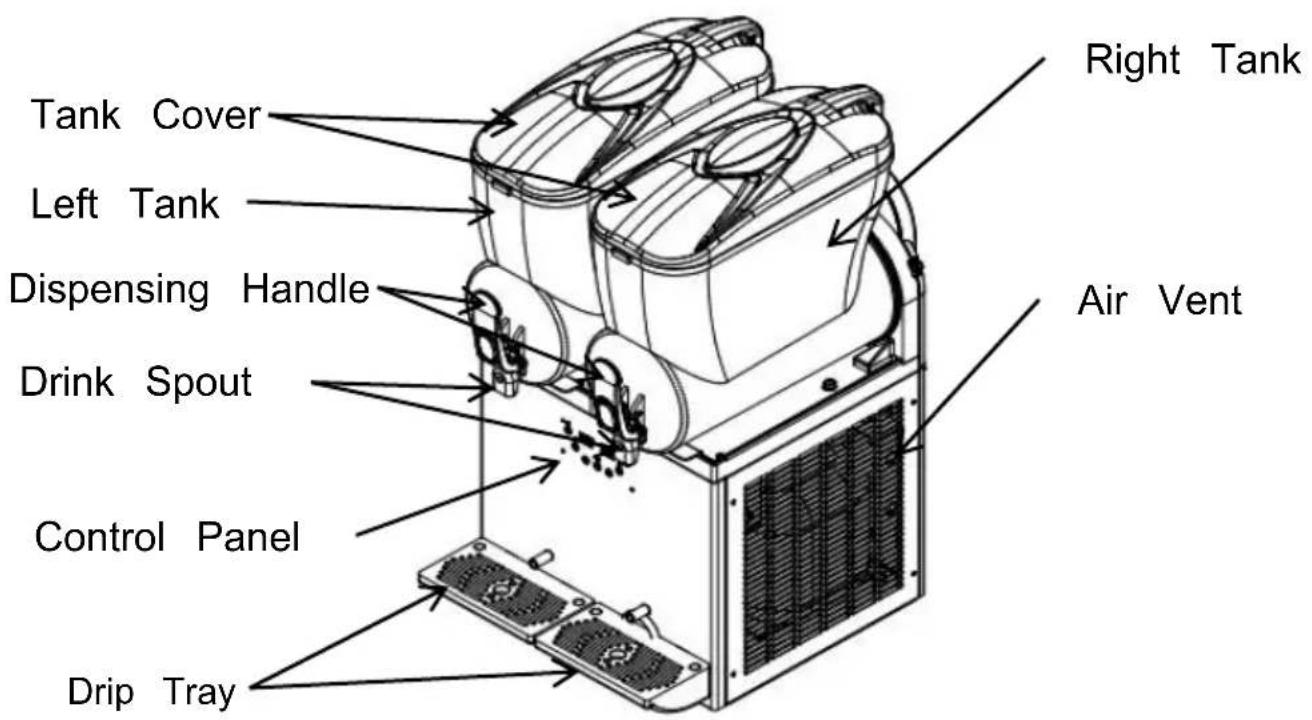
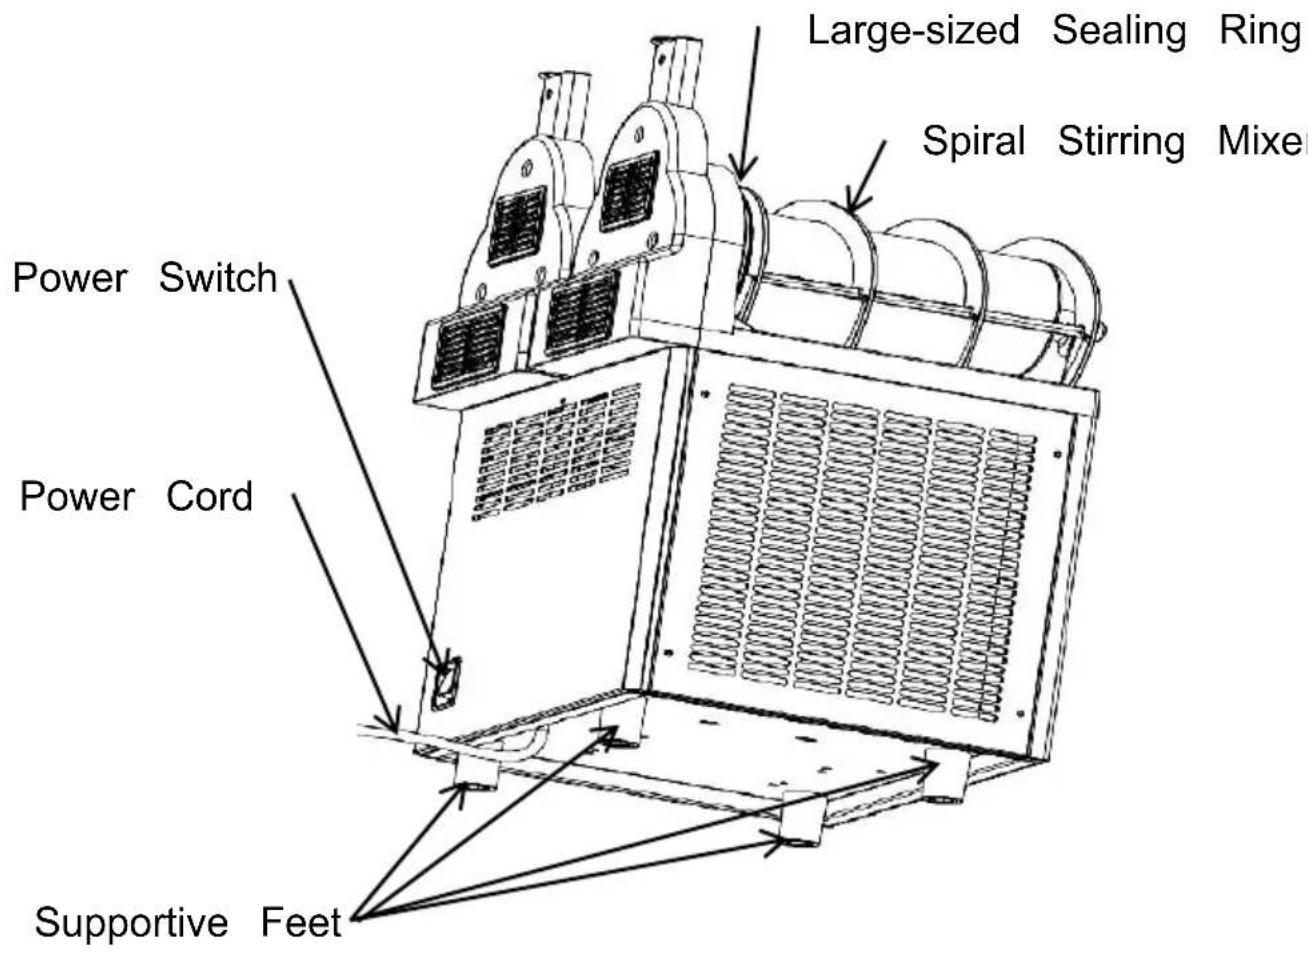
KNOW YOUR SLUSH MACHINE
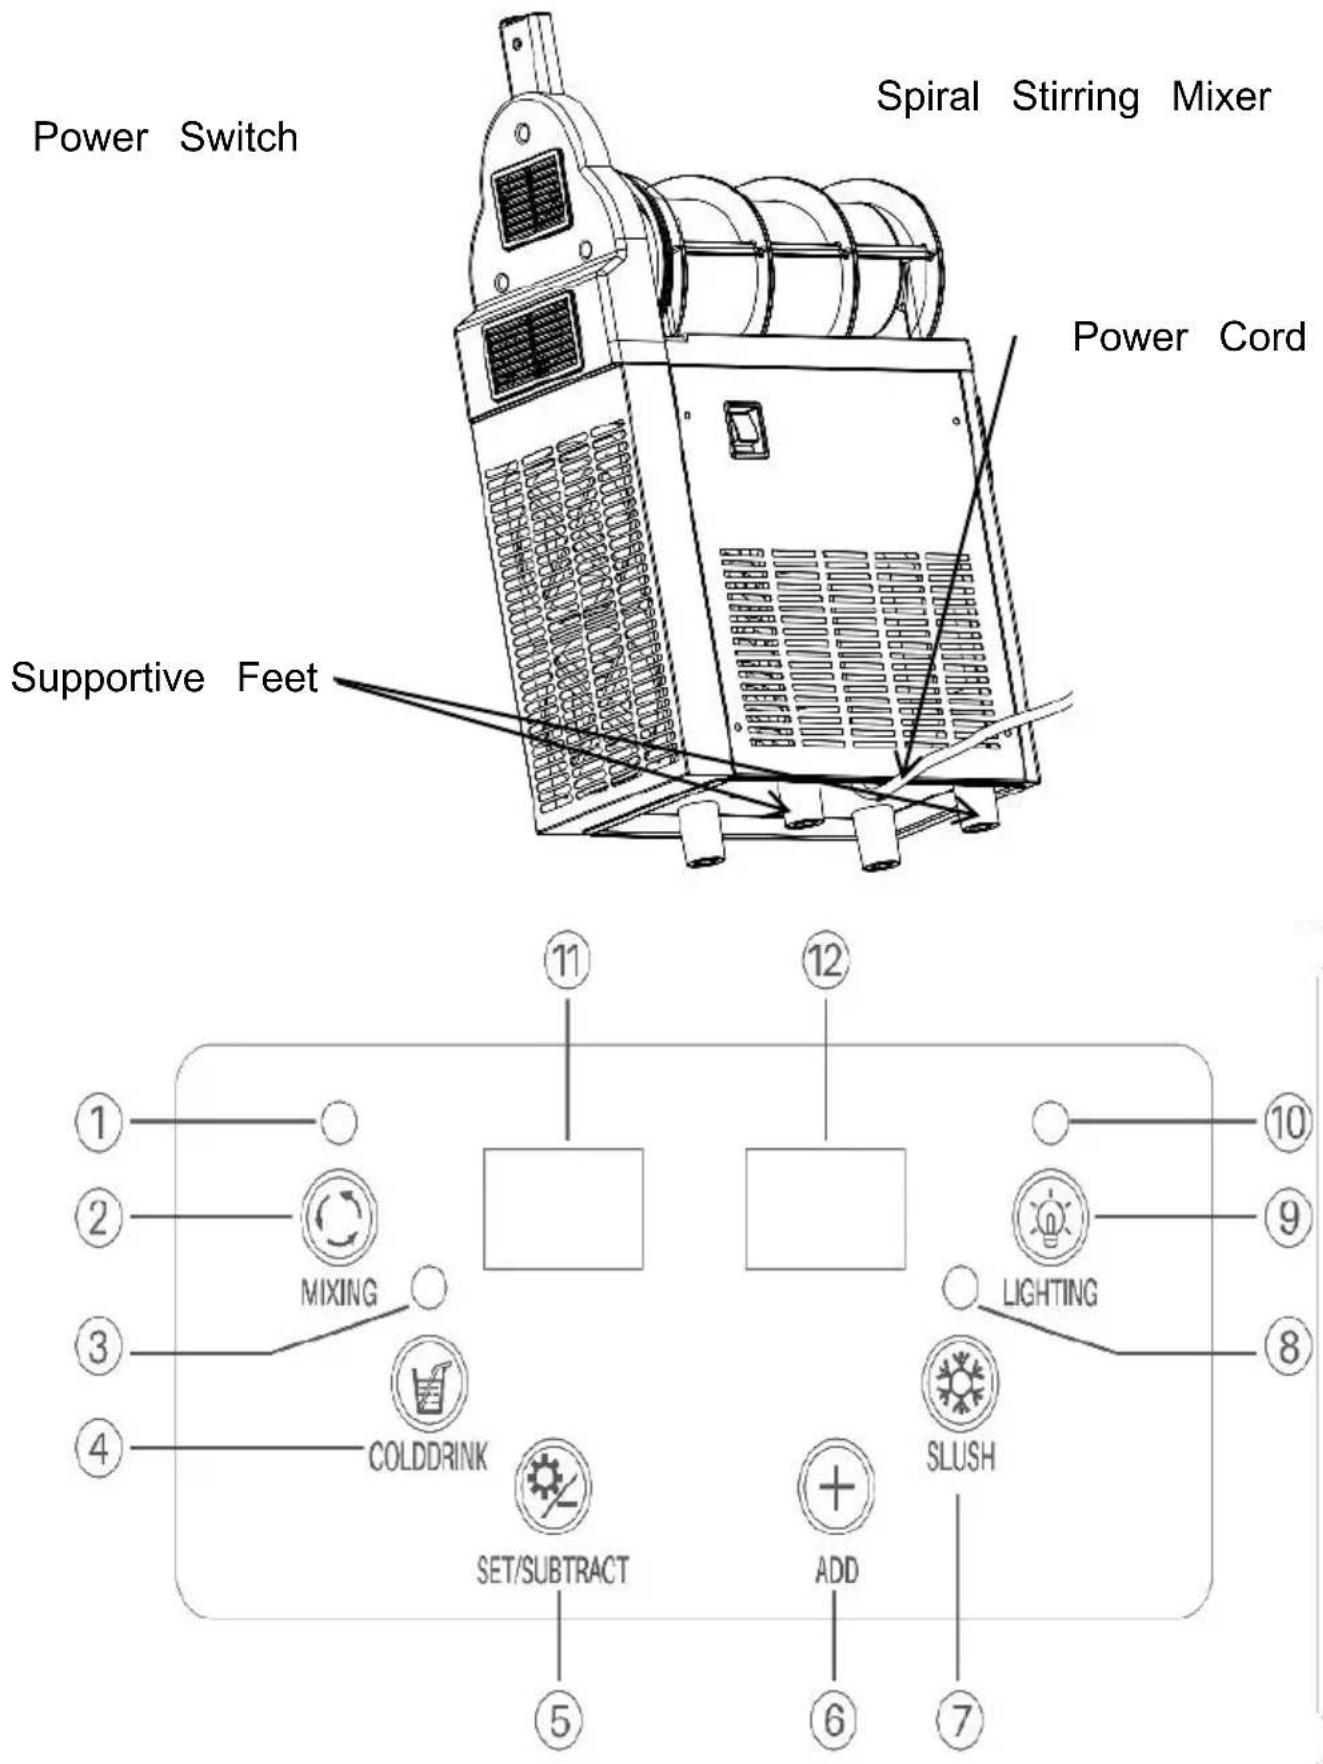
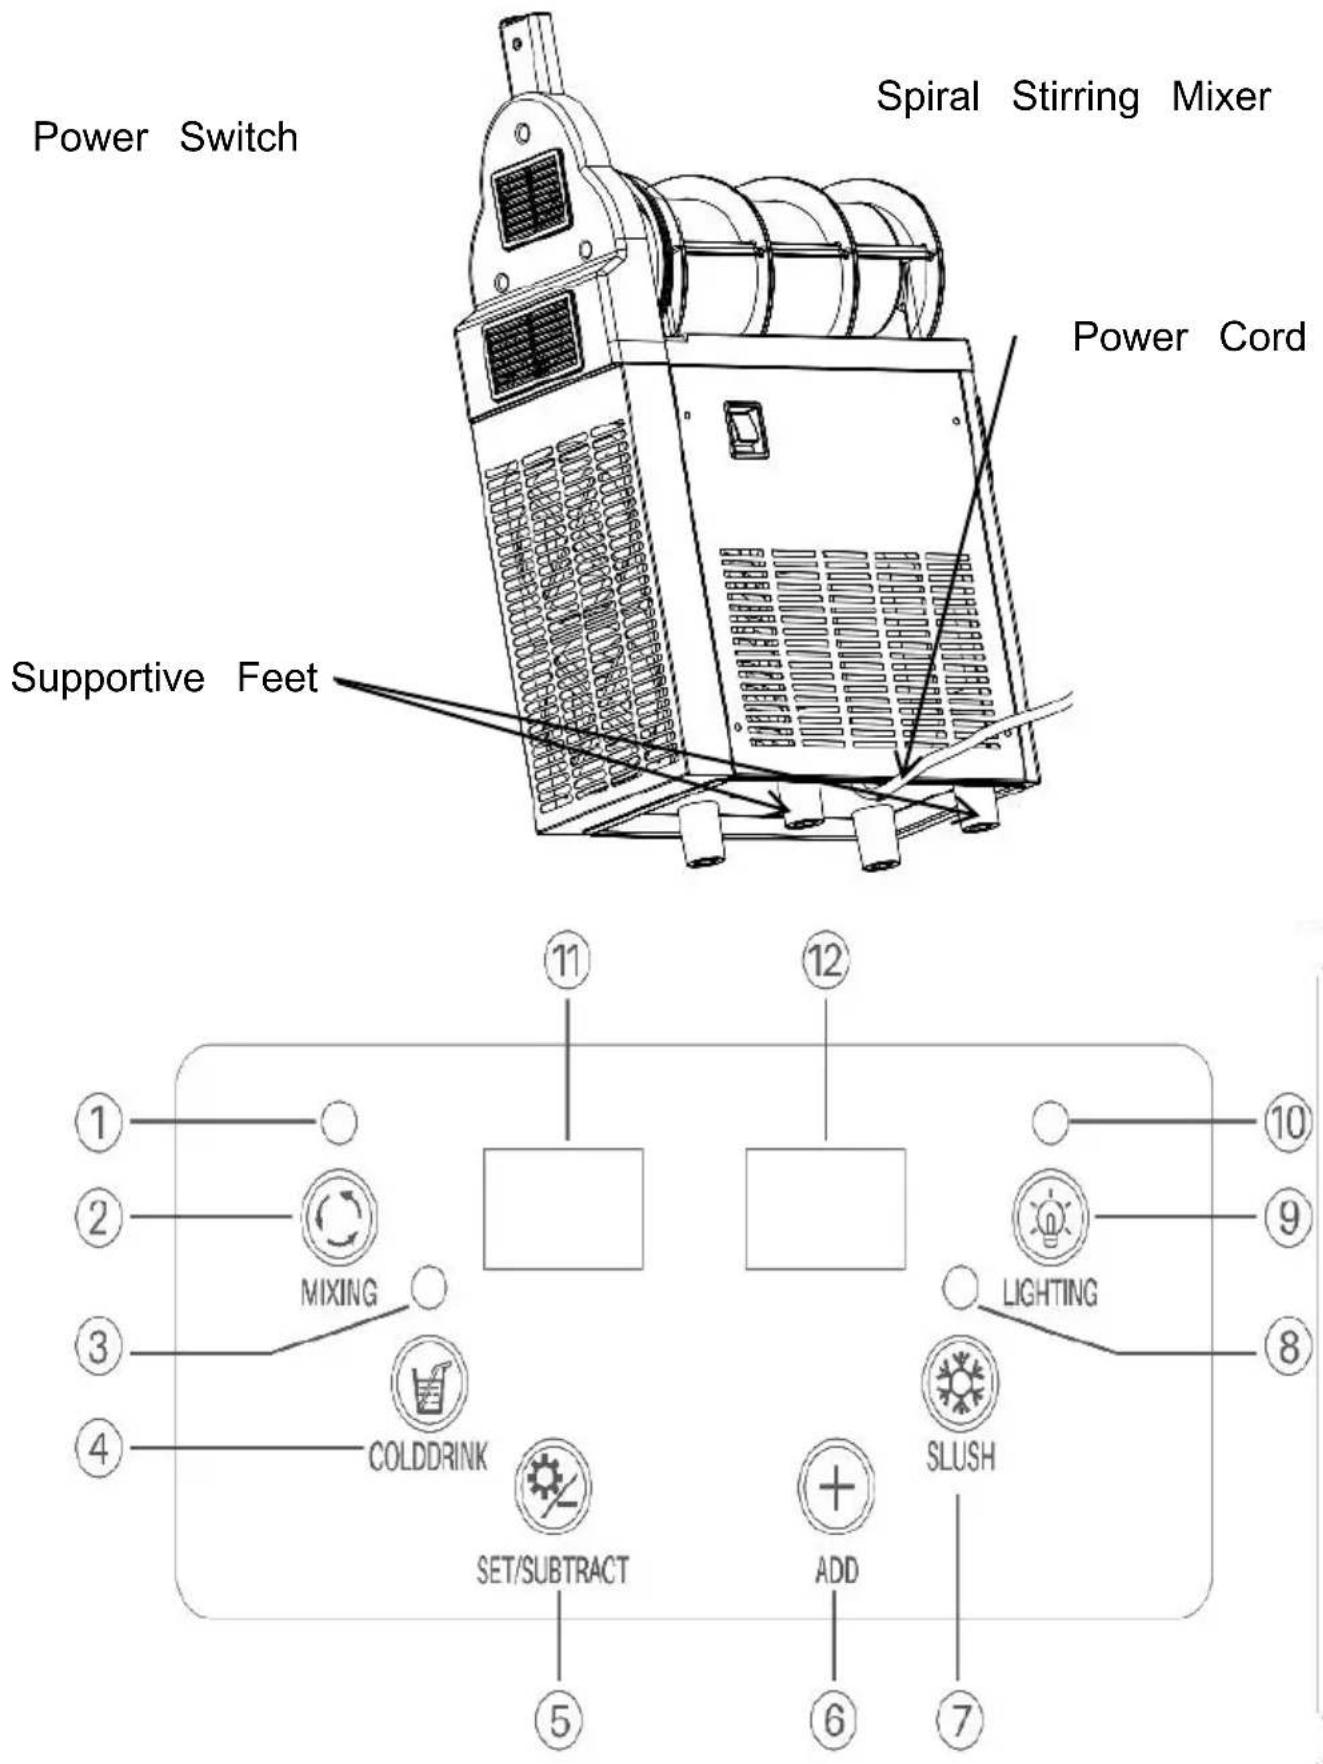
1.X-150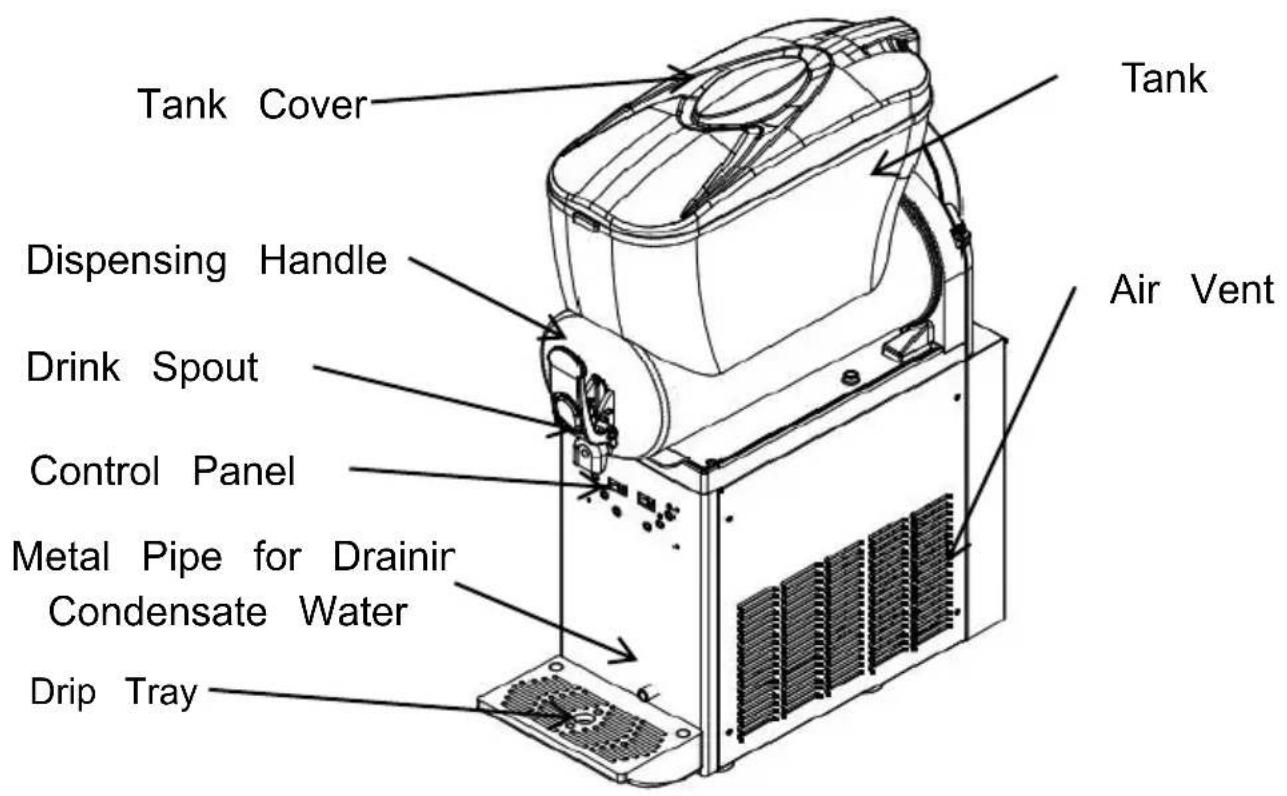
![graph TD A["1"] --> B["MIXING"] C["2"] --> B D["3"] --> E["COLDDRINK"] F["4"] --> E G["5"] --> H["SET/SUBTRACT"] I["6"] --> J["ADD"] K["7"] --> L["SLUSH"] M["8"] --> N["LIGHTING"] O["9"] --> N P["10"] --> Q["Lighting"] R["11"] --> S["Block"] T["12"] --> U["Block"] V["13"] --> W["Block"] X["14"] -->…](/content/2026/04/737529/images/3391562f81d438027c7a1764e249f84e4297208dc6c2d3c5afd7cb441e9b3ddd.jpg)
| 1 Mixing Indicato | 2 Mixing Button | 3 Cooling Indicator |
| 4 Cooling Button | 5 Setting Button | 6 Adjusting Button |
| 7 Slush Making Button | 8 Slush Making Indicator | 9 Lightning On/Off Button |
| 10 Light Indicator | 11 Left LED Pan | 12 Right LED Panel |
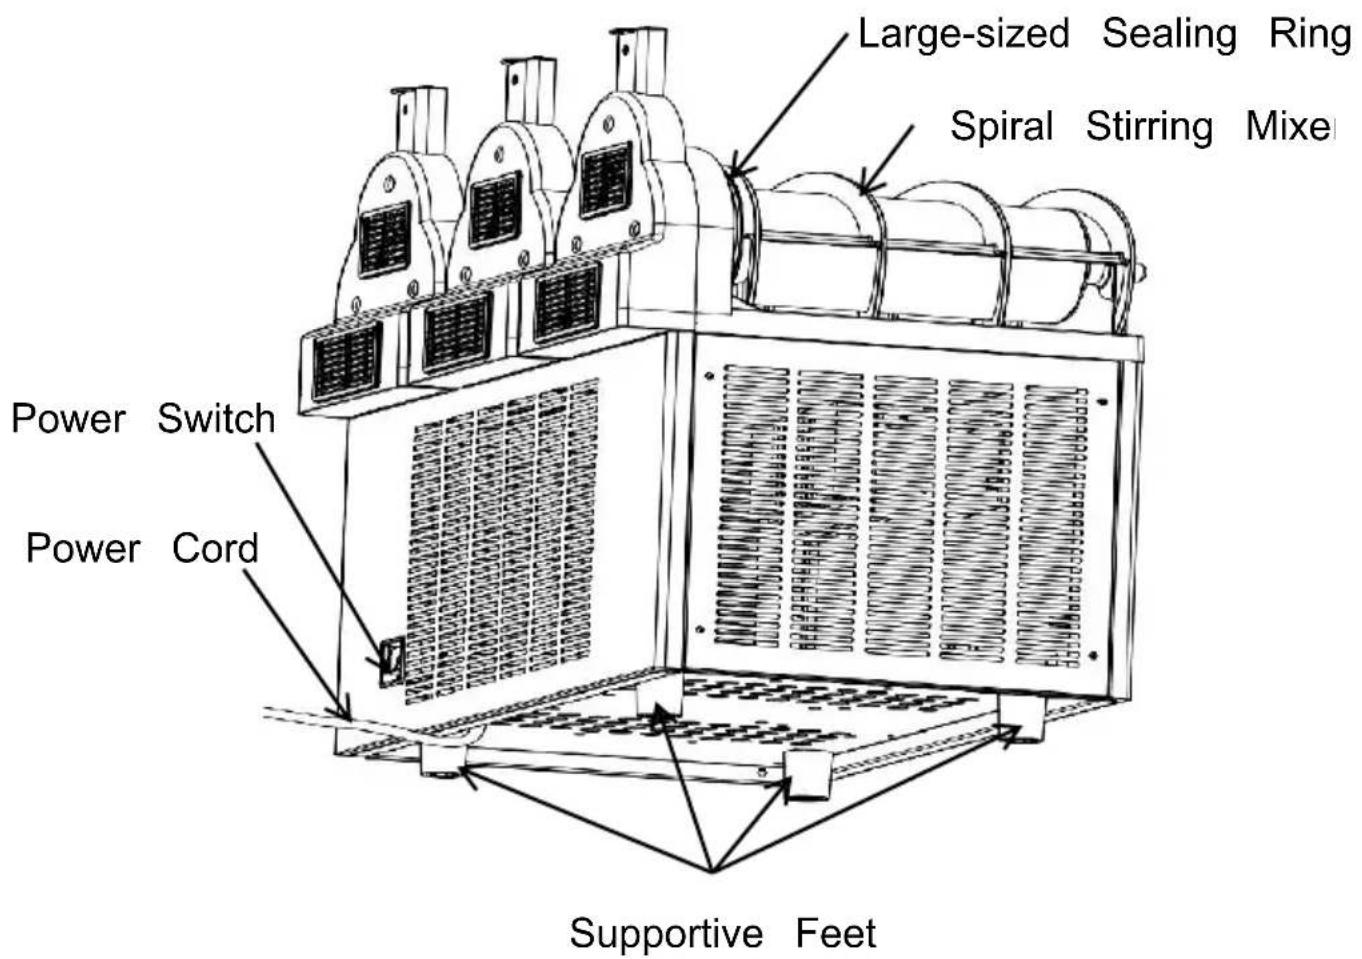
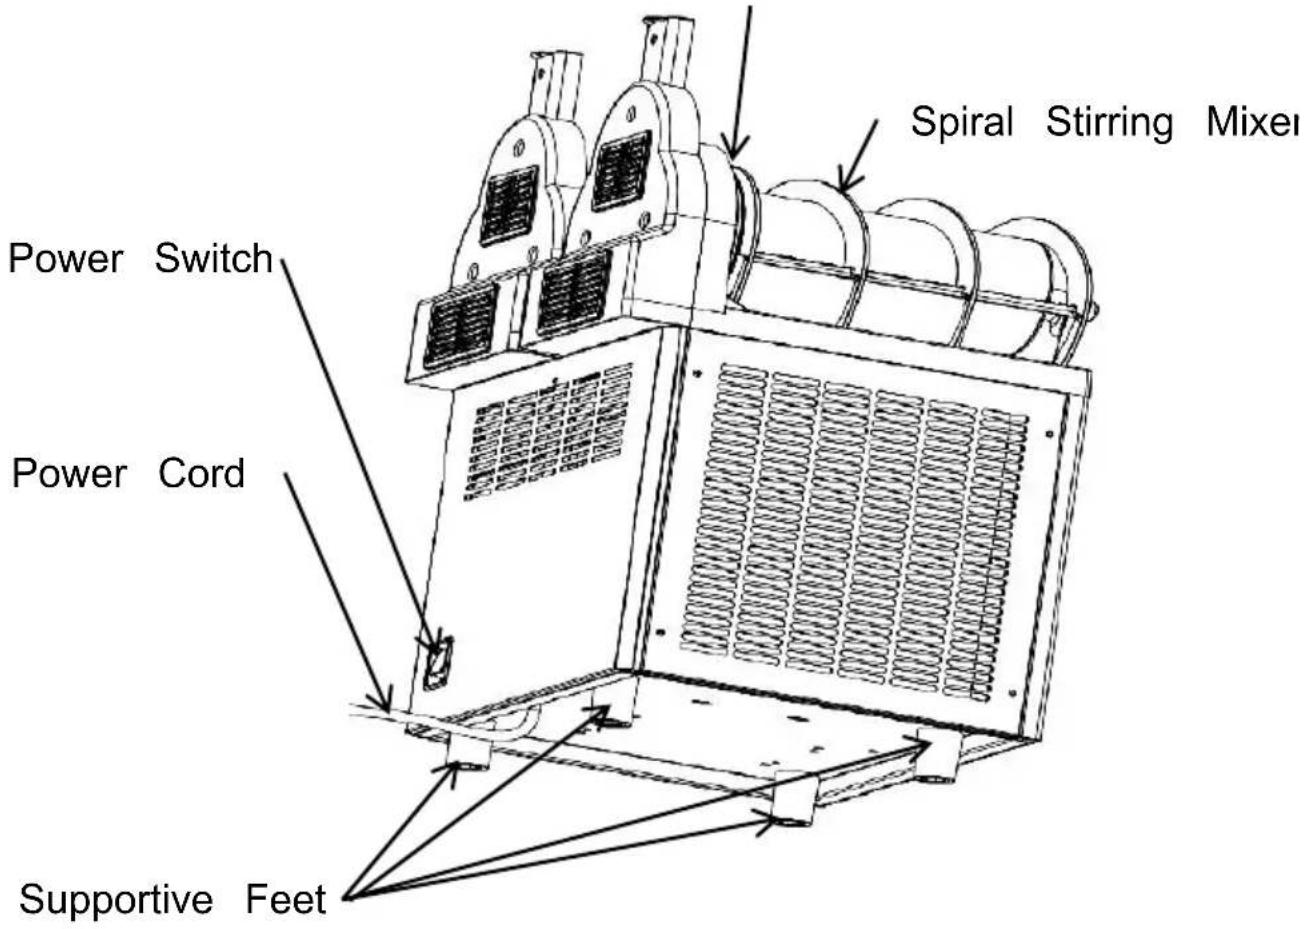
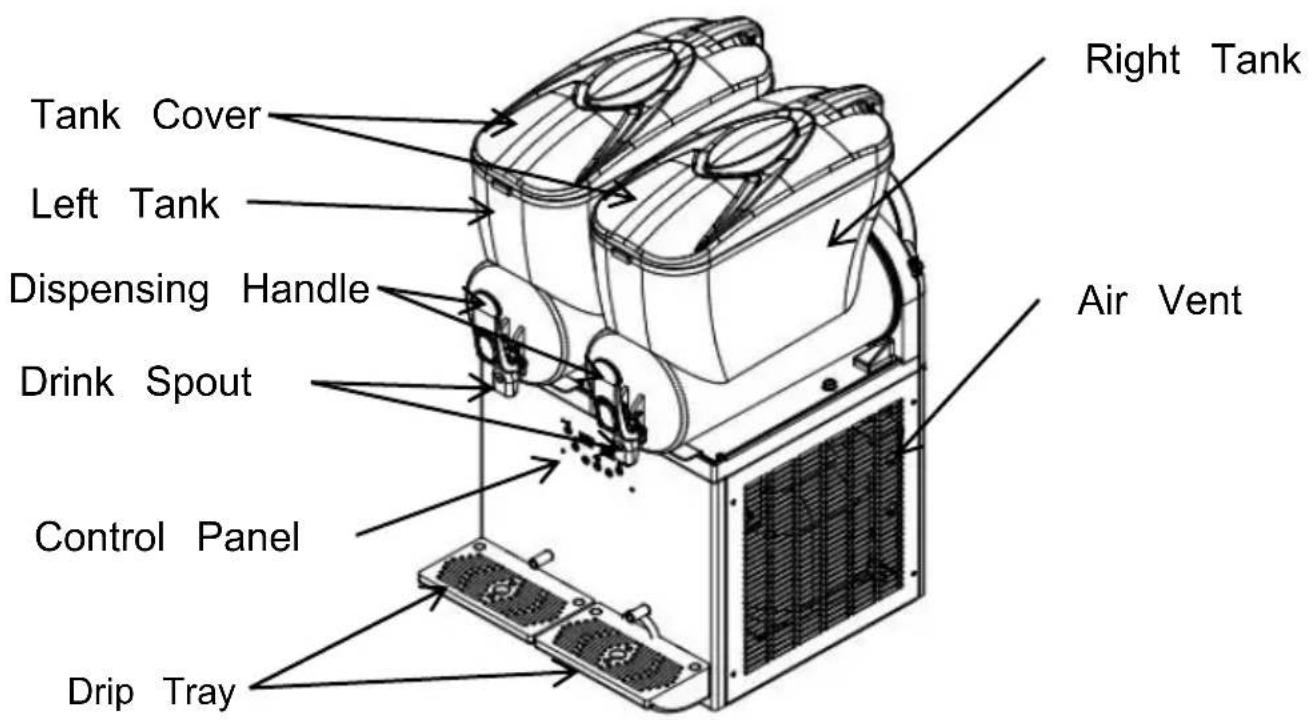
2.X-300
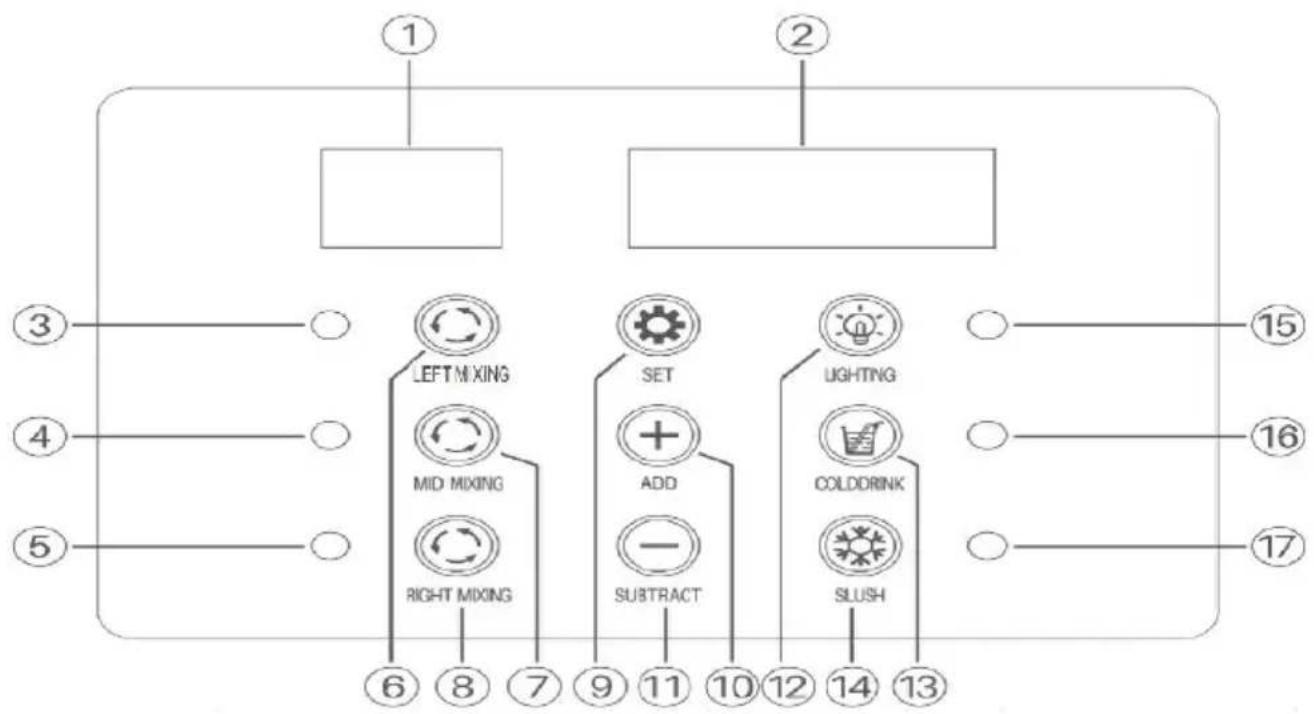
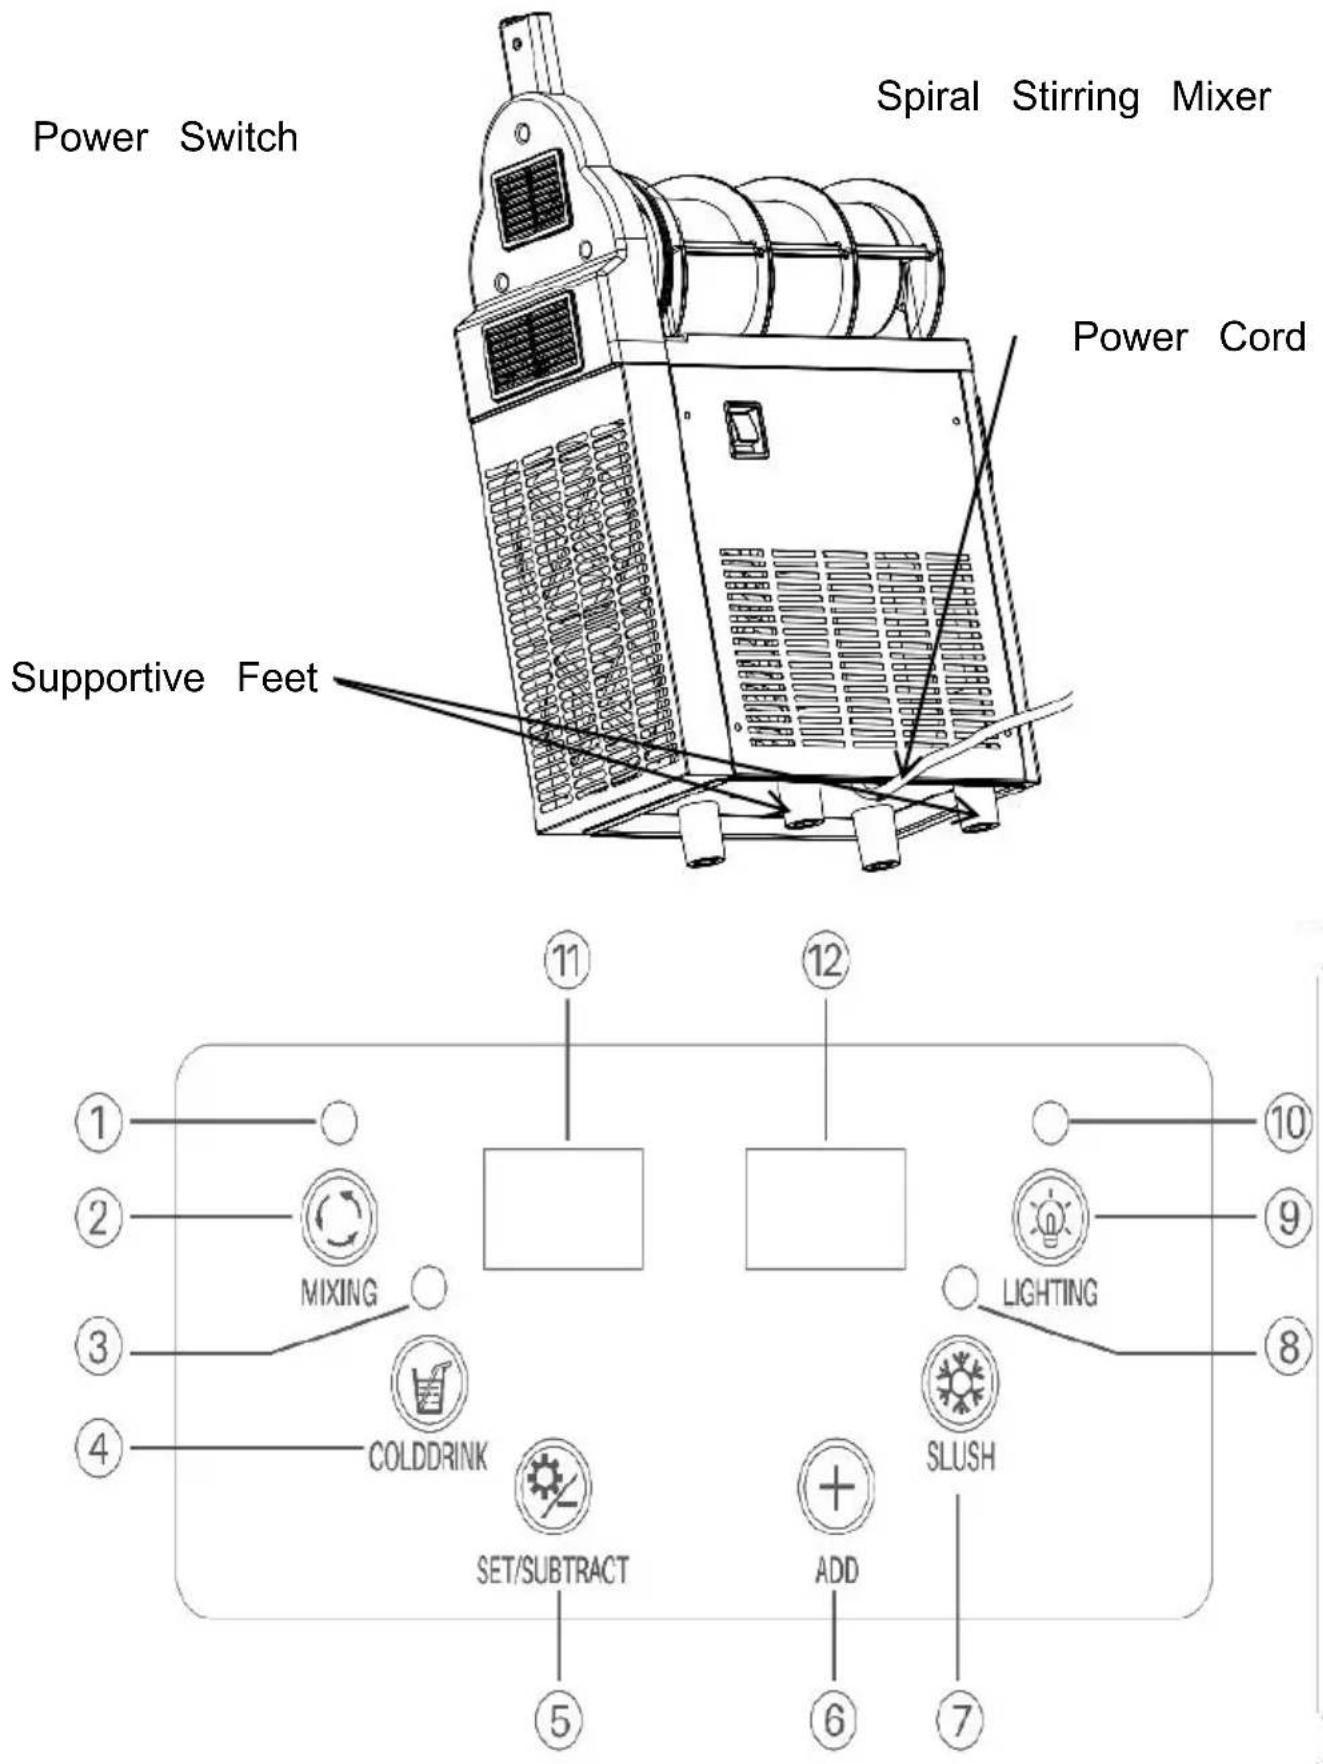
![graph TD A["1"] --> B["LEFT MIXING"] C["2"] --> B D["3"] --> E["COLDDRINK"] F["4"] --> E G["5"] --> H["SET"] I["6"] --> J["LIGHTING/SUBTRACT"] K["7"] --> L["ADD"] M["8"] --> L N["9"] --> O["SLUSH"] P["10"] --> O Q["11"] --> R["RIGHT MIXING"] S["12"] --> R T["13"] --> U[" "] V["14"] --> W[" "] X["15"…](/content/2026/04/737529/images/1b1fa601db2aa4f599c1edf435a2f3b1b6da215605390addb46d31235c001ab0.jpg)
| 1 Mixing Indicator of the Left Tank | 2 Mixing Button for Left Tank | 3 Cooling Indicator for Both Tanks |
| 4 Cooling Button for Both Tanks | 5 Setting Button | 6 Light Indicator |
| 7 Lightning On/Off Button | 8 Adjusting Button | 9 Slush Making Button for Both Tan |
| 10 Slush Making Indicator for Both Tanks | 11 Mixing Button for Right Tank | 12 Mixing Indicator for the Right Tank |
| 13 Left LED Panel | 14 Right LED Panel | |
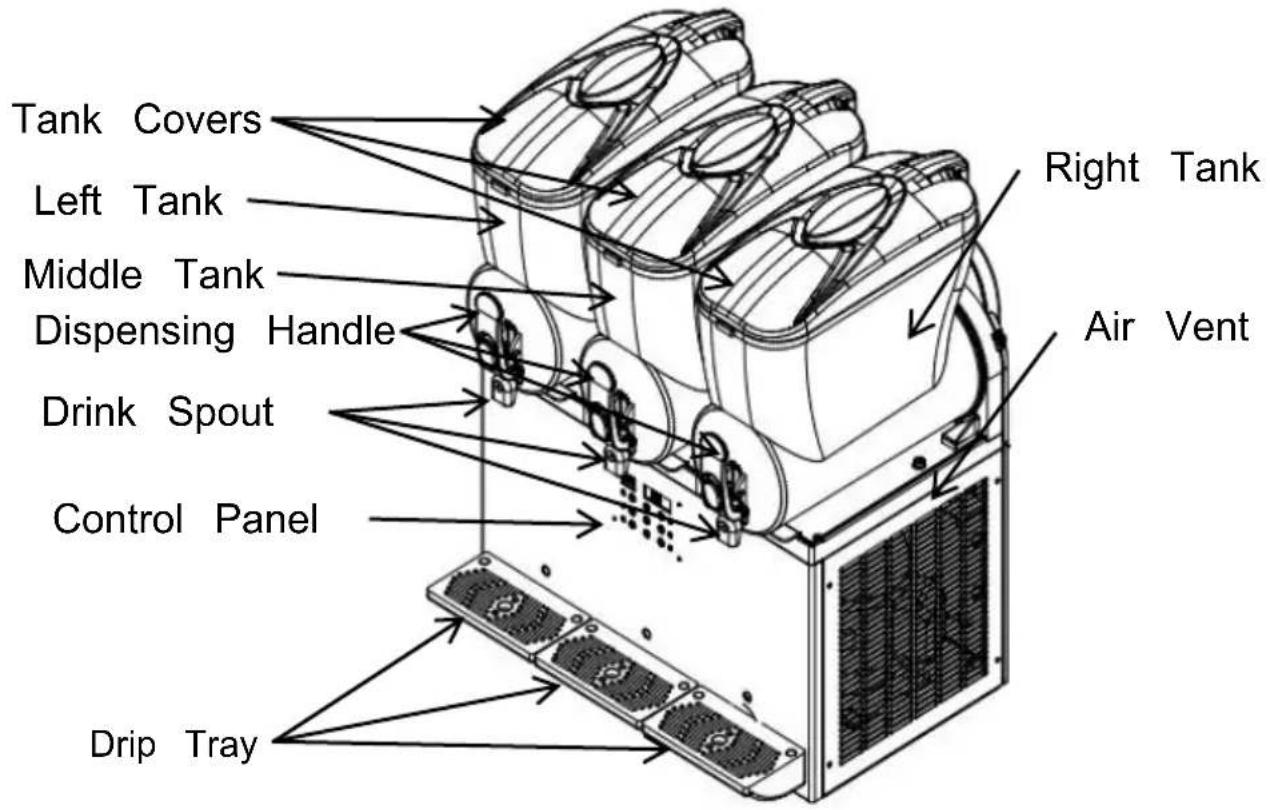
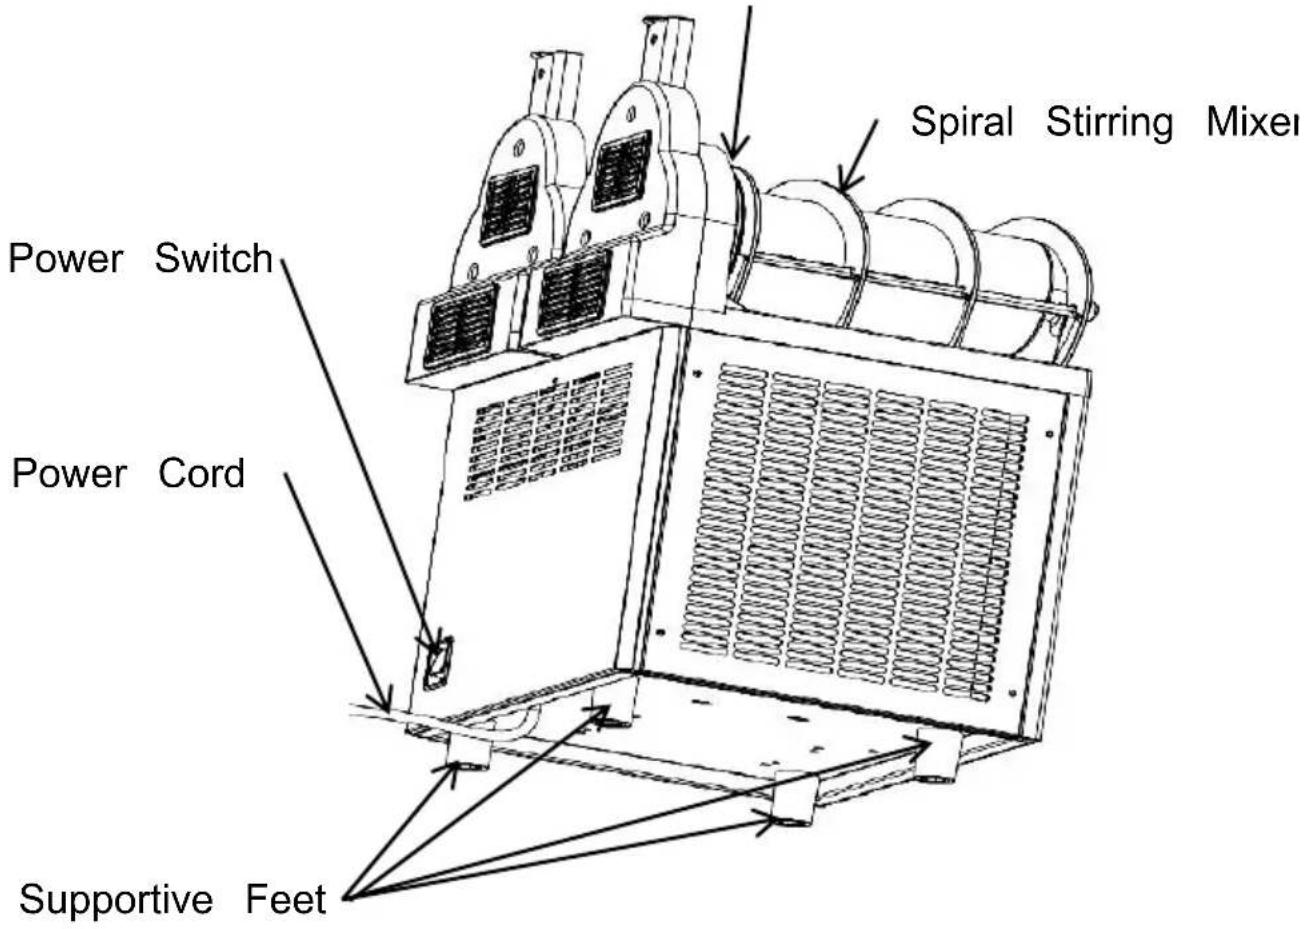
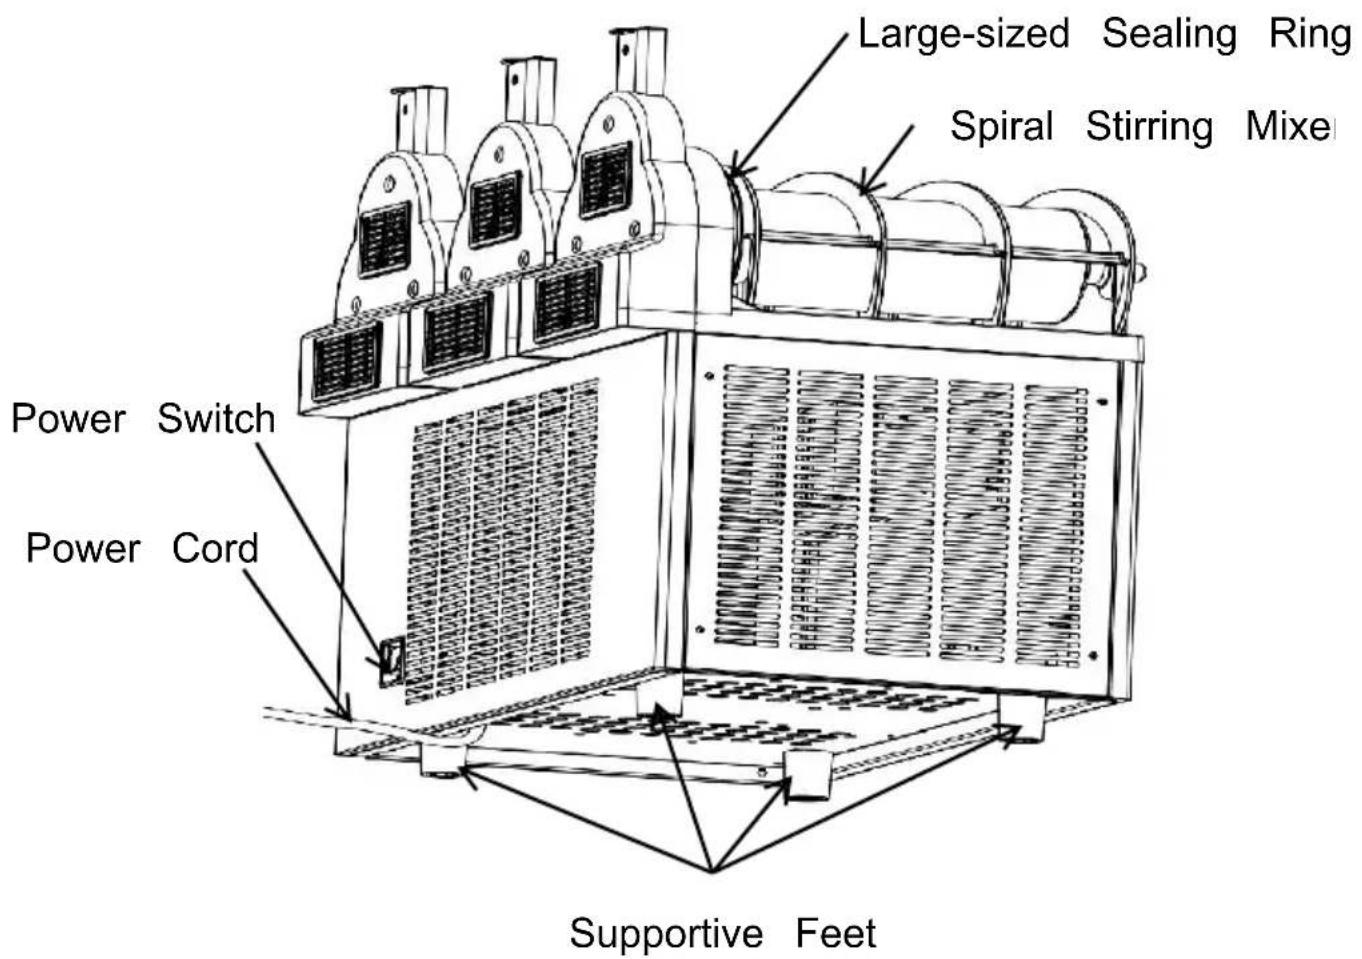
3.X-450
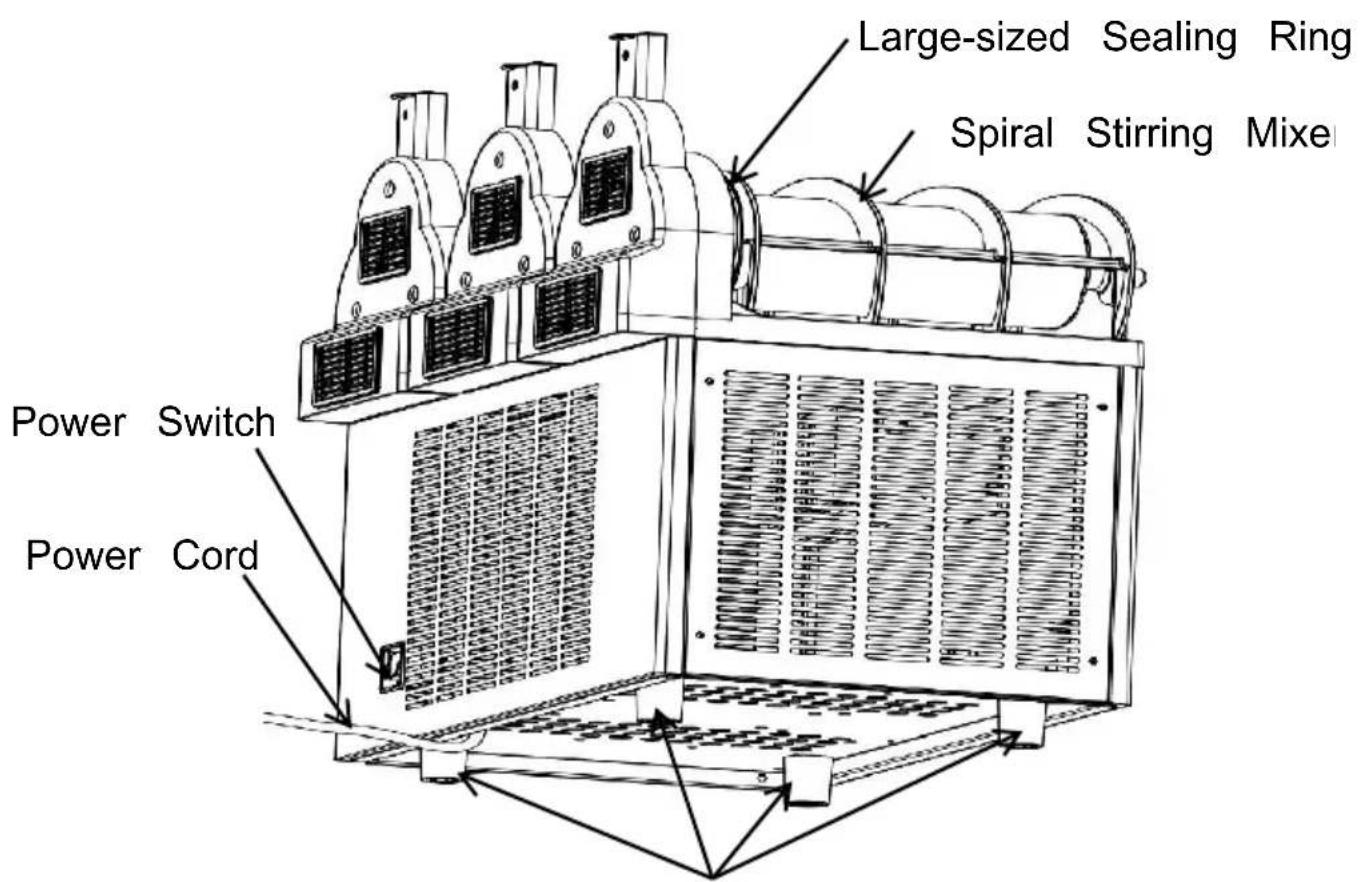
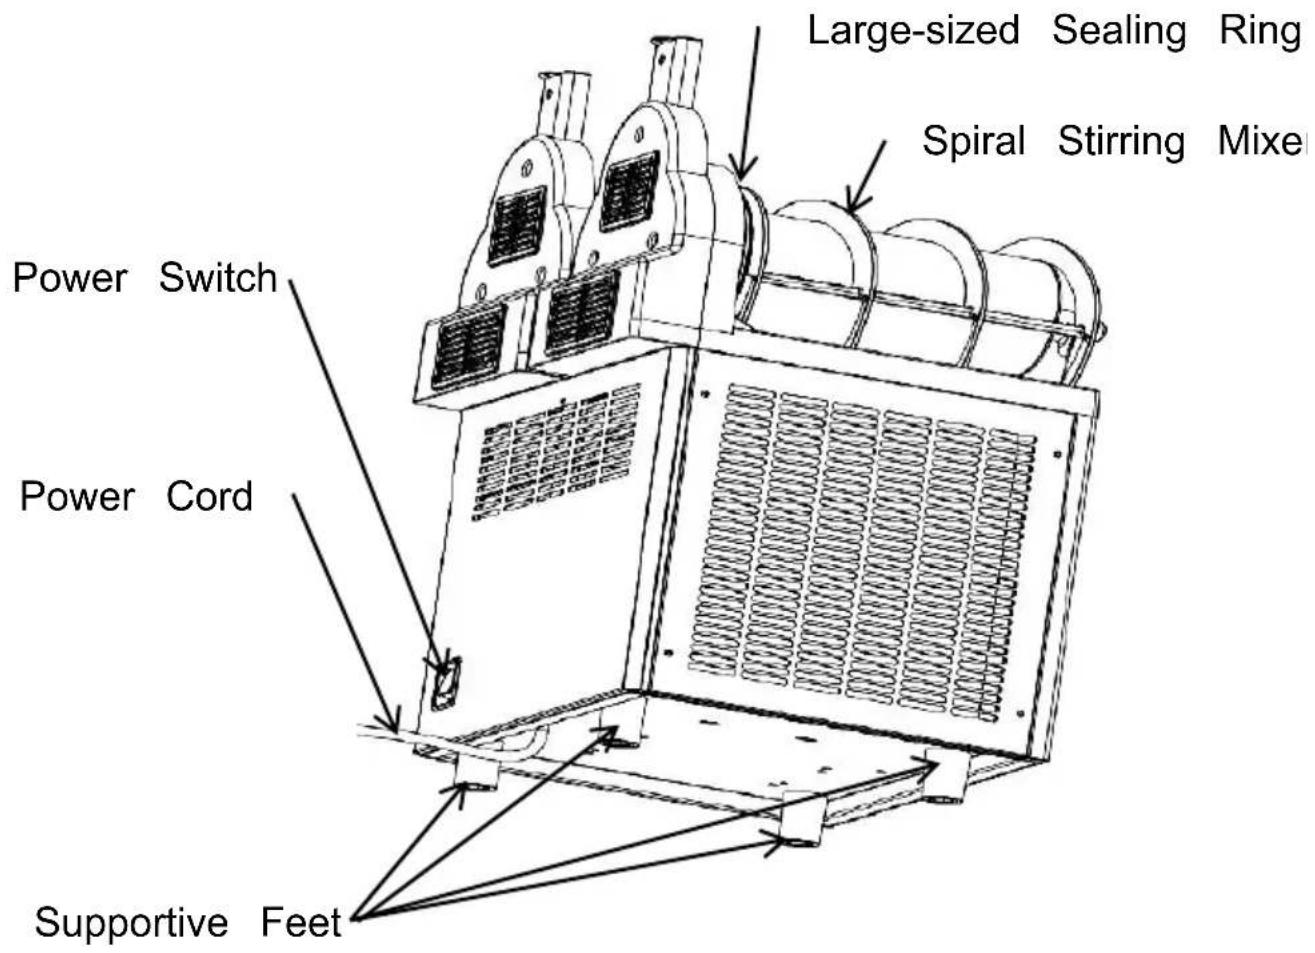
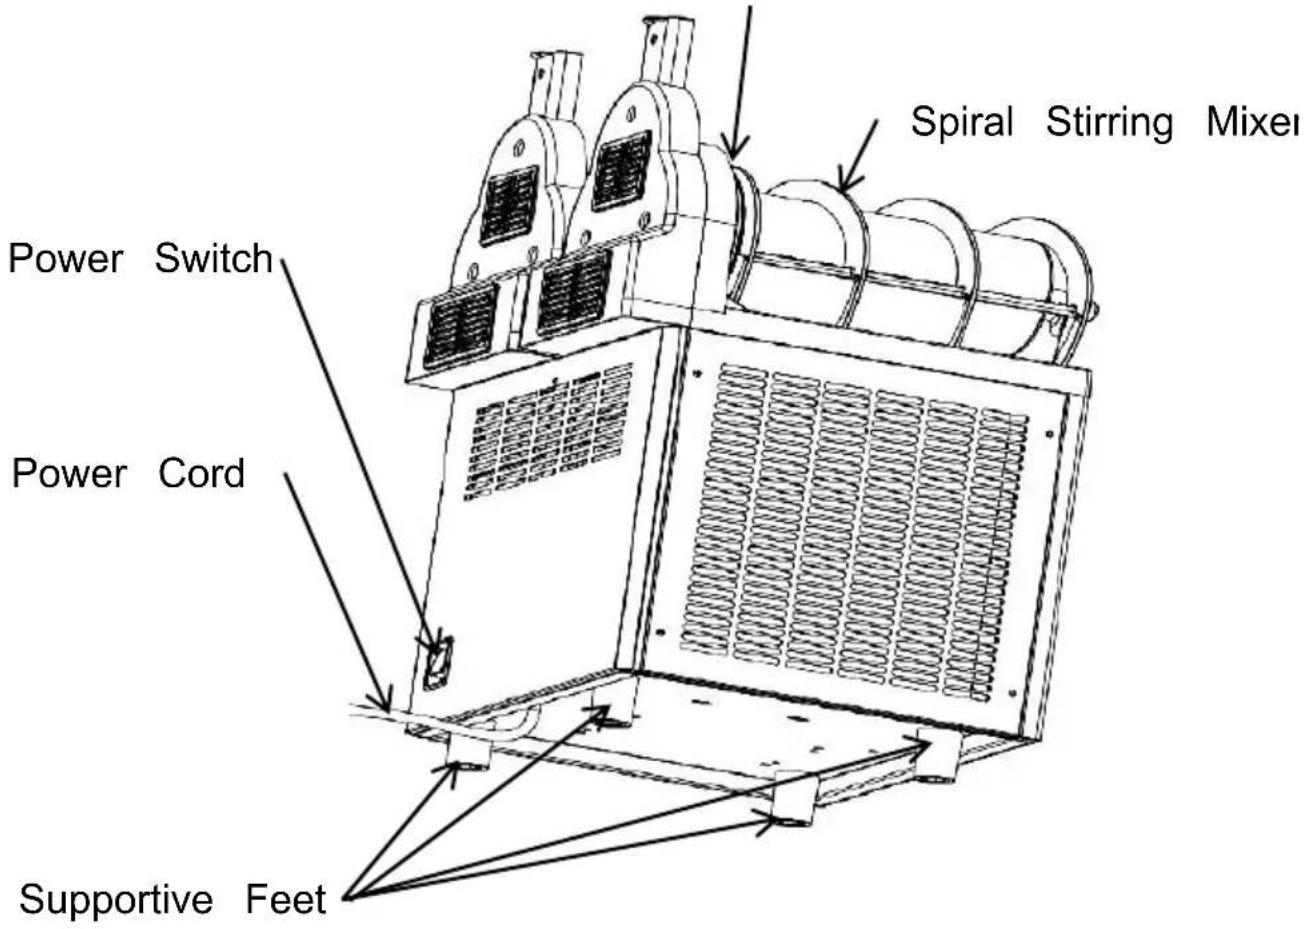
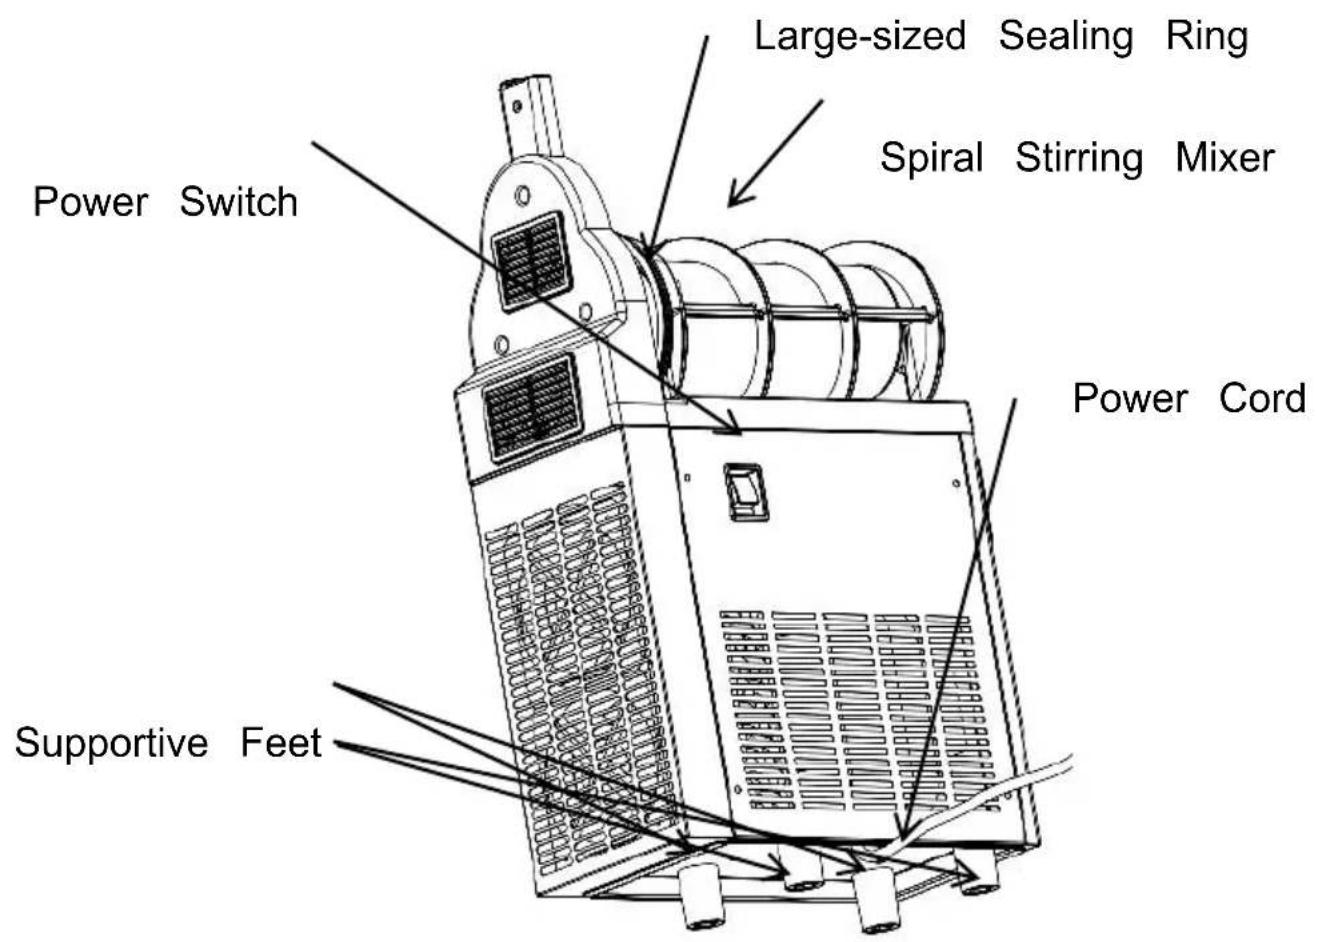
Supportive Feet
![graph TD A["①"] --> B[" "] C["②"] --> D[" "] E["③"] --> F["LEFT MIXING"] G["④"] --> H["MID MIXING"] I["⑤"] --> J["RIGHT MIXING"] K["⑥"] --> L["SET"] M["⑦"] --> N["ADD"] O["⑧"] --> P["SUBTRACT"] Q["⑨"] --> R["LIGHTING"] S["⑩"] --> T["COLDDRINK"] U["⑪"] --> V["SLUSH"] W["⑫"] --> X["15"] Y["⑬"] --> Z["…](/content/2026/04/737529/images/0dc6b972577d6ccb80e40c20344d39a6d6ea0b39f6e325baa69bec85f26dcac2.jpg)
| 1 Left LED Panel | 2 Right LED Panel | 3 Mixing Indicator for the Left Tank |
| 4 Mixing Indicator of the Middle Tank | 5 Mixing Indicator of the Right Tank | 6 Mixing Button of the Left Tank |
| 7 Mixing Button for the Middle Tank | 8 Mixing Button for the Right Tank | 9 Setting Button |
| 10 Adjusting Button + | 11 Adjusting Button - | 12 Lightning On/Off Button |
| 13 Cooling Button for Three Tanks | 14 Slush Making Button for Three Tan | 15 Light Indicator |
| 16 Cooling Indicator Three Tanks | 17 Slush Making Indicator for Three Ta | |
PREPARATION
- Upon arrival of the slush machine, remove all the packaging material and place it on a flat level surface. Let it sit quietly for 24 hours to allow the compressor's lubricating oil to settle before use. Failure to do so may cause easy damage to the compressor.
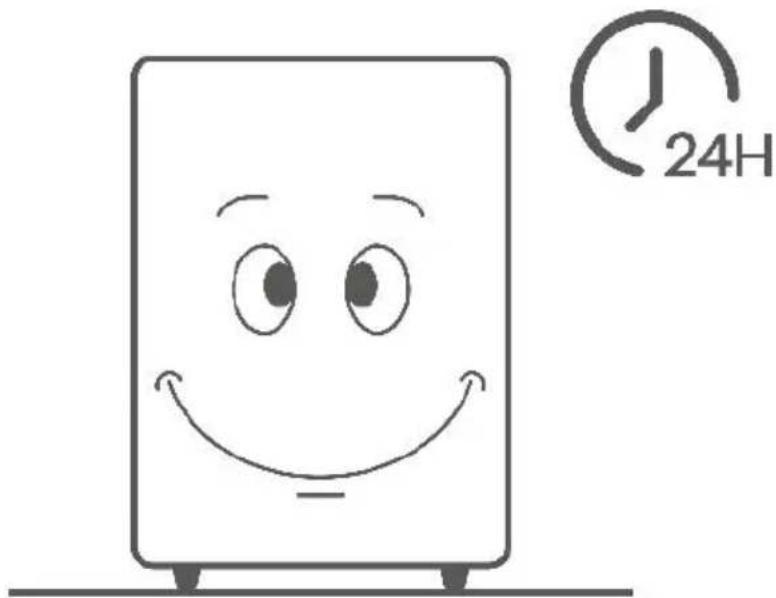
*Ensure the slush machine is positioned on a flat and level surface.

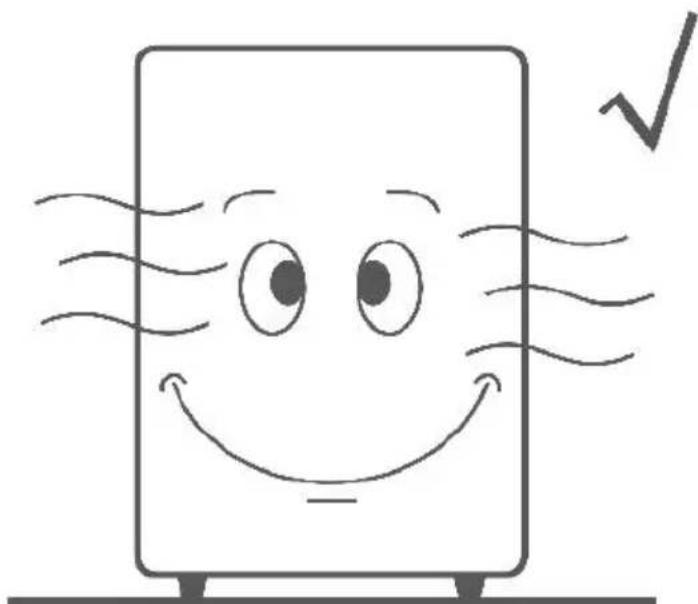
*Place the machine in a well-ventilated room to facilitate air circulation for its cooling system.
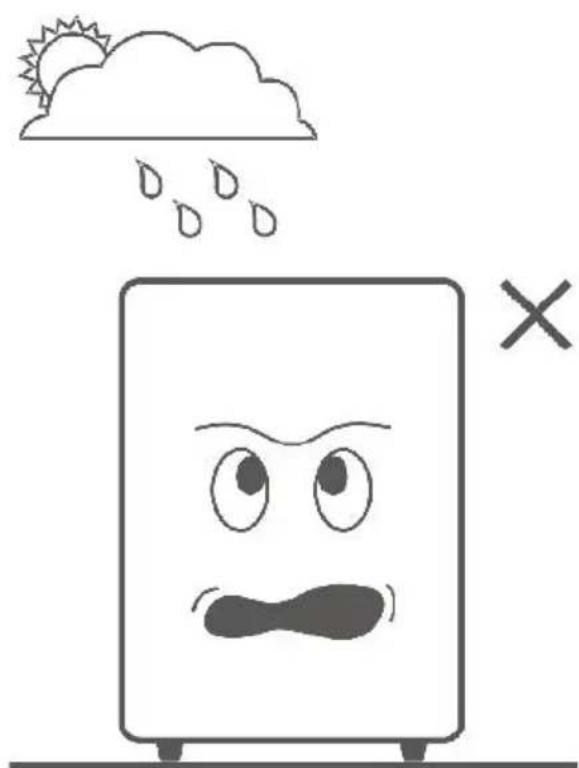
*Avoid exposure to direct sunlight, rain, extreme temperatures, or heat sources.
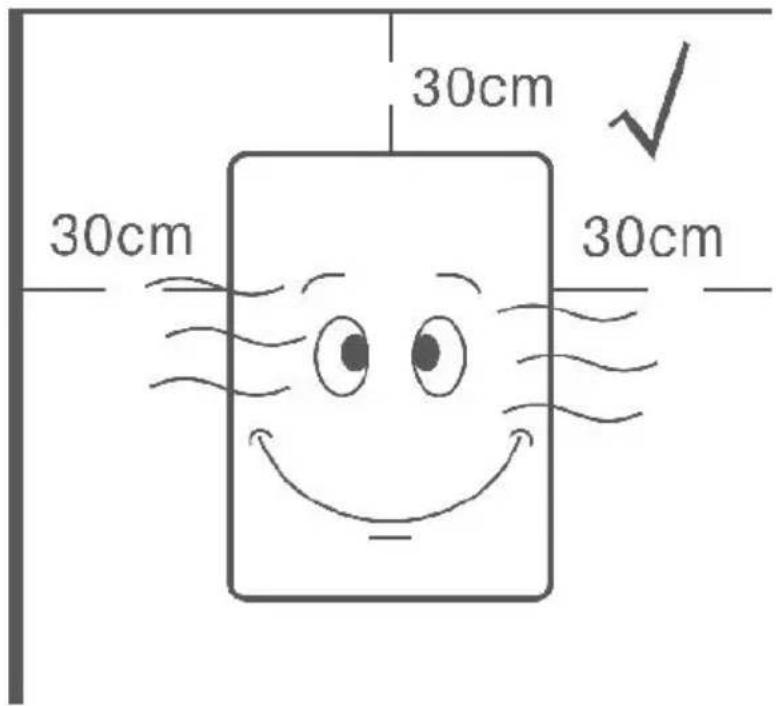
*Maintain at least 30cm of space around all sides of the machine for ventilation.
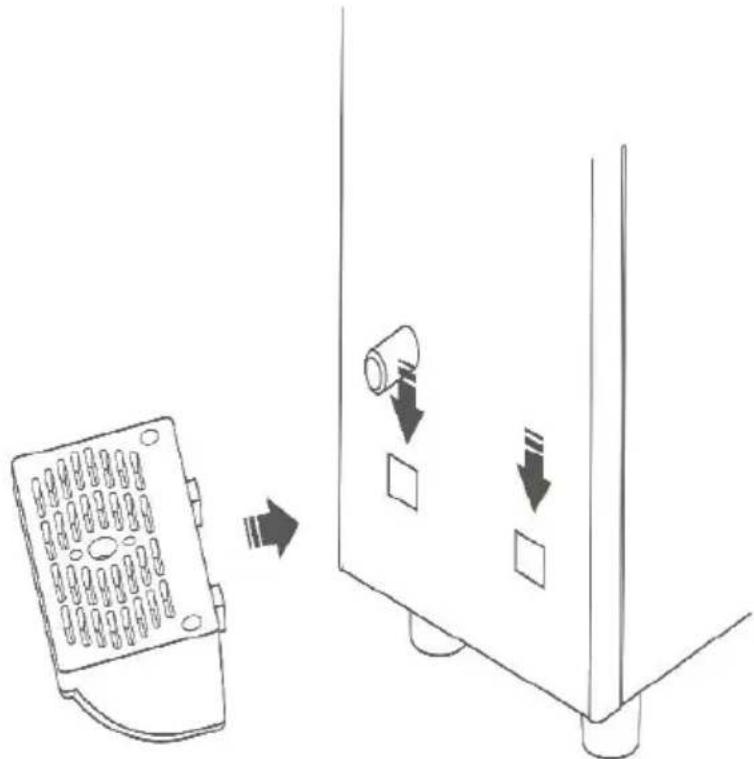
- Install the drip tray(s) into the designated slots in the slush machine.
- Clean the slush machine before the initial use.
Step 1:
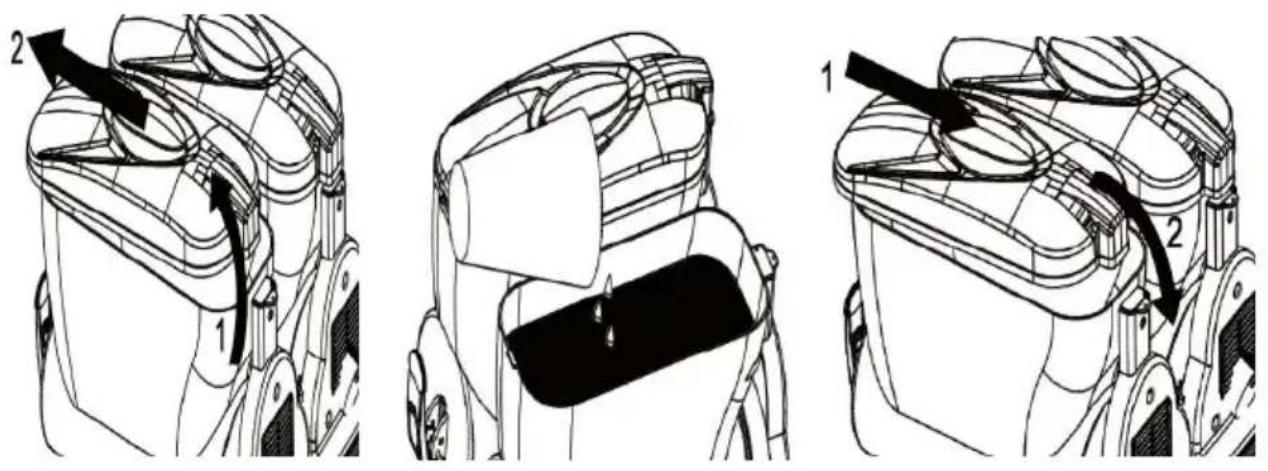
Open the tank cover(s), pour an adequate amount of cleaning water into the tank(s) using a container, and securely close the tank cover(s). Ensure the water level does not exceed the indicated maximum level marked on the tank(s).
Step 2:
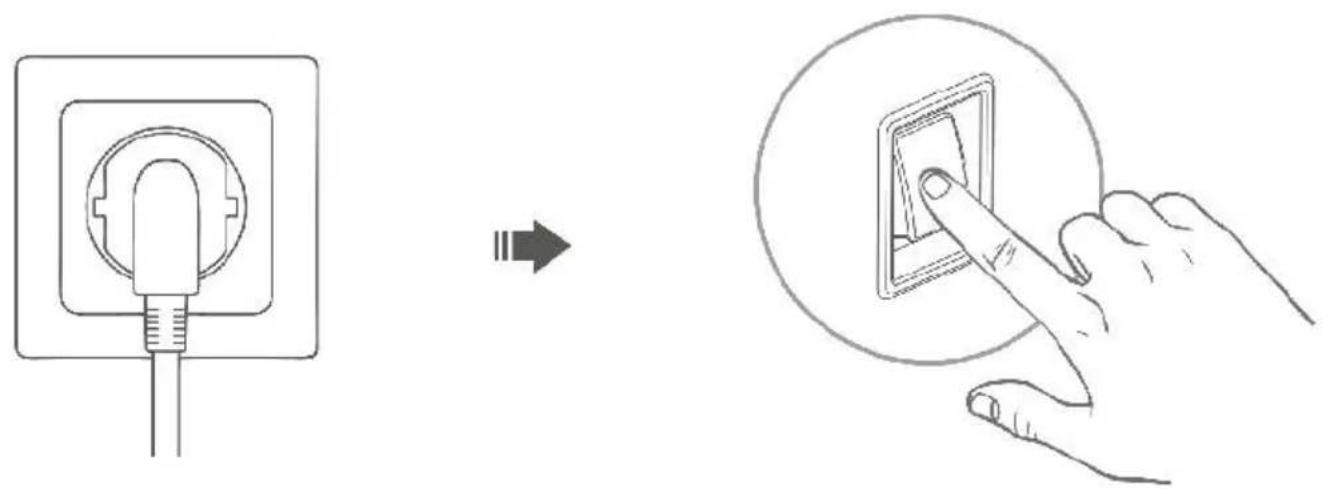
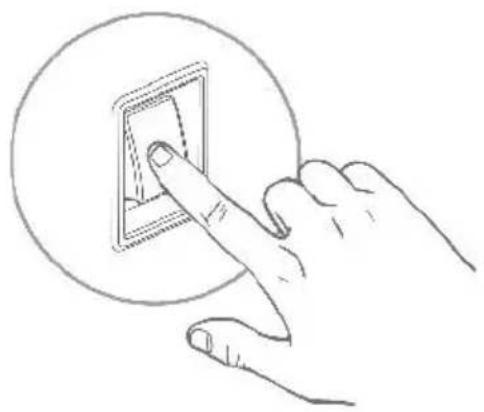
Connect the slush machine's power cord and turn on the power switch.
Step 3:
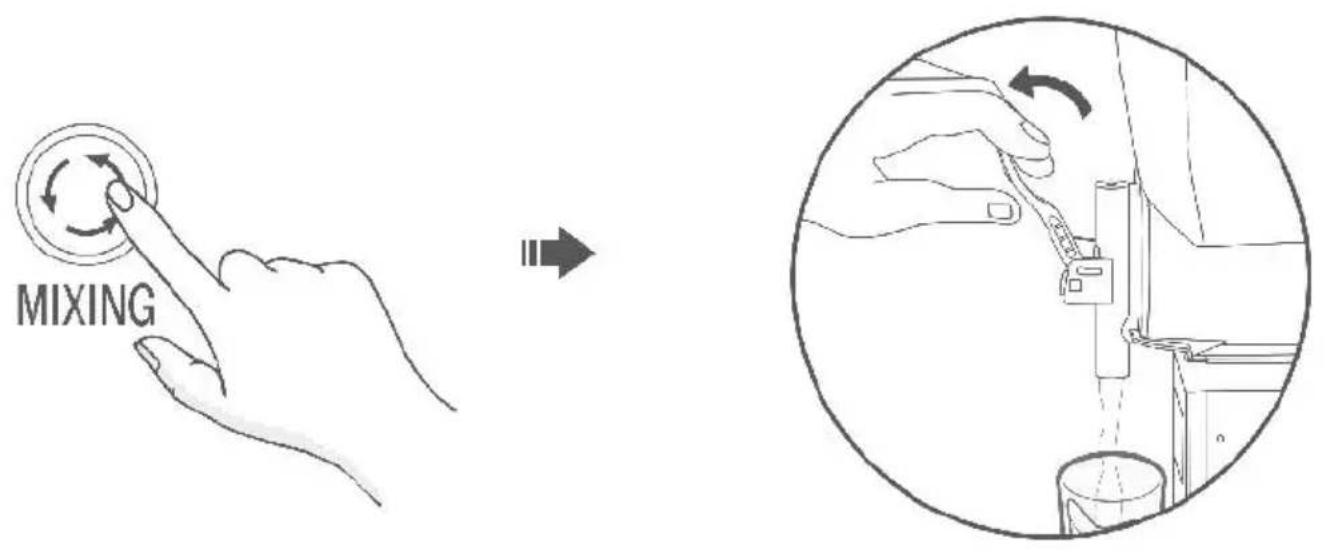
Press the mixing button to allow the machine to stir for approximately 5 minutes. Then use a container to drain the water by pulling the discharge handle.
★ Tips:
*Avoid pouring water directly onto the machine to prevent damage. *If the machine remains unused for an extended period, run it for 4 to 5 hours monthly.
Step 4:
Turn off the power switch and unplug the machine to make it ready for slush making.
Note:
Repeat steps 1 to 4 at least 2-4 times to thoroughly clean the slush machine.
OPERATION GUIDE
Never power on the slush machine before pouring the ingredients into the tank(s).
1.X-150
Preparing Ingredients
Step 1:
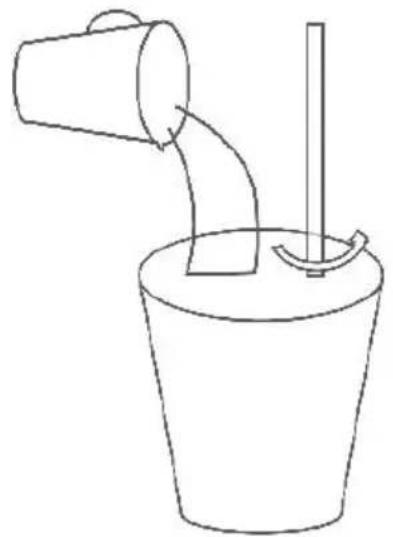
Dilute the concentrate as per the manufacturer's instructions in a suitable container. Ensure a minimum sugar content of 13% to prevent potential
machine damage.
13% Sugar
Step 2:
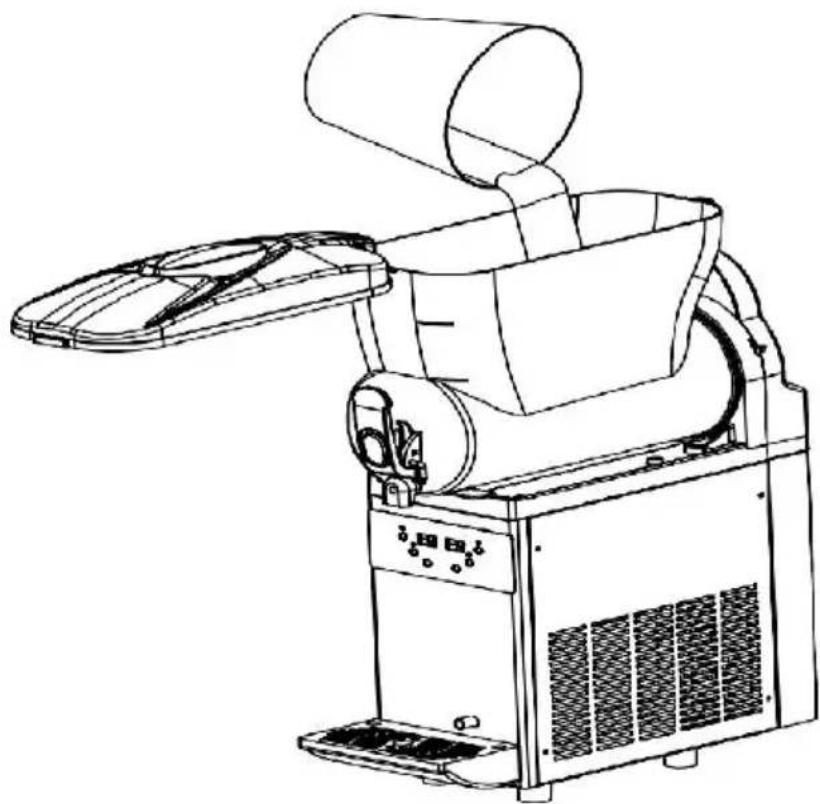
Open the tank cover, pour the diluted concentrate into the tank (Minimum Level 5.5L), and securely close the cover.
Notes:
①Pour concentrate only when the machine is turned off or unplugged. ②Avoid pouring hot liquids exceeding 24°C/75.2°F into the tank.
③Maintain the liquid volume within the indicated minimum and maximum levels on the tank. ④Avoid inserting any body parts into the machine while it's operational.
Power Connection
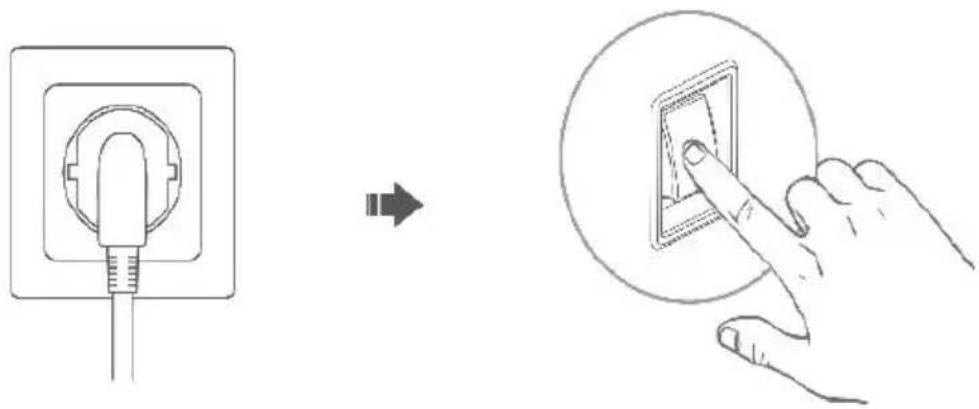
Plug the power cord into a suitable socket, then turn on the power. The LED panels will indicate the tank's current temperature.
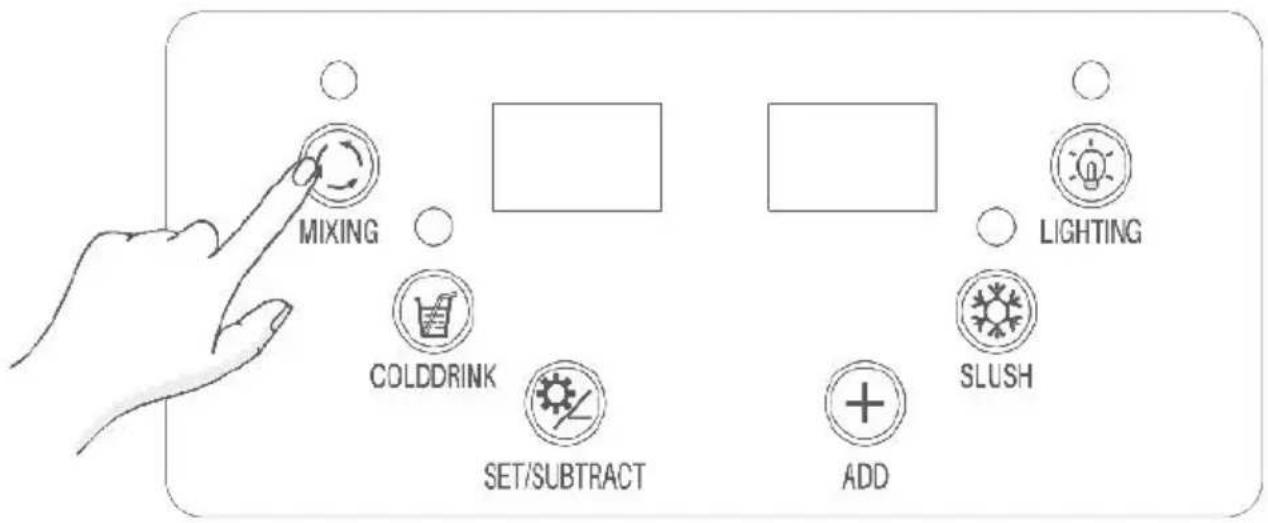
Mixing Function (Must-do)
Press the MIXING button on the control panel to initiate mixing the ingredients within the tank.
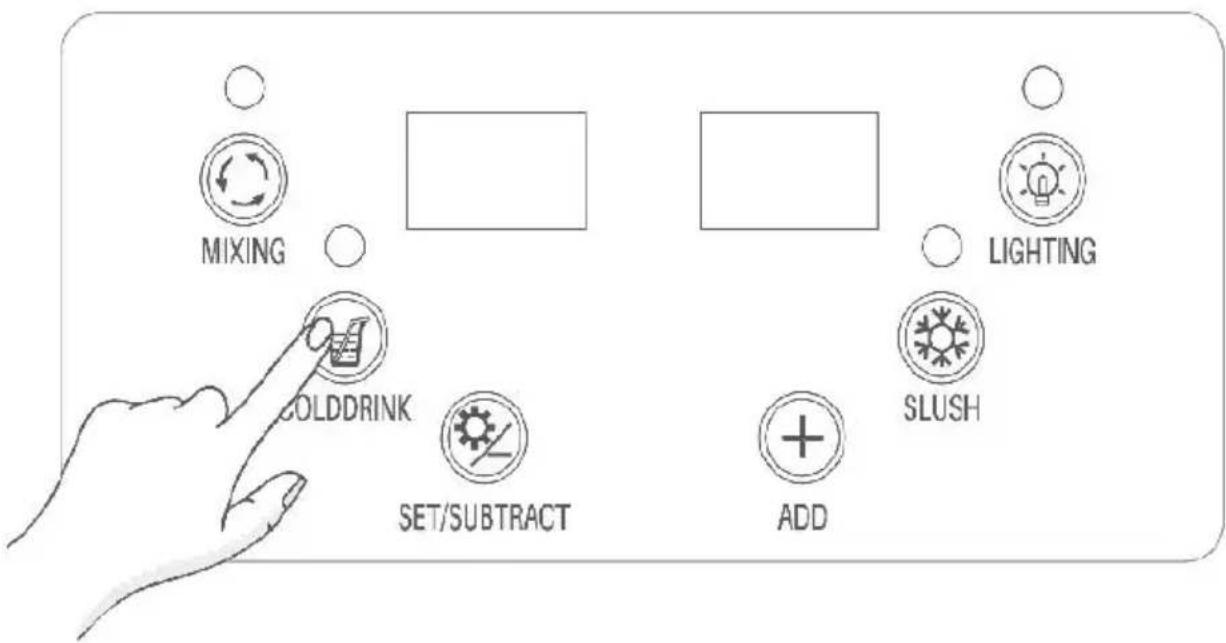
Cooling Function
Once the mixing function is active, press the COLD DRINK button to cool the ingredients.
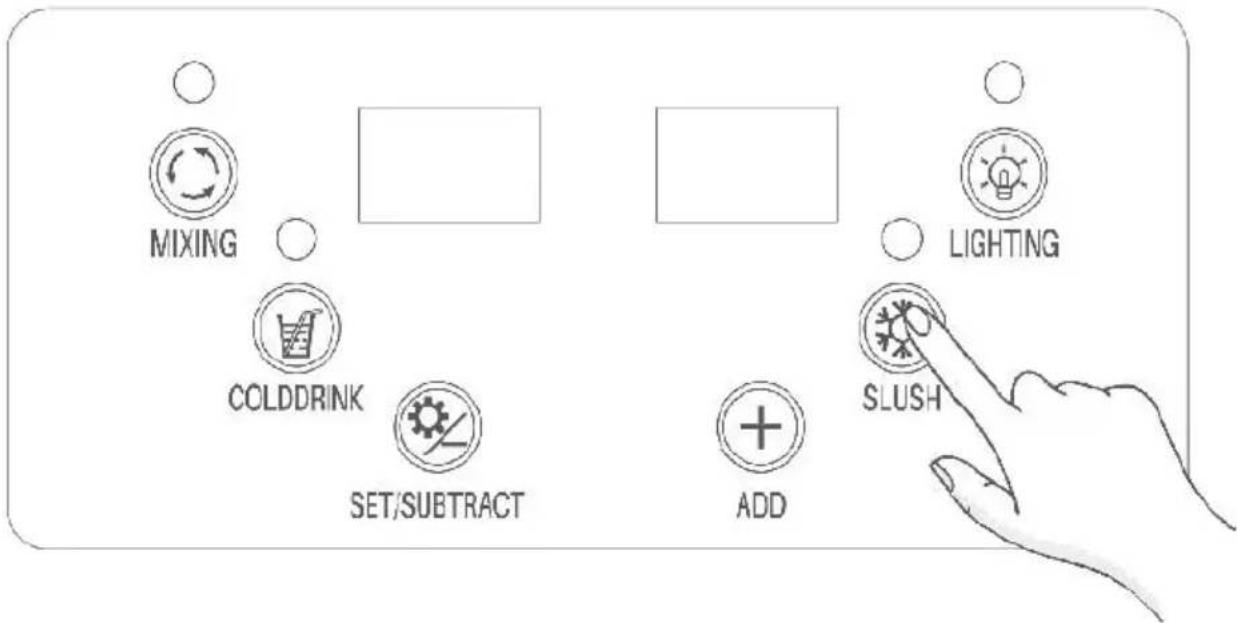
Slush Making Function
While the mixing function is active, press the SLUSH button to create as desired.
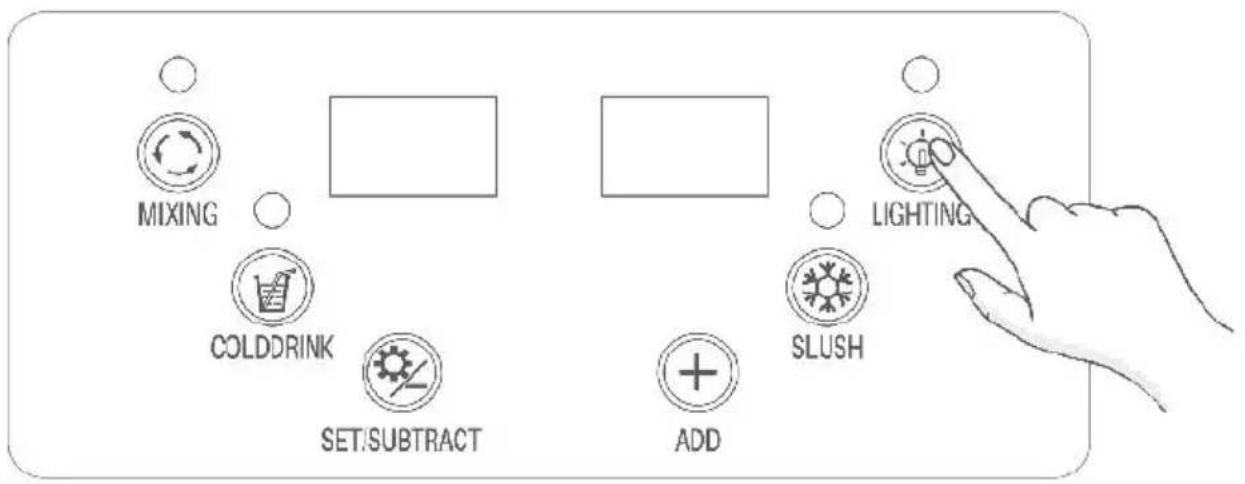
Lighting Control
Briefly press the LIGHTING button to toggle the tank's lighting.
Settings
Press the SET/SUBTRACT button to access parameter settings.
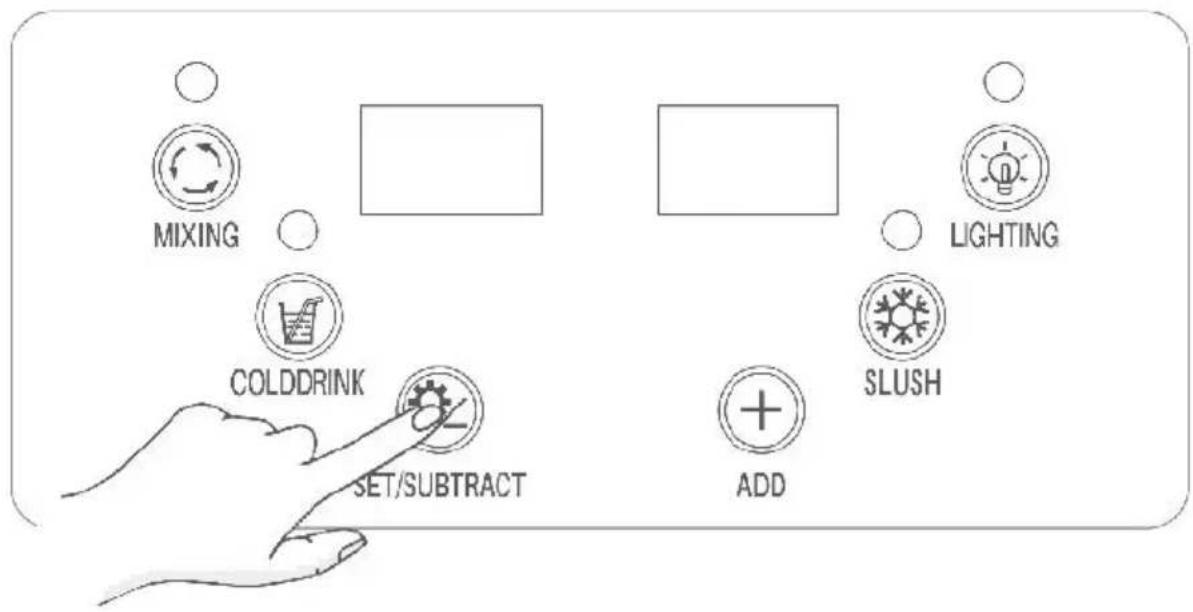
- If the left LED panel displays SL1, it represents the slush temperature setting for the tank. Use the ADD or SET/SUBTRACT button to adjust temperature (the default temperature is -2°C / 28.4°F, and is displayed on the right LED panel) for slush making.
- If the left LED panel shows Cd1, it represents the cooling temperature setting for the tank. Use the ADD or SET/SUBTRACT button to adjust temperature (the default temperature is 5°C / 41°F, and is displayed on the right LED panel) for making cold drinks.
★ Tips:
① Activating a function will illuminate its corresponding indicator. ② When the slush making function is active, the indicator can display statuses: Solid On: The machine's compressor is running.
Flashing: The machine's compressor is off.
Both statuses are normal.
Get Cold Drink or Slush
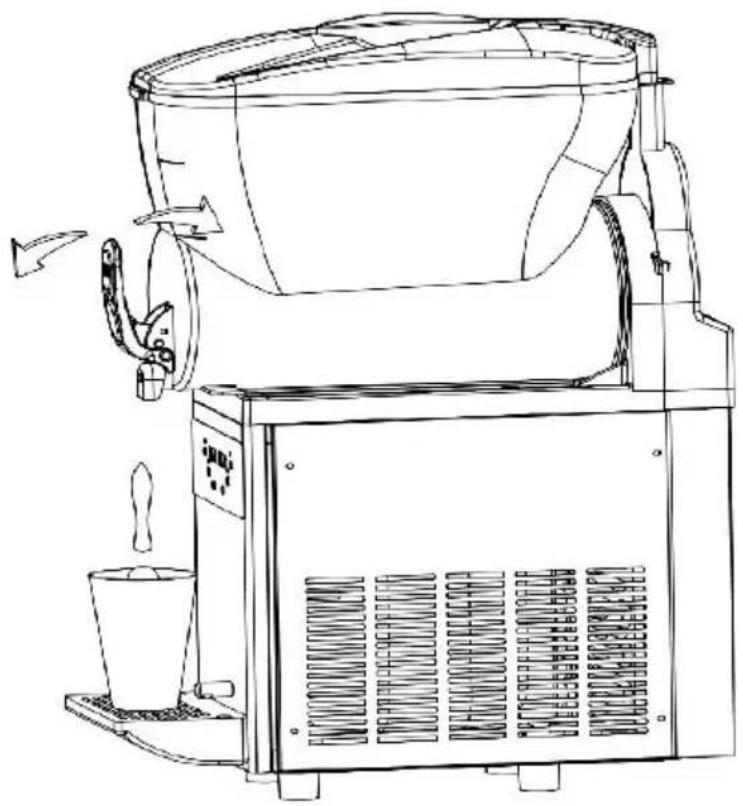
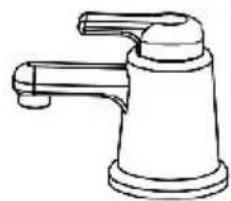
To dispense your cold drink or slush, simply pull or push the dispense handles.
2.X-300
Preparing Ingredients
Step 1:
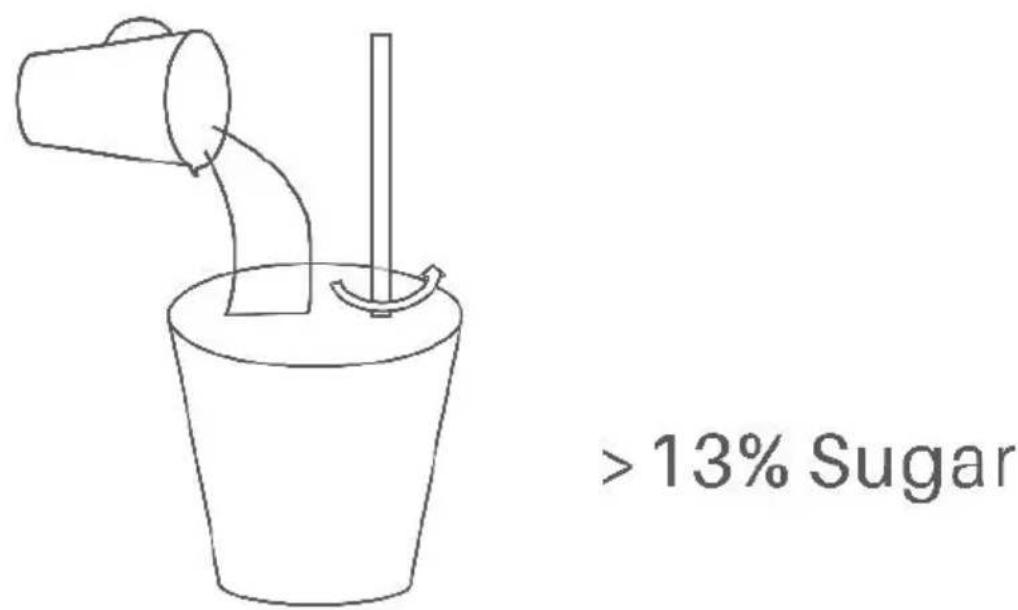
Dilute the concentrate as per the manufacturer's instructions in a suitable container. Ensure a minimum sugar content of 13% to prevent potential machine damage.
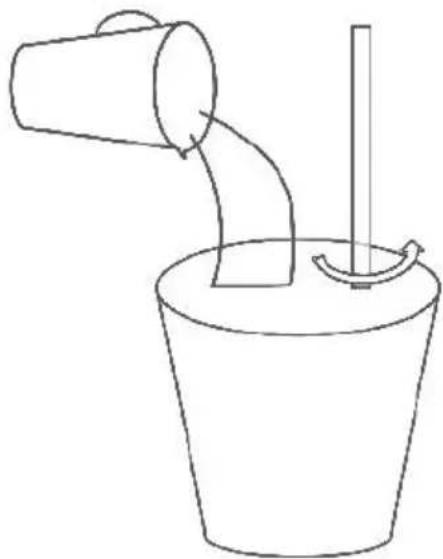
13% Sugar
Step 2:
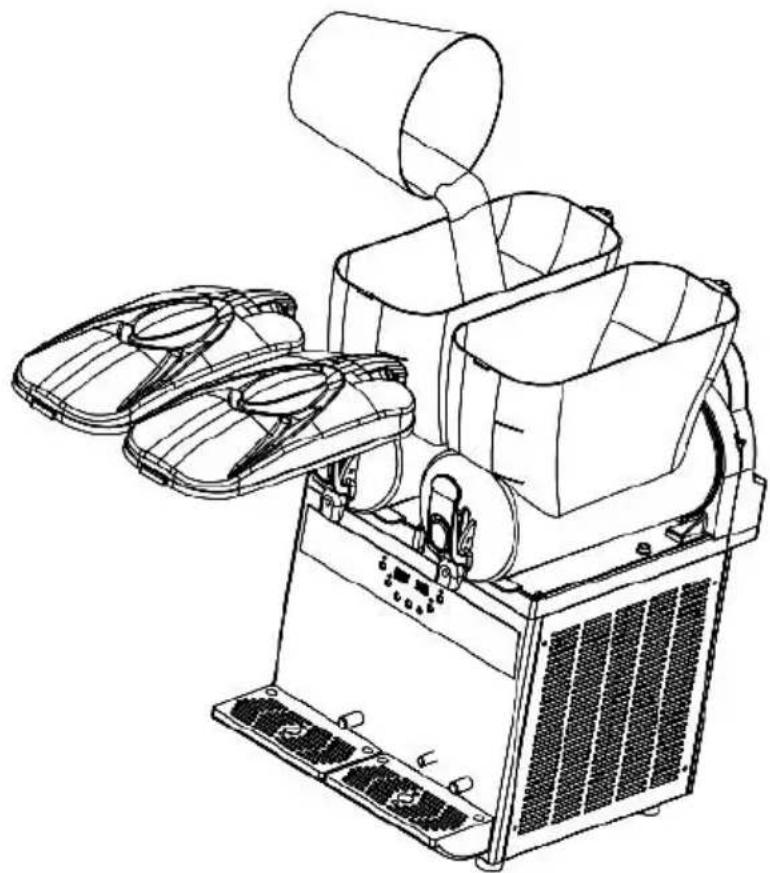
Open both tank covers, pour the diluted concentrate into each tank (Minimum Level 5.5L), and securely close the covers.
Notes:
①Pour concentrate only when the machine is turned off or unplugged. ②Avoid pouring hot liquids exceeding 24°C/75.2°F into the tanks.
③Maintain the liquid volume within the indicated minimum and maximum levels on the tanks.
④Avoid inserting any body parts into the machine while it's operational.
Power Connection
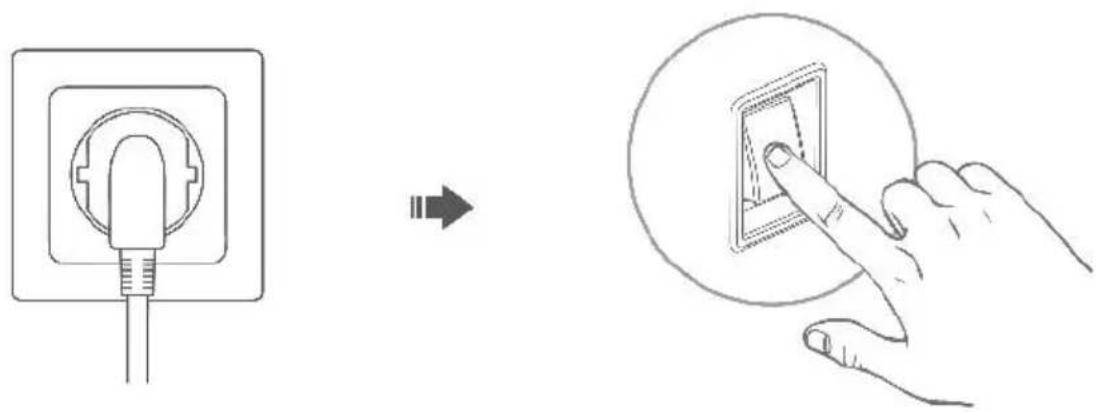
Plug the power cord into a suitable socket, then turn on the power switch. The LED panels will indicate the current temperature in the tanks.
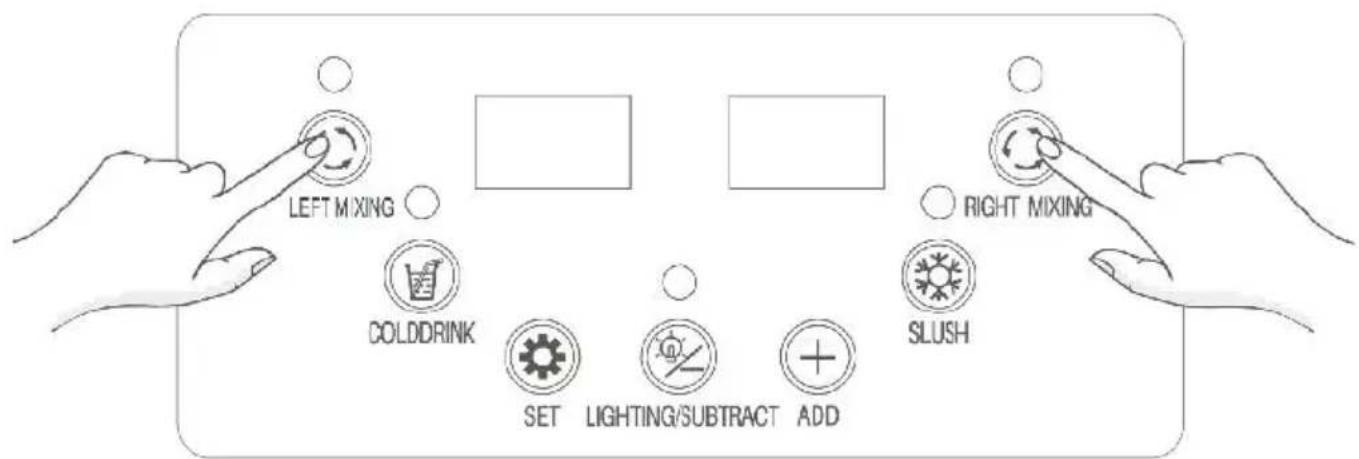
Mixing Function (Must-do)
Press the mixing buttons on the control panel to initiate mixing the ingredients in both tanks.
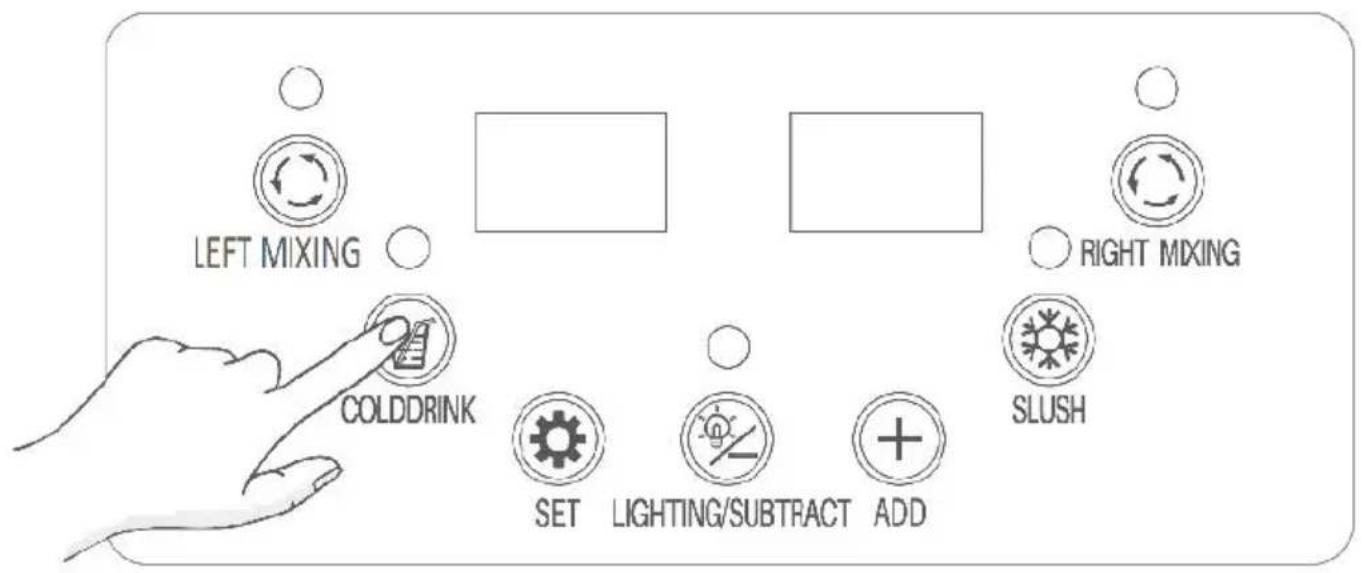
Cooling Function
Once the mixing function is active, press the COLDDRINK button to cool the ingredients in both tanks.
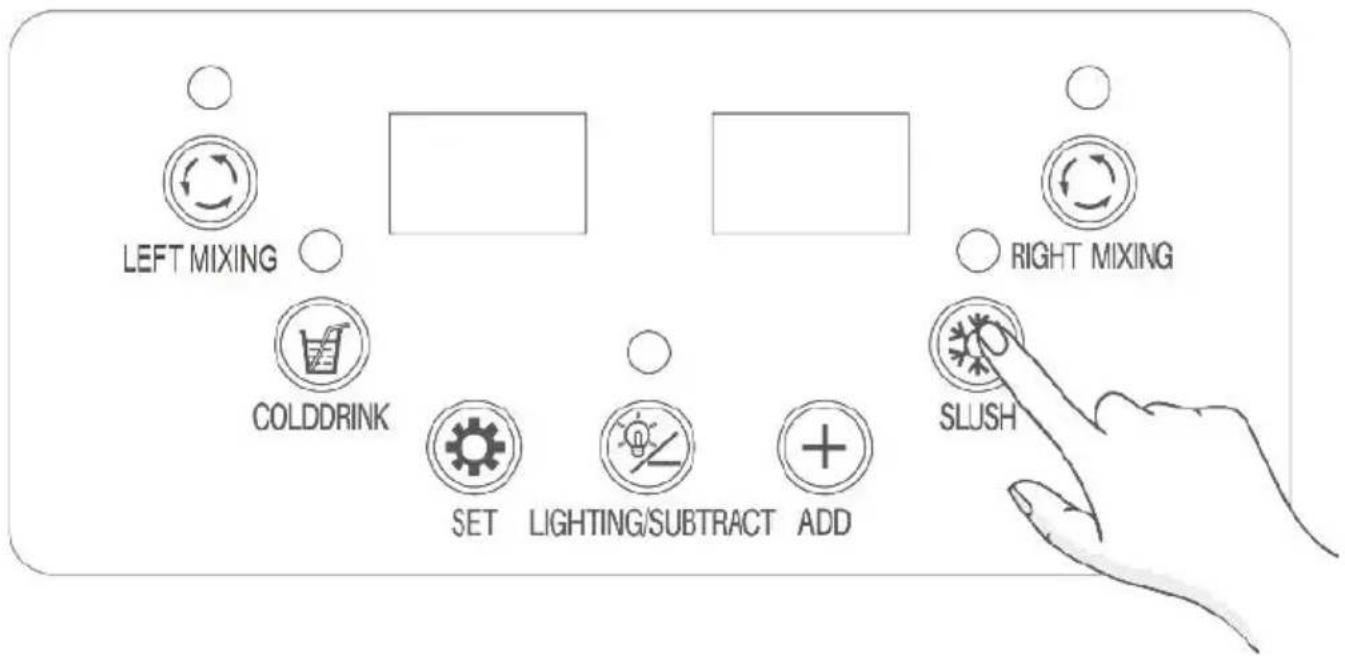
Slush Making Function
While the mixing function is active, press the SLUSH button to create as needed.
Lighting Control
Briefly press the LIGHTING/SUBTRACT button to toggle the tanks' lighting.
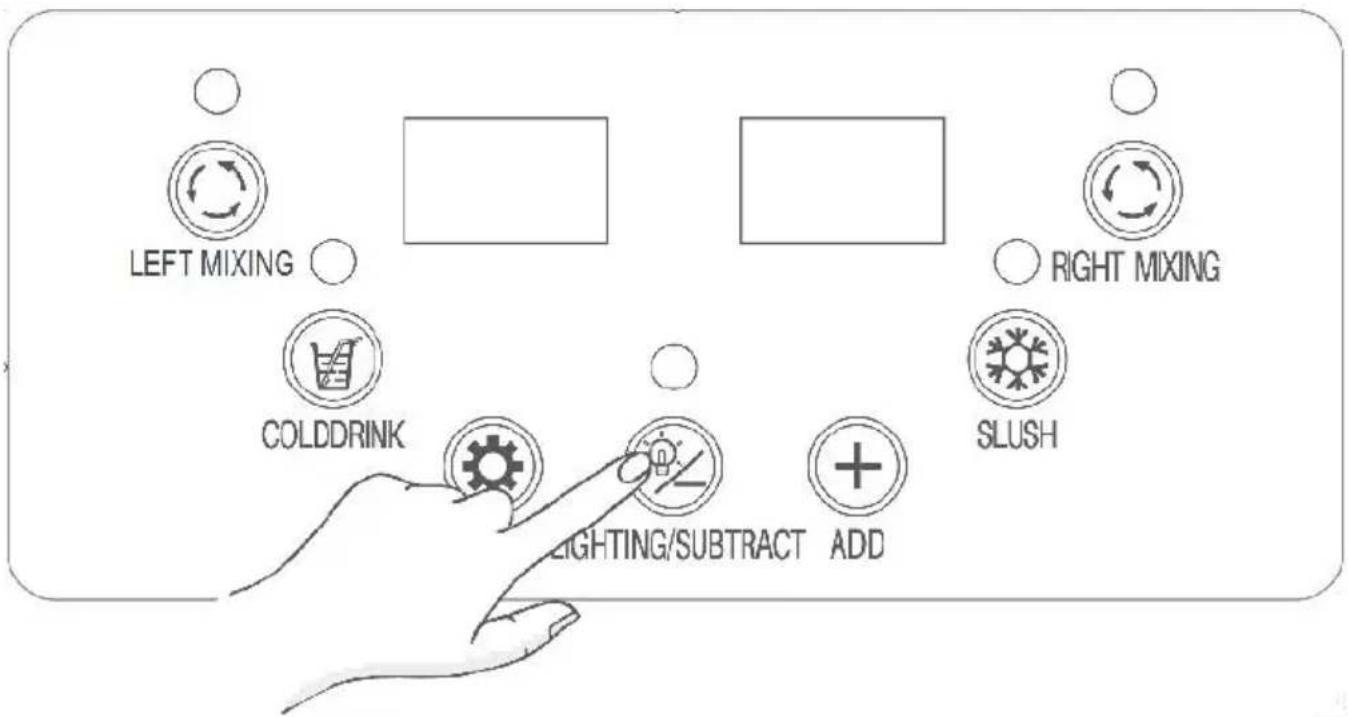
Settings
Press the SET button to access the cold drink and slush temperature settings.
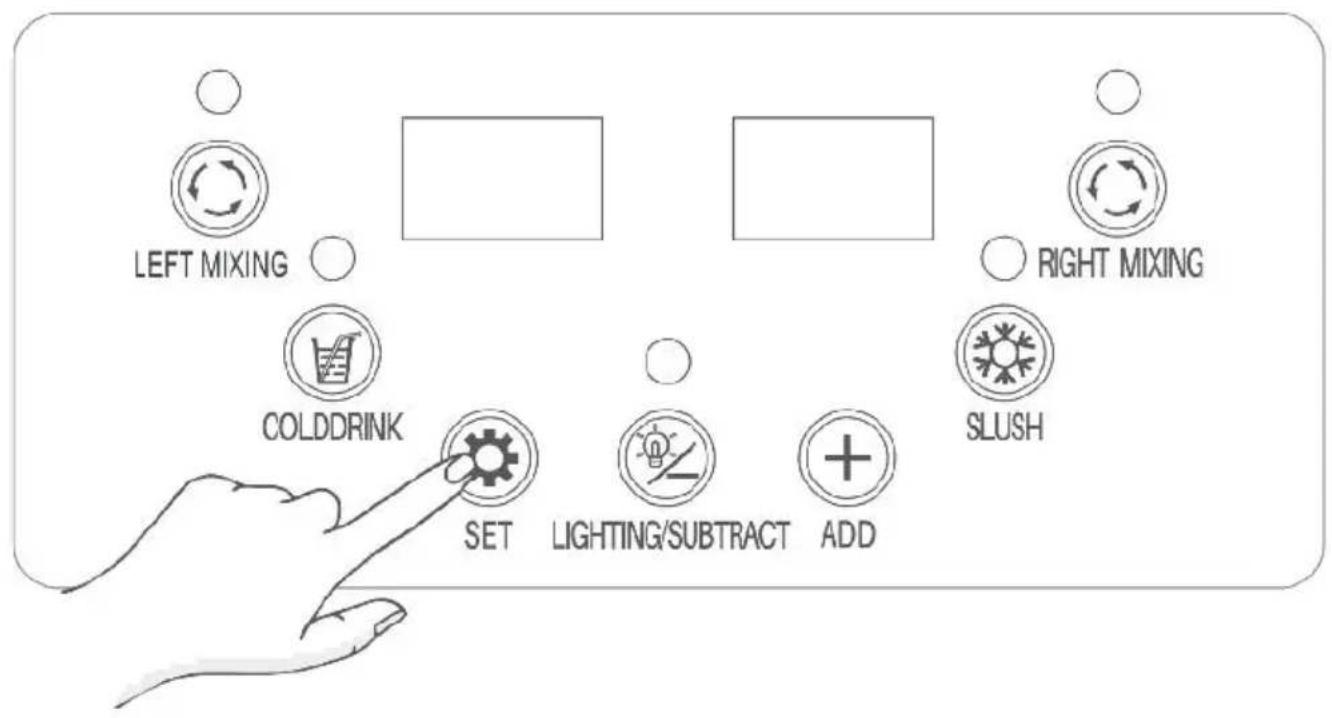
- If the left LED panel displays SL1, it signifies the slush temperature
- If the left LED panel displays SL1, it signifies the slush temperature setting for the left tank. Use the ADD or LIGHTING/SUBTRACT button to adjust the temperature (the default temperature is -2°C/28.4°F, and is displayed on the right LED panel) for slush making.
- If the left LED panel displays Cd1, it signifies the cooling temperature setting for the left tank. Use the ADD or LIGHTING/SUBTRACT button to adjust the temperature (the default temperature is 5°C/41°F, and is displayed on the right LED panel) for making cold drink.
- If the left LED panel displays SL2, it signifies the slush temperature for the right tank. Use the ADD or LIGHTING/SUBTRACT button to adjust the temperature (the default temperature is -2°C/28.4°F, and is displayed on the right LED panel) for slush making.
- If the left LED panel displays Cd2, it signifies the cooling temperature setting for the right tank. Use the ADD or LIGHTING/SUBTRACT button to adjust the temperature (the default temperature is 5°C/41°F, and is displayed on the right LED panel) for making cold drink.
★Tips:
① Activating a function will illuminate its corresponding indicator. ② When the slush making function is active, the indicator can display statuses.
Solid On: The machine's compressor is running.
Flashing: The machine's compressor is off.
Both statuses are normal.
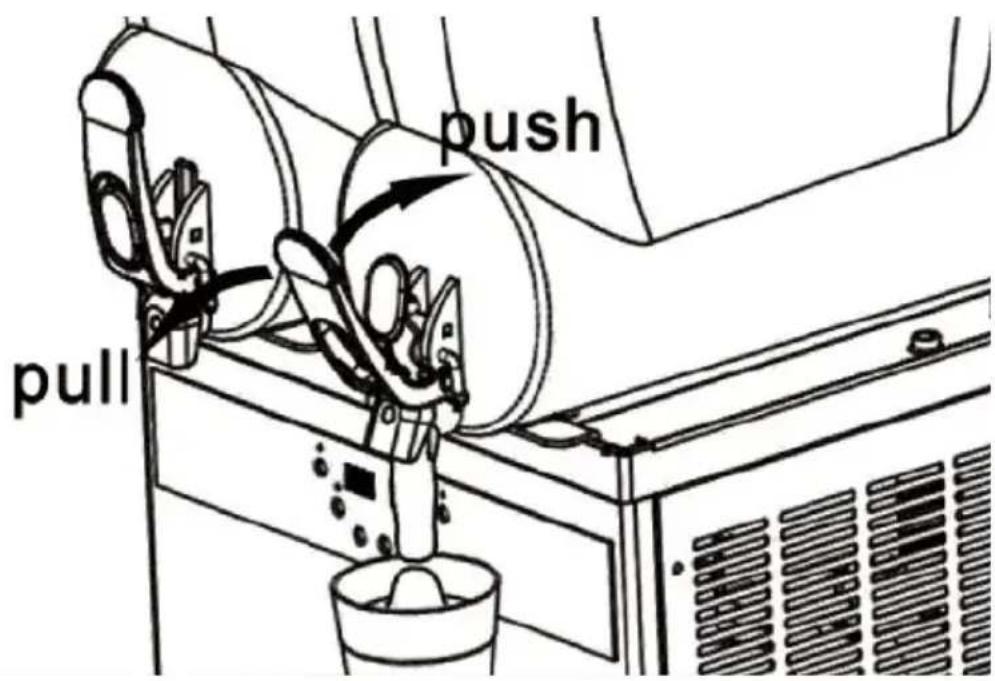
Get Cold Drink or Slush
To dispense your cold drink or slush, simply pull or push the dispensing handles.
3.X-450
Preparing Ingredients
Step 1:
Dilute the concentrate as per the manufacturer's instructions in a suitable container. Ensure a minimum sugar content of 13% to prevent potential machine damage.
Step 2:
Open the tank covers and pour the diluted concentrate into each tank (Minimum Level 5.5L). Then securely close the tank covers.
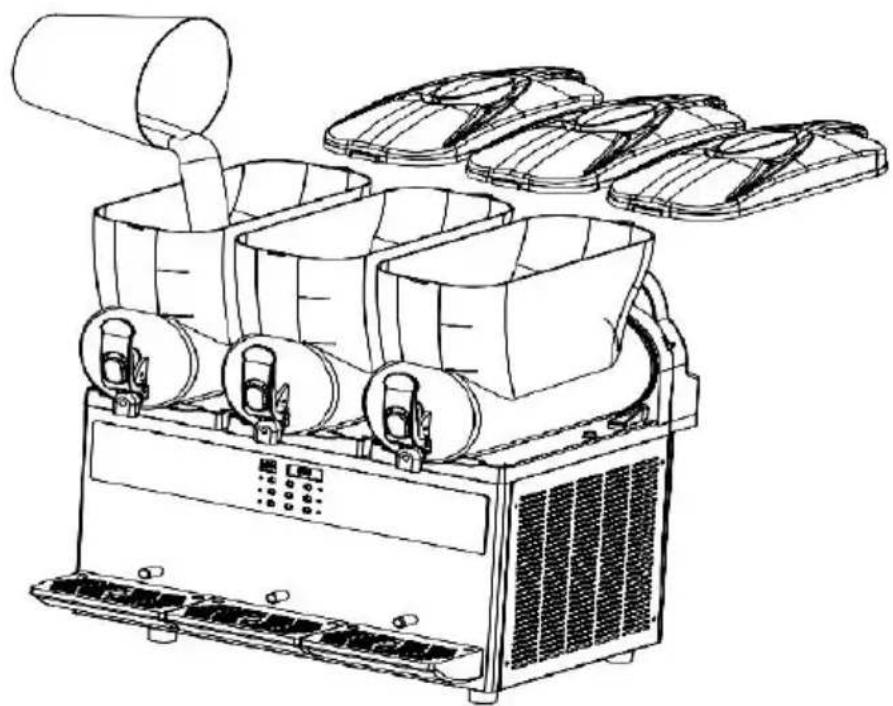
Notes:
① Only pour the concentrate into the tanks when the machine is off or unplugged. ② Do not pour hot liquid which is more than 24°C / 75.2°F into the tanks. ③ The volume of the liquid should be within the minimum and maximum levels marked on the tanks. ④ Never put your hand or fingers or any parts of your body into the machine when it's working.
Power Connection
Plug the power cord into an appropriate socket, then turn on the power switch. The LED panels will indicate the current temperature in the tank.
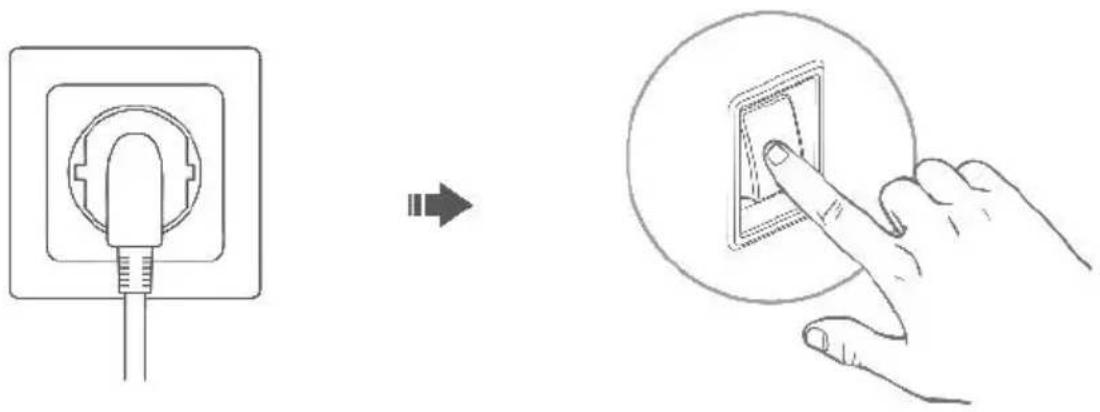
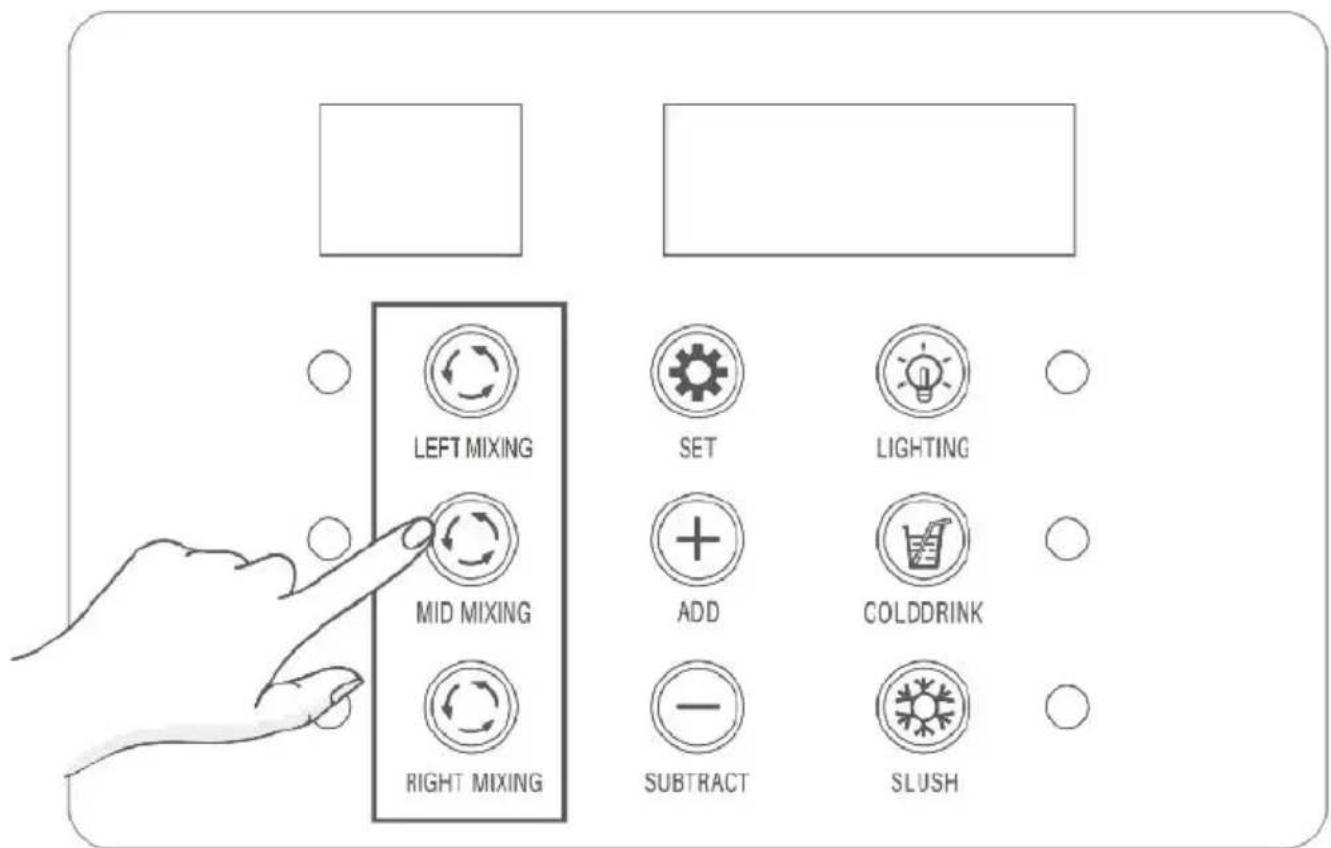
Mixing Function (Must-do)
Press the mixing buttons on the control panel to initiate mixing the ingredients in the tanks.
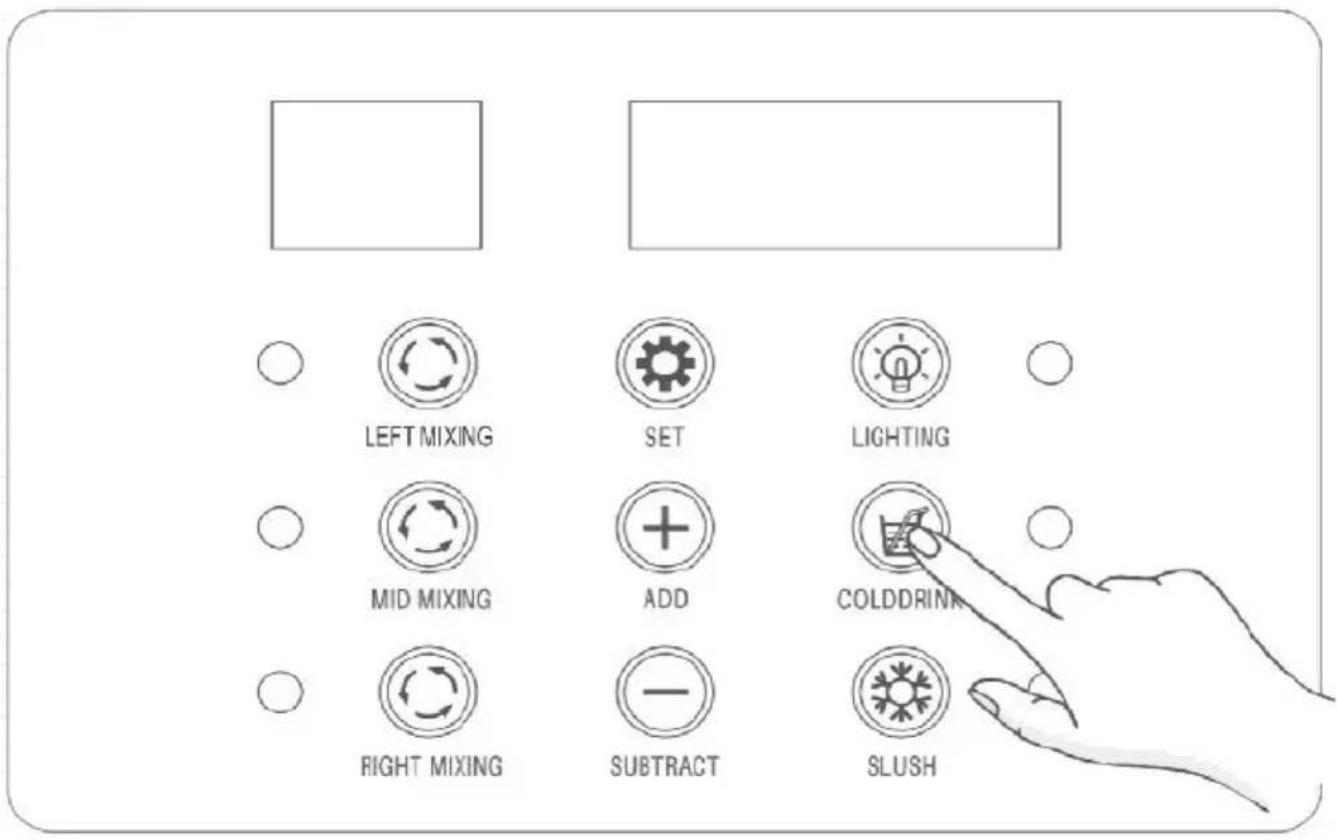
Cooling Function
Once the mixing function is active, press the COLD DRINK button to cool the ingredients in all tanks.
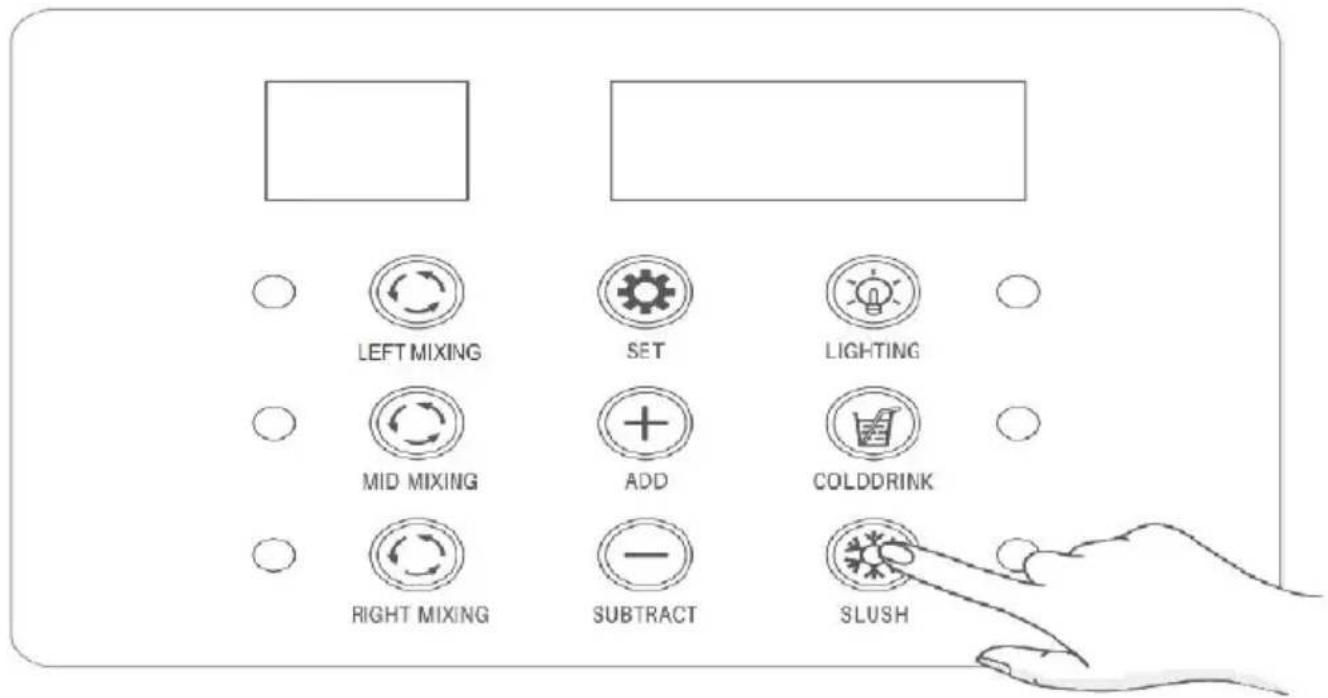
Slush Making Function
While the mixing function is active, press the SLUSH button to create slush as needed.
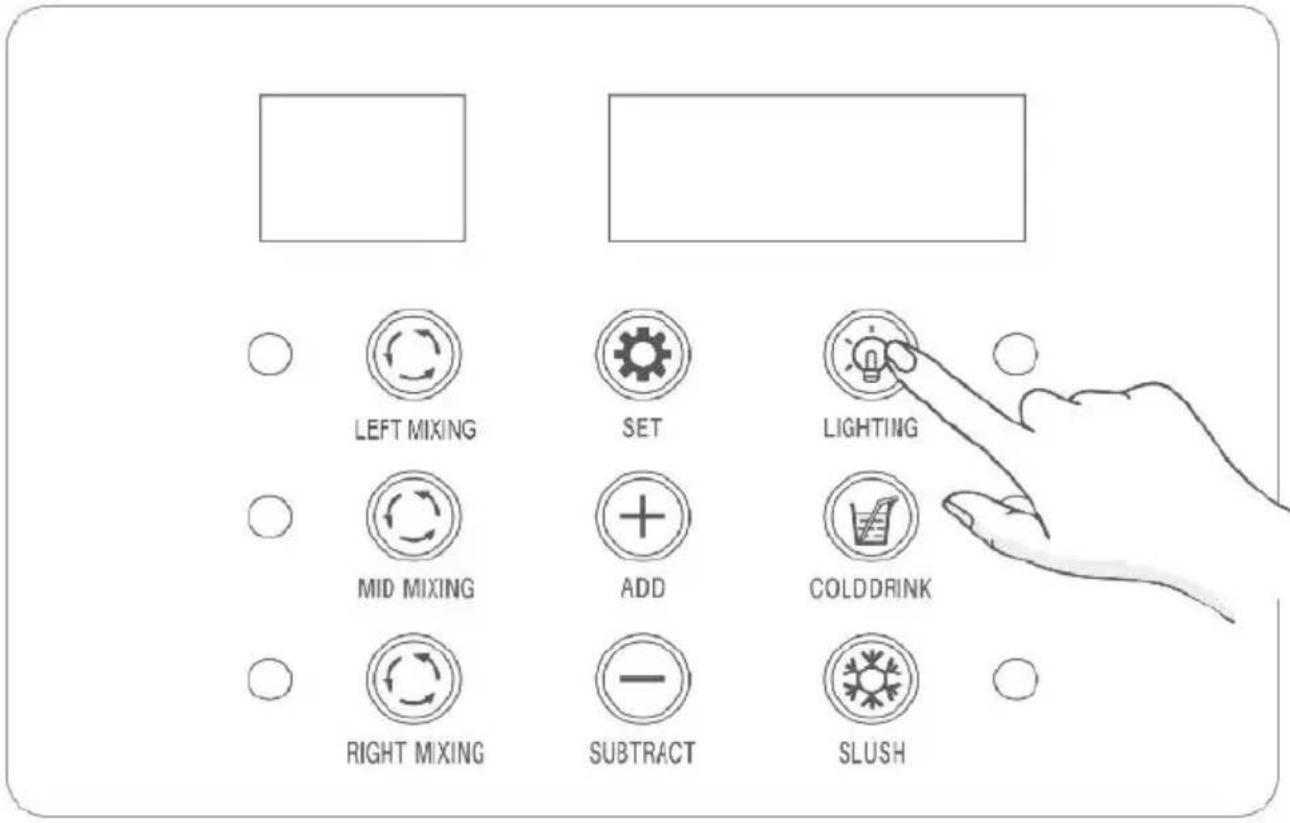
Lighting On/Off
Briefly press the LIGHTING button to toggle the tank lighting.
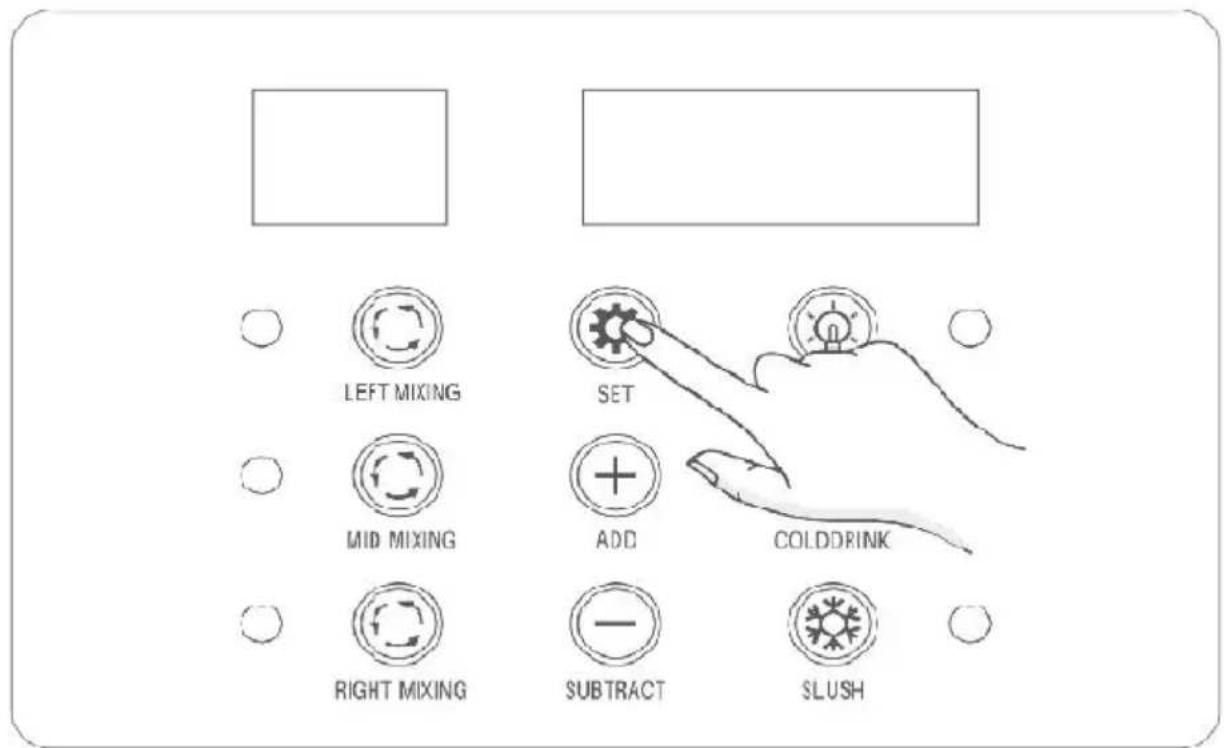
Settings
Press the SET button to access the settings for adjusting the cold drink and slush temperatures.
- If the left LED panel displays S1, it stands for the slush temperature setting of the left tank. Use the ADD or SUBTRACT button to adjust the temperature (the default temperature is -2°C / 28.4°F, and is displayed on the right LED panel) for slush making.
- If the left LED panel displays C1, it stands for the cooling temperature setting of the left tank. Use the ADD or SUBTRACT button to adjust the temperature (the default temperature is 5°C / 41°F, and is displayed on the right LED panel) for making cold drinks.
- If the left LED panel shows S2, it stands for the slush temperature of the middle tank. Use the ADD or SUBTRACT button to adjust the temperature (the default temperature is -2°C / 28.4°F, and is displayed on the right LED panel) for slush making.
- If the left LED panel displays C2, it stands for the cooling temperature setting of the middle tank. Use the ADD or SUBTRACT button to adjust the temperature (the default temperature is 5°C / 41°F, and is displayed on the right LED panel) for making cold drinks.
- If the left LED panel displays S3, it stands for the slush temperature setting of the right tank. Use the ADD or SUBTRACT button to adjust the temperature (the default temperature is -2°C / 28.4°F, and is displayed on the right LED panel) for slush making.
- If the left LED panel displays C3, it stands for the cooling temperature setting of the right tank. Use the ADD or SUBTRACT button to adjust the temperature (the default temperature is 5°C / 41°F, and is displayed on the right LED panel) for making cold drinks.
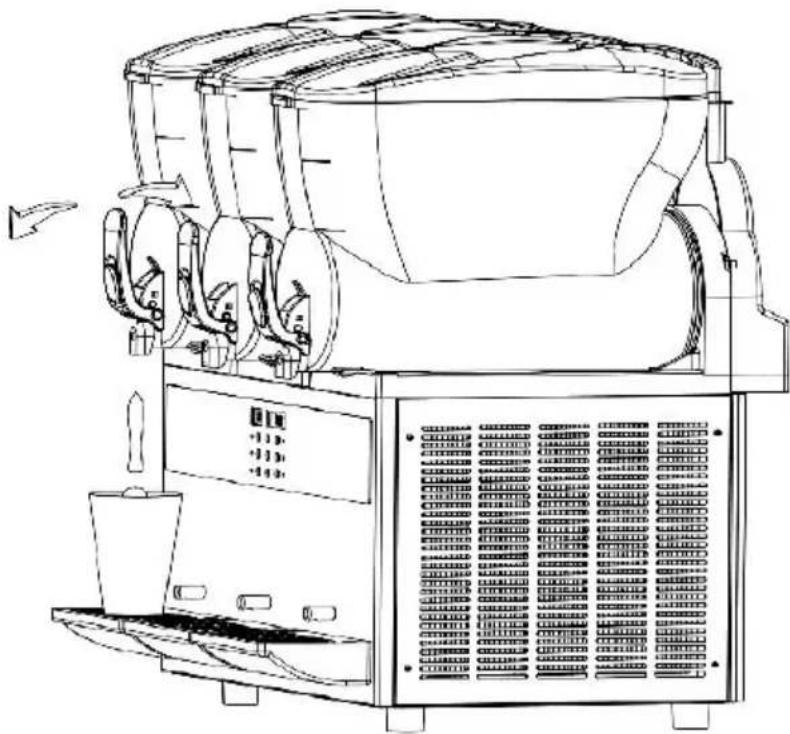
Get Cold Drink or Slush
To dispense your cold drink or slush, simply pull or push the dispensing handles.
★Tips:
①Activating a function will illuminate its corresponding indicator. ②When the slush making function is active, the indicator can display the statuses: Solid On: The machine's compressor is running.
Flashing: The machine's compressor is off.
Both statuses are normal.
CLEANING AND MAINTENANCE
Important Notes Before Cleaning
*Before cleaning or maintaining any components of the machine, ensure the power switch is turned off, and the power cord is unplugged. When performing cleaning and maintenance, follow these instructions:
*Preparation before cleaning:
-Clean utensils (container, soft brushes, soft rags).
-The temperature of clear water and hot water doesn't exceed 50°C/122°F.
-Food-grade neutral detergent.
-Food-grade disinfectant.
-Food-grade lubricant (e.g., vaseline).
*Operations during cleaning and maintenance:
-Wear protective gloves. -Avoid using strong acids, bases, or flammable substances. -Refrain from using abrasive objects or metal sponges for cleaning machine parts. -Take care not to spill cleaning liquids in the surrounding area. -Avoid cleaning internal parts of the tank. -Do not submerge the entire machine in water. -After cleaning, ensure that all parts are correctly placed back to ensure safety and functionality. -Maintaining cleanliness and upholding hygiene standards are essential to guarantee drink quality and comply with health regulations.
Clean the removed parts according to local health standards. Follow these instructions:
-Dilute neutral cleaning agent with water in a container. -Use a soft cloth soaked in the diluted agent to clean the parts. Rinse with water. -Dilute food-grade disinfectant with water in another container. -Soak the parts in the diluted disinfectant for 30 minutes, then rinse with clean water. -Air-dry the disinfected parts in a clean area.
Note:
Clean the tank(s) at least once daily or as per the health standards of the country. You can adjust cleaning frequency based on actual usage. Inadequate cleaning can promote bacterial growth.
If the machine isn't in constant use, wipe the exterior with a soft cloth.
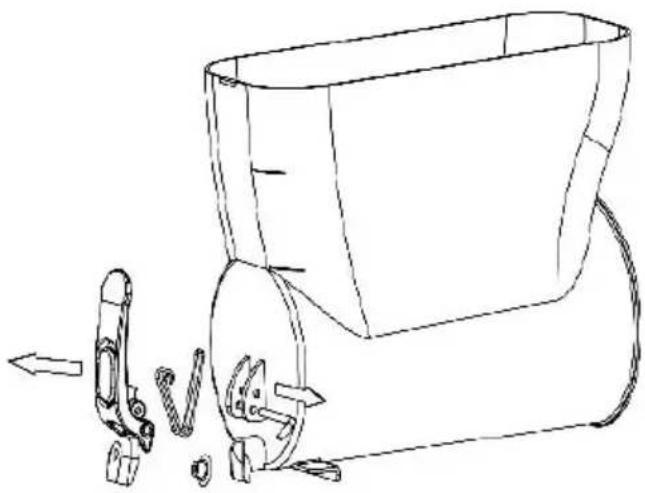
1. Cleaning the Dispenser Parts
① Activate the mixing function and position a container under the dispenser. Pull the dispenser handle to drain the ingredients or liquid in
the tank. Once drained, power off the machine and unplug it.
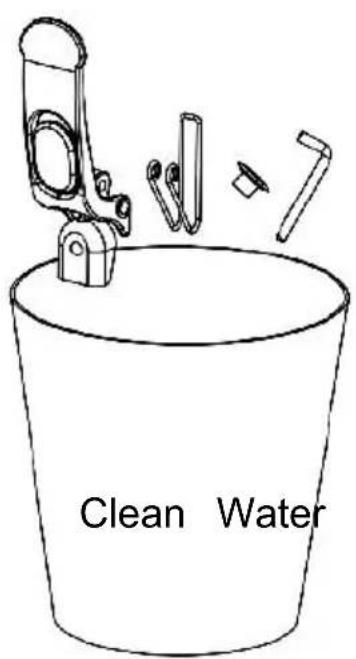
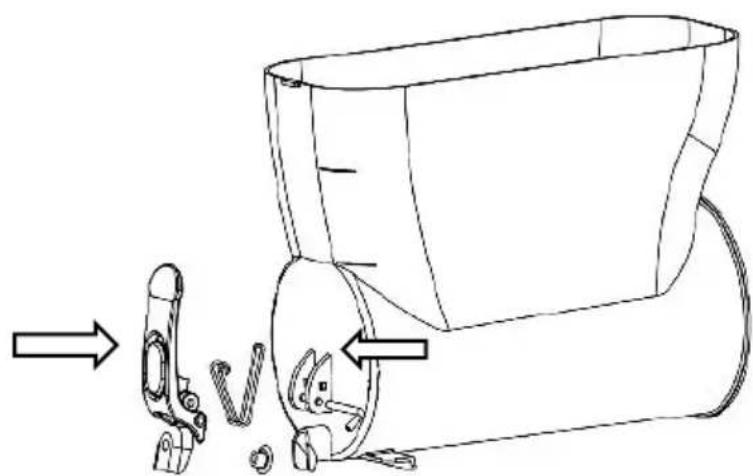
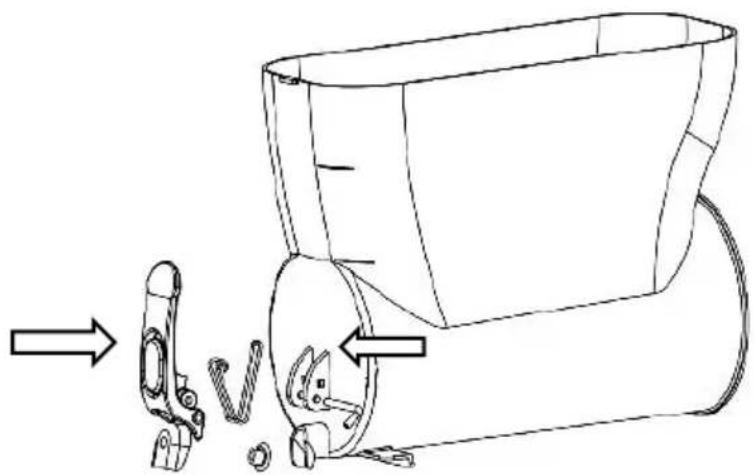
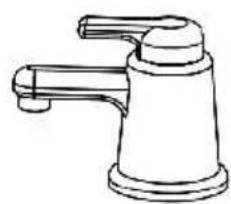
② Loosen the nut counterclockwise on the handle pin, then remove the followed by the handle. Next, take off the upper cover of the spring and the spring itself. Finally, remove the valve stem.
③ Rinse the detached parts in clean water, adhering to the guidelines provided in the section of Important Notes Before Cleaning.
Note:
If there's a lot of ingredients or liquid residue in the tank(s), don't disassemble the dispenser or tank parts.
Please drain them before proceeding.
2. Clean the Tank and the Stirring Mixer
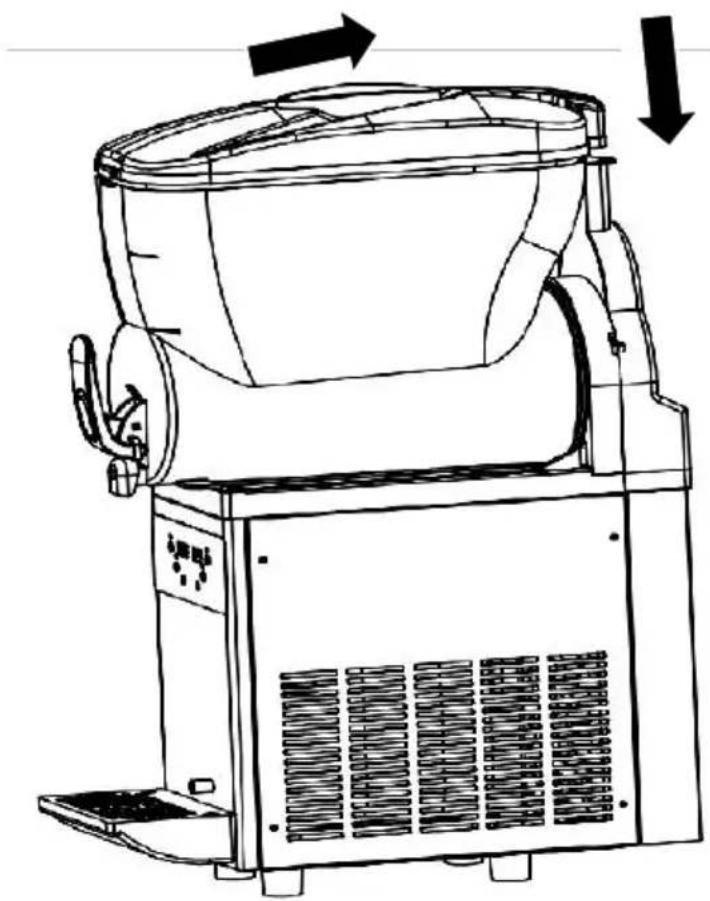
① Pull the plastic protruding part located at the back of the tank, then push the cover forward to remove it.
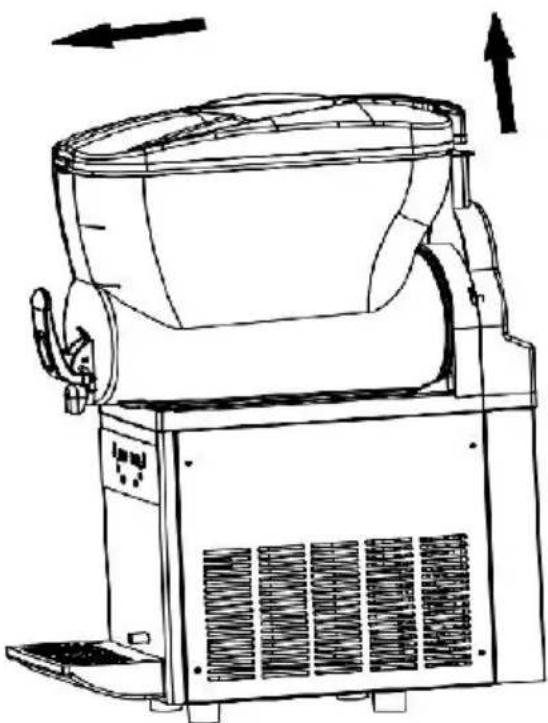
② Lift the tank upward, then pull it out with force.
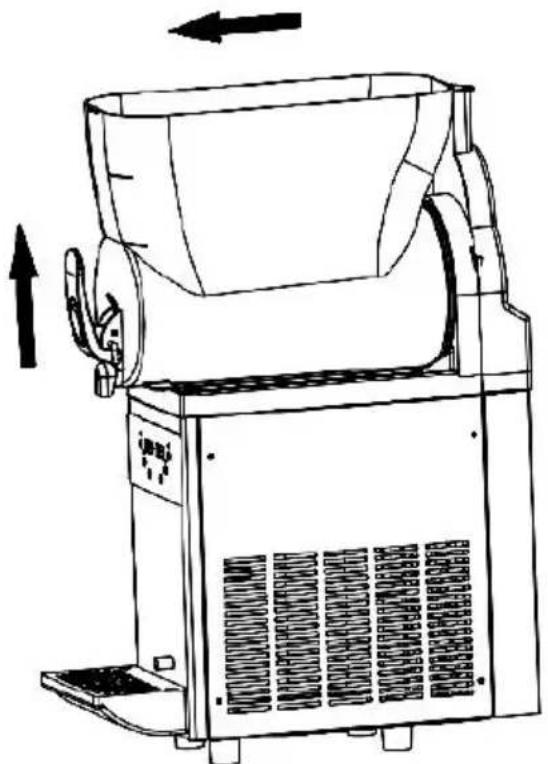
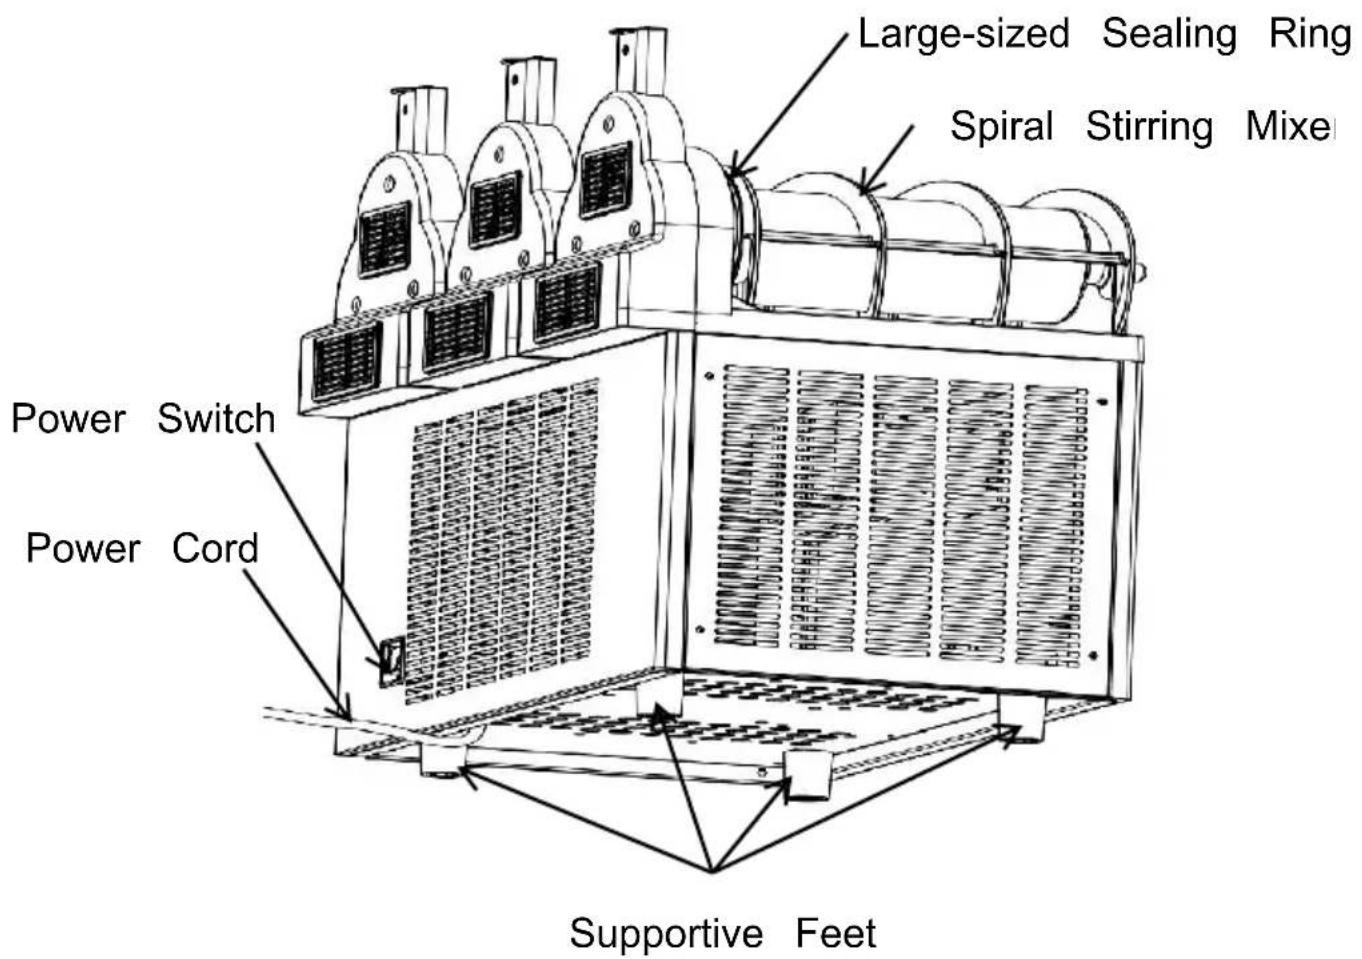
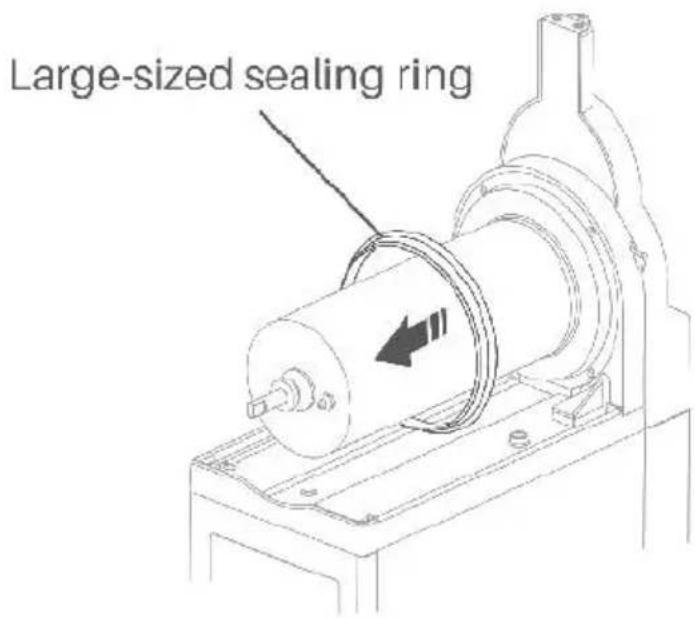
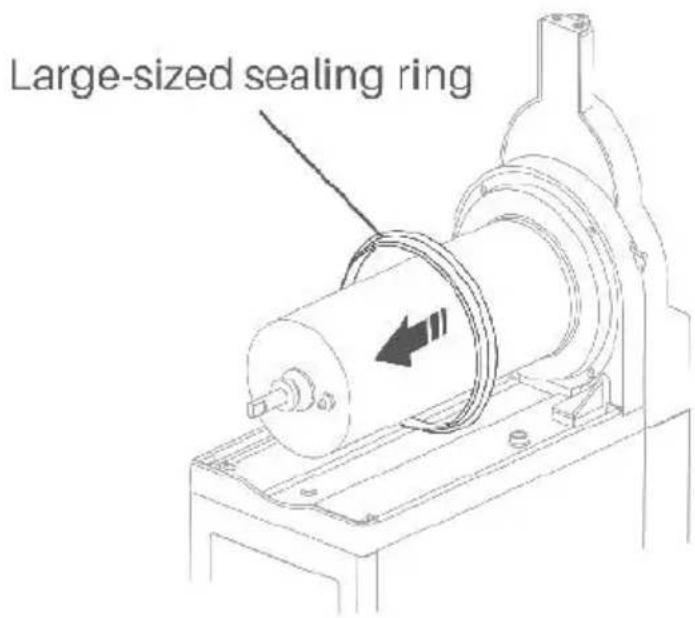
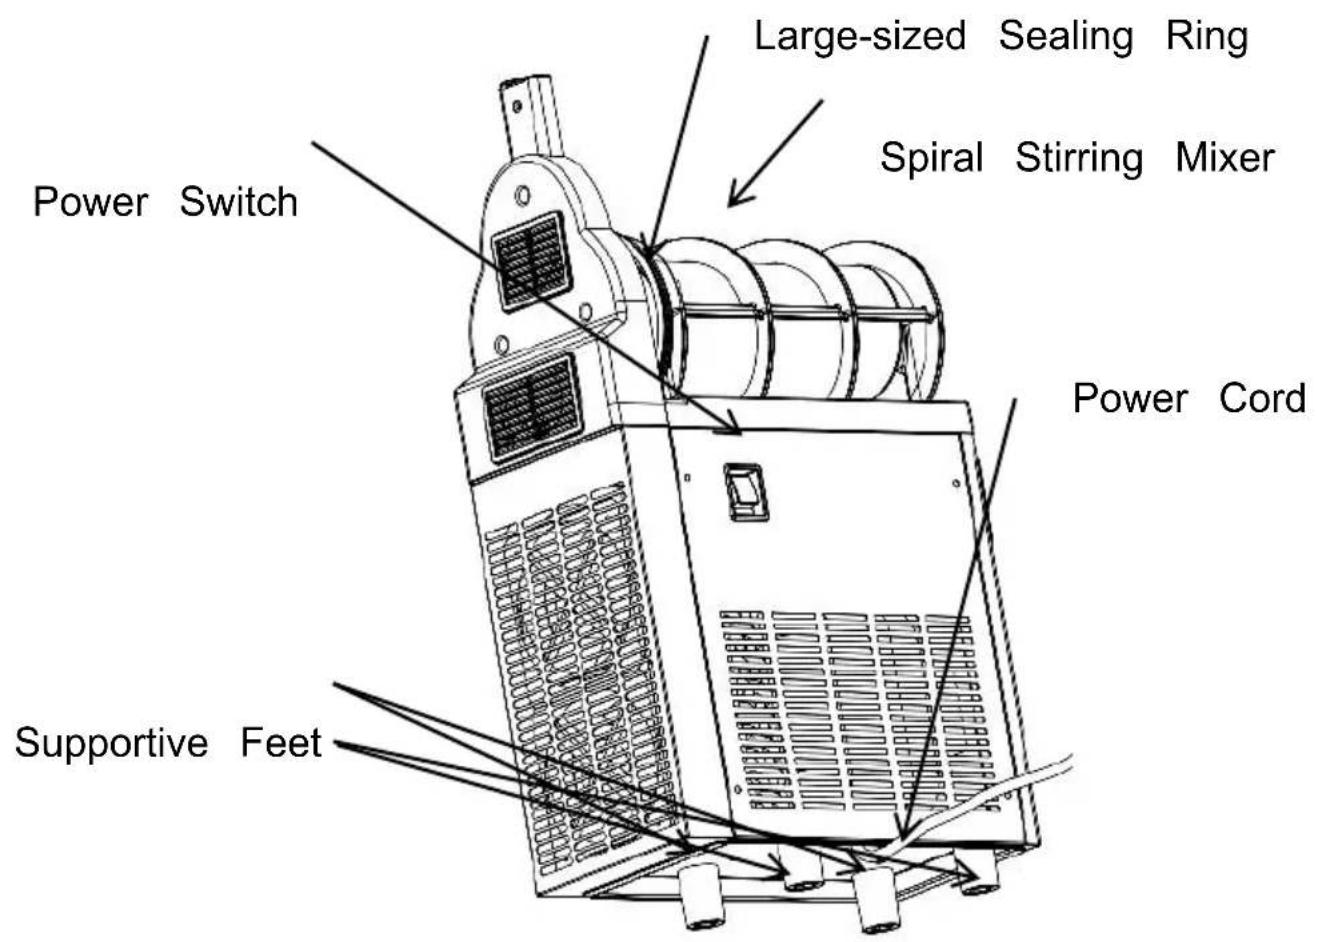
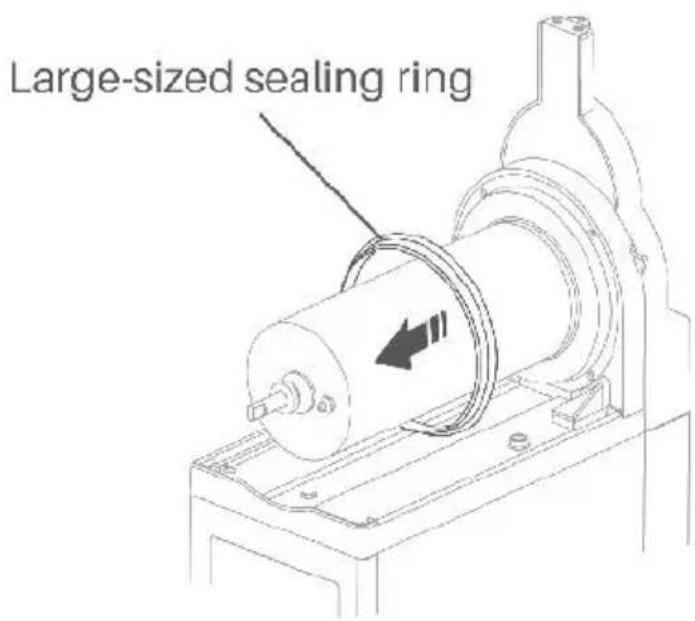
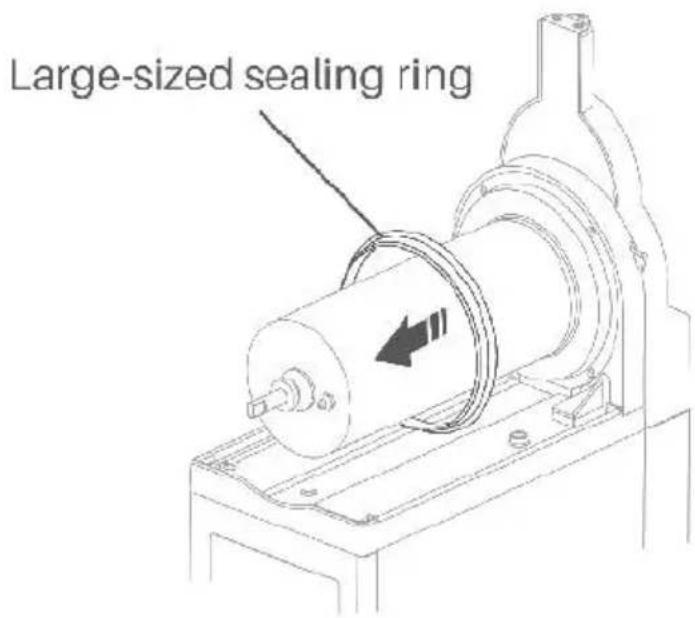
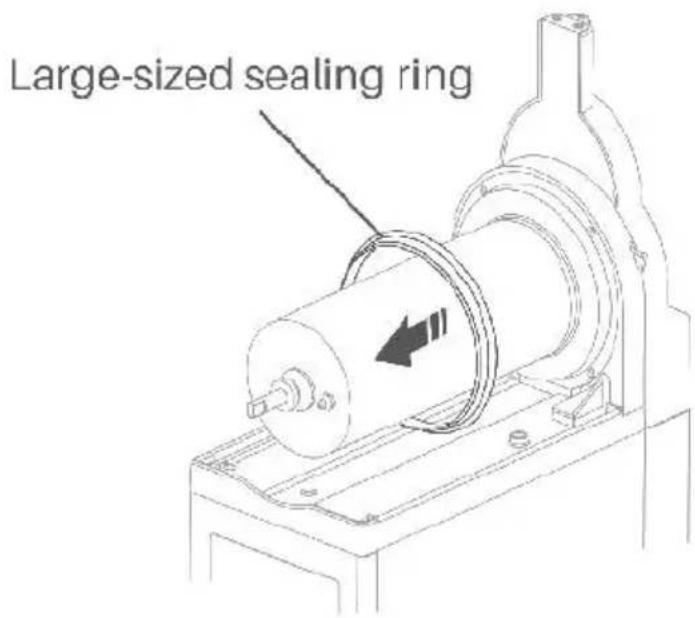
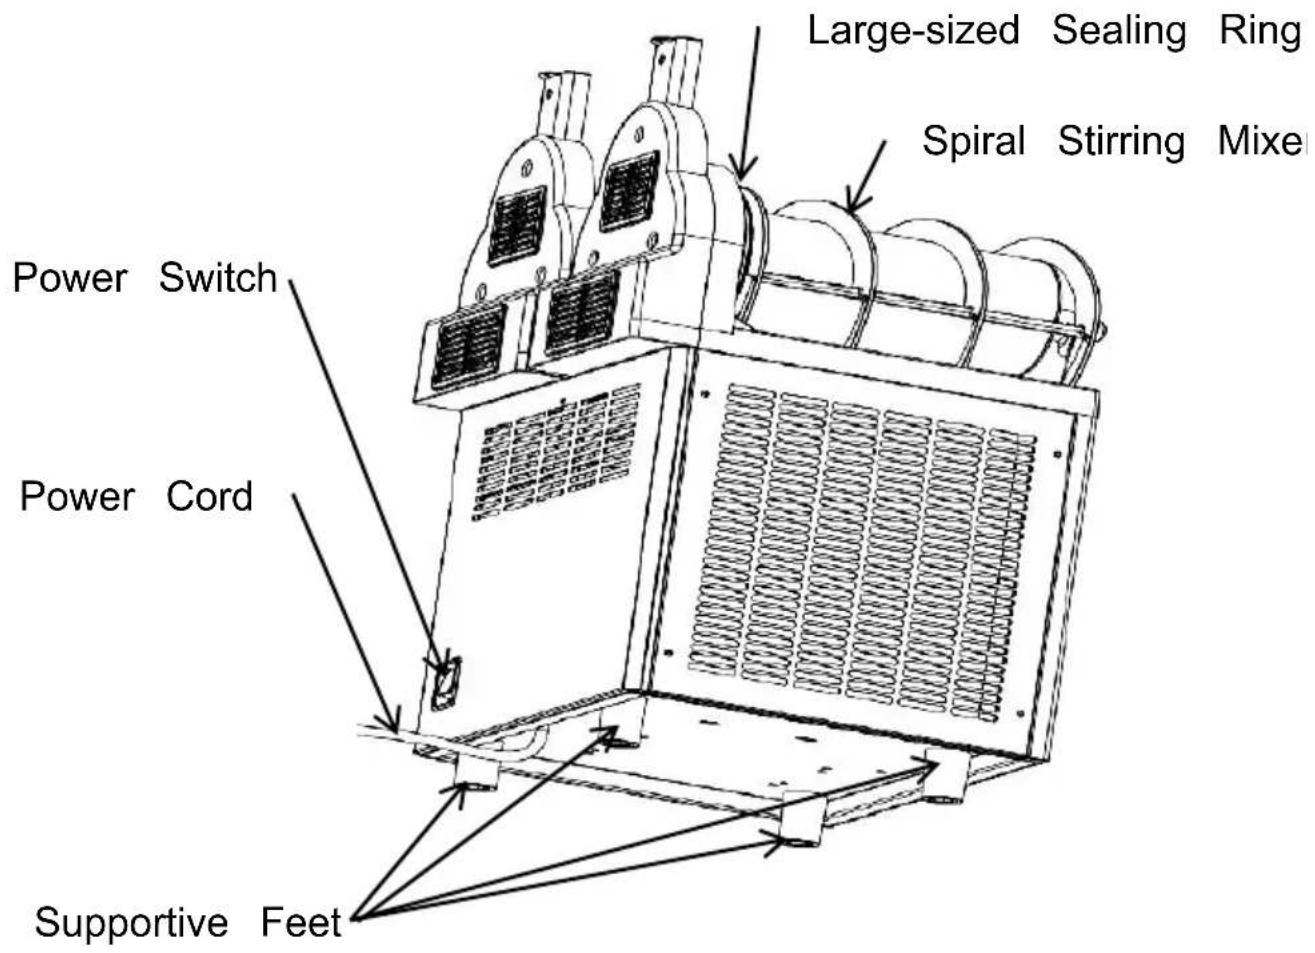
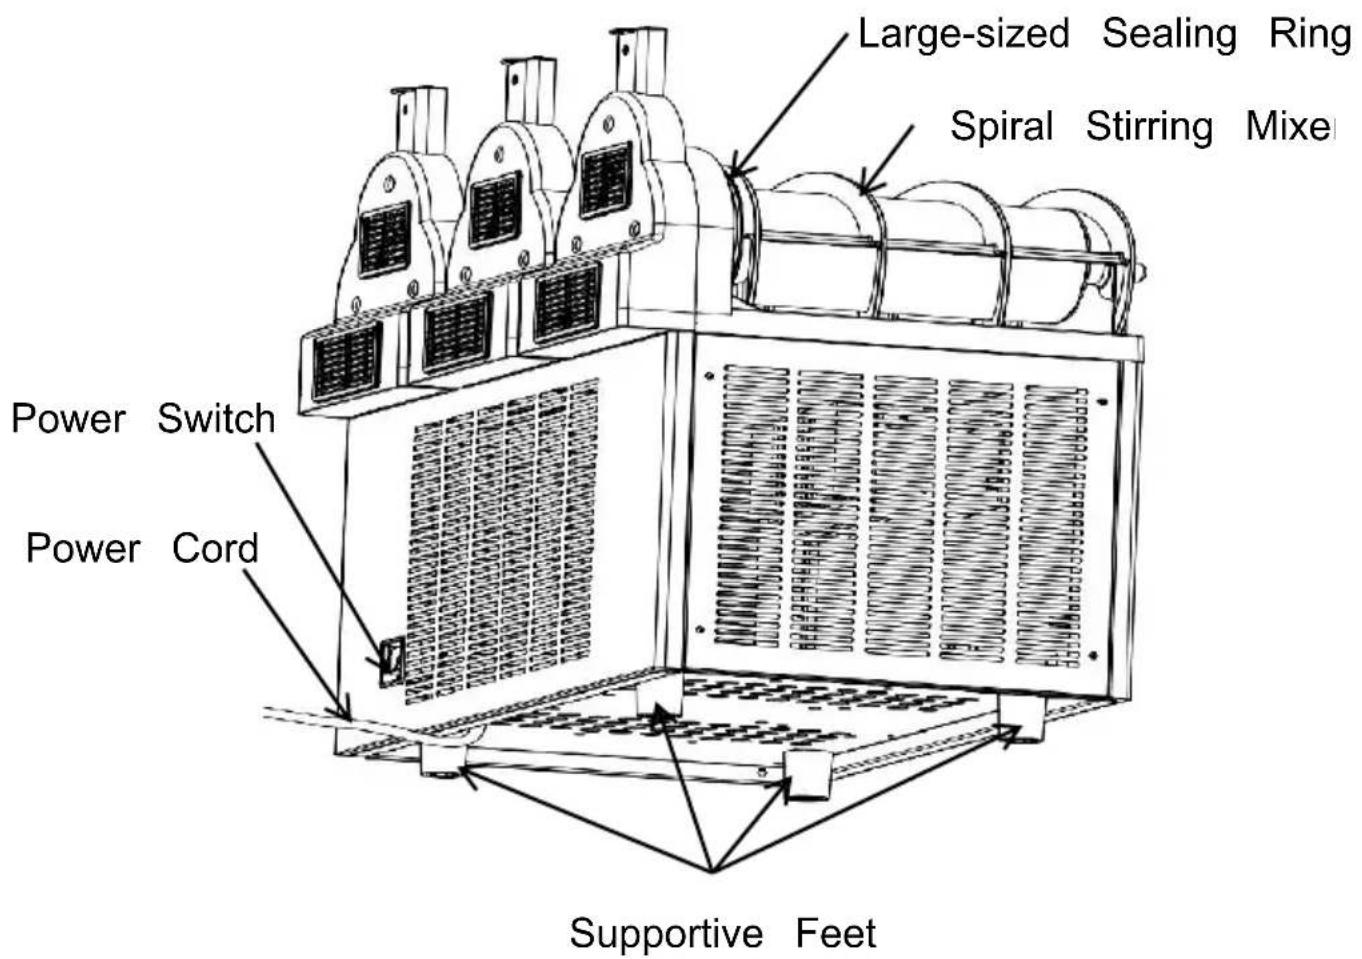
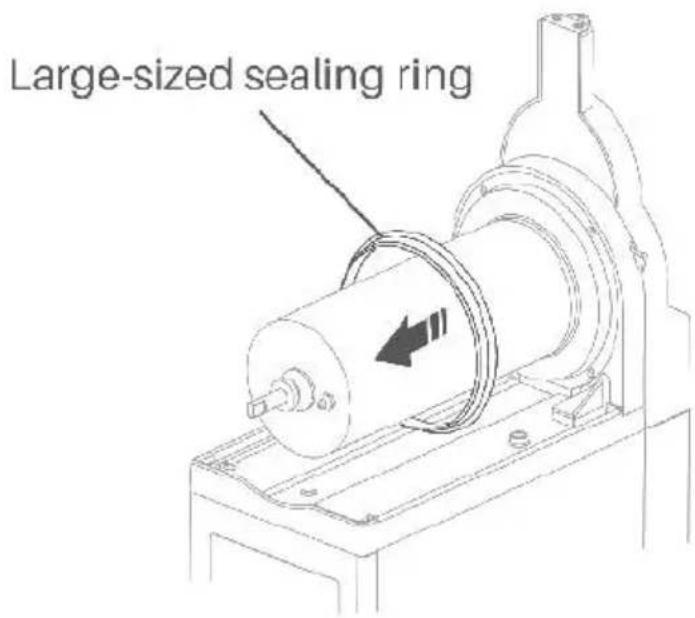
③ Remove the white spiral stirring mixer and take off the large sizes
sealing ring.
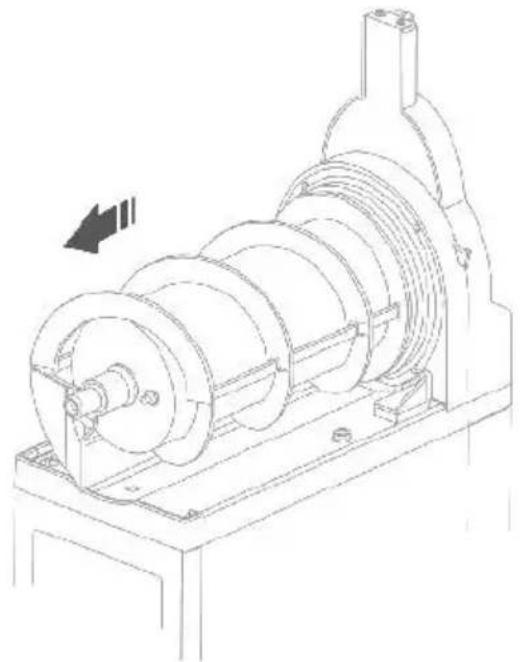
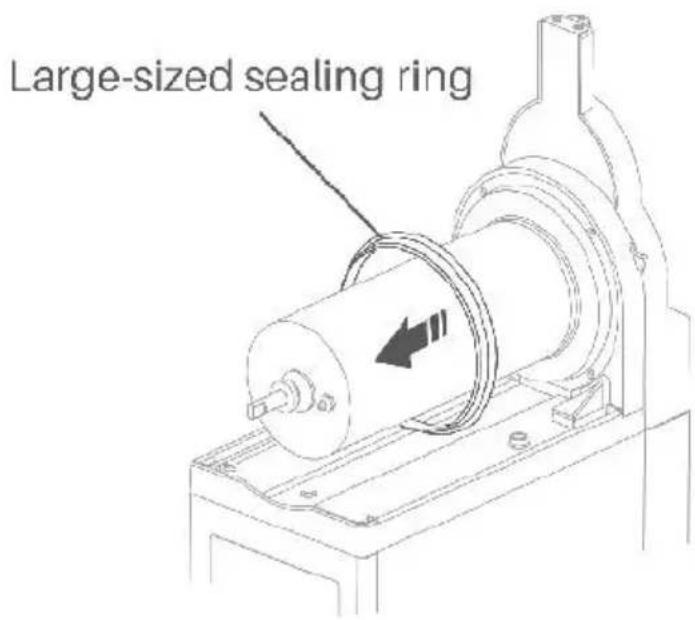
④ Rinse the detached parts in clean water, adhering to the guidelines provided in the section of Important Notes Before Cleaning.
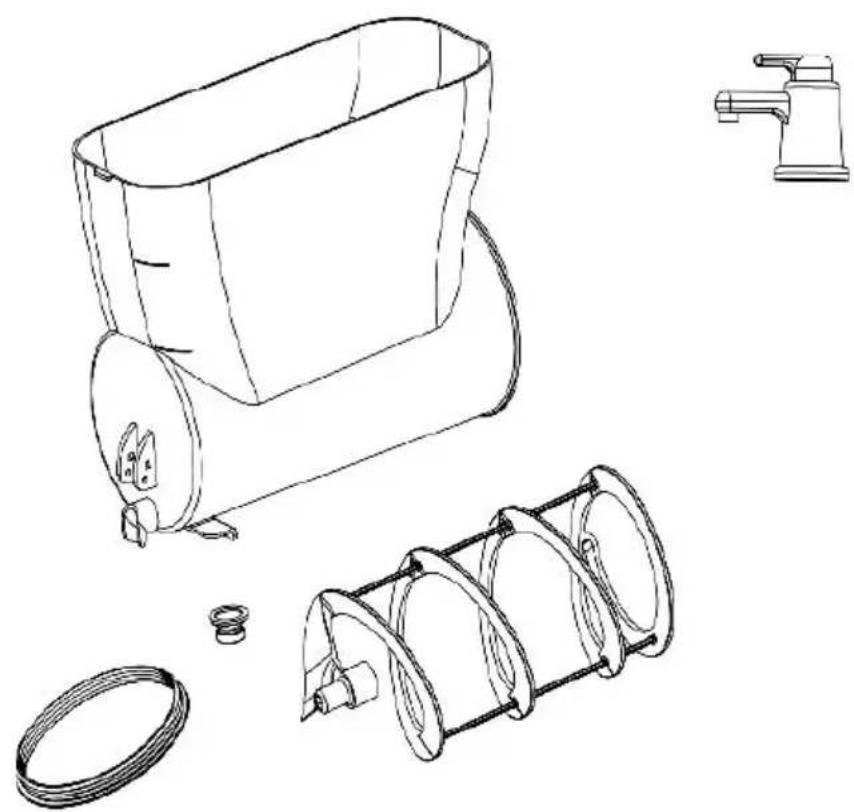
3. Clean the Tank Cover
① Clean the outer surface of the tank cover using a damp cloth. ② Wipe the bottom surface of the tank lid multiple times with a cloth in diluted disinfectant, leaving it on for 30 minutes. ③ Afterward, thoroughly wipe the bottom surface of the tank cover with a wet cloth, then dry it with a dry cloth.
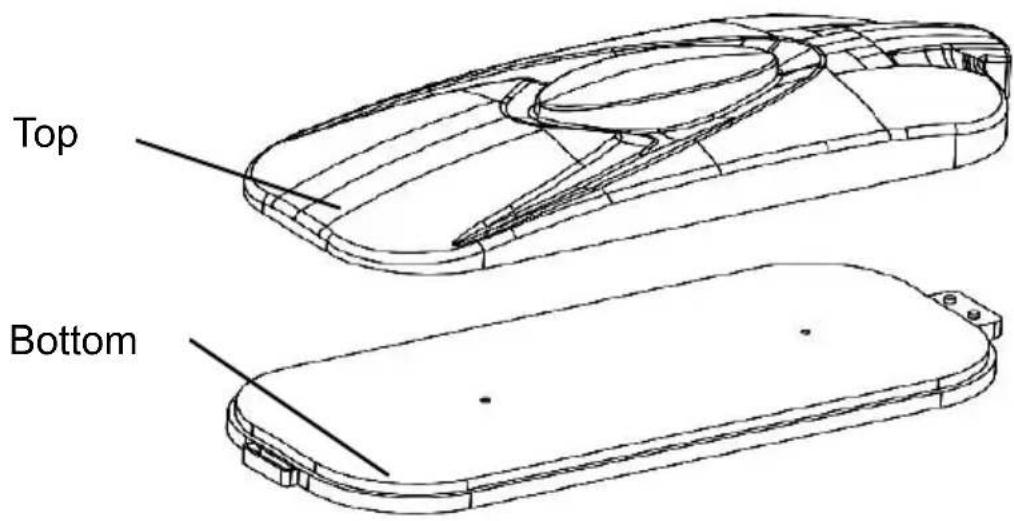
4. Clean Drip Tray
① Gently lift the drip tray and then remove it. Inside, you'll notice a design to secure it to the hole on the machine.
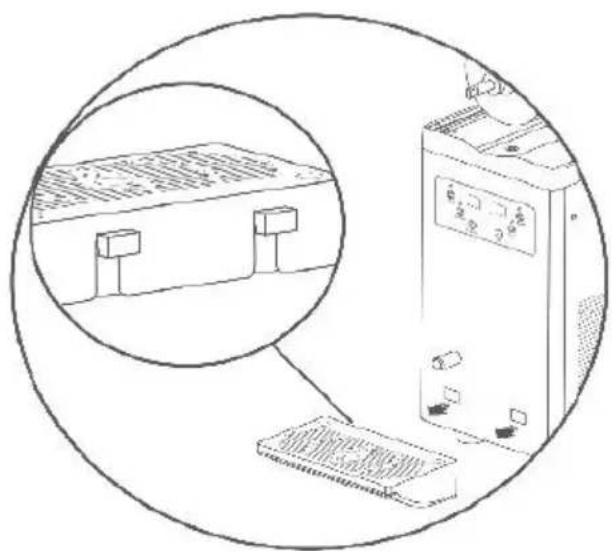
When taking apart the drip tray, avoid pulling the leftover pipe in the carelessly to prevent damage. Empty and clean the drip tray daily.
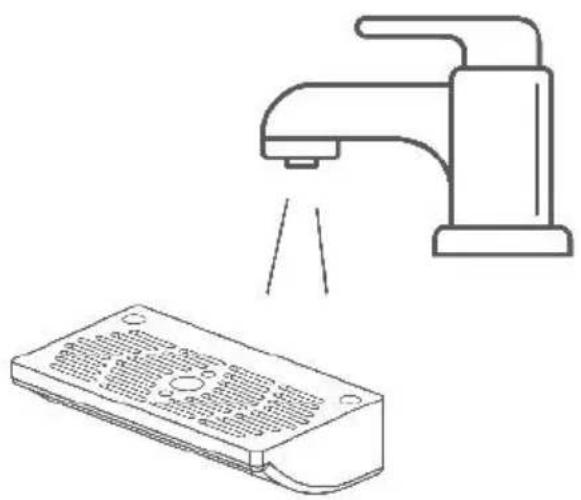
② Rinse the detached parts in clean water, adhering to the guidelines provided in the section of Important Notes Before Cleaning.
5. Clean the Evaporator
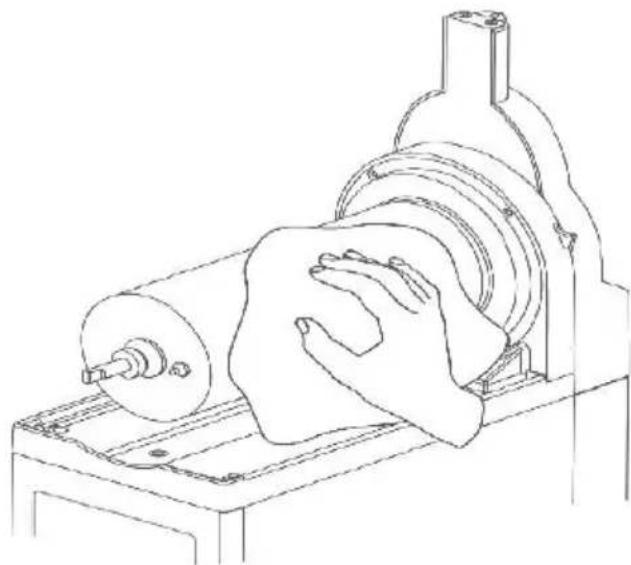
① After removing the white spiral stirring mixer and the large sized ring, clean the evaporator surface and the base with a soft cloth soaked in diluted cleaning solution. ② Wipe these surfaces 2-3 times using a clean wet dishcloth. ③ Then, use a soft cloth soaked in diluted disinfectant, allowing the disinfectant to remain on the surfaces. ④ After 30 minutes, thoroughly wipe the evaporator surface and base with a clean wet dishcloth.
6. Clean the Main Body
① Use a clean, damp soft cloth with diluted cleaning agent to wipe the body. ② Wipe the body using a soft damp cloth soaked in clean water. ③ Dry the body with a clean, dry cloth.
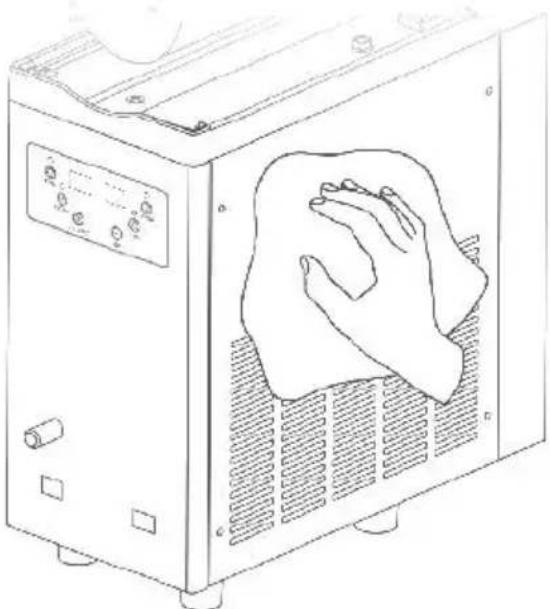
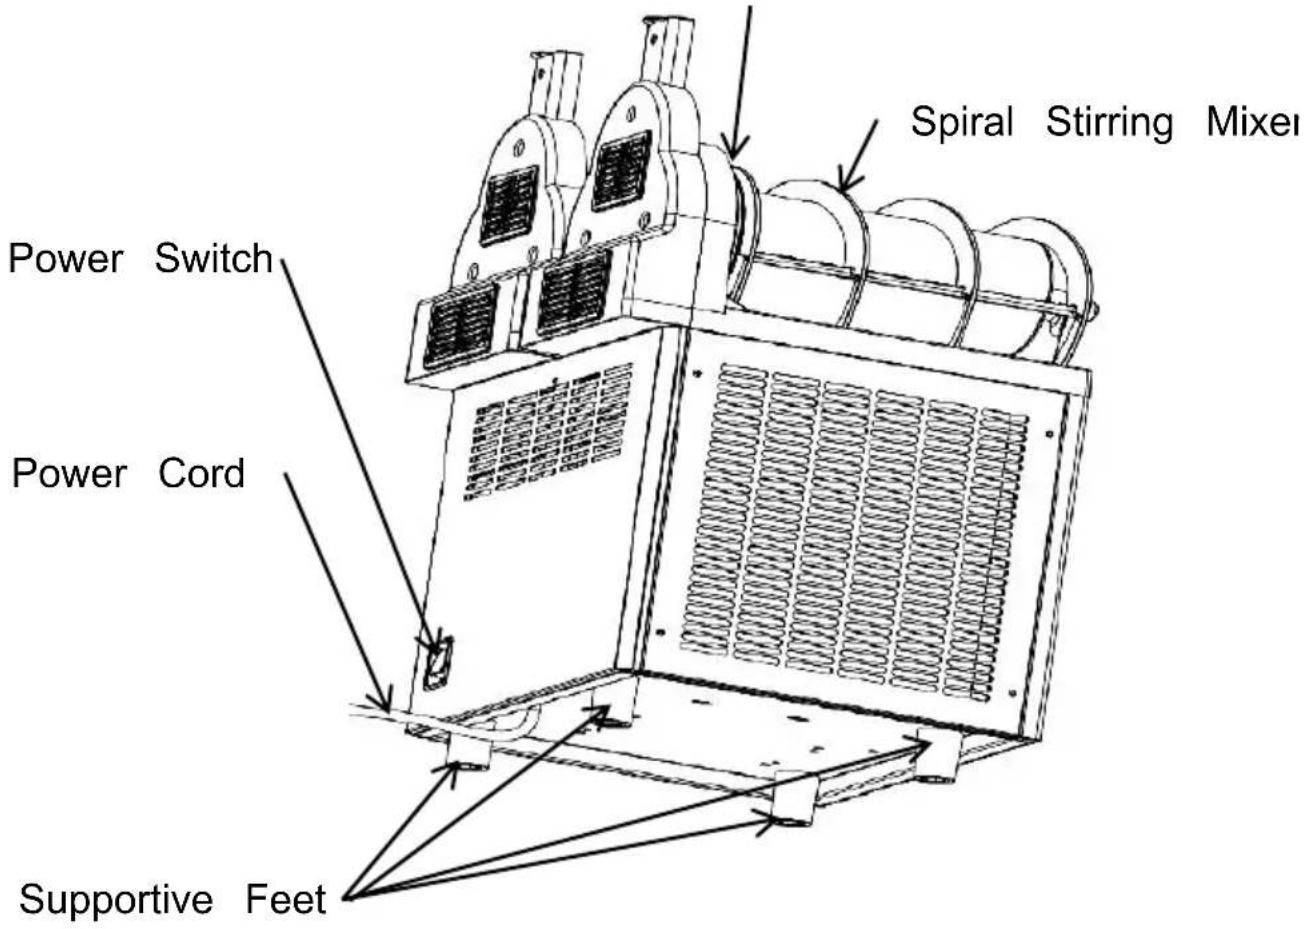
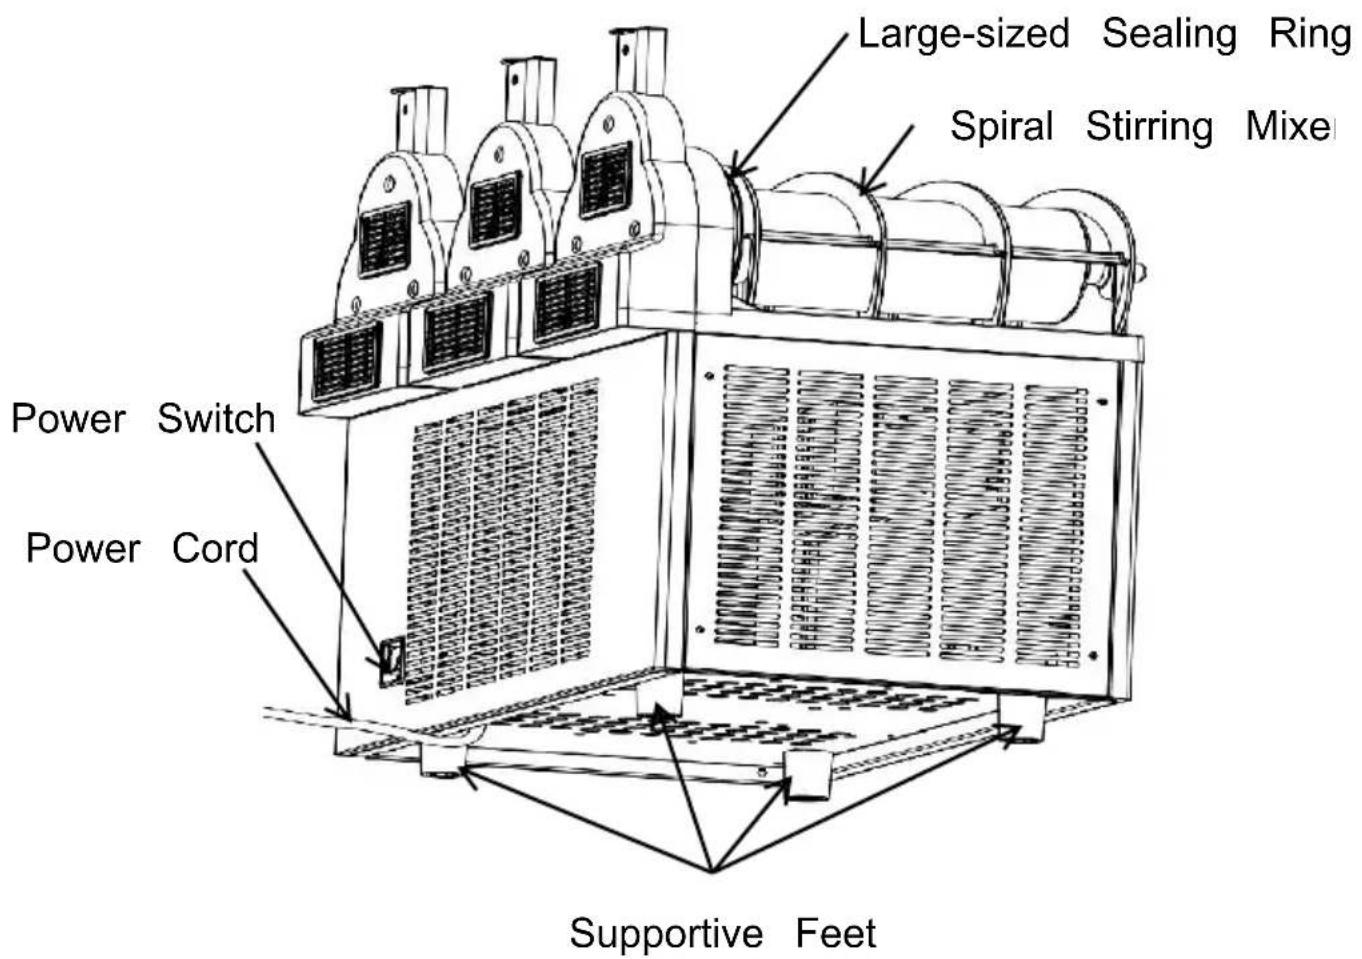
7. Clean the Condenser
* After a period of operation, dust can accumulate on the condenser, impacting heat dissipation and cooling efficiency (e.g., reduced slush out or difficulty in shaping).
* It's recommended to clean monthly or more often in harsh environments by a professional.
* Turn off the power before cleaning, and take care not to damage condenser fins.
For X-300
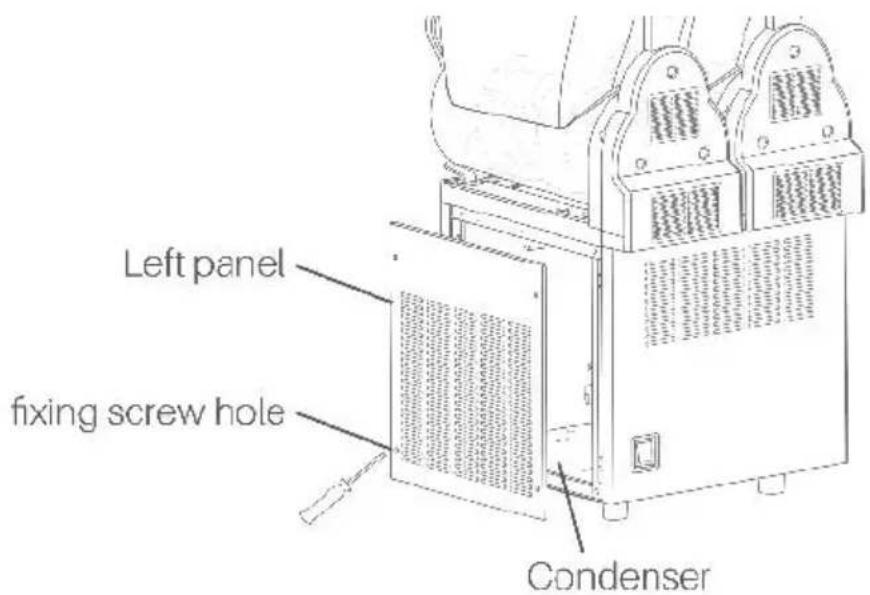
For other models, if you have any questions regarding the condenser, feel free to reach out to us.
8. Reassemble All Parts
① Place the large-sized sealing ring on the evaporator.
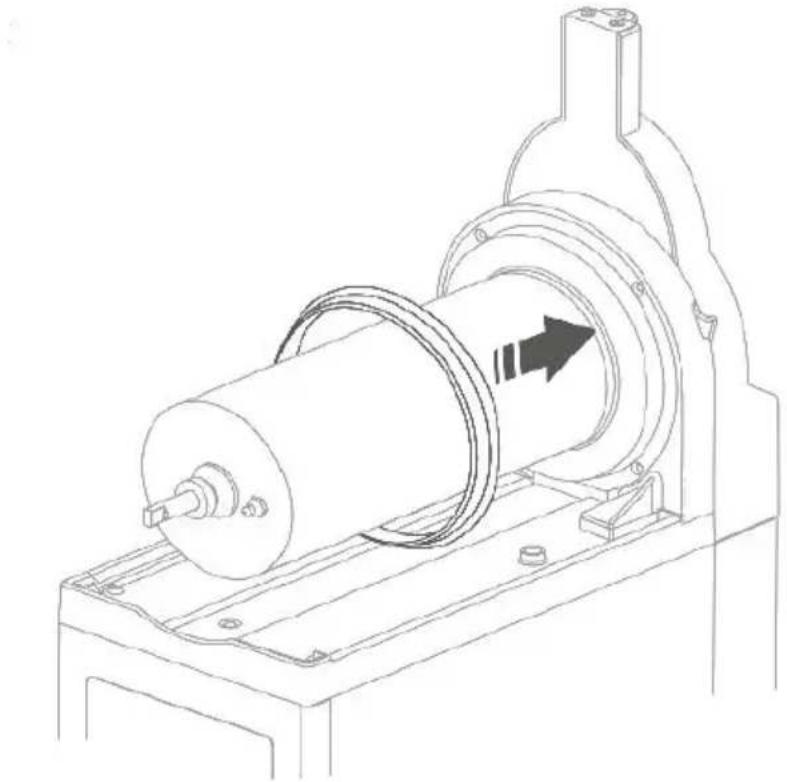
② Align the medium-sized sealing ring with the metal stick on the evaporator to insert the white spiral stirring mixer. Once inserted, rotate clockwise slightly to ensure a secure fit.
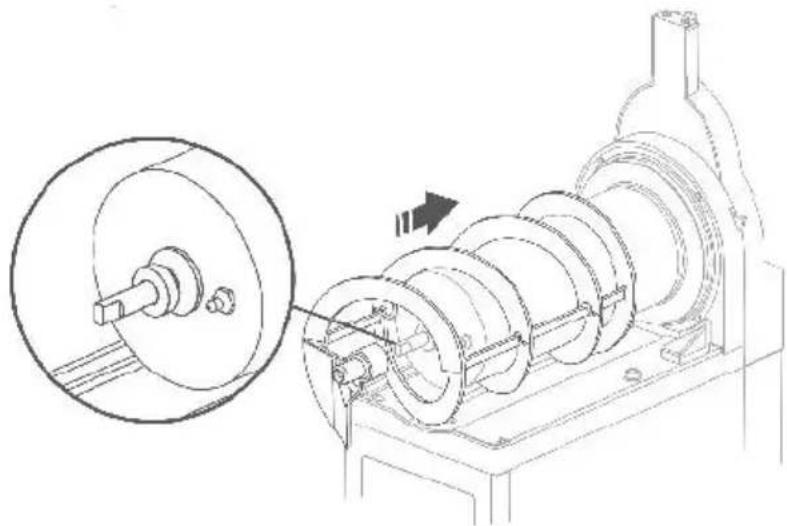
③ Put the tank onto the evaporator, then lift it and push it in until the buckle at the bottom of the tank is inserted into the evaporator base.
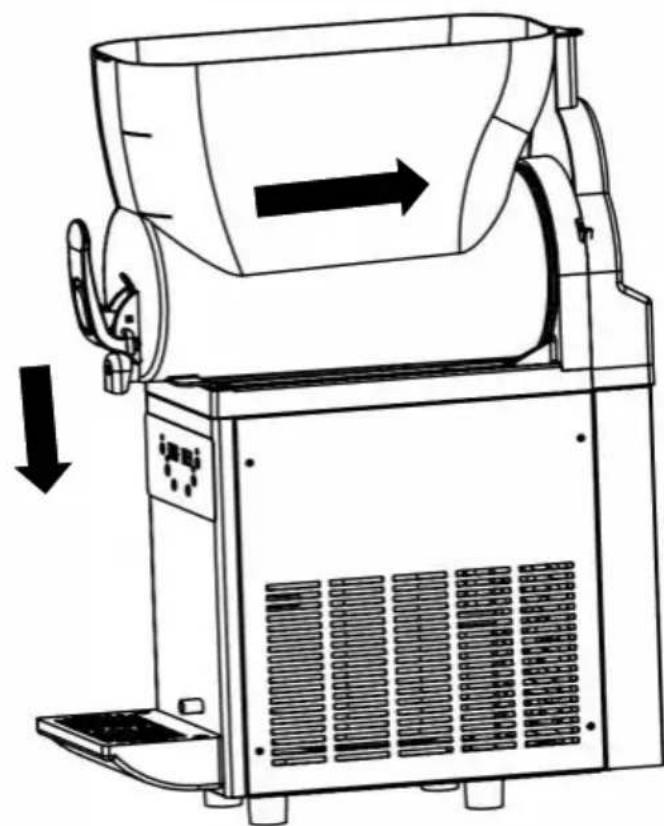
④ Reassemble the dispenser parts.
⑤ Place the tank cover at the front of the tank, aligning the plastic protruding part at the back with the tank, then reinstall the tank cover.
⑥ Once the condenser has been cleaned, reassemble it following the reverse order of disassembly.
FACTORY CODES EXPLANATIONS
When the slush machine is functioning well, please do not alter the factory settings. If you wish to make changes, please refer to the following table for adjustments.
For X-150
①Simultaneously hold the SET/SUBTRACT and ADD buttons for 5 seconds to access the factory setting mode. ②Use the LIGHTING button to alter the code, and utilize the SET/SUBTRACT or ADD button to modify the value. The system will automatically exit and save the settings if there's no operation for above 2-3 seconds.
For X-300
①Simultaneously hold the SET and ADD buttons for 5 seconds to access the factory setting mode. ②Use the SET button to alter the code, and utilize the
LIGHTING/SUBTRACT or ADD button to modify the value. The system automatically exits and saves the settings if there's no operation for about 2-3 seconds.
For X-450
①Simultaneously hold the SUBTRACT and ADD buttons for 5 seconds to access the factory setting mode. ②Use the SET button to alter the code, and utilize the SUBTRACT or ADD button to modify the value. The system will automatically exit and save settings if there's no operation for about 2-3 seconds.
| Code | Explanation | Default Value | Note |
| P00 | Slush Making Temperature Control Differential | 0.1°C | When the slush making temperat is set to -2°C, With a 0.2 differ the compressor restarts once The temperature hits-1.8°C. The defaufactory setting, however, features 0.1 differential |
| P01 | Maximum Slush Making Temperature | 0°C | The upper limit for the slush ma temperature is °0 |
| P02 | Minimum Slush Making Temperature | -15°C | The lower limit for the slush set temperature is -15 |
| P03 | Interval Time of Compressor Restarting | 10s | Adjustment for the time interval the compressors operation |
| P04 | Low Voltage Protection Value for Compressor | 85V | The compressor won't initiate operation if the voltage drops be 85V, ensuring the compressors safety |
| P05 | Low Voltage Protection for Compressor | 0 | 0:Disabled,1:Enabled |
| P06 | 1st Tank Temperature Correction | 0°C | No Adjustment |
| P07 | 2nd Tank Temperature Correction | 0°C | No Adjustment (not for X-150) |
| P08 | 3rd Tank Temperature Correction | 0°C | No Adjustment (not for X-150 or X-300) |
| P09 | Cold Drink Temperature Control Differential | 2.0°C | If the cold drink temperature is 2°C, with a differential of 2°C, the compressor restarts when the temperature hits 4°C. The default factory setting. However, features 0.2 differential. |
| P0A | Current Value for Frozen Tank Protection | 1.4A | When the motor current exceeds1.4A,either the compressor stops working or the tank fails to chill |
| P0B | Current Value for Motor Protection | 1.8A | When the motor current exceeds1.8A,it triggers the motor stop working for protection purposes. |
ERROR CODES EXPLANATIONS
| Error Code | Explanation | Note |
| -- | Frozen Tank(s) | Ensure the sugar ratio is no less than If the sugar ratio is adequate, increase temperature. |
| RH | Temperature Sensor Issue | The cooling function will be deactivated while the slush making function remains unaffected. Please contact us for more help. |
| LLL | Low Voltage Warning | The slush machine will cease operation Please switch off the power and verify power supply. Once the voltage stabilizes restart the machine. If LLL is frequently displayed, consider using a voltage stabilizer. |
| LLH | High Voltage Warning | The slush machine will cease operation Please switch off the power and verify power supply. Once the voltage stabilizes restart the machine. If LLH is frequently displayed, consider using a voltage stabilizer. |
TROUBLESHOOTING GUIDE
Please troubleshoot according to the following table first. If the issue persists after attempting these steps, please contact us.
| Issues | Possible Causes | Solutions |
| The machine won't power on | No power input | Plug the power co into a suitable socket or try another one |
| The power switch isn't turn on | Turn on the power switch | |
| Leakage of slusl or drink from the back of the tank(s) | The tank(s) is (are) not installed properly | Reinstall the tank(s securely |
| The sealing ring(s) is (are) securely installed | Replace the sealing ring(s) | |
| The white spiral stirring mixer(s) is (are) not rotating | The tank(s) is (are) not installed properly | Reinstall the tank(s securely |
| The evaporator surface(s) is (are) frozen | Turn off the power and allow the ice melt | |
| Inability of the machine to produce slush | The ratio of the sugar is than 13% | Please add more sugar |
| The power switch isn't turn on | Turn on the power switch | |
| The slush button was not pressed | Activate the slush-making function | |
| The condenser is (are) excessively dirty | Clean the condenser(s) | |
| The machine is near a he source with poor heat dissipation | Position the machine correctly | |
| Excessive noise from the white spiral stirring mixer(s) | The sealing ring(s) in the white spiral stirring mixer is (are) not installed properly | Ensure proper installation of the sealing ring(s) |
| The slush is overly solid | Turn off the power and allow the ice melt | |
| The sealing ring(s) in the white spiral stirring mixer is (are) either unlubricated or damaged | Apply lubricant or replace with new seal ring(s) | |
| The sugar ratio is less than 13% | Adjust the ratio; avoid substituting sugar with a sweeter alternative | |
| Dispenser(s) malfunction unable to dispense slush or drink | Too much ice in the tank( | Remove excess ice from the tank(s) |
| Presence of black stains in the slush | The tank(s) is (are) not cl | Clean the tank(s) following the instructions |
| Dirty sealing ring(s) in the dispenser(s) or the white spiral stirring mixer(s) | Clean the sealing ring(s) | |
| Damaged sealing ring(s) in the dispenser(s) or the white spiral stirring mixer(s) | Replace the damaged one(s) with new seal ring(s) |
EXPLOSIVE DRAWINGS
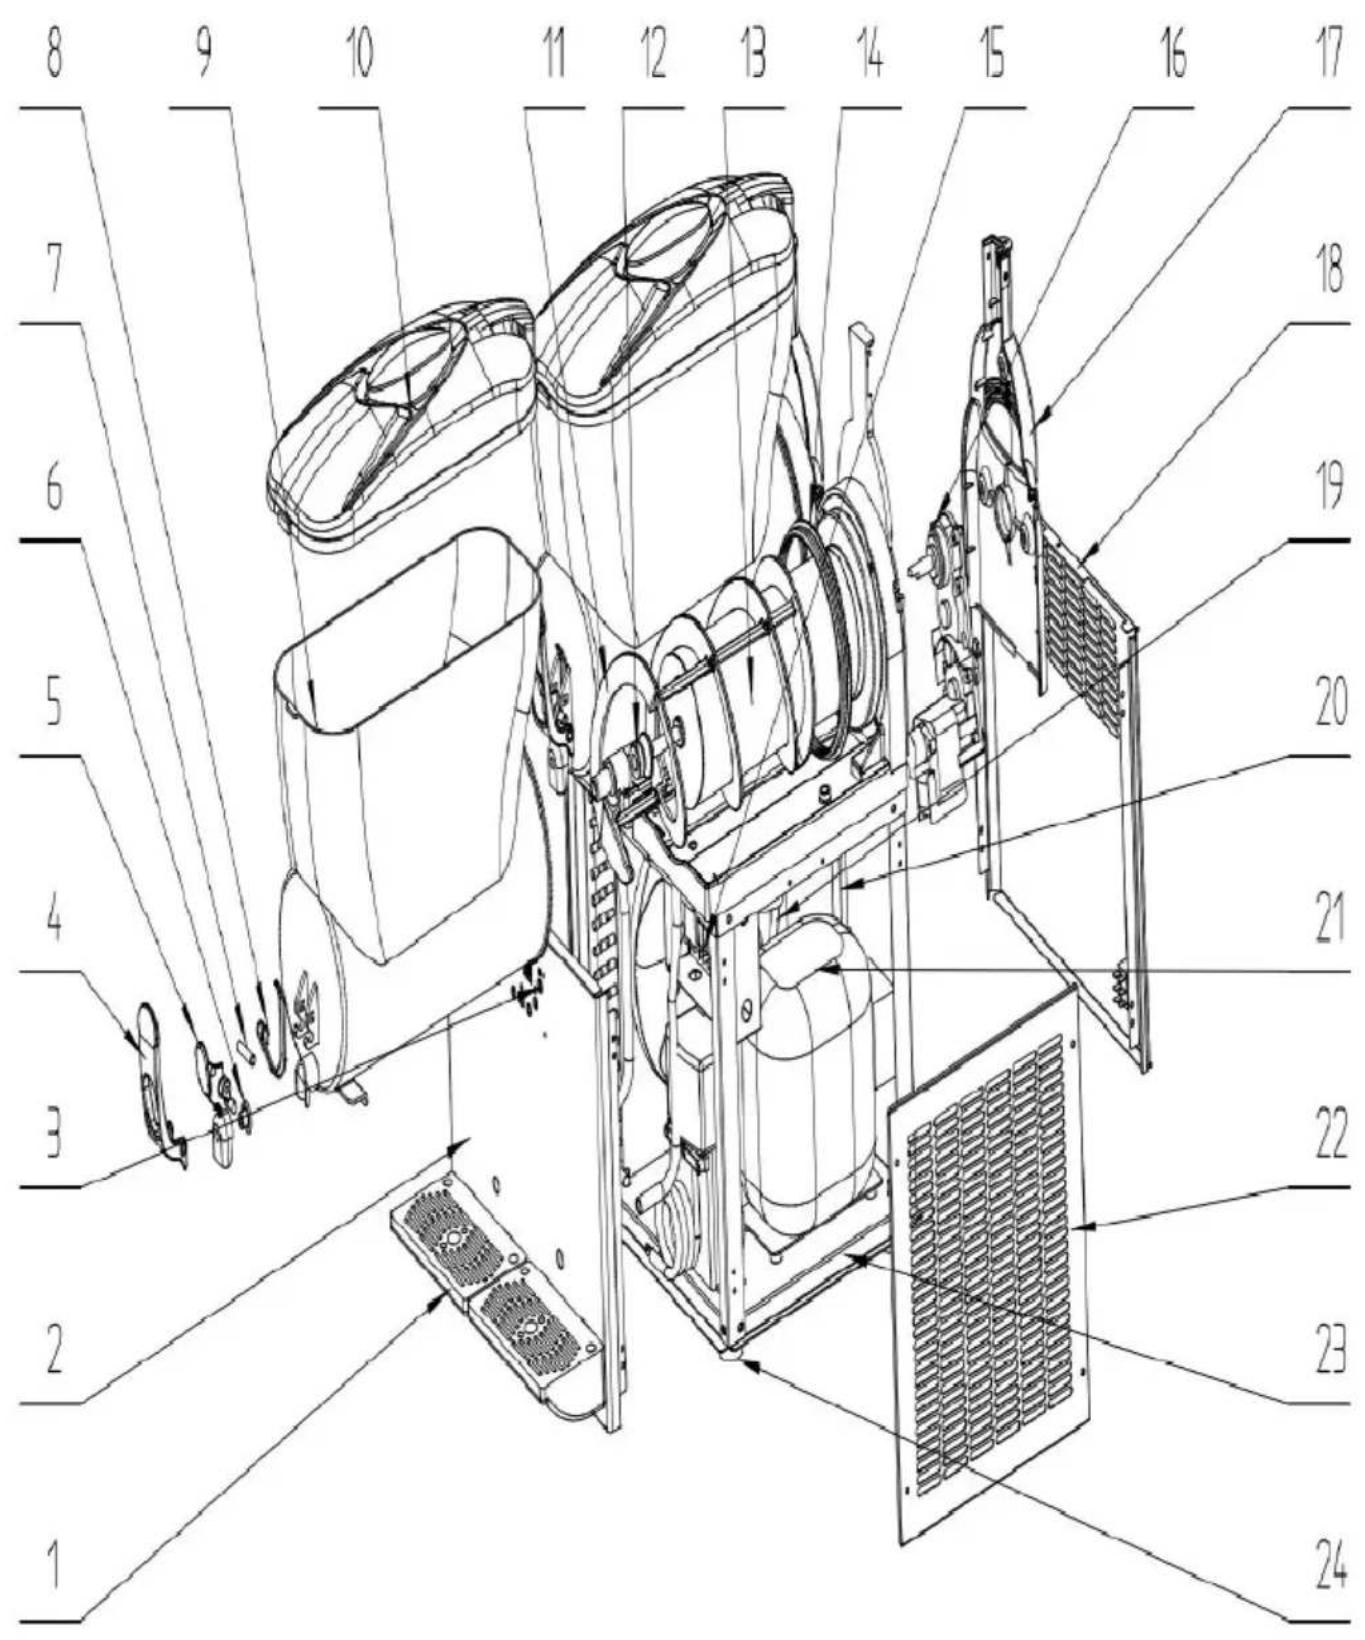
| No. | Part Name | Qty |
| 1 | Drip Tray | 1 |
| 2 | Front Panel | 1 |
| 3 | Control Panel | 1 |
| 4 | Handle parts A | 1 |
| 5 | Handle parts B | 1 |
| 6 | Mini-sized Sealing Ring for Handle | 1 |
| 7 | Bolt for Handle | 1 |
| 8 | Spring for Handle | 1 |
| 9 | Tank | 1 |
| 10 | Tank Cover | 1 |
| 11 | Spiral Stirring Mixer | 1 |
| 12 | Medium-sized Sealing Ring | 1 |
| 13 | Evaporator | 1 |
| 14 | Large-sized Sealing Ring | 1 |
| 15 | Main Board | 1 |
| 16 | Motor | 1 |
| 17 | Back Cover for Evaporator | 1 |
| 18 | Back Panel | 1 |
| 19 | Fan | 1 |
| 20 | Condenser | 1 |
| 21 | Compressor | 1 |
| 22 | Side Panel | 1 |
| 23 | Baseboard | 1 |
| 24 | Feet | 1 |
VEVOR®
TOUGH TOOLS, HALF PRICE
Technical Support and E-Warranty Certificate
www.vevor.com/support
VEVOR®
TOUGH TOOLS, HALF PRICE
IMPORTANT SAFETY CAUTIONS
Large-sized Sealing Ring
![graph TD A["1"] --> B["LEFT MIXING"] C["2"] --> B D["3"] --> E["COLDDRINK"] F["4"] --> E G["5"] --> H["SET"] I["6"] --> J["LIGHTING/SUBTRACT"] K["7"] --> L["ADD"] M["8"] --> L N["9"] --> O["SLUSH"] P["10"] --> O Q["11"] --> R["RIGHT MIXING"] S["12"] --> R T["13"] --> U[" "] V["14"] --> W[" "] X["15"…](/content/2026/04/737529/images/75a53d863ec25f3103d04aeca53a3a3ff630beed08ffb068aa58f3637d4e10fe.jpg)
![graph TD A["①"] --> B[" "] C["②"] --> D[" "] E["③"] --> F["LEFT MIXING"] G["④"] --> H["MID MIXING"] I["⑤"] --> J["RIGHT MIXING"] K["⑥"] --> L["SET"] M["⑦"] --> N["ADD"] O["⑧"] --> P["SUBTRACT"] Q["⑨"] --> R["LIGHTING"] S["⑩"] --> T["COLDDRINK"] U["⑪"] --> V["SLUSH"] W["⑫"] --> X[" "] Y["⑬"] --> Z["…](/content/2026/04/737529/images/69f6b4993c451012d04f2a57dfddc8932fca9c2afa66d86574e98e3e4418a0ae.jpg)
Step 2:
Step 3:
13% Sugar
Step 2:
Notes:
2.X -300
13% Sugar
Step 2:
Notes:
3.X -450
13% Sugar
Step 2:
Notes:
★Tips:
CLEANING AND MAINTENANCE
Note:
www.vevor.com/support
VEVOR®
TOUGH TOOLS, HALF PRICE
IMPORTANT SAFETY CAUTIONS
or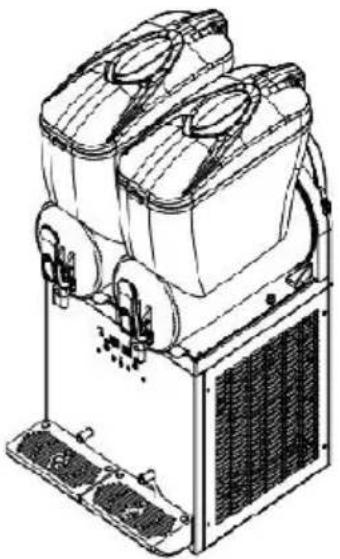
or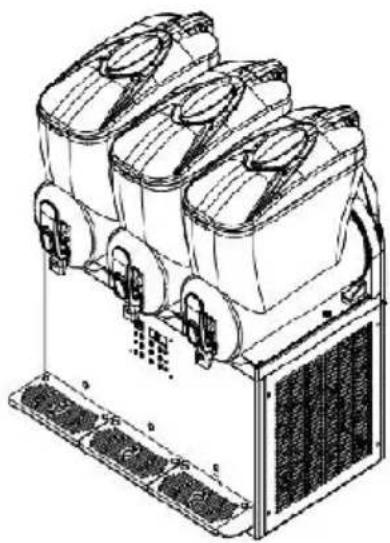
X-150 X-300 X-450
Spare Medium-sized Sealing Ring (1 for X-150, 2 for X-300, 3 for X-450)
KNOW YOUR SLUSH MACHINE
1. X-150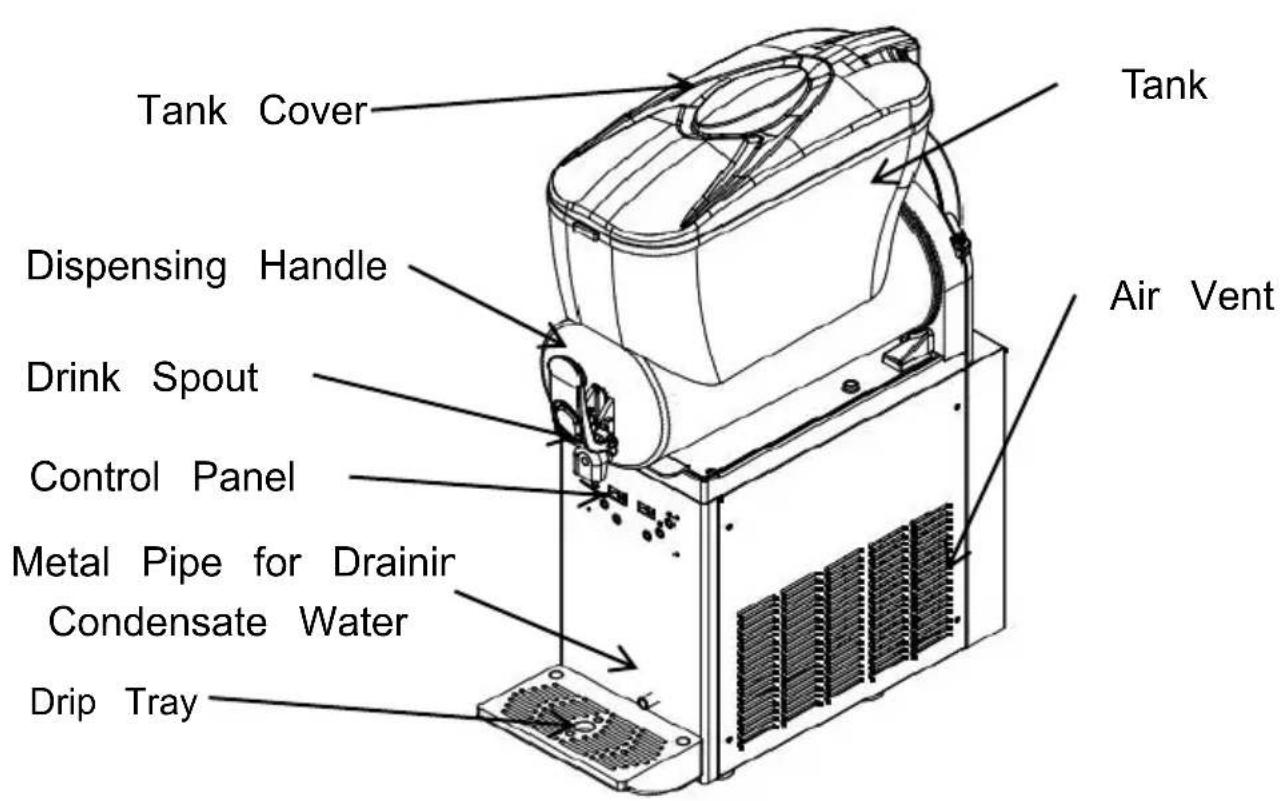
Large-sized Sealing Ring
![graph TD A["1"] --> B["LEFT MIXING"] C["2"] --> B D["3"] --> E["COLDDRINK"] F["4"] --> E G["5"] --> H["SET"] I["6"] --> J["LIGHTING/SUBTRACT"] K["7"] --> L["ADD"] M["8"] --> L N["9"] --> O["SLUSH"] P["10"] --> O Q["11"] --> R["RIGHT MIXING"] S["12"] --> R T["13"] --> U[" "] V["14"] --> W[" "] X["15"…](/content/2026/04/737529/images/410220cda4f26be60d4bc125efa61bbafec06838d45426cf8d8c9b0ce96f3ef5.jpg)
![graph TD A["①"] --> B[" "] C["②"] --> D[" "] E["③"] --> F["LEFT MIXING"] G["④"] --> H["MID MIXING"] I["⑤"] --> J["RIGHT MIXING"] K["⑥"] --> L["SET"] M["⑦"] --> N["ADD"] O["⑧"] --> P["SUBTRACT"] Q["⑨"] --> R["LIGHTING"] S["⑩"] --> T["COLDDRINK"] U["⑪"] --> V["SLUSH"] W["⑫"] --> X[" "] Y["⑬"] --> Z["…](/content/2026/04/737529/images/402339b3c6b5156b95d22480ebf8bd075924eb53fd09992d09d07479fd0afe74.jpg)
Step 2:
Step 3:
13% Sugar
Step 2:
Notes:
Light control
2.X -300
Prepare ingredients
Step 1:
13% Sugar
Step 2:
Notes:
3.X -450
Prepare ingredients
Step 1:
13% Sugar
Step 2:
Notes:
★Tips:
CLEANING AND MAINTENANCE
Note:
www.vevor.com/support
VEVOR®
TOUGH TOOLS, HALF PRICE
IMPORTANT SAFETY CAUTIONS
or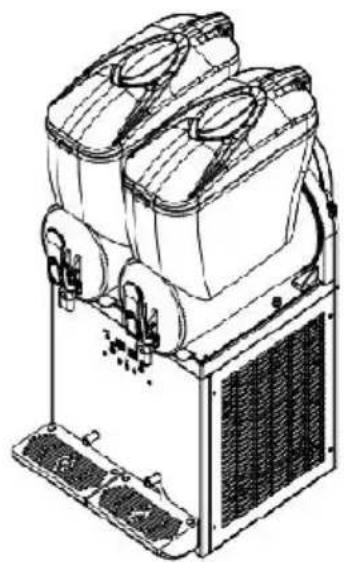
or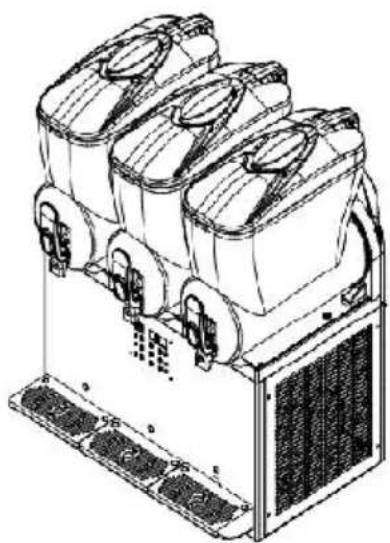
X-150 X-300 X-450
![graph TD A["①"] --> B["MIXING"] C["②"] --> B D["③"] --> E["COLDDRINK"] F["④"] --> E G["⑤"] --> H["SET/SUBTRACT"] I["⑥"] --> J["ADD"] K["⑦"] --> L["SLUSH"] M["⑧"] --> N["LIGHTING"] O["⑨"] --> N P["⑩"] --> Q["Lighting"] R["⑪"] --> S["Set/SUBTRACT"] T["⑫"] --> U["COLDDRINK"]](/content/2026/04/737529/images/d669d8bb89e68dc9e4a434cf74a84807b7c32e1e09c0b37ca883fbc952700f45.jpg)
![graph TD A["1"] --> B["LEFT MIXING"] C["2"] --> B D["3"] --> E["COLDDRINK"] F["4"] --> E G["5"] --> H["SET"] I["6"] --> J["LIGHTING/SUBTRACT"] K["7"] --> L["ADD"] M["8"] --> L N["9"] --> O["SLUSH"] P["10"] --> O Q["11"] --> R["RIGHT MIXING"] S["12"] --> R T["13"] --> U[" "] V["14"] --> W[" "] X["15"…](/content/2026/04/737529/images/4c0b14cf425ac332ca8de6e158fb13af9603f8105f5ebf2f810a915164a17bf1.jpg)
![graph TD A["Supportive Feet"] --> B["1"] A --> C["2"] B --> D["3"] B --> E["4"] B --> F["5"] C --> G["15"] C --> H["16"] C --> I["17"] D --> J["LEFT MIXING"] D --> K["MID MIXING"] D --> L["RIGHT MIXING"] E --> M["SET"] E --> N["ADD"] E --> O["SUBTRACT"] E --> P["LIGHTING"] E --> Q["COLDDRINK"] E -->…](/content/2026/04/737529/images/2289bb433c2defbd244d3ece30c66cd2a988c9edf6afc06ac16976cfc2694f31.jpg)
Step 3:
13% Sugar
Step 2:
Note:
2.X -300
13% Sugar
Step 2:
Note:
3.X -450
13% Sugar
Step 2:
Note:
★Tips:
CLEANING AND MAINTENANCE
Note:
www.vevor.com/support
VEVOR®
TOUGH TOOLS, HALF PRICE
IMPORTANT SAFETY CAUTIONS
Large-sized Sealing Ring
![graph TD A["1"] --> B["LEFT MIXING"] C["2"] --> B D["3"] --> E["COLDDRINK"] F["4"] --> E G["5"] --> H["SET"] I["6"] --> J["LIGHTING/SUBTRACT"] K["7"] --> L["ADD"] M["8"] --> L N["9"] --> O["SLUSH"] P["10"] --> O Q["11"] --> R["RIGHT MIXING"] S["12"] --> R T["13"] --> U[" "] V["14"] --> W[" "] X["15"…](/content/2026/04/737529/images/34782b83612ed6a7350b420beb6b6b27a139f93001bb14de435b62bd25bd5c12.jpg)
![graph TD A["①"] --> B[" "] C["②"] --> D[" "] E["③"] --> F["LEFT MIXING"] G["④"] --> H["MID MIXING"] I["⑤"] --> J["RIGHT MIXING"] K["⑥"] --> L["SET"] M["⑦"] --> N["ADD"] O["⑧"] --> P["SUBTRACT"] Q["⑨"] --> R["LIGHTING"] S["⑩"] --> T["COLDDRINK"] U["⑪"] --> V["SLUSH"] W["⑫"] --> X[" "] Y["⑬"] --> Z["…](/content/2026/04/737529/images/c74176647a68c18ef4f193bc71c4c649df970aaf811ac2b4d4e0a8a80b628c7a.jpg)
Step 2:
Step 3:
13% Sugar
Step 2:
Notes:
2.X -300
13% Sugar
Step 2:
Notes:
3.X -450
13% Sugar
Step 2:
Notes:
★Tips:
CLEANING AND MAINTENANCE
Note:
www.vevor.com/support
VEVOR®
TOUGH TOOLS, HALF PRICE
IMPORTANT SAFETY CAUTIONS
Spare Medium-sized Sealing Ring (1 for X-150, 2 for X-300, 3 for X
KNOW YOUR SLUSH MACHINE
1.X-150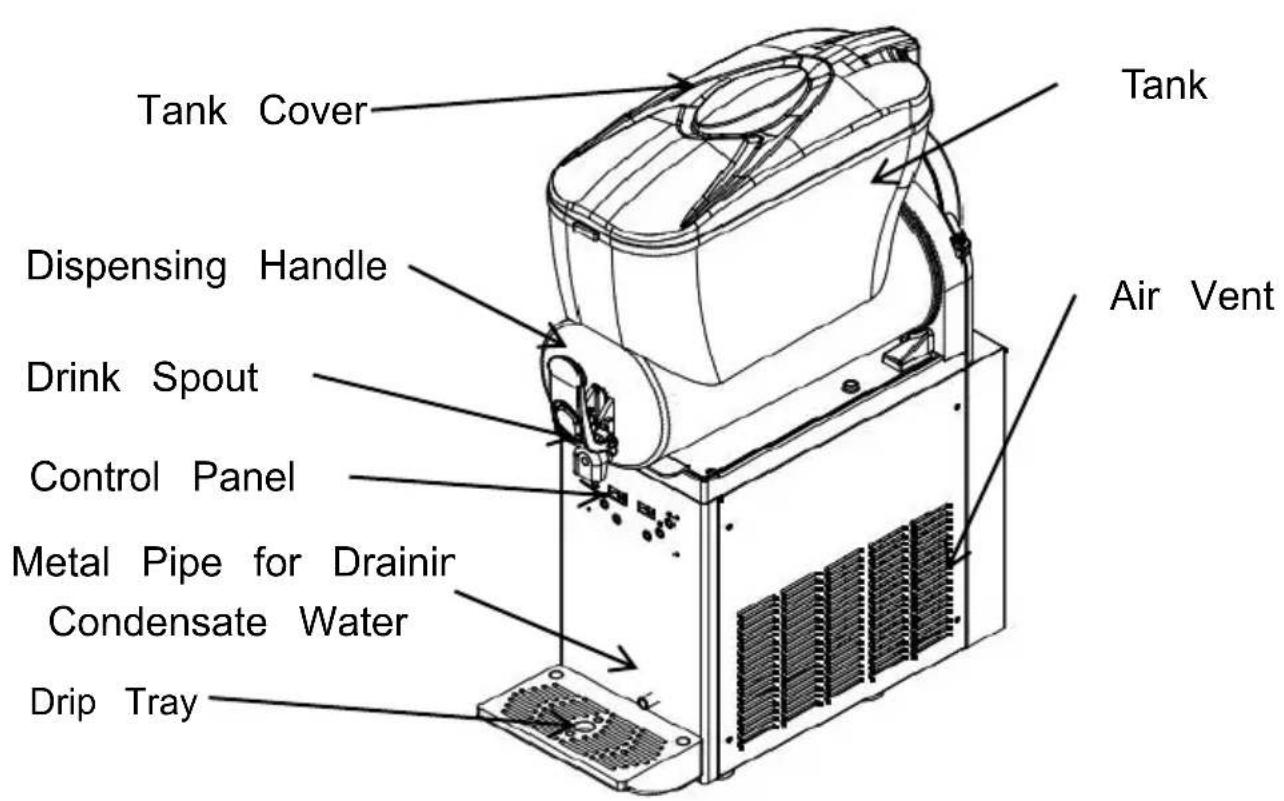
Large-sized Sealing Ring
![graph TD A["1"] --> B["LEFT MIXING"] C["2"] --> B D["3"] --> E["COLDDRINK"] F["4"] --> E G["5"] --> H["SET"] I["6"] --> J["LIGHTING/SUBTRACT"] K["7"] --> L["ADD"] M["8"] --> L N["9"] --> O["SLUSH"] P["10"] --> O Q["11"] --> R["RIGHT MIXING"] S["12"] --> R T["13"] --> U[" "] V["14"] --> W[" "] X["15"…](/content/2026/04/737529/images/bd9efcf1b621542f53a11aef94874a19c63cc4a400ba1c054a4bd393b5805f28.jpg)
Step 2:
Step 3:
13% Sugar
Step 2:
Notes:
2.X -300
13% Sugar
Step 2:
Notes:
3.X -450
13% Sugar
Step 2:
Notes:
★Tips:
CLEANING AND MAINTENANCE
Note:
5. Clean the evaporator
www.vevor.com/support
VEVOR®
TOUGH TOOLS, HALF PRICE
Technical support and e-warranty certificate www.vevor.com/support
SLUSH MACHINE
MODEL: X-150 X-300 X-450
NEED HELP? CONTACT US!
IMPORTANT SAFETY CAUTIONS
or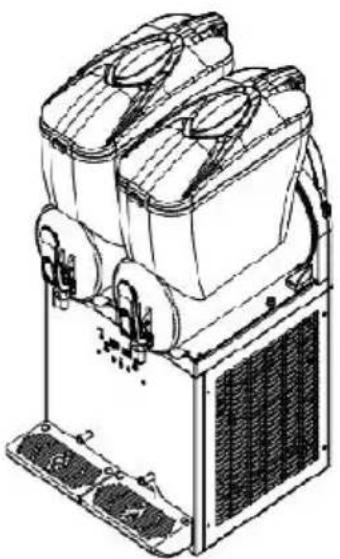
or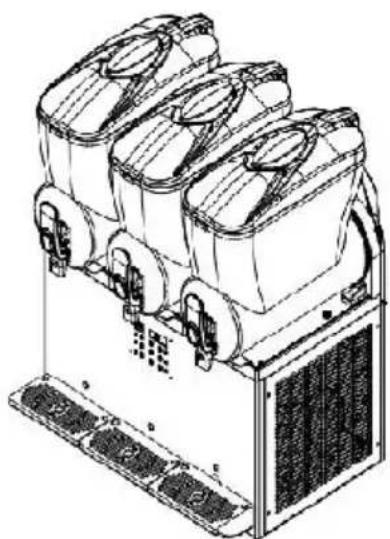
![graph TD A["1"] --> B["MIXING"] C["2"] --> B D["3"] --> E["COLDDRINK"] F["4"] --> E G["5"] --> H["SET/SUBTRACT"] I["6"] --> J["ADD"] K["7"] --> L["SLUSH"] M["8"] --> N["LIGHTING"] O["9"] --> N P["10"] --> Q["Lighting"] R["11"] --> S["Block"] T["12"] --> U["Block"] V["11"] --> W["Block"] X["12"] -->…](/content/2026/04/737529/images/48eda5ad39cb00a5081216715e4f861d80b680b9d3cb47a74b6b918d5d295bfe.jpg)
| 1 Mengindicator | 2 Mengknop | 3 Koelindicator |
| 4 Koelknop | 5 Instelknop | 6 Verstelknop |
| 7 Slush Knop maken | 8 Slush maken Indicator | 9 Bliksem aan/uit Kno |
| 10 Lichtindicator | 11 Linker LED-paneel | 12 Rechter LED-panee |
2.X-300
![graph TD A["1"] --> B["LEFT MIXING"] C["2"] --> B D["3"] --> E["COLDDRINK"] F["4"] --> E G["5"] --> H["SET"] I["6"] --> J["LIGHTING/SUBTRACT"] K["7"] --> L["ADD"] M["8"] --> L N["9"] --> O["SLUSH"] P["10"] --> O Q["11"] --> R["RIGHT MIXING"] S["12"] --> R T["13"] --> U[" "] V["14"] --> W[" "] X["15"…](/content/2026/04/737529/images/f89e1f3a485c575f883811a10d037fe1b60fcc4b3e42e93480ebfbacc35bcc5a.jpg)
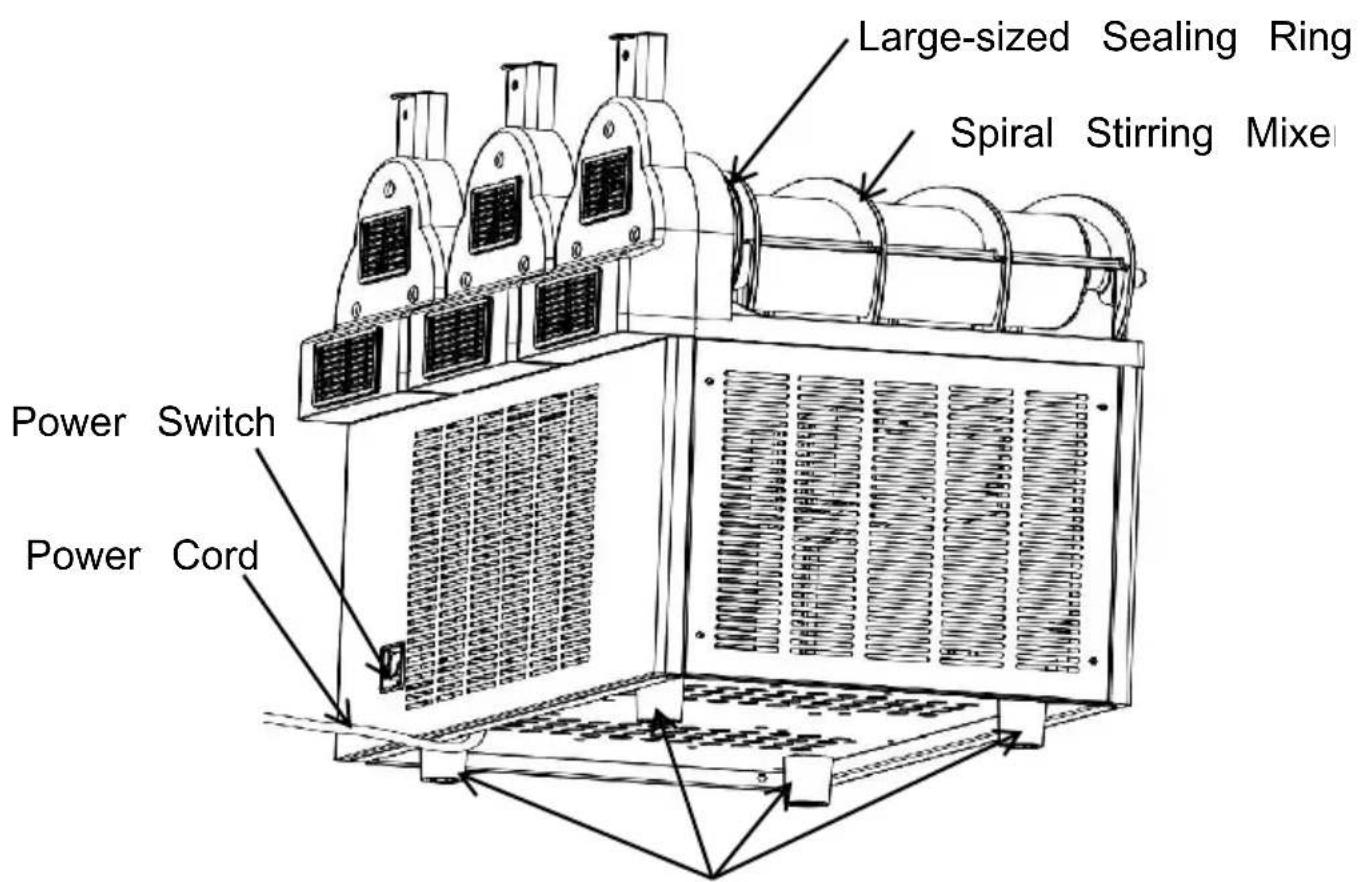
Supportive Feet
![graph TD A["①"] --> B[" "] C["②"] --> D[" "] E["③"] --> F["LEFT MIXING"] G["④"] --> H["MID MIXING"] I["⑤"] --> J["RIGHT MIXING"] K["⑥"] --> L["SET"] M["⑦"] --> N["ADD"] O["⑧"] --> P["SUBTRACT"] Q["⑨"] --> R["LIGHTING"] S["⑩"] --> T["COLDDRINK"] U["⑪"] --> V["SLUSH"] W["⑫"] --> X[" "] Y["⑬"] --> Z["…](/content/2026/04/737529/images/83bc2e78b1b50dcdf3b524907ac0d573eb38dde3ee2b211adda701a0050248fc.jpg)
Step 2:
Step 3:
13% Sugar
Step 2:
Open the tank cover, pour the diluted concentrate into the tank.
Notes:
Slush-making function
2.X -300
13% Sugar
Step 2:
Notes:
3.X -450
13% Sugar
Step 2:
Notes:
★Tips:
CLEANING AND MAINTENANCE
-Do not immerse the entire machine in water.
Note:
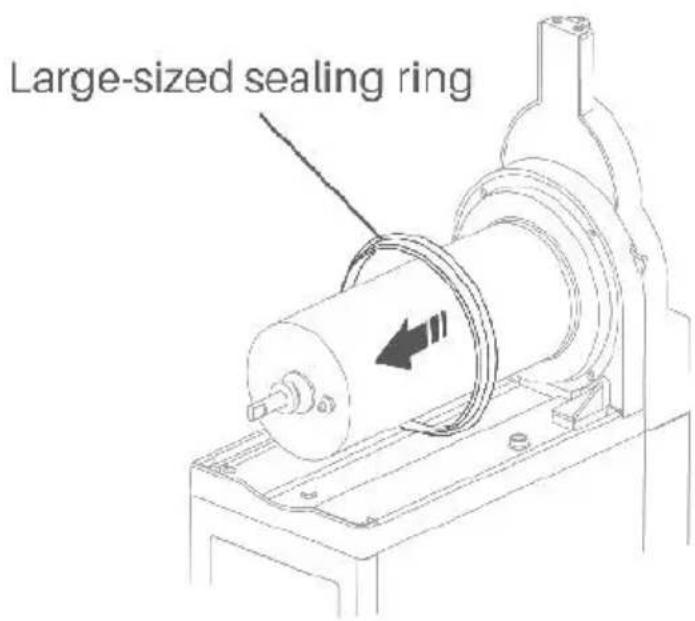
5. Clean the evaporator
7. Clean the condenser
TROUBLESHOOTING GUIDE
www.vevor.com/support
VEVOR®
TOUGH TOOLS, HALF PRICE
IMPORTANT SAFETY CAUTIONS
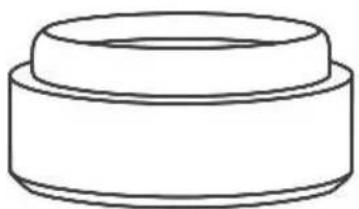

Spare Medium-sized Sealing Ring (1 for X-150, 2 for X-300, 3 for X
KNOW YOUR SLUSH MACHINE
1.X-150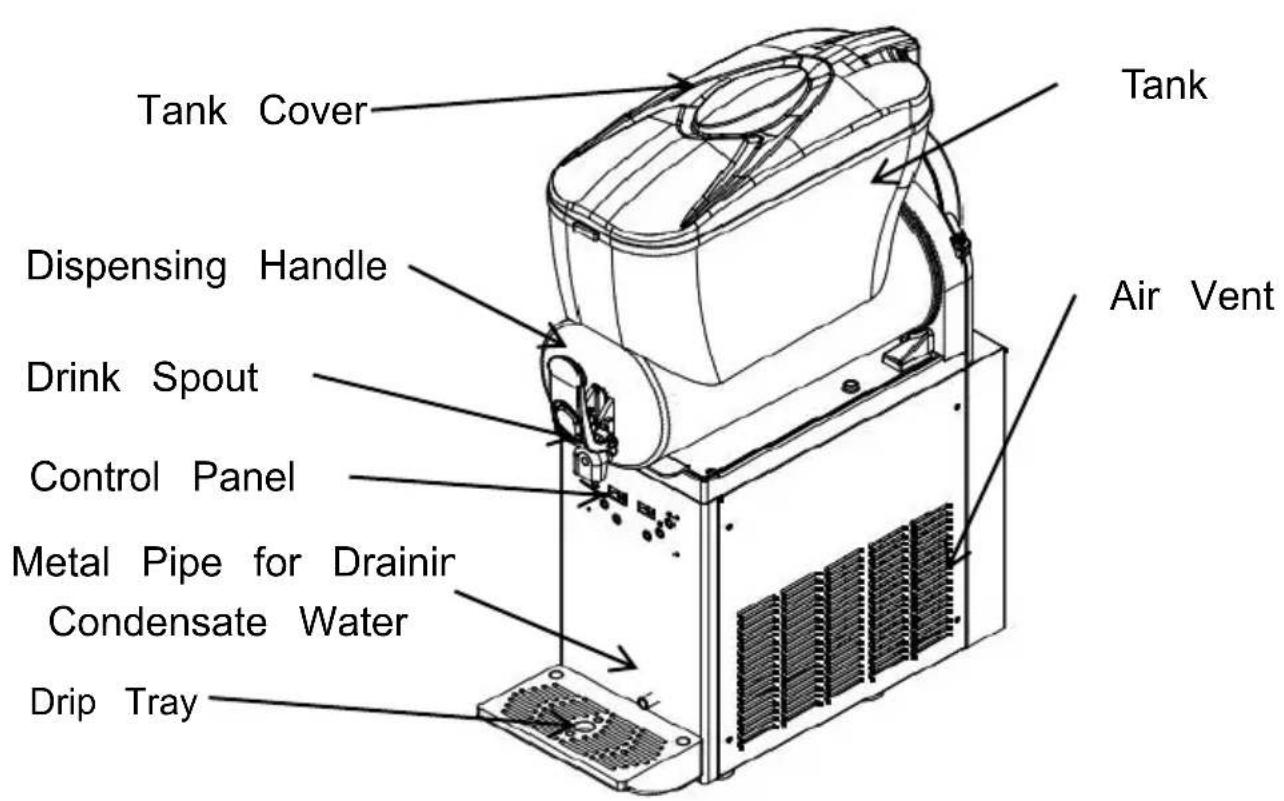
Large-sized Sealing Ring

![graph TD A["1"] --> B["LEFT MIXING"] C["2"] --> B D["3"] --> E["COLDDRINK"] F["4"] --> E G["5"] --> H["SET"] I["6"] --> J["LIGHTING/SUBTRACT"] K["7"] --> L["ADD"] M["8"] --> L N["9"] --> O["SLUSH"] P["10"] --> O Q["11"] --> R["RIGHT MIXING"] S["12"] --> R T["13"] --> U[" "] V["14"] --> W[" "] X["15"…](/content/2026/04/737529/images/8d3893665528af4b179d728518a887ed2449bfa443037b5d61378504e851bfee.jpg)
![graph TD A["①"] --> B[" "] C["②"] --> D[" "] E["③"] --> F["LEFT MIXING"] G["④"] --> H["MID MIXING"] I["⑤"] --> J["RIGHT MIXING"] K["⑥"] --> L["SET"] M["⑦"] --> N["ADD"] O["⑧"] --> P["SUBTRACT"] Q["⑨"] --> R["LIGHTING"] S["⑩"] --> T["COLDDRINK"] U["⑪"] --> V["SLUSH"] W["⑫"] --> X["15"] Y["⑬"] --> Z["…](/content/2026/04/737529/images/8440a838e50f99915e7877567d594c9c0e8e997f6a157a56ad0621ddbc3620cd.jpg)
Step 2:
Step 3:
13% Sugar
Step 2:
Notes:
Mixing function (Required)
Cooling function
Settings
2.X -300
13% Sugar
Step 2:
Notes:
Mixing function (Required)
3.X -450
Step 2:
Notes:

Mixing function (Required)

MID MIXING
SET
LIGHTING

RIGHT MIXING
ADD
COLDDRINK
SLUSH

Settings
★Tip:
CLEANING AND MAINTENANCE
Note:
www.vevor.com/support
- SLUSH MACHINE
- NEED HELP? CONTACT US
- TECHNICAL SUPPORT AND E-WARRANTY CERTIFICATE WWW.VEVOR.COM/SUPPORT
- IMPORTANT SAFETY CAUTIONS
- GENERAL SAFETY PRECAUTIONS
- ELECTRICAL SAFETY PRECAUTIONS
- WARNINGS
- ENVIRONMENTAL CONDITIONS
- INSTALLATION PRECAUTIONS
- SAVE THESE INSTRUCTIONS
- WHAT'S IN THE BOX
- KNOW YOUR SLUSH MACHINE
- X
- PREPARATION
- STEP
- ★ TIPS
- NOTE
- OPERATION GUIDE
- NOTES
- POWER CONNECTION
- MIXING FUNCTION (MUST-DO)
- COOLING FUNCTION
- SLUSH MAKING FUNCTION
- LIGHTING CONTROL
- SETTINGS
- GET COLD DRINK OR SLUSH
- ★TIPS
- CLEANING AND MAINTENANCE
- IMPORTANT NOTES BEFORE CLEANING
- OPERATIONS DURING CLEANING AND MAINTENANCE
- CLEAN THE REMOVED PARTS ACCORDING TO LOCAL HEALTH STANDARDS. FOLLOW THESE INSTRUCTIONS
- CLEANING THE DISPENSER PARTS
- CLEAN THE TANK AND THE STIRRING MIXER
- CLEAN THE TANK COVER
- CLEAN DRIP TRAY
- CLEAN THE EVAPORATOR
- CLEAN THE MAIN BODY
- CLEAN THE CONDENSER
- FOR X
- REASSEMBLE ALL PARTS
- FACTORY CODES EXPLANATIONS
- ERROR CODES EXPLANATIONS
- TROUBLESHOOTING GUIDE
- EXPLOSIVE DRAWINGS
- VEVOR®
- TOUGH TOOLS, HALF PRICE
- LIGHT CONTROL
- SLUSH-MAKING FUNCTION
- MIXING FUNCTION (REQUIRED)
- ★TIP
Brand : Vevor
Model : X-300
Category : Ice Maker