
CWM03-M - Cat flap Vevor - Free user manual and instructions
Find the device manual for free CWM03-M Vevor in PDF.
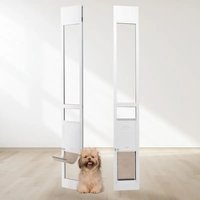


| Product Type | Sliding Glass Door Pet Door |
| Brand | Vevor |
| Model | CWM03-M |
| Color | White |
| Flap Opening Dimensions (W × H) | 209.6 × 311.2 mm (8.25 × 12.25 in) |
| Adjustable Sliding Door Height | 1.93 to 2.05 m (75 7/8 to 80 11/10 in) |
| Sliding Door Width | 295 mm (11.6 in) |
| Main Material | Aluminum frame, vinyl flap |
| Approximate Weight | 5 kg |
| Power Supply | None (mechanical) |
| Main Functions | Pet passage, secure lock closure, removable closure panel, height adjustment, weather seals |
| Locking | Lock latch included |
| Closure Panel | Yes, sliding |
| Weather Seal | Weather brush and glass seal provided |
| Number of screws provided | Approximately 25 screws (various types) |
| T-brackets | 2 brackets included |
| Maintenance | Clean flaps with a soft cloth; replace flaps if shrinkage/stretching |
| Safety | Do not drill into glass; wear safety equipment; do not overtighten screws |
| Operating Temperature | -18 °C to 38 °C (0 °F to 100 °F) |
| Warranty | Not specified in manual |
Frequently Asked Questions - CWM03-M Vevor
User questions about CWM03-M Vevor
0 question about this device. Answer the ones you know or ask your own.
Ask a new question about this device
Download the instructions for your Cat flap in PDF format for free! Find your manual CWM03-M - Vevor and take your electronic device back in hand. On this page are published all the documents necessary for the use of your device. CWM03-M by Vevor.
USER MANUAL CWM03-M Vevor
Dog door for sliding door
CWM03-M / CWM03-L / CWM03-XL / CWM03-L-B / CWM03-XL-B / CWM03-M-H / CWM03-L-H / CWM03-XL-H
We continue to be committed to provide you tools with competitive price. "Save Half", "Half Price" or any other similar expressions used by us only represents an estimate of savings you might benefit from buying certain tools with us compared to the major top brands and does not necessarily mean to cover all categories of tools offered by us. You are reminded to verify carefully when you are placing an order with us if you are actually saving in comparison with the top major brands.
MODEL: CWM03-M / CWM03-L / CWM03-XL / CWM03-L-B / CWM03-XL-B / CWM03-M-H / CWM03-L-H / CWM03-XL-H

This is the original instruction, please read all manual instructions carefully before operation. VEVOR reserves a clear interpretation of our user manual. The appearance of the product shall be subject to the product you received. Please forgive us that we won't inform again if there are any technology or software updates on our product.
Important Safety Information
Explanation of Attention Words and Symbols used in this guide
This is the safety alert symbol, it is used to alert you to potential personal injury hazards.
Obey all safety messages that follow this symbol to avoid possible injury or death.
WARNING
WARNING indicates a hazardous situation which, if not avoided, could result in death or serious injury.
CAUTION
CAUTION used with the safety alert symbol, indicates a hazardous situation which, if not avoided, could result in minor or moderate injury.
NOTICE
NOTICE is used to address safe use practices not related to personal injury.
WARNING
- When children are present in the home, it is important to consider the pet door during childproofing activities. The pet door may be misused by a child, resulting in the child accessing potential hazards that may be on the other side of the pet door. Purchasers/Homeowners with swimming pools should ensure that the pet door is monitored at all times and that the swimming pool has adequate barriers to prevent new hazards from being created inside or outside of your home, which may be accessed through the pet door. The closing panel or lock, if applicable, is provided for aesthetic and energy efficiency purposes and is not intended as a security device. VEVOR will not be liable for unintended use and the purchaser of this product accepts full responsibility for oversight of the opening it creates.
- Power Tools. Risk of severe injury; follow all safety instructions for power tools and always wear proper safety equipment.
CAUTION
- The user, prior to installation, must become familiar with all building codes that may affect the installation of the pet door and determine, along with a licensed contractor, its suitability in a given installation. This pet door is not a fire door. It is important for the owner and contractor to consider any risks that may be present inside or outside of the pet door, and any risks that may be created by subsequent changes to your property and how they may relate to the existence and use, including misuse of the pet door.
NOTICE
- Keep these instructions with important papers; be sure to transfer these instructions to the new owner of the property.
- Prior to installation and drilling, consult your sliding glass door manufacturer's warranty. Unauthorized changes or modifications may void the warranty. Installing screws into vinyl door frames or door jambs may crack the vinyl.
- Apply glass sweep and weather stripping to a clean dry surface at temperature above 63°F (17°C).
- Make sure there is nothing underneath the door where you will be drilling or cutting out the opening.
- Use a manual screwdriver to tighten screws. Do not over tighten. Over tightening can warp the pet door frame.
- It is not possible to cut holes in tempered or double pane glass except at the manufacturer. Consult a professional glazier or glass manufacturer to install the pet door in a glass door or window.
Model and Parameters
1-Piece Sliding Glass Door Dimensions
| Model | Width | Height | Colour |
| CWM03-M | 11.6"(295mm) | 75 7/8 " - 80 11/16 (1.93-2.05m) | White |
| CWM03-L | 13.58"(345mm) | ||
| CWM03-XL | 17"(431mm) | ||
| CWM03-L-B | 13.58"(345mm) | Brown | |
| CWM03-XL-B | 17"(431mm) | ||
| CWM03-M-H | 11.6"(295mm) | 91 7/16 " - 96" (2.32-2.44m) | White |
| CWM03-L-H | 13.58"(345mm) | ||
| CWM03-XL-H | 17"(431mm) |
Door Size
CWM03-M / CWM03-M-H: 8 1/4 in W × 12 1/4 in H (209.6 × 311.2 mm)
CWM03-L / CWM03-L-B / CWM03-L-H:
10 1/4 in W × 16 1/4 in H (260.4 × 412.8 mm)
CWM03-XL / CWM03-XL-B / CWM03-XL-H:
13 5/8 in W × 23 5/8 in H (346 × 600 mm)
Components
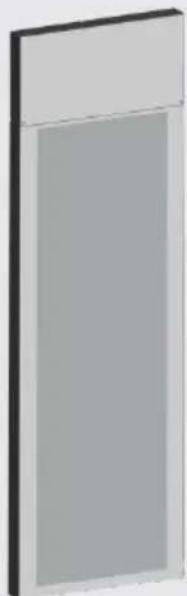 Freedom Patio Panel Freedom Patio Panel |  T-Brackets (2)M4 x 12 mmSheet Metal Screws (10) T-Brackets (2)M4 x 12 mmSheet Metal Screws (10) | 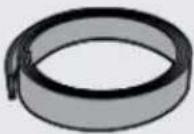 Self-adhesive sealsr Self-adhesive sealsr |
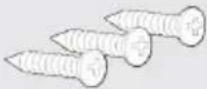 M3*10mm Cross cutself-tapping screws (3) M3*10mm Cross cutself-tapping screws (3) | 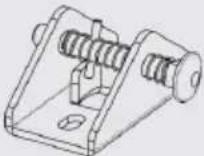 Latch Assembly Latch Assembly | |
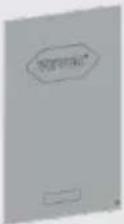 Closing Panel Closing Panel | 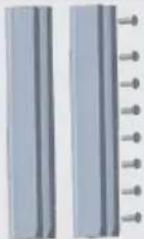 Connecting Bar (2)M3.5*10mm countersunkhead tapping screws withbroken end (10) Connecting Bar (2)M3.5*10mm countersunkhead tapping screws withbroken end (10) | |
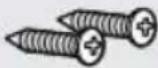 M3.5*12mm Large flathead tapping screws(2) M3.5*12mm Large flathead tapping screws(2) |  Installation Guide Installation Guide |
Tools Needed
 scissor scissor |  Tape Measure Tape Measure | 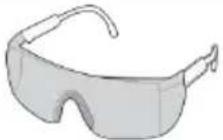 SafetyEquipment SafetyEquipment |  Masking or Painter's Tape Masking or Painter's Tape |  Pencil Pencil |
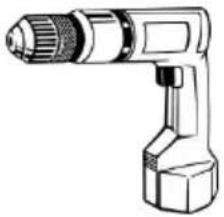 Drill Drill |  (2.5mm)Drill Bit (2.5mm)Drill Bit |  (3.2mm)Drill Bit (3.2mm)Drill Bit |  (6.5mm)Drill Bit (6.5mm)Drill Bit |  PhillipsScrewdriver PhillipsScrewdriver |
Key Definitions
Replacement Flap Size: Overall flap size when removed from pet door
Flap Opening Size: Usable flap space for pet to enter and exit through the pet door
Top Door Section: Section of Sliding Glass Pet Door with the glass
Bottom Door Section: Section of Sliding Glass Pet Door with the pet door
Height Adjuster: A metal panel with springs located above the top door section to adjust the Sliding Glass Pet Door height
Sliding Glass Pet Door height
Sliding Glass Door Frame Opening: Opening in sliding glass door between the top door
track and the lower door track
Exposed Sliding Glass Frame: Sliding glass door frame that is visible and exposed on the interior and exterior wall
Recessed Sliding Glass Frame: Sliding glass door frame that is flush with or not visible in the
interior or exterior wall
Rise: The height from the floor to the bottom of the flap in the pet door. It is the height the pet
must step over to enter or exit the pet door.
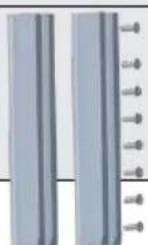
Panel Rib Line: Raised ribbed lines on left and right side of Sliding Glass Pet Door frame to
indicate drilling outside of rib line area. Do not drill inside of the rib line as gas present and
will break if drilling occurs in this area.
Operating Temperature Range: 0°F to 100°F (-18°C to 38°C)
Installing Your Sliding Glass Pet Door
NOTICE
Prior to installation and drilling, consult your sliding glass door manufacturer's warranty. Unauthorized changes or modifications may void the warranty. Installing screws into vinyl door frames or door jambs may crack the vinyl.
Step 1
Measure
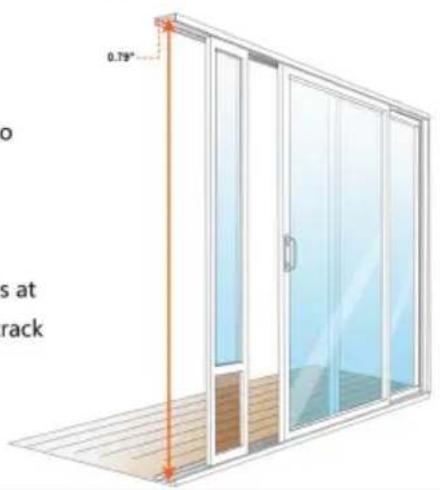
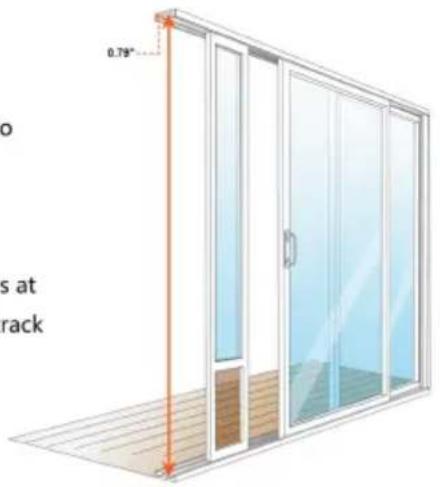
HOW TO MEASURE?
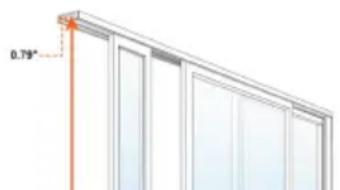
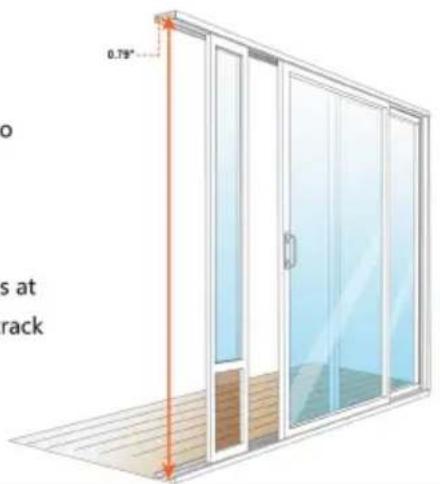
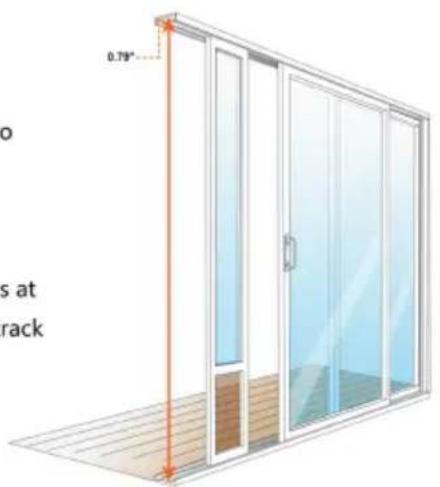
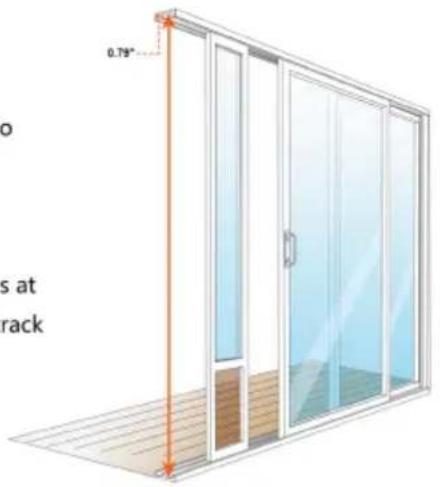
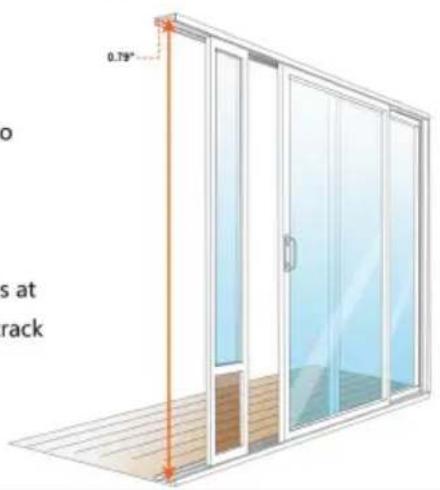
Measure from inside of upper track to inside of lower track.
Measuring aluminum panels requires at least 0.79 inches to be used on the track.
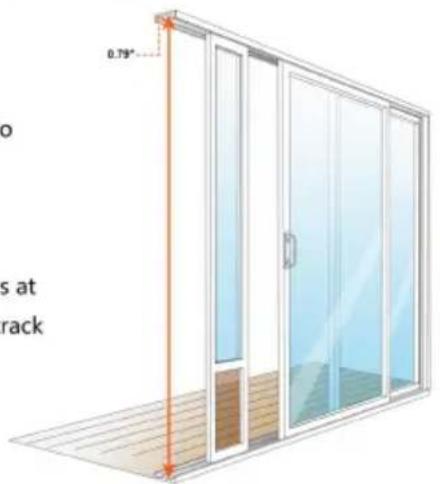
1A. Prior to any Sliding Glass Pet Door purchase, you must determine the height of your sliding glass door frame opening. Measure from the highest point in the upper door track to the lowest point in the lower door track.
Step 2
Install Sliding Glass Pet Door
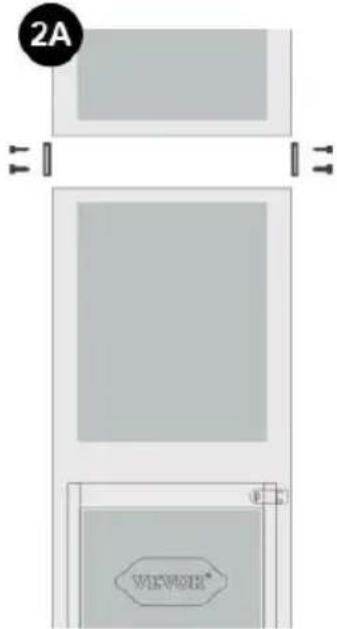
2A. Before proceeding with installation, assemble the top and bottom panels to be one piece. Slide the connecting bars into the bottom panel holes and insert (2) M3.5*10mm Flat Head Screws into each connecting bar. Then slide the top panel down over the connecting bars and insert 2 screws on each side. Check alignment of the 2 door panels, then tighten all 8 screws.
CAUTION
Use care when assembling the two halves of the door together. This could be a potential pinch point and could lead to injury.
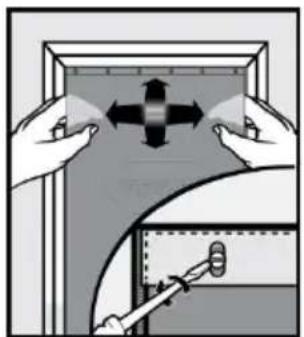
NOTE: Remove all packaging materials, including cardboard inserts inside the height adjuster.
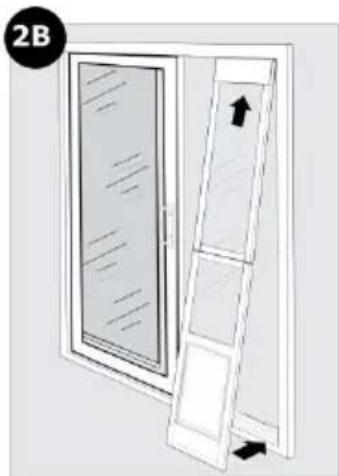
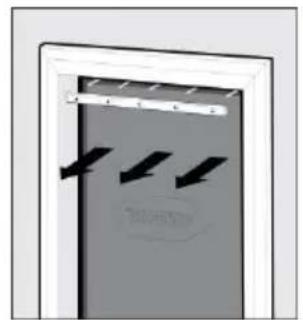
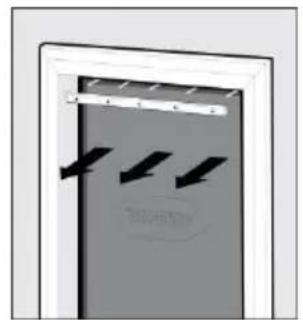
2B. The Sliding Glass Pet Door inserts into the opening in your sliding glass door against the doorjamb. Your sliding glass door will close against the Sliding Glass Pet Door. With the sliding glass door open, insert the top of the Sliding Glass Pet Door with height adjuster into the upper door track on the interior side of the sliding glass door. Lift up and position the bottom of the Sliding Glass Pet Door into the lower door track on the interior side of the sliding glass door. Ensure the side of the Sliding Glass Pet Door showing flap screw heads is on the interior side of your sliding glass door.
side of sliding glass door. Lift up and position the bottom of the Sliding Glass Pet Door into the lower door track on the interior side of the sliding glass door. Ensure that the side of the Sliding Glass Pet Door showing the flap screw heads is on the interior side of your sliding glass door.
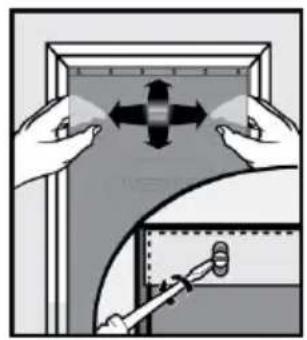
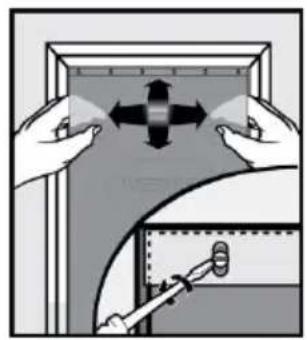
NOTE: You may need to pull down the height adjuster to fit the Sliding Glass Door in your sliding glass door track. Firmly pull down one side and then the
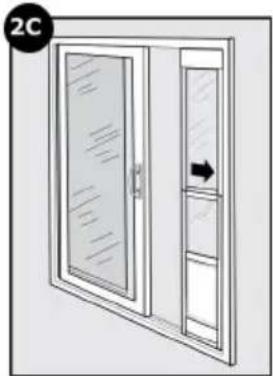
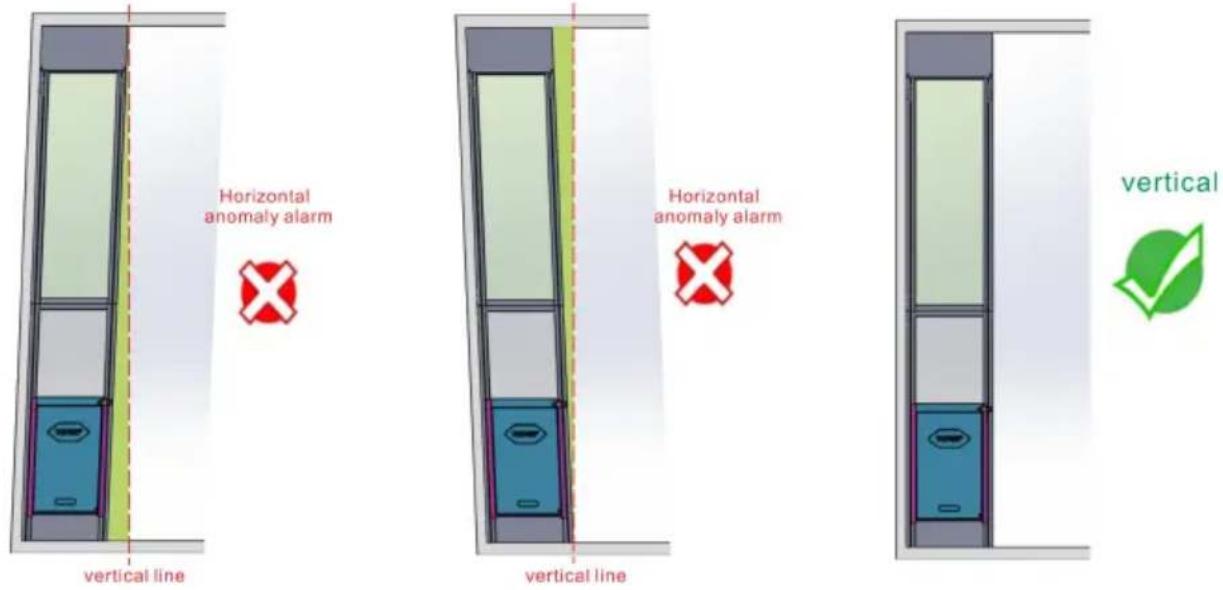
2c. First, check if the door frame angle is a right angle (90°). Place the sliding glass pet door onto the door frame. The sliding glass pet door should be flush with the door frame without any gaps. Ensure that the height adjuster is fully extended and does not tilt to one side. If any gaps are found, add shims until the pet door is parallel to the contact line of the sliding door. Before drilling, make sure you are satisfied with the installation of the sliding glass pet door. Please refer to the following diagram for correct installation.
Step 3
Attach the Sliding Glass Pet Door
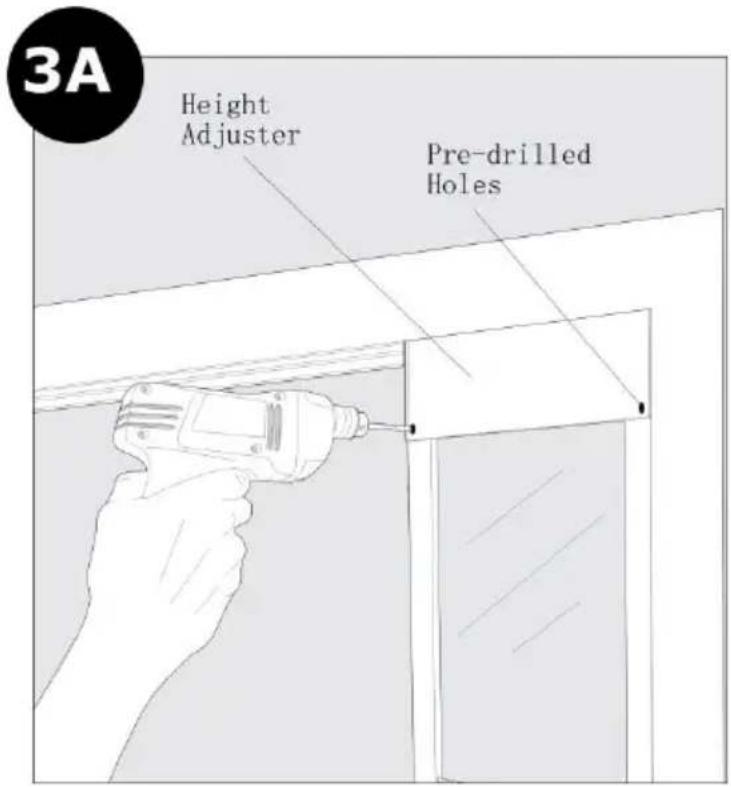
3A. Slide the Sliding Glass Pet Door out slightly from the door jamb to show the pre-drilled holes in the height adjuster. Drill (2.5 mm) holes through the two pre-drilled holes (interior side of the height adjuster). Secure the height adjuster to the Sliding Glass Pet Door using two M3*10mm cross-cut self-tapping screws. Slide the Sliding Glass Pet Door back against the door jamb. Make sure it is flush without any gaps.
Sliding Glass Pet Door Options for Exposed or Recessed Door Frames Install Sliding Glass Pet Door with T-brackets using screws
- Slide the Sliding Glass Pet Door against the sliding door jamb. Measure and mark the top
center and bottom side of the Sliding Glass Pet Door where the sliding door will come against.
Then mark on the sliding door frame (use a pencil or something that can be cleaned away).
These marks are for a marking guide only for the 2 T-brackets.
- Slide the panel over and up to be able to place the T-brackets into the track of the sliding glass door.
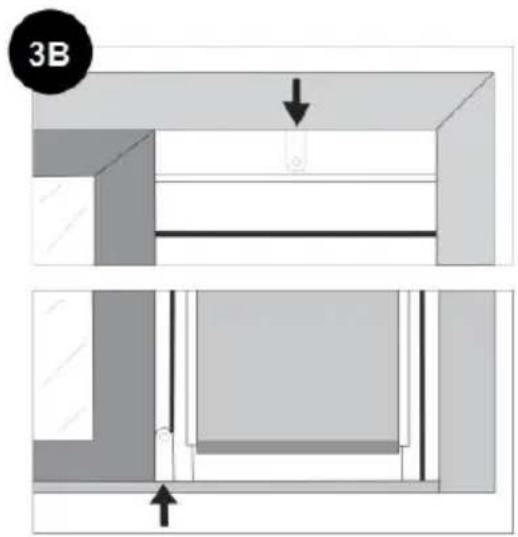
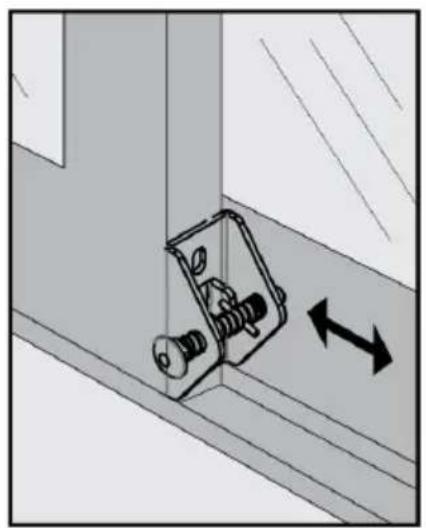
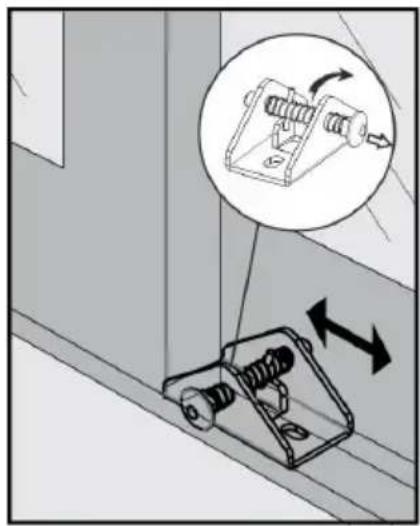
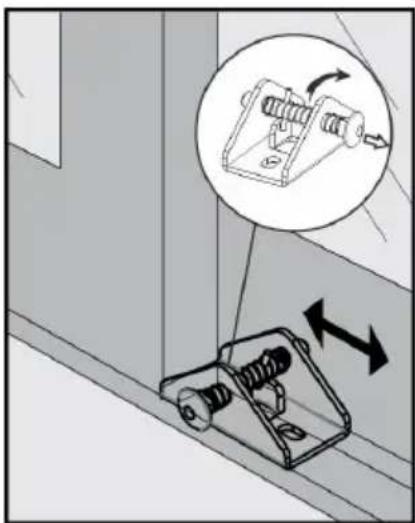
3B. Take one of the T-brackets and place at the top of the sliding glass track so the “T” part of the bracket aligns with your mark. Mark with a pencil on the inside of the track for your pilot holes and do the same for the bottom track. (The T-brackets are universal and will work in the top or bottom track).
Use a (3.2 mm) drill bit to drill pilot holes for T-brackets at the top and bottom of the Sliding Glass Pet Door. Place the T-brackets back into place and, with the 4 mm sheet metal screws provided, secure the T-brackets in the top and the bottom of your sliding glass door track. Slide your Sliding
Glass Pet Door back against the door jamb and you will see the T-brackets in your Sliding Glass Pet Door.
Use a (3.2 mm) drill bit to drill pilot holes through T-brackets and into the Sliding Glass
Pet Door at the top and bottom. Attach the brackets with the screws provided.
Step 4
Install Lock
NOTICE
Prior to installation and drilling, consult your sliding glass door manufacturer's warranty. Unauthorized changes or modifications may void the warranty. Installing screws into vinyl door frames or door jambs may crack the vinyl.
CAUTION
DO NOT DRILL INTO GLASS.
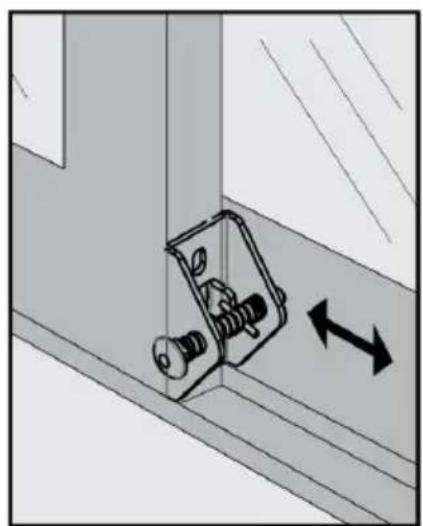
- Close the sliding glass door tightly against the Patio Panel. Position the latch on the bottom or top of your existing sliding glass door. With the locking bolt in the retracted position, pointed toward the sliding glass door or stationary wall. Leave approximately 1/8" clearance between the locking bolt tip and rail.
- Holding the lock firmly in place, mark screw holes and mark the center of the locking hole in the rail of the sliding glass door or stationary window.
Note: Inspect the location of drill marks to make sure they will not be in contact with glass on either
the sliding glass door or the Patio Panel when drilling.
- Drill two pilot holes for attaching the latch, (3.5 mm) for aluminum sliding glass doors and
(2.5 mm) for wood or vinyl sliding glass doors. Drill a 6mm hole for locking bolt. Attach latch with two M4*12mm Sheet Metal screws. DO NOT OVERTIGHTEN.
Helpful Tip: If over tightening results, and you have stripped the connection, move the latch slightly up or down and re-drill mounting holes. Another option is to enlarge existing holes to a larger size and install plastic anchors. Plastic anchors can be purchased at any local hardware or home improvement store.
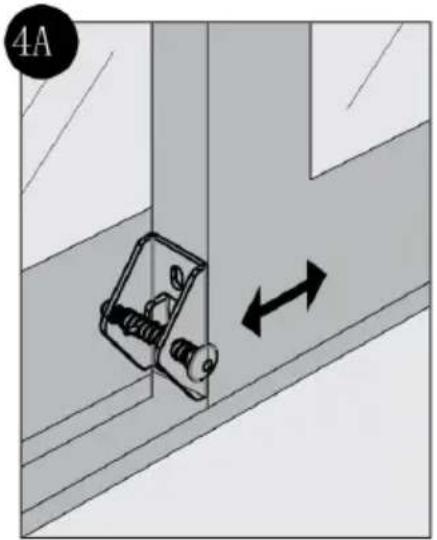
Latch Assembly on sliding door / Latch Assembly on stationary window
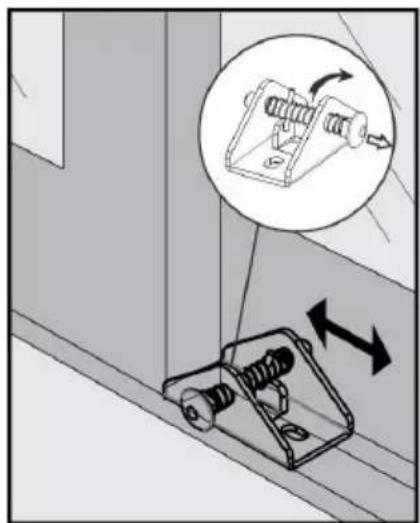
Latch Assembly in lower track
Step 5
Install Glass Sweep and Weather Stripping
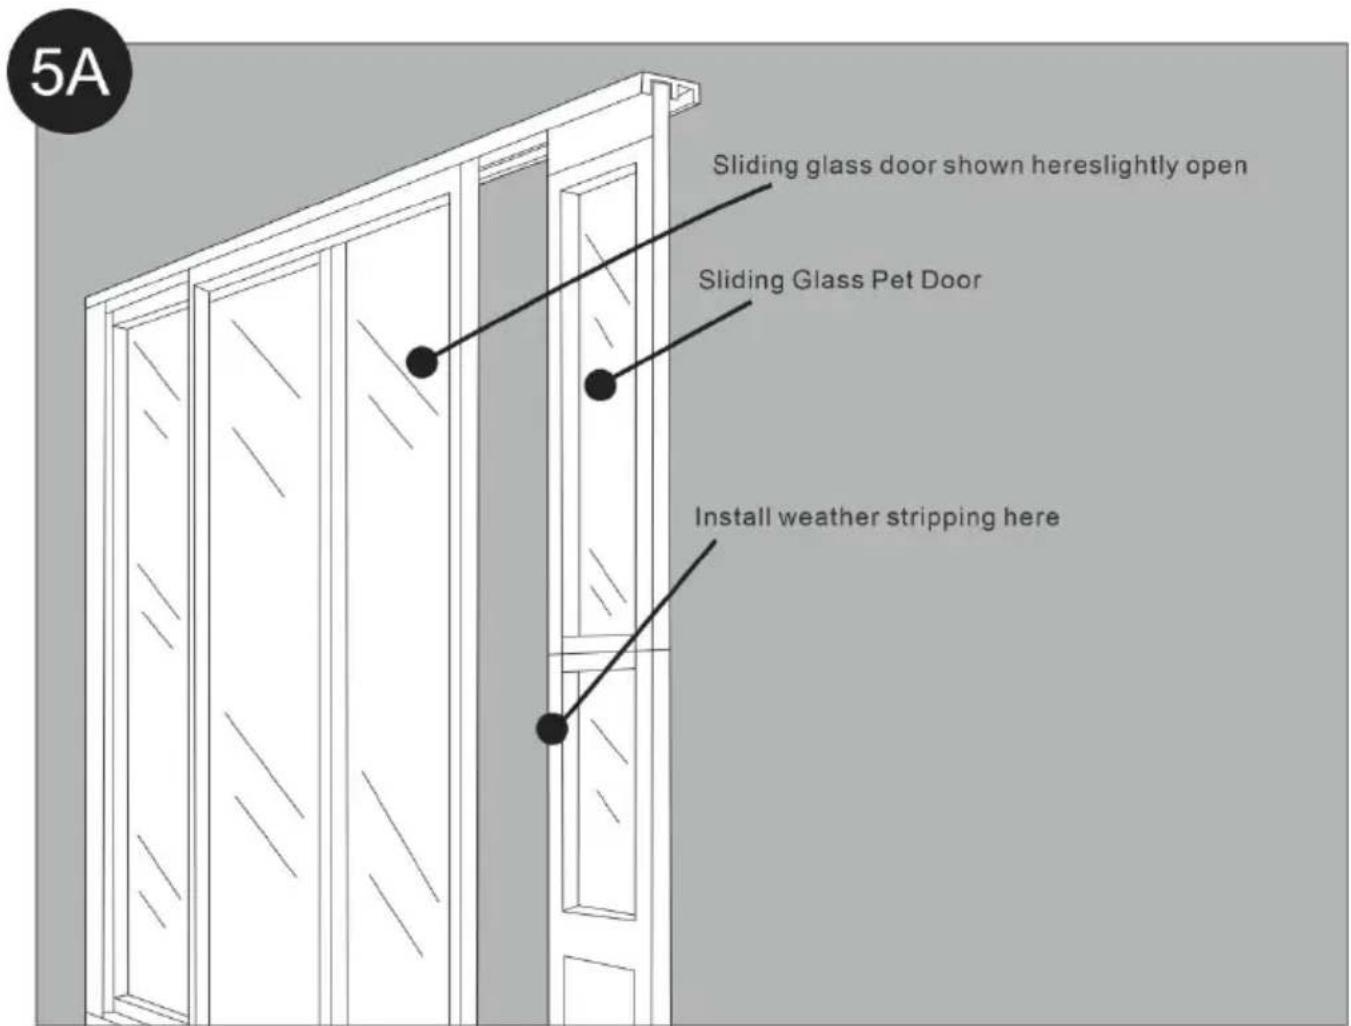
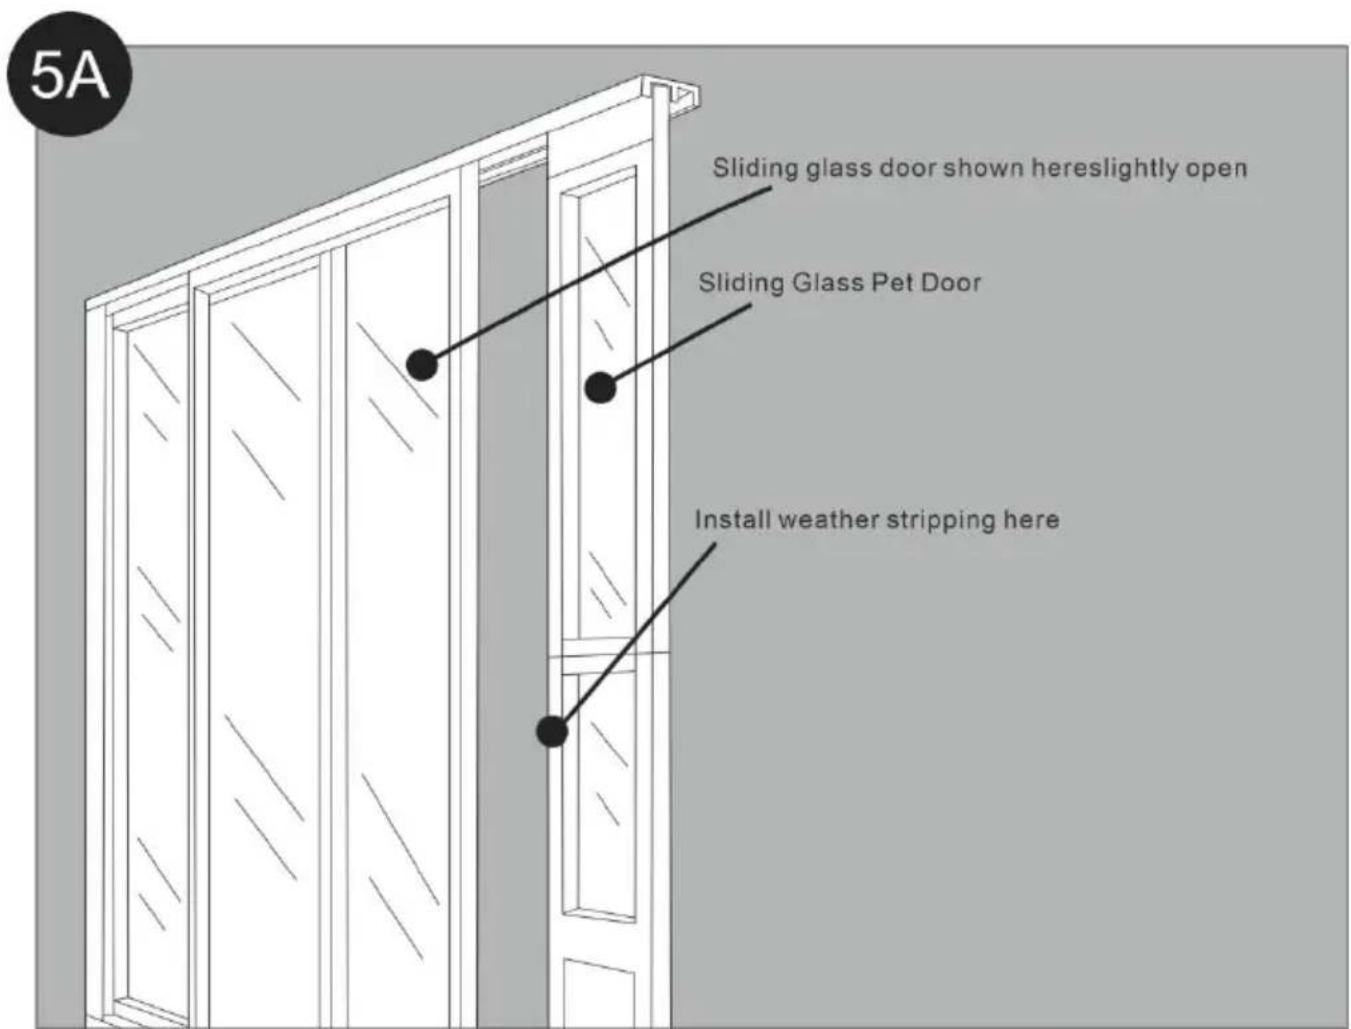
5A. The glass sweep should be installed on the back edge of the sliding glass door to form a seal between the sliding glass door and the stationary glass door. The weather stripping should be installed on the front edge of the sliding glass door to form a seal between the Sliding Glass Pet Door and the sliding glass door.
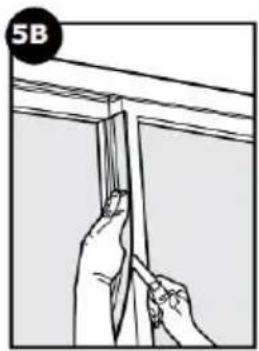
5B. Close the sliding glass door against the Sliding Glass Pet Door. Clean and dry the back edge of the sliding glass door. Position the glass sweep at the top edge with the flexible part touching the
glass of the stationary door. Carefully peel away the backing and press the glass sweep in place as you move down to the bottom of the glass. Trim any excess with scissors.
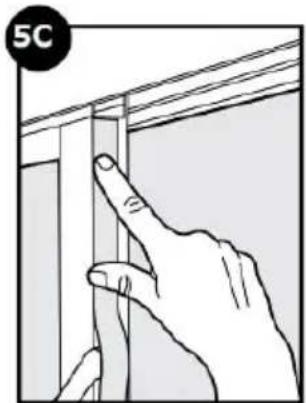
5C. Open the sliding glass door. Clean and dry the front edge of the sliding glass door. Position the weather stripping at the top front edge toward the interior side. Carefully peel away the backing and press the weather stripping into place as you move down to the bottom of the door. Trim any excess with scissors.
Step 6
Train Your Pet

6A. It may help for you to be on one side of the door and your pet on the other. Lift the flap a few inches and try to talk your pet through the door. After your pet has gone through a few times, allow the flap to touch your pet's back so they will become comfortable using the pet door. If your pet will not go through the door, tape it open until they use it on their own.
Helpful Tip: Try treats to encourage your pet to go through the pet door and become comfortable using it.
Closing Panel
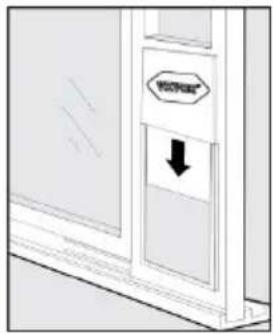
The Closing Panel slides in the track on the interior (or exterior) of the Sliding Pet Door. It is useful during inclement weather or to keep your pet from using the door.
Replacement Flaps
Replace & Adjust
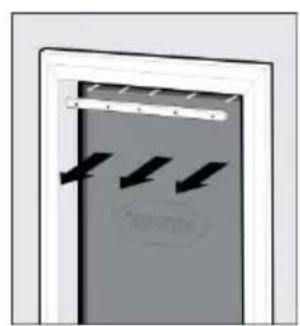
During extreme changes in weather, vinyl flaps can shrink during cold months and stretch in warmer months. Easily replace or adjust to ensure a snug fit during seasonal changes.
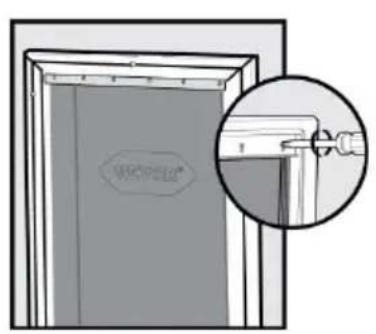
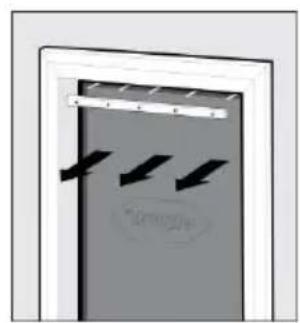
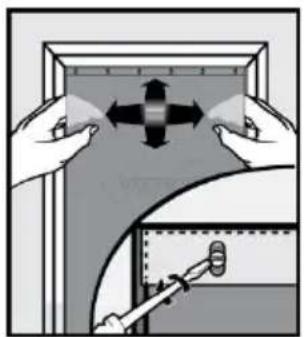
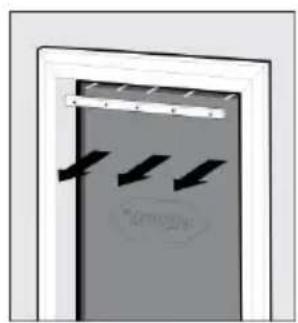
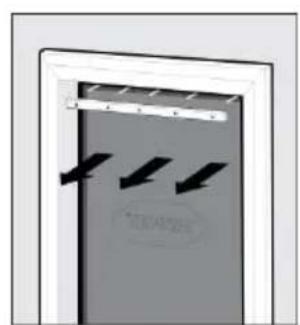
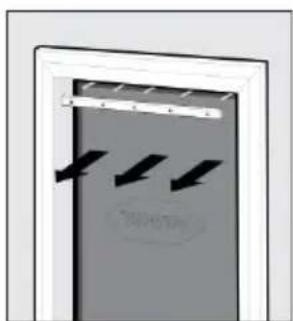
To Replace: Remove screws from the interior frame of pet door.

Remove bar and flap.

Replace new vinyl flap and position horizontally and vertically to fit into door frame. Replace existing bar and tighten screws in place.
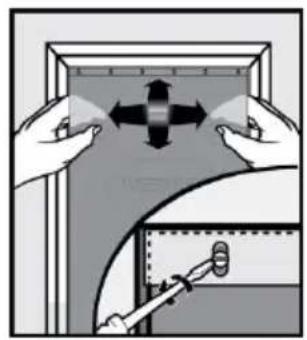
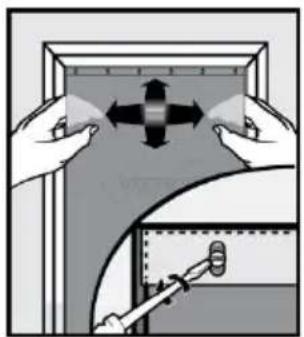
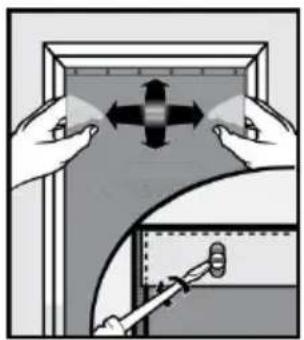
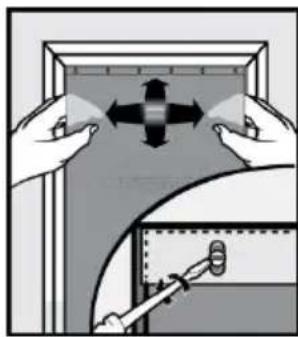
To Adjust: Slightly loosen screws from interior frame of pet door.

Slightly move bar away from flap.

Adjust flap horizontally and/or vertically to fit into door frame. Push bar towards flap and tighten screws in place.
Terms of Use and Limitation of Liability
1. Terms of Use
This Product is offered to you conditioned upon your acceptance without modification of the terms, conditions and notices contained herein. Usage of this Product implies acceptance of all such terms, conditions, and notices.
2. Proper Use
This Product is designed for use with pets where training is desired. The special temperament of your pet may not work with this Product. If you are unsure what this is appropriate for your pet, please consult your veterinarian or certified trainer. Proper use includes reviewing the entire Operating Guide provided with your Product and any specific Caution statements.
3. No Unlawful or Prohibited Use
This Product is designed for use with pets only. This pet training device is not intended to harm, injure, or provoke. Using this Product in a way that is not in could result in violation of Federal, State or local laws.
4. Limitation of Liability
In no event shall VEVOR be liable for any direct, indirect, punitive, incidental, special or consequential damages, or any damages whatsoever arising out of or connected with the use or misuse of this Product. Buyer assumes all risks and liability from use of this Product.
5. Modification of Terms and Conditions
Radio Systems Corporation reserves the right to change the terms, conditions and notices under which this Product is offered.
Manufacturer: Shanghaimuxinmuyeyouxiangongsi
Address: Shuangchenglu 803nong11hao1602A-1609shi, baoshanqu, shanghai 200000 CN.
EC REP: E-CrossStu GmbH.
Mainzer Landstr.69, 60329 Frankfurt am Main.
UK REP: YH CONSULTING LIMITED.
C/O YH Consulting Limited Office 147, Centurion House, London Road, Staines-upon-Thames, Surrey, TW18 4AX
Imported to AUS: SIHAO PTY LTD.
1 ROKEVA STREETEASTWOOD NSW 2122 Australia
Imported to USA: Sanven Technology Ltd.
Suite 250, 9166 Anaheim Place, Rancho Cucamonga, CA 91730
VEVOR®
TOUGH TOOLS, HALF PRICE
VEVOR®
TOUGH TOOLS, HALF PRICE
CWM03-M / CWM03-L / CWM03-XL / CWM03-L -B / CWM03-XL -B / CWM03-M -H / CWM03-L -H / CWM03-XL -H
MODEL: CWM03-M / CWM03-L / CWM03-XL / CWM03-L-B / CWM03-XL / CWM03-M-H / CWM03-L-H / CWM03-XL-H

Measure from inside of upper track to inside of lower track.
Measuring aluminum panels requires at least 0.79 inches to be used on the track.
C/O YH Consulting Limited Office 147, Centurion House, London Road,
Staines-upon-Thames, Surrey, TW18 4AX
Suite 250, 9166 Anaheim Place, Rancho Cucamonga, CA 91730
VEVOR®
TOUGH TOOLS, HALF PRICE
VEVOR®
TOUGH TOOLS, HALF PRICE
CWM03-M / CWM03-L / CWM03-XL / CWM03-L-B / CWM03-XL-B
/ CWM03-M-H / CWM03-L-H / CWM03-XL-H
Dog door for sliding door
MODEL: CWM03-M / CWM03-L / CWM03-XL / CWM03-L-B / CWM03-XL / CWM03-M-H / CWM03-L-H / CWM03-XL-H

Measure from inside of upper track to inside of lower track.
Step 3

A/S YH Consulting Limited Bureau 147, Centurion House, London Road,
Staines-upon-Thames, Surrey, TW18 4AX
Imported in AUS: SIHAO PTY LTD.
1 ROKEVA STREET, EASTWOOD, NSW 2122, Australia
CWM03-M / CWM03-L / CWM03-XL / CWM03-L -B / CWM03-XL -B / CWM03-M -H / CWM03-L -H / CWM03-XL -H
Dog door for sliding door
MODEL: CWM03-M / CWM03-L / CWM03-XL / CWM03-L -B / CWM03-XL -E / CWM03-M -H / CWM03-L -H / CWM03-XL -H

Measure from inside of upper track to inside of lower track
Measuring aluminum panels requires at least 0.79 inches to be used on the track
Step 3
Lock mounting on stationary window
Lock mounting in lower track
Step 5
Install glass wiper and draft strips
Attn: YH Consulting Limited, Office 147, Centurion House, London Road, Staines-upon-Thames, Surrey, TW18 4AX
Suite 250, 9166 Anaheim Place, Rancho Cucamonga, CA 91730
VEVOR®
TOUGH TOOLS, HALF PRICE
VEVOR®
TOUGH TOOLS, HALF PRICE
CWM03-M / CWM03-L / CWM03-XL / CWM03-L-B / CWM03-XL-B / CWM03-M-H / CWM03-L-H / CWM03-XL-H
MODEL: CWM03-M / CWM03-L / CWM03-XL / CWM03-L-B / CWM03-XL / CWM03-M-H / CWM03-L-H / CWM03-XL-H

Measure from inside of upper track to inside of lower track
Measuring aluminum panels requires at least 0.79 inches to be used on the track
C/O YH Consulting Limited, Office 147, Centurion House, London Road, Staines-upon-Thames, Surrey, TW18 4AX
Imported to Australia: SIHAO PTY LTD.
1 ROKEVA STREET, EASTWOOD NSW 2122, Australia
Imported to USA: Sanven Technology Ltd.
Suite 250, 9166 Anaheim Place, Rancho Cucamonga, CA 91730
VEVOR®
TOUGH TOOLS, HALF PRICE
VEVOR®
TOUGH TOOLS, HALF PRICE
CWM03-M / CWM03-L / CWM03-XL / CWM03-L-B / CWM03-XL-B
/ CWM03-M-H / CWM03-L-H / CWM03-XL-H
Dog door for sliding door
MODEL: CWM03-M / CWM03-L / CWM03-XL / CWM03-L-B / CWM03-XL / CWM03-M-H / CWM03-L-H / CWM03-XL-H

interior or exterior wall
Measure from inside of upper track to inside of lower track
Measuring aluminum panels requires at least 0.79 inches to be used on the track
Step 3
To replace:
C/O YH Consulting Limited Office 147, Centurion House, London Road, Staines-upon-Thames, Surrey, TW18 4AX
Imported to AUS: SIHAO PTY LTD.
1 ROKEVA STREET, EASTWOOD, NSW 2122, Australia
Suite 250, 9166 Anaheim Place, Rancho Cucamonga, CA 91730
VEVOR®
TOUGH TOOLS, HALF PRICE
VEVOR®
TOUGH TOOLS, HALF PRICE
CWM03-M / CWM03-L / CWM03-XL / CWM03-L-B / CWM03-XL-B
/ CWM03-M-H / CWM03-L-H / CWM03-XL-H
Dog door for sliding door
MODEL: CWM03-M / CWM03-L / CWM03-XL / CWM03-L-B / CWM03-XL / CWM03-M-H / CWM03-L-H / CWM03-XL-H

Panel of
Measure from inside of upper track to inside of lower track
Measuring aluminum panels requires at least 0.79 inches to be used on the track
To replace:
C/O YH Consulting Limited Office 147, Centurion House, London Road,
Staines-upon-Thames, Surrey, TW18 4AX
Imported into AUS: SIHAO PTY LTD.
1 ROKEVA STREET, EASTWOOD NSW 2122, Australia
Suite 250, 9166 Anaheim Place, Rancho Cucamonga, CA 91730
VEVOR®
TOUGH TOOLS, HALF PRICE
VEVOR®
TOUGH TOOLS, HALF PRICE
CWM03-M / CWM03-L / CWM03-XL / CWM03-L-B / CWM03-XL-B
/ CWM03-M-H / CWM03-L-H / CWM03-XL-H
Dog door for sliding door
MODEL: CWM03-M / CWM03-L / CWM03-XL / CWM03-L-B / CWM03-XL-E / CWM03-M-H / CWM03-L-H / CWM03-XL-H

Measure from inside of upper track to inside of lower track
Measuring aluminum panels requires at least 0.79 inches to be used on the track
Step 3
DO NOT DRILL INTO GLASS.
To replace: Unscrew
C/O YH Consulting Limited Office 147, Centurion House, London Road, Staines-upon-Thames, Surrey, TW18 4AX
Imported into AUS: SIHAO PTY LTD.
1 ROKEVA STREET EASTWOOD NSW 2122 Australia
Imported into USA: Sanven Technology Ltd.
Apartment 250, 9166 Anaheim Place, Rancho Cucamonga, CA 91730
Brand : Vevor
Model : CWM03-M
Category : Cat flap