HB6089-UL - Blender Vevor - Free user manual and instructions
Find the device manual for free HB6089-UL Vevor in PDF.

| Product Type | Commercial Immersion Blender |
| Brand | Vevor |
| Model | HB6089-UL (and variants B, D, AC, AB, A) |
| Power Supply | 120 V~60 Hz |
| Rated Power | 500 W or 750 W depending on model |
| Speed Range | 4000 to 20000 rpm (variable) |
| Shaft Length | 12, 16, or 20 inches depending on model |
| Noise Level | ≤85 dB |
| Continuous Run Function | Yes, with power button lock |
| Safety Button | Yes, must be pressed before each start |
| Thermal Protection | Yes, auto shut-off in case of overheating |
| Shaft Material | Stainless steel (spray) |
| Shaft Cleaning | Dishwasher safe or washable under running water |
| Motor Block Cleaning | Wipe with a damp cloth, do not immerse |
| Blade Disassembly | Possible using two provided wrenches |
| Recommended Use | Commercial (restaurant kitchens, canteens, etc.) |
| Warranty and Support | Technical support via www.vevor.com/support |
| Package Contents | Blender, mixing shaft, instruction manual |
Frequently Asked Questions - HB6089-UL Vevor
User questions about HB6089-UL Vevor
0 question about this device. Answer the ones you know or ask your own.
Ask a new question about this device
Download the instructions for your Blender in PDF format for free! Find your manual HB6089-UL - Vevor and take your electronic device back in hand. On this page are published all the documents necessary for the use of your device. HB6089-UL by Vevor.
USER MANUAL HB6089-UL Vevor
Technical Support and E-Warranty Certificate www.vevor.com/support
INSTRUCTION MANUAL
MODEL:HB6089B-UL/HB6089D-UL/HB6089AC-UL/HB6089AB-UL/HB6089A-UL
We continue to be committed to provide you tools with competitive price "Save Half", "Half Price" or any other similar expressions used by us only report estimate of savings you might benefit from buying certain tools with us compared to top brands and doses not necessarily mean to cover all categories of tools offered are kindly reminded to verify carefully when you are placing an order with us actually saving half in comparison with the top major brands.
VEVOR®
TOUGH TOOLS, HALF PRICE
Commercial Blender
MODEL:HB6089B-UL/HB6089D-UL/HB6089AC-UL/HB6089AB-UL/HB6089A-UL
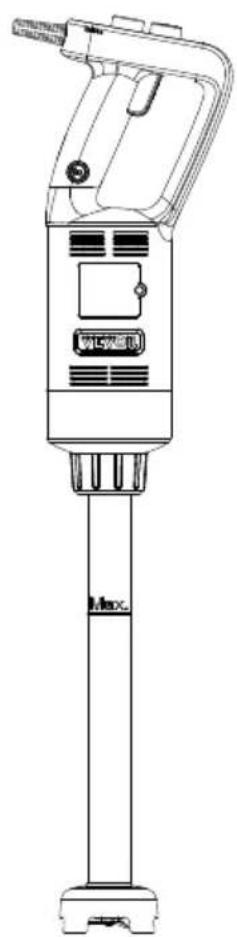
natural_image
Line drawing of a handheld electric shaver with no visible text or symbolsNEED HELP? CONTACT US!
Have product questions? Need technical support? Please feel fr contact us:

CustomerService@vevor.com
This is the original instruction, please read all manual instruction carefully before operating. VEVOR reserves a clear interpretation user manual. The appearance of the product shall be subject to product you received. Please forgive us that we won't inform you there are any technology or software updates on our product.
IMPORTANT SAFEGUARDS
Before using the electrical appliance, the following basic precautions should always be followed including the following:
-
Read all instructions. Before using it, check that the voltage of the wall outlet corresponds to the shown on the rating plate.
-
Do not operate any appliance with a damaged cord or plug or after the appliance malfunctions, or is dropped or damaged in any manner. Return appliance to the nearest authorized service facility for examination, repair or electrical or mechanical adjustment.
-
If the supply cord is damaged, it must be replaced by the manufacturer, a authorized service agent, or a qualified technician to avoid a hazard.
-
Always disconnect the blender from the supply if left unattended before assembling, disassembling, or cleaning.
-
Do not let cord hang over edge of table or hot surface. Be careful not the long power cord when using the appliance.
Do not immerse the upper part of the blender in water, as this would give electric shock.
-
Avoid contacting moving parts.
-
Using accessories not recommended by the manufacturer may cause injuries to persons.
-
Do not operate the appliance for other than its intended use.
- Avoid splashing the food into the vent holes of unit body during blending.
- The blender must be used in a working environment that is far away from corrosive materials or oil pollution, and must be kept away from explosive and flammable materials.
- The metal blades are extremely sharp Please handle it carefully.
- Be careful of potential injury from misuse.
- In the process of using the appliance, it is necessary to hold it with both hands, one hand holding the host handle, and the other hand holding the plastic connector.
- Switch off the appliance and disconnect from supply before changing accessories or approaching parts that move in use.
- This appliance is not intended for use by children or by persons with reduced physical, sensory, or mental capabilities, or lack of experience and knowledge. Close supervision is necessary when any appliance is used near children. Children should be supervised to ensure that they do not play with the appliance.
SAVE THESE INSTRUCTIONS
KNOW YOUR COMMERICAL HAND BLENDER
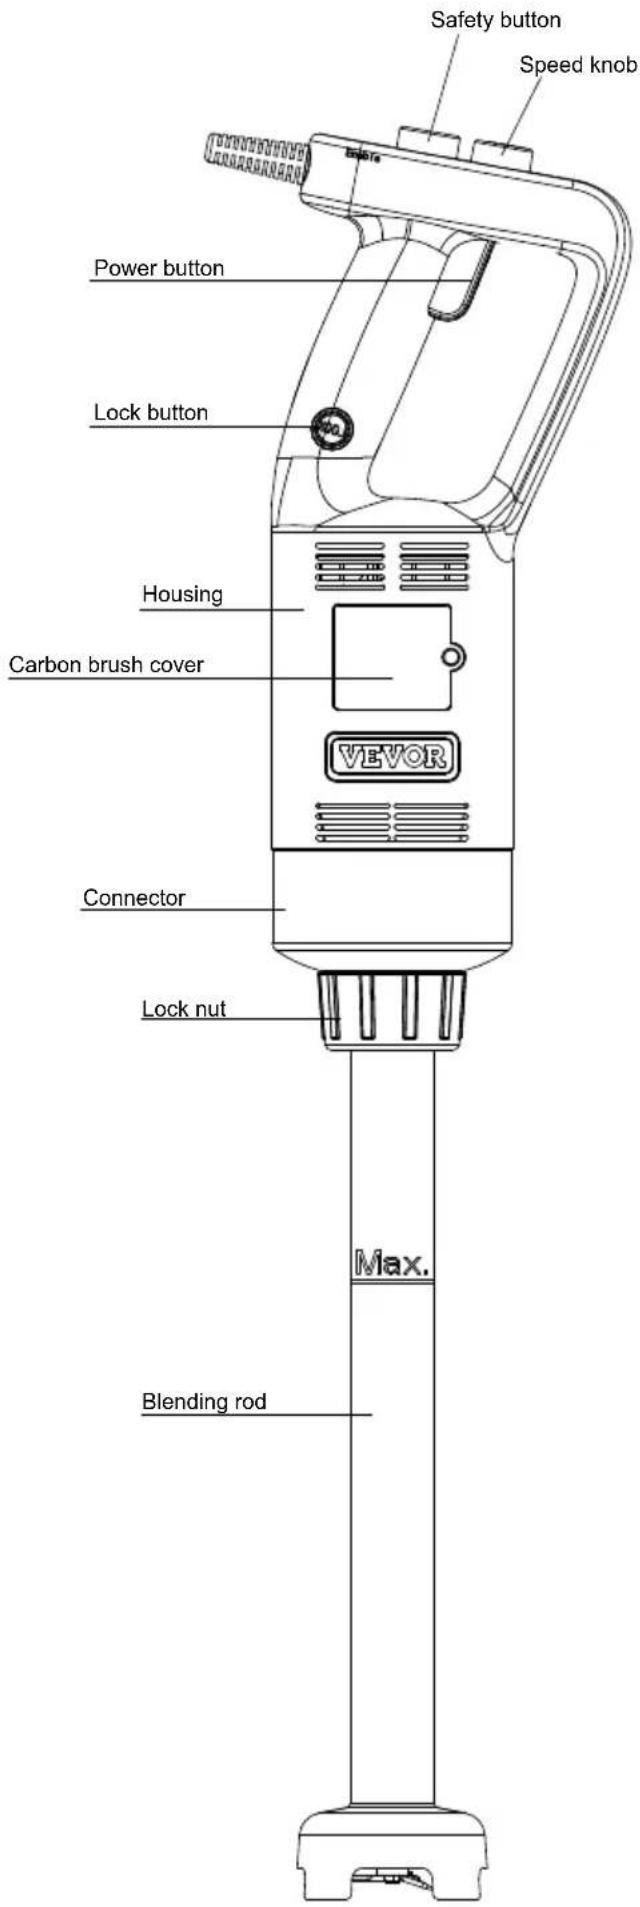
TECHNICAL PARAMETER
| ModellInput | Rated Power | Tool length | Rotating speed(Min) | Rotating speed (Max) | Working noise | |
| HB6089 B-UL | 120V~ 60Hz | 500W12 | inch | 4000 RPM/Min | 18000 RPM/Min | ≤85dB (A) |
| HB6089 D-UL | 120V~ 60Hz | 500W20 | inch | 4000 RPM/Min | 18000 RPM/Min | ≤85dB (A) |
| HB6089 AC-UL | 120V~ 60Hz | 750W12 | inch | 8000 RPM/Min | 20000 RPM/Min | ≤85dB (A) |
| HB6089 AB-UL | 120V~ 60Hz | 750W16 | inch | 8000 RPM/Min | 20000 RPM/Min | ≤85dB (A) |
| HB6089 A-UL | 120V~ 60Hz | 750W20 | inch | 8000 RPM/Min | 20000 RPM/Min | ≤85dB (A) |
Before attaching and detaching operation, it must be ensured that the appliance stops working and its mains plug is unplugged.
How to attach:
- Insert the blending rod into the threaded inner hole of the unit body. When inserting, Align the slot of the connector with the ribs of the square aluminum to ensure that the connector is inserted in place.
- Tighten the lock nut to fix the blending rod firmly onto the body.

After the stirring rod is assembled into place with the main engine, rotate and tighten the plastic parts, and it is considered that the stirring rod has been fixed.
How to detach:
- Loosen the lock nut.
- Pull out the blending rod.
USING YOUR BLENDER
Before the first use, clean the blender according to the section of “QUICK CLEANING”.
The time running unit without load can't exceed 20s.
IMPORTANT: Blades are very sharp; handle them with care. Ensure that the hand-held blender is unplugged from the power outlet before installing or rem attachments.
OPERATION METHOD
GETTING STARTED AND STOPPED
-
Check that the power button (3) is released.
-
Install the blending rod.
-
Connect the main unit to the power source.
-
Press the safety button (1) and proceed to the next step within 5s. If the unlocking fails after 5s, press the safety button (1) again.
-
Press the power button (3) to start the hand blender (working time per c minutes, interval time between two cycles ≥ 1 minute).
-
Release the power button (3), and the machine will stop automatically.

Continuous operation instruction
After completing steps 1-5 above, proceed to the following steps:
- Press the lock button (4) when the power button (3) is pressed down, ar red indicator lights up.
- Release the power button (3) at this time, the hand blender will continue
- Press the power button (3) again, and the appliance stops, and the red is turned off
Speed adjusting instruction
After completing steps 1-5 above, proceed to the following steps:
- Rotate the speed knob (2) to the desired speed setting
NOTE:
In order to better control the hand blender, it is recommended to hold the hand and the bottom of the body. In addition, tilting the machine at a slight angle recommended to prevent the bell-shaped housing from touching the bottom of a container. The ingredients in the container shall not exceed the MAX height of the blending rod. Avoid splashing the food into the vent holes of unit body or blending.
CLEANING AND MAINTENANCE METHODS
- Unplug the appliance and remove the detachable blending rod.
- Wash the detachable blending rod under running water without using an abrasive cleaner or detergents. After cleaning the detachable blending rod, pla upright so that any water that may have gotten in can be drained. The blend is a dishwasher-safe component.
- Wipe the motor unit with a damp cloth. Never immerse it in water for cloth as an electric shock may occur.
- Dry thoroughly.
QUICK CLEANING
Between processing tasks, hold the hand-held blender in the container half fill with water and turn on for a few seconds.
CAUTION: Blades are very sharp; handle them with care.
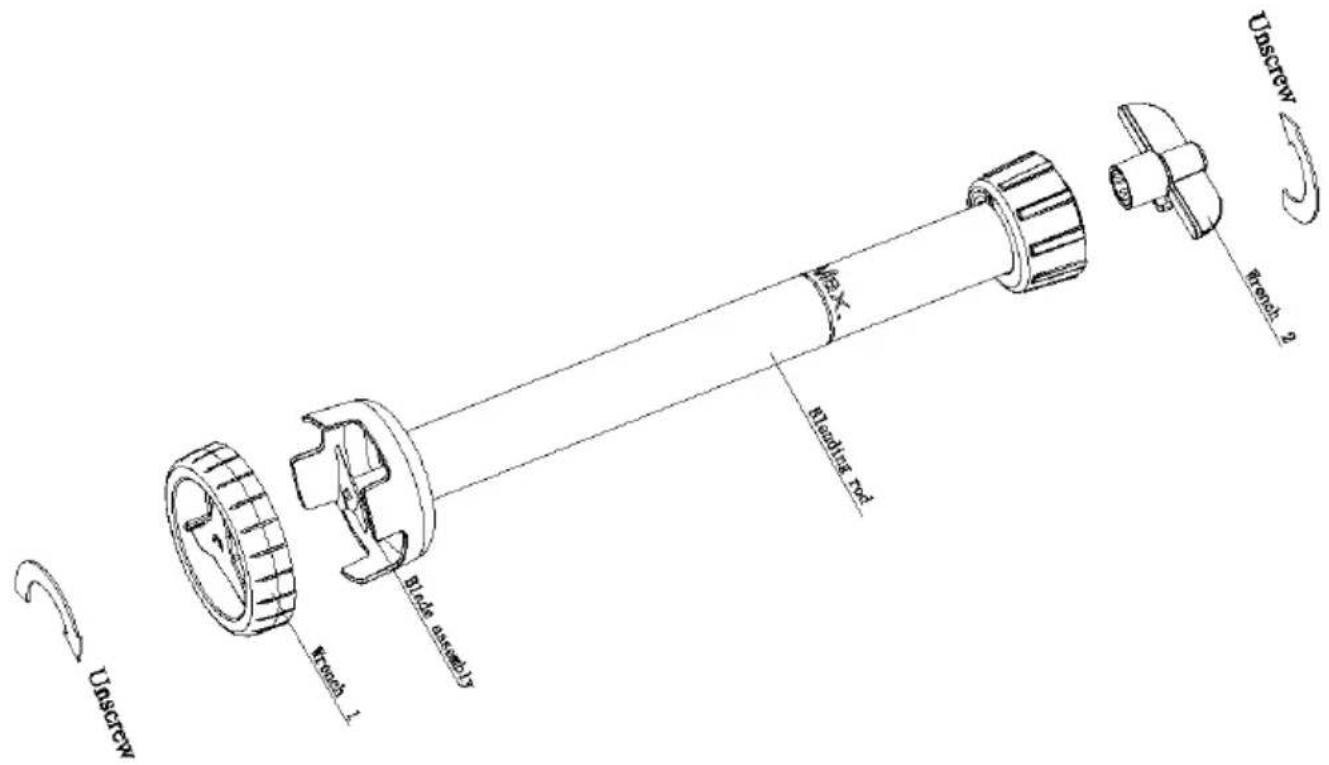
REMOVAL/INSTALLATION OF BLADE ASSEMBLY
- Align the blade assembly with wrench 1 and insert into it.
- Align the blending head slot with wrench 2 and insert into it.
- Unscrew clockwise to remove the blending rod.
FAULT ANALYSI
| Fault Phenomenon | Cause Analysis | Exclusion Methods |
| Indicator light is not on | The power cord is not plugged in. | 1.Check the power cord to m sure it is plugged in. |
| Indicator Light on Product Inoperative | 1.Long working hours, motor overheat protection.2.The machine itself is of order. | 1.Wait an hour before reusing 2.Send to after-sales service department. |
Note:
Above are common trouble analysis and troubleshooting methods. For other troubles, please contact our customer service department, or go directly to ou designated repair point for repair. Do not dismantle and repair yourself.
Made In China
VEVOR®
TOUGH TOOLS, HALF PRICE
Technical Support and E-Warranty Certificate
www.vevor.com/support
VEVOR®
TOUGH TOOLS, HALF PRICE
Technical Support and E-Warranty Certificate www.vevor.com/support
INSTRUCTION MANUAL
MODEL:HB6089B-GS/HB6089D-GS/HB6089AC-GS/HB6089AB-GS/HB6089A-GS
We continue to be committed to provide you tools with competitive price "Save Half", "Half Price" or any other similar expressions used by us only report estimate of savings you might benefit from buying certain tools with us compared to top brands and doses not necessarily mean to cover all categories of tools offered are kindly reminded to verify carefully when you are placing an order with us actually saving half in comparison with the top major brands.
VEVOR®
TOUGH TOOLS, HALF PRICE
Commercial Blender
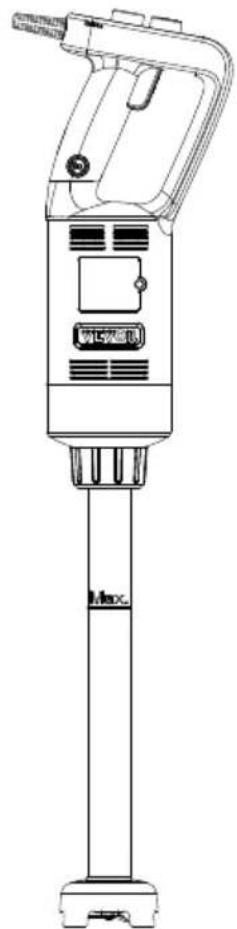
MODEL:HB6089B-GS/HB6089D-GS/HB6089AC-GS/HB6089AB-GS/HB6089A-GS
natural_image
Line drawing of a handheld electric shaver with control panel and base mount (no text or symbols)NEED HELP? CONTACT US!
Have product questions? Need technical support? Please feel fr contact us:

CustomerService@vevor.com
This is the original instruction, please read all manual instruction carefully before operating. VEVOR reserves a clear interpretation user manual. The appearance of the product shall be subject to product you received. Please forgive us that we won't inform you there are any technology or software updates on our product.
IMPORTANT SAFEGUARDS
Before using the electrical appliance, the following basic precautions should always be followed including the following:
- Read all instructions. Before using it, check that the voltage of the wall outlet corresponds to the one shown on the rating plate.
- Do not operate any appliance with a damaged cord or plug or after the appliance malfunctions, or is dropped or damaged in any manner. Return appliance to the nearest authorized service facility for examination, repair or electrical or mechanical adjustment.
- If the supply cord is damaged, it must be replaced by the manufacturer, an authorized service agent, or a qualified technician to avoid a hazard.
- Always disconnect the blender from the supply if left unattended before assembling, disassembling, or cleaning.
- Do not let cord hang over edge of table or hot surface. Be careful not to trip over the long power cord when using the appliance.
Do not immerse the upper part of the blender in water, as this would give rise to electric shock.
-
Avoid contacting moving parts.
-
Using accessories not recommended by the manufacturer may cause injuries to persons.
-
Do not operate the appliance for other than its intended use.
- Avoid splashing the food into the vent holes of unit body during blending.
- The blender must be used in a working environment that is far away from corrosive materials or oil pollution, and must be kept away from explosive and flammable materials.
- The metal blades are extremely sharp Please handle it carefully.
- Be careful of potential injury from misuse.
- In the process of using the appliance, it is necessary to hold it with both hands, one hand holding the host handle, and the other hand holding the plastic connector.
- Switch off the appliance and disconnect from supply before changing accessories or approaching parts that move in use.
- Appliances can be used by persons with reduced physical, sensory or mental capabilities or lack of experience and knowledge if they have been given supervision or instruction concerning use of the appliance in a safe way and if they understand the hazards involved.
- Warning: Use a suitable bowl with attachable accessories and the accessory must not project from the upper part of the bowl.
- These appliances are intended to be used for commercial applications, for example in kitchens of restaurants, canteens, hospitals and in commercial enterprises such as bakeries, but not for continuous mass production of food.
SAVE THESE INSTRUCTIONS
KNOW YOUR COMMERICAL HAND BLENDER

TECHNICAL PARAMETER
| ModellInput | Rated Power | Tool length | Rotating speed(Min) | Rotating speed (Max) | Working noise | |
| HB6089 B-GS | AC220-240V; 50-60Hz | 500W12 | inch | 4000 RPM/Min | 18000 RPM/Min | ≤85dB (A) |
| HB6089 D-GS | AC220-240V; 50-60Hz | 500W20 | inch | 4000 RPM/Min | 18000 RPM/Min | ≤85dB (A) |
| HB6089 AC-GS | AC220-240V; 50-60Hz | 750W12 | inch | 8000 RPM/Min | 20000 RPM/Min | ≤85dB (A) |
| HB6089 AB-GS | AC220-240V; 50-60Hz | 750W16 | inch | 8000 RPM/Min | 20000 RPM/Min | ≤85dB (A) |
| HB6089 A-GS | AC220-240V; 50-60Hz | 750W20 | inch | 8000 RPM/Min | 20000 RPM/Min | ≤85dB (A) |
Before attaching and detaching operation, it must be ensured that the appliance stops working and its mains plug is unplugged.
How to attach:
- Insert the blending rod into the threaded inner hole of the unit body. When inserting, Align the slot of the connector with the ribs of the square aluminum to ensure that the connector is inserted in place.
- Tighten the lock nut to fix the blending rod firmly onto the body.
After the stirring rod is assembled into place with the main engine, rotate and tighten the plastic parts, and it is considered that the stirring rod has been fixed.
How to detach:
- Loosen the lock nut.
- Pull out the blending rod.
USING YOUR BLENDER
Before the first use, clean the blender according to the section of “QUICK CLEANING”.
The time running unit without load can't exceed 20s.
IMPORTANT: Blades are very sharp; handle them with care. Ensure that the hand-held blender is unplugged from the power outlet before installing or rem attachments.
OPERATION METHOD
GETTING STARTED AND STOPPED
- Check that the power button (3) is released.
- Install the blending rod.
- Connect the main unit to the power source.
- Press the safety button (1) and proceed to the next step within 5s. If the unlocking fails after 5s, press the safety button (1) again.
- Press the power button (3) to start the hand blender (working time per cycle≤3 minutes, interval time between two cycles≥1 minute)
- Release the power button (3), and the machine will stop automatically.
Continuous operation instruction
After completing steps 1-5 above, proceed to the following steps:
- Hold the lock button (4) while the power button (3) is pressed down, and the red indicator of the lock button?lights up.
- At this time release the power button (3) first and then release the lock button (4), the hand blender will work continuously, and the red indicator becomes on solidly
- Press the power button (3) again, the appliance stops working, at this time the lock button (4) springs up, and its red indicator goes off.
Note: During continuous working, do not touch the power button when gripping the blender to avoid triggering it to stop working.
How to grip the blender during working:
To blend food, operate the blender with one or both hands. When operating with one hand, just hold the handle position 1. When operating with both hands, hold the handle position 1 with one hand while holding the handle position 2 with the other hand.
CLEANING AND MAINTENANCE METHODS
Warning: Care is needed when handling cutting blades during cleaning.
- Unplug the appliance and remove the detachable blending rod.
- Wash the detachable blending rod under running water without using an abrasive cleaner or detergents. After cleaning the detachable blending rod, place it upright so that any water that may have gotten in can be drained. The blending rod is a dishwasher-safe component. The blending rod is a dishwasher-safe component.
Note: the appliance is not to be cleaned with a water jet or a steam cleaner.
-
Wipe the motor unit with a damp cloth. Never immerse it in water for cleaning, as an electric shock may occur.
-
Dry thoroughly.
QUICK CLEANING
Between processing tasks, hold the hand-held blender in the container half fill with water and turn on for a few seconds.
CAUTION: Blades are very sharp; handle them with care.
REMOVAL/INSTALLATION OF BLADE ASSEMBLY
- Align the blade assembly with wrench 1 and insert into it.
- Align the blending head slot with wrench 2 and insert into it.
- Unscrew clockwise to remove the blending rod.
Warning: When attaching the wrench 2 onto the blade assembly, do not touch the blade assembly by fingers to avoid a risk of injury.

FAULT ANALYSI
| Fault Phenomenon | Cause Analysis | Exclusion Methods |
| Indicator light is not on | The power cord is not plugged in. | 1.Check the power cord to m sure it is plugged in. |
| Indicator Light on Product Inoperative | 1.Long working hours, motor overheat protection.2.The machine itself is of order. | 1.Wait an hour before reusing 2.Send to after-sales service department. |
Note:
Above are common trouble analysis and troubleshooting methods. For other troubles, please contact our customer service department, or go directly to ou designated repair point for repair. Do not dismantle and repair yourself.
Made In China
VEVOR®
TOUGH TOOLS, HALF PRICE
Technical Support and E-Warranty Certificate
www.vevor.com/support
VEVOR®
TOUGH TOOLS, HALF PRICE
MANUEL D'INSTRUCTIONS
MODÈLE : HB6089B-UL/HB6089D-UL/HB6089AC-UL/HB6089AB-UL/HB6089A-UL
natural_image
Line drawing of a VLEVER electric shaver with a vertical pole and labeled 'Max.' (no text or symbols on the device itself)BESOIN D'AIDE? CONTACTEZ-NOUS!
MANUEL D'INSTRUCTIONS
MODÈLE : HB6089B-GS/HB6089D-GS/HB6089AC-GS/HB6089AB-GS/HB6089A-GS
natural_image
Line drawing of a VLEVER electric shaver with a vertical pole and labeled 'Max.' (no text or symbols on the device itself)BESOIN D'AIDE? CONTACTEZ-NOUS!
Machine Translated by Google
natural_image
Line drawing of a VLEVER electric shaver with a vertical pole and labeled 'Max.' (no text or symbols on the device itself)Kundenservice@vevor.com
FEHLERANALYSE
www.vevor.com/support
VEVOR®
TOUGH TOOLS, HALF PRICE
natural_image
Line drawing of a VLEVER electric shaver with a vertical pole and labeled 'Max.' (no text or symbols on the device itself)Kundenservice@vevor.com
www.vevor.com/support
VEVOR®
TOUGH TOOLS, HALF PRICE
natural_image
Line drawing of a VLEVER electric shaver with a vertical pole and labeled 'Max.' (no text or symbols on the device itself)elettronica www.vevor.com/support
VEVOR®
TOUGH TOOLS, HALF PRICE
natural_image
Line drawing of a WELER electric shaver with a vertical pole and base (no text or symbols on the device itself)elettronica www.vevor.com/support
VEVOR®
TOUGH TOOLS, HALF PRICE
natural_image
Line drawing of a WELER electric shaver with a vertical pole and base (no text or symbols on the device itself)natural_image
Line drawing of a VLEVER electric shaver with a vertical pole and handle (no text or symbols on the device itself)ANÁLISIS DE FALLAS
natural_image
Line drawing of a VLEVER electric shaver with a vertical pole and handle (no text or symbols on the device itself)POTRZEBUJESZ POMOCY? SKONTAKTUJ SIĘ Z NAMI!
ANALIZA USTEREK
Machine Translated by Google
Notatka:
natural_image
Line drawing of a VLEVER electric shaver with a vertical pole and handle (no text or symbols on the device itself)POTRZEBUJESZ POMOCY? SKONTAKTUJ SIĘ Z NAMI!
Machine Translated by Google
Notatka:
natural_image
Line drawing of a VLEVER electric shaver with a vertical pole and base (no text or symbols on the device itself)HULP NODIG? NEEM CONTACT MET ONS OP!
Klantenservice@vevor.com
FOUTANALYSE
garantiecertificaat www.vevor.com/support
VEVOR®
TOUGH TOOLS, HALF PRICE
Technische ondersteuning en e-garantiecertificaat www.vevor.com/support
GEBRUIKSAANWIJZING
MODEL:HB6089B-GS/HB6089D-GS/HB6089AC-GS/HB6089AB-GS/HB6089A-GS
natural_image
Line drawing of a VLEVER electric shaver with a vertical pole and handle (no text or symbols on the device itself)HULP NODIG? NEEM CONTACT MET ONS OP!
Klantenservice@vevor.com
garantiecertificaat www.vevor.com/support
VEVOR®
TOUGH TOOLS, HALF PRICE
natural_image
Line drawing of a VLEVER electric shaver with a vertical pole and labeled 'Max.' (no text or symbols on the device itself)BEHÖVER HJÄLP? KONTAKTA OSS!
Kontinuerlig driftinstruktion
FELANALYS
www.vevor.com/support
VEVOR®
TOUGH TOOLS, HALF PRICE
natural_image
Line drawing of a VLEVER electric shaver with a vertical pole and labeled 'Max.' (no text or symbols on the device itself)BEHÖVER HJÄLP? KONTAKTA OSS!
Kontinuerlig driftinstruktion
FELANALYS
www.vevor.com/support