DM12-U - Blender Vevor - Free user manual and instructions
Find the device manual for free DM12-U Vevor in PDF.

| Product type | Electric drink mixer |
| Brand | Vevor |
| Model | DM12-U |
| Power supply | 220-240 V, 50-60 Hz |
| Rated power | 750 W |
| Speeds | 3 speeds (LO, MED, HI) + pulse |
| Timer | 8 timing settings |
| Cup capacity | Not specified, compatible with mixing cup |
| Material | Metal and plastic body, metal agitators |
| Dimensions (approx.) | 50 cm (height), 15 cm (width), 20 cm (depth) |
| Weight (approx.) | 5 kg |
| Usage | Domestic and similar (kitchens, farms, hotels) |
| Main functions | Mixing drinks, milkshakes, smoothies, ice cream |
| Agitators | Solid disk and moving wings (for soft ice cream) |
| Safety stop | Cup actuator (ON/OFF) with two-step support |
| Thermal protection | Overload protection circuit (auto stop, wait 30 min) |
| Maintenance | Wipe with a damp cloth; cup dishwasher safe; shaft cleaned with soapy water |
| Spare parts | Interchangeable agitators (screw to turn clockwise) |
| Country of manufacture | China |
| General information | CE certification; indoor use; do not immerse in water |
Frequently Asked Questions - DM12-U Vevor
User questions about DM12-U Vevor
0 question about this device. Answer the ones you know or ask your own.
Ask a new question about this device
Download the instructions for your Blender in PDF format for free! Find your manual DM12-U - Vevor and take your electronic device back in hand. On this page are published all the documents necessary for the use of your device. DM12-U by Vevor.
USER MANUAL DM12-U Vevor
Technical Support and E-Warranty Certificate www.vevor.com/support
ELECTRONIC DRINK MIXER USER'S MANUAL
Model: DM11-G/DM12-G/DM13-G /DM11-A/DM12-A/DM13-A
We continue to be committed to provide you tools with competitive price. "Save Half", "Half Price" or any other similar expressions used by us only represent estimate of savings you might benefit from buying certain tools with us compared top brands and dose not necessarily mean to cover all categories of tools offered are kindly reminded to verify carefully when you are placing an order with us actually saving half in comparison with the top major brands.
VEVOR®
TOUGH TOOLS, HALF PRICE
ELECTRONIC DRINK MIXER
natural_image
Line drawings of three different types of laboratory equipment (no text or symbols present)NEED HELP? CONTACT US!
Have product questions? Need technical support? Please feel fr contact us:
Technical Support and E-Warranty Certificate www.vevor.com/support
This is the original instruction, please read all manual instruction carefully before operating. VEVOR reserves a clear interpretation user manual. The appearance of the product shall be subject to product you received. Please forgive us that we won't inform you there are any technology or software updates on our product.
 | For your safety of this product, always read the instruction book carefully before using. |
 | Alternating current |
 | Connect an earth terminal to the ground |
 | Correct Disposal: This product is subject to the provision of european Directive 2012/19/EU. The symbol showing a wheelie bin crossed through indicates that the product requires separate refuse collection in European Union. This applies to the product and all accesso marked with this symbol. Products marked as such may not discarded with normal domestic waste, but must be taken to acollection point for recycling electrical and electronic devices. |
 | Indoor Use Only |
 | The product complies with the applicable European directives evaluation method of conformity for these directives was done |
IMPORTANT SAFEGUARDS
When using electrical appliances, basic safety precautions should be followed, including the following.
- READ ALL INSTRUCTIONS.
- Unplug from outlet when not in use, before putting on or taking off and before cleaning.
- Please check that the specified supply voltage in the product is consistent the supply voltage(AC only).
- This appliance can be used by children aged from 8 years and above ar persons with reduced physical, sensory or mental capabilities or lack of
experience and knowledge if they have been given supervision or instruction concerning use of the appliance in a safe way and understand the hazards involved.
-
Children shall not play with the appliance. Cleaning and user maintenance not be made by children without supervision.
-
To protect against electrical hazards, do not put the Drink Mixer in water liquids
-
Avoid contact with moving parts.
-
Do not operate the Drink Mixer or any other electrical equipment with a damaged cord or plug, or after the unit malfunctions or is dropped or damage any manner. Return it to the nearest authorized service facility for examination repair, or adjustment.
-
Do not use outdoors. FOR HOUSEHOLD USE ONLY
-
Do not let the cord hang over the edge of the table or counter or touch surfaces.
-
Put this instruction manual in a safe place. Do not discard.
-
If the supply cord is damaged, it must be replaced by the manufacturer, service agent or similarly qualified persons in order to avoid a hazard.
-
Electric Shock Danger! Non-professional personnel are forbidden to repair the products, otherwise it may result in electrical shock. When failures happen should be repaired by a qualified maintenance personnel.
-
WARNING! It is strictly prohibited to put the main body of the machine and the power cord into any liquid. The machine must be fully cool before cleaning.
-
Do not place the product directly on the fire or near the source of fire, otherwise the product will be damaged or even result in danger. Once part of product is on fire, do not directly use water to extinguish the fire. Use a w/cover the fire site.
-
When the plug is plugged into the socket, it must be plugged to the er otherwise it will cause the components overheating and burning due to poor contact.
-
Do not leave the product to work with no one watching. If the machine overheating, please stop working immediately and unplug the power.
-
Switch off the appliance and disconnect from supply before changing
accessories or approaching parts that move in use.
- This appliance is intended to be used in household and similar application such as:
– staff kitchen areas in shops, offices and other working environments;
- farm houses;
– by clients in hotels, motels and other residential type environments;
- bed and breakfast type environments.
-
This appliance can be used by children aged from 8 years and above if have been given supervision or instruction concerning use of the appliance in safe way and if the understand the hazards involved. Cleaning and user maintenance shall not be made by children unless they are aged from 8 years above and supervised. Keep the appliance and its cord out of reach of child aged less than 8 years.
-
This appliance shall not be used by children. Keep the appliance and its out of reach of children.
-
Appliances can be used by persons with reduced physical, sensory or medical capabilities or lack of experience and knowledge if they have been given supervision or instruction concerning use of the appliance in a safe way and understand the hazards involved Children shall not play with the appliance.
-
This appliance can be used by children aged from 8 years and above a person with reduced physical, sensory or mental capabilities or lack of experience and knowledge if they have been given supervision or instruction concerning use of the appliance in a safe way and understand the hazards involved. Children shall not play with the appliance. Cleaning and user maintenance shall not be made by children without supervision.
-
Do not run appliance for longer than 10 minutes at a time. Allowing to briefly and continue mixing.
SAVE THESE INSTRUCTIONS
PRODUCTS SPECIFICATIONS
| Model | DM11-G/DM11-A | DM12-G/DM12-A | DM13-G/DM13-A |
| Voltage | AC 220-240V 50-60Hz | ||
| Rated Wattage | 250W | 500W | 750W |
| Speed | 3 speed setting +Pulse | ||
| Timer | 8 timing setting | ||
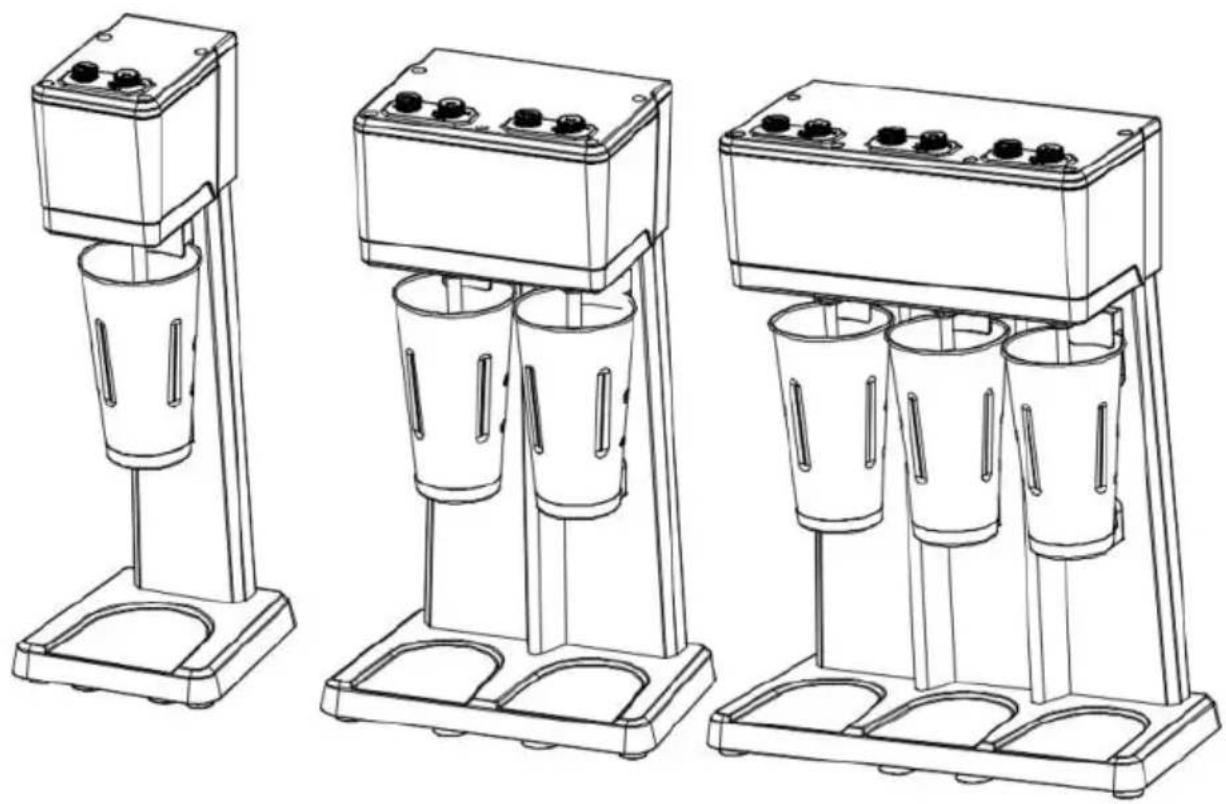
PARTS AND FEATURE
Explanation of the Product's components:
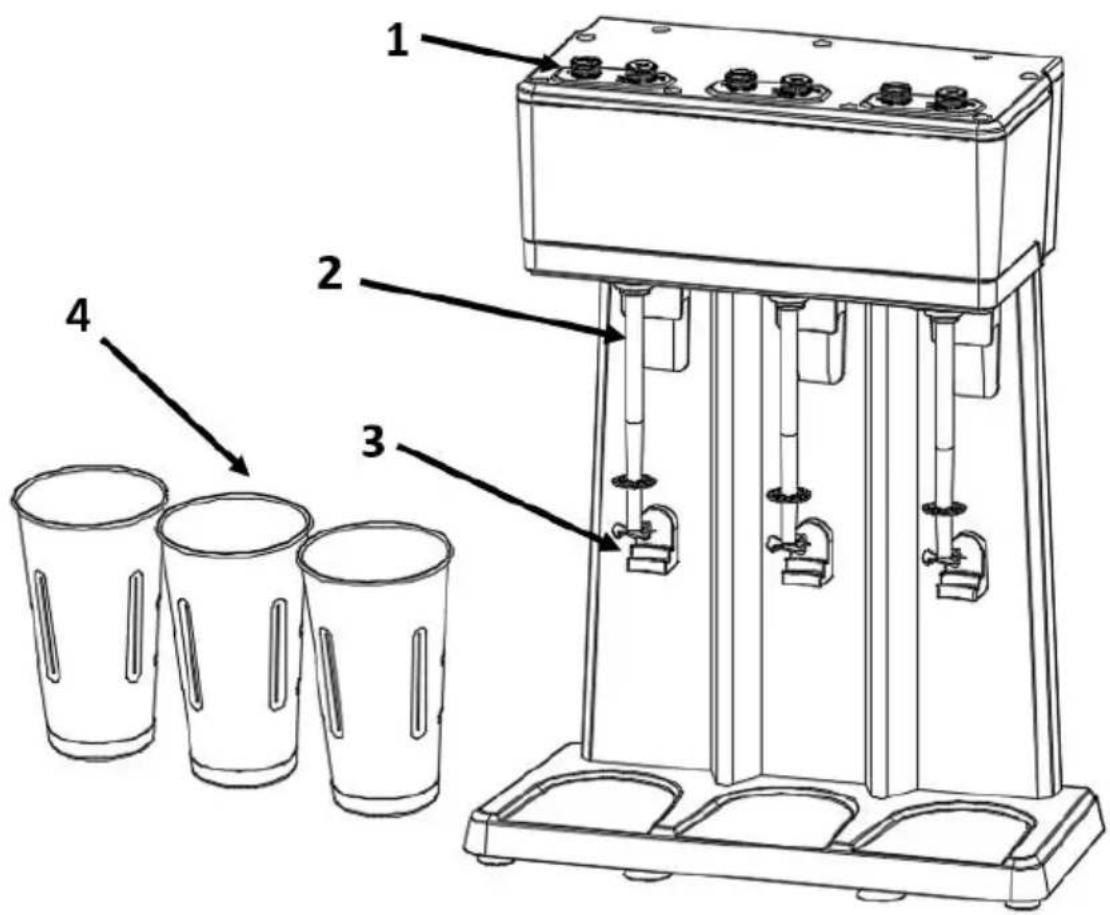

- Control Switch
2.Cup Actuator (ON/OFF)
3.Cup Support
- Mixing Cup
5.Solid Disk Agitators
6.Moving-Wing Agitators
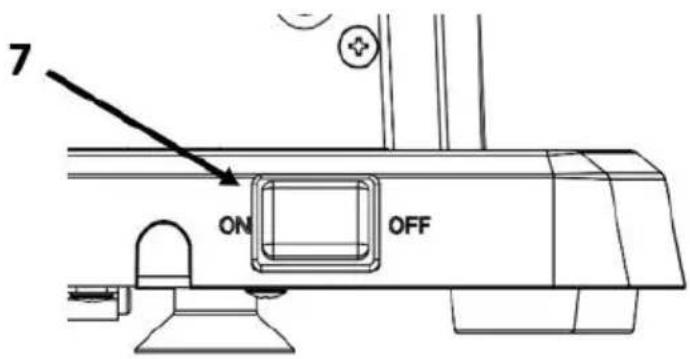
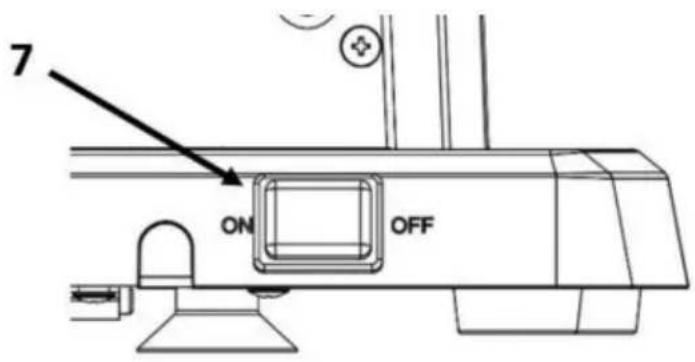
- POWER ON/OFF (at Back)
- Plug in and Power ON.
- Place the ingredients into the Mixing Cup.
- Select the desired speed.
- Position the Mixing Cup into Cup Actuator (#2) and move the cup upward, active the Motor.
- The Cup Support (#3) has two steps. Motor will be active when Mixing c placed at Upper Step.
- Motor will be OFF when Mixing cup is placed at Lower Step.
- You may also turn the motor ON and OFF using the pulse without using Actuator.
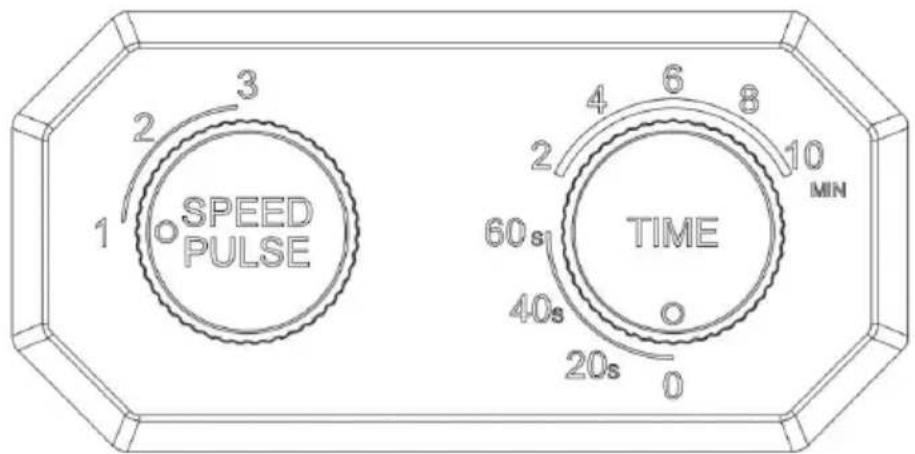
KEY Knob/Button
1.Speed Knob:
a.Choosing speed for LO, MED or HI
2.Pulse Button:
a. Press and hold Pulse Button and the mixer runs at the set speed until but released.
- Timer Knob
a. Select the desired time.
b. Timer will be activated, after placing the cup and actuating Motor.
c. After removing the Cup (or Motor Stopped), timer will reset to the selected
d.Counting time is from Motor Start-up to final selection on knob. (Counting t do not accumulate)
The timers will need to be set individually if more than one timer in unit.
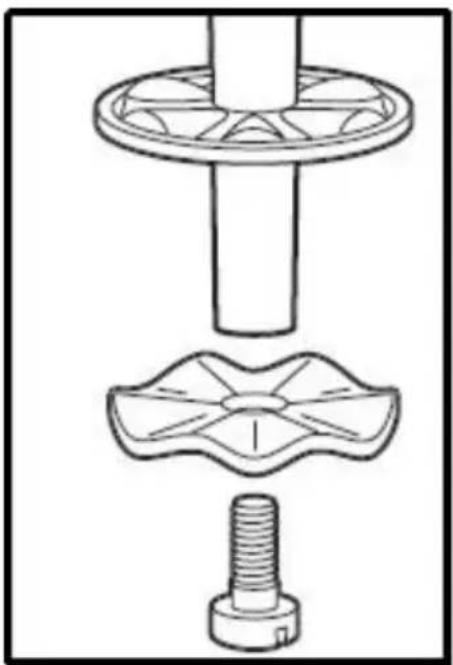
CHANGING AGITATORS
-
Unplug Drink Mixer
-
Loosen the screw/Agitator by turning it clockwise.
-
Remove the Agitator
-
Insert new agitator and screw back in.
natural_image
Technical line drawing of a mechanical assembly with three views: top view of a cylindrical component, front view of a flanged screw, and bottom view of a threaded bolt (no text or symbols)CLEANING
- TURN UNIT OFF USING POWER SWITCH LOCATED ON BACK OF UNIT UNPLUG MIXER POWER CORD FROM ELECTRICAL OUTLET.
• DO NOT PUT IT IN THE DISHWASHER
• DO NOT IMMERSE APPLIANCE IN WATER OR OTHER LIQUID. -
To clean the drink mixer, wipe with a damp cloth or spongy. Do not use cleaners of any type.
-
To clean the mixing shaft, place 200ml warm, soapy water in Mixing Cup place it on the mixer's normal operating position. Run on LO speed for 30 seconds—empty Cup. When finished, turn the unit OFF.
- Repeat Step 1 with warm water only to rinse mixer shaft.
- With unit turned to OFF, unplug unit and wipe residual soap and water from mixing shaft with a damp cloth or sponge.
- The Mixing Cup should be washed in warm, soapy water or in a dishwa
HELPFUL HINTS
- Always turn unit off or unplug the Drink Mixer before disassembling or assembling parts.
- Keep all the instructions and service information in a safe and handy plac
- For mixing heavy drinks, use HI speed only; for light drinks with more liq LO speed.
- If using ice, only use crushed ice in the Drink Mixer.
- Clean the Drink Mixer thoroughly before initial use.
- Keep mixing cups clean. Wash, rinse and sanitize thoroughly after use.
- Be sure that all detachable parts are fastened tightly before operating the Mixer.
- Operate the Drink Mixer only when it is fully assembled.
- To avoid splashing drinks of thin consistency, operate on Speed LO.
- Keep a firm grip on the cup while using PULSE.
- Moving-Wing Agitators is for soft ice cream.
TROUBLESHOOTING GUIDE
| Problem | Solution | |
| 1 | Ingredients are not being mixedProperly | Try select a different speed. |
| 2 | Motor does not turn on when is set on Cup Support | • Cup is not tall enough to ac motor switch.• The unit features a thermal overload protection circuit. Turn unit OFF, wait 30min. Then turn again. |
| 3 | Excessive Product splash-out (Some splash-out is common) | • Ingredients too full• Speed setting too high for ingredients• Agitator fastened tightly to the spindle• Agitator bent or worn. |
Made In China
VEVOR®
TOUGH TOOLS, HALF PRICE
Technical Support and E-Warranty Certificate
www.vevor.com/support
VEVOR®
TOUGH TOOLS, HALF PRICE
natural_image
Line drawings of three different electronic devices with cooling fans and control panels (no text or symbols)BESOIN D'AIDE? CONTACTEZ-NOUS!


Bouton/bouton KEY
- Bouton de vitesse :
natural_image
Technical line drawing of three mechanical components: a cylindrical component, a flanged base with cross-shaped features, and a threaded bolt (no text or symbols)NETTOYAGE
natural_image
Technical line drawing of a mechanical assembly with three views: top view of a circular component, front view of a flanged base, and bottom view of a threaded bolt (no text or symbols)REINIGUNG
www.vevor.com/support
VEVOR®
TOUGH TOOLS, HALF PRICE
natural_image
Line drawings of three different electronic devices with cooling fans and control panels (no text or symbols)

Manopola/Pulsante CHIAVE
natural_image
Technical line drawing of three mechanical components: a cylindrical component, a flanged base with cross-shaped cutouts, and a threaded bolt (no text or symbols)PULIZIA
elettronica www.vevor.com/support
VEVOR®
TOUGH TOOLS, HALF PRICE
natural_image
Line drawings of three different electronic devices with cooling fans and control panels (no text or symbols)
Botón/perilla CLAVE
natural_image
Technical line drawing of a mechanical assembly with three views: top view of a circular component, middle view of a flanged screw, and bottom view of a threaded bolt (no text or symbols)LIMPIEZA
natural_image
Line drawings of three different types of laboratory equipment (no text or symbols present)POTRZEBUJESZ POMOCY? SKONTAKTUJ SIĘ Z NAMI!
SPECYFIKACJE PRODUKTÓW


Gałka/przycisk KEY
- Pokrętło prędkości:
natural_image
Technical line drawing of a mechanical assembly with three views: top view of a circular component, middle view of a flanged tool, and bottom view of a threaded bolt (no text or symbols)CZYSZCZENIE
natural_image
Line drawings of three different types of laboratory equipment (no text or symbols present)HULP NODIG? NEEM CONTACT MET ONS OP!


SLEUTELKNOP/KNOP
- Snelheidsknop:
natural_image
Technical line drawing of a mechanical assembly with three views: top view of a circular component, front view of a flanged part, and side view of a threaded bolt (no text or symbols)SCHOONMAAK
HANDLEIDING VOOR PROBLEEMOPLOSSING
garantiecertificaat www.vevor.com/support
VEVOR®
TOUGH TOOLS, HALF PRICE
natural_image
Line drawings of three different types of laboratory equipment (no text or symbols present)BEHÖVER HJÄLP? KONTAKTA OSS!


1.Kontrollbrytare
KNAPP Vrid/knapp
- Hastighetsratt:
natural_image
Technical line drawing of three mechanical components: a cylindrical component, a flanged base with cross-shaped cutouts, and a threaded bolt (no text or symbols)RENGÖRING
www.vevor.com/support