
TC-20B - Paint gun Vevor - Free user manual and instructions
Find the device manual for free TC-20B Vevor in PDF.

User questions about TC-20B Vevor
0 question about this device. Answer the ones you know or ask your own.
Ask a new question about this device
Download the instructions for your Paint gun in PDF format for free! Find your manual TC-20B - Vevor and take your electronic device back in hand. On this page are published all the documents necessary for the use of your device. TC-20B by Vevor.
USER MANUAL TC-20B Vevor
Technical Support and E-Warranty Certificate
www.vevor.com/support
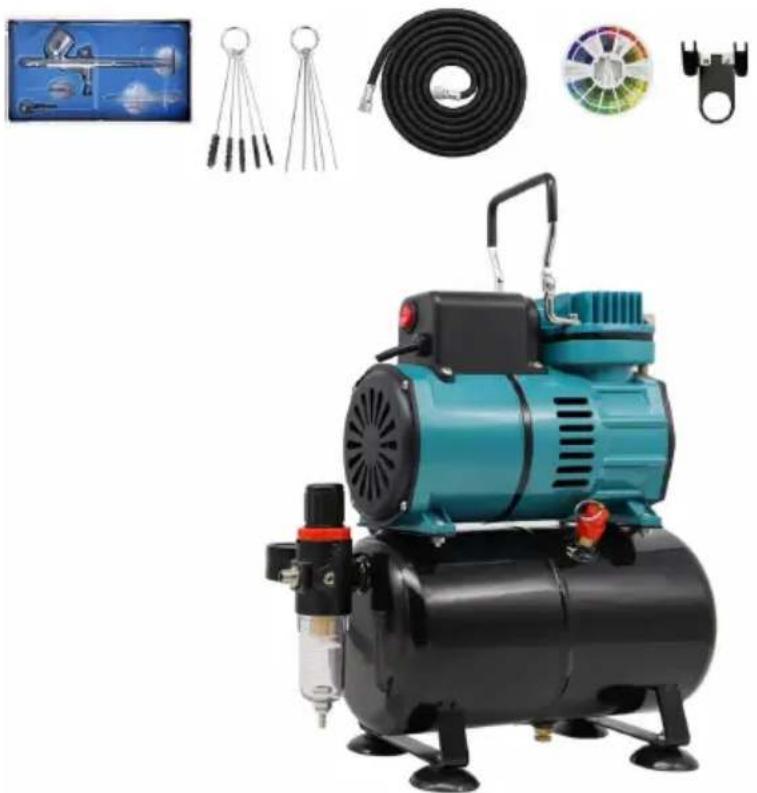
Airbrush Set
TC-20B
We continue to be committed to provide you tools with competitive price. "Save Half", "Half Price" or any other similar expressions used by us only represent estimate of savings you might benefit from buying certain tools with us compared to top brands and does not necessarily mean to cover all categories of tools offered are kindly reminded to verify carefully when you are placing an order with us actually saving half in comparison with the top major brands.
Model: TC-20B
natural_image
Product photo of an air conditioning air lift with attached hoses and control panel (no visible text or symbols)NEED HELP? CONTACT US!
Have product questions? Need technical support? Please feel fr contact us:
Technical Support and E-Warranty Certificate www.vevor.com/support
This is the original instruction, please read all manual instruction carefully before operating. VEVOR reserves a clear interpretation user manual. The appearance of the product shall be subject to product you received. Please forgive us that we won't inform you there are any technology or software updates on our product.
 | Warning - To reduce the risk of injury, the user must r instructions manual carefully. |
 | Warning- Be sure to wear eye protectors when using th product. |
 | Warning- Be sure to wear dust masks when using this |
 | This symbol, placed before a safety comment, indicates of precaution, warning, or danger. Ignoring this warning r lead to an accident. To reduce the risk of injury, fire, c electrocution, please always follow the recommendation sh below. |
 | Indoor Use Only |
 | CORRECT DISPOSALThis product is subject to the provision of european Dire 2012/19/EU. The symbol showing a wheelie bin crossed indicates that the product requires separate refuse collect the European Union. This applies to the product and all accessories marked with this symbol. Products marked as may not be discarded with normal domestic waste, but i taken to acollection point for recycling electrical and elec devices. |
INSTRUCTIONS
Thank you very much for choosing this Airbrush. Set
- Please read all of the instructions before using it. The information you achieve the best possible results.
The products carried in this catalog may be different in color than the item.
WARNING:
- Operate in a safe work environment. Keep your work area clean,
and free of distractions.
- Use as intended only.
- This is not a toy, Not for use by children.
- Clean theAirbrush IMMEDIATELY after use.Delayed or inadequate cleaning v permanently clog the Airbrush.
A. FEATURES
- Two cooling fans can achieve long-term continuous operation without overheating, protecting the air pump. Much safer, thermally protected!
·Piston type, oil free
- It can start with pressure, continuous working, powerful.
- Much safer, thermally protected!
·Low noise
·Auto Stop Function: Stop at 4BAR, Auto start at 3BAR.
-Pressure-adjustable.
B. SPECIFICATIONS
| US specifications:Model: TC-20BVoltage: 120VFrequency: 60HzPower: 1/6HPAir Flow 23-25 L/MINCapacity of Air storage tank: 3.5 LDimension of nozzle: 0.3mmVolume of cup: 9ML | UK/EU/AU specifications:Model: TC-20BVoltage: 220-240VFrequency: 50HzPower: 1/6HPAir Flow 23-25 L/MINCapacity of Air storage tank: 3.5 LDimension of nozzle: 0.3mmVolume of cup: 9ML |
C. SAFETY
- Do not use the Compressor for other purpose than the one it has designed for.
- Do not process other fluid than air.
- Do not operate the compressor in explosive atmospheres, such as presence of flammable liquids, gases or dust.
- Always make sure the unit is unplugged from the electrical line be performing any service, maintenance or cleaning.
- Do not expose this unit to rain or moisture.
- Do not allow children and other untrained people to use or play a compressor.
-
To avoid the risk of burning, be aware that after extensive use of compressor, some parts can be very hot. Allow the compressor to cc down before touching it.
-
Do not leave the compressor unattended while running.
D. INSTALLATION
-
After taking the compressor out of its packaging, please check, it carefully for any damages due to shipping.
-
Install the compressor on a flat surface in a suitable size, dry roof good ventilation, where the temperature is not likely to rise above 94 degrees Farenheits (35 degrees Centigrades).
-
Insert the power cord into a grounded outlet. Be sure the electric rating is proper to the appliance (refer to the data label), that the e line is protected and equipped of the ground line.
-
Connect one end of the air hose to the air outlet of the compre
-
After taking the compressor out of its packaging, please check, it carefully for any damages due to shipping.
- Install the compressor on a flat surface in a suitable size, dry rot good ventilation, where the temperature is not likely to rise above 94 degrees Farenheits (35 degrees Centigrades).
- Insert the power cord into a grounded outlet. Be sure the electric rating is proper to the appliance (refer to the data label), that the e line is protected and equipped of the ground line.
- Connect one end of the air hose to the air outlet of the compre
natural_image
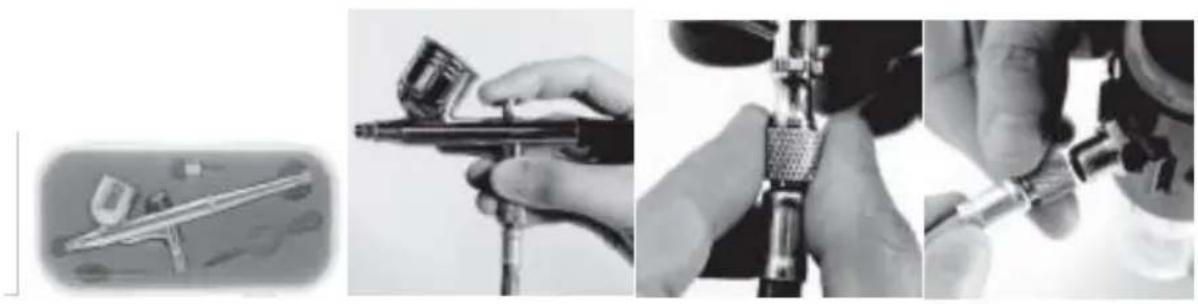
Four-panel black-and-white photo showing hands operating a spray gun, with close-ups of mechanical components (no visible text or symbols)E. HOW TO SPRAY
- Turn on the compressor.
- Fill fluid in the cup after thinning appropriately.
- Press down on the airbrush trigger to release air from the nozzle.
Slowly and gently draw back on the trigger to release the paint from needle. The air will atomize the paint and create a fine spray.
- Continue to move the trigger back slowly to achieve the consistency need for your spray technique.

natural_image
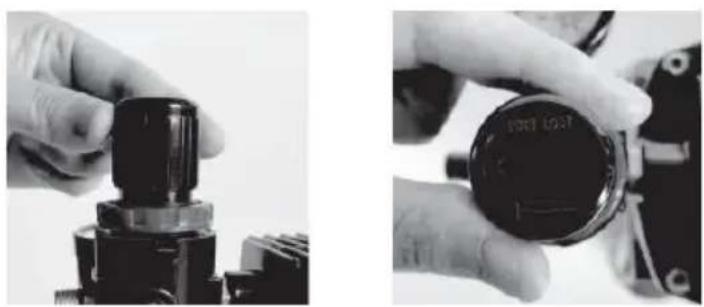
Two grayscale illustrations of a spray gun with no visible text or symbols- The spray pattern is in accordance with the distance between a wo surface and airbrush. Keep the distance from the workpiece at about 5", depending on the airflow and paint type. For very delicate work, may reduce the distance up to 1" from the workpiece.
If you need a smaller pressure and gentler airflow, you can reduce the outlet air pressure on the pressure regulator when the compressor is auto stop (clock at 4bar). Operation by picture, pressure adjust range 4-0Bar.
natural_image
Close-up of hands adjusting a black industrial control knob with a circular dial (no visible text or symbols)- To avoid paint buildup, start moving the airbrush before pressing the
trigger. When finished with the stroke, release the trigger while still m the airbrush. Doing this will produce a smoother finish. Do not stop i the airbrush while spraying. If the airbrush stops even briefly while sp paint can build up and run down the workpiece.
- When finished using the compressor, turn its power switch off. Release any remaining air. Air hose fittings and compressor body may get hot fittings to cool before disconnecting, or wear gloves to prevent burns.
- Perform maintenance on the compressor according to the instructions the following pages.
- Clean the airbrush thoroughly IMMEDIATELY after EVERY use, according to instructions on the following pages.
Note: Do not use the compressor continuously for longer than 20 minutes. Allow the compressor to cool down for 15 minutes after every 20 minutes working cycle. The motor is equipped with a th protector with automatic reset.
F. HOW TO MIX PANIT FOR AIRBRUSH
Warning: The airbrush shall be filled with special paint and diluted accordingly. Do not use normal paint like lacquer and nail polish dire, the nozzle will be blocked and cannot be used anymore. Most paints designed for airbrushes do not need to be thinned. And other paint is mixed with thinner/reducer. Each paint type requires a specific thinner/reducer. We suggest to thin paint according to the manufacture directions and mix thoroughly. Or refer to the following steps:
Step 1. Choose your paint. Different projects call for different paint, s select the right paint for the job.
Step 2. Match the thinner/reducer to your paint.
| You can use one or multiple following when thinning water-based airbrush paints: | The Manufactured Reducer (Water-Based)Distilled Water (But don’t use a lot)Airbrush Acrylic Medium (Ether by it or along side the others listed above) |
| You can use one of the follow when thinning solvent-based airbrush paints: | •The Manufactured Reducer (Solvent-Based)• Mineral Spirits• Lacquer Thinner |
Tip: Water colors, Tempera and acrylic paints can usually be thinned with distilled water. Enamal paints are solvent based, and are generally thin with mineral spirits. Lacquer paints are solvent based, and are thinned lacquer thinner.
Step 3. Pour the needed amount of paint into a mixing cup.
Step 4. Determine the mixing ratio. The ratio of thinner to paint depes the brand of paint and the surface you're painting. Most paints will be thinning instructions on the can that include the recommended thinner thinning ratio.
Step 5. Add the proper ratio of thinner to the amount of paint in the cup. If the paint you are using does not have any instructions, gene you need to start with a ratio of two parts of paint to one thinner paint is still too thick, add more thinner until you achieve the desired consistency. Conversely, if the paint is too thin, add more paint to the up. Then thin the paint to a watery consistency, until it flows like m Step 6. Slowly stir the mixture with a mixing stick until the paint is thoroughly mixed.
Step 7. Pour the thinned paint through a paint strainer into a second cup. This step is optional, but ensures that there is no dirt or debris paint.
Tip: Test the mixture on a scrap piece of material before beginning project
Warning: Follow any manufacturer's safety instructions that maybe included with the paint, and use a little common sense. Solvent base paints and thinners/reducers are flammable, so keep them away from flames. Use solvent based paints in a well ventilated area, and wear respirator if needed.
Step 5. Add the proper ratio of thinner to the amount of paint in the
cup. If the paint you are using does not have any instructions, generally you need to start with a ratio of two parts of paint to one thinner paint is still too thick, add more thinner until you achieve the desired consistency. Conversely, if the paint is too thin, add more past thicken it up. then thin the paint to a watery consistency, until it flakes milk.
Step 6. Slowly stir the mixture with a mixing stick until the paint is thoroughly mixed.
Step 7. Pour the thinned paint through a paint strainer into a second cup. This step is optional, but ensures that there is no dirt or debris paint.
Tip: Test the mixture on a scrap piece of material before beginning your project
Warning: Follow any manufacturer's safety instructions that maybe include with the paint, and use a little common sense. Solvent based paints thinners/reducers are flammable, so keep them away from open flames. Use solvent based paints in a well ventilated area, and wear a respi needed.
G. HOW TO CLEAN AIRBRUSH
- Empty the jar and clean it with solvent.
- Turn on the compressor and connect the airbrush.
- Refill the cup with water or solvent, then block the needle cover finger and press the operation lever. The air flows backward into the to clean the paints remained in the airbrush.
- Disconnect the airbrush from the compressor.
- Remove the nozzle and needle and soak them in solvent until cle Use an old toothbrush and toothpicks to remove any paint.
CAUTION: Do not immerse the airbrush.
Note: Do not use metal objects to clean the nozzle to prevent dama passages. If the needle is bent, have it replaced by a qualified techn 6. Use solvent to wipe down the airbrush body.
- Lubricate the airbrush after cleaning. A non-silicon oil or a light lu may be used on threaded connections before storing.
H. INSPECTION AND MAINTENANCE
Compressor
Note: These procedures are in addition to the regular checks and maintenance required to operate the compressor and other air-operated tools.
-
BEFORE EVERY USE, inspect the general condition of the compre Check for:
-
loose screws,
- misalignment or bending of moving parts,
-damaged air supply hose, - cracked or broken parts,
- any other condition that may affect its safe operation.
2. AFTRE EVERY USE
a. Drain the water trap.
- With the compressor running, drain the moisture by loosening the n bottom of the drain valve. The moisture will be forced out.
- Turn off and disconnect the compressor from its power source.
- Close the drain valve.
b. Wipe the compressor with a piece of clean cloth.
Airbrush
Note: These procedures are in addition to the regular checks and maintenance required to operate the compressor and other air-operated tools.
-
BEFORE EYERY USE, inspect the general condition of the tool. Ch for:
-
bent needles,
- loose screws,
-
misalignment or bending of moving parts,
-clogged nozzle, -
cracked or broken parts,
-
any other condition that may affect its safe operation.
-
AFTREEVERY USE, clean the airbrush, according to following instructions.
I. TROUBLESHOOTING
Airbrush
| Problem | Possible Causes | Likely Solutions |
| Poor Paint Atomization | 1. Low paint level.2. Paint not properly thinned Clogged nozzle.4. Loose/damaged needle. | 1. Refill the airbrush with pa2. Thin paint.3. Clean nozzle.4. Adjust or replace the nee |
| Will Not Spray | No pressure at the airbrush. | Check the air hoses. |
| Over spray (Paint Spraying Further Than Intended) | 1. Improper application speec2. Improper distance from Work piece. | 1. Move moderately and par to the subject.2. Adjust the distance from intended object. |
| Nozzle Leakage | 1. Dirty nozzle.2. Worn or damaged nozzle | 1. Clean the nozzle.2. Replace the nozzle and/o needle. |
| Air Leaking from Nozzle | 1. Dirty air valve/seat.2. Sticky air valve.3. Damaged air valve spring4. Worn/damaged air valve/s | 1. Clean the air valve/seat.2. Lubricate the air valve/sea3. Replace the air valve spr4. Replace the air valve. |
| Follow all safety precautions whenever diagnosing or servicing the tool.Disconnect the air supply before servicing the tool. | ||
Compressor
| Problem | Possible Causes | Likely Solutions |
| The Motor Does Not Wo | 1. No electrical power.2. Damaged power cord.3. The electrical wiring within unit is defective.4. The power switch is defe | 1. Plug the power cord into a working, grounded, electrical out2. Have a qualified service technician replace the power co3. Have a qualified service technician- replace the electrical wiring.4. Have a qualified service technicianre- place the power switch. |
| The Motor Runs, but it Makes Irregular or Knock Noises. | 1. The bearing is loose or damaged. 2. The screws in connection rod are loose. | 1. Have a qualified service technician replace the bearing.2. Tighten the screws, or repla them if necessary. |
| Not Enough Pressure Wh Spraying or Painting. | 1. Loose air connection(s).2. The air hose is damaged3. The screws on the cylind cover are loose. | 1. Check all the air connection and tighten them if necessary.2. Replace the air hose.3. Tighten the screws. |
| Poor Spray Pattern. | 1. Loose air connection(s).2. The paint is too thick.3. The airbrush nozzle is plu or dirty. | 1. Check all the air connection and tighten them if necessary.2. Add paint thinner and mix thoroughly.3. Clean or change the nozzle |
| Motor Runs Properly, but Air Pressure or Lack of Delivery. | 1. The valve plate is loose of place.2. The retainer ring is dama after excessive use at high pressure. | 1. Open the front cover and n sure the valve plate is in the proper position. Tighten the scr if necessary.2. Have a qualified service technician replace the retainer |
Address: Shuangchenglu 803nong11hao1602A-1609shi, baoshanqu, shanghai 200000 CN.
Imported to AUS: SIHAO PTY LTD, 1 ROKEVA STREETEASTWOOD NSW 2122 Australia
Imported to USA: Sanven Technology Ltd., Suite 250, 9166 Anaheim Place, Rancho Cucamonga, CA 91730
| EC | REP |
E-CrossStu GmbH
Mainzer Landstr.69, 60329 Frankfurt am Ma
| UK | REP |
YH CONSULTING LIMITED.
C/O YH Consulting Limited Office 147, Centurion H
London Road. Staines-upon-Thames. Surrey. TW18 4
VEVOR®
TOUGH TOOLS, HALF PRICE
Technical Support and E-Warranty Certificate www.vevor.com/support
VEVOR®
TOUGH TOOLS, HALF PRICE
natural_image
Product photo of an air conditioning air lift with attached hoses and control panel (no visible text or symbols)natural_image
Four-panel black-and-white photo showing a spray gun, hand holding a spray gun, and hands adjusting a tool (no visible text or symbols)E. WIE SPRÜHT MAN
natural_image
Two identical diagrams showing a spray gun with a pointed tip and a triangular target, no text or symbols present.natural_image
Close-up of hands adjusting a black industrial control knob and terminal block (no visible text or symbols)C/O YH Consulting Limited Office 147, Centurion House, London Road, Staines-upon-Thames, Surrey, TW18 4AX
VEVOR®
TOUGH TOOLS, HALF PRICE
natural_image
Product photo of an air conditioning air lift with attached hoses and control panel (no visible text or symbols)BESOIN D'AIDE? CONTACTEZ-NOUS!
natural_image
Four-panel black-and-white photo showing a spray gun, hand holding a spray gun, and hands adjusting a tool (no visible text or symbols)E. COMMENT PULVÉRISER
natural_image
Two identical diagrams showing a spray gun with a pointed tip and a triangular target, no text or symbols present.natural_image
Close-up of hands adjusting a black industrial control knob and terminal block (no visible text or symbols)C/O YH Consulting Limited Bureau 147, Centurion House, London Road, Staines-upon-Thames, Surrey, TW18 4AX
VEVOR®
TOUGH TOOLS, HALF PRICE
natural_image
Product photo of an air conditioning air lift with attached hoses and control panel (no visible text or symbols)HULP NODIG? NEEM CONTACT MET ONS OP!
natural_image
Four-panel black-and-white photo showing hands using a spray gun to adjust or install a small object, with no visible text or symbols.E. HOE TE SPRAYEN
natural_image
Two grayscale illustrations of a spray gun with pointed tip and blade, shown from different angles (no text or symbols)natural_image
Close-up of hands adjusting a black industrial control knob and terminal block (no visible text or symbols)I. PROBLEEMOPLOSSING
Airbrush
C/O YH Consulting Limited Kantoor 147, Centurion House, Londen Road, Staines-upon-Thames, Surrey, TW18 4AX
VEVOR®
TOUGH TOOLS, HALF PRICE
Technische ondersteuning en e- garantiecertificaat www.vevor.com/support
VEVOR®
TOUGH TOOLS, HALF PRICE
natural_image
Product photo of an air conditioning air lift with attached hoses and control panel (no visible text or symbols)BEHÖVER HJÄLP? KONTAKTA OSS!
natural_image
Four-panel black-and-white photo showing hands using a spray gun to adjust or install a small object, with no visible text or symbols.E. HUR MAN SPRAYAR
natural_image
Two identical diagrams showing a spray gun with a pointed tip and a triangular target, no text or symbols present.natural_image
Close-up of hands adjusting a black industrial control knob and terminal block (no visible text or symbols)C/O YH Consulting Limited Office 147, Centurion House, London Road, Staines-upon-Thames, Surrey, TW18 4AX
VEVOR®
TOUGH TOOLS, HALF PRICE
natural_image
Product photo of an air conditioning air lift with attached hoses and control panel (no visible text or symbols)natural_image
Four-panel black-and-white photo showing a spray gun, hand holding a spray gun, and hands adjusting a tool (no visible text or symbols)E. CÓMO PULVERIZAR
natural_image
Two grayscale illustrations of a spray gun with pointed tip and blade, shown from different angles (no text or symbols)natural_image
Close-up of hands adjusting a black industrial control knob and terminal block (no visible text or symbols)G. CÓMO LIMPIAR EL AERÓGRAFO
C/O YH Consulting Limited Oficina 147, Centurion House,
Carretera de Londres, Staines-upon-Thames, Surrey, TW18 4AX
VEVOR®
TOUGH TOOLS, HALF PRICE
natural_image
Product photo of an air conditioning air lift with attached hoses and control panel (no visible text or symbols)natural_image
Four-panel black-and-white photo showing a spray gun, hand holding a spray gun, and hands adjusting a tool (no visible text or symbols)E. COME SPRUZZARE
natural_image
Two grayscale illustrations of a spray gun with pointed tip and blade, shown from different angles (no text or symbols)natural_image
Close-up of a hand adjusting a black mechanical component (no visible text or symbols)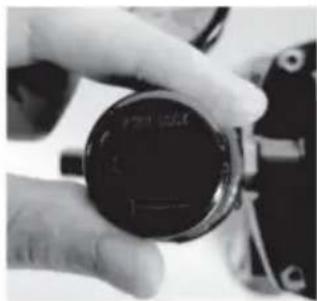
natural_image
Close-up of a hand holding a small black circular object with visible internal markings (no readable text or symbols)Importato in AUS: SIHAO PTY LTD, 1 ROKEVA STREETEASTWOOD
Nuovo Galles del Sud 2122 Australia
natural_image
Product photo of an air conditioning air lift with attached hoses and control panel (no visible text or symbols)POTRZEBUJESZ POMOCY? SKONTAKTUJ SIĘ Z NAMI!
natural_image
Four-panel black-and-white photo showing hands using a spray gun to adjust or install a small object, with no visible text or symbols.E. JAK ROZPYLAĆ
natural_image
Two identical diagrams showing a spray gun with a pointed tip and a triangular target, no text or symbols present.natural_image
Close-up of hands adjusting a black industrial control knob and terminal block (no visible text or symbols)Importowane do AUS: SIHAO PTY LTD, 1 ROKEVA STREETEASTWOOD NSW 2122 Australia
C/O YH Consulting Limited Biuro 147, Centurion House, London Road, Staines-upon-Thames, Surrey, TW18 4AX
VEVOR®
TOUGH TOOLS, HALF PRICE


