YT60310 - Weather Station Vevor - Free user manual and instructions
Find the device manual for free YT60310 Vevor in PDF.

User questions about YT60310 Vevor
0 question about this device. Answer the ones you know or ask your own.
Ask a new question about this device
Download the instructions for your Weather Station in PDF format for free! Find your manual YT60310 - Vevor and take your electronic device back in hand. On this page are published all the documents necessary for the use of your device. YT60310 by Vevor.
USER MANUAL YT60310 Vevor
Affordable. Reliable. Home Improvement.
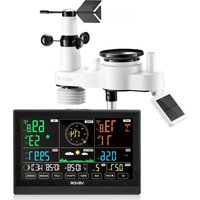
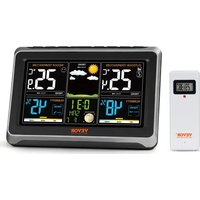
WEATHERSTATION
MODEL:YT60310

Please scan the QR code to see a video on how to use it.
MODEL:YT60310

This is the original instruction, please read all manual instructions carefully before operating. VEVOR reserves a clear interpretation of our user manual. The appearance of the product shall be subject to the product you received. Please forgive us that we won't inform you again if there are any technology or software updates on our product.
| Warning-To reduce the risk of injury, user must read instructions manual carefully. | |
| This device complies with Part 15 of the FCC Rules. Operation subject to the following two conditions:(1)This device may not cause harmful interference, and (2)this device must accept any interference received, including interference that may cause undesired operation. | |
| This product is subject to the provision of European Directive 2012/19/EC. The symbol showing a wheelie bin crossed through indicates that the product requires separate refuse collection in the European Union. This applies to the products and all accessories marked with this symbol. Products as such may not be discarded with normal domestic waste, must be taken to a collection point for recycling electrical or electronic devices |
WARNING! Please read and understand all safety precautions, operating instructions, and care/maintenance instructions before operating this appliance. Keep this manual for future reference.
- This product is not a toy. Keep out of the reach of children.
- This product is designed for use in the home only as indication of weather conditions.
This product is not to be used for medical purposes or for public information. - Do not clean the unit with abrasive or corrosive materials.
- Do not place the appliance near open flames or heat sources. Fire, electric shock, product damage, or injury might occur.
- Only use fresh new batteries in the product. Do not mix new and old batteries together.
- Do not disassemble, alter, or modify the product.
- Only use attachments or accessories with this product specified by the manufacturer.
- Do not submerge the unit in water. Dry the product with a soft cloth if liquid spills on it.
- Do not subject the unit to excessive force, shock, duct, extreme temperature, or humidity.
- Do not cover or block the ventilation holes with any objects.
- This display console of this product is intended to be used indoors only.
- This product is only suitable for mounting at height less than 2m (6.6 ft.).
- Do not tamper with the unit's internal components.
- Batteries are not included. When inserting batteries, make sure that the positive and negative polarities match with the markings in the compartment.
- Do not mix standard, alkaline, and rechargeable batteries together.
- Leaving a battery exposed to extremely high temperature in the surrounding environment can result in an explosion or leakage of flammable liquid or gas.
- Leaving a battery exposed to extremely low air pressure in the surrounding environment can result in an explosion or leakage of flammable liquid or gas.
TIPS FOR SENSOR SITE SELECTION
- Rain collector must be cleaned every few months.
- Sensor should be installed at least 1.5m (5') away from any building or structure.
- Choose a location in open space under direct sunlight with no obstructions.
- The sensor should remain in line of sight and within 150m (492') of the display console for consistent, steady transmission.
- Keep your sensor and display console away from household appliances that operate on the same frequency. The console and sensor should be at least 1 - 2 m (3' -7') away from such interferences.
PRODUCT FEATURES
Colorful and big digit display with super bright backlight.
- 9 functional buttons: SET, /TEMP, RAIN, WIND/, /BARO/, ALERT, MAX/MIN, CHANNEL, LIGHT/ SNOOZE.
Self setting accurate atomic time function.
- Alarm with snooze function.
Time zone: -12~12.
8 languages for weekdays display.
Moon Phase.
- Indoor & outdoor temperature (^ / ^) & humidity readings with trend.
4-level brightness of backlight.
- Hourly, Daily, Weekly, Monthly, Total rainfall and Rainfall rate in past hour.
- Average wind speed, gust wind speed and wind direction displays.
- Absolute and relative Barometric pressure displays with trend.
- Weather index display: Feel likes, Wind Chill, Heat index. Dew point.
- Weather Forecasting.
Max/Min reading.
- Weather alert settings.
1
2
3
4
5
6

7
8
- Display Console
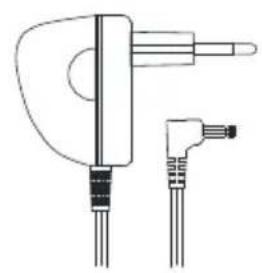
- Adapter
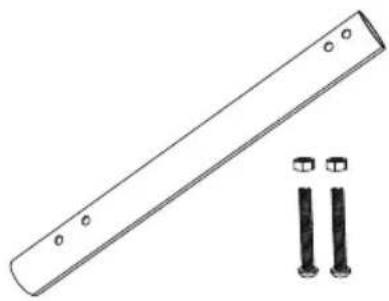
- Mounting pole with 2 screws
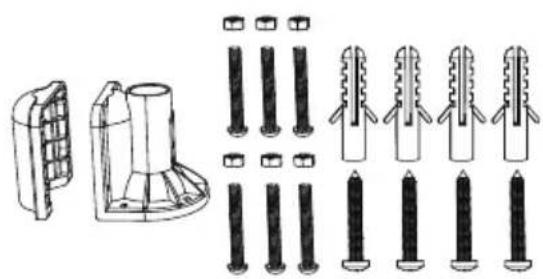
- Mounting brackets with 6 screws
- Wireless 5-in-1 outdoor sensor
- Rubber pads X 2
- Screwdriver
- User guide
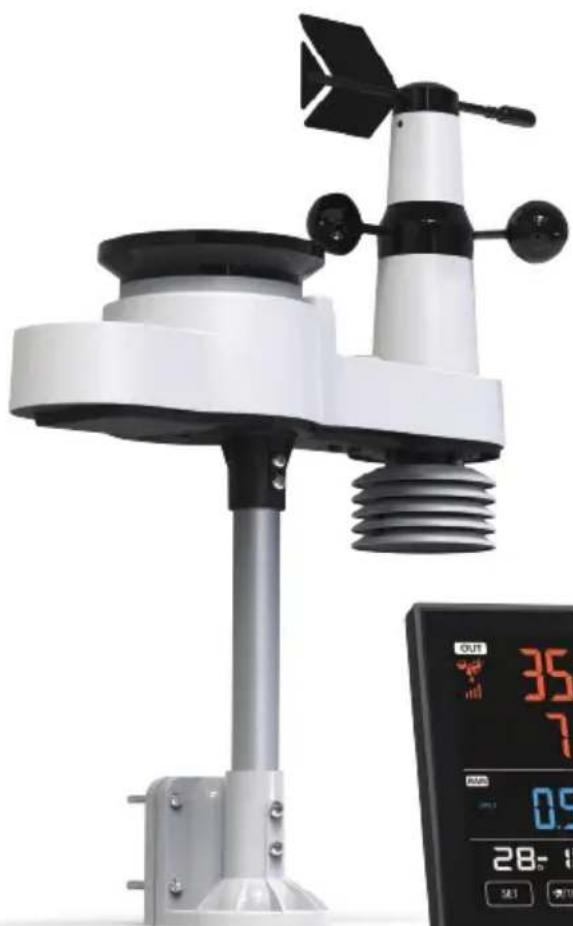
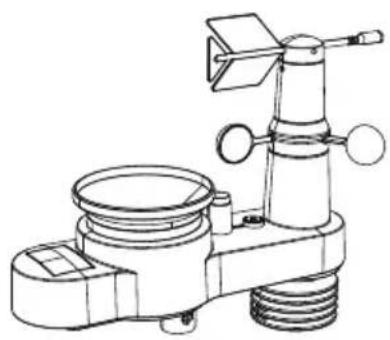
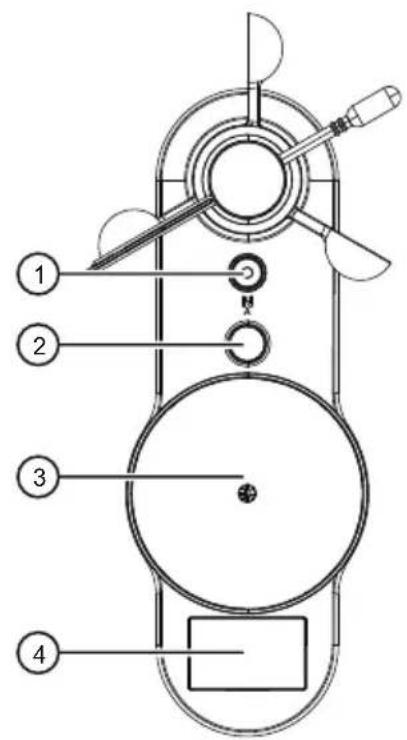
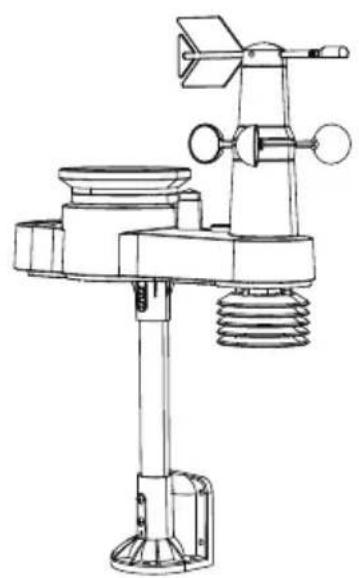
WIRELESS 5-IN-1 OUTDOOR SENSOR
① Bubble level gradient
(2) Antenna
(3) Rain collector
(4) Solar panel
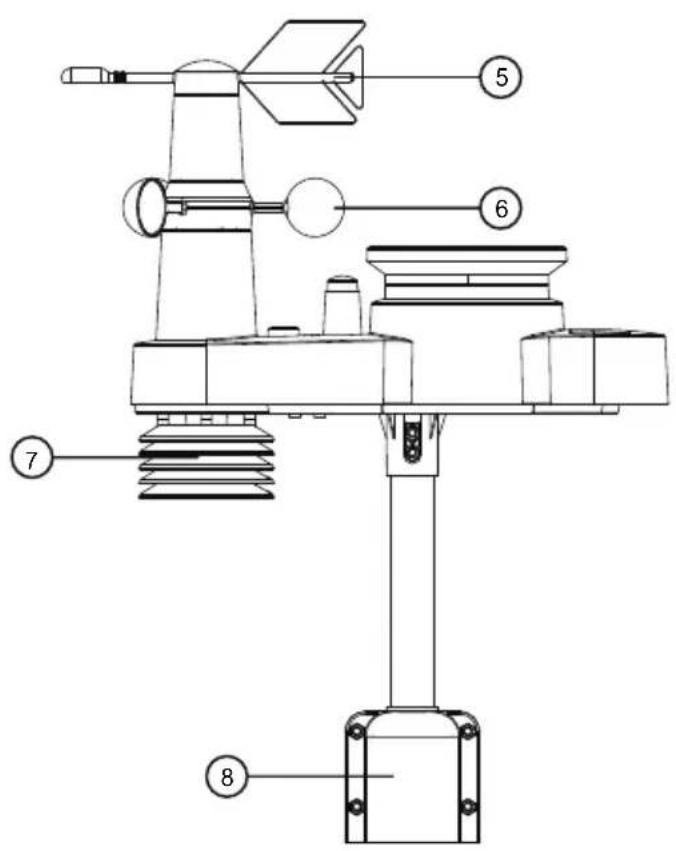
(5) Wind direction vane
(6) Wind speed cups
(7) Hygro-thermo sensor
(8) Mounting brackets
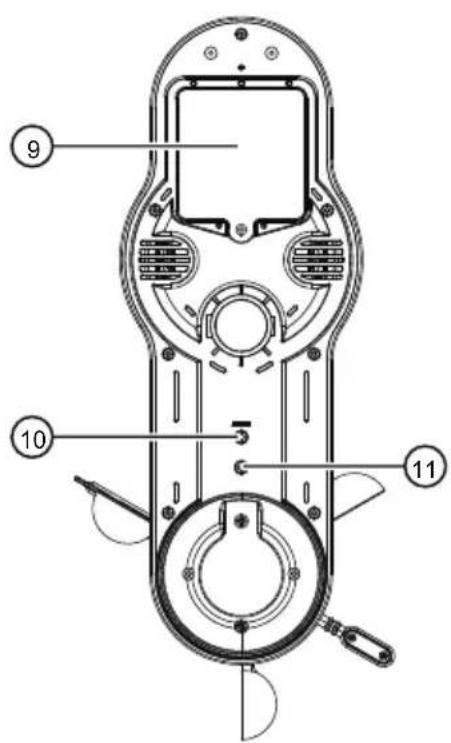
(9) Battery door
⑩ RESET button
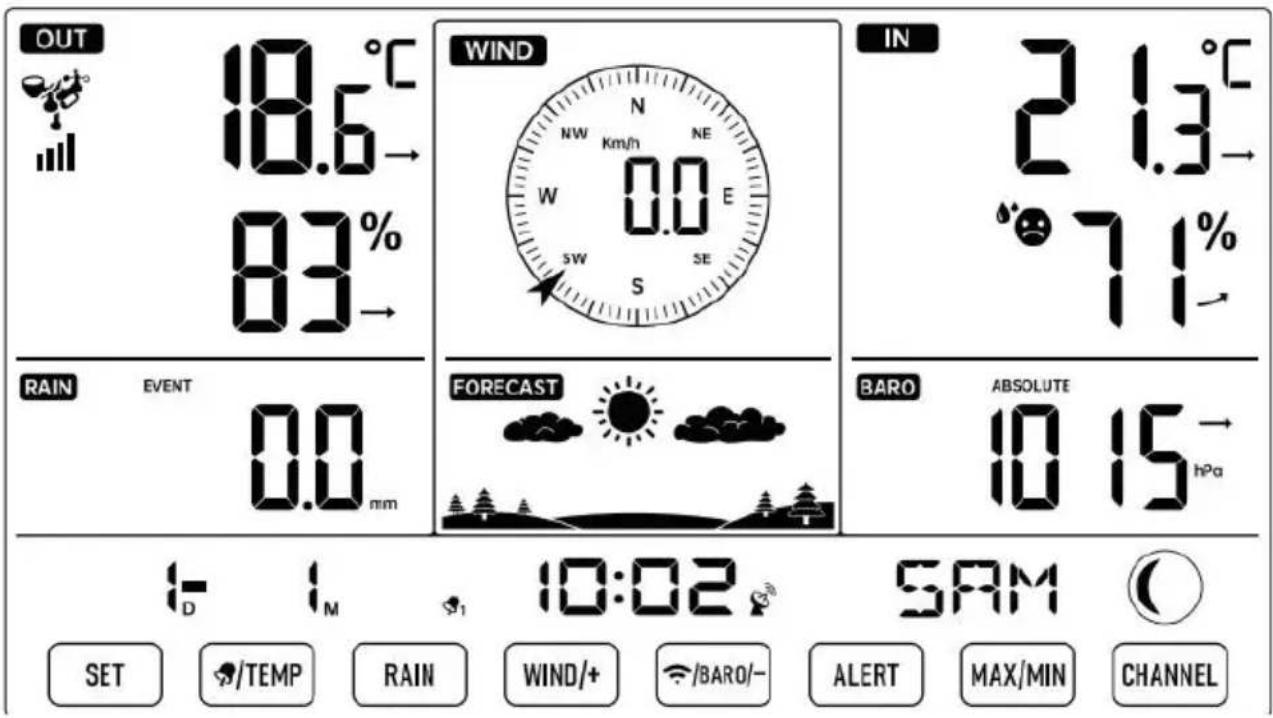
(1) LED: Flashes when the unit transmits a reading
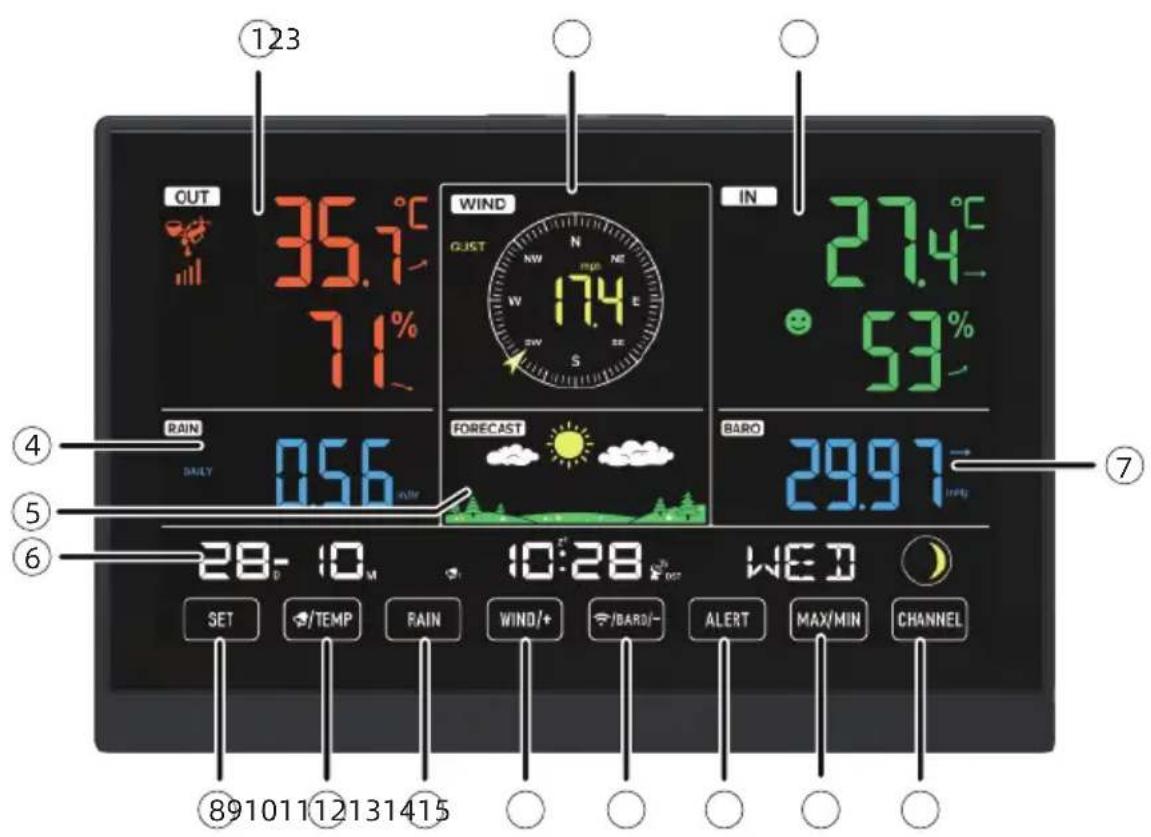


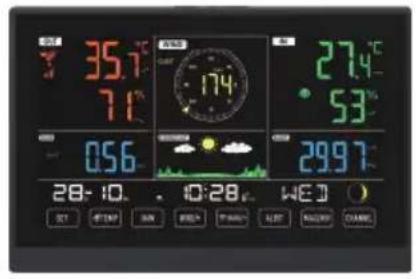
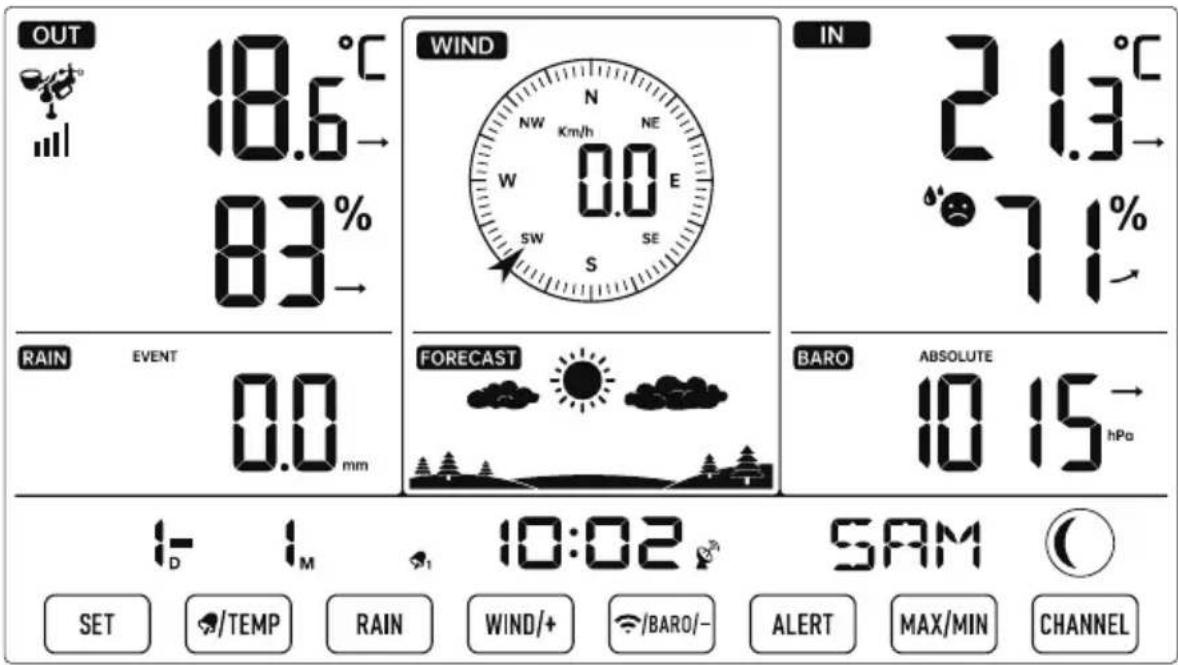
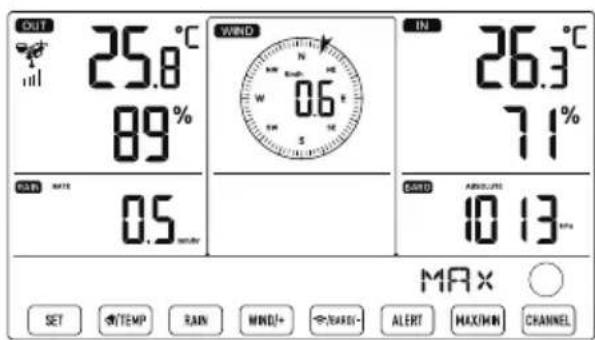
① Outdoor temperature/humidity reading, weather index
② Wind direction & speed
③ Indoor temperature/humidity reading
(4) Rain
(5) Weather forecast
⑥ Time & date, moon phase, Weekday
(7) Barometer
⑧ SET button
(9) /TEMP(ALARM) button
10 RAIN button
(1) WIND/+ button
12 /BARO/- (RCC) button
13 ALERT button
14 MAX/MIN button
15 CHANNEL button
16 LIGHT/SNOOZE button
17 Battery compartment (3 x AAA batteries, not included)
SETTING UP THE WIRELESS 5-IN-1 OUTDOOR SENSOR
The wireless 5-in-1 outdoor sensor measures wind speed, wind direction, rainfall, temperature, and humidity.
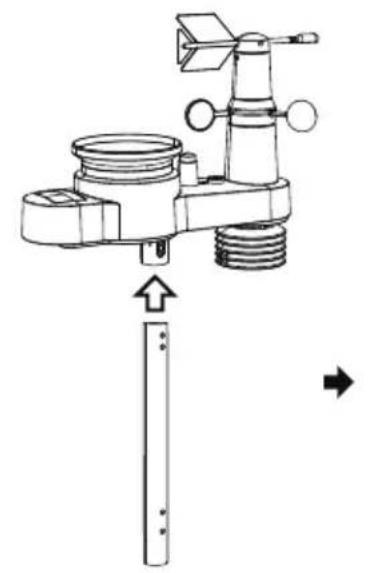
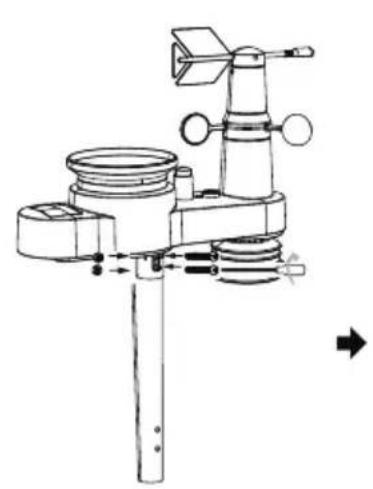
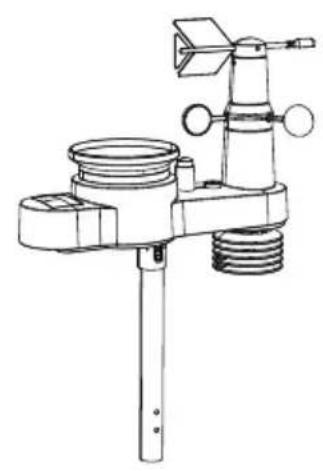
INSTALLING THE MOUNTING POLE AND BRACKET
- Secure the sensor onto a mounting pole and bracket (included) using the screws (included).
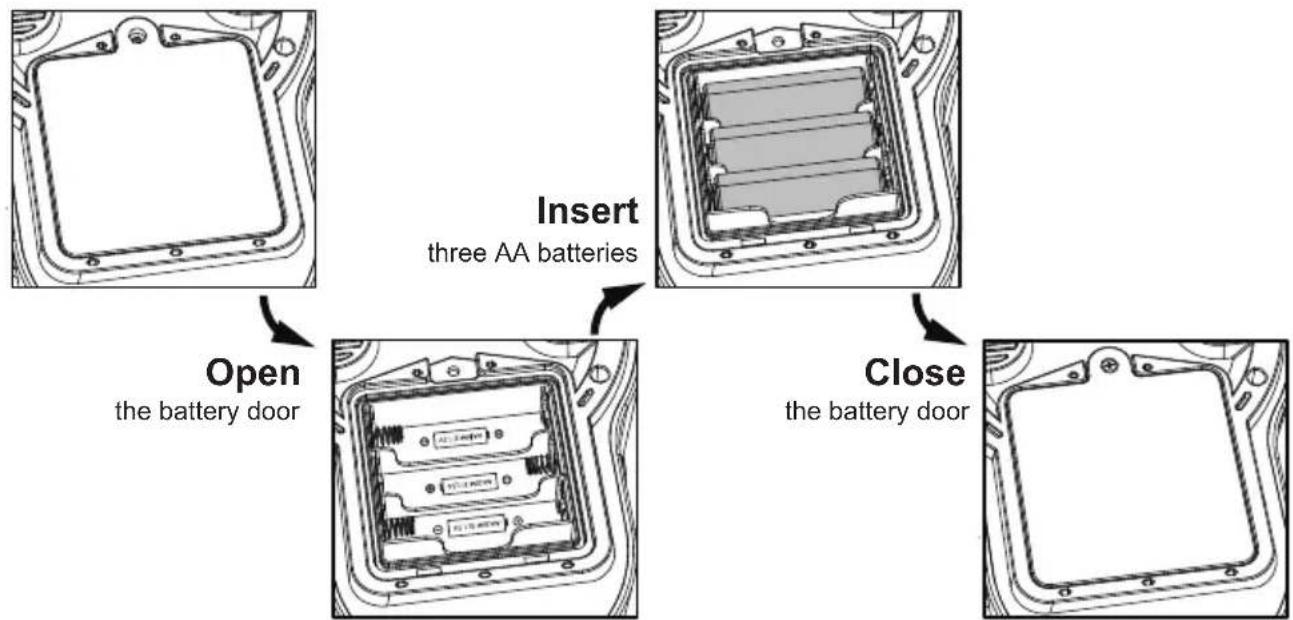
INSTALLING THE BATTERIES
- Open the battery door.
- Insert three AA batteries (not included) according to the +/- polarity labeled in the compartment.
- Close the battery door on the compartment.
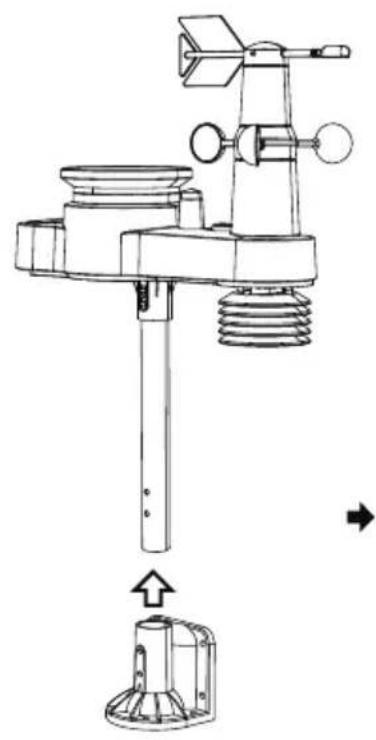
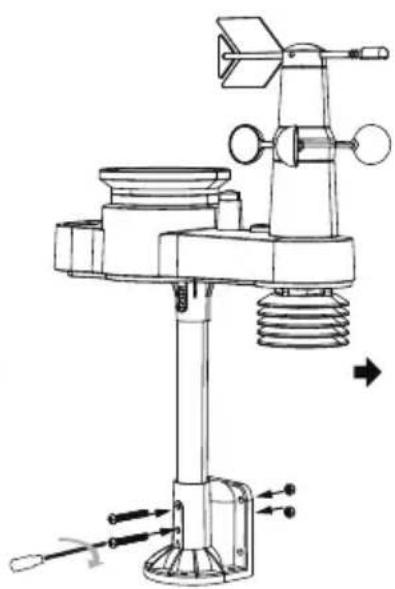
MOUNTING THE WIRELESS 5-IN-1 OUTDOOR SENSOR
Pick a location for the 5-in-1 outdoor sensor that is open with no obstructions.
- Tighten the mounting brackets to a surface/wall using four tapping screws (included), or tighten the mounting pole to your existing mounting pole with four 5 Bolts and M5 Nuts assembly.
- Add rubber pads onto the mounting bracket before fastening the mounting bracket to the sensor.
- Make sure the rain collector faces north and the solar panel faces south before fastening the screws (included).
- Please ensure that the sensor is fixed particularly tightly, otherwise windy conditions cause the transmitter to shake and thus misread the rainfall data.
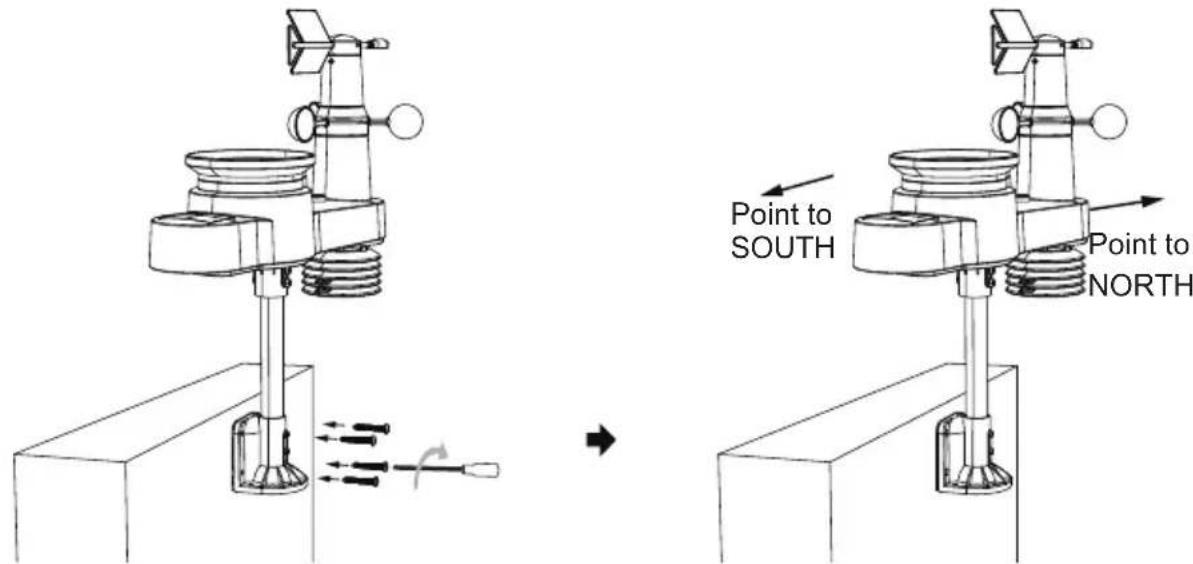

POINTING THE WIRELESS 5-IN-1 OUTDOOR SENSOR TO SOUTH (OPTIONAL)
The outdoor wireless weather sensor is calibrated to be pointed north for maximum accuracy. However, for your convenience, if you are a user located in the Southern Hemisphere, you can use the sensor with the rain collector pointing south.
1.) Mount and install the wireless weather sensor with the rain collector pointing South, instead of North. (Please refer to MOUNTING THE WIRELESS 5-IN-1 OUTDOOR SENSOR.)
2.) Select "STH" for south hemisphere in the clock setting mode. (Please refer to "setting the clock")
NOTE: Changing the hemisphere setting will automatically switch the direction of the moon phases on the display.
Pointing the wireless weather sensor toward the south will allow maximum sunlight on the solar panel, especially during the winter season in the Southern Hemisphere.
POWERING UP THE WEATHER STATION
- Plug the power adapter into the power jack located in the back of the weather station. Insert 3 new AAA alkaline batteries (not included) for backup.
- Once the weather station is turned on, it will automatically enter pairing mode.
PAIRING THE WIRELESS 5-IN-1 SENSOR
- Once your weather station powers on, it should automatically search for and connect to the wireless sensors. If the weather station does not connect within the first 5 minutes, refer to the following section, "RE-PAIRING SENSOR".
- You will see the icon of an antenna scrolling in the temperature and humidity (outdoor) section of the display.
- Once the pairing process completes, the antenna icon will appear solid (not flashing), and the readings for outdoor temperature and humidity, wind speed, wind direction,, and rainfall will appear in their designated sections of the LCD display.
NORMAL TIME DISPLAY
RE-PAIRING SENSOR
- If the connection fails or the weather station is reset, then press and hold the 15 【CHANNEL】 button over 2 seconds to enter pairing mode, and the weather station will re-register all the sensors that have already been registered to it before, (i.e. the weather station will not lose the connection of the sensors that you'd paired up before.)
ATOMIC CLOCK RECEPTION
- After RF connection is established or 5 minutes pairing time, the weather station will automatically receive atomic clock signal, the RCC receiving dot icon will flash.
- When the weather station detects the atomic clock signal, the signal strength indication will be indicated. When the atomic clock signal is received successfully, the time and date will be updated.
- The weather station automatically begins to search DCF signal and update the time every day at 1:00 am, 2:00 am, 3:00 am, 4:00 am, 5:00 am.
The Atomic Time tower icon will flash while searching and will appear solid when it has connected. - Put the weather station away from interference, such as electronic devices. (TV, computer, microwave, radio, etc.)
MANUAL ATOMIC CLOCK RECEPTION
- You can receive the atomic clock signal manually. In Normal display, press and hold 12 【/BARO/-】 button over 2 seconds to receive the atomic clock signal manually.
- During atomic clock reception, press and hold 12 【 /BARO/-】 button for over 2 seconds to exit atomic clock reception.
NOTE : During RCC reception, the backlight is temporarily turned off in order to get better receiving performance. After RCC reception is finished, the backlight will resume.
OPERATING INSTRUCTIONS
CLOCK
Setting the Clock
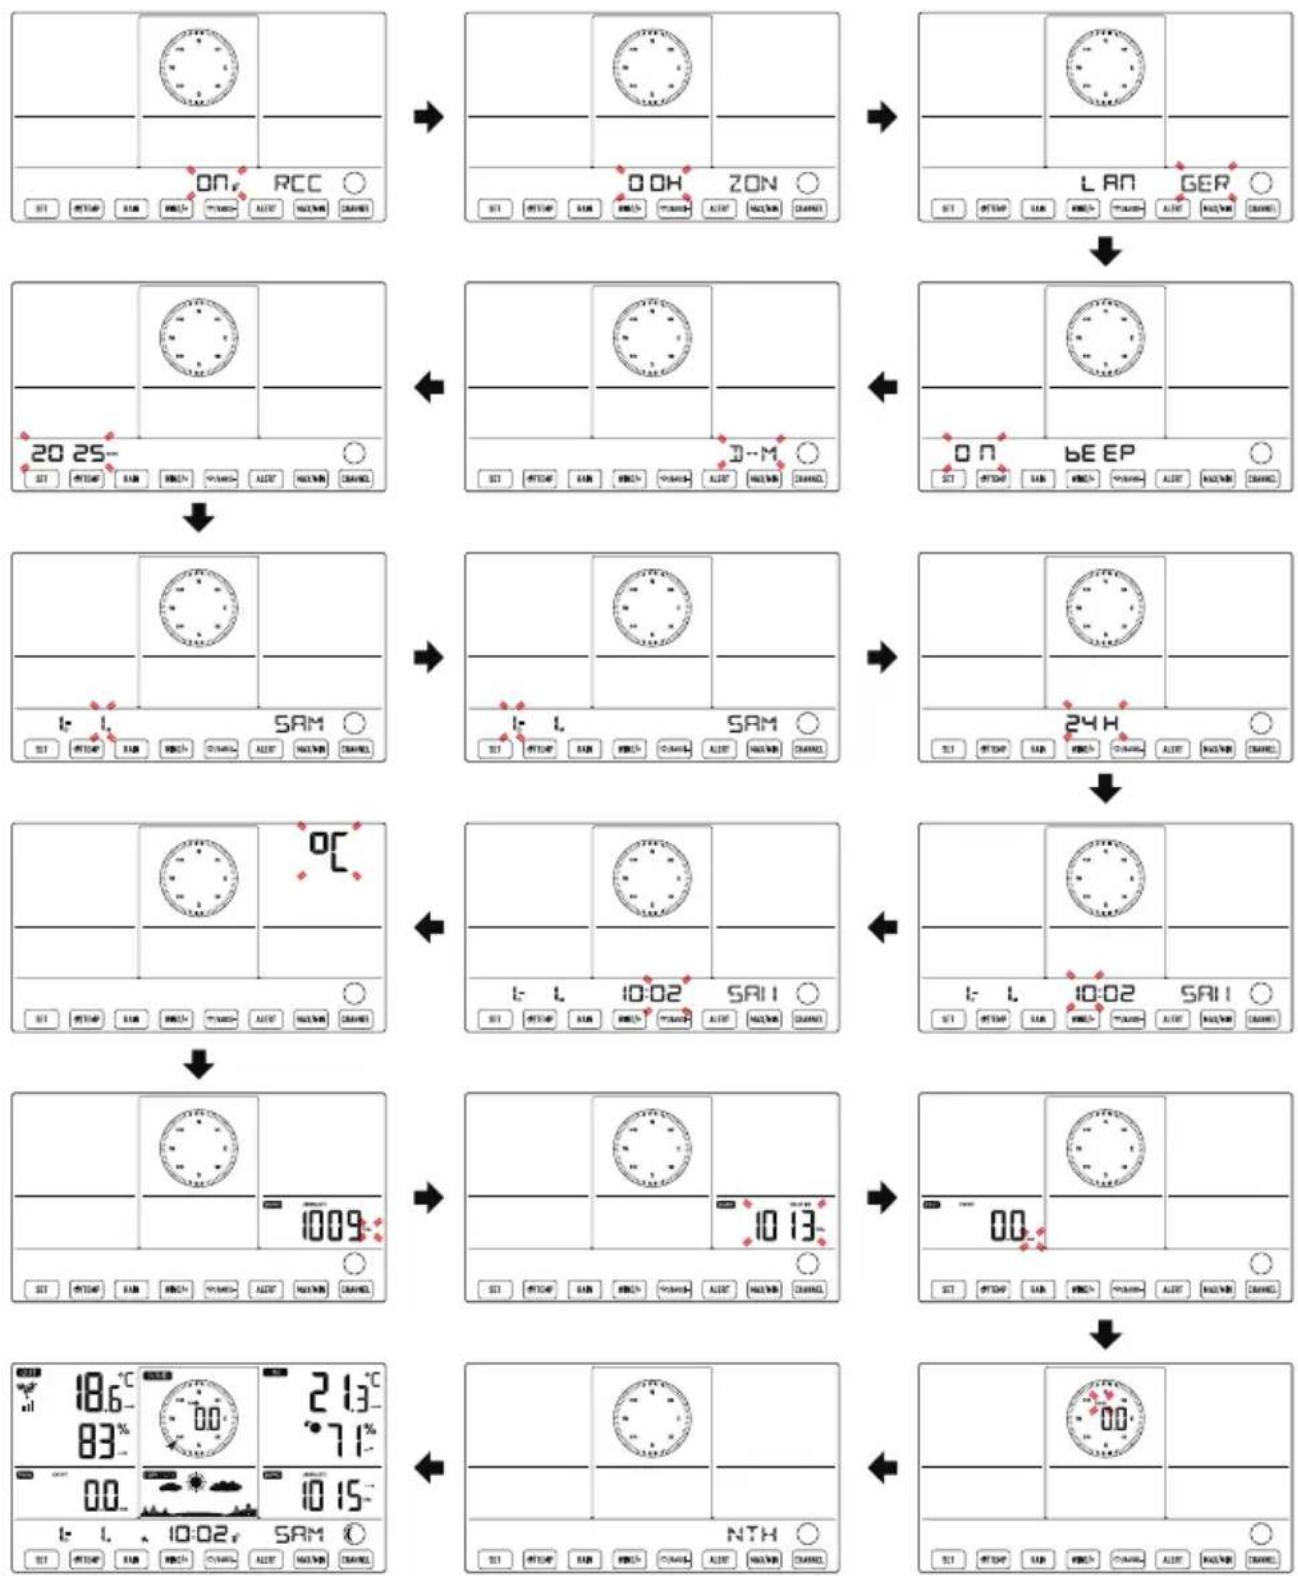
In Normal time display, press and hold 8【SET】 over 2 seconds to enter time setting mode. Press and release 11【WIND/+】 and 12【/BARO/-】 to adjust the values. Hold 11【WIND/+】 and 12【/BARO/-】 over 2 seconds to adjust the values rapidly.
Press and release (8)【SET】 to confirm and move to the next item. To exit the setting mode at any time, press (16)【LIGHT/SNOOZE】 button.
Setting Order
- RCC On/Off
- BEEP On/Off
-
Month
-
Time Zone
- M-D/D-M Format
-
Date
-
Hour
-
Minute
-
Pressure Unit
-
Relative Pressure Calibration
-
Wind Speed Unit
-
Hemisphere
-
Weekday Language
- Year
-
12/24 Hour Format
-
Temperature Unit
- Rainfall Unit
- End of setting
1.) Press and hold 8【SET】 button entering the settings. RCC ON flashes. Press (1)【WIND/+】 or (2)【/BARO/-】 to change between RCC on and RCC off. Press (8)【SET】 to select Time Zone.
NOTE: If RCC OFF is selected, you will skip DST and time zone setting, and move to BEEP setting.
2.) When Time Zone flashes, press 11【WIND/+】or 12【/BARO/-】to set time zone. Press 8【SET】to select language for weekday display.
3.) When weekday flashes, press (1)【WIND/+】 or (12)【/BARO/-】 to adjust the desire language. Press (8)【SET】 to select beep sound on/off when pressing any button.
NOTE : There are total 8 languages for weekday display. (ENG = English, GER = German, FRE = French, SPA = Spanish, ITA = Italian, DAN = Danish, DUT = Dutch, RUS = Russian)
4.) When Beep On flashes, press 11【WIND/+】 or 12【/BARO/-】 to beep sound on/off. Press 8【SET】 to select date format.
5.) When M--D flashes, press 11【WIND/+】 or 12【/BARO/-】 to switch between M-D and D-M date format. Press 8 【SET】 to select year.
6.) When year flashes, press 11【WIND/+】 or 12【/BARO/-】 to adjust the calendar year. Press 8 【SET】 to select month.
7.) When month flashes, press 11【WIND/+】 or 12 【/BARO/-】 to adjust the calendar month. Press 8 【SET】 to select date.
8.) When Day flashes, press 11【WIND/+】 or 12【/BARO/-】 to adjust the calendar day. Press 8【SET】 to select 12/24-hour format.
9.) When 12H flashes, press 11【WIND/+】 or 12【/BARO/-】 to change between 12 hour and 24 hour format. Press 8【SET】 to select hour.
10.) When hour flashes, press ①【WIND/+】 or ⑫【/BARO/-】 to adjust the hour. Press ⑧【SET】 to select minute.
11.) When minute flashes, press ①【WIND/+】 or ⑫【/BARO/-】 to adjust the minute. Press ⑧【SET】 to select temperature unit.
12.) When ^ F flashes, press 11【WIND/+】 or 12【/BARO/-】 to change between ^ F and ^ C . Press 8【SET】 to select pressure unit.
13.) When pressure unit flashes, press (1)【WIND/+】 or (12)【/BARO/-】 to change between hPa, inHg and mmHg. Press (8)【SET】 to select relative pressure calibration.
14.) When Relative Pressure flashes, press 11【WIND/+】 or 12【/BARO/-】 to adjust the relative pressure. Press 8【SET】 to select windspeed unit.
15.) When Rain unit flashes, press (11) [WIND/+] or (12) [BARO/-] to change unit between in and mm. Press (8) [SET] to select windspeed unit.
16.) When Wind speed unit flashes, press 11【WIND/+】or 12【/BARO/-】to change unit between in and mm. Press 8【SET】to select hemisphere.
17.) When NTH flashes, press (11)【WIND/+】 or (12)【/BARO/-】 to change hemisphere between NTH (northern) and STH (southern). Press (8)【SET】 to save and exit the setting. It will return to the normal mode display.
NOTE: If there is no valid operation within 20 seconds, it will automatically return to the normal display mode from the setting mode. While adjusting settings, you can press [16]【LIGHT/SNOOZE】 button to return to normal display mode.
Moon Phase
The display console calculates the moon phase according to your time, date, and time zone.
The table below explains the corresponding phases and their icons for both the Northern and Southern hemispheres.
| Northern Hemisphere Icons | Southern Hemisphere IconsMoon | Phase |
| New Moon | ||
| Waxing Crescent Moon | ||
| First Quarter Moon | ||
| Waxing Gibbous Moon | ||
| Full Moon | ||
| Waning Gibbous Moon | ||
| Third Quarter Moon | ||
| Waning Crescent Moon |
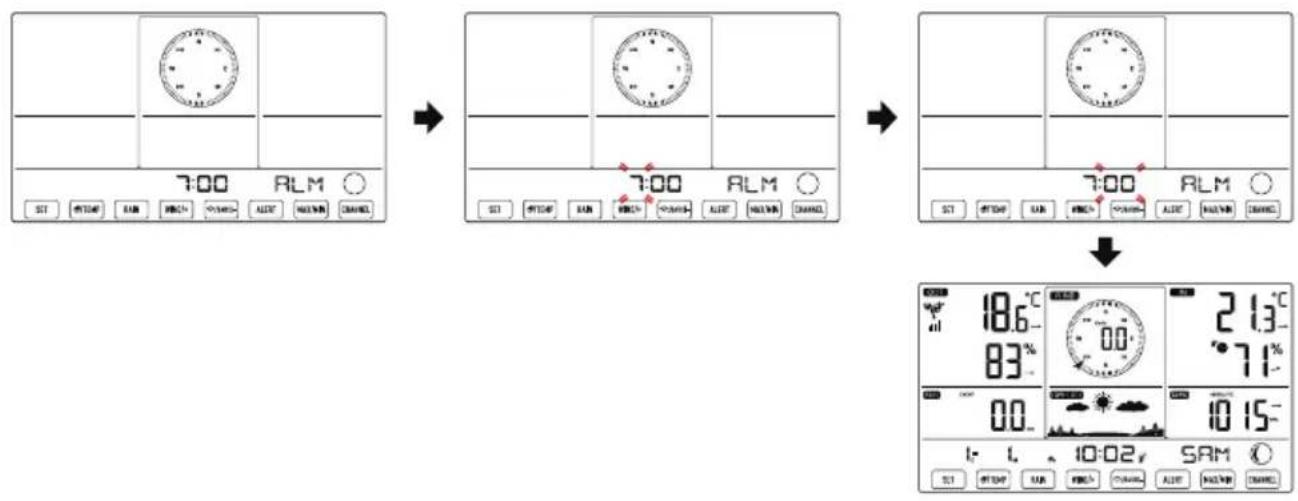
Setting the Alarm
- In normal time display, press 8 【SET】 button to switch display alarm time (alarm time mode).
- In alarm time display, press and hold 8 【SET】 button over 2 seconds to enter alarm setting mode. Hour of alarm starts to flash.
- Press (11)【WIND/+】 or (12)【/BARO/-】 button to set required alarm hours. Hold (11)【WIND/+】 or (12)【/BARO/-】 button to adjust alarm hours quickly.
Press (8)【SET】 button to select minute of Alarm. Minute of alarm starts to flash. - Press (11)【WIND/+】 or (12)【/BARO/-】 button to set required alarm minutes. Hold (11)【WIND/+】 or (12)【/BARO/-】 button to adjust alarm minutes quickly.
- Press (8)【SET】 button to save all settings and exit to normal display mode.
NOTE: If there is no valid operation within 20 seconds, it will automatically return to the normal display mode from the setting mode. While adjusting settings, you can press [16]【LIGHT/SNOOZE】 button to return to normal display mode.
Deactivate/Activate Alarm
- In alarm time display, press (9)【TEMP】 button to select the Alarm on or off.
- If the alarm is on, its corresponding alarm icon will be shown on the display.
- When the alarm is ringing, press any buttons except 16【LIGHT/SNOOZE】 button to stop the alarm signal. It is not necessary to reactivate the alarm. It will ring again this time next day.
Snoopze Function
When the alarm rings, press 16【LIGHT/SNOOZE】 button to pause the alarm. The snooze indicator icon z^ keep flashing. The alarm will resume after 5 minutes.
TEMPERATURE
Temperature/Humidity Trend
Tendency arrows allow you to quickly determine of temperature and humidity are rising and falling in a one-hour update period.
Temperature Trend
| Temperature has risen > 1°C/2°F in the past hour | Temperature has not changed more than 1°C/2°F in the past hour | Temperature has fallen < 1°C/2°F in the past hour |
| → | → | → |
Humidity Trend
| Humidity has risen > 3% in the past hour | Humidity has not changed more than 3% in the past hour | Humidity has fallen < 3% in the past hour |
| → | → | → |
Indoor Comfort Index
The indoor comfort displays a pictural representation based on the indoor air temperature and humidity levels to determine the approximate comfort level.
| Too cold Comfortable | Too hot |
PRESSURE
Barometer Pressure Display

In normal mode, press 12【/BARO/-】 button switch between absolute and relative pressure.
| Absolute | The absolute atmospheric pressure of your location. |
| Relative | The relative atmospheric pressure based on the sea level. |
Pressure Trend
Tendency arrows allow you to quickly determine if pressure is rising or falling in a one-hour update period.
| Pressure has risen > 2hpa/0.06inHg in the past hour | Pressure has not change more than 2hpa/0.06inHg in the past hour | Pressure has fallen > 2hpa/0.06inHg in the past hour |
| → | → | → |
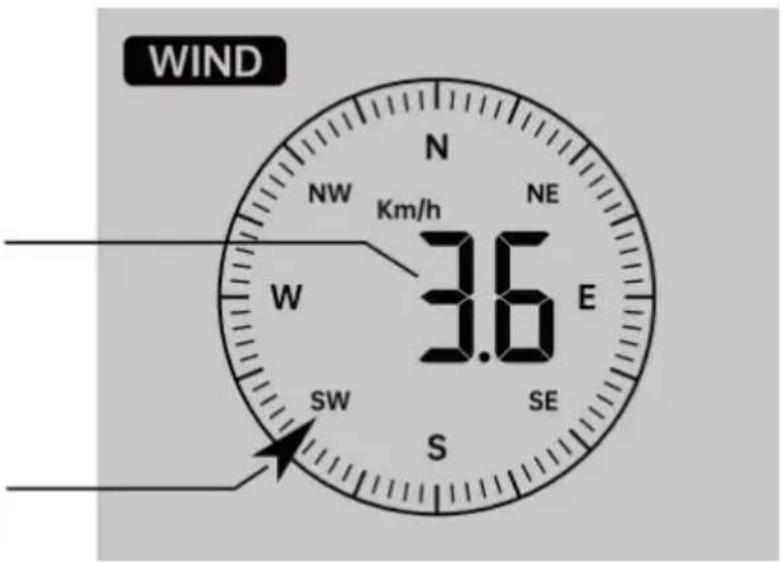
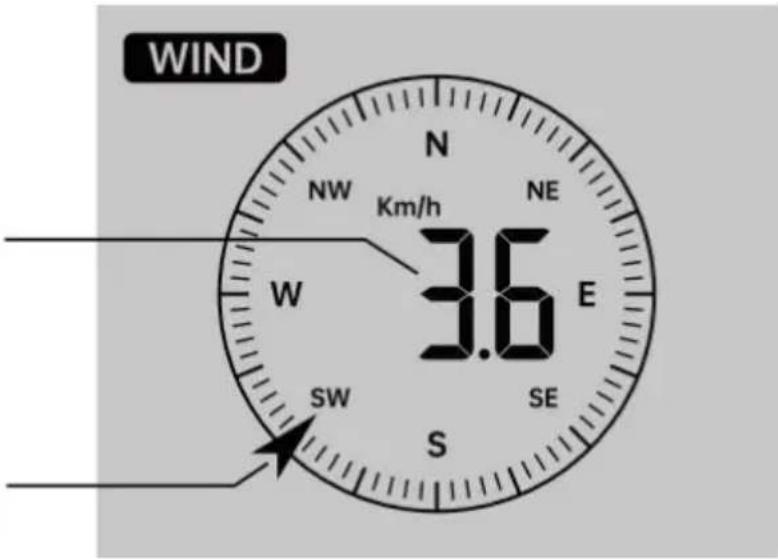
WIND
Wind Display
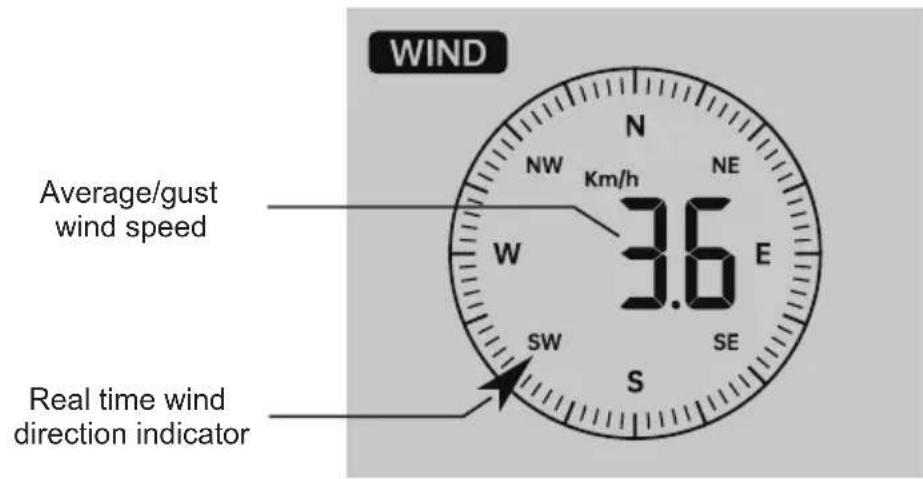
Selecting Wind Display Mode
In normal display mode, press 11WIND/+ button to switch between current average wind speed, gust wind speed and wind direction.
RAIN
Rainfall Display
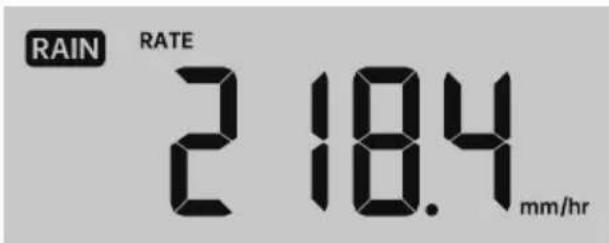
The Rainfall shows information regarding the rainfall and rain rate.
Select the Rainfall Display Mode
In normal display mode, press 10【RAIN】 button to switch between Rain Rate, Rain Event, Rain Hourly, Rain Daily, Rain Weekly, Rain Monthly and Rain Total.
Increments of Rain Definition
Rain Rate: Current rainfall rate in the past hour.
Rain event: Continuous rain, and resets to zero if rainfall accumulation is less than 10mm (0.039 in) in a 24-hour period.
Daily Rain: Total rainfall since midnight (00:00)
Weekly Rain: Total rainfall for the current calendar week, and resets on Sunday morning at midnight (Sunday thru Saturday)
Monthly Rain: Total rainfall for the current calendar month, and reset on the first day of the Month.
Total Rain: Total rainfall since the last reset.
Reset the Total Rainfall Record
In normal display mode, press and hold 10【RAIN】 button over 2 seconds to reset the rain record.
NOTE:
Resetting the weekly rain also resets the daily rain.
Resetting the monthly rain also resets the daily and weekly rain.
Resetting the total rain also resets the monthly, weekly and daily rain.
WEATHER
Weather Index
When reading the Weather Index display, you can press 9【/TEMP】 button to cycle through different weather indexes in the following order:
Feels Like > Heat Index > Wind Chill
Feels Like
The Feels Like temperature index determines what temperature it actually feels like outside, taking into account factors like wind speed, pressure, temperature and humidity.
Wind Chill
Wind Chill is determined by a combination of the wireless weather sensor's temperature and wind speed data.
NOTE:
Only when the temperature is below 50^(10^) and the wind speed is over 4.8km/h (3 mph), will display the wind chill value, otherwise it will display “--.”
Heat Index
The Heat Index is determined by the wireless weather sensor's temperature and humidity readings.
Dew Point
The dew point is the temperature at which a given parcel of humidity air must be cooled, at constant barometric pressure, for water vapor to condense into water. The condensed water is called dew. The dew point is a saturation temperature.
The Dew Point temperature is determined by the temperature and humidity data from the wireless weather sensor.
Weather Forecast
The built-in barometer can notice atmospheric pressure changes, and based on the data collected, can predict the weather conditions.
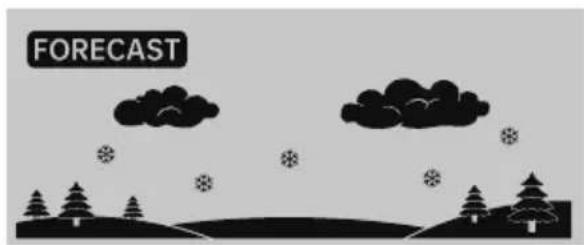
There are 6 weather icons --- Sunny, Partly Cloudy, Cloudy, Rainy, Stormy and Snowy.

Sunny Partly Cloudy
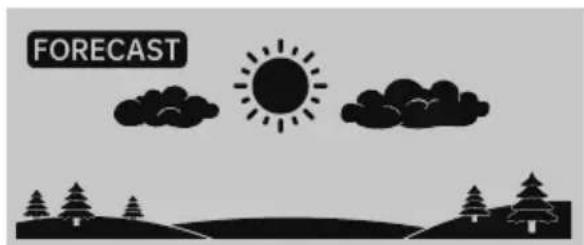

Cloudy Rainy


Stormy Snowy
NOTE:
The accuracy of a general pressure-based forecast is about 65 - 70% .
Forecasts are not guaranteed.
It may not necessarily reflect the current situation.
Ice Alert
When outdoor temperature is lower than 1^ / 33.8^ , the snowflake icon will appear on the LCD display.
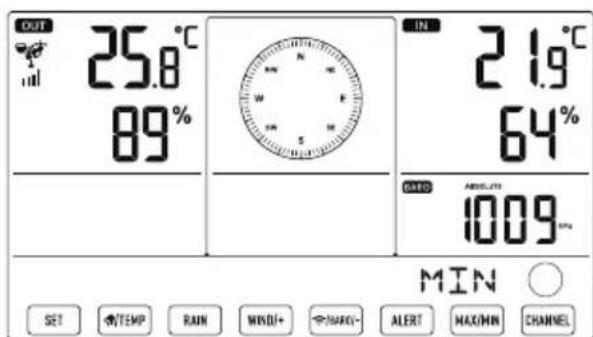
MAX/MIN
In normal display mode, press 14【MAX/MIN】 button switching between maximum and minimum value.
NOTE: If there is no valid operation within 10 seconds, it will automatically return to the normal display mode.
To View the Accumulated MAX/MIN
- Display Feel like, Wind Chill, Heat Index, Dew Point Max/Min Values.
1.) When the max values are displayed, press ⑨【TEMP】 button to interchange viewing the Outdoor temperature Feel like Wind Chill Heat Index Dew Point Outdoor temperature.
2.) When the min values are displayed, press ⑨【TEMP】 button to interchange viewing the outdoor temperature Feel like Wind Chill Heat Index Dew Point Outdoor temperature.
- Display Wind Speed, Wind Gust Max Values.
When the max values are displayed, press ⑪【WIND/+】 button to interchange viewing between the AVERAGE and GUST wind speeds. - Display Rain Rate, Daily Rain, Weekly Rain and Monthly Rain Max Values. When the max values are displayed, press 10【RAIN】 button to interchange viewing Rain Rate → Daily Rain → Weekly Rain → Monthly Rain.
- Display Absolute and Relative pressure Max/Min Values.
1.) When the max values are displayed, press 12【/BARO/-】 button to interchange viewing between Absolute and Relative pressure.
2.) When the min values are displayed, press 12【/BARO/-】 button to interchange viewing between Absolute and Relative pressure. - Display indoor and other channels sensor temperature & humidity Max/Min values.
1.) When the max values are displayed, press 15【CHANNEL】 button to interchange viewing indoor and paired outdoor sensor(s) temperature and
2.) humidity. When the min values are displayed, press 15【CHANNEL】 button to
NOTE: If other channel sensors were paired, it could show the other channel's max/min temperature and humidity values. If other channel sensors were not paired, it would only show current indoor max/min temperature and humidity values.
To Clear the MAX/MIN Data Record
- To clear the max value, press and hold 14【MAX/MIN】 button over 2 seconds while max values are displayed.
- To clear the min value, press and hold 14【MAX/MIN】 button over 2 seconds while min values are displayed.
HI/LO ALERT SETTING
To View the Alert Setting
- In normal display mode, press 13【ALERT】 button switching between Hi alert and Low alert setting value.
To Set the Alert
- In normal display mode, press and hold 13【ALERT】 button over 2 seconds to enter the alert setting mode.
- Press 11【WIND/+】 and 12【/BARO/-】 button to adjust the value up or down, then press 9 【TEMP】 button to turn on/off the alert.
- Press 13【ALERT】 button to confirm and jump to next setting.
The icon or will display when the alert is on.
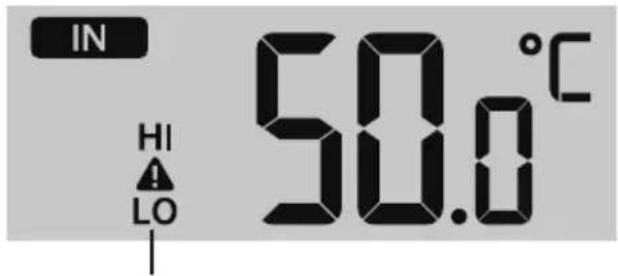
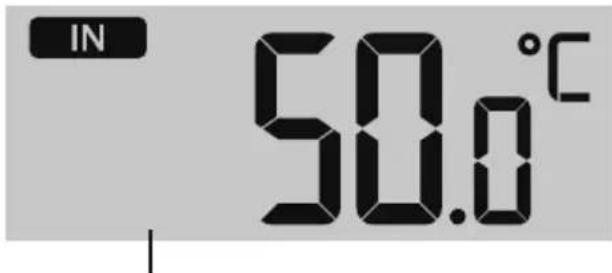
High/Low Alert on High/Low Alert off
- To exit the alert setting mode at any time, press 16【LIGHT/SNOOZE】 button. The Hi/Lo alert setting order is shown below:
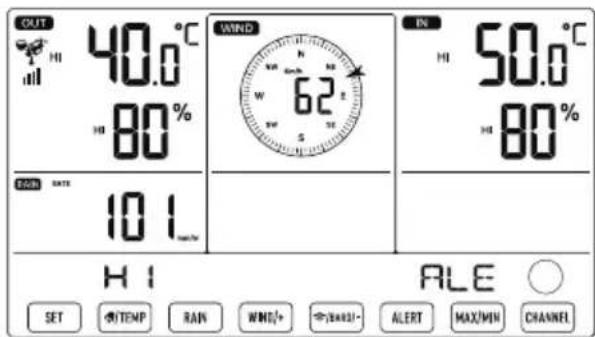
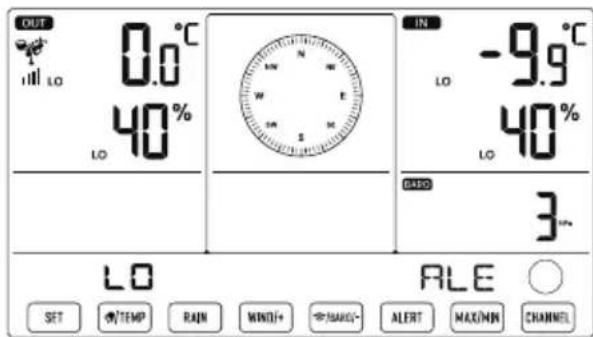
| Alert Setting Order | Setting Range | Display Section Default |
| Indoor Temperature Hi Alert 50°C (122°F) - 50°C (-9.9°F - 122°F) | Indoor temperature & Humidity | |
| Indoor Temperature Lo Alert (-14.1°F - 122°F) | -9.9°C (14.1°F) | |
| Indoor Humidity Hi Alert | 1% - 99% | 80% |
| Indoor Humidity Lo Alert | 40% | |
| Outdoor Temperature Hi Alert 40°C (104°F) - 70°C (-40°F - 158°F) | Outdoor temperature & Humidity | |
| Outdoor Temperature Lo Alert | 0°C (32°F) | |
| Outdoor Humidity Hi Alert | 1% - 99% | 80% |
| Outdoor Humidity Lo Alert | 40% |
| Alert Setting Order | Setting Range | Display Section | Default |
| High Average Wind Speed Alert | 0 - 50m/s2 - 180 km/h1 - 111mph1 - 97 knots0-60 bft | Wind Speed | 17m/s62km/h38mph33 knots20bft |
| High Wind Gust alert | 0 - 50m/s2 - 180 km/h1 - 111mph1 - 97 knots0-60 bft | Wind Speed | 17m/s62km/h38mph33 knots20bft |
| Pressure Drop Alert | 1 hpa - 10hpa0.03~0.3 inHg0.7~7.5mmHg | Barometer drop | 3hpa0.09inHg2.2mmHg |
| High Rain Rate alert | 1mm/hr – 1000mm/hr(0.04 in/hr – 39 in/hr) | Rainfall Rate | 101mm/hr(4 in/hr) |
| High Daily Rain alert | 1mm – 1000mm(0.03 in – 39.37 in) | Rainfall Rate | 101mm(4 in) |
To Silence the Hi/Lo Alert Alarm
Press the 16【LIGHT/SNOOZE】 button on top of the display console to silence the alarm, or it will automatically turn off after one minute.
NOTE: Once the alert is triggered, the alarm will sound for one minute and the associated alert icon and weather readings will flash. If the alert alarm automatically shuts off after one minute instead of being manually shut off, the associated alert icon and readings will continue flashing until the reading is out of the alert range.
The weather alert alarm will go off once the readings fall into alert range again.
BACKLIGHT
Display Backlight
With AC Adapter
The backlight can only be continuously on when the AC adapter is permanently on. When the AC adapter is disconnected, the backlight can be temporarily turned on.
- Press 16【LIGHT/SNOOZE】 button to adjust the backlight brightness, High, Low and Without AC Adapter.
- Press 16【LIGHT/SNOOZE】 button temporarily turn on the backlight for 15 seconds.
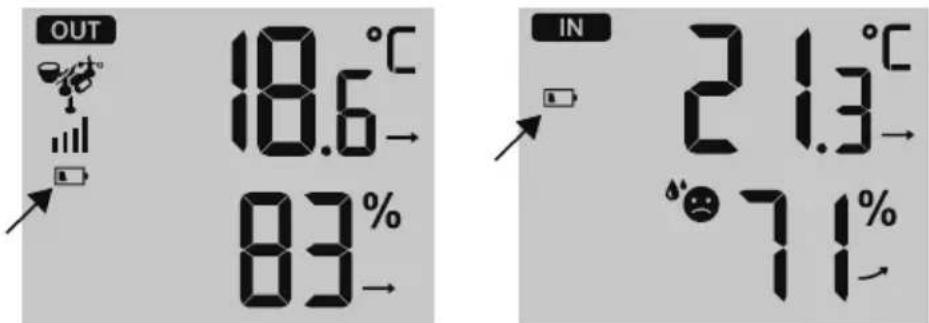
LOW BATTERY INDICATOR
If the low battery indicator icon is displayed in the outdoor temperature and humidity section or the corresponding CH section of the LCD console display, this indicates that the batteries in your wireless weather sensor(s) are running low and should be replaced. Make sure to replace all batteries at the same time.
FACTORY START
If there is malfunction, the Factory Restart is a great way to return your station to "out of the box" condition.
1.) Remove all power (batteries and AC adapter) from outdoor sensors and weather station.
2.) Follow the operation "SETTING UP THE WEATHER STATION" to start the pair the sensor.
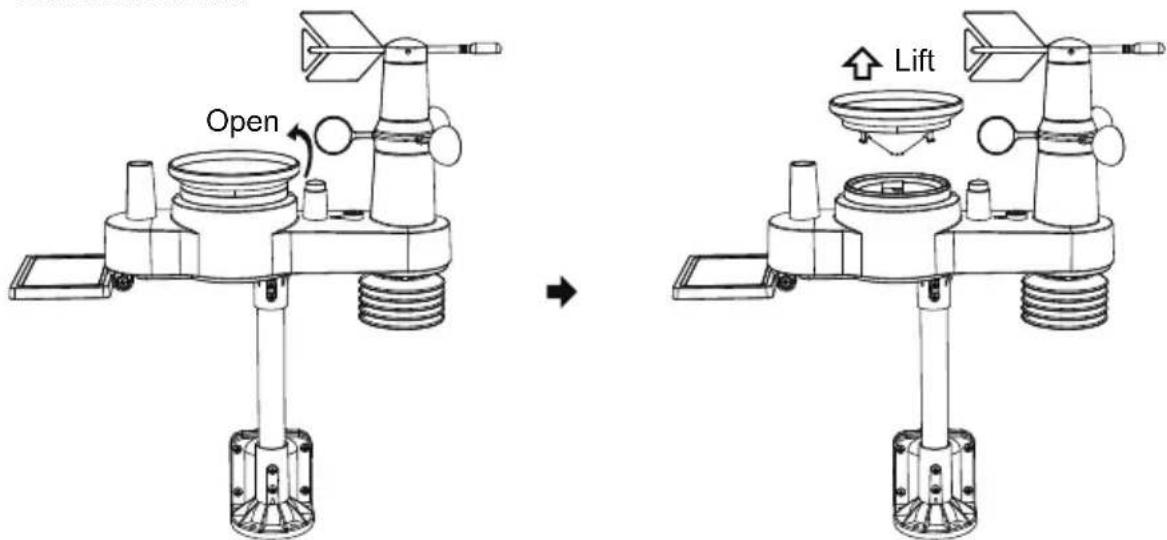
CARE AND MAINTENANCE
1.) Clean the rain gauge every 3 months. Rotate the funnel counterclockwise and lift to expose the rain gauge mechanisms, and clean with a damp cloth. Remove any dirt, debris, and insects. If bug infestation is an issue, spray the sensor lightly with insecticide.
2.) Clean the solar panel every 3 months with damp cloth.
3.) When replacing the batteries, apply a corrosion preventive compound on the battery terminals.
SPECIFICATION
| WEATHER STATION | |
| General Specifications | |
| Dimension | 191.6 x 127 x 28.8mm (7.5 x 5 x 1.1inch) |
| Power source | AC-AC 5V, 0.15A adapter (included) |
| Battery | 3 x AAA battery (not included) |
| Support sensors | 1 x 5-in-1 sensor (included) |
| Time Function Specifications | |
| Time display | HH : MM |
| Hour format | 12 hour or 24 hour |
| Date display | DD/MM or MM/DD |
| Time synchronization method | Synchronizes with atomic clock |
| Time zones | -12~12 |
| Barometer Display & Function Specifications | |
| Barometer units | hPa, inHg and mmHg |
| Measuring range | 600 - 1100 hPa (relative setting range 930 - 1050hPa) |
| Accuracy | 700 -1100 hPa±5 hPa/600 -696 hPa±8 hPa20.67 - 32.48 inHg±0.15 inHg/17.72 -20.55inHg ±0.24 inHg525 -825 mmHg±3.8 mmHg/450 -522 mmHg±6 mmHgTypical at 25°C (77°F) |
| Weather forecast | Sunny, Partly Cloudy, Cloudy, Rainy, Stormy and Snowy |
| Display mode | Current |
| Memory mode | Daily Max/ Min |
| Alert | Pressure change alert |
| Indoor/Outdoor Temperature Display & Function Specifications | |
| Temperature unit | °C and °F |
| Indoor Display range | -9.9°C - 50°C(-14.1°F - 122°F) |
| Outdoor Display range | -40°C - 70°C(-40°F - 158°F) |
| In/Out accuracy | 10 - 50°C ± 1°C / 50 - 122°F ± 1.8°F-20 - 10°C ± 1.5°C / -4 - 50°F ±2.7°Fothers : ±2°C / ±3.6°F |
| Display mode | Current |
| Memory mode | Daily Max/ Min |
| Alert | High/Low temperature alert |
| Indoor/Outdoor Humidity Display & Function Specifications | |
| Humidity unit | % |
| Display range | 1 – 99% |
| In/Out accuracy | 40 – 80% RH ± 5% RH @25°C(77°F) Others : ± 8% RH @25°C(77°F) |
| Display mode Current | |
| Memory mode | Daily Max/ Min |
| Alert | High/Low humidity alert |
| Wind Speed and Direction Display & Function Specifications | |
| Wind Speed unit | mph, m/s, km/h, knots |
| Display range | 0 -112mph, 50m/s, 180km/h, 97 knots |
| Speed accuracy | <5m/s: ±0.5m/s, >5m/s: ±10% (whichever is greater) |
| Display mode Gust/Average | |
| Memory mode | Daily Gust/Average |
| Alert | High Wind Speed Alert (Gust/Average) |
| Wind direction | 16 directions |
| Rain Display & Function Specifications | |
| Unit of rainfall | mm, in |
| Range of rainfall | 0 – 12999mm (0 – 511.7 in) |
| Accuracy of rainfall | ±7% |
| Display mode | Current |
| Memory mode | Daily Max |
| Rainfall display mode | Hourly/ Daily/ Weekly/ Monthly/ Total Rainfall |
| Alert High Daily Rainfall alert | |
| Weather Index Display & Function Specifications | |
| Weather Index mode | Feels like, wind chill, heat index and dew point |
| Display mode | Current |
| Memory mode | Daily Max/min |
| WIRELESS 5-IN-1 OUTDOOR SENSOR | |
| Dimension 361 x 5.67 x 489mm | (14.21 x 13.8 x 19.25inch) |
| Main power | 3 x AA 1.5V Battery |
| Backup power | Solar power |
| Weather data temperature, hum | humidity, wind speed, wind direction, rainfall |
| RF frequency | 868MHz |
| RF transmission range | 150m (492ft) |
| Transmission interval Every 20 | seconds for wind speed、temperature, humidity and rain data and wind direction data |
| Operation temp | -40°C – 60°C(-40°F – 140°F) |
Manufacturer: Shanghaiuxinmuyeyouxianggsi
Address: Shuangchenglu 803nong11hao1602A-1609shi, baoshanqu, shanghai 200000 CN.
Imported to AUS: SIHAO PTY LTD. 1 ROKEVA STREETEASTWOOD NSW 2122 Australia
Imported to USA: Sanven Technology Ltd. Suite 250, 9166 Anaheim Place, Rancho Cucamonga, CA 91730
YH CONSULTING LIMITED. C/O YH Consulting Limited Office 147, Centurion House, London Road, Staines-upon-Thames, Surrey, TW18 4AX
Affordable. Reliable. Home Improvement.
STATION MÉTEO
MODELE:YT60310

This is the original instruction, please read all manual instructions carefully before operating. VEVOR reserves a clear interpretation of user manual. The appearance of the product shall be subject to the product you received. Please forgive us that we won't inform you there are any technology or software updates on our product.
SETTING UP THE WIRELESS 5-IN-1 OUTDOOR SENSOR
Average/gust wind speed
Real time wind direction indicator
Imported to AUS: SIHAO PTY LTD. 1 ROKEVA STREETEASTWOOD NSW 2122 Australia
Imported to USA: Sanven Technology Ltd. Suite 250, 9166 Anaheim Place, Rancho Cucamonga, CA 91730

YH CONSULTING LIMITED. C/O YH Consulting Limited Office 147, Centurion House, London Road, Staines-upon-Thames, Surrey, TW18 4AX

Affordable. Reliable. Home Improvement.
WETTERSTATION
MODELL:YT60310

This is the original instruction, please read all manual instructions carefully before operating. VEVOR reserves a clear interpretation of user manual. The appearance of the product shall be subject to the product you received. Please forgive us that we won't inform you there are any technology or software updates on our product.
SETTING UP THE WIRELESS 5-IN-1 OUTDOOR SENSOR
Average/gust wind speed
Real time wind direction indicator
Imported to AUS: SIHAO PTY LTD. 1 ROKEVA STREETEASTWOOD NSW 2122 Australia
Imported to USA: Sanven Technology Ltd. Suite 250, 9166 Anaheim Place, Rancho Cucamonga, CA 91730

YH CONSULTING LIMITED. C/O YH Consulting Limited Office 147, Centurion House, London Road, Staines-upon-Thames, Surrey, TW18 4AX

Affordable. Reliable. Home Improvement.
STAZIONEMETEO
MODELLO:YT60310

This is the original instruction, please read all manual instructions carefully before operating. VEVOR reserves a clear interpretation of user manual. The appearance of the product shall be subject to product you received. Please forgive us that we won't inform you there are any technology or software updates on our product.
SETTING UP THE WIRELESS 5-IN-1 OUTDOOR SENSOR
TEMPO NORMALE DISPLAY
Average/gust wind speed
Real time wind direction indicator

Imported to AUS: SIHAO PTY LTD. 1 ROKEVA STREETEASTWOOD NSW 2122 Australia
Imported to USA: Sanven Technology Ltd. Suite 250, 9166 Anaheim Place, Rancho Cucamonga, CA 91730

YH CONSULTING LIMITED. C/O YH Consulting Limited Office 147, Centurion House, London Road, Staines-upon-Thames, Surrey, TW18 4AX

Affordable. Reliable. Home Improvement.
ESTACION
METEOROLOGICA
MODELO:YT60310

Por favor escanee el numero
This is the original instruction, please read all manual instructions carefully before operating. VEVOR reserves a clear interpretation of user manual. The appearance of the product shall be subject to the product you received. Please forgive us that we won't inform you there are any technology or software updates on our product.
SETTING UP THE WIRELESS 5-IN-1 OUTDOOR SENSOR
Confort interior Indice
Average/gust wind speed
Real time wind direction indicator

Imported to AUS: SIHAO PTY LTD. 1 ROKEVA STREETEASTWOOD NSW 2122 Australia
Imported to USA: Sanven Technology Ltd. Suite 250, 9166 Anaheim Place, Rancho Cucamonga, CA 91730

YH CONSULTING LIMITED. C/O YH Consulting Limited Office 147, Centurion House, London Road, Staines-upon-Thames, Surrey, TW18 4AX
Affordable. Reliable. Home Improvement.
STACJA POGODOWA
MODEL:YT60310

This is the original instruction, please read all manual instructions carefully before operating. VEVOR reserves a clear interpretation of user manual. The appearance of the product shall be subject to the product you received. Please forgive us that we won't inform you there are any technology or software updates on our product.
SETTING UP THE WIRELESS 5-IN-1 OUTDOOR SENSOR
RECZNY ZEGAR ATOMOWY PRZYJEcIE
Imported to AUS: SIHAO PTY LTD. 1 ROKEVA STREETEASTWOOD NSW 2122 Australia
Imported to USA: Sanven Technology Ltd. Suite 250, 9166 Anaheim Place, Rancho Cucamonga, CA 91730

YH CONSULTING LIMITED. C/O YH Consulting Limited Office 147, Centurion House, London Road, Staines-upon-Thames, Surrey, TW18 4AX

Affordable. Reliable. Home Improvement.
WERSTATION
MODEL: YT60310

This is the original instruction, please read all manual instructions carefully before operating. VEVOR reserves a clear interpretation of user manual. The appearance of the product shall be subject to the product you received. Please forgive us that we won't inform you there are any technology or software updates on our product.
DRAADLOZE 5-IN-1 BUITENSENSOR
SETTING UP THE WIRELESS 5-IN-1 OUTDOOR SENSOR
DE DRAADLOZE 5-IN-1 BUITENSSENSOR NAAR HET ZUIDEN RICT (OPTIONEEL)
Average/gust wind speed
Real time wind direction indicator

Wind selectoren Weergave Modus
HI/LO WAARSCHUWINGSINSTELLING
Omde
Imported to AUS: SIHAO PTY LTD. 1 ROKEVA STREETEASTWOOD NSW 2122 Australia
Imported to USA: Sanven Technology Ltd. Suite 250, 9166 Anaheim Place, Rancho Cucamonga, CA 91730

YH CONSULTING LIMITED. C/O YH Consulting Limited Office 147, Centurion House, London Road, Staines-upon-Thames, Surrey, TW18 4AX

Affordable. Reliable. Home Improvement.
VÄDERSTATION
MODELL:YT60310

This is the original instruction, please read all manual instructions carefully before operating. VEVOR reserves a clear interpretation of user manual. The appearance of the product shall be subject to the product you received. Please forgive us that we won't inform you there are any technology or software updates on our product.
SETTING UP THE WIRELESS 5-IN-1 OUTDOOR SENSOR
Avaktivera/aktivera larm
Average/gust wind speed
Real time wind direction indicator

Välja vind Visa Lage
Imported to AUS: SIHAO PTY LTD. 1 ROKEVA STREETEASTWOOD NSW 2122 Australia
Imported to USA: Sanven Technology Ltd. Suite 250, 9166 Anaheim Place, Rancho Cucamonga, CA 91730

YH CONSULTING LIMITED. C/O YH Consulting Limited Office 147, Centurion House, London Road, Staines-upon-Thames, Surrey, TW18 4AX