ZDCD1 - Air mattress Vevor - Free user manual and instructions
Find the device manual for free ZDCD1 Vevor in PDF.

| Brand | Vevor |
| Model | ZDCD1 |
| Product type | Inflatable car mattress |
| Main material | Oxford fabric and PVC |
| Maximum load | 272 kg (600 lbs) |
| Electric pump | DC 12V, 70W |
| Power supply | 12V cigarette lighter |
| Pump operating time | 15 minutes max, then 5 minutes rest |
| Operating temperature | -25°C to 50°C |
| Color | Gray |
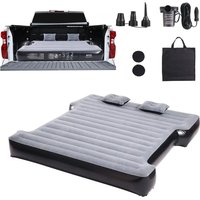
| Included accessories | Carrying bag, nozzle, air pump, 2 repair patches, 2 inflatable stools |
| Dimensions (inflated) | Approximately 190 x 140 x 20 cm |
| Mattress weight | Approximately 5 kg |
| Maintenance | Clean with a damp cloth and mild detergent |
| Repair | Repair kit with patches (PVC adhesive not included) |
| Safety | Do not use for infants under 15 months; risk of suffocation |
| Warranty | Coverage: pump, seams, valve; excludes punctures and wear |
| Compliance | FCC Part 15, EU directive 2012/19/EU |
Frequently Asked Questions - ZDCD1 Vevor
User questions about ZDCD1 Vevor
0 question about this device. Answer the ones you know or ask your own.
Ask a new question about this device
Download the instructions for your Air mattress in PDF format for free! Find your manual ZDCD1 - Vevor and take your electronic device back in hand. On this page are published all the documents necessary for the use of your device. ZDCD1 by Vevor.
USER MANUAL ZDCD1 Vevor
Technical Support and E-Warranty Certificate
www.vevor.com/support
CAR-AIR-MATTRESS
MODEL: ZDCD1、FW1、FW2、X1
We continue to be committed to provide you tools with competitive price. "Save Half", "Half Price" or any other similar expressions used by us only represent the estimate of savings you might benefit from buying certain tools with us compared to top brands and does not necessarily mean to cover all categories of tools offered. We are kindly reminded to verify carefully when you are placing an order with us actually saving half in comparison with the top major brands.
VEVOR®
TOUGH TOOLS, HALF PRICE
CAR-AIR-MATTRESS
| MODEL | ZDCD1 | FW1 FW2 | X1 |
| PICTURE |
NEED HELP? CONTACT US!
Have product questions? Need technical support? Please feel fr contact us:
Technical Support and E-Warranty Certificate www.vevor.com/support
This is the original instruction, please read all manual instruction carefully before operating. VEVOR reserves a clear interpretation user manual. The appearance of the product shall be subject to product you received. Please forgive us that we won't inform you there are any technology or software updates on our product.

Warning-To reduce the risk of injury, user must read instructio manual carefully.
SECURITY &WARNINGS
IMPORTANT SAFEGUARDS
Thank you for choosing our product! We adopt unique rip stop and thickenec Eco-friendly material ( more rip stop than most mattresses in the market after long-time market survey), offering a great protection when you use this Truc inflatable air mattress.

Due to the stretching period of the material, the new product will stretch
deflate a little within 12 hours after it is fully inflated. Minor refill might be r It's the natural leakage of inflation product.
RISK OF SUFFOCATION
- Infants have suffocated on inflatable mattresses. Never place an infant 15 months and younger sleep on an inflatable mattress.
- When used by Children over 15 months old:
- Provide at least a shoulder width space between mattress and walls, dressers or other vertical c to avoid entrapment.
- Always keep mattress fully inflated when in use.

0-15 Months
Safety Instruction of Electric Air Pump
WARNING:
- Adult use only.
Household use only - Do not drop unit into water or expose unit to rain or water.
-
Do not direct air stream at face or body.
-
Do not operate for more than 15 minutes at a time. Unplug and let cool least 5 minutes.
- Unplug unit when not in use.
- Do not obstruct vent holes or open source.
- Do not insert objects into the inflation or deflation connector.
- The DC supply cord cannot be replaced. If the cord is damaged the appli should be scrapped.
- This appliance is not intended for use by persons (including children) with reduced physical, sensory or mental capabilities, or lack of experience and knowledge, unless they have been given supervision or instruction concerning use of the appliance by a person responsible for their safety.
- To reduce the risk of electric shock, do not expose to rain. Store indoors.
- Children should be supervised to ensure that they do not play with the appliance.
FOLLOW THESE RULES AND ALL INSTRUCTIONS TO AVOID PROPERTY DAMAGE, ELECTRIC SHOCK, BURNS OR OTHER INJURY.
CAUTION
- To reduce the risk of electric shock, do not expose to rain. Store indoors.
FCC INFORMATION OF ELECTRIC AIR PUMP
CAUTION: Changes or modifications not expressly approved by the party responsible for compliance could void the user's authority to operate the equipment!
This device complies with Part 15 of the FCC Rules. Operation is subject to following two conditions:
1) This product may cause harmful interference.
2) This product must accept any interference received, including interference that may cause undesired operation.
WARNING: Changes or modifications to this product not expressly approved by the party.responsible for compliance could void the user's authority to operate product.
Note: This product has been tested and found to comply with the limits for B digital device pursuant to Part 15 of the FCC Rules, These limits are des provide reasonable protection against harmful interference in a residential installation.
This product generates, uses and can radiate radio frequency energy, and if installed and used in accordance with the instructions, may cause harmful interference to radio communications. However, there is no guarantee that interference will not occur in a particular installation. If this product does cause harmful interference to radio or television reception, which can be determined by turning the product off and on, the user is encouraged to try to correct the interference by one or more of the following measures.
- Reorient or relocate the receiving antenna.
- Increase the distance between the product and receiver.
- Connect the product to an outlet on a circuit different from that to which receiver is connected.
- Consult the dealer or an experienced radio/TV technician for assistance.
CORRECT DISPOSAL
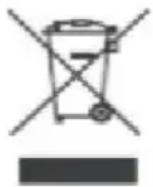
This product is subject to the provision of European Directive 2012/19/EU. The symbol showing a wheelie bin crossed through indicates that the product requires separate refuse collection in the European Union. This applies to the product and all accessories
marked with this symbol. Products marked as such may not be discarded with normal domestic waste, but must be taken to a collection point for recycling electrical and electronic devices.
SAVE THESE INSTRUCTIONS
PART LIST
When unpacking this product, ensure the parts listed below are included and carefully inspect for any damage that may have occurred during transit. Do not attempt to assemble or use the product if any part is missing or damaged.
| Model | ZDCD1 | FW1 / FW2 | X1 | |
| Mattress | 1pcs | 1pcs | 1pcs | |
| Carry Bag | 1pcs | 1pcs | 1pcs | |
| Nozzle | 1pcs | 1pcs | 1pcs | |
| Pillow | / | 2pcs | 2pcs | |
| Air Pump Set | 1pcs | 1pcs | 1pcs | |
| Patches | 2pcs | 2pcs | 2pcs | |
| Inflatable Stool | 2pcs | / | 2pcs | |
PARAMETER LIST
| Model | ZDCD1 | FW1 | FW2 | X1 |
| Max.Load | 600lbs | 650lbs | 650lbs | 660lbs |
| Material | Oxford Fabric&PVC | PVC | PVC | PVC |
| Pump | DC12V,70W | DC12V,70W | DC12V,70W | DC12V,70W |
| Color | Grey | Black | Grey | Black |
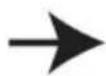
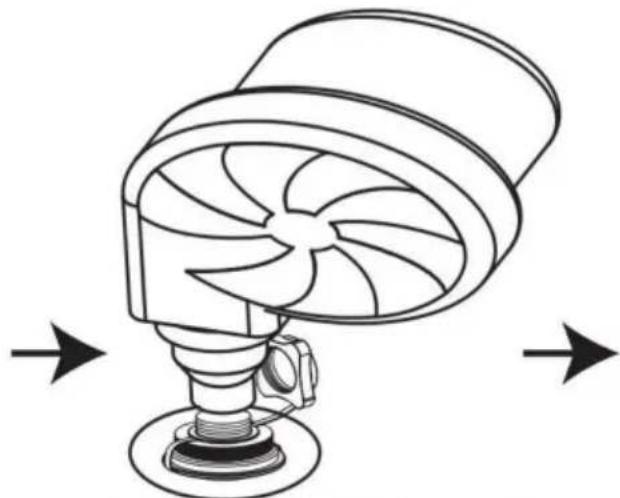
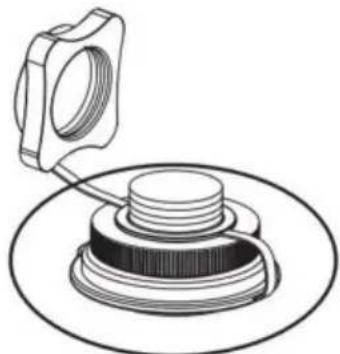
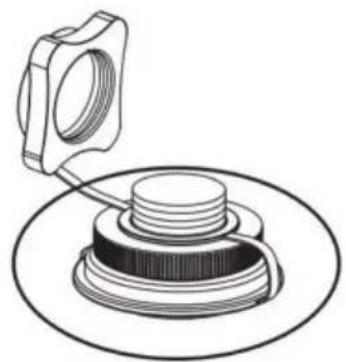
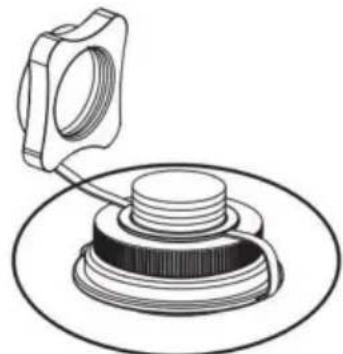
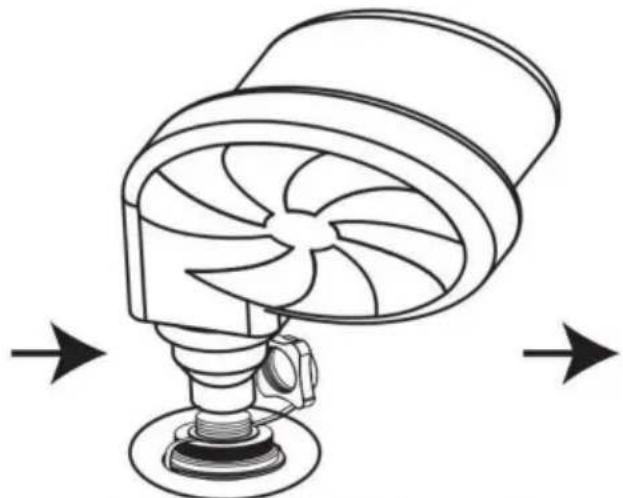
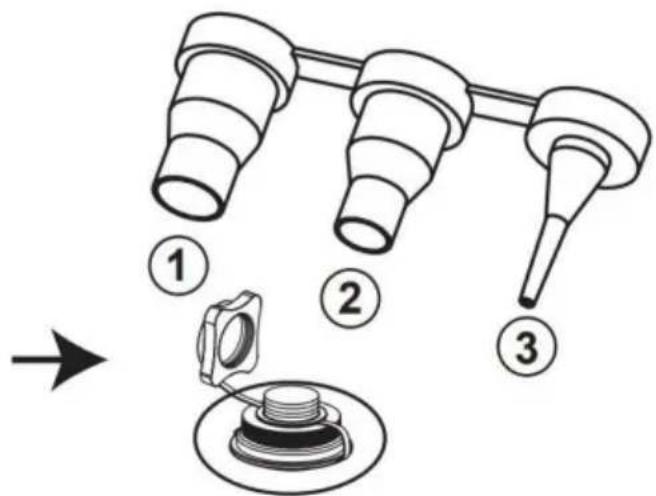
Inflation
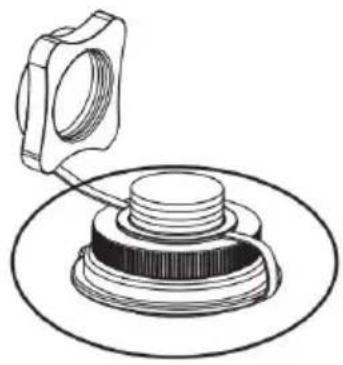
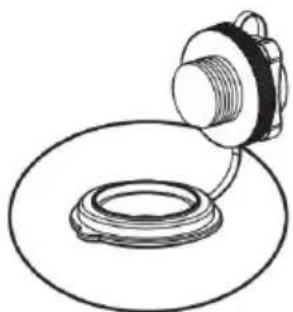
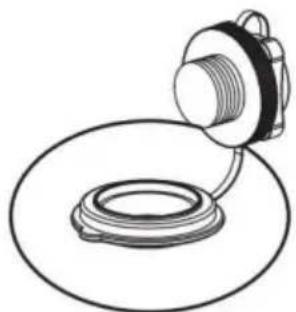
St.1 Remove the upper cap
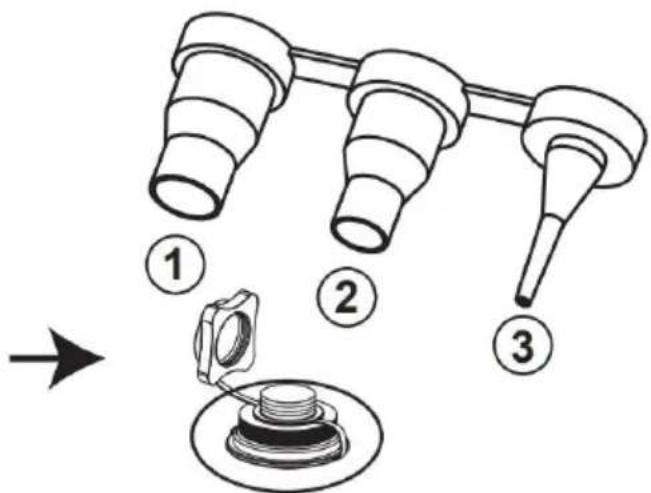
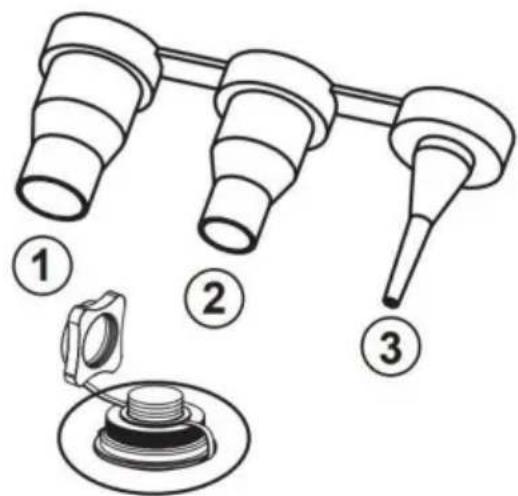
St.2 Choose the suitable nozzle
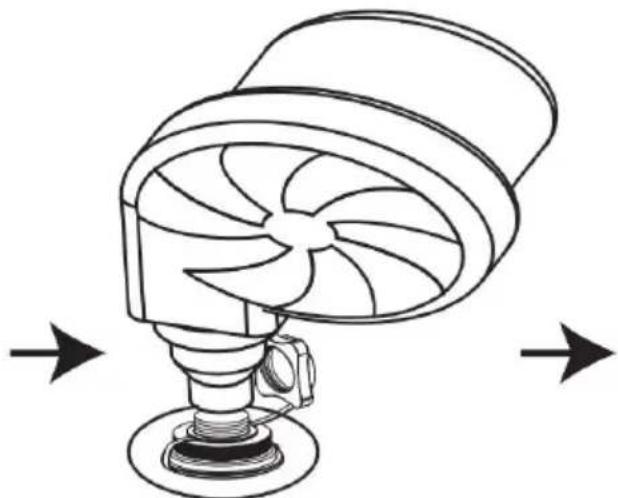
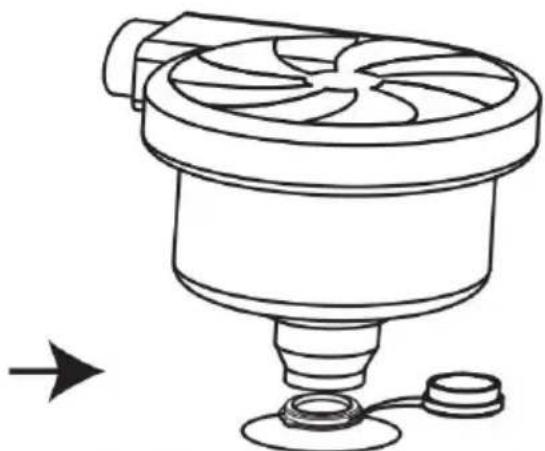
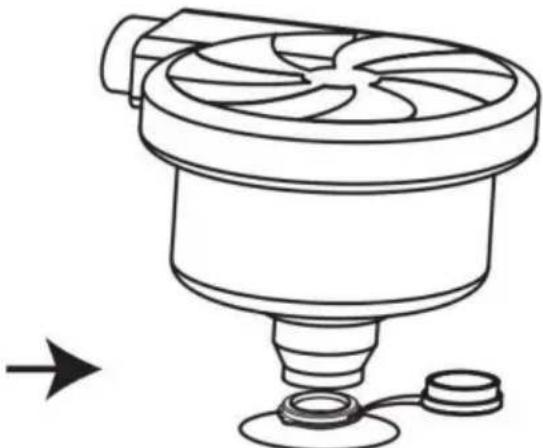
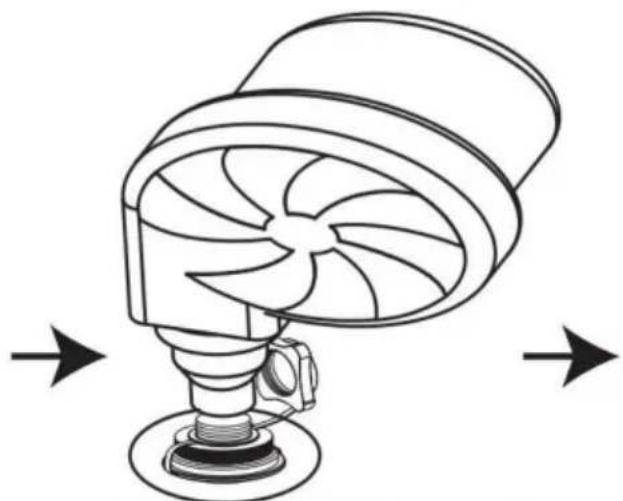
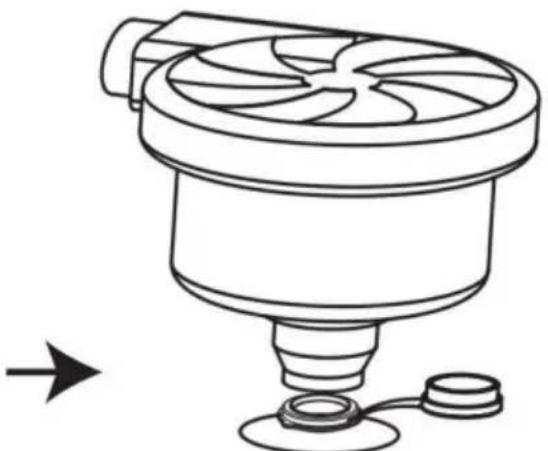
St.3 Insert inflation port of pump with nozzle ②

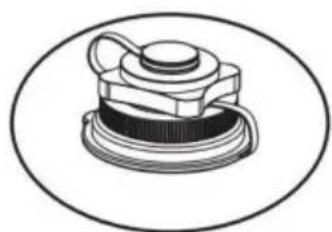
St.4 Screw up the cap tightly
Note: Please DO NOT overfill
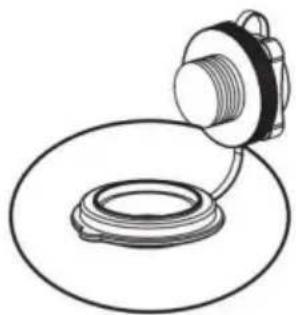
Deflation
St.1 Open the middle valve for discharging air
St.2 Use deflation port of pump with nozzle 1 to discharge uninflated air
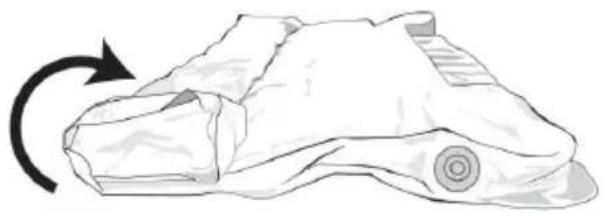
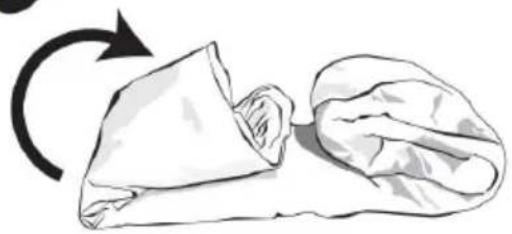
FOLDING INSTRUCTIONS
Upon complete deflation, lay bed on flat surface with sleeping surface facing upwards and fold according to the steps below.
1
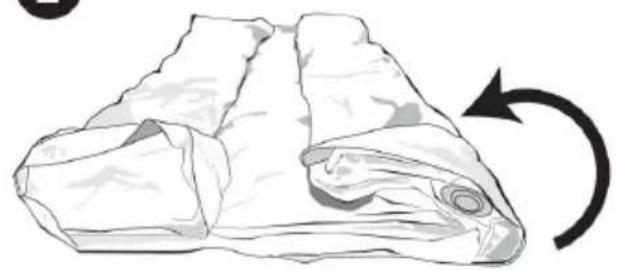
2
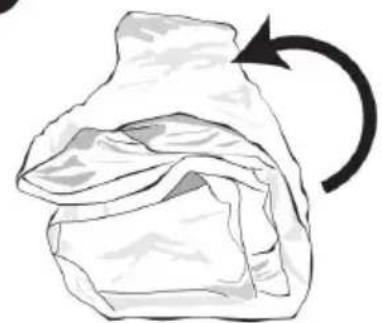
3
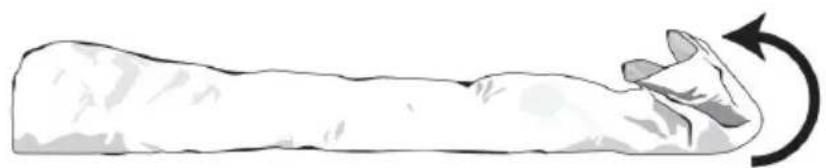
4
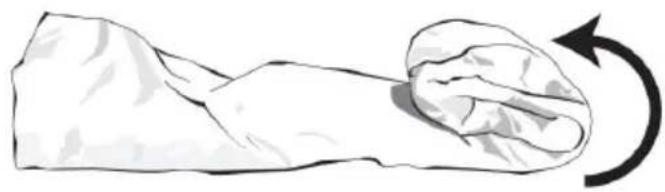
5
6

7

8
*Bag may vary from illustration
PRECAUTIONS
- This product is a non-life-saving device and cannot be used for water play water rescue; Children should only be allowed to use it under adult supervisi
- The ideal temperature used in the truck is -25^ to 50^ .
- Keep this product used in a well-organized space where it will be easy to and protected from sharp objects.
- After inflation, make sure all the covers of the 2-layer close tightly to avoid leakage.
- In case of leakage, check the leaking part carefully or use detergent to do the leaking part. After finding it, you can use the materials in the repair kit. Friendly Reminder: We do not provide adhesive; please purchase it separately. We recommend purchasing PVC adhesive for bonding.
- Please refer to the instructions about the air pump before inflating.
- The product has been stored for a long time from production to packaging, then to the customer, it might have a slight smell [such as mobile phones, clothes, etc.], the same goes for inflatable products, just leave it in a ventilator place, the smell will soon dissipate.
- Store in a well-ventilated place and keep away from ignition sources, exceed heat, and excessive cold.
CLEANING
- For spot cleaning, use a clean damp cloth to wipe the surface of the mask. Apply a clear liquid dish detergent without dye if necessary.
- Wet stained area thoroughly; gently massage stained area with detergent. If the area to remove staining substance.
- Rinse thoroughly and blot dry. Allow your bed to air dry completely after cleaning and before storing.
ADDITIONAL INFORMATION
IN CASE OF AIR LEAKAGE
Please check the following if there is an air leak.
- Have the upper cap closed?
- Have the middle valve been tightened to the bleeder valve.
- Repair Patches have been included for minor repairs. (Includes patches)
Friendly Reminder: We do not provide adhesive; please purchase separately. We recommend purchasing PVC adhesive for bonding.
REPAIRING AN AIR LEAK
- Wipe bed with mild soap water over area to find possible air leak. DO NOT SUBMERGE MATTRESS IN WATER! If there is a leak bubbles will form arc leakage area.
- Follow cleaning instructions for leak area.
- Use included patch kit to cut a suitable sized patch for leak. Make sure the edges of repair patch to avoid peeling.
- Apply adhesive to patch area and around leakage area.
- Press patch firmly over the puncture area.
- Wait 24 hours before inflating. To prevent patch from peeling while drying. It is recommended to tape down patch edges with a light adhesive tape.
WARRANTY POLICY
Problems covered by the warranty include failure of the pump, seams or the Punctures or wear to the mattress due to use or abuse are not covered. It normal for an airbed that has been inflated for extended periods to require t addition of air after a few days. Air will be lost from the mattress through t material over time. Also, cooling of the air around the bed will cause the air the bed to contract, and the bed will be softer and may need refilling.
What is not Covered by This Warranty?
- Damage of a product resulting from negligence.
- Damage of a product resulting from unauthorized modification of the product
- Damage caused by natural disaster.
- Theft or loss of the product.
- Wear and tear of expendable parts during the course of normal use does represent a defect.
Manufacturer: Shanghaiuxinmuyeyouxianggsi
Address: Shuangchenglu 803nong11hao1602A-1609shi, baoshanqu,
shanghai 200000 CN.
Imported to AUS: SIHAO PTY LTD. 1 ROKEVA STREETEASTWOOD
NSW 2122 Australia
Imported to USA: Sanven Technology Ltd. Suite 250, 9166 Anaheim
Place, Rancho Cucamonga, CA 91730

YH CONSULTING LIMITED.
C/O YH Consulting Limited Office 147,
Centurion House, London Road,
Staines-upon-Thames, Surrey, TW18 4AX

E-CrossStu GmbH
Mainzer Landstr.69,
60329 Frankfurt am Main.
VEVOR
TOUGH TOOLS, HALF PRICE
Technical Support and E-Warranty Certificate
www.vevor.com/support
VEVOR
TOUGH TOOLS, HALF PRICE
MODELE: ZDCD1, FW1, FW2, X1

St.1 Remove the upper cap
St.2 Choose the suitable nozzle

St.3 Insert inflation port of pump with nozzle ②

St.4 Screw up the cap tightly
Note: Please DO NOT overfill
Deflation

St.1 Open the middle valve for discharging air

St.2 Use deflation port of pump with nozzle 1 to discharge uninflated air
INSTRUCTIONS DE PLIAGE
Lieu, Rancho Cucamonga, CA 91730
YH CONSULTING LIMITEE.
A/S YH Consulting Limited Bureau 147,
Maison du Centurion, London Road,
Staines-upon-Thames, Surrey, TW18 4AX
E-CrossStu GmbH
Mainzer Landstr.69,
www.vevor.com/support
AUTO-LUFTMATRATZE
MODELL: ZDCD1, FW1, FW2, X1

St.1 Remove the upper cap

St.2 Choose the suitable nozzle
St.3 Insert inflation port of pump with nozzle ②

St.4 Screw up the cap tightly
Note: Please DO NOT overfill
Deflation
St.1 Open the middle valve for discharging air
St.2 Use deflation port of pump with nozzle ① to discharge uninflated air
FALTANLEITUNG
C/O YH Consulting Limited Office 147,
Centurion House, London Road,
Staines-upon-Thames, Surrey, TW18 4AX
E-CrossStu GmbH
Mainzer Landstr.69,
60329 Frankfurt am Main.
VEVOR
TOUGH TOOLS, HALF PRICE
www.vevor.com/support
VEVOR
TOUGH TOOLS, HALF PRICE
elettronica www.vevor.com/support
MATERASSO-AD-ARIA-PER-AUTO
MODELLO: ZDCD1, FW1, FW2, X1
St.1 Remove the upper cap

St.2 Choose the suitable nozzle

St.3 Insert inflation port of pump with nozzle ②
St.4 Screw up the cap tightly
Note: Please DO NOT overfill
Deflation

St.1 Open the middle valve for discharging air

St.2 Use deflation port of pump with nozzle ① to discharge uninflated air
ISTRUZIONI PER LA PIEGATURA
Importato in AUS: SIHAO PTY LTD. 1 ROKEVA STREETEASTWOOD
Nuovo Galles del Sud 2122 Australia
C/O YH Consulting Limited Ufficio 147,
Casa del centurione, London Road,
Staines-upon-Thames, Surrey, TW18 4AX
E-CrossStu GmbH
Mainzer Landstr.69,
60329 FrancofortesulMeno.
VEVOR
TOUGH TOOLS, HALF PRICE
St.1 Remove the upper cap
St.2 Choose the suitable nozzle
St.3 Insert inflation port of pump with nozzle ②

St.4 Screw up the cap tightly
Note: Please DO NOT overfill
Deflation
St.1 Open the middle valve for discharging air

St.2 Use deflation port of pump with nozzle ① to discharge uninflated air
Casa Centurión, London Road,
Staines-upon-Thames, Surrey, TW18 4AX
E-CrossStu GmbH
Mainzer Landstr.69,
St.1 Remove the upper cap


St.2 Choose the suitable nozzle
St.3 Insert inflation port of pump with nozzle ②

St.4 Screw up the cap tightly
Note: Please DO NOT overfill
Deflation

St.1 Open the middle valve for discharging air

St.2 Use deflation port of pump with nozzle ① to discharge uninflated air
INSTRUKCJA SKŁADANIA
DODATKOWE INFORMACJE
W PRZYPADKU WYCIEKU POWIETRZA
POLITYKA GWARANCYJNA
C/O YH Consulting Limited Biuro 147,
Dom Centuriona, London Road,
Staines-upon-Thames, Surrey, TW18 4AX
E-CrossStu GmbH
Mainzer Landstr.69,
60329 Frankfurt nad Menem.
VEVOR
TOUGH TOOLS, HALF PRICE
www.vevor.com/support
AUTO-LUCHTMATERIALAAL
MODEL: ZDCD1, FW1, FW2, X1
HULP NODIG? NEEM CONTACT MET ONS OP!
St.1 Remove the upper cap
St.2 Choose the suitable nozzle

St.3 Insert inflation port of pump with nozzle ②

St.4 Screw up the cap tightly
Note: Please DO NOT overfill
Deflation

St.1 Open the middle valve for discharging air
St.2 Use deflation port of pump with nozzle 1 to discharge uninflated air
VOUWINSTRUCTIES
C/O YH Consulting Limited Kantoor 147,
Centurionhuis, London Road,
Staines-upon-Thames, Surrey, TW18 4AX
E-CrossStu GmbH
Mainzer Landstr.69,
60329 Frankfurt am Main.
VEVOR
TOUGH TOOLS, HALF PRICE
garantiecertificaat www.vevor.com/support
VEVOR
TOUGH TOOLS, HALF PRICE
www.vevor.com/support
BIL-LUFT-MADRASS
MODELL: ZDCD1, FW1, FW2, X1

St.1 Remove the upper cap


St.2 Choose the suitable nozzle

St.3 Insert inflation port of pump with nozzle ②

St.4 Screw up the cap tightly
Note: Please DO NOT overfill
Deflation

St.1 Open the middle valve for discharging air

St.2 Use deflation port of pump with nozzle 1 to discharge uninflated air
VIKNINGSINSTRUKTIONER
C/O YH Consulting Limited Office 147,
Centurion House, London Road,
Staines-upon-Thames, Surrey, TW18 4AX

E-CrossStu GmbH
Mainzer Landstr.69,
60329 Frankfurt am Main.
VEVOR
TOUGH TOOLS, HALF PRICE
www.vevor.com/support