Smart1 - Slicer Vevor - Free user manual and instructions
Find the device manual for free Smart1 Vevor in PDF.

| Product Type | Desktop Vinyl Cutter |
| Brand | Vevor |
| Model | Smart1 |
| Max. Feed Width | 330 mm (13 inches) |
| Max. Cutting Width | 305 mm (12 inches) |
| Max. Cutting Thickness | ≤1 mm |
| Linear Cutting Speed | 10-300 mm/s |
| Tool Pressure (Right) | 10-500 gf |
| Tool Pressure (Left) | 50-500 gf |
| Cutting Precision | ±0.1 mm |
| Interfaces | USB Type-B, U-DISK port, Bluetooth 4.2 BLE |
| Supported Operating Systems | Mac, Windows, Android 5.1+, iOS 11.0+ |
| Power Supply | Power adapter: input AC 100-240 V, 50-60 Hz, output DC 24 V, 2 A |
| Approximate Dimensions | 480 x 230 x 250 mm |
| Approximate Weight | 5 kg |
| Main Functions | Cutting vinyl, paper, adhesive film, stencils; online cutting and contour cutting; use with ExactCut software and mobile app |
| Maintenance and Cleaning | Clean with a dry, lint-free cloth; do not use liquids |
| Safety | Very sharp blade: do not touch; unplug before maintenance; do not use outdoors |
| Spare Parts and Repairability | Replacement blade, cutting mat; technical support at www.vevor.com/support |
| General Information | Made in China; FCC Part 15 certification; WEEE compliance |
Frequently Asked Questions - Smart1 Vevor
User questions about Smart1 Vevor
0 question about this device. Answer the ones you know or ask your own.
Ask a new question about this device
Download the instructions for your Slicer in PDF format for free! Find your manual Smart1 - Vevor and take your electronic device back in hand. On this page are published all the documents necessary for the use of your device. Smart1 by Vevor.
USER MANUAL Smart1 Vevor
Technical Support and E-Warranty Certificate www.vevor.com/support
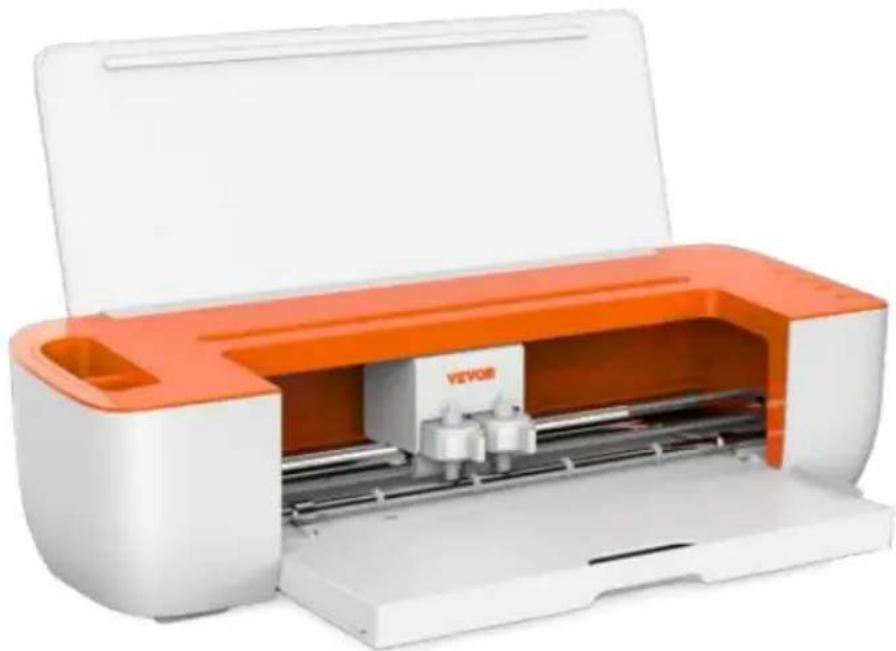
DESKTOP VINYL CUTTER
MODEL:SMART1
We continue to be committed to provide you tools with competitive price. "Save Half", "Half Price" or any other similar expressions used by us only represent of savings you might benefit from buying certain tools with us compared top brands and does not necessarily mean to cover all categories of tools offered are kindly reminded to verify carefully when you are placing an order with us actually saving half in comparison with the top major brands.
VEVOR®
TOUGH TOOLS, HALF PRICE
DESKTOP VINYL
Model: Smart1
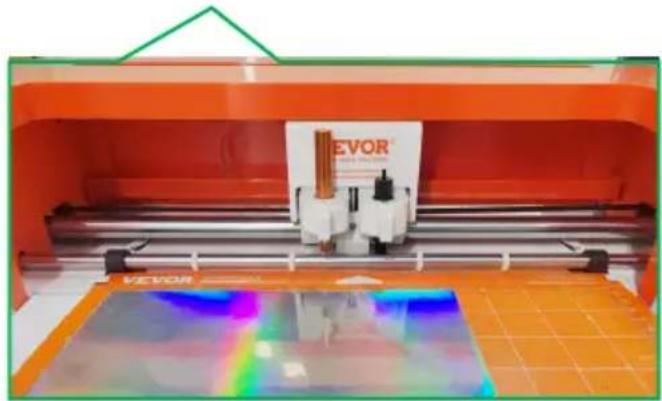
natural_image
White and orange industrial printer with internal components, no visible text or symbols on the device bodyNEED HELP? CONTACT US!
Have product questions? Need technical support? Please feel fr contact us:
Technical Support and E-Warranty Certificate www.vevor.com/support
This is the original instruction, please read all manual instruction carefully before operating. VEVOR reserves a clear interpretation user manual. The appearance of the product shall be subject to product you received. Please forgive us that we won't inform you there are any technology or software updates on our product.
Contents
I. Bacic Safety Rules....3-4
II. Matters Needing Attention....4-6
III. Introduction for Main Parts....7
IV. Technical Parameters......8
V. Product Assembly Steps....8-10
VI. Software Installation....11-12
VII. Software Function Description....13-14
VIII. Software Output Cutting....15-20
IX.APP Installation and Use....21-25
X.Frequently Asked Questions....26-29
XI.Operation Video....29
XII.FCC Information....30
XIII.Correct Disposal....31
I. Bacic Safety Rules

WARNING: Read all safety warnings, instructions, illustrations and specifications provided with this appliance. Failure to follow all instructions listed below may result in electric shock, fire and/or
serious injury.
- Protective material must be removed before turning on the cutting plotter.
-
Check the label on the back side of the plotter to confirm that the rated required by the plotter matches the voltage of the power base.
-
Firstly make sure that the power switch is off, then plug the power supply grounded power outlet.
-
Do not operate any appliance with a damaged cord or plug or after the a malfunctions, or has been damaged in any manner. Return appliance to the nearest authorized service facility for examination, repair or adjustment.
-
Type X attachment: If the supply cord is damaged, it must be replaced by special cord or assembly available from the manufacturer or its service agent.
-
Please do not touch the power cord with wet hands to avoid electric shock
-
Please only use the power cord, data cable provided with this product, or manufacturer-approved replacements.
-
Do not use outdoors. INDOOR USE ONLY
-
Please do not drop metal objects and liquids into the machine to avoid malfunction.
-
After shutting down, you must wait another 5 seconds to turn on the cut plotter again, otherwise it will cause damage to the cutting plotter.
-
In thunderstorms, turn the power switch to OFF and unplug the power cor
-
Please do not privately change the manufacturer's components.
-
Manufacturer reserves the right to change product specifications without pr notice.
-
The manufacturer only bears the legal obligations of the product itself sold the users, and does not bear other losses caused by the malfunction of the products.
-
Without our company's permit, no part of this manual can be copied or
transmitted in any name.
- Do NOT drag the carriage by hand.
- If there is an abnormal sound after powering on the machine, please turn power immediately and contact the after-sales department for feedback.
- This appliance can be used by children aged from 8 years and above an persons with reduced physical, sensory or mental capabilities or lack of experience and knowledge if they have been given supervision or instruction concerning use of the appliance in a safe way and understand the hazards involved. Children shall not play with the appliance. Cleaning and user maintenance shall not be made by children without supervision.
- Close supervision is necessary when any appliance is used by or near ch Children shall not use the appliance. Cleaning and user maintenance shall no made by children.
- To protect against fire, electric shock, or personal injury, do not immerse electric plugs, or appliances in water or other liquids.
21.WARNING:
Blade is very sharp. Please do not touch the blade directly with your hand, otherwise, your finger will be injured and the tip will be blunt. and hold the the blade when you remove it.
II. Matters Needing Attention
To ensure that the operator can correctly use the plotter and prevent damage, please follow the instructions marked with the following indicators.
- Ensure Safe Use Methods
 warning warning | Improper operation can result in injuries. |
| Improper operation may cause damage to the machine. | |
 Pay attention to Pay attention to | Improper operation may result in personal injury of damage to other objects. |
- Symbol Description
 | warning | |
 | Symbol indicates that users need to pay close attention. Th on the left signifies "Beware of electric shock." | |
 | Do not use a power supply that does not meet the rated Using an unqualified power supply can cause fire or electric | |
 | If the machine emits smoke, unusual odors, noise, or e any other abnormal behavior, please power it off immed and do not continue using it. Using the machine in such conditions can lead to fire or electric shock. | |
 | Do not plug or unplug the power cord while the power Unplugging the power cord while the power is on can dam machine. | |
 | Ensure that the machine is properly grounded. Failure to ground it may result in electrical shock or mechanical failure | |
 | Do not disassemble, repair, or modify the machine. Doin can result in a fire or electric shock, leading to personal ir | |
 | Pay attention to | |
 | The machine should not come into contact with liquids, or fall onto me objects, and so on. These objects c cause fires. |  |
 | Do not damage or replace the origin power cord, and avoid excessive bending, pulling, tying, or placing he objects on the power cord. |  |
 | If the cutting plotter will not be use a long time, please unplug the power cord from the socket. Otherwise it w cause a fire. |  |
 | When operating, do not put your ha on the reel. This may cause injury. |  |
 | The machine should be positioned o stable surface. Otherwise, the machine may topple, causing injury. |  |
 | When disconnecting the power cord from the socket, please pull the plu not the cable. Pulling on the cable c cause electric shock or fire. | 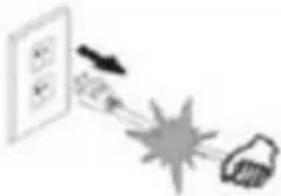 |
 | Using the machine during thunderstorms and lightning weather prohibited to prevent lightning damag to the machine. | 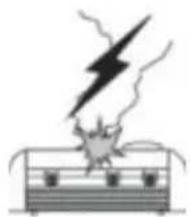 |
 | Before inserting the power plug, che whether the power supply voltage ar power cable are normal. Make sure are no exceptions before you plug in device. | 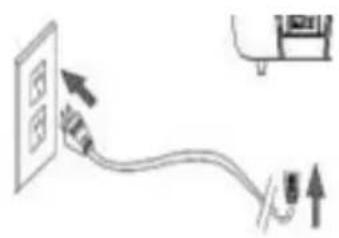 |
III. Introduction for Main Parts
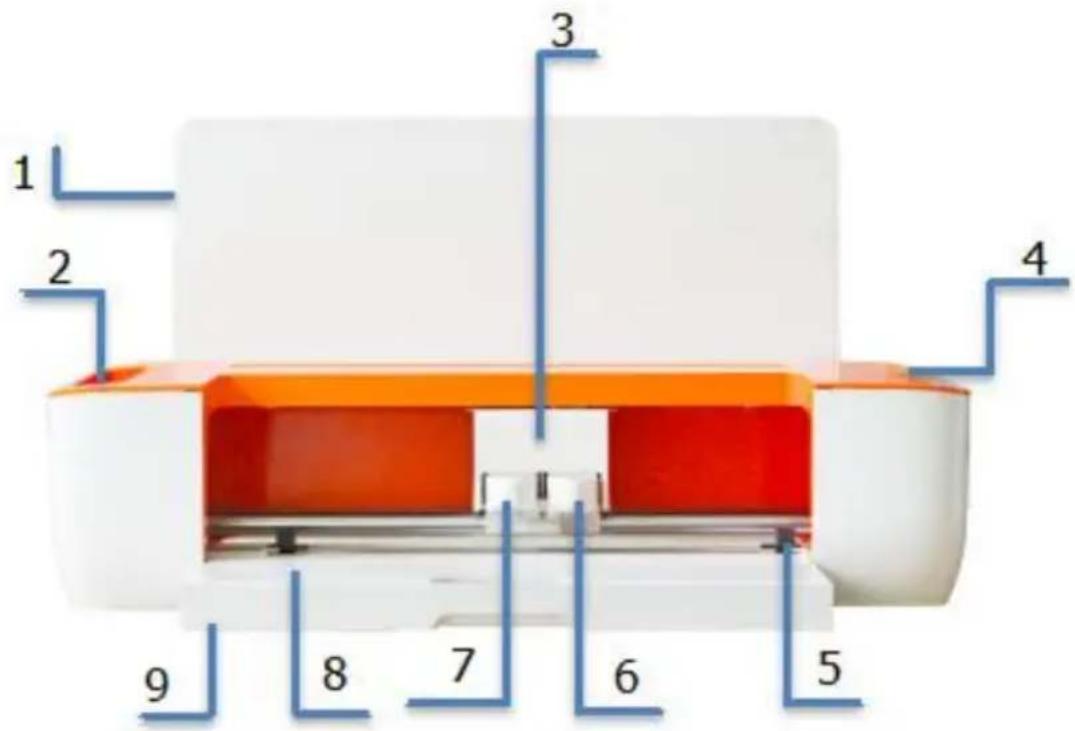
| 1.Cover plate | 2. Storge cup |
| 3. Carriage | 4.Button |
| 5.Paper roller | 6.Clamp R |
| 7.Clamp L | 8.Cutting platform |
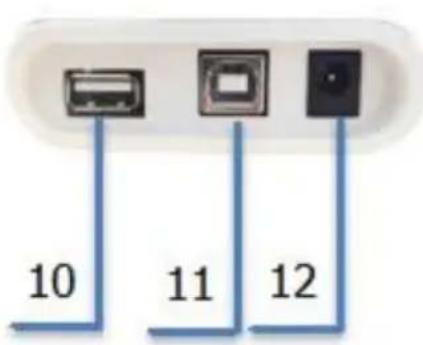
| 9.Storage box | 10.U-DISK port |
| 11.USB Type-B | 12.DC 24V |
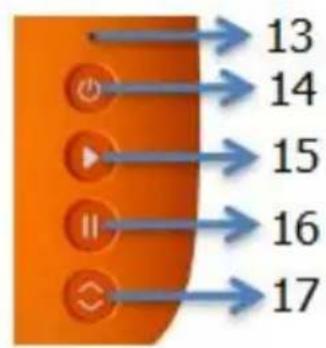
| 13.Indicator light | 14.Power button |
| 15.Start button | 16.Pause button |
| 17.Load/unload button |
Light status description
White: Normal
Blue: Bluetooth connected
Red: Machine fault
IV. Technical Parameters
| ModeIItem | Smart1 |
| Max. feeding width | 13inch(330mm) |
| Max. cutting width | 12inch(305mm) |
| Cutting thickness | ≤1mm |
| linear velocity | 10-300mm/s |
| Right tool pressure | 10-500gf |
| Left tool pressure | 50-500gf |
| Buffer | 1M |
| Cutting precision | ±0.1mm |
| Interface | U-DISK/USB /Bluetooth4.2ble |
| Supporting systems | Mac、Windows 、Android 5.1/iOS 11.0 above |
| Adapter | INPUT:AC100-240V,50-60Hz, 48W;OUTPUT:DC24V , 2A |
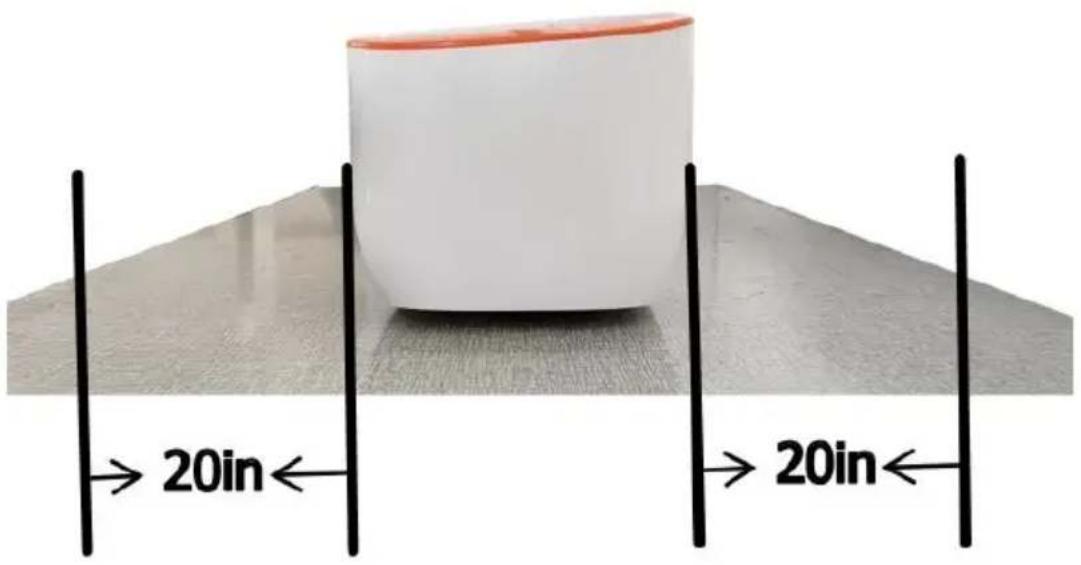
V.Product Assembly Steps
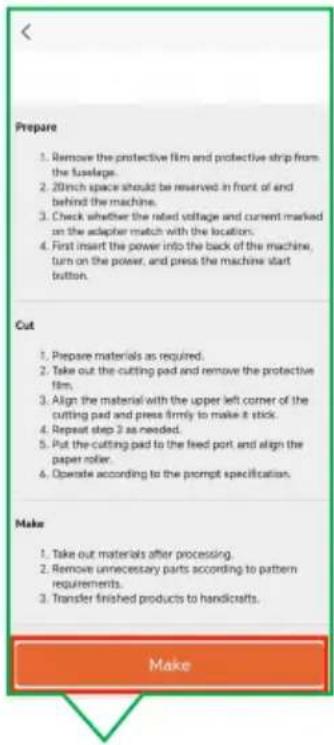
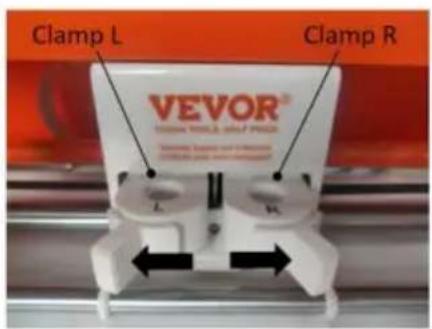
a. Keep the front and rear 20 inches clear of obstructions.
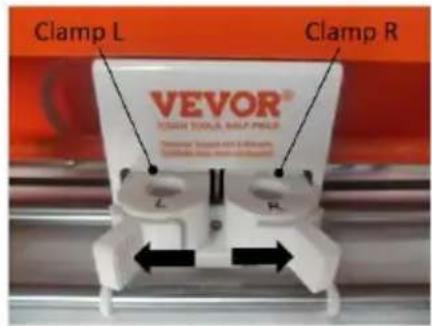
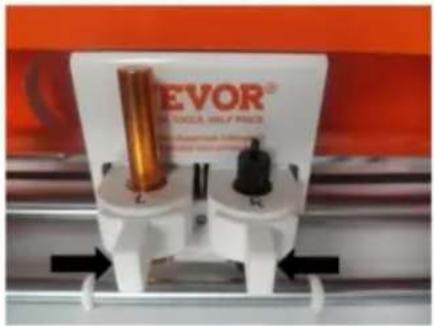
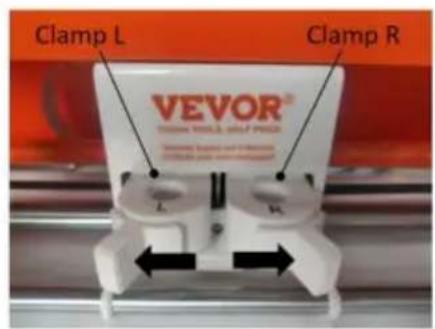
- Open the Clamp as shown by the arrow.
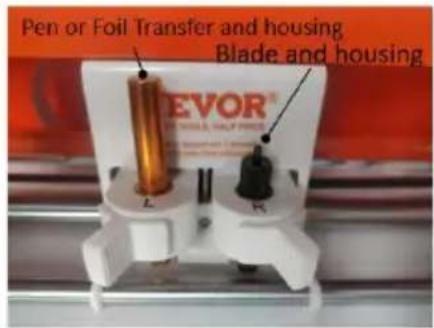
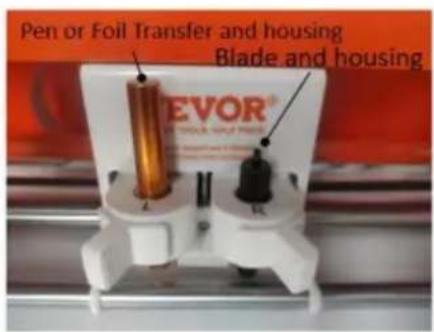
- Place the Blade and housing in Clamp R. Place the pen or the foil transfer and housing in Clamp L.
natural_image
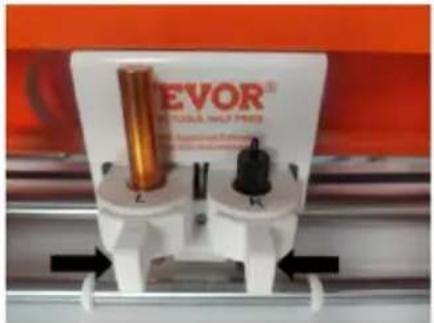
Close-up of a mechanical testing device with two cylindrical components and directional arrows (no readable text or symbols)- Close the Clamp as shown by the arrow.
natural_image
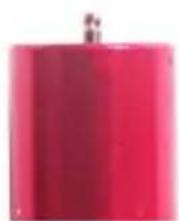
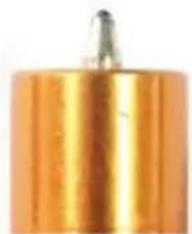
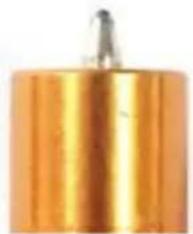
Solid red cylindrical object with a small protrusion at the top (no text or symbols visible)Foil Transfer and housing
Blade and housing
natural_image
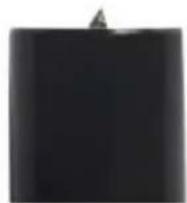
Close-up of a cylindrical metallic object with a small protrusion at the top (no visible text or symbols)Pen
The foil transfer and housing needs to be purchased separately.
Note: Never place the Blade and housing in Clamp L.
Warning:
Do not touch the blade tip with your fingers, as it can result in injury blunting of the tip.
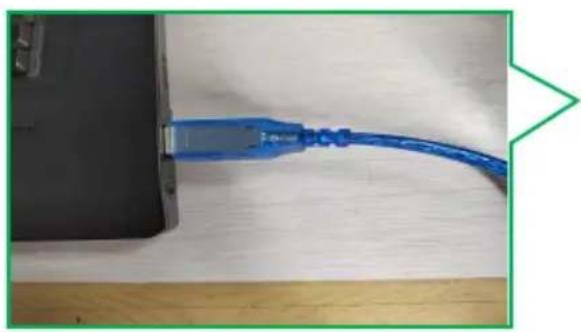
b: The USB cable is used to connect c: Plug in the power supply.
Smart1 to your computer.

natural_image
Close-up of a blue cable inserted into a white electrical outlet, next to a black electronic device (no visible text or symbols)
natural_image
Close-up of a blue cable inserted into a white socket, showing internal components and a black socket with two handles (no text or symbols visible)Attention: Before powering on, check whether the voltage and current of the machine adapter match the location. Once confirmed, you can proceed to power on to avoid potential hazards.
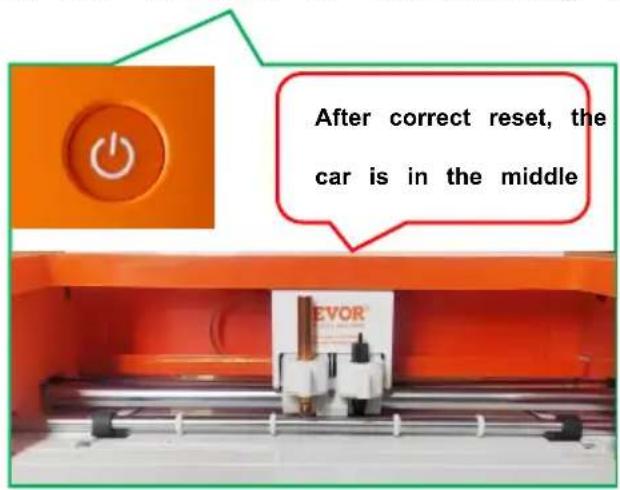
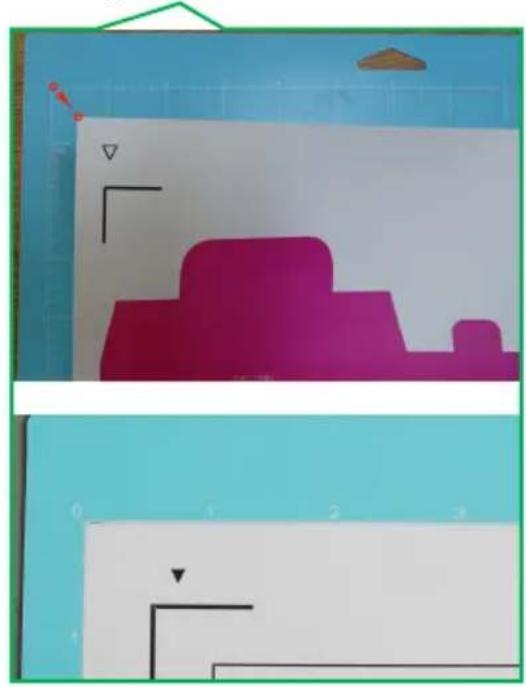
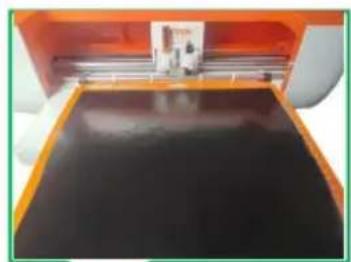
d: Press the power-on button and w f: Align the cutting surface of the for the machine to automatically rese material to be cut upwards with the upper left corner of the cutting pad and paste it onto the cutting pad v backing surface.
natural_image
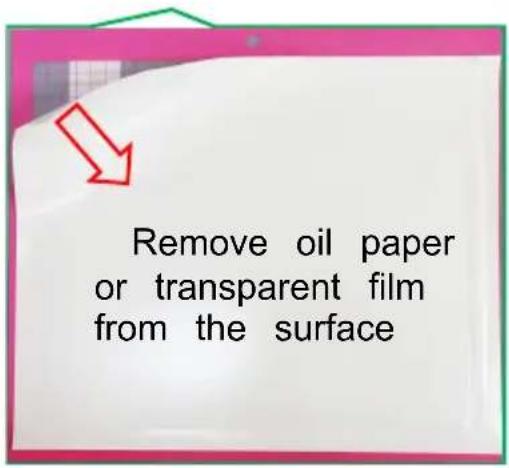
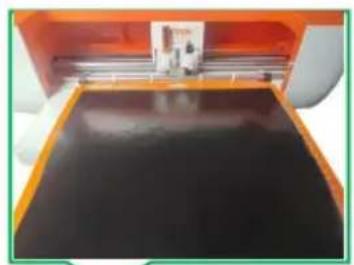
Two-panel diagram showing a magenta 3D shape on a white background with grid lines and arrows, no text or symbols present.e: Remove the cutting pad and tear the white oil paper protective film. g: place material on the mat inside grid, position it underneath the mat guides, and make sure both rollers slightly clamp the top edge of the the same time.
natural_image
Industrial printing machine with orange casing and visible internal components (no readable text or symbols)VI. Software Installation
- Download the corresponding version of software installation through the link. https://get.exact-cut.com/
- Before installing the software, find the refrigerator sticker with the software
PSN code in the accessory box.

- Enter the given link in your browser to access the registration screen.
3.1 Click Register after entering your registration information
3.2 Proceed to your email address to verify your account.


3.4 Please enter the PSN code found ( 3.3 Click here to verify email refrigerator sticker in the accessory box.


3.5 Download the appropriate software version based on your computer system.

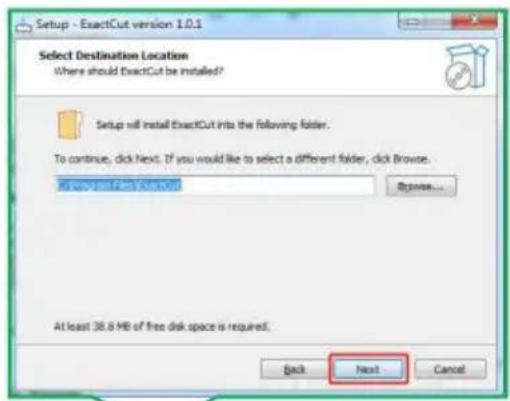
- Double click the desktop installation package.
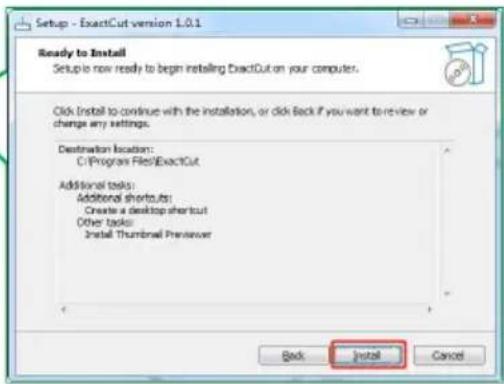
- Install the program in order.
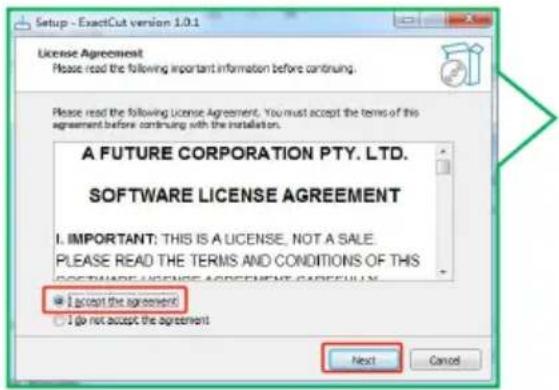
5.1 Agree and click "Next"
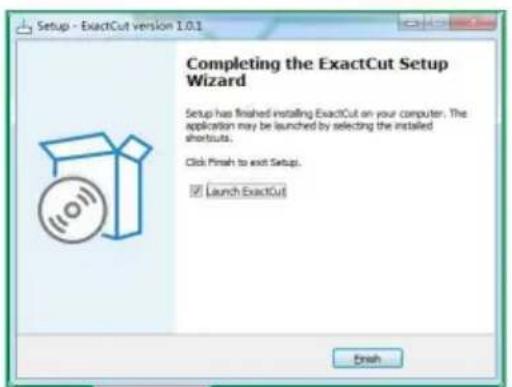
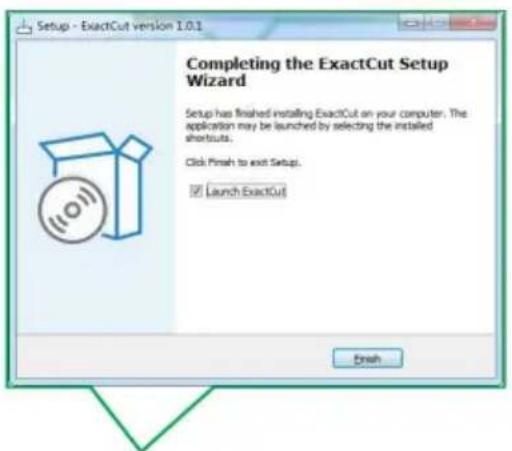
5.4 Click "Finish"

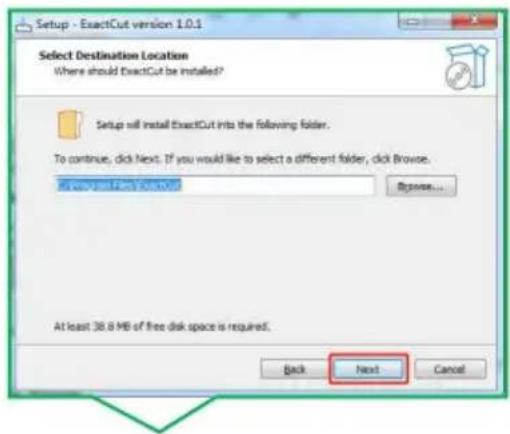
5.2 Click "Next"
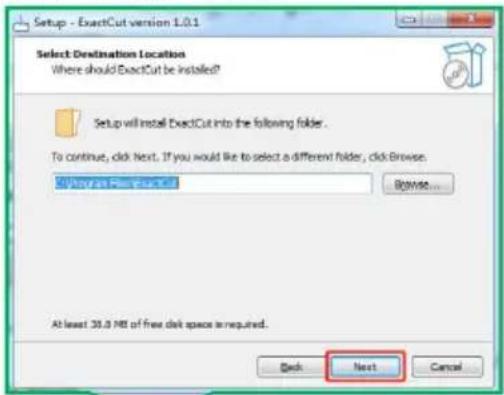
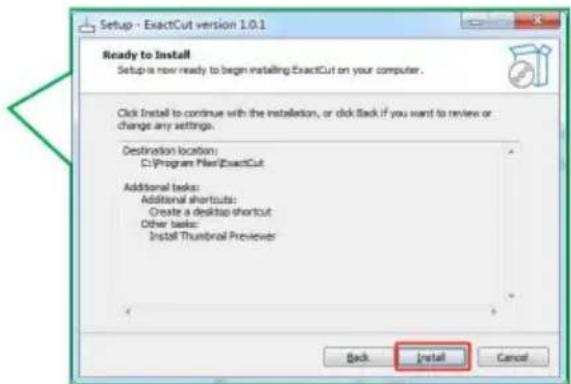
5.3 Click "Install."
5.5 Enter your email address to log 5.6 After successful login, close this your account. dialog box.


VII. Software Function Description
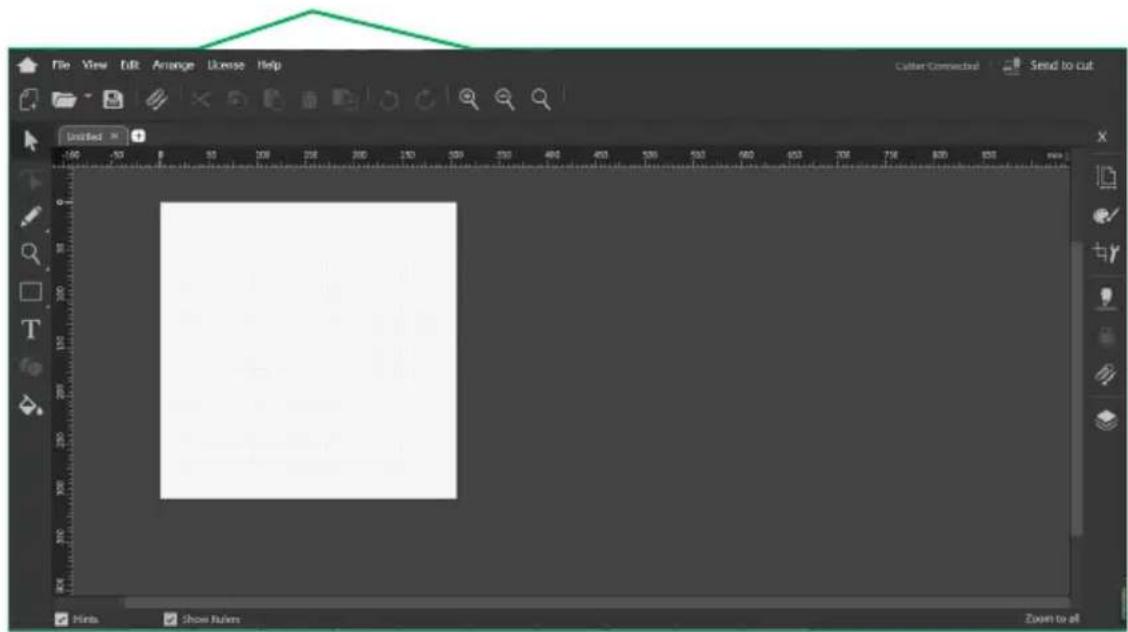
1. Main interface of the software
2. Module Description
a:Menu bar(Includes features such as File, View, Edit, Arrange, License, and Help.)

b:Common Options Toolbar (including File Create, Open and Save, File Import Cut, Object Copy, Paste and Delete, Duplicate, Undo and Redo, Zoom In, Zo Out and Zoom mode, and more.)


c:Left toolbar with selection, brush zoom in and out, shapes and me
d: The right toolbar contains feature such as Page Setup, Color, Size, Device Settings, Outline Tool, Galle and Layers

e:Canvas interface editing area

natural_image
Pure technical diagram with a green triangular shape above a grid, no text or symbols present.VIII. Software Output Cutting
1.Normal Cutting Output
1.1 Plug in the cable that connec 1.2 Check here if the machine is the machine. connected after opening the software.
natural_image
Close-up of a blue USB cable attached to a black device on a wooden surface (no text or symbols visible)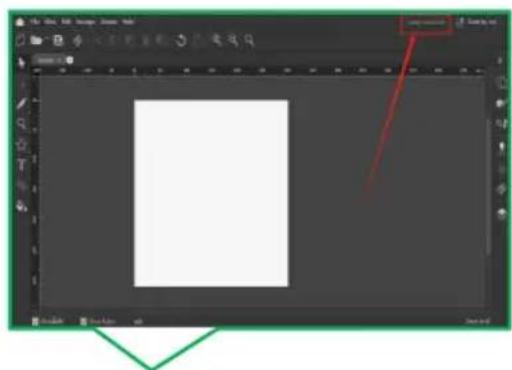
natural_image
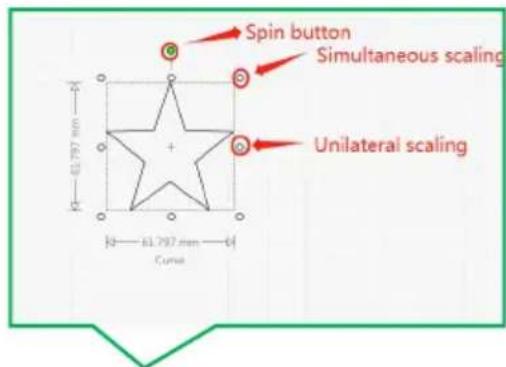
Screenshot of a graphic design software interface showing a blank canvas with toolbars and a red arrow pointing to the top-right corner (no text or symbols on the canvas itself)1.4 Selected shapes can be edited
1.3 Design graphics can be created from the software toolbar or imported from file (SVG, PNG and JPG formats are supported for import).

natural_image
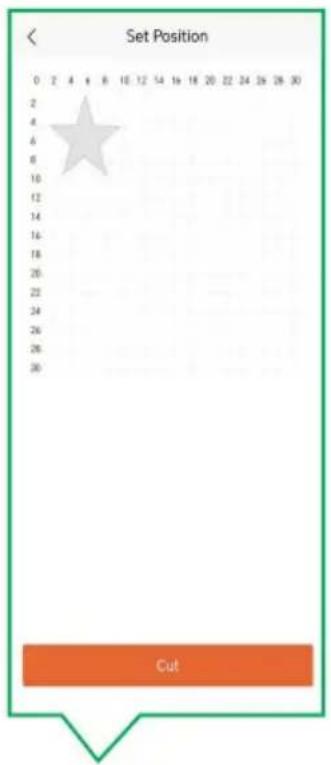
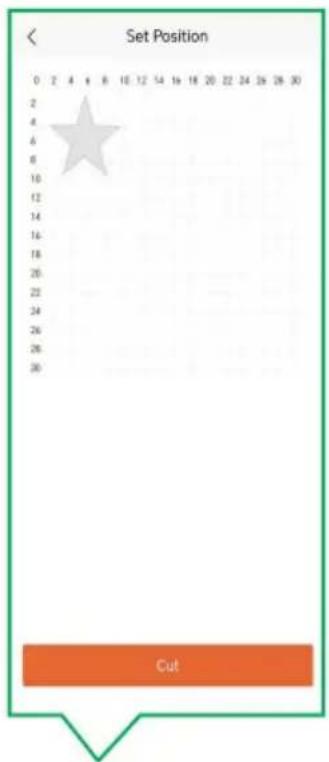
Simple green outline of a five-pointed star on grid paper background (no text or symbols)1.5 Setting the cutting mat
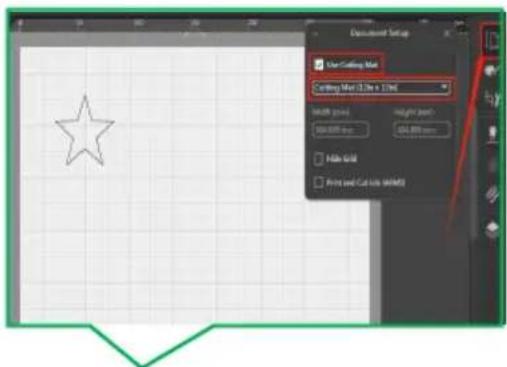
Tip: Cutting mats must be used when working soft rolls with adhesive backing or single-layer materials (when choosing cutting mats, select appropriate size for the material used), while harder double-layer materials can be used with cutting mats. However, it is recommended to cutting mats for all materials!
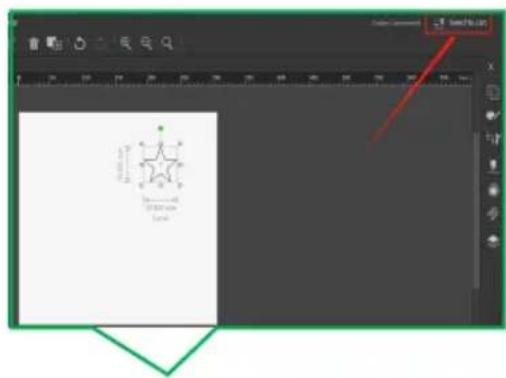
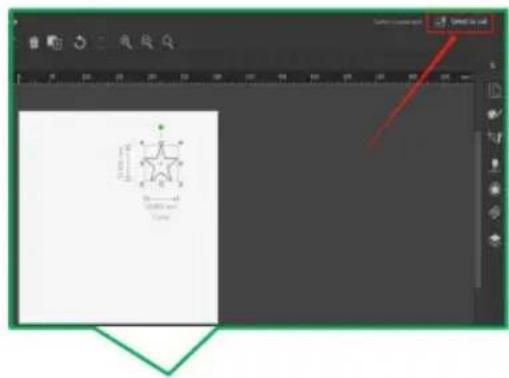
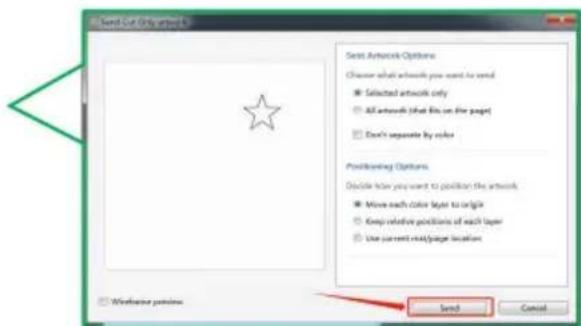
1.6 Select CLAMP L or CLAMP R 1.7 Click "Send to cut" according to the settings in the figur below, the default is CLAMP R, while the cutting tool clamp
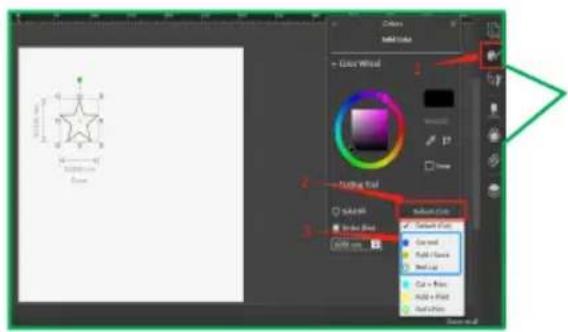
1.9 Move the graph in this screen | 1.8 Click "Send" adjust the cutting position.
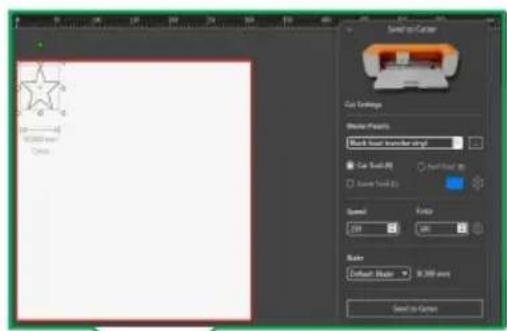

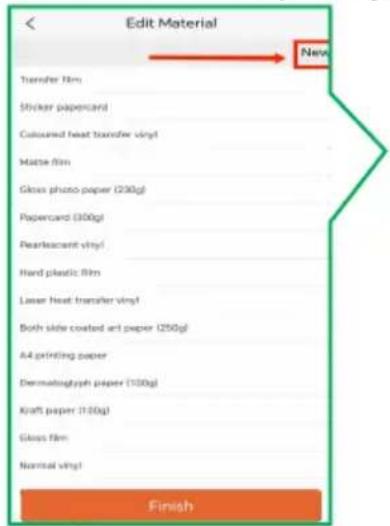
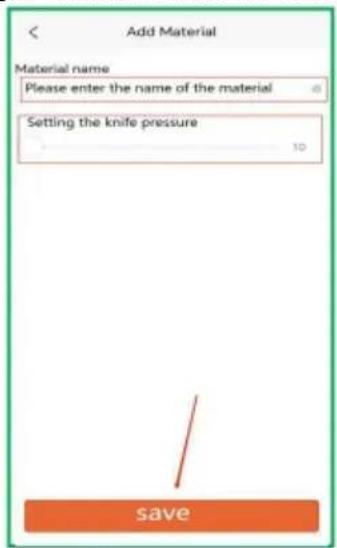
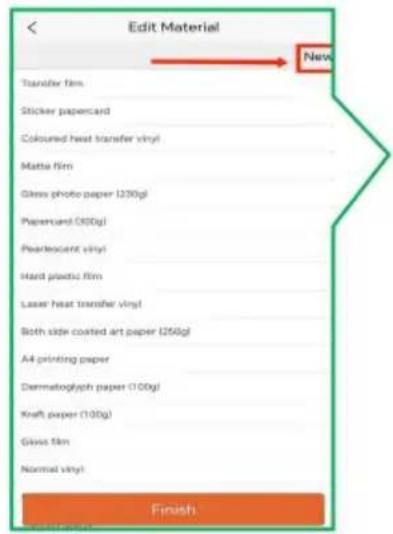
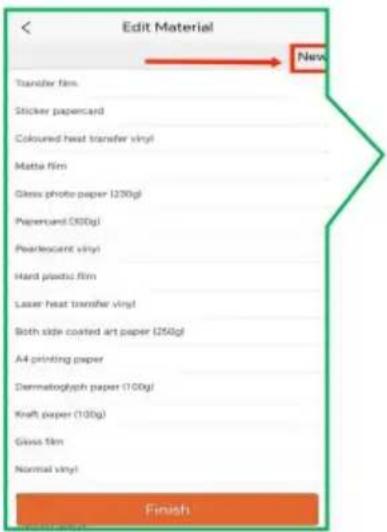
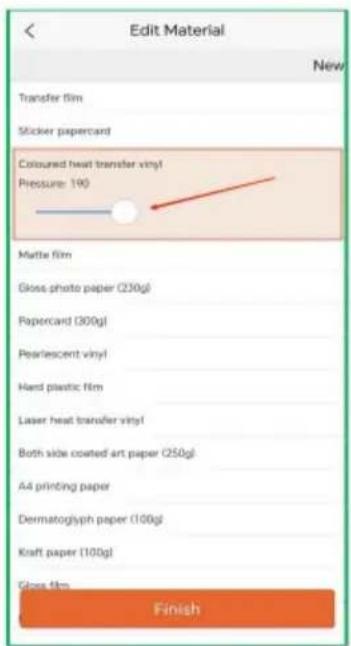
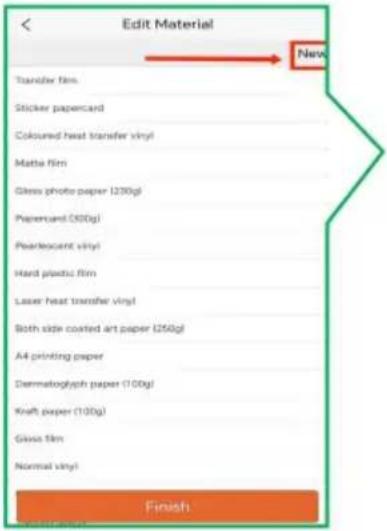
1.10 Select the corresponding material from the material pool here.
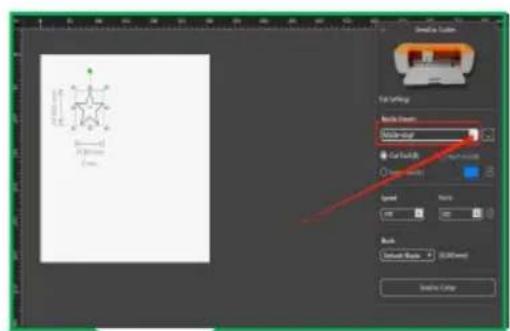
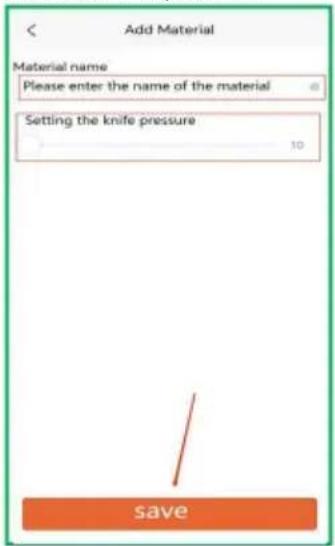
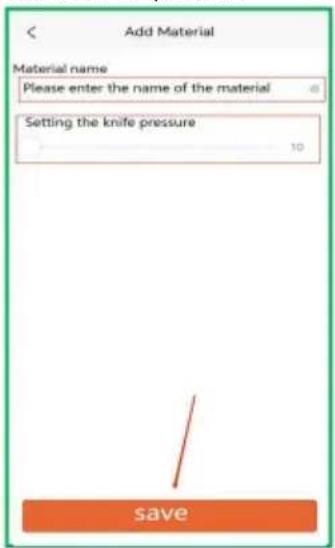
Note: 1. There is no material in the material that I am using, please click here to add ma
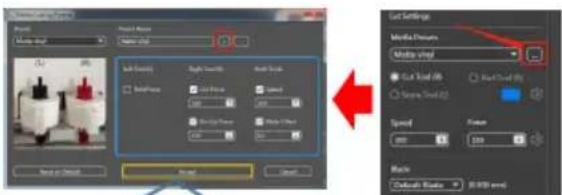
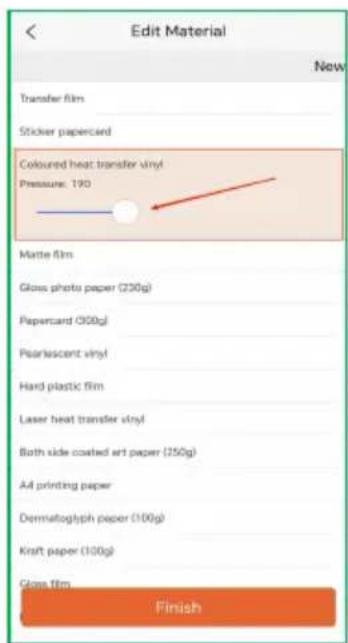
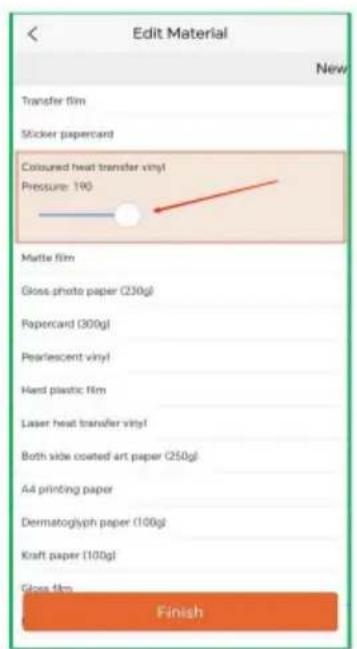
Click on the red area to add the name of the material on the blue area to set the speed pressure of the too on the yellow area to accept, add the material is com
1.11 Click here to send cuts

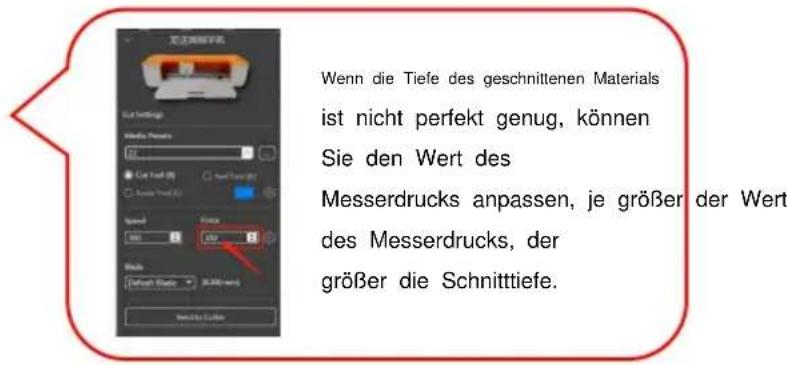
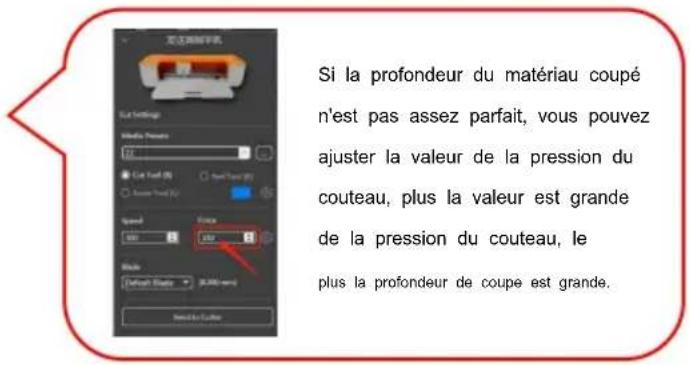
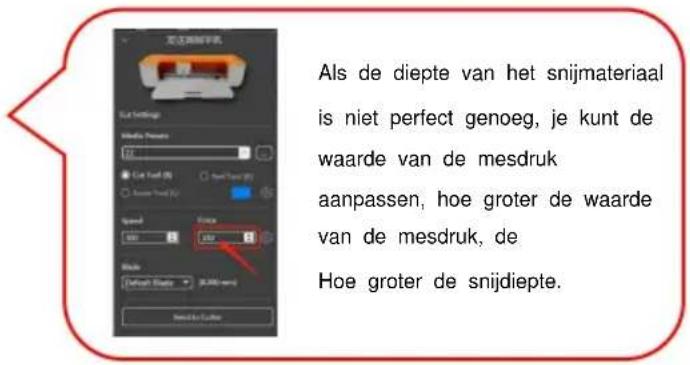
![连接网络手机 User Settings Modify Points Speed Size Block Default: Default [100% width] Load to Edit](/content/2026/04/737024/images/4b431639a44c35aa4f0713ba0ba86b9c140a2f3979b426e682415e0f4958565c.jpg)
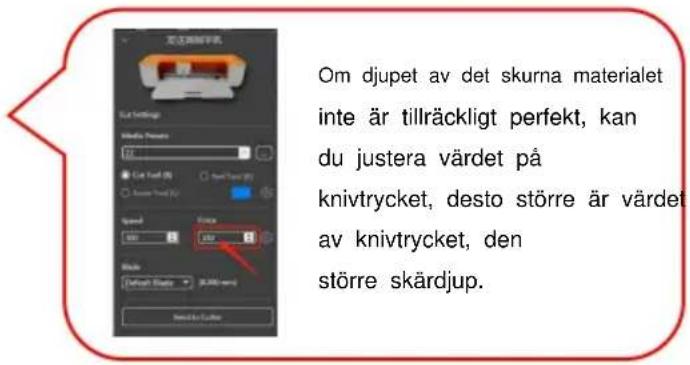
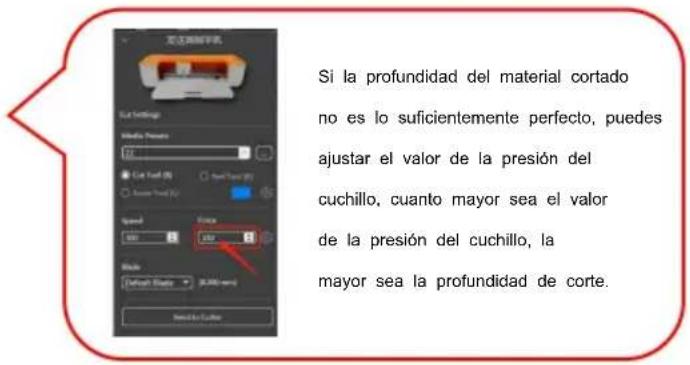
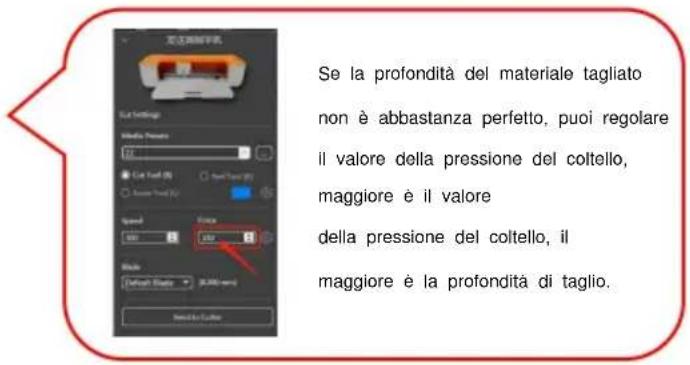
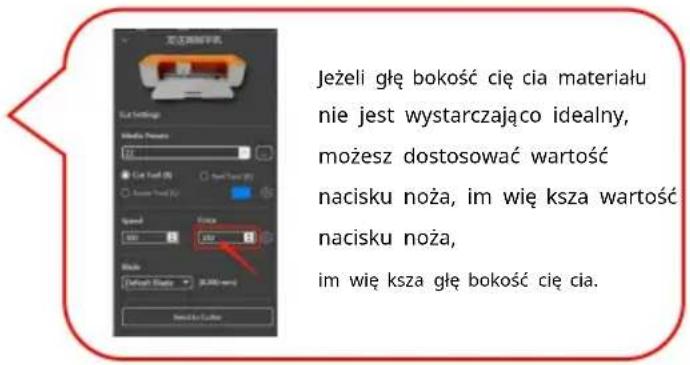
If the depth of the cut mater is not perfect enough, you can adjust the value of the knife pressure, the larger the value of the knife pressure, the greater the cutting depth.
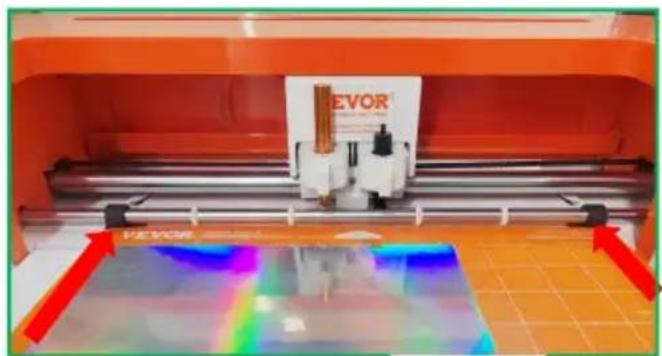
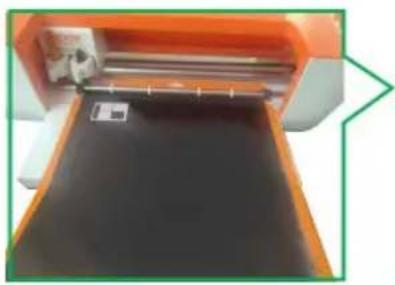
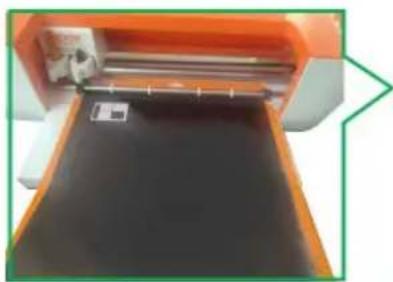
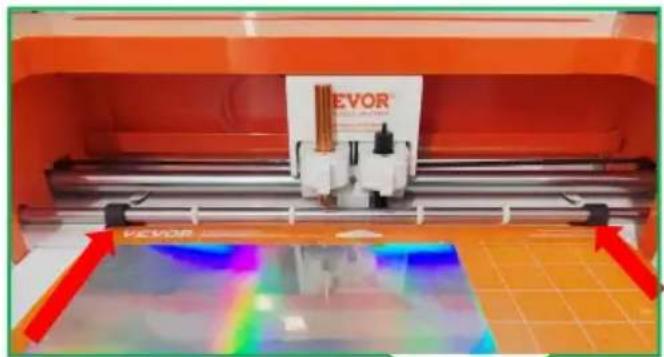
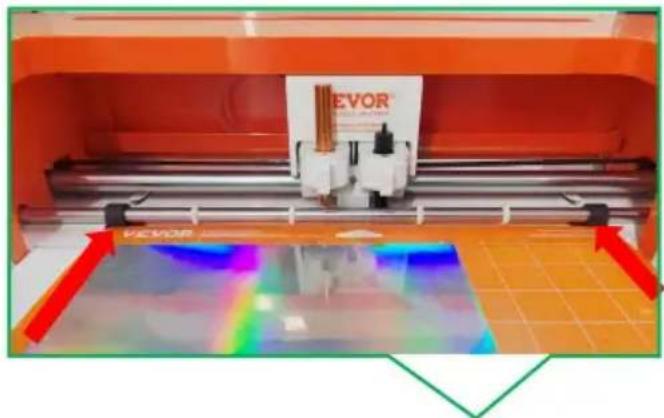
1.12 Prompt to press the paper feed 1.13 Place the material on the mat inside the grid, position the mat underneath the mat guides, and ends that the top edge of the mat is secured by both rollers simultaneous

natural_image
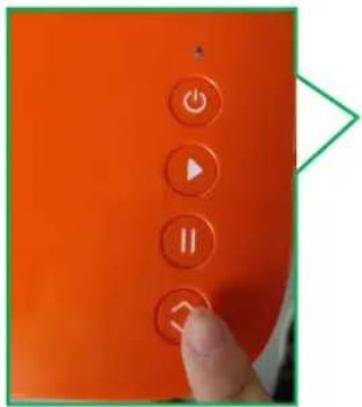
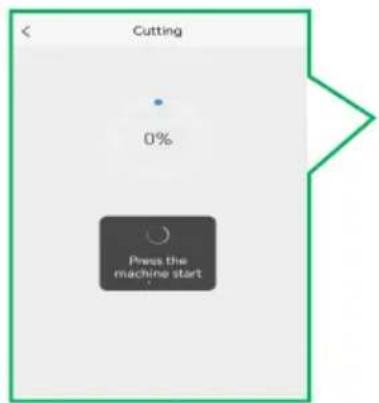
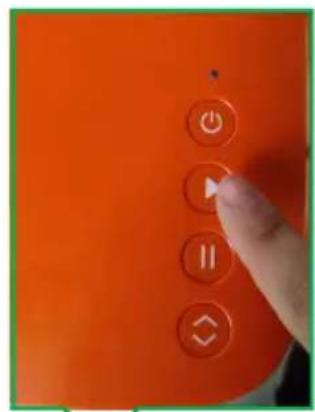
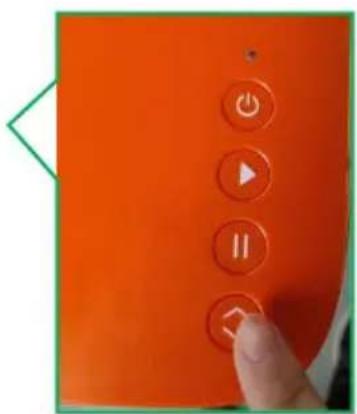
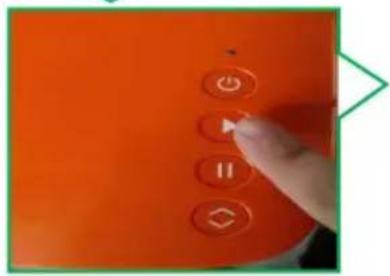
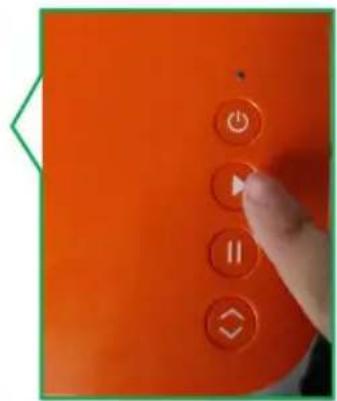
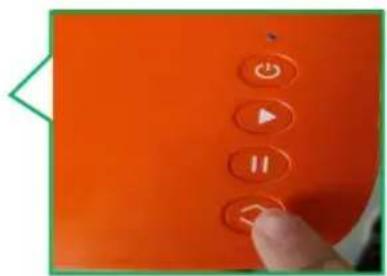
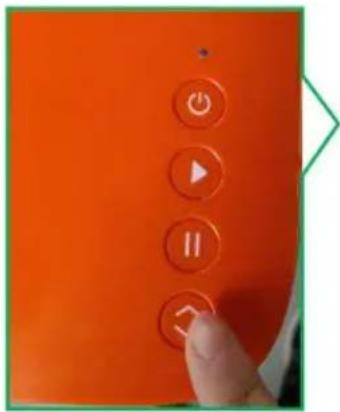
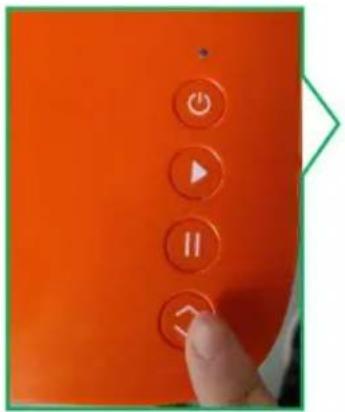
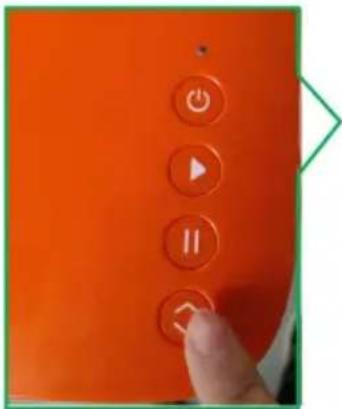
3D printer printing process with VEVOR branding and color calibration overlay (no readable text or symbols)1.16 Press the start 1.15 Prompt to press tl 1.14 Press the LOAD button on the machine. start button. button when the material is ready.
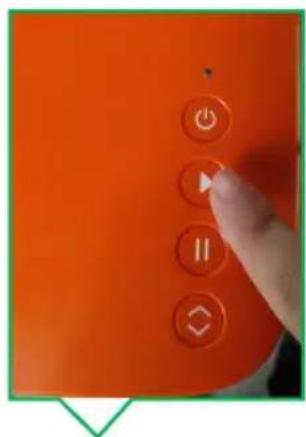


1.17 When processing is 1.18 Press the
1.19 Cutting Completion.
complete, the software wi machine's
prompt you to press the LOAD/UNLOAD button.
LOAD button.
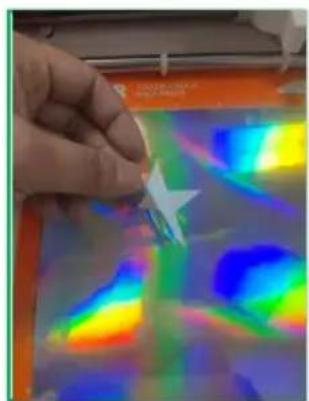
natural_image
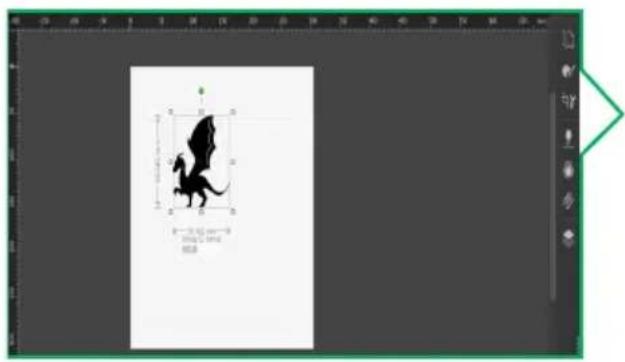
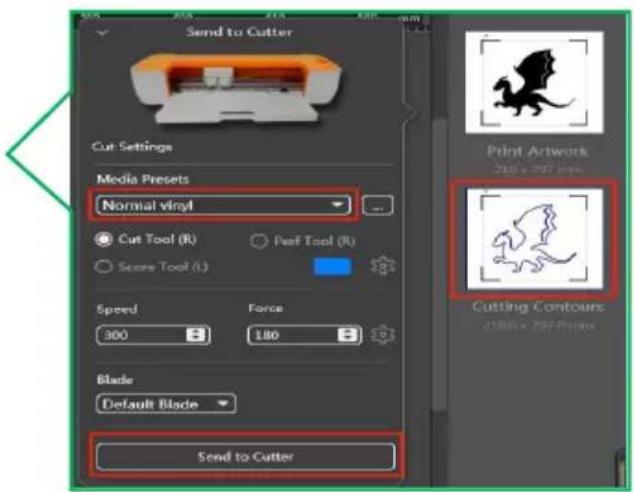
Close-up of a hand holding a small object over a colorful, iridescent heatmap or sky-like pattern (no text or symbols visible)2.Contour Output Cutting
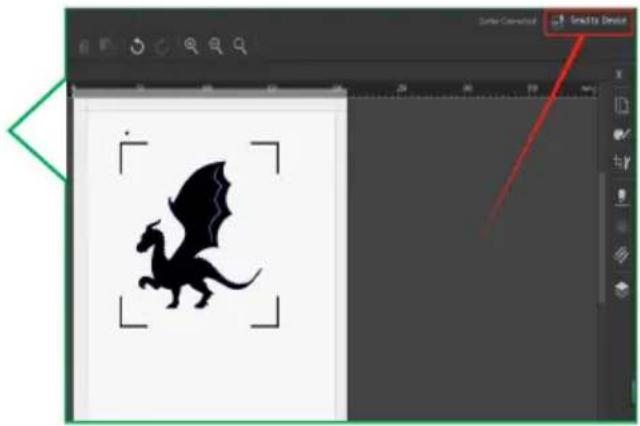
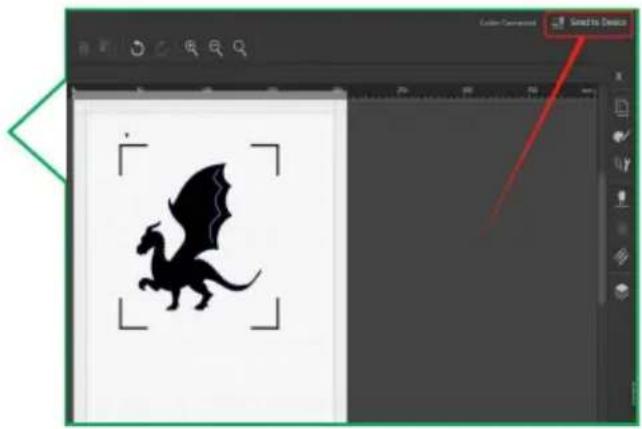
2.1 Design graphics can be created 2.2 Select the drawing and click on from the software toolbar or importe right side to create an outline.
from a file (SVG, PNG and JPG formats are supported for import).
natural_image
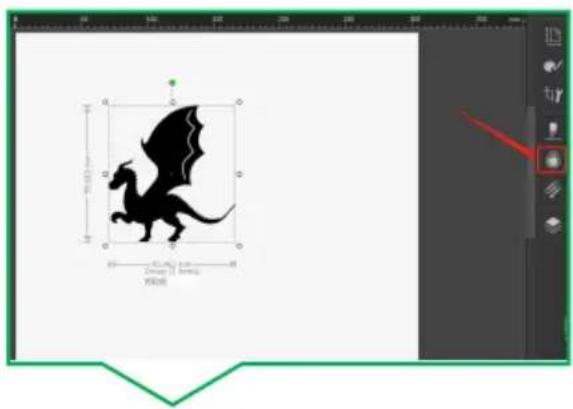
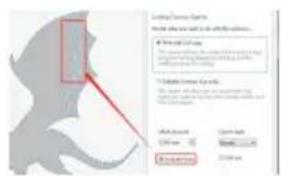
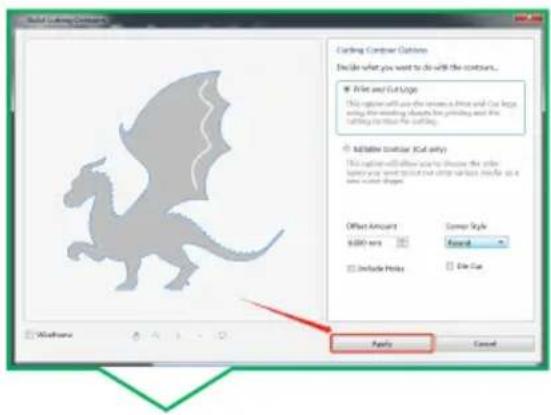
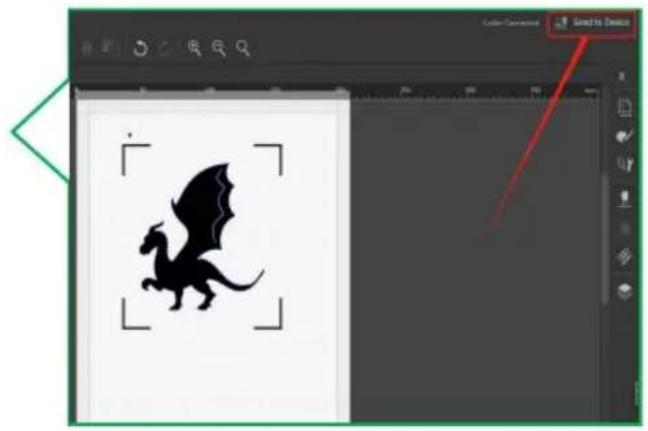
Silhouette of a flying creature inside a square frame, displayed within an image editing software interface (no text or symbols on the drawing itself)2.3 Click "Apply".
Note: If you need to cut some par the interior of the graph, you need check the skeleton checkbox here
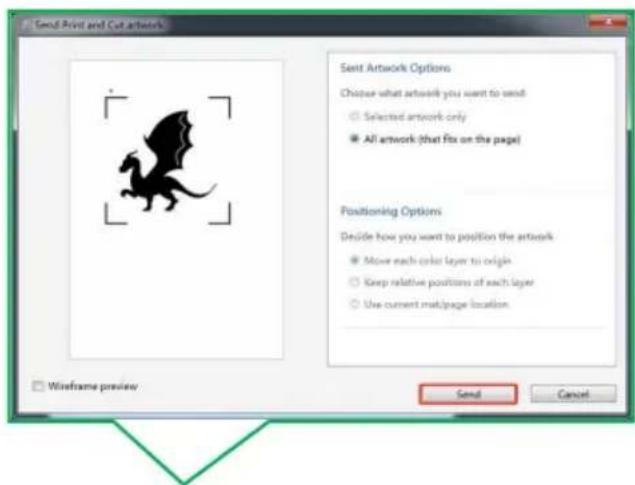
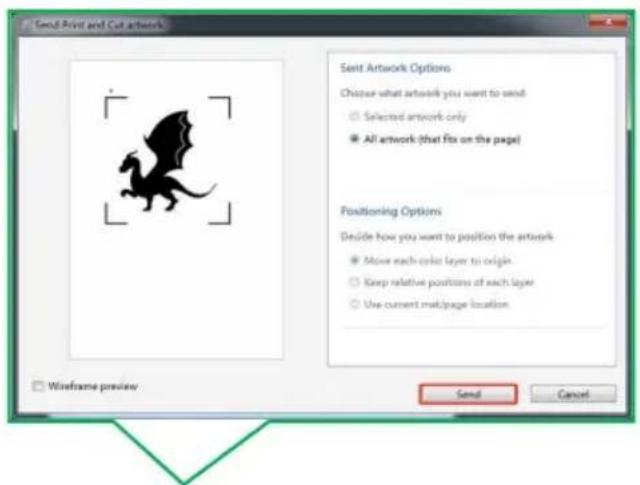
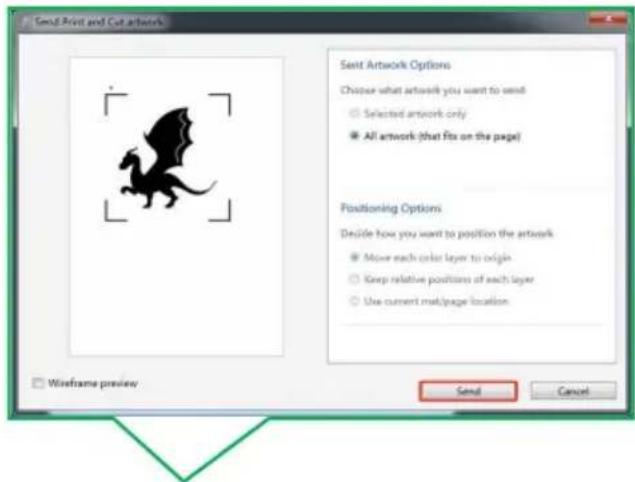
2.5 Click "Send"

2.4 Click "Send to Device"
natural_image
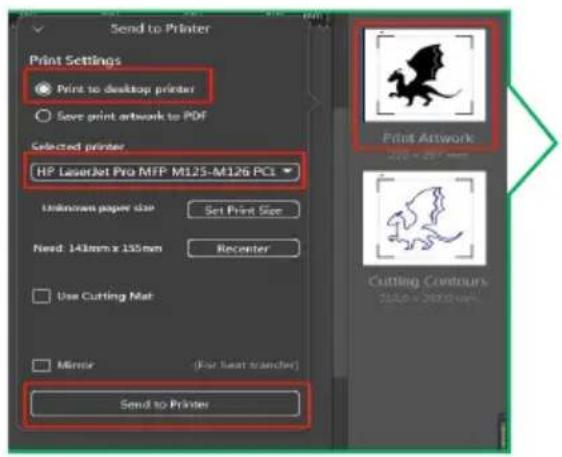
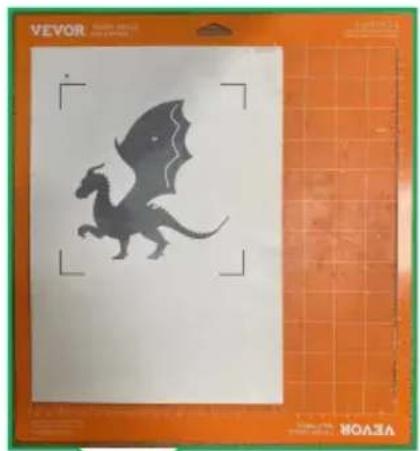
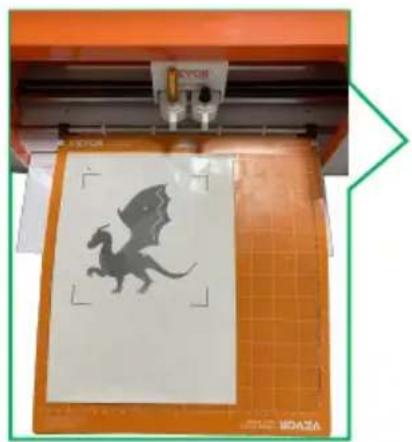
Silhouette of a flying creature inside a design software interface (no text or symbols on the creature itself)2.6 Click on the graphic in the rec 2.7 Attach the printed graphic to the on the right and select a printer tc cutting mat placement machine. the designed graphic.
natural_image
Illustration of a flying creature with wings, displayed on an orange cutting board (no text or symbols)2.9 Follow the software instructions locate this button on the machine.
2.8 Click on the graphic in the red on the right to select the cutting ou
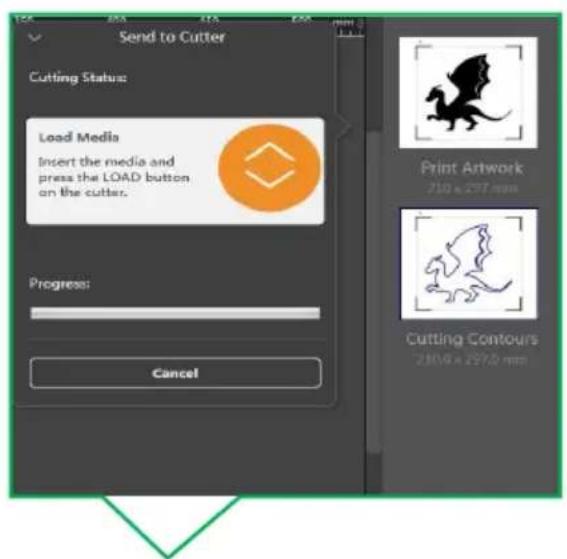
2.10 First, place the pad with tl 2.11 Press the LOAC 2.12 Prompt to adhered material on the edge of button when the press the start press wheel according to the material is ready. button. diagram below.
natural_image
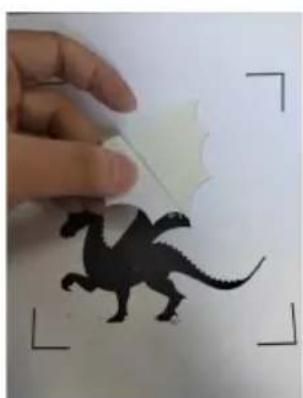
Close-up of a 3D printer with a dinosaur silhouette on its screen, placed on an orange cutting board (no visible text or symbols)2.16 Contour cutting completed.
2.15 Press the machine's LOAD/UNLOAD button.

2.14 When processing is complete, the software will prompt you to press the LOAD button.

2.13 Press the start button on the machine.
natural_image
Hand holding a white object with a black silhouette of a dinosaur, framed by corner brackets (no text or symbols)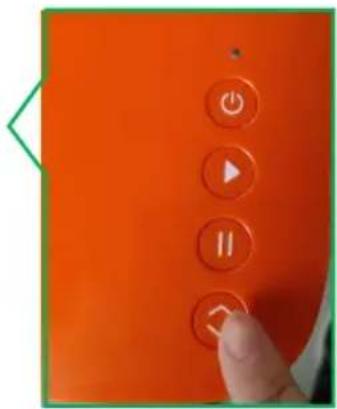
For details, please refer to the operation video
Warm tips: The PC version of the software and the Mac version of interface are the same, the use of the method is also the same.
IX.APP Installation and Use
To pair your machine with mobile devices featuring Bluetooth wireless technology, ensure that Smart1 is turned on and within a distance of no more than 15 feet.
Warm tip: The Android and iOS versions of the app have the same inte and are used in the same way.
1. Software Download
You can download the APP software through the following link or scan the code below.
http://api.cutterplotter.cn/index/d

- Open the app and register for an account, then log in.
2.1 Create new account 2.2 Fill in the corresponding information in order.
2.3 Enter your account number and click "SIGN IN".


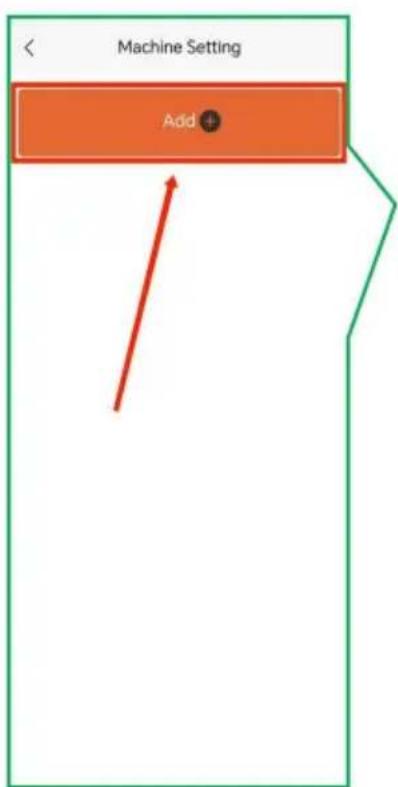
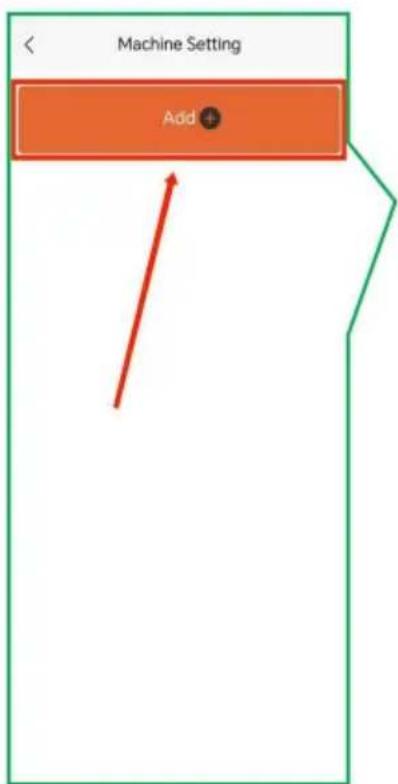
2.6 Click "Machine Setting"
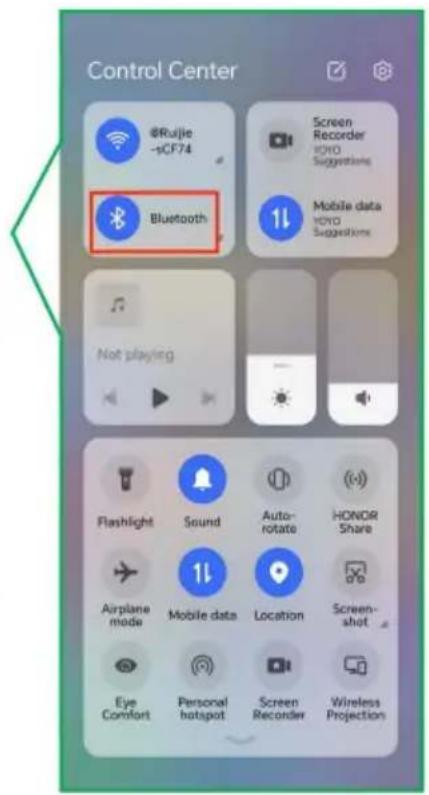
2.5 Navigate to the hor 2.4 Turn on system's page and click "Profile" Bluetooth


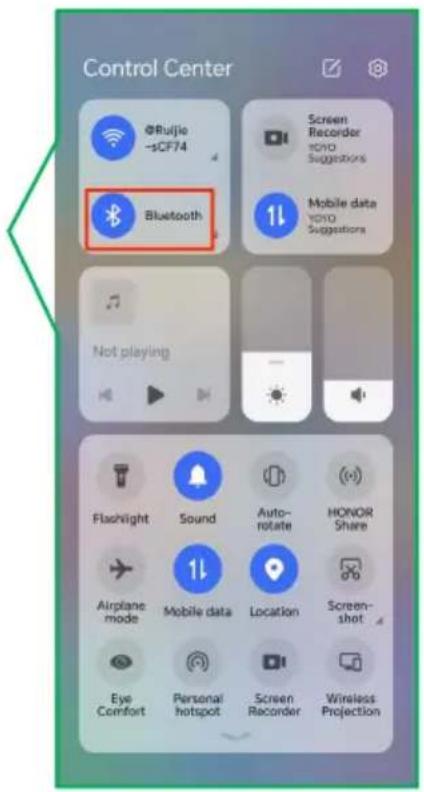
2.7 Allow location access when using.
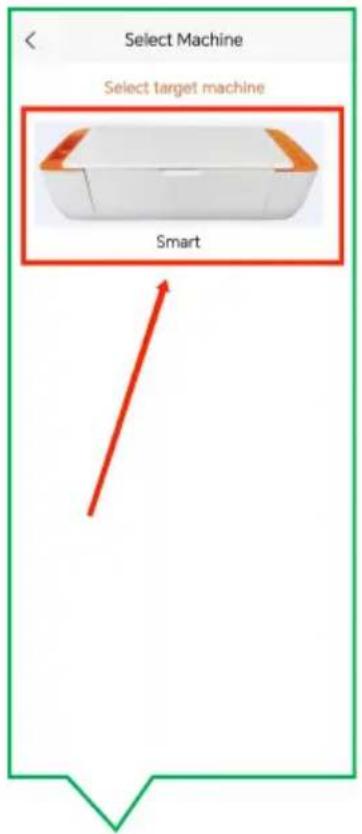
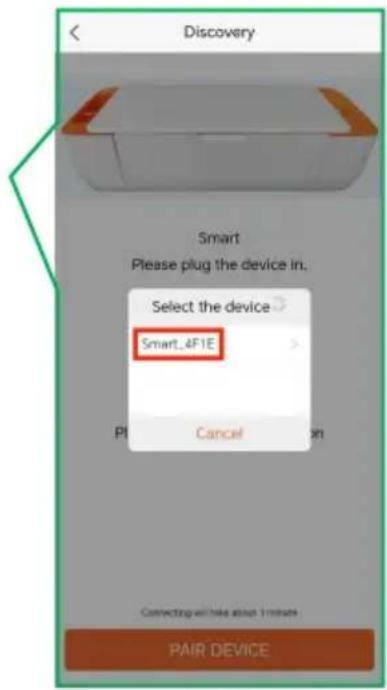
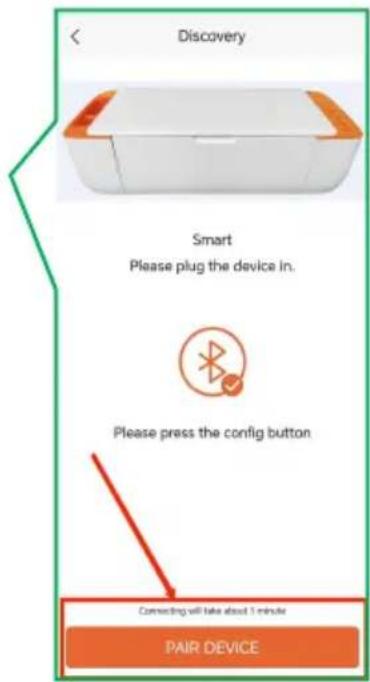
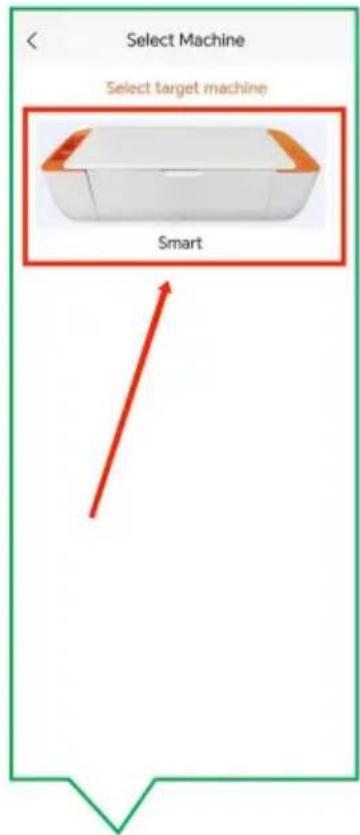
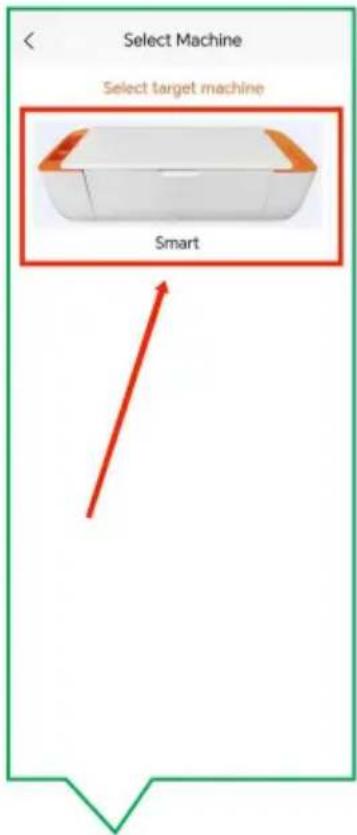
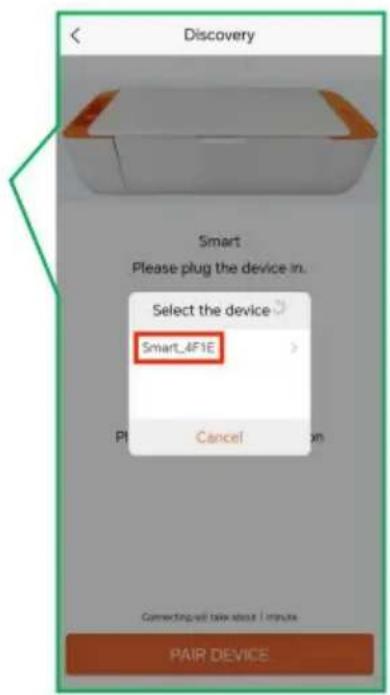
2.8 Click "Add"
2.9 Click on the Sm cutter icon.


2.12 Connection successful, click back.
2.11 Select the device 2.10 Click "Pair Devices with the name for connection.

2.13 Click "Home"
2.14 Select a graphic from the gallery list.
2.15 Click to create.


2.18 Click to create.
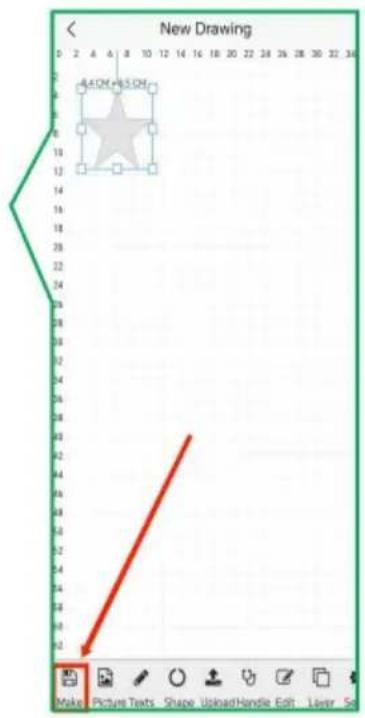
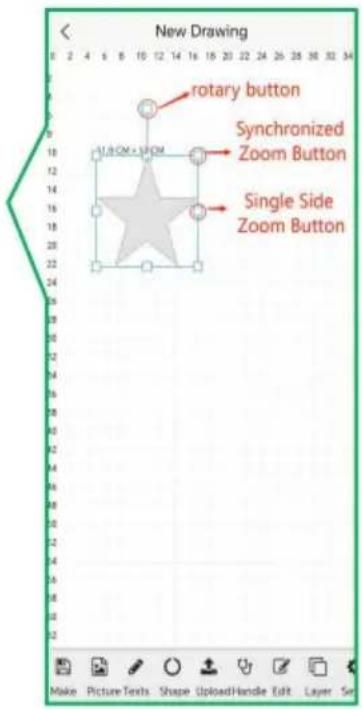
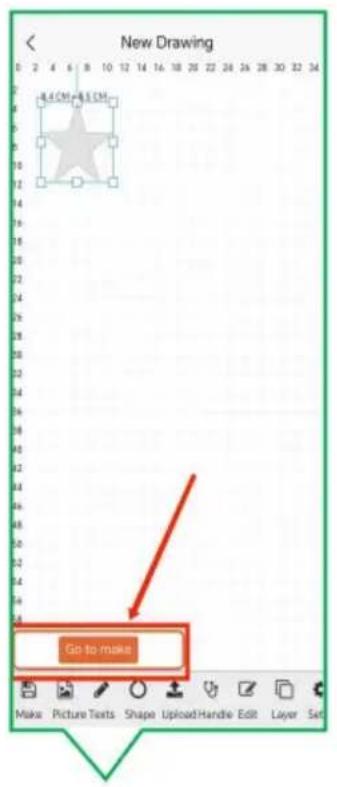
2.17 Confirm editing and 2.16 Graphics can be tap Make. edited in the canvas.
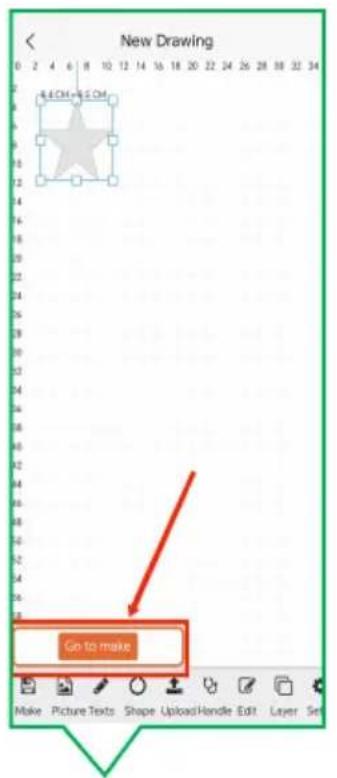
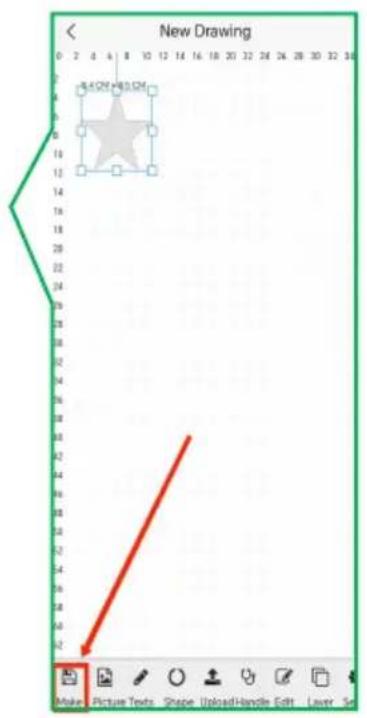
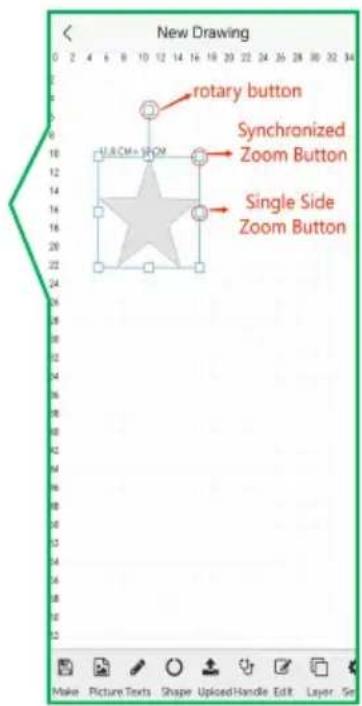
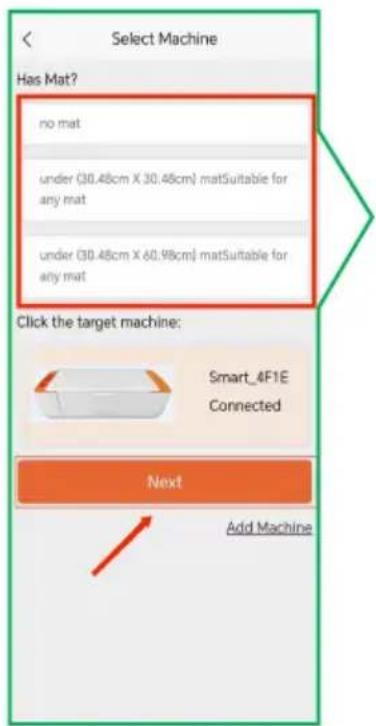
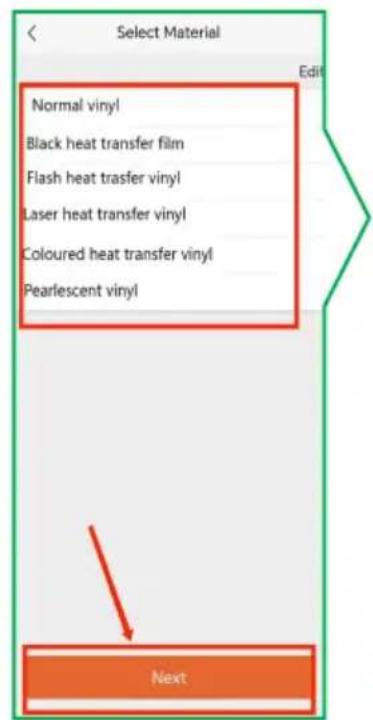
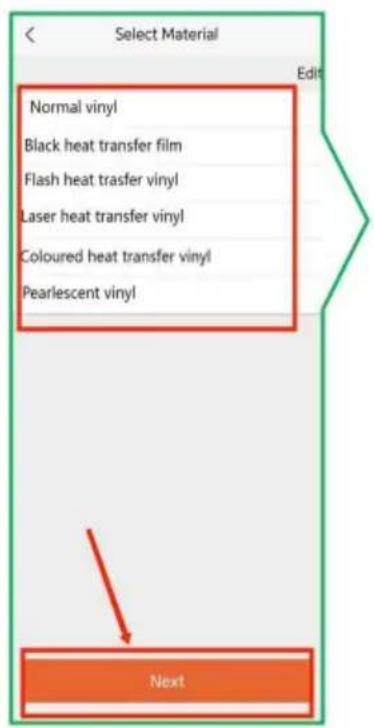
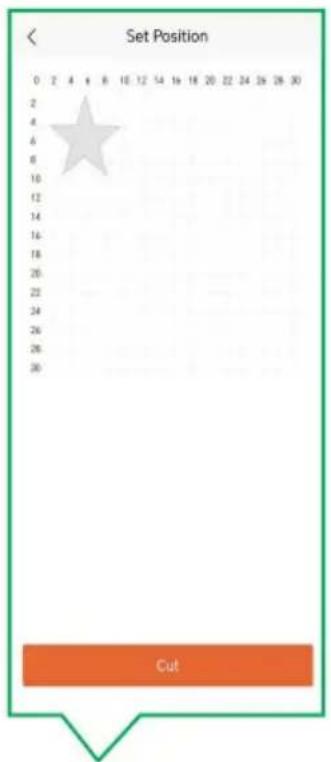
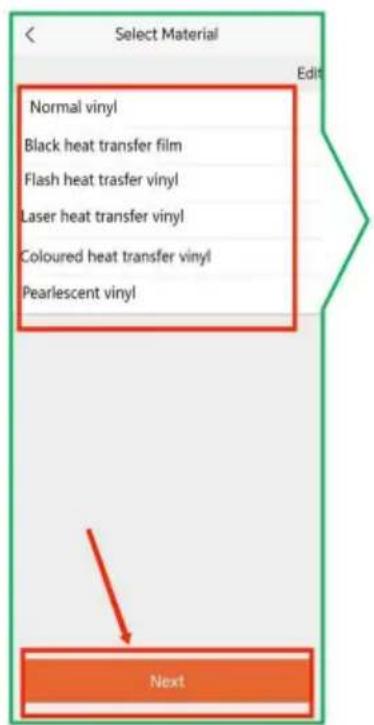
2.19 Select the cutting 2.20 Select materials ar 2.21 Move the graphic mat and click next "Ne; click "Next". this screen to adjust the cutting position.

2.23 First, place the pad with the adhered mate 2.22 Please press the the edge of the press wheel according to the c feed key. below.

natural_image
Industrial printing machine with orange casing and a reflective display showing rainbow-colored filter (no visible text or symbols)
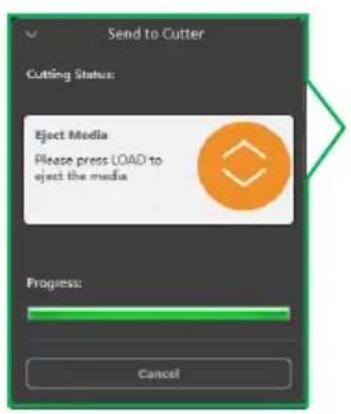
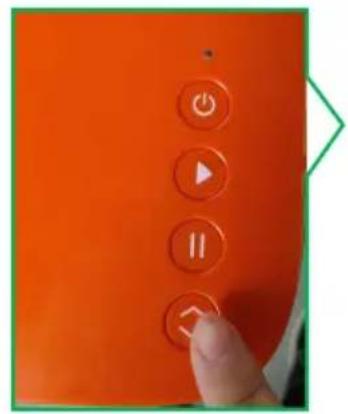
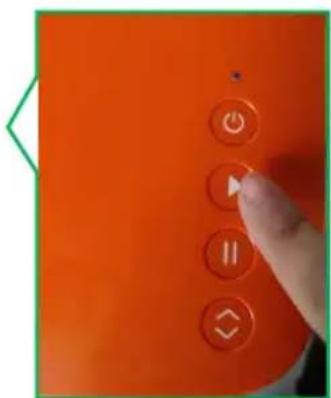
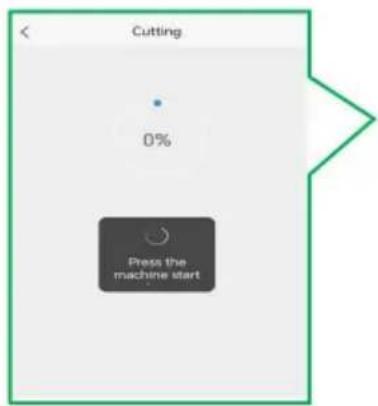
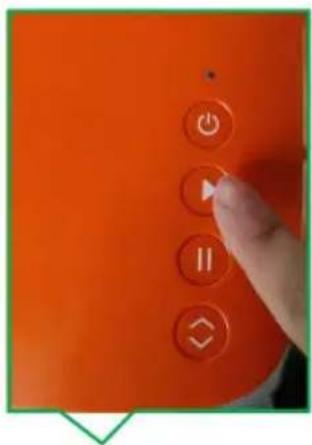
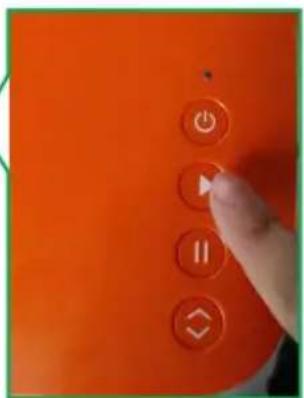
2.24 Press the LOAD 2.25 Press the machine 2.26 Press the start button when the material start button. button on the machine. is ready.
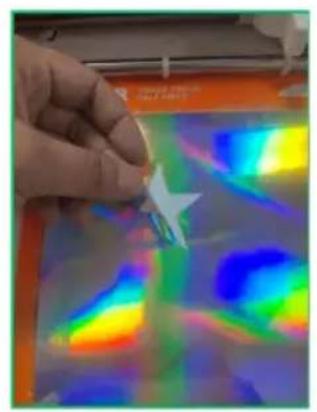
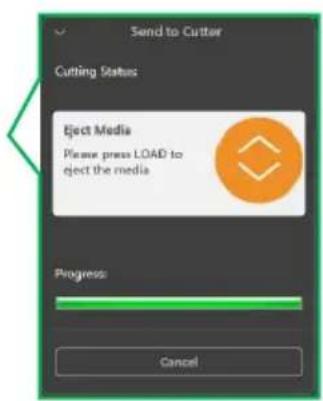
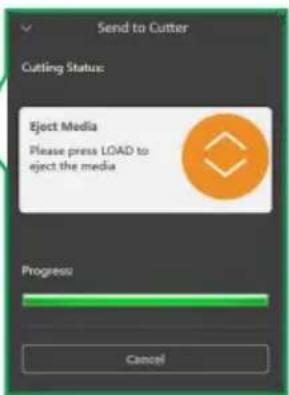
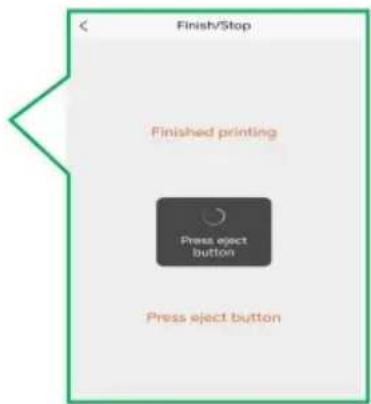
2.29 Cutting Completion. 2.28 Press the machine 2.27 When processing LOAD/UNLOAD button. is complete, the software prompts you to press the eject button.
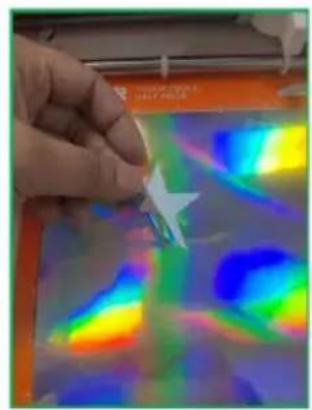
natural_image
Hand holding a small object with a star-shaped mark, interacting with a colorful, abstract thermal or spectrogram display (no text or symbols visible)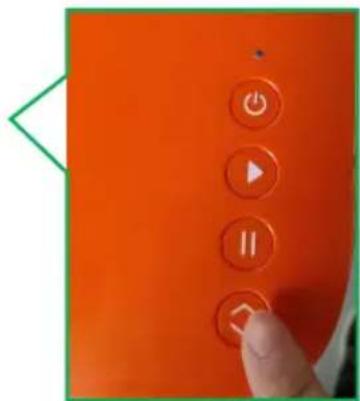

X.Frequently Asked Questions
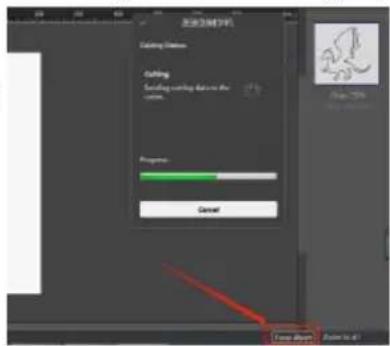
Q: What if the software shuts down during the cutting process and the softw
gets stuck?
A: Click "Force Abort" in the softwa
Q: The default knife pressure in the material library has been used for cutting while. How can it no longer cut through the material?
A: It's time to replace the blade, the tip is dull and not sharp enough.
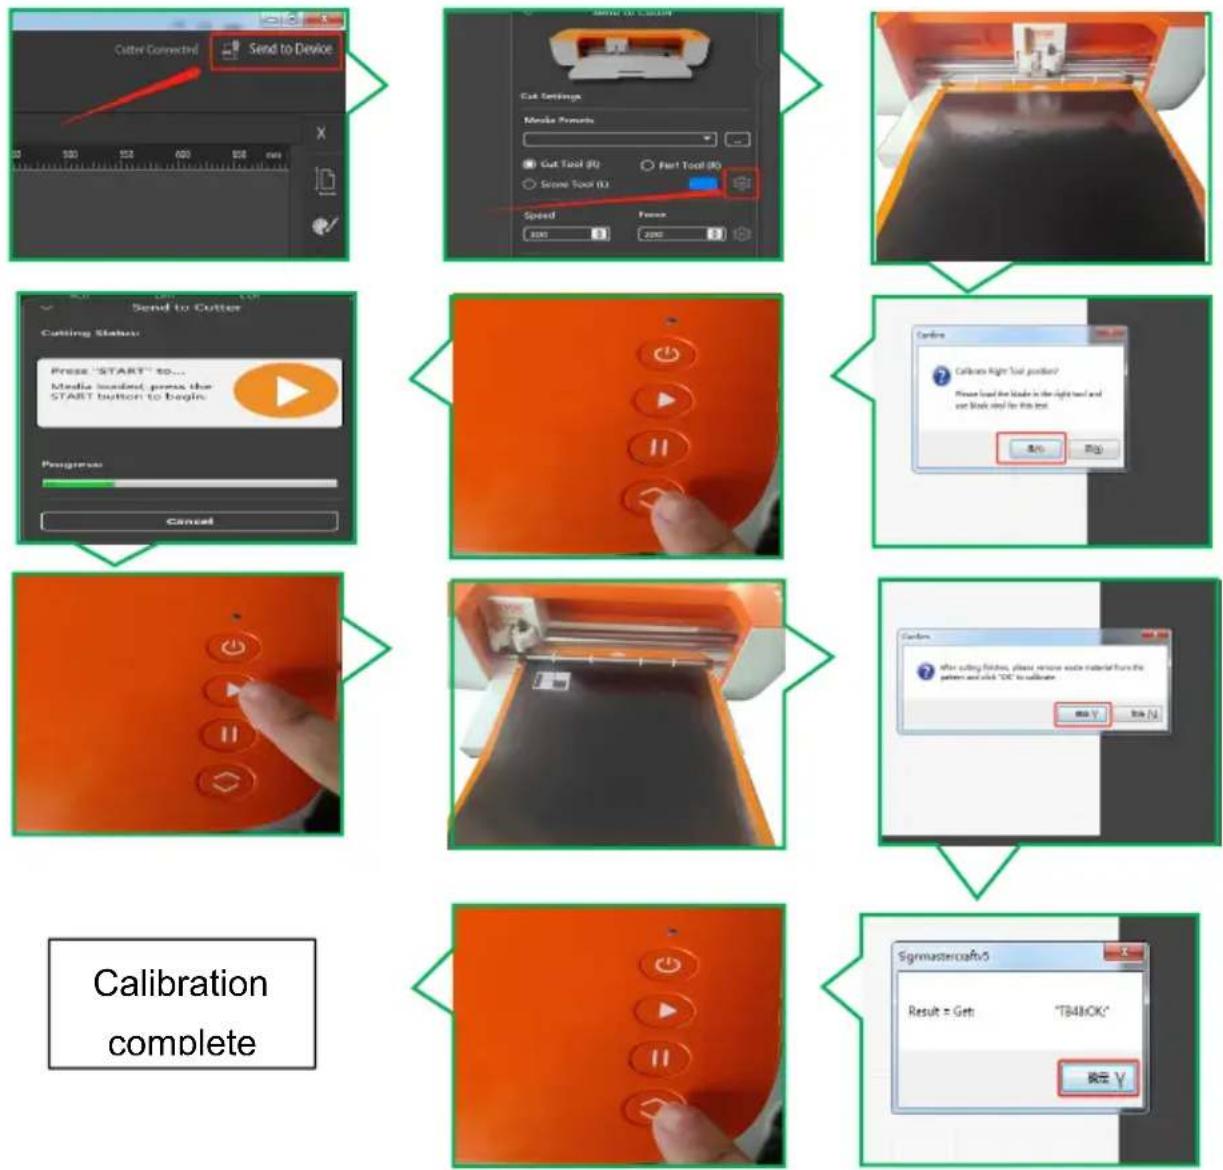
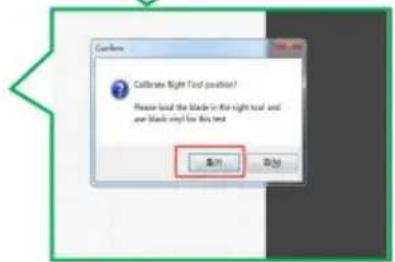
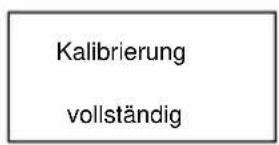
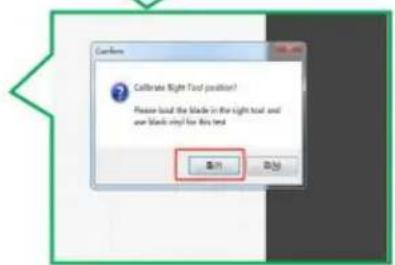
Q: What should I do if there is deviation in contour cutting?
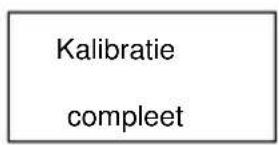
A: Follow the steps below to perform automatic calibration.
flowchart
graph TD
    A["Start: Cable Connected"] --> B["Send to Device"]
    B --> C["Cut Settings"]
    C --> D["Middle Prompts"]
    D --> E["Cut Tool (R)"]
    E --> F["Part Tool (R)"]
    F --> G["Some Tool (R)"]
    G --> H["Speed"]
    H --> I["Force"]
    I --> J["End"]

    K["Start: Cable to Cutter"] --> L["Send to Cutter"]
    L --> M["Cutting Status"]
    M --> N["Press "START" to..."]
    N --> O["Middle enclosed press the START button to begin"]
    O --> P["Pseudogase"]
    P --> Q["Cancel"]

    R["Start: Connect Right Tool Position"] --> S["Connect Right Tool Position"]
    S --> T["Please load the load in the right tool and not block until for this test."]
    T --> U["OK"]
    U --> V["Up"]

    W["Start: Connect Right Tool Position"] --> X["When load the load is the right tool and not block until for this test."]
    X --> Y["OK"]
    Y --> Z["Up"]

    AA["Start: Connect Right Tool Position"] --> AB["When load the load is the right tool and not block until for this test."]
    AB --> AC["OK"]
    AC --> AD["Up"]

    AE["Start: Connect Right Tool Position"] --> AF["When load the load is the right tool and not block until for this test."]
    AF --> AG["OK"]
    AG --> AH["Up"]

    AI["Start: Connect Right Tool Position"] --> AJ["When load the load is the right tool and not block until for this test."]
    AJ --> AK["OK"]
    AK --> AL["Up"]

    AM["Start: Connect Right Tool Position"] --> AN["When load the load is the right tool and not block until for this test."]
    AN --> AO["OK"]
    AO --> AP["Up"]

    AQ["Start: Connect Right Tool Position"] --> AR["When load the load is the right tool and not block until for this test."]
    AR --> AS["OK"]
    AS --> AT["Up"]

    AU["Start: Connect Right Tool Position"] --> AV["When load the load is the right tool and not block until for this test."]
    AV --> AW["OK"]
    AW --> AX["Up"]

    AY["Calibration complete"] --> AZ
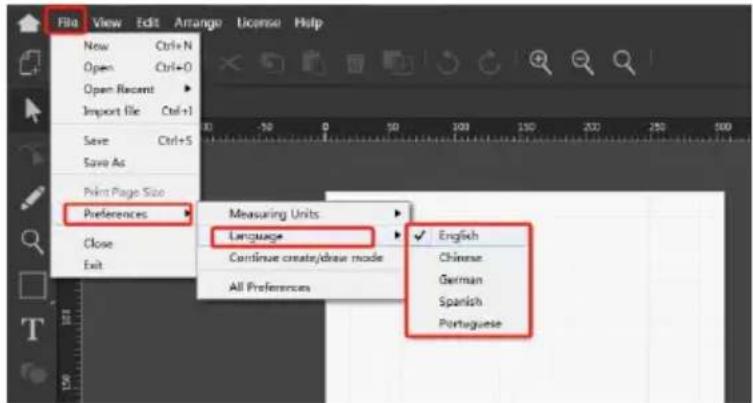
Q: How do I switch the language of the software?
A: Follow the instructions below to switch languages.
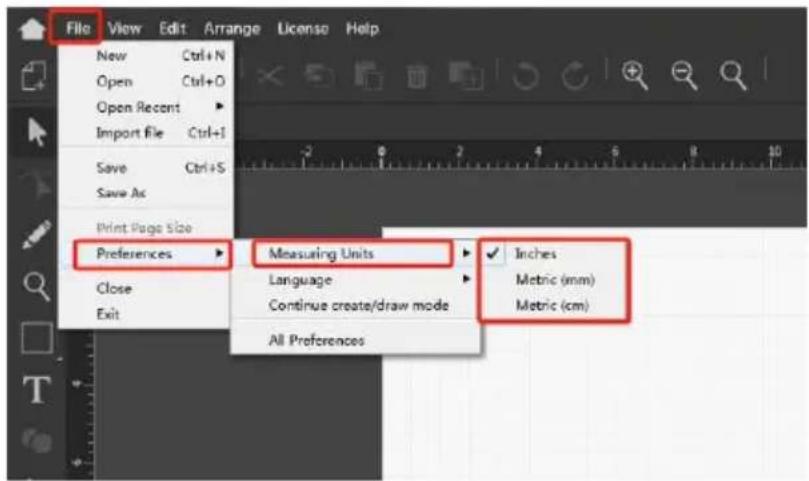
Q: How to change the measuring units?
A: Please follow the steps below to switch between units.
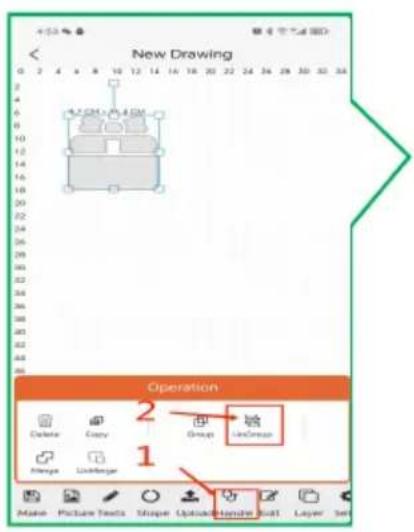
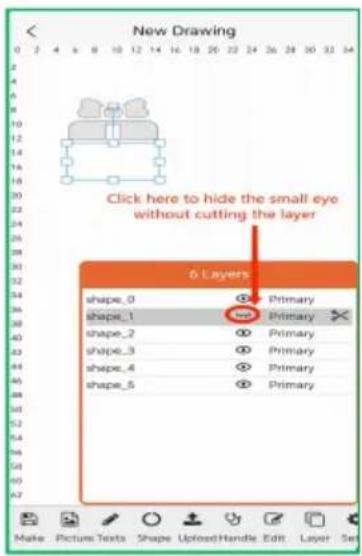
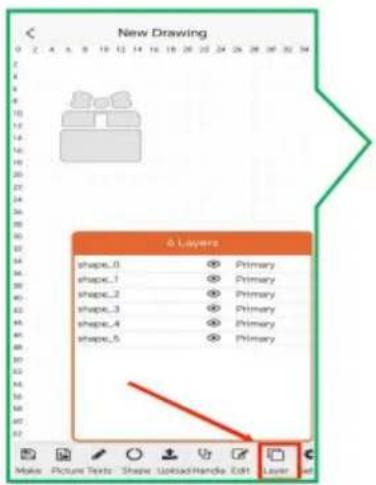
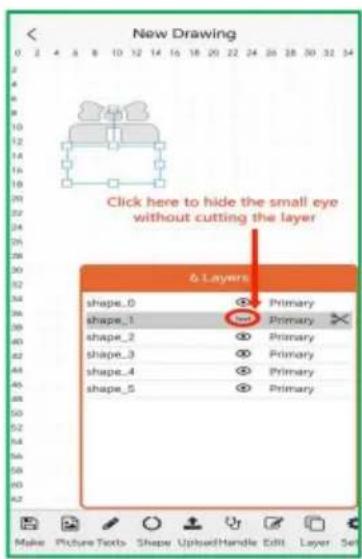
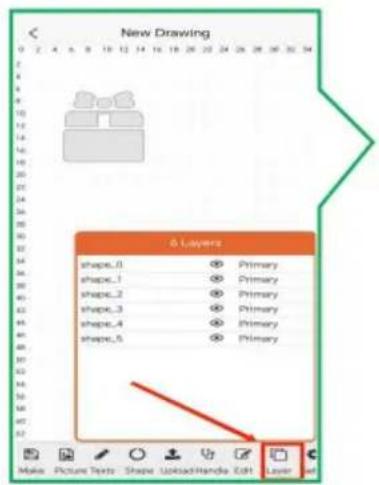
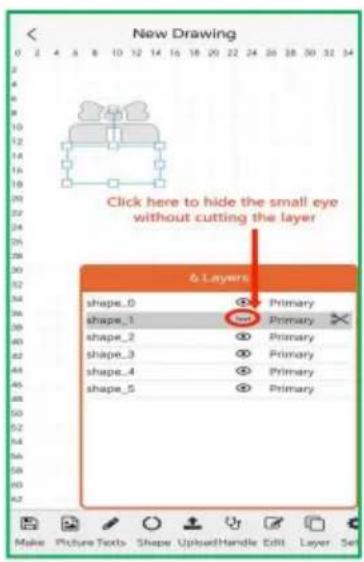
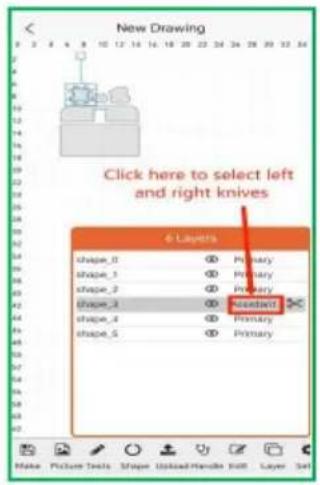
Q: How to cut in layers in APP?
A: Please follow the steps below.

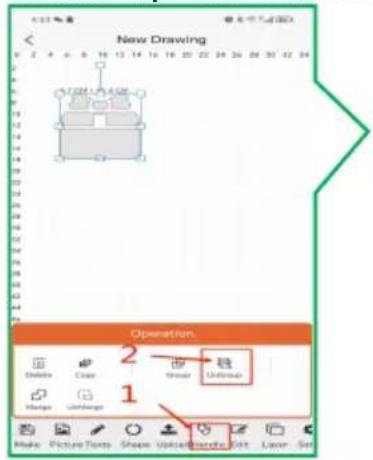
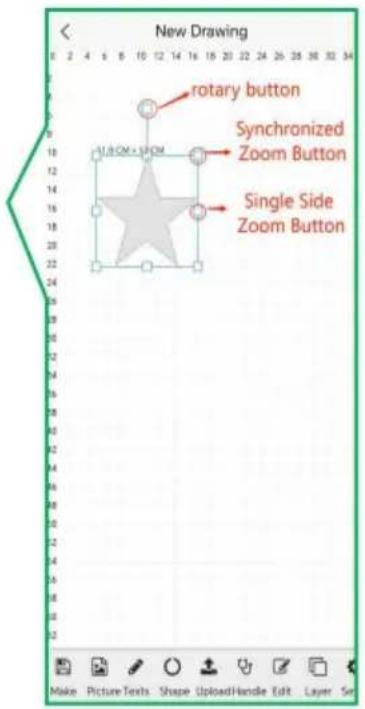
Q: How to switch left and right knives in APP?
A: Set up as follows.


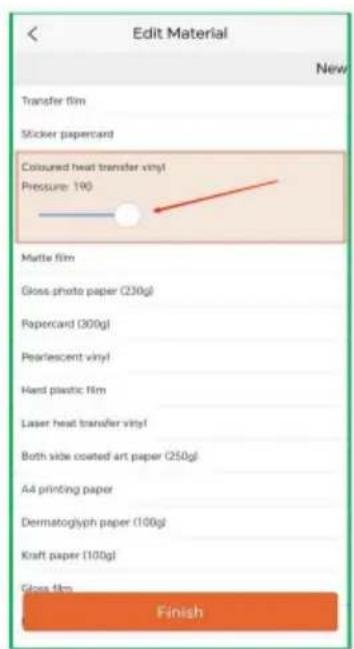
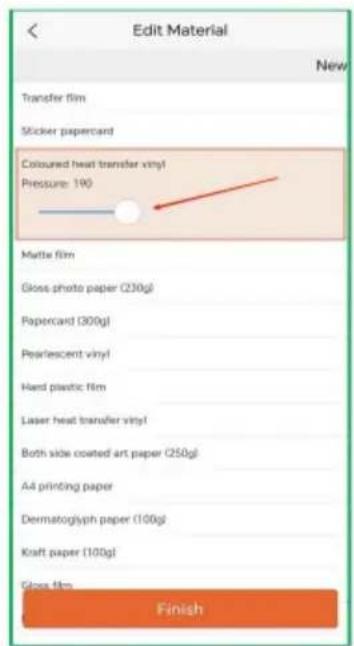
Q: What if I don't have the material I want to cut in the APP's material libra A: You can go to the Material Library page to add materials and set pressu


Q: How do I adjust the pressure to increase or decrease?
A: You can set it up in the following ways.

Q: Why doesn't it recognize the USB flash disk?
A: The format of your USB flash disk may not be supported.
Support format : FAT and FAT32
Unsupported format: NTFS and exFAT
XI.Operation Video
- https://youtu.be/K7XpFJqkuuA 2. https://youtu.be/6yPM4iy5Ixc


- https://youtu.be/Kj-b7WdSCH8 4. https://youtu.be/FqSa51zLvtw


- https://youtu.be/-5u-A62vNql 6. https://youtu.be/hMHugAJSWdM


XII.FCC Information
CAUTION: Changes or modifications not expressly approved by the party responsible for compliance could void the user's authority to operate the equipment!
This device complies with Part 15 of the FCC Rules. Operation is subject to following two conditions:
1) This product may cause harmful interference.
2) This product must accept any interference received, including interference that may cause undesired operation.
WARNING: Changes or modifications to this product not expressly approved by the party responsible for compliance could void the user's authority to operate product.
Note: This product has been tested and found to comply with the limits for B digital device pursuant to Part 15 of the FCC Rules. These limits are des provide reasonable protection against harmful interference in a residential installation.
This product generates, uses, and can radiate radio frequency energy, and if installed and used in accordance with the instructions, may cause harmful interference to radio communications. However, there is no guarantee that interference will not occur in a particular installation. If this product does cause harmful interference to radio or television reception, which can be determined turning the product off and on, the user is encouraged to try to correct the interference by one or more of the following measures.
- Reorient or relocate the receiving antenna.
- Increase the distance between the product and the receiver.
- Connect the product to an outlet on a circuit different from that to which receiver is connected.
- Consult the dealer or an experienced radio/TV technician for assistance.
XIII.CORRECT DISPOSAL
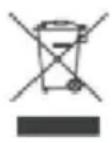
This product is subject to the provision of European Directive 2012/19/EC. The symbol showing a wheelie bin crossed through indicate that the product requires separate refuse collection in the European U
This applies to the product and all accessories marked with this symbol. Pro marked as such may not be discarded with normal domestic waste, but must taken to a collection point for recycling electrical and electronic devices.
Made In China
VEVOR®
TOUGH TOOLS, HALF PRICE
Technical Support and E-Warranty Certificate
www.vevor.com/support
VEVOR®
TOUGH TOOLS, HALF PRICE
natural_image
White and orange HP printer with internal components, no visible text or symbols on the device bodyÿ. Softwareinstallation....11-12

- Open the Clamp as shown by the arrow.

- Place the Blade and housing in Clamp R. Place the pen or the foil transfer and housing in Clamp L.
natural_image
Close-up of a white mechanical component with two metallic parts, one labeled 'EVOR' and the other showing 'COCA HALF PRICE', against an orange background (no readable text beyond branding)- Close the Clamp as shown by the arrow.

natural_image
Solid red cylindrical object with a small protrusion at the top (no text or symbols visible)Foil Transfer and housing

Blade and housing

natural_image
Close-up of a metallic cylindrical object with vertical ridges and a small protrusion at the top (no visible text or symbols)Pen
natural_image
Close-up of a blue cable inserted into a white electrical outlet, next to a black electronic device (no visible text or symbols)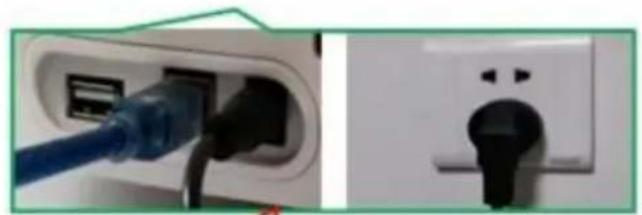
natural_image
Close-up of a white electrical outlet plug with a blue cable inserted, alongside a black wall socket (no text or symbols visible)Attention: Before powering on, check whether the voltage and current of the machine adapter match the location. Once confirmed, you can proceed to power on to avoid potential hazards.
natural_image
Two-panel illustration showing a pink abstract shape and a blue background with geometric lines (no text or symbols)natural_image
Exterior view of a red and orange industrial machine with a visible brand logo (no readable text or symbols)ÿ. Softwareinstallation


Dialogfeld.


natural_image
Pure technical diagram with a green triangle on top and a red rectangle below, no text or symbols present.natural_image
Close-up of a blue USB cable attached to a black electronic device on a wooden surface (no text or symbols visible)natural_image
Simple green star outline inside a green speech bubble outline on grid paper (no text or symbols)


natural_image
3D printer printing process with VEVOR branding and color calibration overlay (no readable text or symbols)
Machine Translated by Google


natural_image
Hand holding a small white object with a star-shaped mark, interacting with a colorful abstract background (no text or symbols visible)natural_image
Silhouette of a dragon flying inside a square frame, displayed within an image editing software interface (no text or symbols on the dragon itself)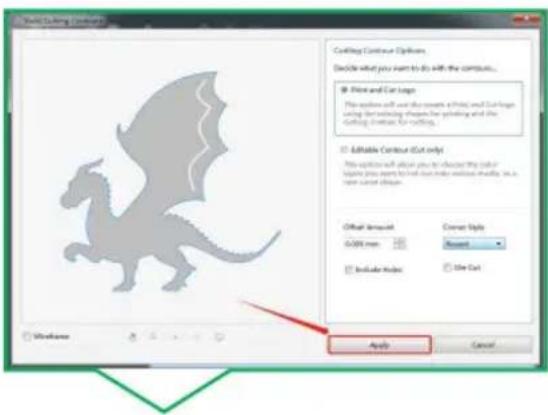
natural_image
Illustration of a black dragon flying on a white background within a software interface (no text or symbols on the dragon itself)natural_image
Orange printed flat with a white canvas featuring a black dragon silhouette and a grid background (no readable text or symbols)natural_image
3D printer with a gray dragon silhouette on its cover, placed on an orange cutting board (no visible text or symbols)2.16 Kontur

natural_image
Hand holding a black dinosaur silhouette on a white background, framed by corner brackets (no text or symbols)


Cutter-Symbol.
2.12 Anschluss

natural_image
Industrial printing machine with orange frame and reflective material, no visible text or symbols on the machine itself.
natural_image
Close-up of a hand holding a small object over a colorful, iridescent heatmap or sky pattern (no text or symbols visible)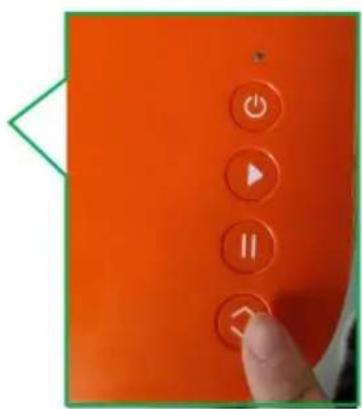


natural_image
Close-up of a 3D printer or printer with a black cover on its surface, no visible text or symbols.

natural_image
Close-up of an orange printer with a black cover and paper holder, no visible text or symbols


- https://youtu.be/Kj-b7WdSCH8

5.https://youtu.be/-5u-A62vNql

- https://youtu.be/6yPM4iy5Ixc

- https://youtu.be/FqSa51zLvtw

- https://youtu.be/hMHuqAJSWdM

ÿ.FCC-Informationen
www.vevor.com/support
VEVOR®
TOUGH TOOLS, HALF PRICE
natural_image
White and orange HP printer with internal components, no visible text or symbols on the device bodyBESOIN D'AIDE? CONTACTEZ-NOUS!
- Open the Clamp as shown by the arrow.
- Place the Blade and housing in Clamp R. Place the pen or the foil transfer and housing in Clamp L.

natural_image
Close-up of a white mechanical device with two cylindrical components and directional arrows, no visible text or symbols.- Close the Clamp as shown by the arrow.

natural_image
Solid red cylindrical object with a small protrusion at the top (no text or symbols visible)Foil Transfer and housing

Blade and housing

natural_image
Close-up of a metallic cylindrical object with vertical ridges and a small protrusion at the top (no visible text or symbols)Pen
natural_image
Close-up of a blue cable inserted into a white electrical plug socket, next to a black electronic device (no visible text or symbols)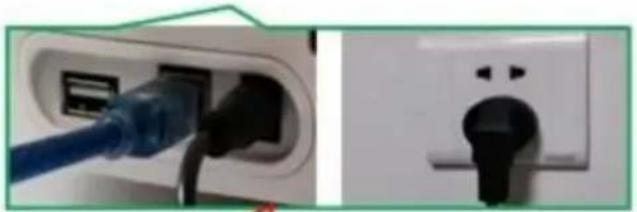
natural_image
Close-up of a white electrical outlet plug with black connectors, showing internal socket and cable (no text or symbols visible)Attention: Before powering on, check whether the voltage and current of the machine adapter match the location. Once confirmed, you can proceed to power on to avoid potential hazards.
natural_image
Two-panel illustration showing a magenta abstract shape on a light background, with no visible text or symbols.natural_image
Exterior view of a red and orange industrial machine with a visible 'EVOR' branding on its side (no text or symbols on the machine itself)

natural_image
Pure technical diagram with a green triangle on a horizontal axis and a red rectangular frame, no text or symbols present.natural_image
Close-up of a blue USB cable attached to a black electronic device on a wooden surface (no text or symbols visible)natural_image
Simple green outline of a five-pointed star on grid paper (no text or symbols)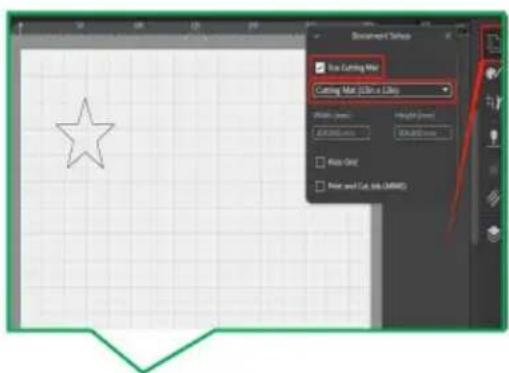


natural_image
3D printer printing process with VEVOR branding and color calibration overlay (no readable text or symbols)


natural_image
Hand holding a small white object with a star-shaped mark, overlaid on a colorful thermal or simulation heatmap (no text or symbols visible)natural_image
Silhouette of a dragon flying inside a square frame, displayed within an image editing software interface (no text or symbols on the dragon itself)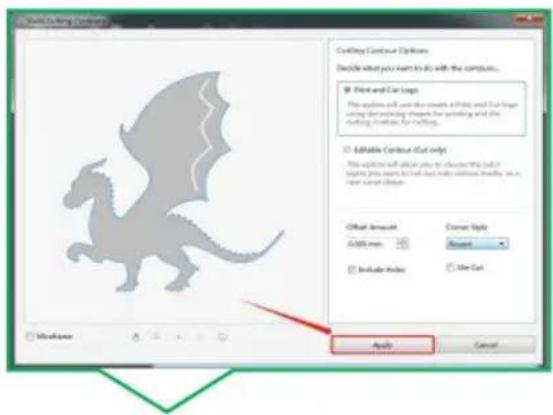
natural_image
Illustration of a black dragon flying on a white background within a software interface (no text or symbols on the dragon itself)natural_image
Illustration of a flying creature on a cutting board (no text or symbols)natural_image
3D printer with a gray dragon silhouette on its cover, placed on an orange cutting board (no visible text or symbols)natural_image
Hand holding a white object with a black silhouette of a dinosaur, framed by corner brackets (no text or symbols)


2.7 Autoriser la localisation

icône de coupeur.

2.12 Connexion


natural_image
Industrial printing machine with orange frame and reflective material, no visible text or symbols on the machine itself.

natural_image
Close-up of a hand holding a small object over a colorful, iridescent heatmap or sky pattern (no text or symbols visible)

flowchart
graph TD
A["Send to Device"] --> B["Cut Settings"]
B --> C["Media Preset"]
C --> D["Cut Tool (R)"]
D --> E["Pad Tool (R)"]
E --> F["Secure Tool (S)"]
F --> G["Speed"]
G --> H["Force"]
H --> I["200"]
I --> J["200"]
K["Send to Cutter"] --> L["Cutting Status"]
L --> M["Press "START" so..."]
M --> N["Media loaded, press the START button to begin."]
N --> O["Progresser"]
O --> P["Cancel"]
Q["Confine"] --> R["Callrate Right Tool position?"]
R --> S["Please load the blade in the right tool and use black vinyl for this test"]
S --> T["8x7"]
T --> U["8x7"]
V["Confine"] --> W["When cutting flasks please remove paste material from the pattern and click "OK" to callrate"]
W --> X["8x7"]
X --> Y["8x7"]
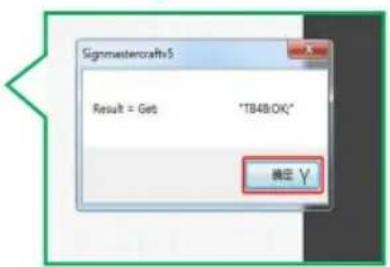
Z["Étalonnage complet"] --> AA["Signmastercrafts5"]
AA --> AB["Result = Get "TB4B:OK""]
AB --> AC["确定 Y"]


3.https://youtu.be/Kj-b7WdSCH8

5.https://youtu.be/-5u-A62vNql

- https://youtu.be/6yPM4iy5Ixc

- https://youtu.be/FqSa51zLvtw

- https://youtu.be/hMHuqAJSWdM

.Informations FCC
natural_image
White and orange HP printer with internal components, no visible text or symbols on the device bodyHULP NODIG? NEEM CONTACT MET ONS OP!

- Open the Clamp as shown by the arrow.

- Place the Blade and housing in Clamp R. Place the pen or the foil transfer and housing in Clamp L.

natural_image
Close-up of a white mechanical device with two cylindrical components and directional arrows, no visible text or symbols.- Close the Clamp as shown by the arrow.

natural_image
Solid red cylindrical object with a small protrusion at the top (no visible text or symbols)Foil Transfer and housing

Blade and housing

natural_image
Close-up of a metallic cylindrical object with vertical ridges and a small protrusion at the top (no visible text or symbols)Pen
natural_image
Two-panel image showing a blue cable inserted into a white plug, next to a black device (no visible text or symbols)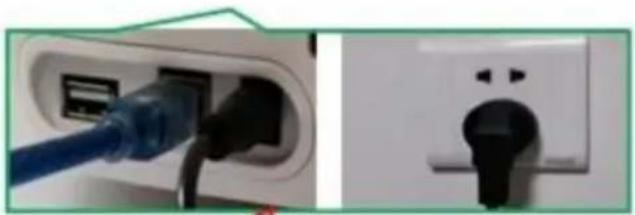
natural_image
Close-up of a white electrical outlet plug with black connectors, showing internal socket and cable (no text or symbols visible)Attention: Before powering on, check whether the voltage and current of the machine adapter match the location. Once confirmed, you can proceed to power on to avoid potential hazards.
natural_image
Two-panel illustration showing a magenta abstract shape on a light background, with no visible text or symbols.natural_image
Exterior view of a red and orange industrial machine with a visible 'EVOR' branding on its side (no text or symbols on the machine itself)ÿ. Software-installatie
3.4 Voer de PSN-code in die u op de koelkaststicker in de accessoiredoos.

5.3 Klik op "Installeren".

dialoogvenster.


natural_image
Pure technical diagram with a green triangle on top and a red rectangle below, no text or symbols present.natural_image
Close-up of a blue USB cable attached to a black electronic device on a wooden surface (no text or symbols visible)1.5 De snijmat instellen


natural_image
Simple green speech bubble with a five-pointed star on grid paper (no text or symbols)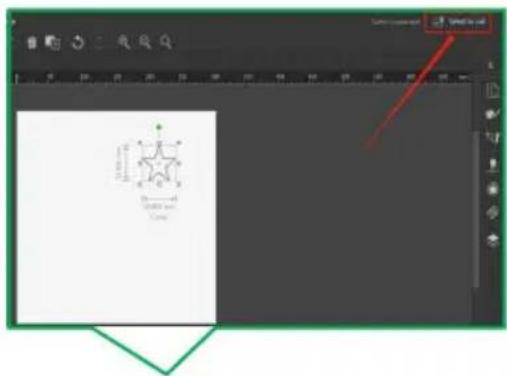
1.8 Klik op "Verzenden"

natural_image
3D printer printing process with VEVOR branding and color calibration overlay (no readable text or symbols)

natural_image
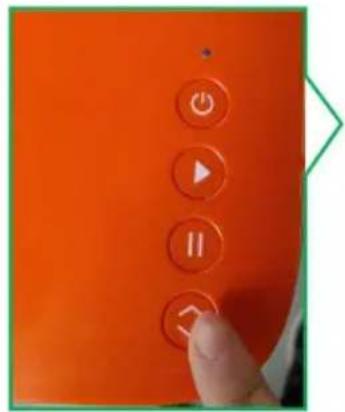
Orange electronic device with five control buttons (Power, Play, Pause, Idle) and a finger pressing the button (no text or symbols visible)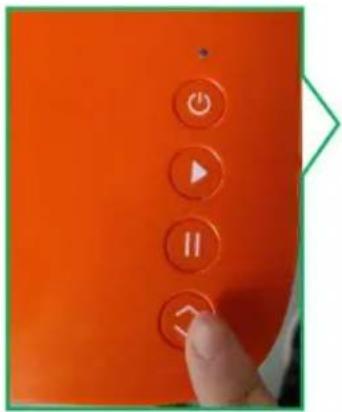
natural_image
Hand holding a small white object with a star-shaped mark, overlaid on a colorful thermal or simulation visualization (no text or symbols visible)natural_image
Silhouette of a dragon flying inside a square frame, displayed within an image editing software interface (no text or symbols on the dragon itself)
natural_image
Silhouette of a flying creature inside a design software interface (no text or symbols on the creature itself)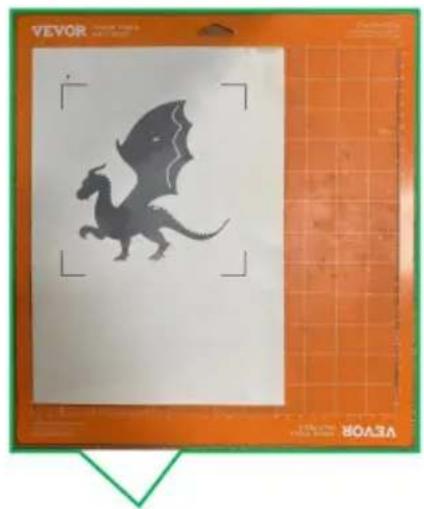
natural_image
Illustration of a stylized dragon flying on a cutting board (no text or symbols)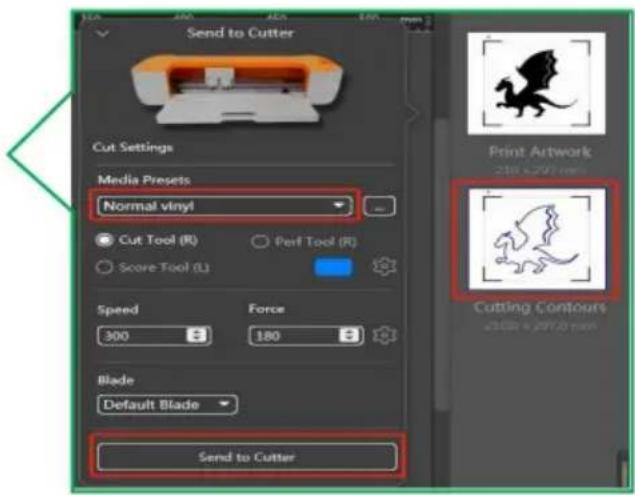
natural_image
3D printer with a gray dragon silhouette on its cover, placed on an orange cutting board (no visible text or symbols)2.14 Wanneer

natural_image
Hand holding a white object with a black silhouette of a dinosaur, framed by corner brackets (no text or symbols)


2.6 Klik op "Machine


2.12 Verbinding succesvol, klik terug.
2.13 Klik op "Home"

2.15 Klik om te maken.


2.18 Klik om te maken.

natural_image
Industrial printing machine with orange frame and reflective material, no visible text or symbols on the machine itself.
is compleet, de software
natural_image
Close-up of a hand holding a small object over a colorful, iridescent heatmap or sky pattern (no text or symbols visible)


natural_image
Close-up of a 3D printer with orange paper edge and black surface (no visible text or symbols)

natural_image
Close-up of an orange printer with a black cover and paper roller, no visible text or symbols


- https://youtu.be/Kj-b7WdSCH8

5.https://youtu.be/-5u-A62vNql

- https://youtu.be/6yPM4iy5Ixc

- https://youtu.be/FqSa51zLvtw

- https://youtu.be/hMHuqAJSWdM

ÿ.FCC-informatie
garantiecertificaat www.vevor.com/support
VEVOR®
TOUGH TOOLS, HALF PRICE
natural_image
White and orange HP printer with internal components, no visible text or symbols on the device bodyBEHÖVER HJÄLP? KONTAKTA OSS!
- Open the Clamp as shown by the arrow.

- Place the Blade and housing in Clamp R. Place the pen or the foil transfer and housing in Clamp L.

natural_image
Close-up of a white mechanical device with two cylindrical components and directional arrows, no visible text or symbols.- Close the Clamp as shown by the arrow.

natural_image
Solid red cylindrical object with a small protrusion at the top (no text or symbols visible)Foil Transfer and housing
Blade and housing

natural_image
Close-up of a metallic cylindrical object with vertical ridges and a small protrusion at the top (no visible text or symbols)Pen
natural_image
Close-up of a blue cable inserted into a white electrical outlet, next to a black electronic device (no visible text or symbols)natural_image
Close-up of a white electrical outlet plug with black connectors, showing internal wiring and a close-up of the socket (no text or symbols visible)Attention: Before powering on, check whether the voltage and current of the machine adapter match the location. Once confirmed, you can proceed to power on to avoid potential hazards.
natural_image
Two-panel illustration showing a magenta abstract shape on a light background, with no visible text or symbols.natural_image
Exterior view of a red and orange 3D printer with a visible brand logo (no readable text or symbols on the device itself)ÿ. Programvaruinstallation


natural_image
Pure technical diagram with a green triangle on top and a red rectangle below, no text or symbols present.natural_image
Close-up of a blue USB cable attached to a black electronic device on a wooden surface (no text or symbols visible)1.4 Utvalda former kan redigeras.

natural_image
Simple green speech bubble with a five-pointed star outline on grid paper (no text or symbols)
natural_image
Industrial printing machine with orange casing and white tool, showing a reflective surface (no visible text or symbols)1.16 Tryck på start


natural_image
Hand holding a small white object with a star-shaped mark, overlaid on a colorful thermal or simulation heatmap (no text or symbols visible)2.Konturutskärning 2.1 Designgrafik
natural_image
Silhouette of a dragon flying inside a square frame, displayed within an image editing software interface (no text or symbols on the dragon itself)2.3 Klicka på "Apply".

natural_image
Silhouette of a flying creature inside a design software interface (no text or symbols on the creature itself)natural_image
Illustration of a flying creature on a cutting board (no text or symbols)natural_image
3D printer with a gray dragon silhouette on its cover, placed on an orange cutting board (no visible text or symbols)2.16 Kontur
2.14 När
natural_image
Hand holding a white object with a black silhouette of a dinosaur, framed by corner brackets (no text or symbols)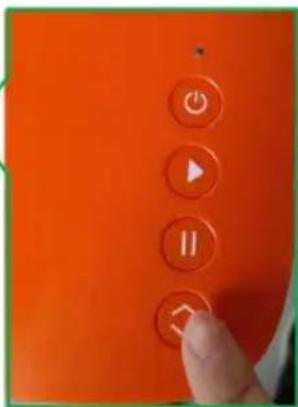


2.6 Klicka på "Maskin

2.7 Tillåt plats

2.12 Anslutning


2.19 Välj skärning

natural_image
Industrial printing machine with orange frame and reflective material on a grid floor (no visible text or symbols)
natural_image
Close-up of a hand holding a small object over a colorful, iridescent heatmap or sky pattern (no text or symbols visible)

ÿ.Vanliga frågor


- https://youtu.be/Kj-b7WdSCH8

5.https://youtu.be/-5u-A62vNql

- https://youtu.be/6yPM4iy5Ixc

- https://youtu.be/FqSa51zLvtw

- https://youtu.be/hMHuqAJSWdM

ÿ.FCC-information
www.vevor.com/support
VEVOR®
TOUGH TOOLS, HALF PRICE
natural_image
White and orange HP printer with internal components, no visible text or symbols on the device body
- Open the Clamp as shown by the arrow.

- Place the Blade and housing in Clamp R. Place the pen or the foil transfer and housing in Clamp L.

natural_image
Close-up of a white mechanical device with two cylindrical components and directional arrows, no visible text or symbols.- Close the Clamp as shown by the arrow.

natural_image
Solid red cylindrical object with a small protrusion at the top (no visible text or symbols)Foil Transfer and housing

Blade and housing

natural_image
Close-up of a metallic cylindrical object with vertical ridges and a small protrusion at the top (no visible text or symbols)Pen
natural_image
Close-up of a blue cable inserted into a white plug socket, next to a black electronic device (no visible text or symbols)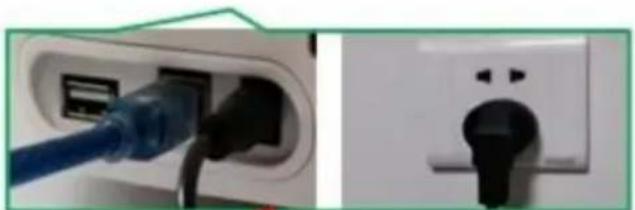
natural_image
Close-up of a blue cable inserted into a white electrical outlet socket (no text or symbols visible)Attention: Before powering on, check whether the voltage and current of the machine adapter match the location. Once confirmed, you can proceed to power on to avoid potential hazards.
natural_image
Two-panel image showing a magenta abstract shape on a light background, with no visible text or symbols.natural_image
Exterior view of a red and orange 3D printer with a visible brand logo (no readable text or symbols on the device itself)
5.4 Haga clic en "Finalizar"
5.3 Haga clic en "Instalar".
caja de diálogo.


natural_image
Pure technical diagram with grid lines and scale bar, no readable text or symbolsnatural_image
Close-up of a blue USB cable attached to a black electronic device on a wooden surface (no text or symbols visible)natural_image
Simple green star outline inside a green speech bubble outline on grid paper (no text or symbols)
1.8 Haga clic en "Enviar"


natural_image
3D printer printing process with VEVOR branding and color calibration overlay (no readable text or symbols)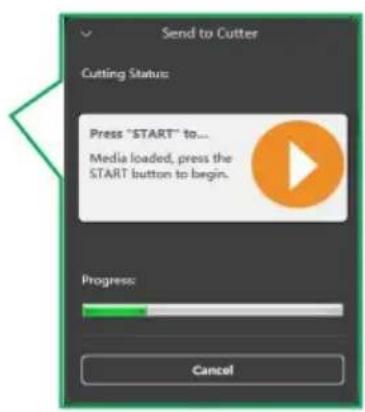


natural_image
Hand holding a pen examining a colorful, abstract thermal or heatmap-like visualization (no text or symbols visible)natural_image
Silhouette of a dragon flying inside a square frame, displayed within an image editing software interface (no text or symbols on the dragon itself)2.3 Haga clic en "Aplicar".

2.5 Haga clic en "Enviar"
2.4 Haga clic en "Enviar al dispositivo"
natural_image
Silhouette of a flying creature inside a design software interface (no text or symbols on the creature itself)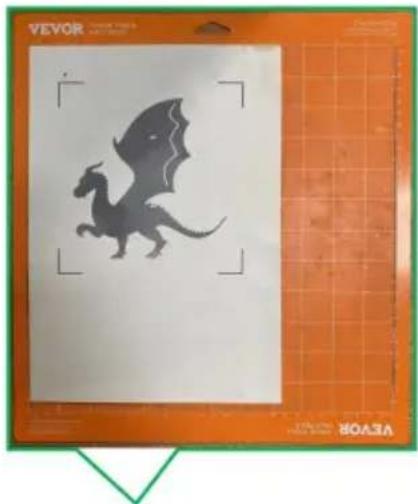
natural_image
Illustration of a stylized dragon flying on a whiteboard with orange grid background (no text or symbols)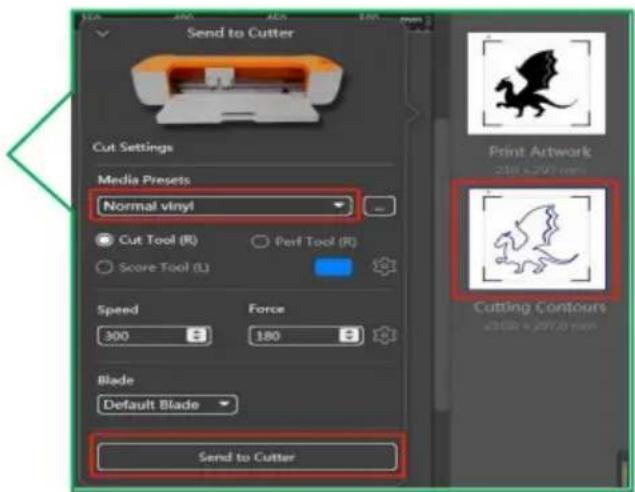
natural_image
3D printer with a gray dragon silhouette on its cover, placed on an orange cutting board (no visible text or symbols)2.14 Cuando

natural_image
Hand holding a white object with a black silhouette of a dinosaur, framed by corner brackets (no text or symbols)


2.6 Haga clic en "Máquina


icono de cortador.
2.12 Conexión
exitoso, haga clic atrás.
2.15 Haga clic para crear.


2.18 Haga clic para crear.


natural_image
Industrial printing machine with orange frame and reflective material, no visible text or symbols on the machine itself.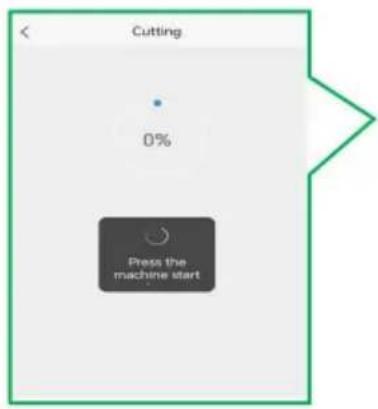
2.27 Al procesar
natural_image
Close-up of a hand holding a small object over a colorful, iridescent heatmap or sky pattern (no text or symbols visible)


- https://youtu.be/6yPM4iy5Ixc

- https://youtu.be/Kj-b7WdSCH8

- https://youtu.be/FqSa51zLvtw

- https://youtu.be/-5u-A62vNql

- https://youtu.be/hMHuqAJSWdM

natural_image
White and orange HP printer with internal components, no visible text or symbols on the device body
- Open the Clamp as shown by the arrow.

- Place the Blade and housing in Clamp R. Place the pen or the foil transfer and housing in Clamp L.

natural_image
Close-up of a white mechanical component with two metallic parts, one labeled 'EVOR' and the other showing 'COCA HALF PRICE', against an orange background (no readable text beyond branding)- Close the Clamp as shown by the arrow.

natural_image
Solid red cylindrical object with a small protrusion at the top (no visible text or symbols)Foil Transfer and housing

Blade and housing
natural_image
Close-up of a metallic cylindrical object with vertical ridges and a small protrusion at the top (no visible text or symbols)Pen
natural_image
Close-up of a blue cable inserted into a white electrical plug, next to a black electronic device (no visible text or symbols)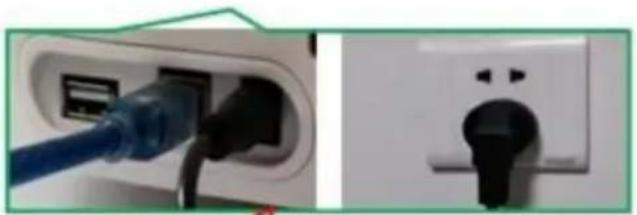
natural_image
Close-up of a white electrical outlet plug with black socket, showing cable insertion and power outlet (no text or symbols visible)Attention: Before powering on, check whether the voltage and current of the machine adapter match the location. Once confirmed, you can proceed to power on to avoid potential hazards.
natural_image
Two-panel illustration showing a pink abstract shape on a light background, with no visible text or symbols.natural_image
Exterior view of a red and orange industrial machine with a visible 'EVOR' logo on its side (no text or symbols on the machine itself)

5.4 Fare clic su "Fine"
5.2 Fare clic su "Avanti"

natural_image
Pure technical diagram with a green triangle on top and a red rectangle below, no text or symbols present.natural_image
Close-up of a blue USB cable attached to a black electronic device on a wooden surface (no text or symbols visible)natural_image
Simple green speech bubble with a five-pointed star outline on grid paper (no text or symbols)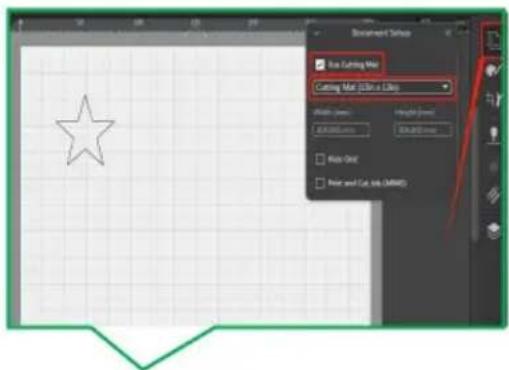

natural_image
3D printer printing process with VEVOR branding and color calibration overlay (no readable text or symbols)

Machine Translated by Google
Pulsante CARICA/SCARICA.

natural_image
Hand holding a small white object with a star-shaped mark, overlaid on a colorful thermal or simulation image (no text or symbols visible)natural_image
Silhouette of a dragon flying inside a square frame, displayed within an image editing software interface (no text or symbols on the dragon itself)2.3 Fare clic su "Applica".


natural_image
Silhouette of a flying creature inside a design software interface (no text or symbols on the creature itself)
natural_image
Silhouette of a flying creature on a whiteboard with orange grid background (no text or symbols)
natural_image
3D printer with a gray dragon silhouette on its cover, placed on an orange cutting board (no visible text or symbols)2.14 Quando
natural_image
Hand holding a white object with a black silhouette of a dinosaur, framed by corner brackets (no text or symbols)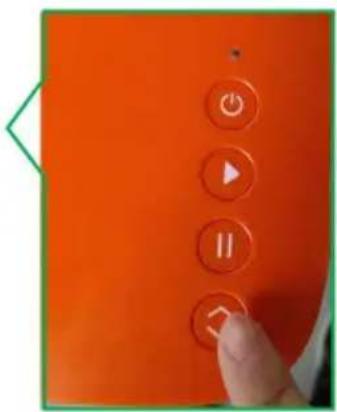


Machine Translated by Google
2.12 Connessione
2.13 Fare clic su "Home"


natural_image
Industrial printing machine with orange frame and reflective material, no visible text or symbols on the machine itself.
natural_image
Close-up of a hand holding a small object over a colorful, iridescent heatmap or sky pattern (no text or symbols visible)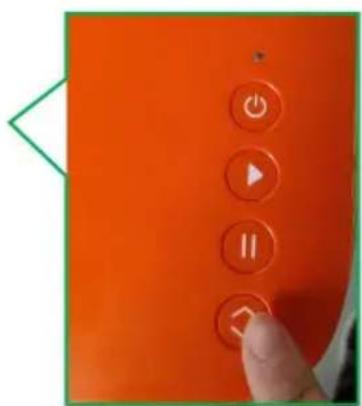

ÿ.Domande frequenti


- https://youtu.be/Kj-b7WdSCH8

5.https://youtu.be/-5u-A62vNql

- https://youtu.be/6yPM4iy5Ixc

- https://youtu.be/FqSa51zLvtw

- https://youtu.be/hMHuqAJSWdM

ÿ.Informazioni FCC
elettronica www.vevor.com/support
VEVOR®
TOUGH TOOLS, HALF PRICE
natural_image
White and orange HP printer with internal components, no visible text or symbols on the device bodyPOTRZEBUJESZ POMOCY? SKONTAKTUJ SIĘ Z NAMI!

- Open the Clamp as shown by the arrow.

- Place the Blade and housing in Clamp R. Place the pen or the foil transfer and housing in Clamp L.

natural_image
Close-up of a white mechanical component with two metallic parts, one labeled 'EVOR' and the other showing 'COCA HALF PRICE', against an orange background (no readable text beyond branding)- Close the Clamp as shown by the arrow.
natural_image
Solid red cylindrical object with a small protrusion at the top (no visible text or symbols)Foil Transfer and housing

Blade and housing

natural_image
Close-up of a metallic cylindrical object with vertical ridges and a small protrusion at the top (no visible text or symbols)Pen
natural_image
Close-up of a blue cable inserted into a white electrical plug, next to a black electronic device (no visible text or symbols)natural_image
Close-up of a blue cable inserted into a white electrical outlet socket (no text or symbols visible)Attention: Before powering on, check whether the voltage and current of the machine adapter match the location. Once confirmed, you can proceed to power on to avoid potential hazards.
natural_image
Two-panel image showing abstract shapes with no visible text, numbers, or symbols.natural_image
Exterior view of a red and orange 3D printer with a visible brand logo (no readable text or symbols on the device itself)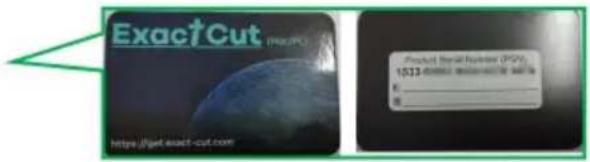
5.2 Kliknij „Dalej“
okno dialogowe.


natural_image
Pure technical diagram showing a green triangle on a green ruler above a blank white grid, with no text or symbols present.natural_image
Close-up of a blue USB cable attached to a black electronic device on a wooden surface (no text or symbols visible)
natural_image
Simple green speech bubble with a five-pointed star outline on grid paper (no text or symbols)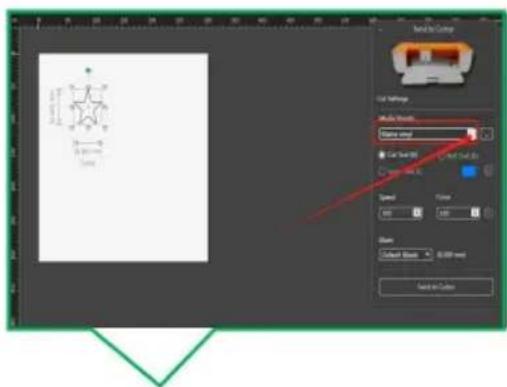

natural_image
3D printer printing process with VEVOR branding and color calibration overlay (no readable text or symbols)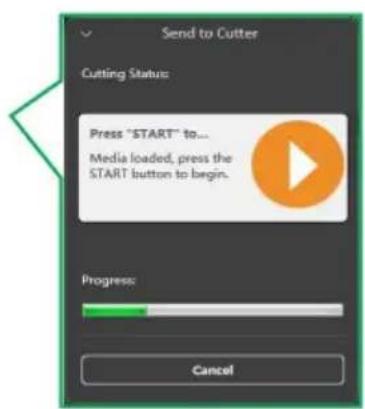

natural_image
Orange electronic device with five control buttons (Power, Play, Pause, Idle) and a finger pressing the button (no text or symbols visible)1.17 Po zakończeniu


natural_image
Hand holding a small white object with a star-shaped mark, interacting with a colorful abstract background (no text or symbols visible)natural_image
Silhouette of a dragon flying inside a square frame, displayed within an image editing software interface (no text or symbols on the dragon itself)
natural_image
Silhouette of a flying creature inside a design software interface (no text or symbols on the creature itself)
natural_image
Illustration of a stylized dragon flying inside a whiteboard with orange grid background (no text or symbols)
natural_image
3D printer with a gray dragon silhouette on its cover, placed on an orange cutting board (no visible text or symbols)2.16 Kontur
cie cie zakończone.
2.15 Naciśnij
maszyna
Załaduj/Rozładuj
przycisk.
2.14 Kiedy
po zakończeniu
przetwarzania
2.13 Naciśnij
natural_image
Hand holding a white object with a black silhouette of a dinosaur, framed by corner brackets (no text or symbols)


Wie cej szczegółów


natural_image
Industrial printing machine with orange frame and reflective material, no visible text or symbols on the machine itself.
natural_image
Close-up of a hand holding a small object over a colorful, iridescent heatmap or sky pattern (no text or symbols visible)


- https://youtu.be/Kj-b7WdSCH8

5.https://youtu.be/-5u-A62vNqI

- https://youtu.be/6yPM4iy5Ixc

- https://youtu.be/FqSa51zLvtw

- https://youtu.be/hMHuqAJSWdM