
UM30 - Hand tool Vevor - Free user manual and instructions
Find the device manual for free UM30 Vevor in PDF.
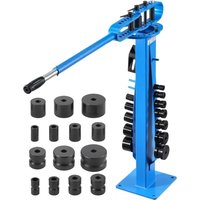


| Product Type | Manual Bender |
| Brand | Vevor |
| Model | UM30 |
| Maximum Bending Width | 50,8 mm |
| Maximum Bending Thickness (Low Carbon Steel) | 6 mm |
| Maximum Bending Thickness (Aluminum) | 10 mm |
| Maximum Bending Angle | 200° |
| Bendable Materials | Flat, round bar, square bar, tube (up to G3/4") |
| Number of Included Dies | 14 (7 Dies II, 7 Dies I) |
| Main Function | Precise metal bending for various shapes |
| Mounting | Bolted to the floor (mandatory fixing) |
| Safety | Wear goggles and gloves; do not exceed capacities |
| Assembly | Simple assembly: support on base, fork arm and handle |
| Maintenance | Clean after use, lubricate pivots, store dry |
| Spare Parts Available | Yes, detailed list in the manual |
| Repairability | Easy: modular assembly, standard parts |
| Warranty | Technical support and electronic warranty certificate via www.vevor.com/support |
| Country of Manufacture | China (Shanghai) |
| Usage | Workshop, construction site, service truck |
Frequently Asked Questions - UM30 Vevor
User questions about UM30 Vevor
0 question about this device. Answer the ones you know or ask your own.
Ask a new question about this device
Download the instructions for your Hand tool in PDF format for free! Find your manual UM30 - Vevor and take your electronic device back in hand. On this page are published all the documents necessary for the use of your device. UM30 by Vevor.
USER MANUAL UM30 Vevor
Technical Support and E-Warranty Certificate www.vevor.com/support
BENDER
MODEL: UM30
We continue to be committed to provide you with tools at competitive prices. "Save Half", "Half Price" or any other similar expressions used by us only represent an estimate of savings you might benefit from buying certain tools with us compared to top brands and does not necessarily mean to cover all categories of tools offered. We are kindly reminded to verify carefully when you are placing an order with us that you are actually saving half in comparison with the top major brands.
VEVOR®
TOUGH TOOLS, HALF PRICE
BENDER
UM30
NEED HELP? CONTACT US!
Have product questions? Need technical support? Please feel free to contact us:
Technical Support and E-Warranty Certificate www.vevor.com/support
This is the original instruction. Please read all manual instructions carefully before operating. VEVOR reserves a clear interpretation of the user manual. The appearance of the product shall be subject to the product you received. Please forgive us that we won't inform you of any technology or software updates on our product.
PRODUCT PROFILE
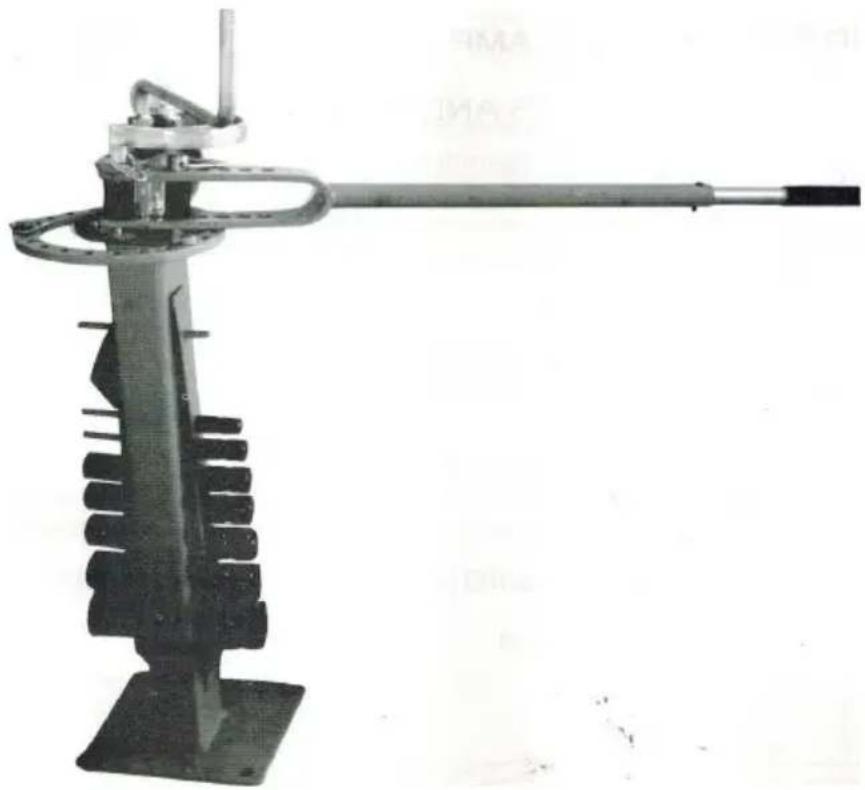
The device is made to be used for bending flat materials, round and square as well as pipes. It brings an efficient and economic bending method for various shapes and bendings. It is easy enough to be carried, being used in different working places or workshop lorries.
Setting possibilities
Attention!
Make sure the bender is fastened to the floor with screws.
Make sure all pivots are properly passed through and in the necessary position.
Do not bend steel other than that used for construction, namely up to 8*50 mm round steel up to 16 mm, square steel up to 14*14 mm, and pipes up to 6 mm. Do not bend materials thicker than that around the central pivot, but use a 24 mm roller to prevent pivot bending!
Do not use other completion of the arm!
Do not use the set for angle bending to bend the round bars!
Should you use accessories for angle bending, bend only constructional steel to 6*50 mm or 7*30 mm!
Keep the working place clean to avoid accidents!
Be careful as the material set on the bender to have an adequate length in contact with the stop block in order to avoid sliding of the bar to be bent and severe accident in fact.
IMPORTANT SAFEGUARDS

Read the instruction manual.

Warning - Be sure to wear eye protectors when using this product.

Warning - Be sure to wear gloves when using this product.
Warning: To reduce the risk of injury, user must read instruction manual carefully. Ignore the warning, non-proper use of compact bender could lead to fatal and serious injury.
- Wear safety glasses when using the compact bender. Serious injury may occur if this warning is ignored!
- Please use the pipe with the corresponding specification of the mold.
- Don't knock, break, or corrupt the mold equipped with this machine. Keep the mold properly and ensure its accuracy.
BREAKDOWN AND PARTS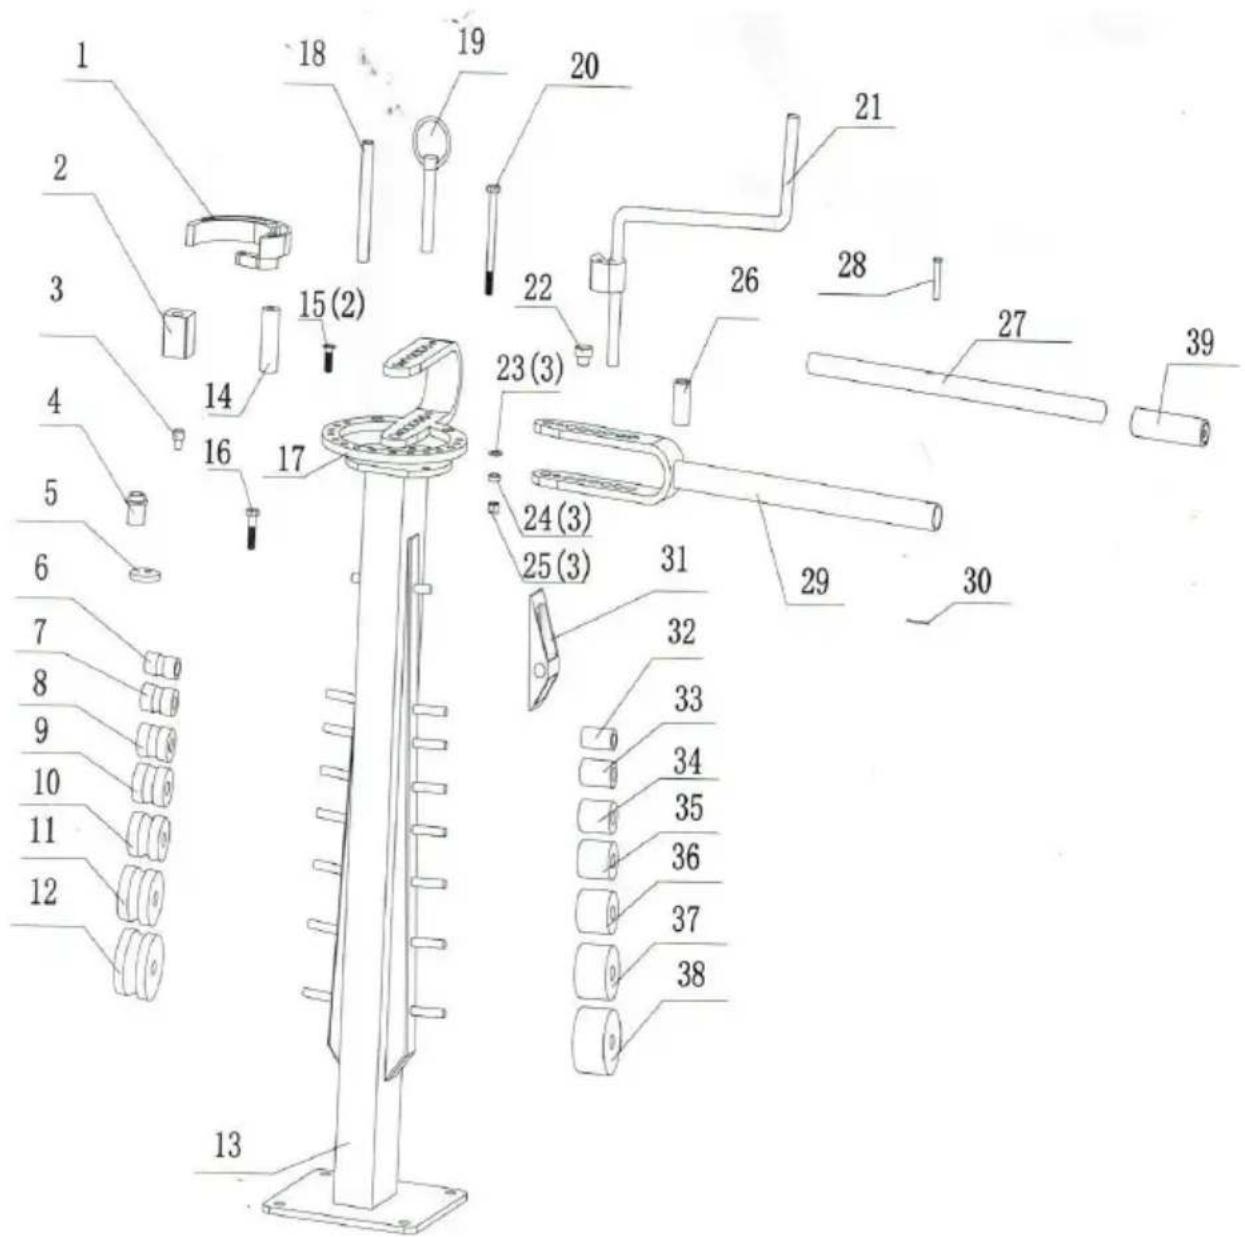
| Item | Description | Part nr | Qty | Item | Description | Part nr | Qty |
| 1 | Bending die | 1 | 21 | Crank | 1 | ||
| 2 | Die | 1 | 22 | Pin | 1 | ||
| 3 | Pin | 1 | 23 | Washer | φ10 | 4 | |
| 4 | Bushing | 1 | 24 | Sleeve | 3 | ||
| 5 | Eccentric mat | 1 | 25 | Hexagon nut | M10 | 4 | |
| 6 | Die II-1 | φ25 | 26 | Bushing | 1 | ||
| 7 | Die II-2 | φ31 | 1 | 27 | Lengthen handle | 1 | |
| 8 | Die II-3 | φ38 | 1 | 28 | Pin | 1 | |
| 9 | Die II-4 | φ44.5 | 1 | 29 | Handle | 1 | |
| 10 | Die II-5 | φ50.5 | 1 | 30 | Cotter | 1 | |
| 11 | Die II-6 | φ63 | 1 | 31 | Base | 1 | |
| 12 | Die II-7 | φ76 | 1 | 32 | Die I- | 1 | |
| 13 | Stand | 1 | 33 | Die I-2 | φ30 | 1 | |
| 14 | Long bushing | 1 | 34 | Die I-3 | φ37 | 1 | |
| 15 | Slotted countersunk flat head screw | M10X30 | 2 | 35 | Die I-4 | φ43 | 1 |
| 16 | Hexagon bolt | M10X40 | 1 | 36 | Die I-5 | φ49 | 1 |
| 17 | Disk | 1 | 37 | Die I-6 | φ62 | 1 | |
| 18 | Fixed pivot | 1 | 38 | Die I-7 | φ75 | 1 | |
| 19 | Draw bar | 3 | 39 | Handle cover | 1 | ||
| 20 | Hexagon bolg | M10X120 | 1 |
ACCESSORY
| Item | Description | Part nr | Qty | Item | Description | Part nr | Qty |
| 1 | Bending die | 1 | 21 | Crank | 1 | ||
| 3 | Pin | 1 | 22 | Pin | 1 | ||
| 4 | Bushing | 1 | 23 | Washer | φ 10 | 4 | |
| 5 | Eccentric mat | 1 | 24 | Sleeve | 3 | ||
| 6 | Die II-1 | 25 | 25 | Hexagon nut | M10 | 4 | |
| 7 | Die II-2 | 31 | 1 | 27 | Lengthen handle | 1 | |
| 8 | Die II-3 | 38 | 1 | 28 | Pin | 1 | |
| 9 | Die II-4 | 44.5 | 1 | 30 | Cotter | 1 | |
| 10 | Die II-5 | 50.5 | 1 | 32 | Die I- | 1 | |
| 11 | Die II-6 | 63 | 1 | 33 | Die I-2 | 30 | 1 |
| 12 | Die II-7 | 76 | 1 | 34 | Die I-3 | 37 | 1 |
| 15 | Slotted countersunk flat head screw | M10X30 | 2 | 35 | Die I-4 | 43 | 1 |
| 16 | Hexagon bolt | M10X40 | 1 | 36 | Die I-5 | 49 | 1 |
| 18 | Fixed pivot | 1 | 37 | Die I-6 | 62 | 1 | |
| 19 | Draw bar | 3 | 38 | Die I-7 | 75 | 1 | |
| 20 | Hexagon bolg | M10X120 | 1 |
SPECIFICATIONS
| Model | UM30 |
| Maximum bending width | 50.8mm |
| Maximum bending thickness | Low carbon steel: 6mm; Aluminum: 10m |
| Maximum bending angle | 200° |
ASSEMBLY
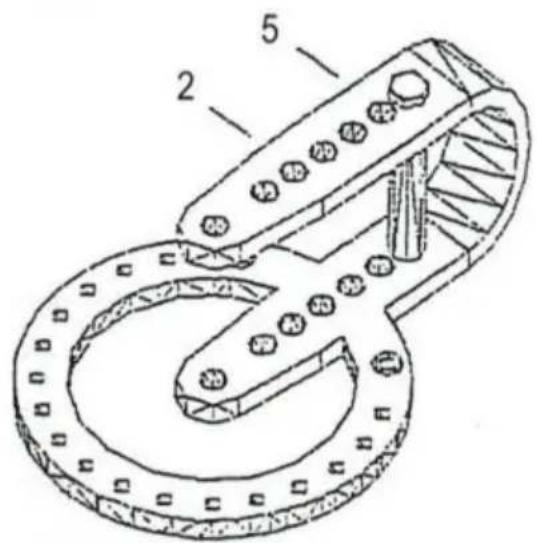
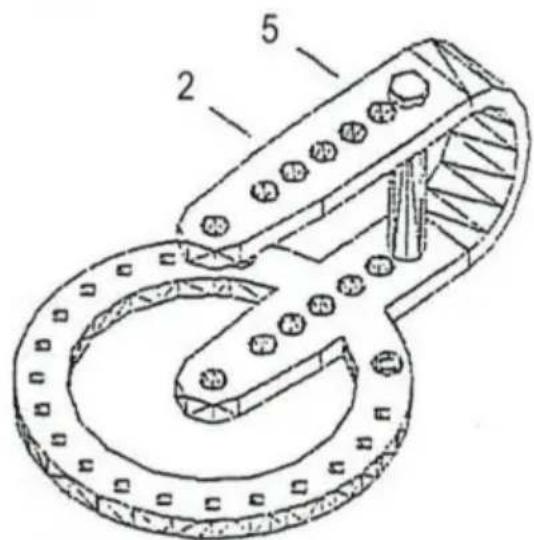
- Mount the bending bracket to the base using the components shown in Figure 1.
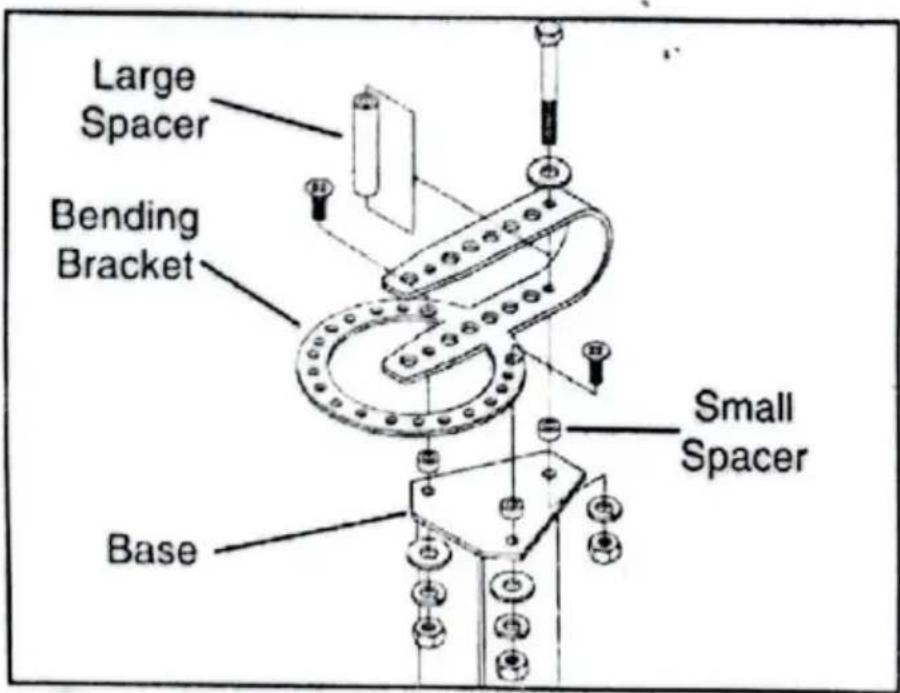
Figure 1. Mounting bending bracket to base.
- Connect the yoke arm and handle together with the clevis pin and the cotter pin.
- Mount the handle assembly onto the bending bracket with a long hitch pin.
- Bolt the compact bender to the floor.
CAUTION: Do not attempt to use the compact bender without it being fastened to a stable surface. Failure to comply can result in personal injury and equipment damage!
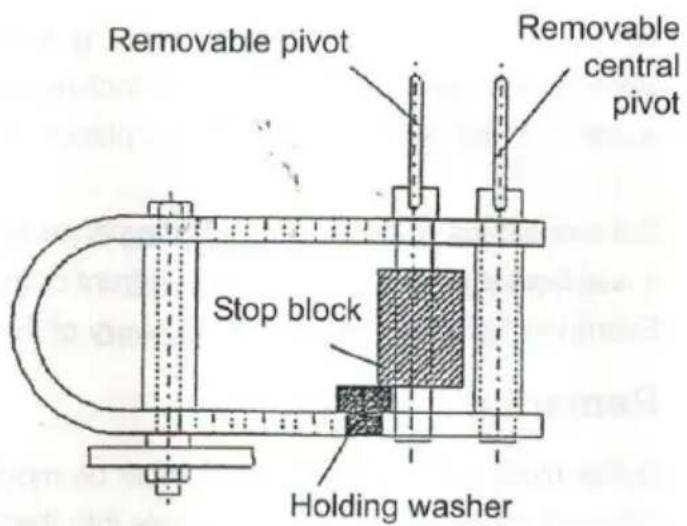
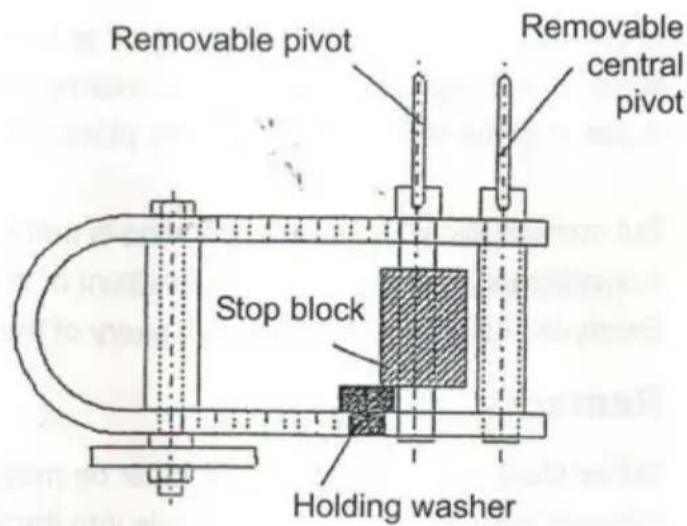
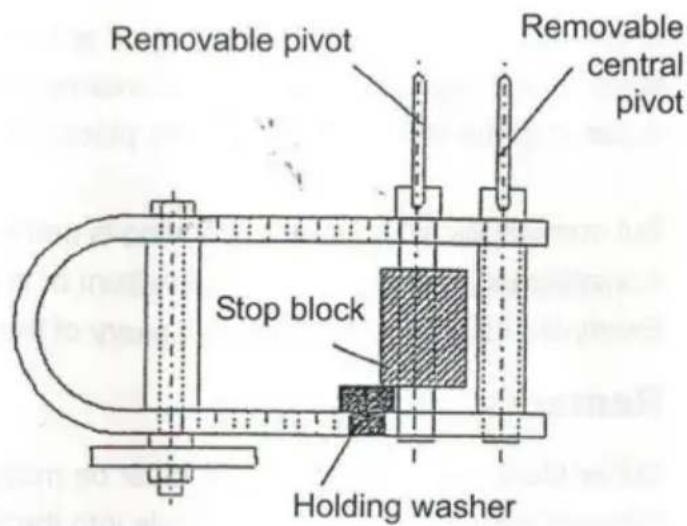
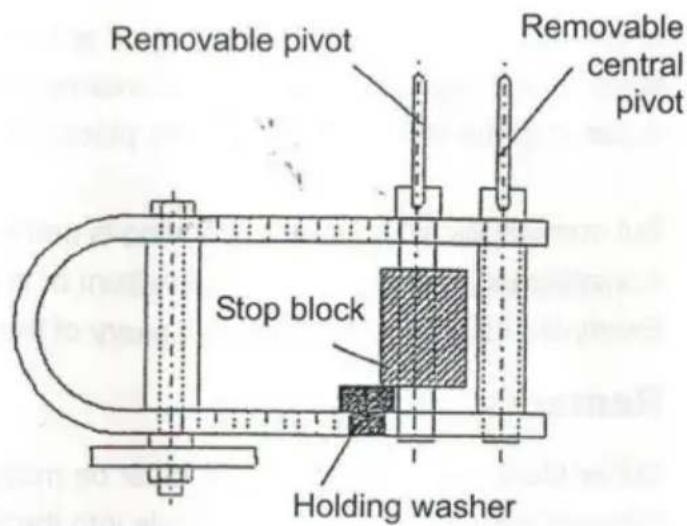
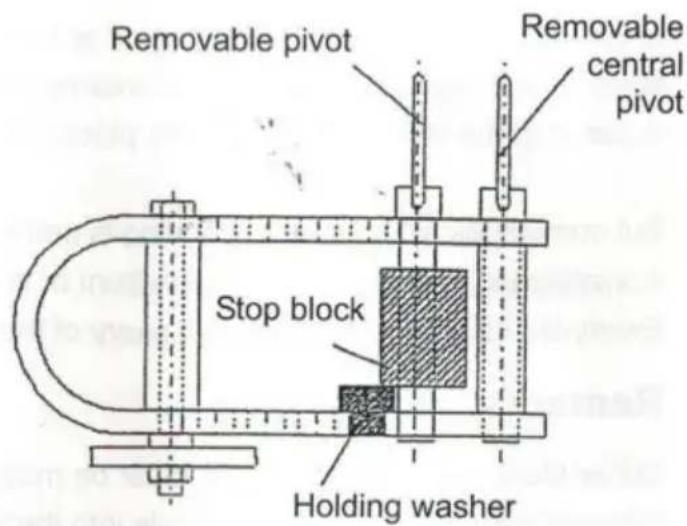
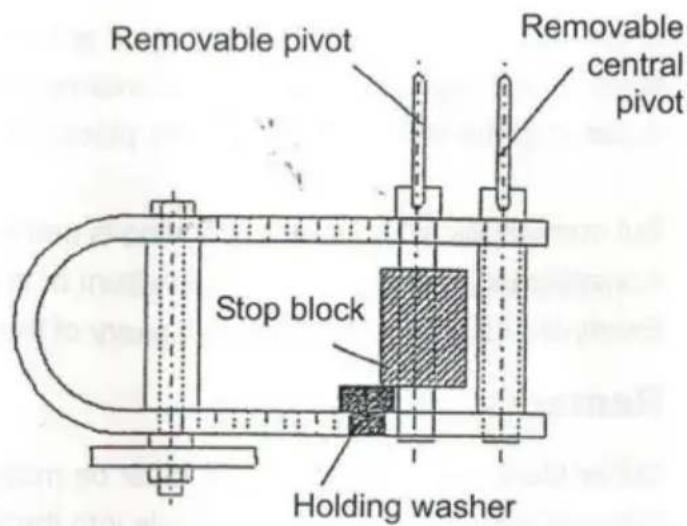
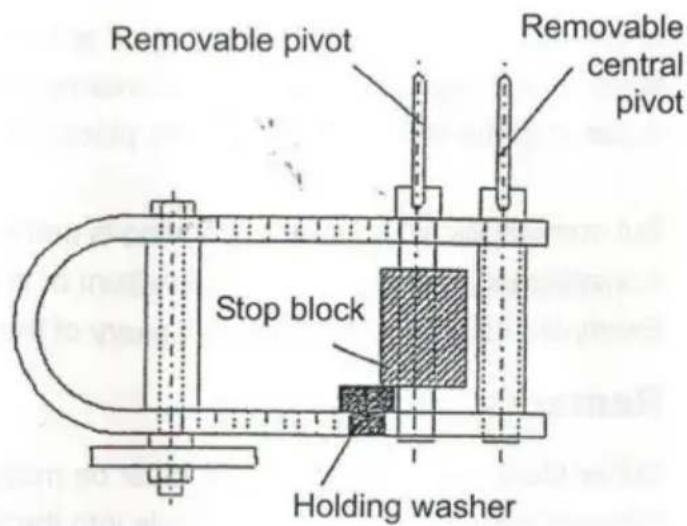
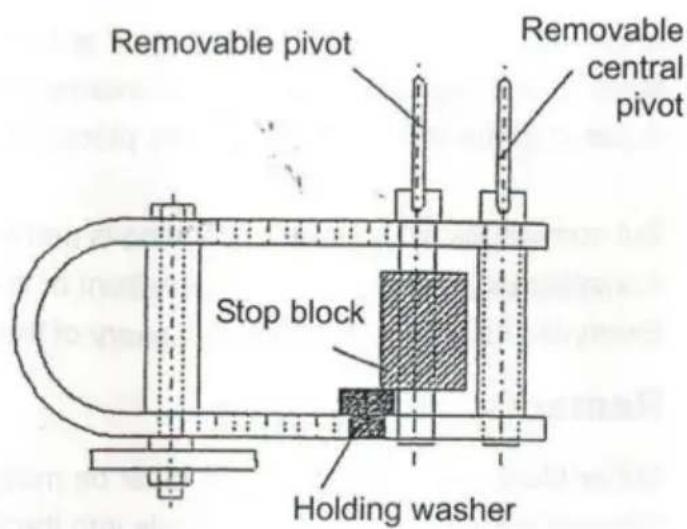
Holding washer set eccentrically under the stop block.
1. Use of stop block
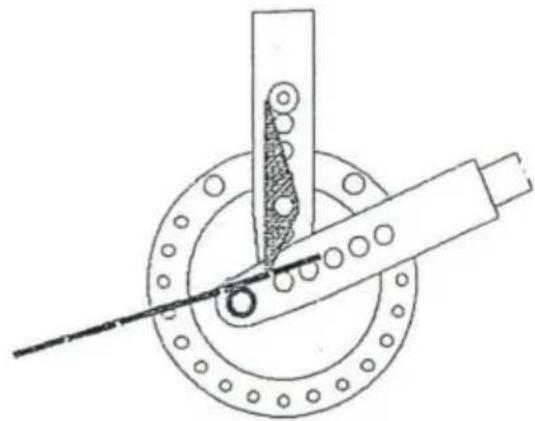
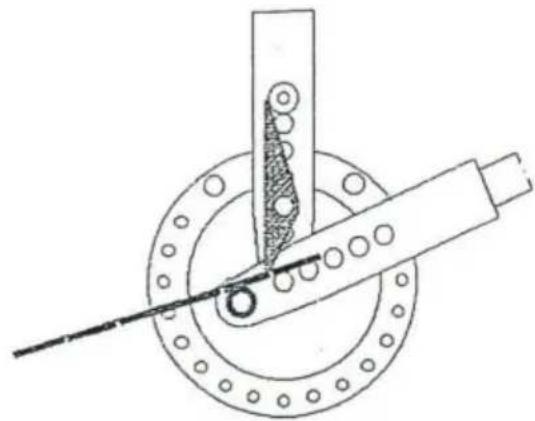
The stop block keeps the material in a proper position during bending with the hand arm around the central pivot or the roll just used. The block has only proper positions!
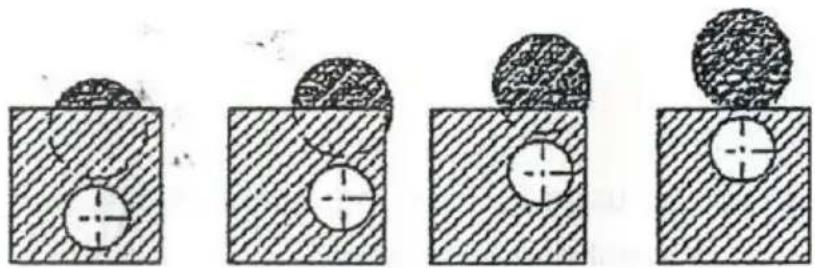
The four proper positions of the stop block
Always use the position that places the block closer to the central pivot or roll, but still allows enough space for setting the material.
Turn the block position by position to get one of the four adequate positions. If the space is created from the centre to the left, the stop block will be turned and the material will slide. If you use a bigger roll on the central pivot, the stop block and holding washer move as far as the adjustable stop, so that the material is held. Always place the stop block as close as possible to the central pivot or roll, but leave enough clearance to release the material. In case the clearance between the stop block and the central pivot or roll is too large, turn the presser to one of the four proper positions. The stop block with holding washer can be moved back and forth in every seat of the dividing heater. The necessary clearance is thus obtained.
A too large clearance between the central pivot or roll and the stop block may cause sliding of the material and decreases bending accuracy.
In case of very accurate bending, it is better to hold the material in front of the stop block with a clamp (hand vice, self-locking wrench) to avoid possible sliding of the material. If the stop block is properly placed, it is not necessary to use the clamp.
But sometimes, when special bending is performed or accurate dimensions are necessary, it is indicated to set the hand vice in front of the stop block.
Examples for using the buffer block in each of the four proper positions.
Remarks:
The buffer block and holding washer must be moved back and forth to suit different materials and rolls. The hole in the block has four proper positions.
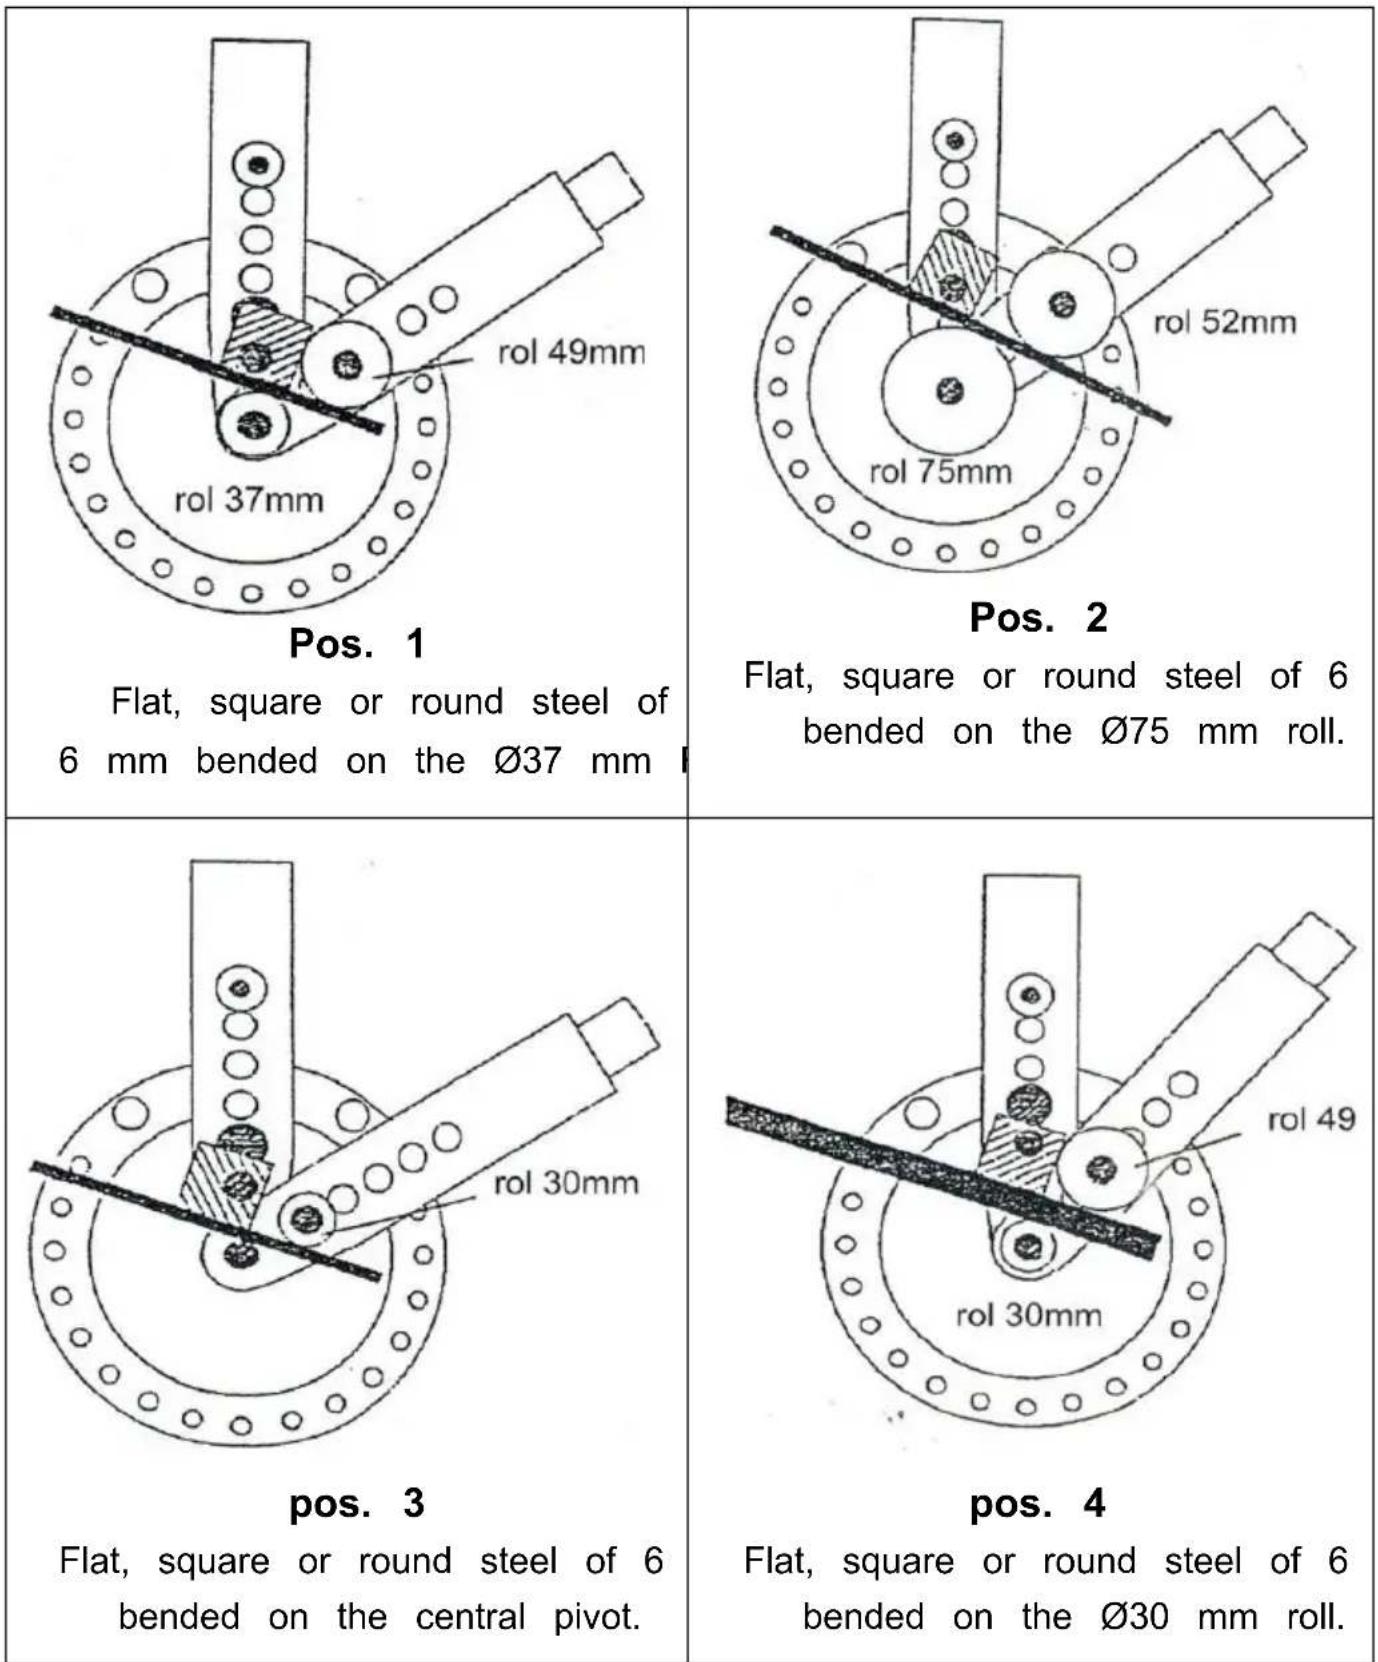
Flat, square or round steel of 6 mm bent on the ∅37 mm roll.
Flat, square or round steel of 6 mm bent on the ∅75 mm roll.
Flat, square or round steel of 6 mm bent on the central pivot.
Flat, square or round steel of 6 mm bent on the ∅30 mm roll.
2. HANDLE BENDING
2.1 Round material
It is easy to perform handles of various shapes and dimensions with the Un Bender. Each of the three types in the figure is performed in round material of mm diameter and 230 mm length.
After making the bended parts in round bar, drill holes at 15 mm, put the bended parts at the holes and weld them at the fitting side. Grind the over-welding to the level.
Note: In case you use material of another diameter for the handle, the bore will be the same as that of the material used.
Necessary material:
— ∅ 15 mm round bar, 230 mm length
— flat steel for the holes
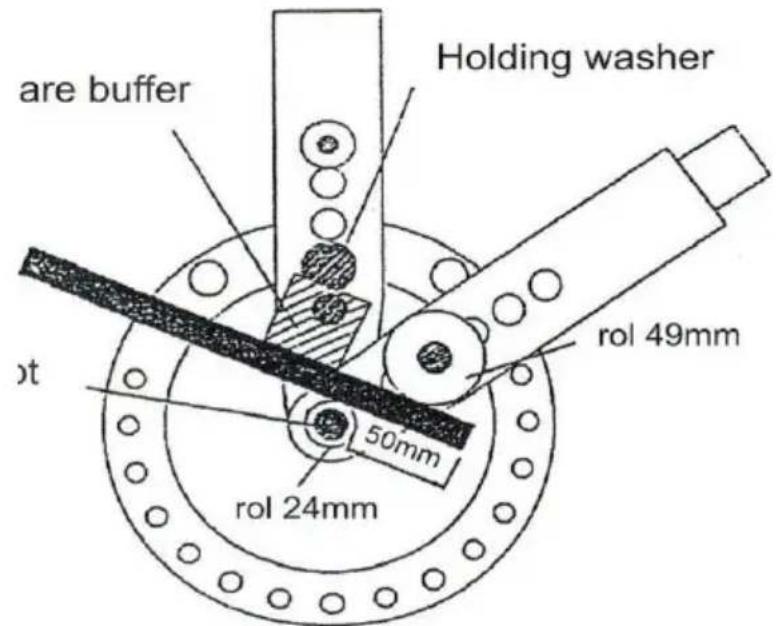
The right position of the stop block used for bending material of 15 mm is presented in the above drawing. After performing the bending at 90°, turn the material and bend the other end at 90°.
2.2 Flat material
Draw with chalk the signs like in the drawing below. Signs from the bottom must be drawn on the opposite side to that where the signs in the middle are drawn. Dimensions indicated can be replaced with other ones. Can also make other handles on user's desire.
Material Bending order
— length 254 mm, — thickness 5 mm — width 25 mm:
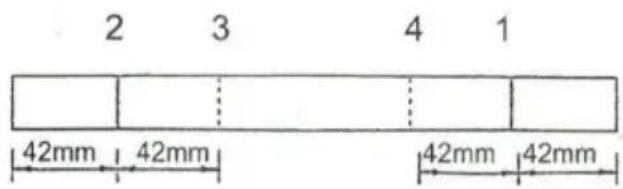
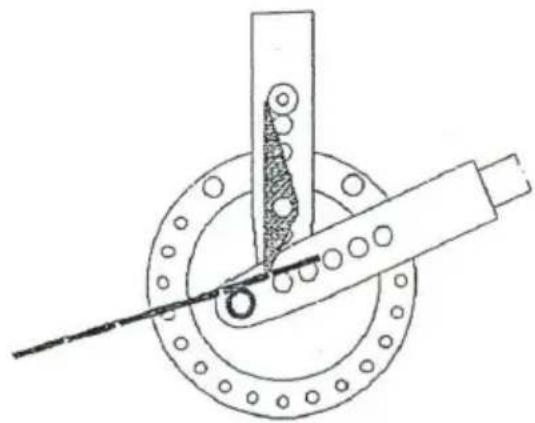
Bending no. 1:
Put the flat material into the bender with the sign no. 1 at the point key and bend at 90°. Check the angle before going on. Set the adjustable stop so as every bending to be at 90°.
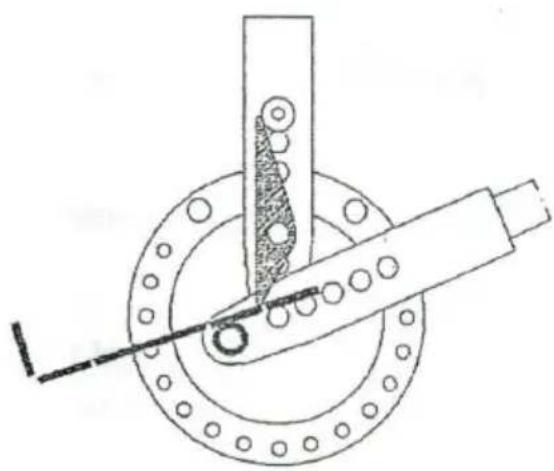
Bending no. 2:
Turn the material to the other end, align it with the sign no. 2 straight at the key and bend at 90°.
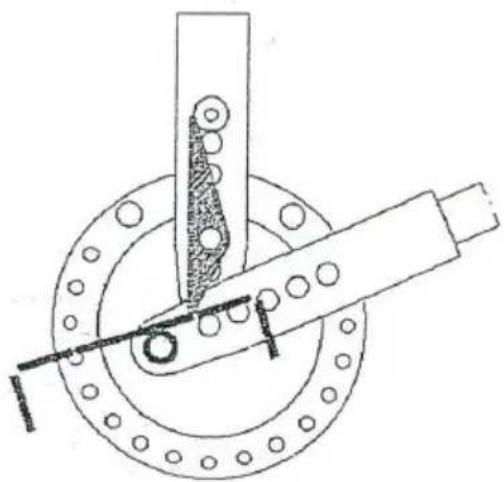
Bending no. 3:
Turn the semi-finished material over, align mark no. 3 with the key, and bend it 90°.
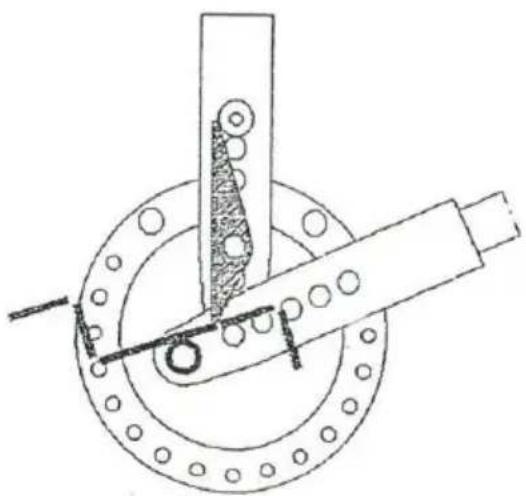
Bending no. 4:
Turn the semi-finished material to the other end, insert it into the bend with mark no. 4 aligned with the key, and bend it 90°.
Drill if necessary, then smooth and grind the sharp edges.
2.3 BENDING OF PIPE CLAMPS
Manufacture of round pipe clamps
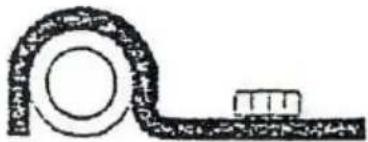
Unilateral yoke with 25 mm inner diameter
Material
Steel band 5*50 mm, length 10 mm
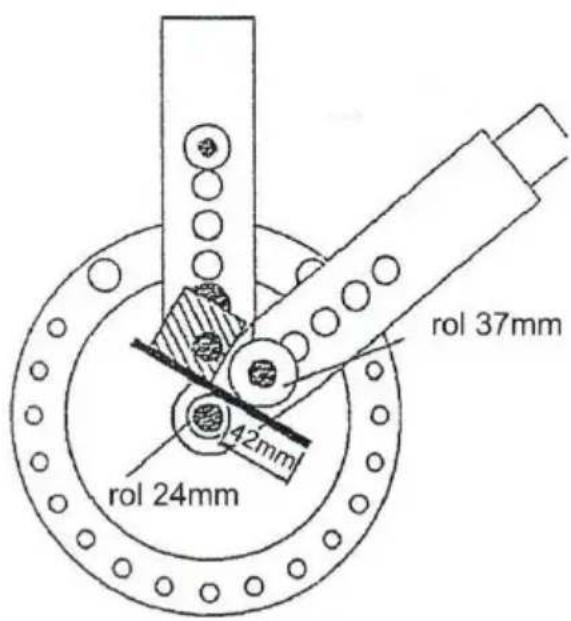
Bending no. 1:
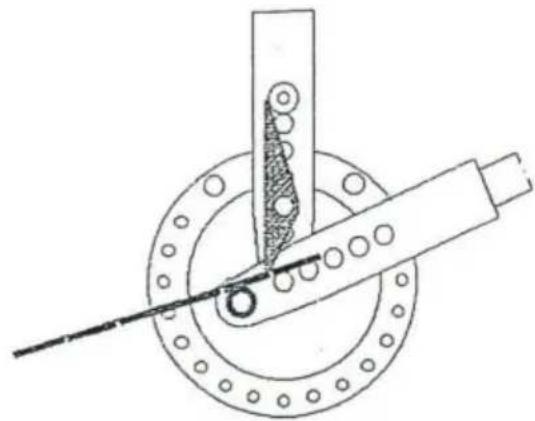
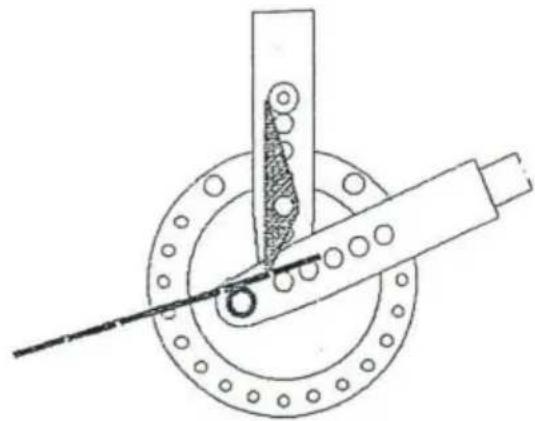
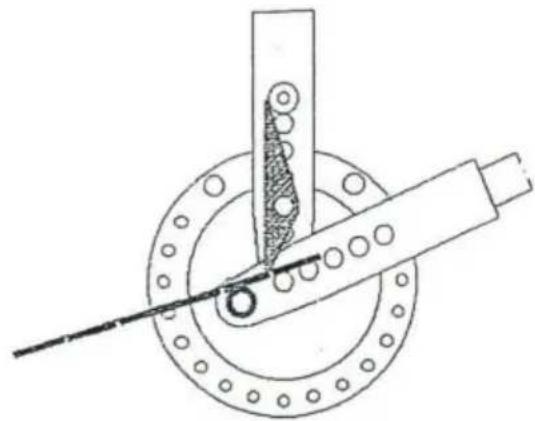
Place the stop block at position 2. Insert the material into the bender as shown in figure a, and react on the bending arm until the roll on the arm comes out from the material.
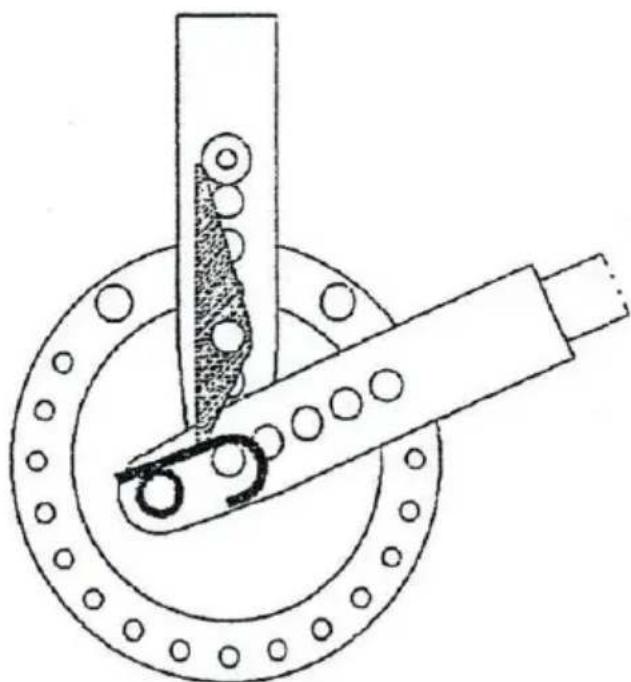
Bending no. 2:
Set the key for angular bending. Insert the material so that the semicircle rolls up around the central pivot. Place the stopper into the sixth hole in the dividing head (counting clockwise). Bend by turning the arm 3 mm to the pivot.
Set a clip at the end of the clamp to prevent material sliding. You can bend more of the clamp.
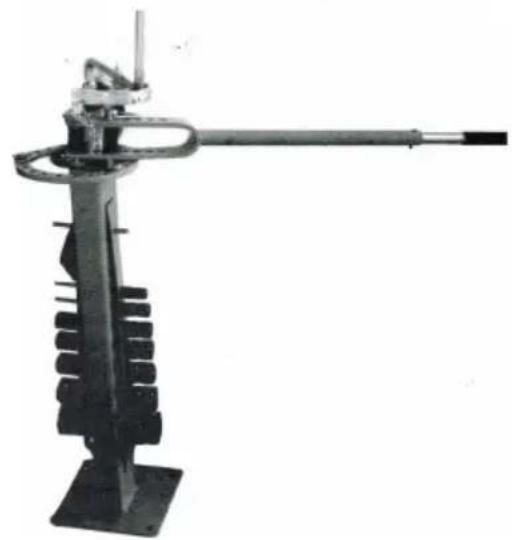
2.4 ACCESSORIES
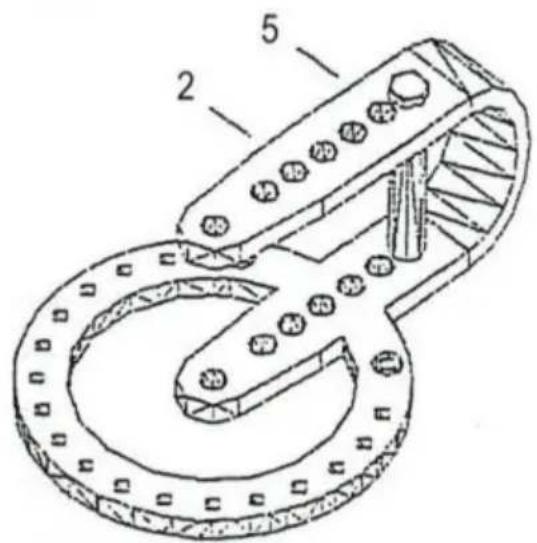
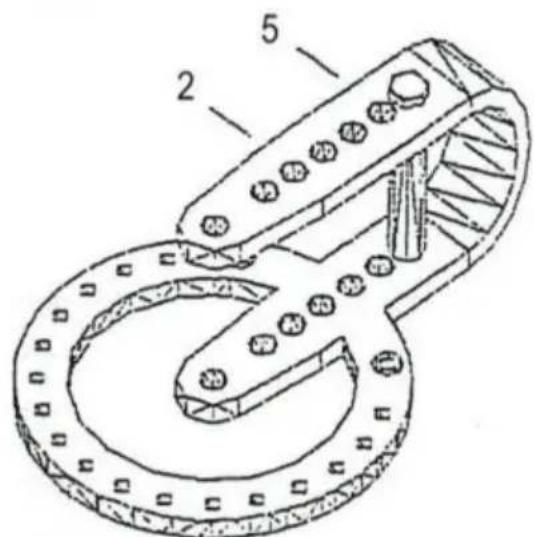
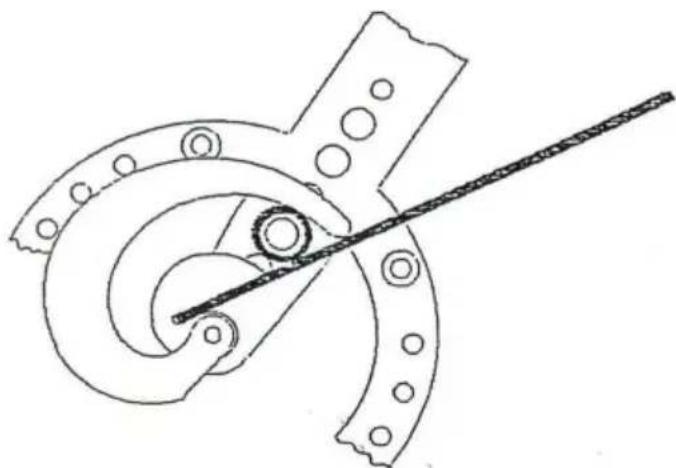
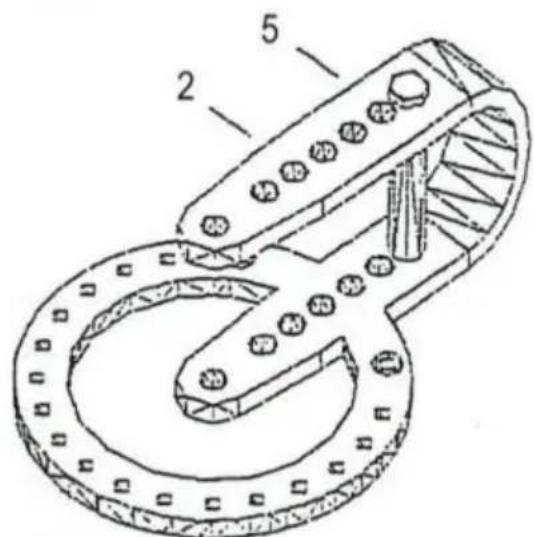
It bends 5x25mm hot-rolled material. The collar of the bush leads the material straight during spiral coiling. When making several spirals of the same shape, make a mark on the upper side of the bender at the point where the first spiral's bending finished. Bending every subsequent spiral to this mark will ensure all spirals are the same size.
When bending large and small spirals, place the pivot and the bush into the 2nd hole for the first bending step.
First step: hole no. 2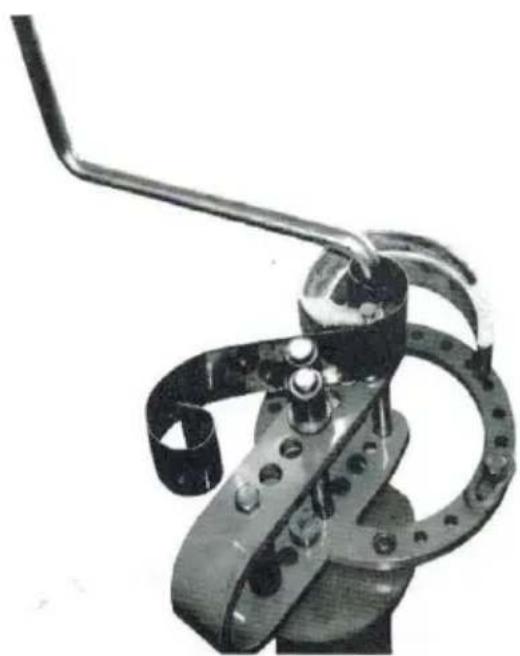
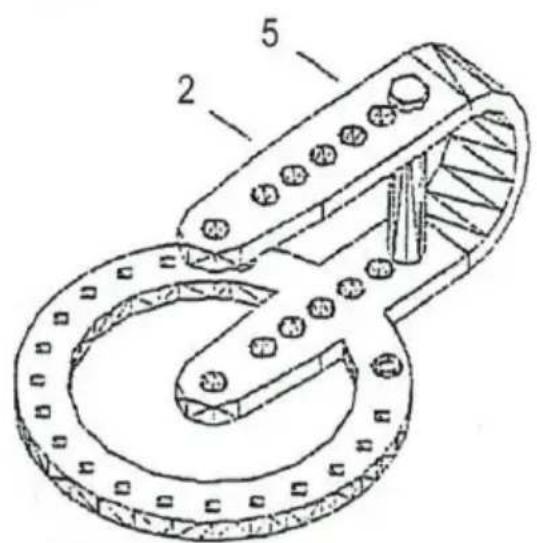
For bending large spirals, after finishing the first bending step, remove the pivot and bush from hole no. 2 and insert them into hole no. 5 (behind).
Second step: hole no. 5
Do not start bending large spirals with the pivot and bush in the hole. It is necessary to start with the pivot in hole no. 2, otherwise the spiral will not be adequate.
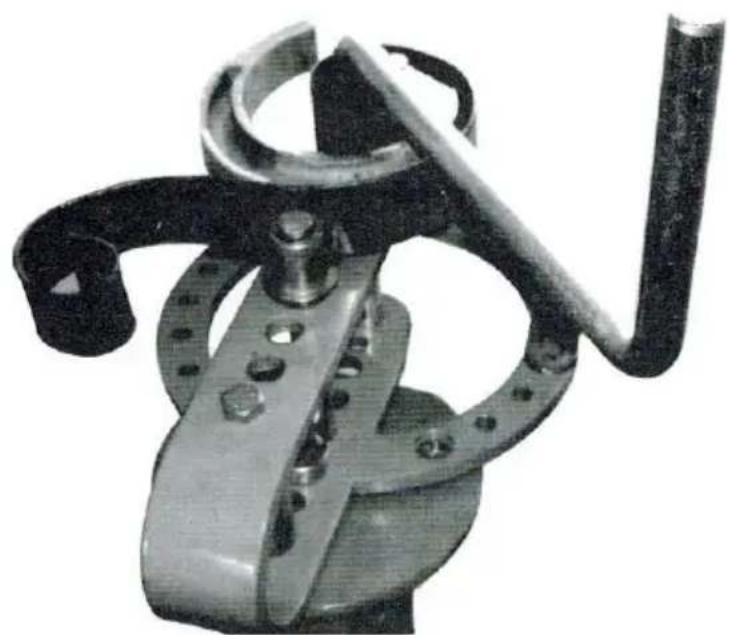
Pivot and bush (first step)
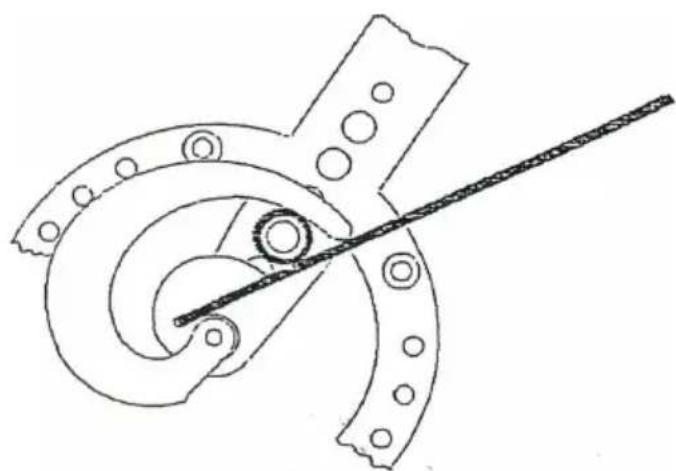
Roll up the spiral all the way around until the bush prevents further rolling. Remove the pivot and bush and place them into the hole for the 2nd step at the spiral.
Manufacturer: Shanghaimuxinmuyeyouxiangongsi
Address: Shuangchenglu 803nong11hao1602A-1609shi, baoshanqu, shanghai 200000 CN.
Imported to AUS: SIHAO PTY LTD. 1 ROKEVA STREETEASTWOOD NSW 2 Australia
Imported to USA: Sanven Technology Ltd. Suite 250, 9166 Anaheim Place, Rancho Cucamonga, CA 91730
| EC | REP |
E-CrossStu GmbH
Mainzer Landstr.69, 60329 Frankfurt am Main
| UK | REP |
YH CONSULTING LIMITED.
C/O YH Consulting Limited Office 147, Centurion House, London Road, Staines-upon-Thames, Surrey TW18 4AX
VEVOR®
TOUGH TOOLS, HALF PRICE
Technical Support and E-Warranty Certificate
www.vevor.com/support
VEVOR®
TOUGH TOOLS, HALF PRICE
NEED HELP? CONTACT US!
Fold #1:
Fold #2:
Fold #3:
Fold #4:
Fold #1: Stop
Fold #2: Adjust
2.4 ACCESSORIES
A/S YH Consulting Limited Bureau 147, Centurion
House, London Road, Staines-upon-Thames, Surrey, TW18 4AX
VEVOR®
TOUGH TOOLS, HALF PRICE
www.vevor.com/support
VEVOR®
TOUGH TOOLS, HALF PRICE
Bend No 1:
Bend No 2:
Bend No 3:
Bend No 4:
Bend No 1:
Bend No 2:
2.4 ACCESSORIES
C/O YH Consulting Limited Office 147, Centurion Haus, London Road, Staines-upon-Thames, Surrey, TW18 4AX
VEVOR®
TOUGH TOOLS, HALF PRICE
www.vevor.com/support
VEVOR®
TOUGH TOOLS, HALF PRICE
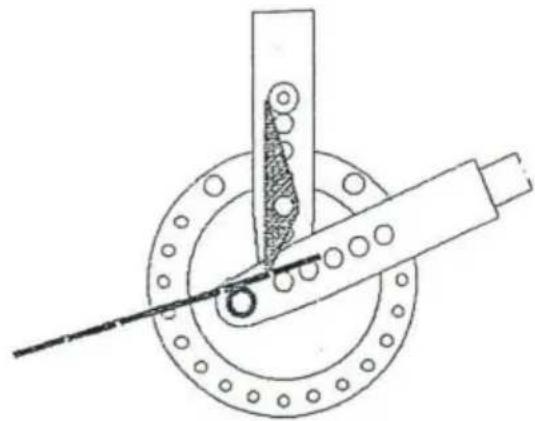
Bend No. 1:
Bend No. 2:
Bend No. 3:
Bend No. 4:
Bend No. 1:
Bend No. 2:
2.4 ACCESSORIES
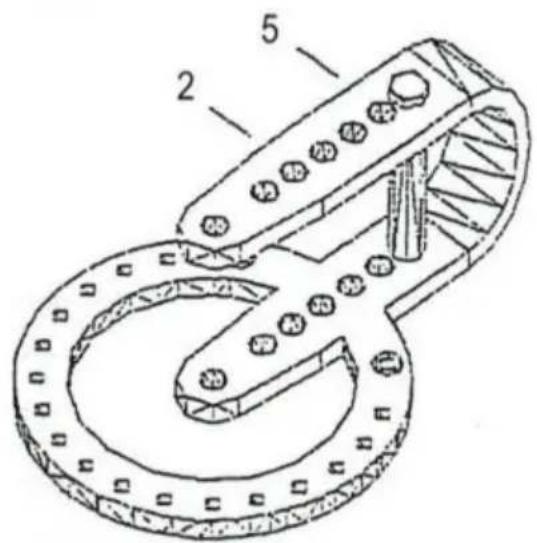
Imported into AUS: SIHAO PTY LTD. 1 ROKEVA STREETEASTWOOD NSW 2122 Australia
Imported into USA: Sanven Technology Ltd. Suite 250, 9166 Anaheim Place, Rancho Cucamonga, CA 91730
C/O YH Consulting Limited Office 147, Centurion
House, London Road, Staines-upon-Thames, Surrey,
TW18 4AX
VEVOR®
TOUGH TOOLS, HALF PRICE
www.vevor.com/support
VEVOR®
TOUGH TOOLS, HALF PRICE
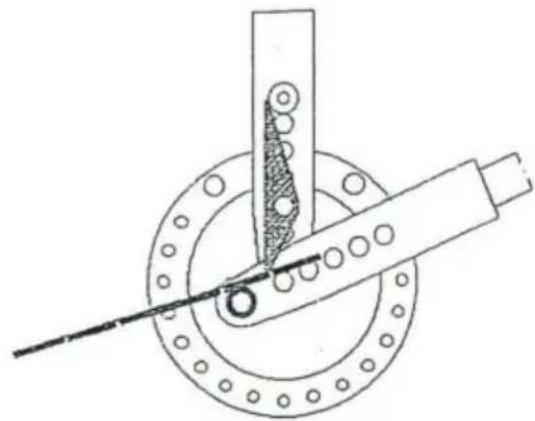
Curve No. 1:
Curve No. 2:
Curve No. 3:
Curve No. 4:
2.4 ACCESSORIES
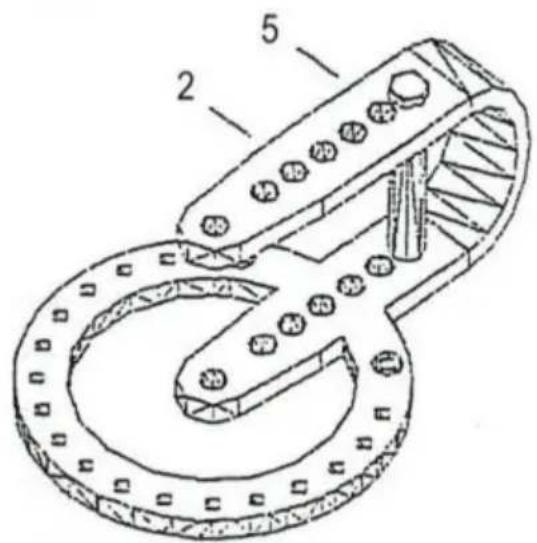
Pivot and bushing (first step)
C/O YH Consulting Limited Office 147, Centurion House, London Road, Staines-upon-Thames, Surrey, TW18 4AX
VEVOR®
TOUGH TOOLS, HALF PRICE
www.vevor.com/support
VEVOR®
TOUGH TOOLS, HALF PRICE
NEED HELP? CONTACT US!
Bend No. 1:
Bend No. 2:
Bend No. 3:
Rotate the semi-finished product
Bend No. 4:
Bend No. 2: Set
2.4 ACCESSORIES
C/O YH Consulting Limited Office 147, Centurion
House, London Road, Staines-upon-Thames, Surrey,
TW18 4AX
VEVOR®
TOUGH TOOLS, HALF PRICE
www.vevor.com/support
VEVOR®
TOUGH TOOLS, HALF PRICE
Technical support and e-warranty certificate www.vevor.com/support
BENDER
MODEL: UM30
NEED HELP? CONTACT US!
Bend no. 1:
Bend no. 2:
Bend no. 3:
Bend no. 4:
Bend no. 1:
Bend no. 2: Set
2.4 ACCESSORIES
C/O YH Consulting Limited Office 147, Centurion House, London Road, Staines-upon-Thames, Surrey, TW18 4AX
VEVOR®
TOUGH TOOLS, HALF PRICE
www.vevor.com/support
VEVOR®
TOUGH TOOLS, HALF PRICE
NEED HELP? CONTACT US!
| Punkt | Beskrivning | Artikelnr Antal Artikel Beskrivning Artikelnr | Antal | |||
| 1 | Böjningsform | 1 | 21 | Vev | ||
| 2 | De | 1 22 | Stift | |||
| 3 | Stift | 1 23 | Bricka | f10 | ||
| 4 | Bussning | 1 24 | Ärm | |||
| 5 | Excentrisk matta | 1 25 | Sexkantsmutter M10 4 | |||
| 6 | Die II-1 | f25 | 26 | Bussning | ||
| 7 | Die II-2 | f31 | 1 27 | Förlänga hantera | ||
| 8 | Die II-3 | ÿ38 | 1 28 | Stift | ||
| 9 Die II-4 | ÿ44,5 | 1 29 | Hantera | |||
| 10 Die II-5 | ÿ50,5 | 1 | 30 | Sprint | ||
| 11 | Die II-6 | ÿ63 | 1 | 31 | Bas | |
| 12 | Die II-7 | ÿ76 | 1 | 32 | Dö jag- | |
| 13 | Stå | 1 | 33 | Dö I-2 | ÿ30 | |
| 14 | Lång bussning | 1 | 34 | Dö I-3 | ÿ37 | |
| 15 | Slitsad försänkt platt huvudskruv | M10X30 2 | 35 | Dö I-4 | f43 | |
| 16 | Sexkantsbult M10X40 1 | 36 | Dö I-5 | ÿ49 | ||
| 17 | Disk 1 | 37 | Dö I-6 | ÿ62 | ||
| 18 | Fast pivot | 1 | 38 | Dö I-7 | ÿ75 | |
| 19 | Ritstång | 3 | 39 Handtagsskydd | |||
| 20 | Hexagon Bolg M10X120 1 | |||||
FOLLOWING
| Punkt | Beskrivning | Art.nr | Antal | objekt | Beskrivning Artikelnr Antal | ||
| 1 | Böjningsform | 1 | 21 | Vev | 1 | ||
| 3 | Stift | 1 | 22 | Stift | 1 | ||
| 4 | Bussning | 1 | 23 | Bricka | f10 | 4 | |
| 5 | Excentrisk matta | 1 | 24 | Ärm | 3 | ||
| 6 | Die II-1 | f25 | 25 Sexkantsmutter M10 4 | |||
| 7 | Die II-2 | f31 | 1 | 27 | Förlänga hantera | |
| 8 | Die II-3 | f38 | 1 | 28 | Stift | |
| 9 | Die II-4 | ÿ44,5 | 1 | 30 | Sprint | |
| 10 | Die II-5 | ÿ50,5 | 1 | 32 | Dö jag- | |
| 11 | Die II-6 | f63 | 1 | 33 | Dö I-2 | f30 |
| 12 | Die II-7 | f76 | 1 | 34 | Dö I-3 | f37 |
| 15 | Slitsad försänkt platt skruv | M10X30 2 | 35 | Dö I-4 | f43 | |
| 16 | Sexkantsbult M10X40 1 | 36 | Dö I-5 | f49 | ||
| 18 | Fast pivot | 1 | 37 | Dö I-6 | f62 | |
| 19 | Ritstång | 3 | 38 | Dö I-7 | f75 | |
| 20 | Hexagon Bolg M10X120 1 | |||||
SPECIFICATIONS
| Modell | UM30 |
| Maximal böjbredd | 50,8 mm |
| Maximal böjtjocklek | Lågt kolstål: 6mm; Aluminium: 10 mm |
| Maximal böjningsvinkel | 200° |
ASSEMBLY
Bend no. 1:
Bend no. 2:
Bend no. 3:
Bend no. 4:
Single-sided OK with 25 mm inner diameter
Material
Bend no. 1:
2.4 ACCESSORIES
C/O YH Consulting Limited Office 147, Centurion House, London Road, Staines-upon-Thames, Surrey, TW18 4AX
VEVOR®
TOUGH TOOLS, HALF PRICE
www.vevor.com/support

- BENDER
- VEVOR®
- NEED HELP? CONTACT US
- PRODUCT PROFILE
- ATTENTION
- IMPORTANT SAFEGUARDS
- ASSEMBLY
- USE OF STOP BLOCK
- THE FOUR PROPER POSITIONS OF THE STOP BLOCK
- REMARKS
- HANDLE BENDING
- ROUND MATERIAL
- NECESSARY MATERIAL
- FLAT MATERIAL
- MATERIAL BENDING ORDER
- BENDING NO
- BENDING OF PIPE CLAMPS
- MATERIAL
- ACCESSORIES
- SECOND STEP: HOLE NO
- PIVOT AND BUSH (FIRST STEP)
- TOUGH TOOLS, HALF PRICE
- MODEL: UM
- BEND NO
Brand : Vevor
Model : UM30
Category : Hand tool