SL-1930 - Press tool Vevor - Free user manual and instructions
Find the device manual for free SL-1930 Vevor in PDF.

| Product Type | Battery-powered pressing tool |
| Brand | Vevor |
| Model | SL-1930 |
| Rated pressure | 19 kN |
| Stroke | 30 mm |
| Pressure range (stainless steel) | 12-35 mm |
| Pressure range (copper) | 12-35 mm |
| Pressure range (PEX/XPAP) | 16-40 mm |
| Oil capacity | 35 ml |
| Hydraulic oil | Coque Terre S2V HV15 |
| Operating ambient temperature | -10 to 40 °C |
| Battery voltage | 18 V DC, 2.0 Ah |
| Charging voltage | AC 100-240 V, 50-60 Hz |
| Charging time | Approximately 40 minutes |
| Weight (with battery) | 2.3 kg |
| Weight (with battery and jaw) | 3.6 kg |
| Dimensions | 409 x 119 x 76 mm |
| Included accessories | 2 batteries, 1 charger, seal kits |
| Main functions | High-pressure hydraulic system, OLED display, auto reset, 350° head rotation, double protection |
| Maintenance | Clean jaws after use, lubricate, check seals every 10,000 cycles, store dry |
| Safety | Do not use on live conductors, wear PPE, avoid water, auto shutoff >70 °C |
| Spare parts | Seals, jaws (consumables), battery, charger |
| Warranty | 2 years (90 days professional use/rental) |
Frequently Asked Questions - SL-1930 Vevor
User questions about SL-1930 Vevor
0 question about this device. Answer the ones you know or ask your own.
Ask a new question about this device
Download the instructions for your Press tool in PDF format for free! Find your manual SL-1930 - Vevor and take your electronic device back in hand. On this page are published all the documents necessary for the use of your device. SL-1930 by Vevor.
USER MANUAL SL-1930 Vevor
Technical Support and E-Warranty Certificate www.vevor.com/support
BATTERY PRESSING TOOL
MODEL: SL-1930
We continue to be committed to provide you tools with competitive price. "Save Half", "Half Price" or any other similar expressions used by us only rep estimate of savings you might benefit from buying certain tools with us compared top brands and doses not necessarily mean to cover all categories of tools offer are kindly reminded to verify carefully when you are placing an order with us actually saving half in comparison with the top major brands.
Model: SL-1930
natural_image
Line drawing of a mechanical device with cylindrical components and a base (no text or symbols)Due to continuing improvements, actual product may differ slightly from the product described herein.
NEED HELP? CONTACT US!
Have product questions? Need technical support? Please feel fr contact us:
Technical Support and E-Warranty Certificate
www.vevor.com/support
This is the original instruction, please read all manual instruction carefully before operating. VEVOR reserves a clear interpretation user manual. The appearance of the product shall be subject to product you received. Please forgive us that we won't inform you there are any technology or software updates on our product.
SAVE THIS MANUAL
Keep this manual for the safety warnings and precautions, assembly, operating inspection, maintenance and cleaning procedures. Write the month and year of purchase. Keep this manual and the receipt in a safe and dry place for future reference.
IMPORTANT SAFETY INFORMATION
In this manual, on the labeling, and all other information provided with this p
| Warning icon | Meaning |
 | Please read the manual and security icon carefully using the product |
 | Caution |
 | Caution: Please operate carefully to protect any parts of the body such as your fingers |
 | If misusing or jaws are worn, the fracture smash out and cause dangerous |
 | Important information |
GENERAL SAFETY RULES
TO WORK IN SAFE CONDITIONS WITH THIS TOOLING, IT IS IMPERATIVE READ CAREFULLY THE DIRECTIONS FOR USE AND TO FOLLOW THE INSTRUCTIONS IT CONTAINS. IF YOU DO NOT RESPECT THE INFORMATION WRITTEN IN THAT INSTRUCTION MANUAL THE WARRANTY WILL BE CANCELLED.
1. Work area safety
a. Keep work area clean and clear. Cluttered or dark areas invite accidents.
b. This tool is not insulated; please do not use it on live conductor.
c. Please do not use or store the tool under high temperature, or one surro filling with corrosive fluid. Pay attention to the sealing kits becoming aging.
d. Keep children and bystander away while operating the Battery powered too. Distractions will cause you to lose control.
e. Do not use or charging the tool around flammable, explosive environment
2. Electrical safety
a. Make sure the plug matches with the plug seat. Never try any changes of plug.
b. Do not put tool, battery and charger under a rainy or humid surroundings easy to trigger an electric shock accident if any water goes into the electric of the tool.
c. Do not use electric wire to carry, pull, or to draw out the plug and do the “-”and “+”, the damaged or twined wire may cause an electric shock acc
d. If the charger was strongly crashed, or dropping down or any other damage happening, please do not try to repair it by yourself, send it back to the au service center as soon as possible. The damaged charger may cause an ele shock accident.
e. The best temperature for charging is between 10^ C- 40^ C. Make sure the air hole of the battery and charger are uncovered during charging.
f. Please cut off the power of the charger each time to reduce the hazard child or the person who not expert on the tool.
g. Do not wait until the battery runs over for recharging, the recharging will the battery does not working anymore. Please keep the battery out of the to avoid the power discharge.
h. Please do not burn the battery or make it being short-circuited, it may cause explosion.
i. Do not use the waste battery otherwise it will cause the electric shock.
j. Do not disassemble the battery and charger. If any problems please contact manufacture or agent.
3. Personal safety
a. Stay alert, watch what you are doing and use common sense when operate the tool. Do not use the tool while you are tired or still under the influence alcohol or medication. A moment of inattention may result in series personal
b. Use safety equipment. Always use safety equipment such as mask, helmet safety cap, insulating shoes and etc to reduce the risk of personal injury.
c. Dress properly. Do not wear loose clothing or jewelry. Keep your hair, clc and gloves away from moving parts. Loose clothes jewelry or long hair can caught in moving parts.
d. Maintain power tools. Check for misalignment or binding of moving parts, breakage of parts and any other condition that may affect the tool operation. damaged, have the tool repaired before use. Many accidents are caused by maintained power tools.
e. Please use the tool properly, the tool with correct power will do the job and safer at the rate for which it was designed.
f. Do not put your fingers into the head of the tool during operating. Your tool could be pinched very severely.
4. Service
Have your Battery Powered Pressing Tool serviced by a qualified service technician using only identical replacement parts. This will ensure that the saf the Battery Powered Pressing Tool Kit is maintained.
SPECIFIC SAFETY RULES
1) Maintain labels and nameplates on the tool which carry important safety information. If unreadable or missing, contact the agent to replace.
2) This product is not a toy, keep it out of reach of children.
3) Do not put your fingers into the head of the tool during operating. Your could be pinched very severely.
4) Make sure the head was locked firmly during operation.
5) Do not knock any parts of the tool, otherwise it will cause injury.
6) Do not operate at will, it will damage the MCU and electric system
7) The design of the limit screw on the head is for preventing the head from dropping or popping.
8) Make sure the head was locked firmly during operation.
9) Do not use this tool for continuous use. After 30 to 40 cycles, allow the cool for 15 minutes.
10) Do not secure this tool in a vise. This tool is designed for hand-held o
11) The built-in safety valve goes through strict pressure test before marketing, please do not adjust the pressure by unprofessional person. If the pressure is not enough please return the tools back to the service center. The tool can be reused after checking and testing by trained person.
12) The warnings, precautions, and instructions discussed in this instruction manual cannot cover all possible conditions and situations that may occur. must be understood by the operator that common sense and caution are factors which cannot be built into this product, but must be supplied by operator.
UNDERSTAND YOUR TOOL
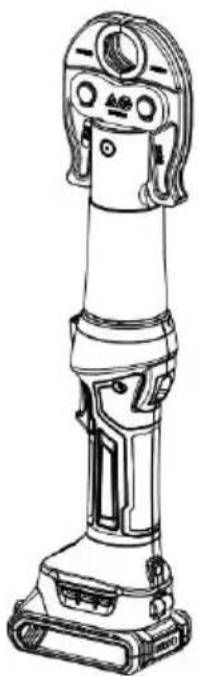
SL-1930 is a tool for pressing Stainless steel pipe, Copper pipe, XPAP, PEX with fittings. It is powered by Li-ion, actuated by motor and controlled by MC With a high pressure hydraulic system, it is a perfect tool to be used in plug and heating installations.
- Specification
| Rated pressure: | 19kN |
| Stroke | 30mm |
| Pressing range: | Stainless steel pipe:12-35mm (1/2"-1")Copper pipe:12-35mm (1/2"-1")Pex pipe. XPAP:16-40mmPlease carefully check the required pipe fitt size and matching mold clamp on the promotional website when applying for purch |
| Oil capacity: | 35ml |
| Hydraulic oil: | Shell Tellus S2V HV15 |
| Ambient temperature | -10~40°C |
| Voltage of battery: | DC 18V,2.0Ah |
| Charging voltage: | AC 100V~240V ;50~60Hz |
| Charging time: | Approx.40mins |
| Weight: | 2.3kgs (with battery) |
| 3.6kgs (with battery with jaw) | |
| Size of tool: | 409x119x76mm |
| Accessories: | |
| Battery: | 2 pcs |
| Charger: | 1 pc |
| Sealing ring of cylinder: | 1 set |
| Sealing ring of safety valv | 1 set |
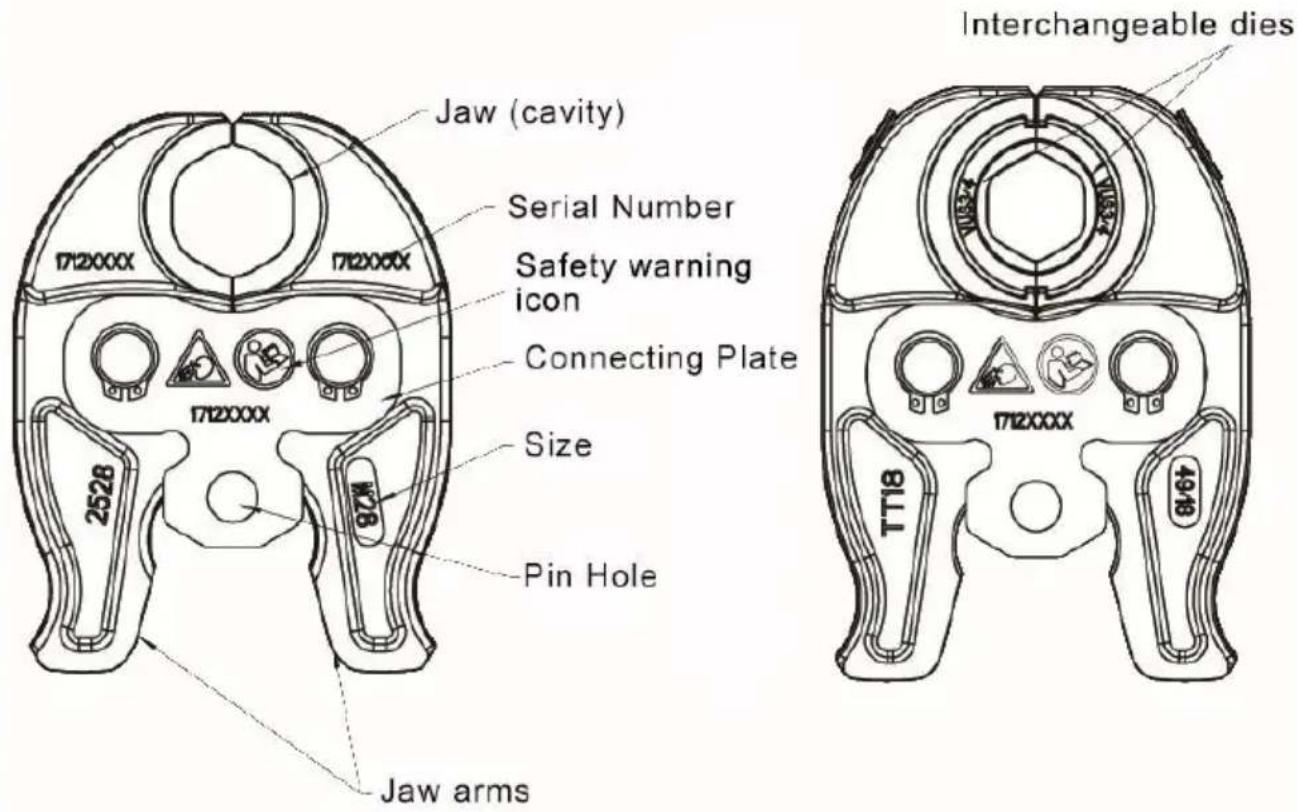
2. Description of components:
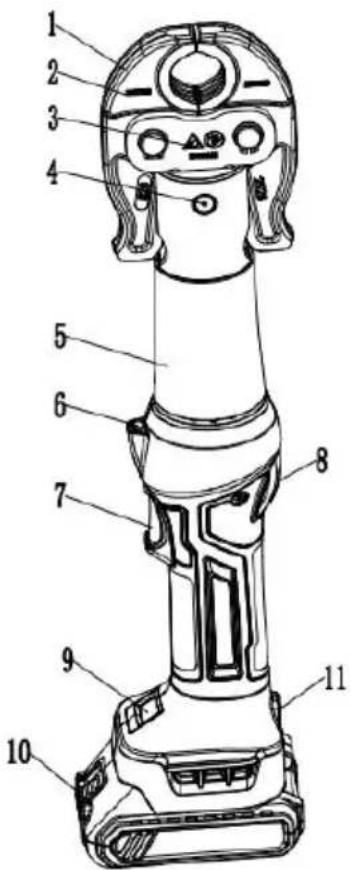
| Parts No. | Description | Function |
| 1 | Jaw | For pressing, interchangeable jaw |
| 2 | Serial NO. | For record |
| 3 | Security icon | For warning |
| 4 | Pin handle | For fixing pressing jaw |
| 5 | Sheath | For preventing finger or other parts injuries |
| 6 | LED indicator | For illumination |
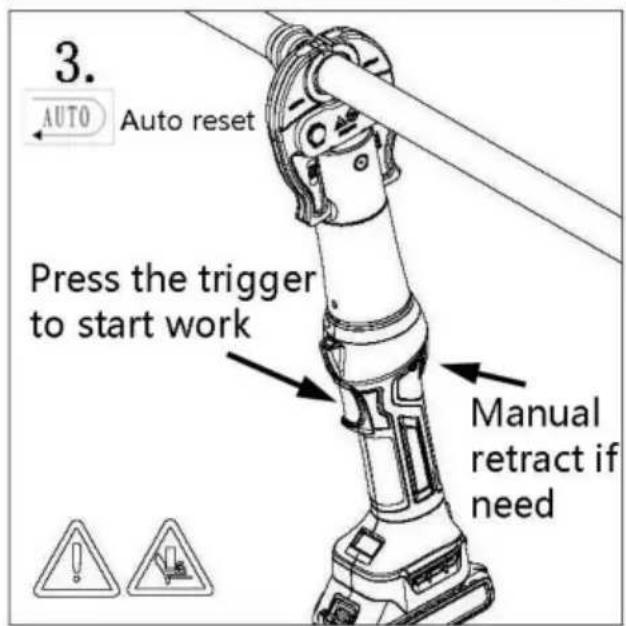
| 7 | Trigger | For starting operation |
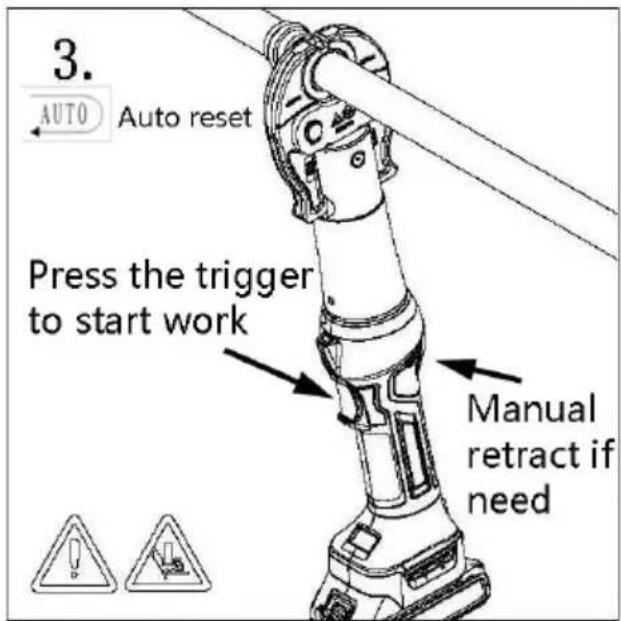
| 8 | Retract button | For manual retracting the piston in case of an operation. |
| 9 | OLED display | Show pressing time, power, errors info |
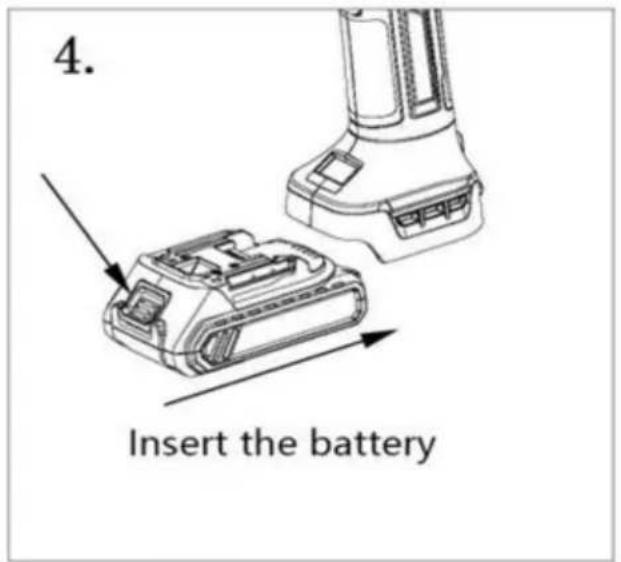
| 10 | Battery | For supplying power, rechargeable Li-ion (18V) |
| 11 | LED indicator | For showing tool status, warning |
3. Function description
Micro computer control system-automatically detects the pressure when in working with double safety protect.

OLED display - Dot matrix OLED display, which shows working time: battery power, working pressure (if equipped with pressure sensor), maintenance reminding and fault code.

Auto reset- Release the pressure automatically, retract the piston to starting position when reached the max output.

Manual reset —Can retract the piston to the starting positioning in c of an incorrect operation.

The unit is equipped with a double piston pump which is characterized by a rapid approach of the jaw towards the idler wheel and a slow working motion.

The head can be smoothly turned by 350^ in order to gain better to tight corners and other difficult working areas.

If a deviation from the set operation pressure or low battery charge identified, an acoustic signal sounds.

The overall structure of the tool is compact. It is ergonomically designed with a non-slip rubber grip and an optimized center of gravity for easier operation.
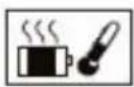
A temperature sensor makes the tool stop working automatically when the temperature over 70^ under long time working, the fault signal sounds, it means the tool can't continue working until the temperature reduce to the normal.
Table 1 Signal Instruction and Meaning:
| Series No | Instruction | LED(red) | LED |  | OLED screen | What it means |
| 1 | Self-checking | (2Hz) | (2Hz)(green) |  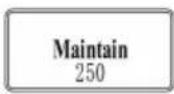 | Self-checking to assure everything ok | |
| 2 | Light | (5min)(white) | 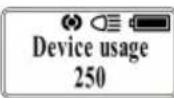  | Enter the working state, the battery full | ||
| 3 | Charging reminding | 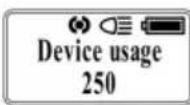 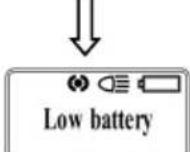 | Showing “Low battery” for 3s, lacking power and need charging | |||
| Ⓞ | 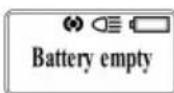 | Lacking power and need charging | ||||
| Ⓞ (0.1s) |  | Lacking power or battery loses efficacy | ||||
 | The screen doesn respond, the batter lose efficacy and need to replace | |||||
| 4 | Motor overload | Ⓞ (2Hz) |  | Motor get stuck, battery reloading, recovery work interface | ||
| 5 | Hydraulic system Malfunction | ### | ◎◎◎◎◎(5s) |  | Tool doesn't releas pressure automatically when working over 2min reload battery | |
| 6 | High temperature warning | ### | ◎◎◎◎(2Hz) |  | Motor surface temperature is too high, waiting for cooling to restart tool | |
| 7 | Dangerous operation protection | α(5s) | ◎◎◎◎◎(2Hz) |  | Auto-protection when press the st button on and of quickly, reload battery | |
| 8 | Maintenance reminding | ◎(0.5s) |  | Tools must be maintained |
Read the entire SAFETY INFORMATION section at the beginning of this man including all text under subheadings therein before using this product.
Use this tool for the manufacturer's intended purpose only. Use other than the which is described in this manual can result in injury or property damage.
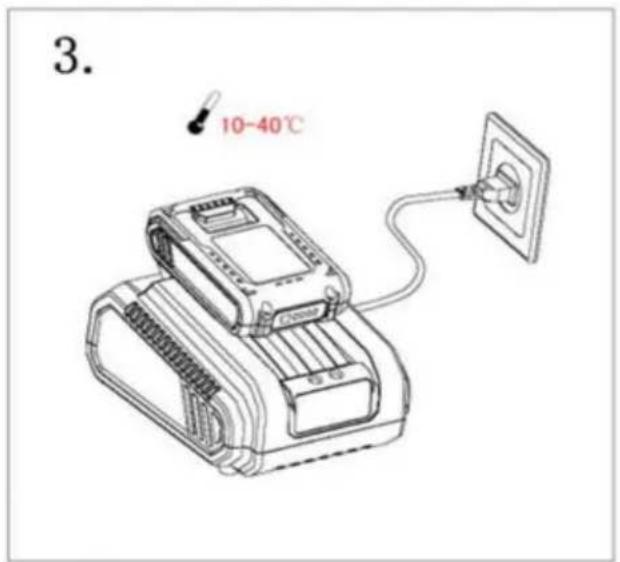
1. Charging
Push battery into charger and connect the plug with the plug seat. Make sun room temperature is between 10^ C- 40^ C. The charging time is around 40mins.
Please see the illustration below.

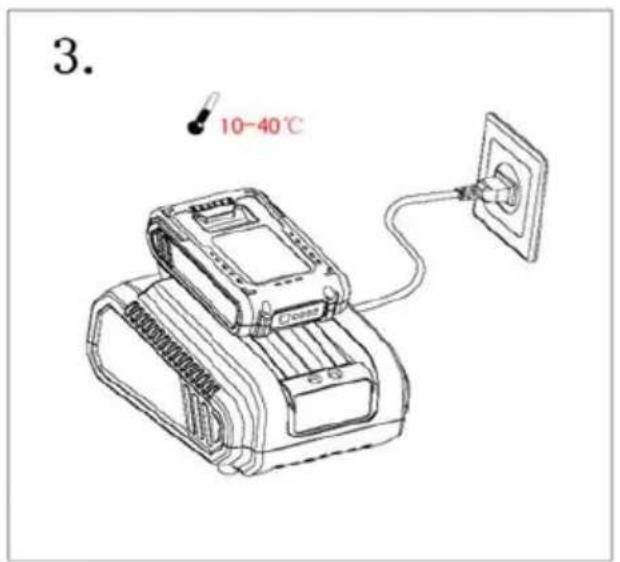

The detail of the charging information, please refer the manual (MANUAL FOI CHARGER)

1) When use the factory original battery, must charge by the original charger 4.0Ah / 5.0Ah battery charging current shouldn't exceed 5A.2.0Ah battery charging current shouldn't exceed 3.0Ah. The battery will be smoking, burnt, even explode if charge with a non-compliant charger. 2) The battery can be used for hundreds of times, when the life span reduces obviously, change to a new battery please. 3) Please charging the battery in time to avoid it to be used up absolutely; otherwise it will become useless forever. If the battery not be used for a time, it will discharge automatically. Make sure to charge it one time per
quarter.
4) Do not connect the two poles of the battery with a wire, which is likely electric spark, combustion or even explosion.
5) Do not use the damaged battery or charge it, or it will increase the risk electric shock.
6) Under no circumstances should batteries be burned, or they may explode.
7) When charging the battery, do not cover the charger with any object, so the charger cannot dissipate heat, which is likely to cause fire.
8) Disconnect the charger when not in use. It will reduce the risk of injury children and untrained personnel.
9) Do not use the charger in humid environment, and do not expose to rain snow, or it will increase the risk of electric shock.
10) Do not disassemble the battery and charger without permission. If there is fault in the process of use, please send it to the professional or the manufacturer for maintenance, until the problem is solved.
2. Usage of the tool
2.1 OLED display interface description:

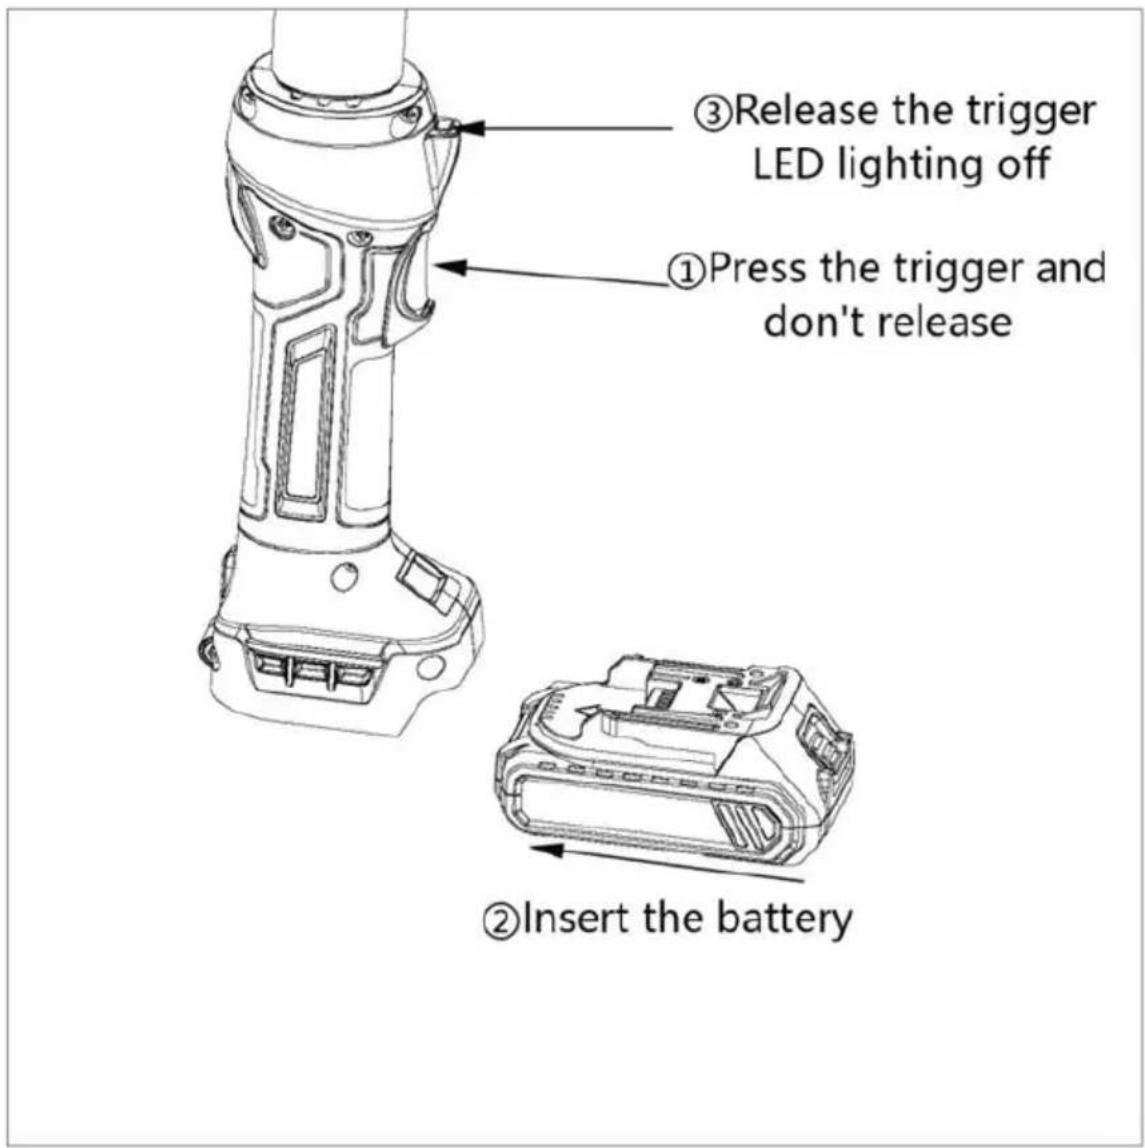
Tool LED illuminator: After clicking the start button, the LED illuminator lights After the tool is released, the button will automatically turn off after a delay seconds. Press the start button before installing the battery. When the battery installed, release the start button and the LED light is off. If the light is on, battery must be reinstalled once. As shown in the figure.
2.2 Operation


Warning:
1) This tool is a high-pressure, high-strength, heavy-duty appliance. Please follow the instructions and precautions strictly to operate carefully!
2) Before operating, you must check the tool for any damage, aging, missing parts, stuck components, and any other unfavorable factors that threaten safety. If you find any problems, please stop using it immediately until the problem is solved.
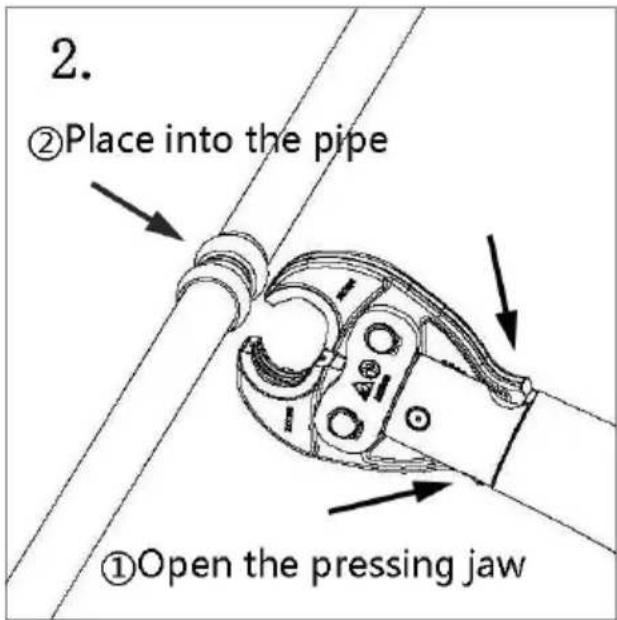
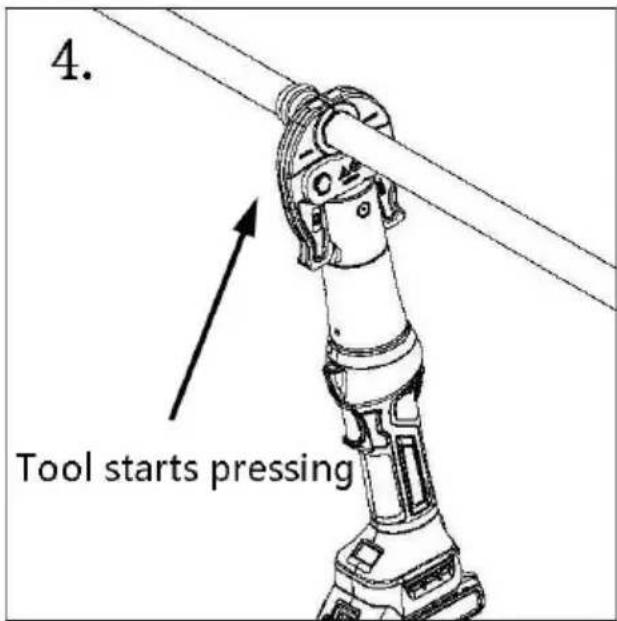
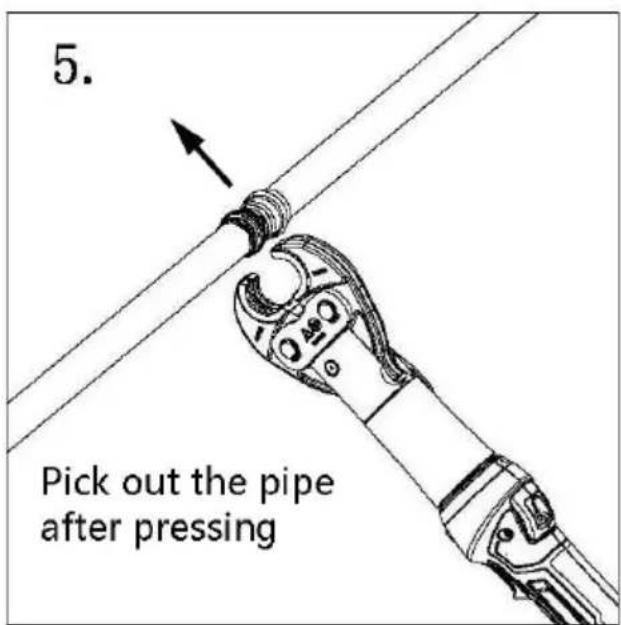
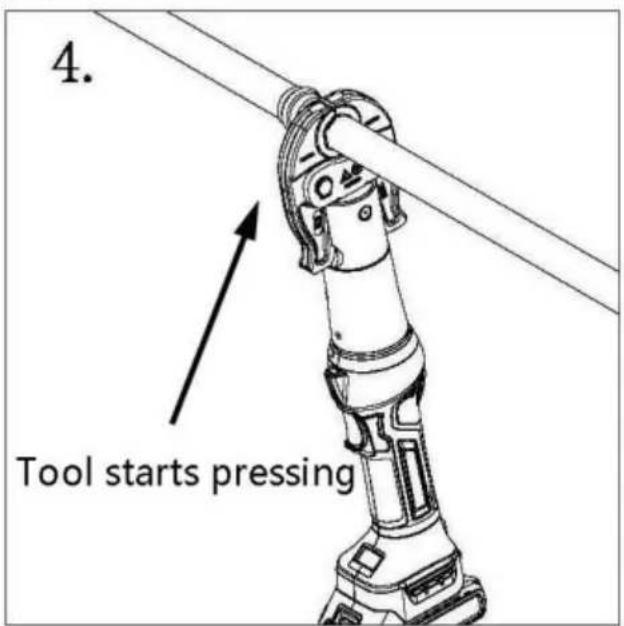
3) After pressing the jaw arm and holding the pipe, please keep your hands fingers away from the jaw, press the start button and hold it until the pin reaches the set value and reset automatically. Release the start button halfway to pause, press the release button to return the piston.
4) Do not let the tool or jaws hang directly on the pipe fittings, to avoid unnecessary injury or even fatal accidents caused by the tools falling accidentally.
5) Before start the tool, the ram pin must be fully inserted into the ram, other it will easily cause damage to the ram and even personal injury.
6) Remove the grease from the non-lubricated parts of the tool, especially the hand-held parts, to avoid the tool slipping during use.
7) Do not disassemble and assemble tools at will, otherwise tool damage or personal injury may occur.
8) Do not put your fingers and any part of the human body into the moving of the jaws during use, and avoid pointing the tool head at yourself or
9) The pressure of the tool should be checked and calibrated regularly. The pressure check and calibration need to be carried out under the special pressure detection device. Do not adjust it without permission, otherwise that tool may be damaged or even personal injury may occur.
10) After 30 minutes of continuous use, the tool should be cool down before. Otherwise the temperature will over high and resulting in early seal failure oil leakage.
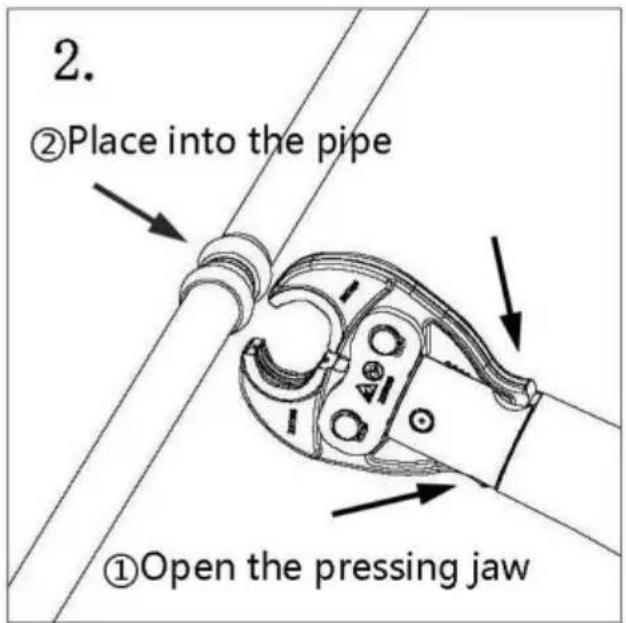
3. Pressing jaws
3.1. Introduction of pressing jaws

CAUTION:
1) The operation staff must have participated in professional training, and the construction engineering company must have the corresponding construction qualification recognized by the state.
2) Pressing tool and pressing jaw are only for the corresponding piping system and fittings. Use of other ways or modified standard accessories for other applications may damage tools and accessories, and may even result in personal injury.
3) This compact series press jaws only suit for 19kN press tool
i Important information:
1) The jaw is a consumable part. When it is often used for pressing, the m will be fatigued and cracks will occur. A heavily worn jaw is prone to break, especially if it is used improperly (such as over-sized fittings, skewed presses or illegal operation.
2) Check the jaw for any breakage, cracks, or component jams and any other unfavorable factors that compromise safety and normal operation, either periodically or before each use. If you find any problems, please stop using immediately, and return them to the professional repairing manufacturer or return to the factory for repair until the problem is solved.
3) Once you find the following phenomenon, please stop using it and replace with a new one!
a. the board is cracked
b. the jaw arm is cracked and deformed
c. the jaw is cracked, scratched, sunken or severely worn
d. other anomalies
4) It is forbidden to disassemble the tools by yourself. It is strictly forbidden polish, drill or other changes to the die accessories!
5) Do not put any part of the human body, such as your fingers, into the use!
6) This tool is a high-strength, heavy-duty appliance. Please strictly follow the instructions and precautions!

CAUTION:
Improper operation can lead to leaks at the joint
1) Please ensure that the press fitting specifications are the same as the jav
2) It should be confirmed that the jaw has been completely closed after the pressing is completed.
3) When pressing, make sure that the jaw along with the pressing tool is positioned on the flange of the fitting.
4) If the jaw cannot be completely closed when pressed, it should be sent to tool dealer or manufacturer for repair.
5) If the jaw connection is incorrectly squeezed, replace a new jaw and do continue to use it.
6) If there is a burr on the pipe joint after pressing, it should be handed or tool dealer or manufacturer for inspection.
3.2. Please refer the illustration For Economic type below:

3.3. Jaw cleaning and maintenance
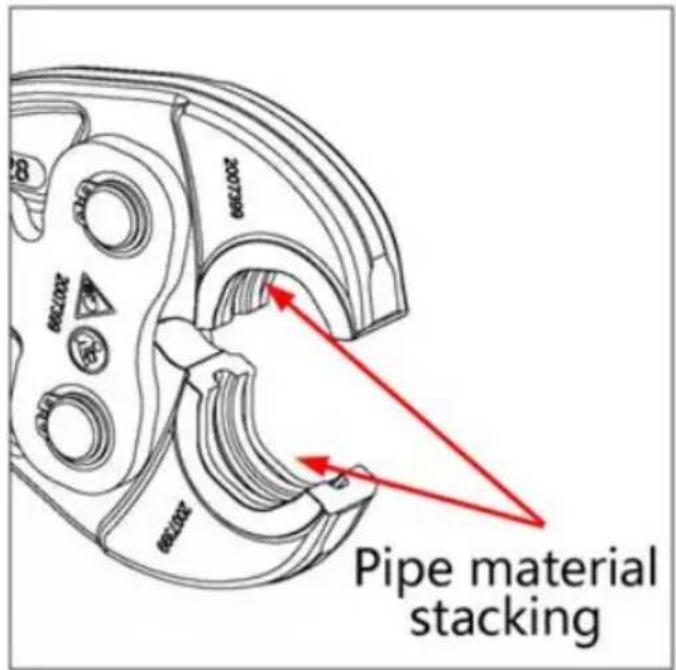
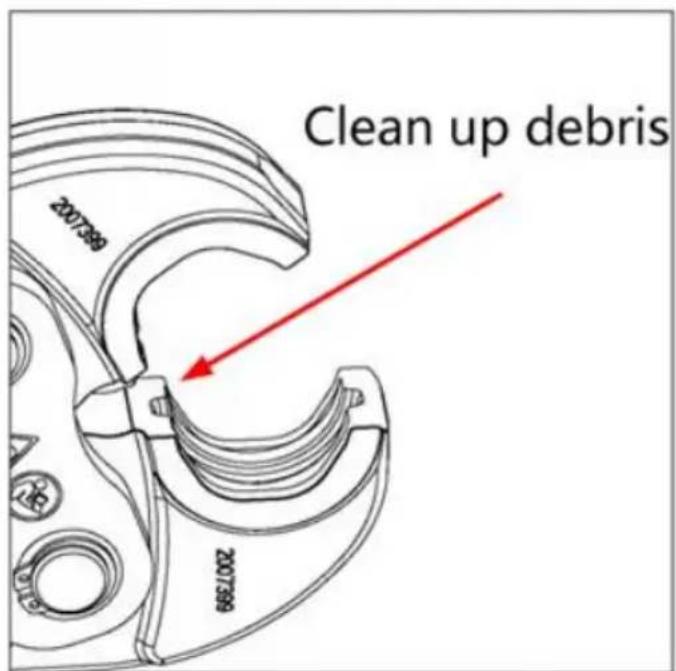
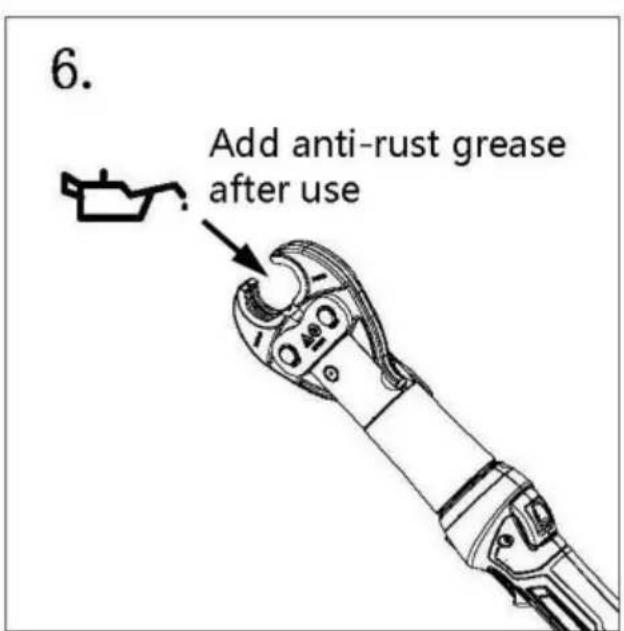
1) Clean the residue accumulated the pressing jaws in time. Cleaning residue can be done with a scoul pad or a steel wool, but it can't cleaned with something harder (such as sandpaper, filet, etc.), which will accelerate the wear on the edge cavity.
2) After each pressing is complete remove the impurities and dust on surface of the jaws, especially the at the bottom of the jaws; then r lubricant on the surface of the jaw especially the pin and jaws, and put it into the dedicated toolbox.
3) It is strictly forbidden to collide any metal. It is strictly forbidden it contact any jaws with any sharp object.
4) Check the jaw return spring be each use. Normally, the jaw can easily opened and closed by apply a finger.
5) It is recommended to check the wear of the jaw once a year by the de manufacturer.
MAINTENANCE AND SERVICING

Damaged equipment may cause serious personal injury. Do not use damaged equipment. If abnormal noise or vibration occurs, have the problem
corrected before further using.
- Please note that routine maintenance and inspections can extend the life of your tools.
Before each using, inspect the general condition of the tool. Check for I screws, misalignment or binding of moving parts, cracked or broken parts, any other condition that may affect its safe operation.
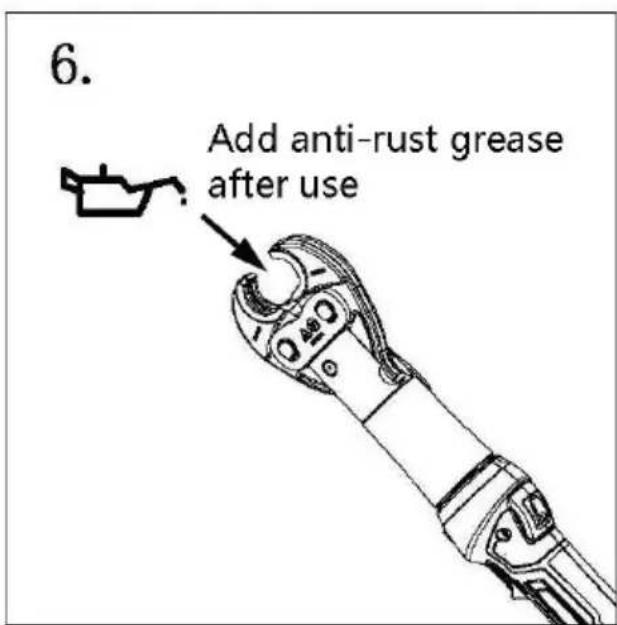
After using, clean external surfaces of the tool with clean, moist, smear rust preventing oil on the metal surface of the tool and the dies to avoid Store the tool in the dry environment. - Service to the tool should only be done by a qualified Service Technician
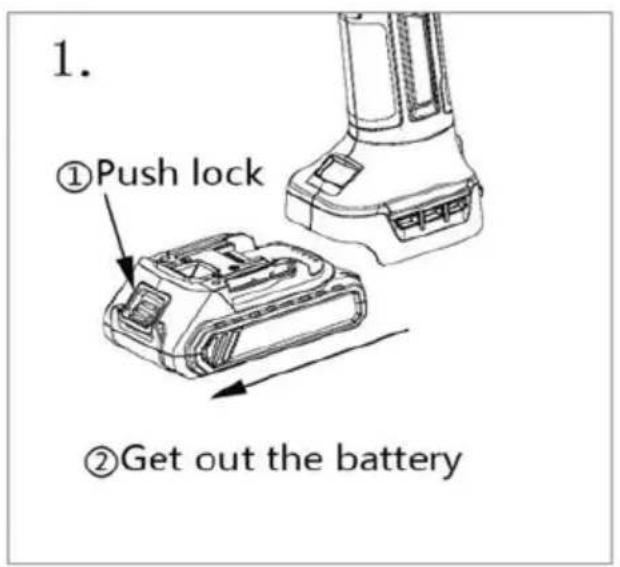
- Keep the tool and spare parts dry. If the tool is wet, take out the batter wait until the tool is completely dry before reloading the battery.
- Do not put the tool in too hot or cold place. Otherwise the spare parts damaged.
- Do not use aggressive chemical cleaners or strong detergents to clean too
- The warranty of tool is 2 years or 30,000 cycles. In order to prolong the lit the tool please maintain every 10,000 cycles.
- If the tool not used for a long time, please make sure the piston stay c starting position, clear up the tool and paint the rustproof oil both to the and accessories. Take out the battery and put them into box and store t in a dry surrounding.
- After a long time using, the sealing kits will be damaged, if there is leak please contact with the manufacturer and/or the distributor to change the sealing kits.
LIMITED 2 YEARS WARRANTY
We make every effort to assure that its products meet high quality and dura standards, and warrants to the original purchaser that this product is free from defects in materials and workmanship for the period of two years from the shipment (90 days if used by a professional contractor or if used as rental equipment). This warranty does not apply to damage due directly or indirectly misuse, abuse, negligence or accidents, repairs or alterations outside our facility normal wear and tear, or to lack of maintenance. We shall in no event be death, injuries to persons or property, or for incidental, contingent, special or consequential damages arising from the use of our product. Some states do allow the exclusion or limitation of incidental or consequential damages, so that above limitation of exclusion may not apply to you. THIS WARRANTY IS EXPRESSLY IN LIEU OF ALL OTHER WARRANTIES, EXPRESS OR IMPLIED INCLUDING THE WARRANTIES OF MERCHANTABILITY AND FITNESS.
To take advantage of this warranty, the product or part must be returned to transportation charges prepaid. Proof of purchase date and an explanation of complaint must accompany the merchandise. If our inspection verifies the defe we will either repair or replace the product at our election or we may elect the purchase price if we cannot readily and quickly provide you with a repl We will return repaired products at our expense, but if we determine there is defect, or that the defect resulted from causes not within the scope of our then you must bear the cost of returning the product.
The warranty gives you specific legal rights and you may also have other rights which vary from state to state.
Manufacturer: Shanghaimuxinmuyeyouxiangongsi
Address: Shuangchenglu 803nong11hao1602A-1609shi, baoshanqu, shanghai 200000 CN.
Imported to AUS: SIHAO PTY LTD. 1 ROKEVA STREETEASTWOOD NSW 2122 Australia
Imported to USA: Sanven Technology Ltd. Suite 250, 9166 Anaheim Place, Rancho Cucamonga, CA 91730
| UK | REP |
YH CONSULTING LIMITED.
C/O YH Consulting Limited Office 147,
Centurion House, London Road,
Staines-upon-Thames, Surrey, TW18 4AX
| EC | REP |
E-CrossStu GmbH
Mainzer Landstr.69,
60329 Frankfurt am Main.
VEVOR®
TOUGH TOOLS, HALF PRICE
Technical Support and E-Warranty Certificate
www.vevor.com/support
VEVOR®
TOUGH TOOLS, HALF PRICE
natural_image
Line drawing of a mechanical device with cylindrical top and base (no text or symbols)


2.2 Fonctionnement


Avertissement:
A/S YH Consulting Limited Bureau 147,
Centurion House, London Road,
Staines-upon-Thames, Surrey, TW18 4AX
E-CrossStu GmbH
Mainzer Landstr.69,
natural_image
Line drawing of a mechanical device with cylindrical top and base (no text or symbols)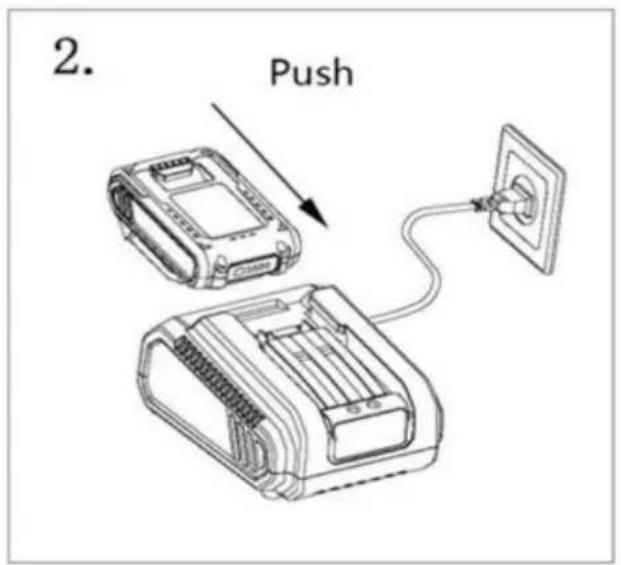


2.2 Bedienung


Warnung:
C/O YH Consulting Limited Office 147,
Centurion House, London Road,
Staines-upon-Thames, Surrey, TW18 4AX
www.vevor.com/support
VEVOR®
TOUGH TOOLS, HALF PRICE
natural_image
Line drawing of a mechanical device with cylindrical top and base (no text or symbols)


2.2 Funzionamento


Avvertimento:
Importato in AUS: SIHAO PTY LTD. 1 ROKEVA STREETEASTWOOD
Nuovo Galles del Sud 2122 Australia
C/O YH Consulting Limited Ufficio 147,
Centurion House, London Road,
Staines-upon-Thames, Surrey, TW18 4AX
elettronica www.vevor.com/support
VEVOR®
TOUGH TOOLS, HALF PRICE
natural_image
Line drawing of a mechanical device with cylindrical top and base (no text or symbols)


2.2 Funcionamiento


Advertencia:
Centurion House, London Road,
Staines-upon-Thames, Surrey, TW18 4AX

E-CrossStu GmbH
Mainzer Landstr.69,
natural_image
Line drawing of a mechanical device with cylindrical top and base (no text or symbols)
2.2 Działanie


Ostrzeżenie:
C/O YH Consulting Limited Biuro 147,
Centurion House, London Road,
Staines-upon-Thames, Surrey, TW18 4AX
| Przedstaw ciel UE |
E-CrossStu GmbH
Mainzer Landstr.69,
60329 Frankfurt nad Menem.
VEVOR®
TOUGH TOOLS, HALF PRICE
natural_image
Line drawing of a mechanical device with cylindrical top and base (no text or symbols)HULP NODIG? NEEM CONTACT MET ONS OP!


2.2 Werking


Waarschuwing:
C/O YH Consulting Limited Kantoor 147,
Centurion House, London Road,
Staines-upon-Thames, Surrey, TW18 4AX

E-CrossStu GmbH
Mainzer Landstr.69,
60329 Frankfurt am Main.
VEVOR®
TOUGH TOOLS, HALF PRICE
garantiecertificaat www.vevor.com/support
VEVOR®
TOUGH TOOLS, HALF PRICE
natural_image
Line drawing of a mechanical device with cylindrical top and base (no text or symbols)www.vevor.com/support


Mer information om laddningsinformationen, se manualen (MANUAL FOR LADDARE)

2.2 Drift


Varning:
C/O YH Consulting Limited Office 147,
Centurion House, London Road,
Staines-upon-Thames, Surrey, TW18 4AX
| EC | REP |
E-CrossStu GmbH
Mainzer Landstr.69,
60329 Frankfurt am Main.
VEVOR®
TOUGH TOOLS, HALF PRICE
www.vevor.com/support