USER MANUAL FLO300 Vevor
Technical Support and E-Warranty Certificate www.vevor.com/support
SHOWER PUMP
INSTALLATION INSTRUCTIONS
MODEL:FLO300
We continue to be committed to provide you tools with competitive price. "Save Half", "Half Price" or any other similar expressions used by us only represents an estimate of savings you might benefit from buying certain tools with us compared to the major top brands and does not necessarily mean to cover all categories of tools offered by us. I are kindly reminded to verify carefully when you are placing an order with us if you are actually saving half in comparison with the top major brands.
VEVOR®
TOUGH TOOLS, HALF PRICE
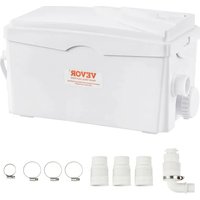
SHOWER PUMP
MODEL:FLO300
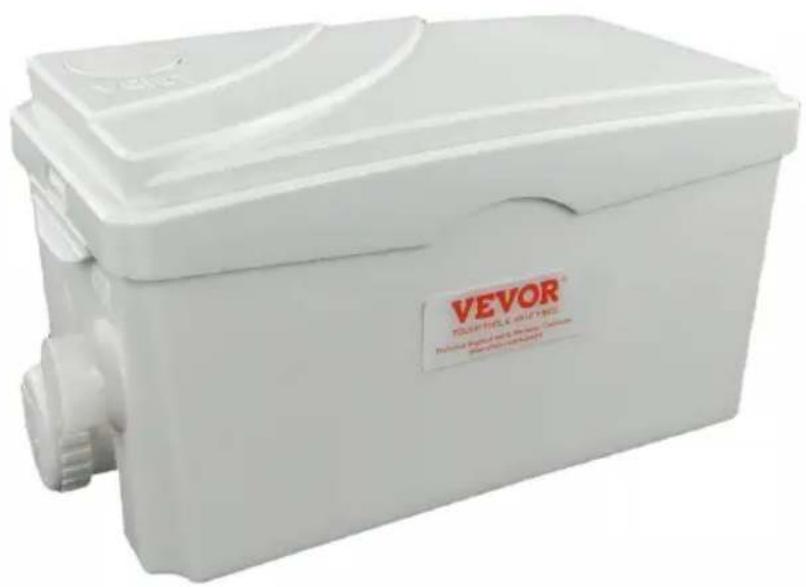
natural_image
White VEVOR plastic container with lid and side port (no visible text or symbols on body)
Have product questions? Need technical support? Please feel free to contact us:
Technical Support and E-Warranty Certificate
www.vevor.com/support
This is the original instruction, please read all manual instructions carefully before operating. VEVOR reserves a clear interpretation of o user manual. The appearance of the product shall be subject to the product you received. Please forgive us that we won't inform you ag there are any technology or software updates on our product.
Kindly Reminder

The FLO300 has been developed with the utmost care and it is tested in the factory. Therefore, it is possible that the test water remains in the appliance.
INSTALLATION REQUIREMENTS
This appliance must be earthed.
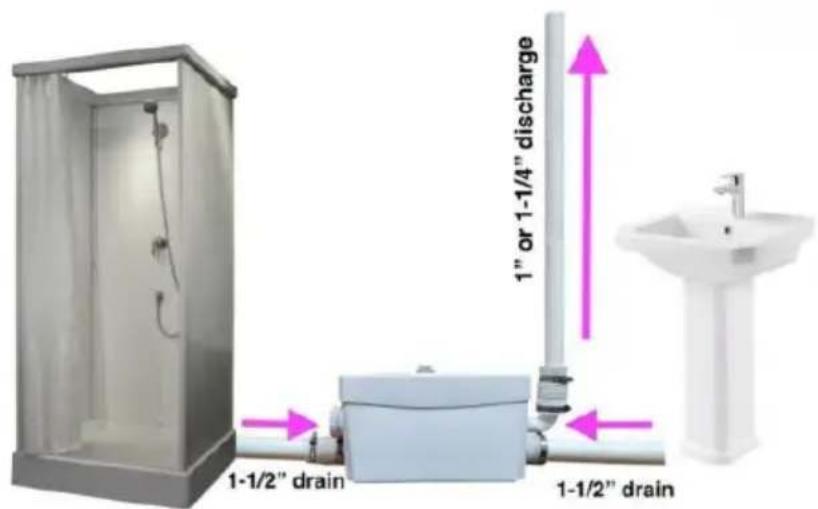
If the supply cord is damaged, it must be replaced by a qualified pe. The cable type is SJT 18AWGx3C. The IP rating of this appliance is Water: The unit is gravity fed from the washing machine, shower, etc. a built-in pressure switch that detects the incoming waste and starts to pump.
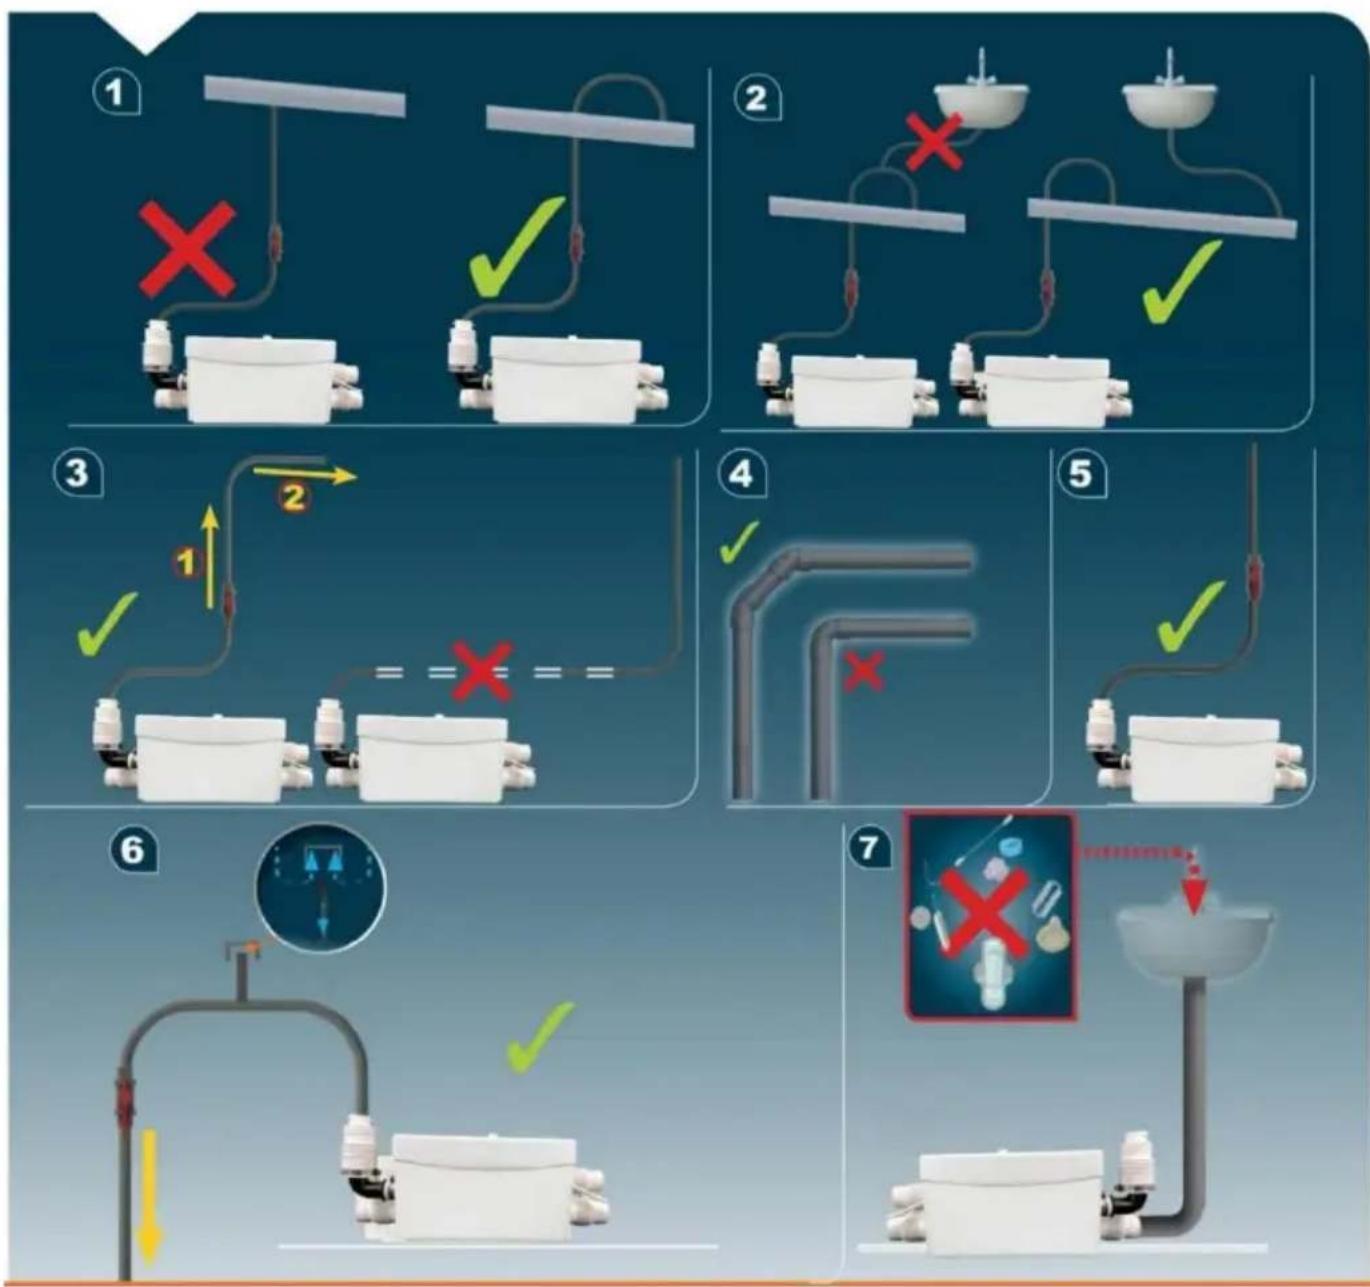
The outlet comes as standard with a 1-1/4" (32 mm) connection, how 1" (28 mm) can be used with a reducer. If using bends in the conr pipework, ensure they are smooth curves to avoid blockages. Besides, never use a 90-degree bent, but a 45-degree bent.
SPECIFICATIONS
The water temperature should be a minimum of 1^ for it is important the unit does not freeze, and a maximum water temperature is 90^ .
| Input Power Rating | 350W | Max Vertical Lift: | 7M |
| Input Voltage: | 220-240V, 50HZ | Max Temperature: | 90°C |
| Flow Rated: | 100L/MIN | Noise Level: | 45 dBA |
| Max Horizontal Lift: | 70M | Degree of Protection: | IPX4 |
INSTALLATION GUIDANCE
(1) Accessories list
A [1] 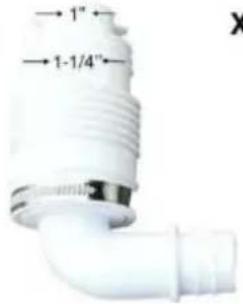 | B 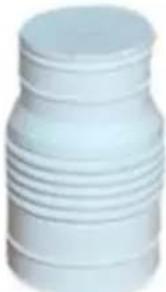 | C 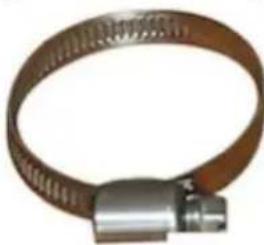 | D 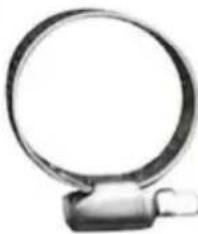 | X1 |
| Check Valve | Rubber Tube | Snap hoop (32mm-50mm) | Snap hoop (20mm-32mm) |
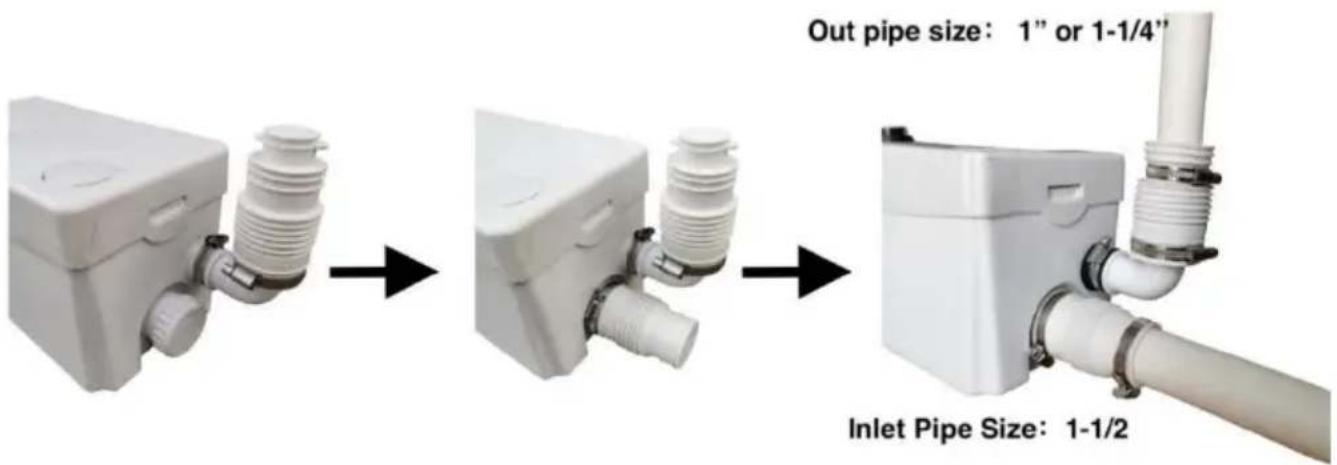
(2) Install the check valve at the outlet. Tighten with the snap hoop (accessory D). Remove the choke plug from the product, install the net tube (accessory B), and tighten it with the snap hoop (accessory C). outlet pipe is 3/4" (1" and 1-1/4" are also good choices), and inlet pipe 1-1/2".
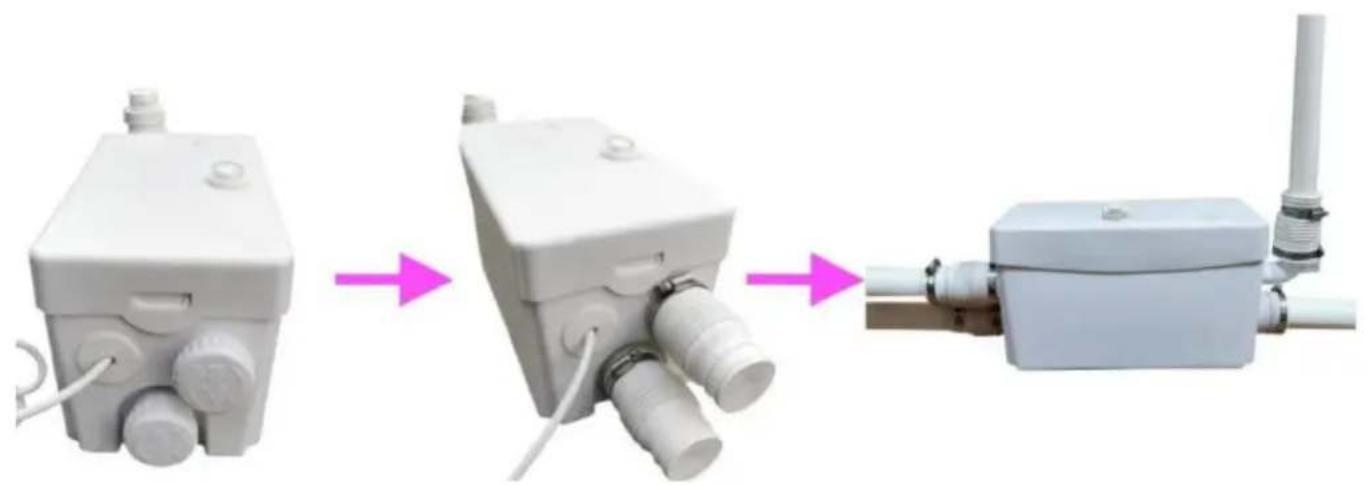
(3) The other side of the product has two water inlets, which are co with a choke plug. When installing, the arrow on the choke plug is downward, then the plug can be pulled out. Then install the snap ho Unused water inlets should be covered with choke plugs, and the dire of the arrow should be turned to other directions.
flowchart
graph LR
    A["Device 1: Initial component"] --> B["Intermediate: Pipe assembly"]
    B --> C["Final: Pipe pipe connection"]
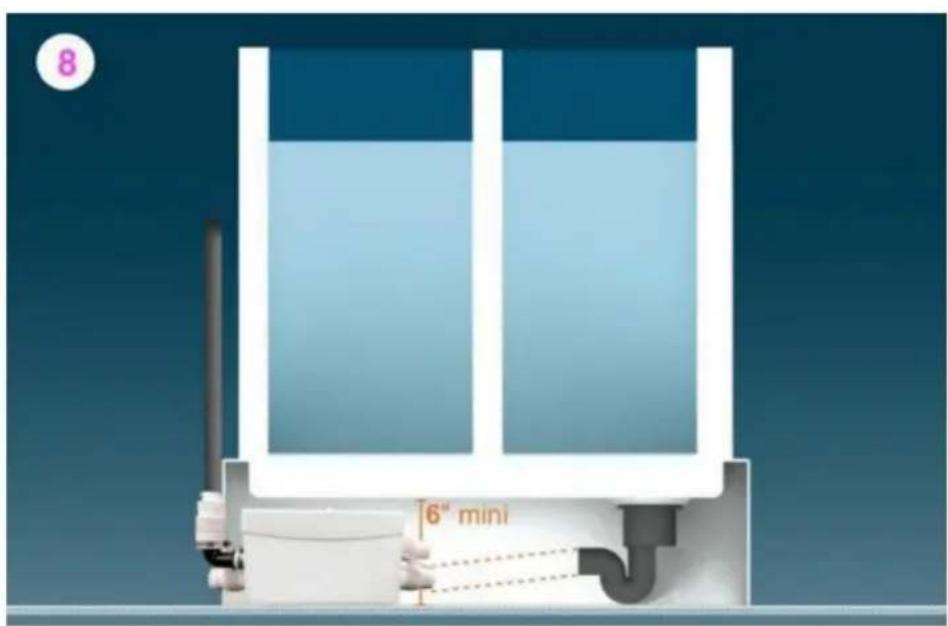
(4) Notes and installation diagram.
For wastewater from the shower and bath, ensure that the slope of siphon is at least 1% (0.4 inches per 40 inches) so that the wastewater flows through the natural gravity to the unit position.
If other sanitary units are connected to the disposal line along the di circuit, install check valves in the appropriate waste pipes to prevent backflow.
The slope of the horizontal components must be at least 1%.
Note: Discharge pipe length to the first elbow should be a minimum of 1.6
flowchart
graph TD
    A["Step 1: Initial setup with tube, valve, and patient"] --> B["Step 2: Internal procedure with bowl, tube, and patient"]
    B --> C["Step 3: Internal procedure with tube, valve, and patient"]
    C --> D["Step 4: Internal procedure with tube, valve, and patient"]
    D --> E["Step 5: Internal procedure with tube, valve, and patient"]
    E --> F["Step 6: Internal procedure with tube, valve, and patient"]
    F --> G["Step 7: Discharge with sink, valve, and patient"]
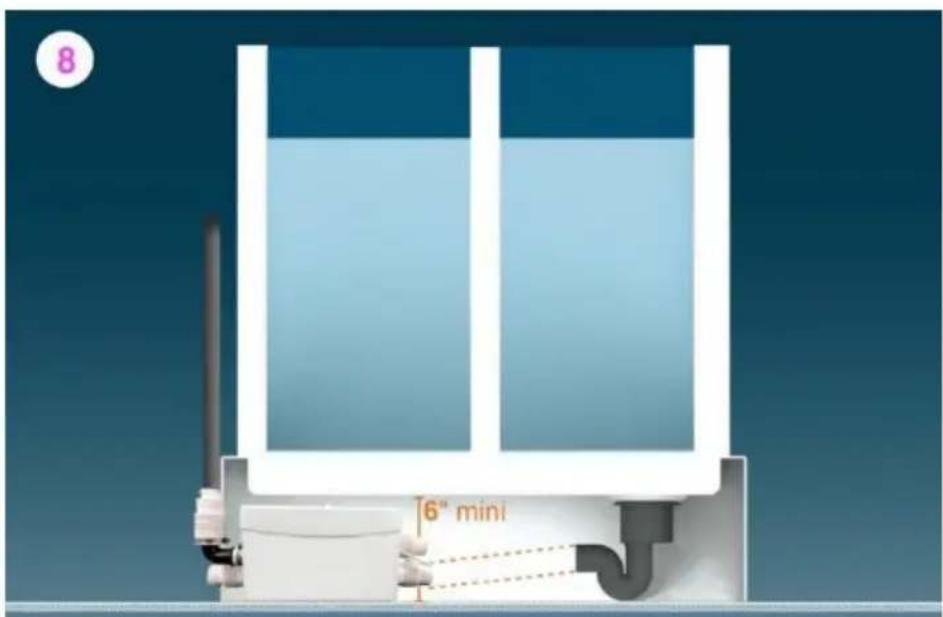
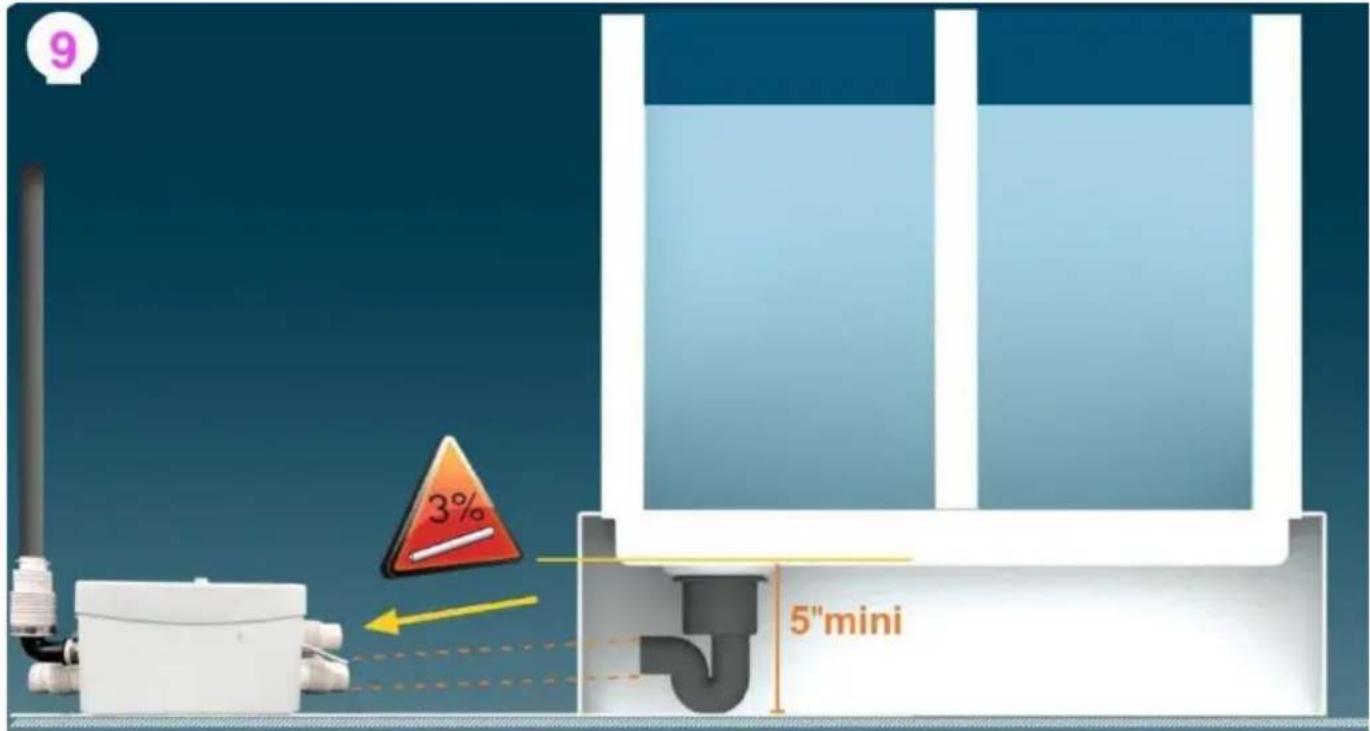
(5) If installing underground, the method is as follows:
TROUBLE SHOOTINGS
Some malfunctions of the grinder are not practically serious. You can correct it by yourself. To diagnose and find a solution to the Trouble to the diagram below. For other malfunctions, contact the supplier or qualified professional.
| MALFUNCTIONS | POSSIBLE CAUSES | SOLUTIONS |
| The appliance occasionally starts to work | The connected pipelines are leaking | Check the installation in front of the appliance |
| The check valve is leaking | Clean or replace the check v |
| The motor is running prope but the water runs slowly away. | The aerator in the lid is block | Clean the aerator |
| The engine is running properly but non-stop or run for a long time | The height or length of the d is too large,or too many bend are used(power failure) | Check the installation |
| The pump is blocked | Turn off the power, disassemble the pump and unblock |
| The motor is not switched | The power supply is not switched on | Switch the on power supply (repeat) |
| The plug is defective | Repair the plug |
| The trouble with the motor or sensor | Remove the lid,flush clean,and dry the sensor up(hair dryer) |
| The motor rattles with a no | There's a strange object in th motor | Remove the lid,clean it and remove the object |
| The motor is buzzing and does not rotate | The condensator is broken or trouble with the motor | Get in contact with a qualified specialist or the supplier |
| There's a strange object in th Remove the lid,clean it and motor | Remove the lid,clean it and remove the object |
Importer: WAITCHX
Address: 2 Holywell Lane, London, England, EC2A 3ET
Manufacturer: Ningbo YUNSUN Electromechanical Co., Ltd
Address : Building 3 No.7 Hongshen Road Hongtang Industrial Zone A
Jiangbei District 315033 Zhejiang P.R. China
Made In China
EUREP UK LTD
UNIT 2264, 100 OCK STREET, ABINGDON
OXFORDSHIRE ENGLAND OX14 5DH
EUREP GmbH
Unterlettenweg 1a, 85051
Ingolstadt, Germany
VEVOR®
TOUGH TOOLS, HALF PRICE
Technical Support and E-Warranty Certificate
www.vevor.com/support
VEVOR®
INSTRUCTIONS D'INSTALLATIONS
MODÈLE : FLO300
natural_image
White VEVOR plastic waste bin with lid and label (no additional text or symbols visible)
CARACTÉRISTIQUES
flowchart
graph LR
    A["White plastic device with ports and tubing"] --> B["Three-step assembly"]
    B --> C["Electrical outlet with pipe fittings and a chimney"]
flowchart
graph TD
    A["Step 1: Initial setup with horizontal bars and connectors"] --> B["Step 2: Internal circuit with water tank and bowl"]
    B --> C["Step 3: Internal circuit with valves and connectors"]
    C --> D["Step 4: Internal circuit with pipe and valve"]
    D --> E["Step 5: Internal circuit with valves and connectors"]
    E --> F["Step 6: Internal circuit with valves and connectors"]
    F --> G["Step 7: Discharge with liquid level and switch"]
    style A fill:#f9f,stroke:#333
    style B fill:#ccf,stroke:#333
    style C fill:#cfc,stroke:#333
    style D fill:#fcc,stroke:#333
    style E fill:#cff,stroke:#333
    style F fill:#ffc,stroke:#333
    style G fill:#fcf,stroke:#333
DÉPANNAGE
natural_image
White VEVOR plastic waste bin with lid and side port (no visible text or symbols on body)
BRAUCHEN SIE HILFE? KONTAKTIERE UNS!
www.vevor.com/support
SPEZIFIKATIONEN
flowchart
graph LR
    A["White plastic device with ports and tubing"] --> B["Three-step assembly"]
    B --> C["Electrical outlet with pipe fittings and a chimney"]
flowchart
graph TD
    A["Step 1: Initial setup with horizontal bars and connectors"] --> B["Step 2: Internal circuit with water tank and bowl"]
    B --> C["Step 3: Internal circuit with valves and connectors"]
    C --> D["Step 4: Internal circuit with pipe and valve"]
    D --> E["Step 5: Internal circuit with valves and connectors"]
    E --> F["Step 6: Internal circuit with valves and connectors"]
    F --> G["Step 7: Discharge with liquid level and switch"]
    style A fill:#f9f,stroke:#333
    style B fill:#ccf,stroke:#333
    style C fill:#cfc,stroke:#333
    style D fill:#fcc,stroke:#333
    style E fill:#cff,stroke:#333
    style F fill:#ffc,stroke:#333
    style G fill:#fcf,stroke:#333
FEHLERBEHEBUNG
www.vevor.com/support
VEVOR®
natural_image
White VEVOR plastic waste bin with lid and side port (no visible text or symbols on body)
HO BISOGNO DI AIUTO? CONTATTACI!
elettronica www.vevor.com/support
SPECIFICHE
flowchart
graph LR
    A["White plastic device with ports and tubing"] --> B["Three-step assembly"]
    B --> C["Electrical outlet with pipe fittings and a chimney"]
elettronica www.vevor.com/support
VEVOR®
natural_image
White VEVOR plastic waste bin with lid and label (no additional text or symbols visible)
ESPECIFICACIONES
flowchart
graph LR
    A["White plastic device with ports and tubing"] --> B["Three-step assembly"]
    B --> C["Electrical outlet with pipe fittings and a chimney"]
flowchart
graph TD
    A["Step 1: Initial setup with white tank, blue tube, and red X mark"] --> B["Step 2: Breakdown of bottle, plate, and lamp"]
    B --> C["Step 3: Breakdown of bottle, plate, and lamp"]
    C --> D["Step 4: Breakdown of bottle, plate, and lamp"]
    D --> E["Step 5: Breakdown of bottle, plate, and lamp"]
    E --> F["Step 6: Breakdown of bottle, plate, and lamp"]
    F --> G["Step 7: Discharge with red X mark in bowl, down arrow"]
    style A fill:#f9f,stroke:#333
    style B fill:#ccf,stroke:#333
    style C fill:#cfc,stroke:#333
    style D fill:#fcc,stroke:#333
    style E fill:#cff,stroke:#333
    style F fill:#ffc,stroke:#333
    style G fill:#fcf,stroke:#333
natural_image
White VEVOR plastic waste bin with lid and label (no additional text or symbols visible)
POTRZEBUJE POMOCY? SKONTAKTUJ SIĘ Z NAMI!
SPECYFIKACJE
flowchart
graph LR
    A["White industrial device with pipes and valves"] --> B["Intermediate device with pipe fittings"]
    B --> C["Electrical outlet with pipe tube and chimney"]
flowchart
graph TD
    A["Step 1: Initial setup with white tank, blue tube, and red X mark"] --> B["Step 2: Breakdown of bottle, plate, and lamp"]
    B --> C["Step 3: Breakdown of bottle, plate, and lamp"]
    C --> D["Step 4: Breakdown of bottle, plate, and lamp"]
    D --> E["Step 5: Breakdown of bottle, plate, and lamp"]
    E --> F["Step 6: Breakdown of bottle, plate, and lamp"]
    F --> G["Step 7: Discharge with red X mark in bowl, down arrow"]
    style A fill:#f9f,stroke:#333
    style B fill:#ccf,stroke:#333
    style C fill:#cfc,stroke:#333
    style D fill:#fcc,stroke:#333
    style E fill:#cff,stroke:#333
    style F fill:#ffc,stroke:#333
    style G fill:#fcf,stroke:#333

ROZWIĄZYWANIE PROBLEMÓW
www.vevor.com/support
VEVOR®
Technische ondersteuning en e-garantiecertificaat www.vevor.cosupport
DOUCHEPOMP
INSTALLATIE
SINSTRUCTIE
MODEL:FLO300
natural_image
White VEVOR plastic container with lid and side ports, no visible text or symbols on the body.
www.vevor.com/support
SPECIFICATIES
flowchart
graph LR
    A["White plastic device with ports and tubing"] --> B["Three-step assembly"]
    B --> C["Electrical outlet with pipe fittings and a chimney"]
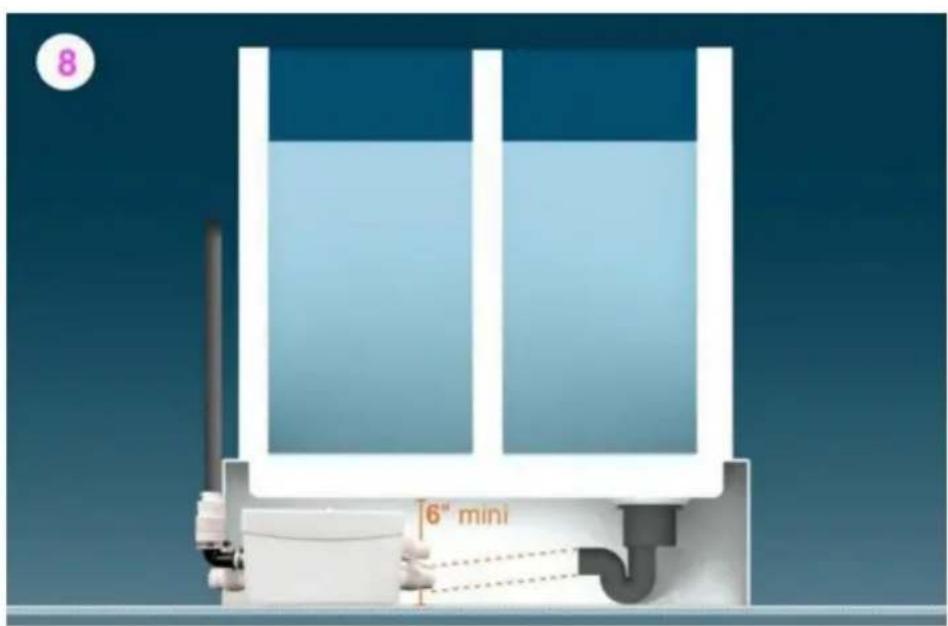
(4) Opmerkingen en installatieschema.
flowchart
graph TD
    A["Step 1: Initial setup with horizontal bars and connectors"] --> B["Step 2: Internal circuit with water tank and bowl"]
    B --> C["Step 3: Internal circuit with valves and connectors"]
    C --> D["Step 4: Internal circuit with pipe and valve"]
    D --> E["Step 5: Internal circuit with valves and connectors"]
    E --> F["Step 6: Internal circuit with valves and connectors"]
    F --> G["Step 7: Discharge with liquid level and switch"]
    style A fill:#f9f,stroke:#333
    style B fill:#ccf,stroke:#333
    style C fill:#cfc,stroke:#333
    style D fill:#fcc,stroke:#333
    style E fill:#cff,stroke:#333
    style F fill:#ffc,stroke:#333
    style G fill:#cfc,stroke:#333
PROBLEMEN OPLOSSEN
Jiangbei District 315033 Zhejiang PR China
Gemaakt inChina
EUREP UKLTD
EENHEID 2264, OCKSTREET 100ABINGDON
OXFORDSHIRE ENGELAND OX14 5DH
EUREP GmbH
Unterlettenweg 1a, 85051
garantiecertificaat www.vevor.com/support
VEVOR®
INSTALLATIONSANVISNING S
MODELL: FLO300
natural_image
White VEVOR plastic waste bin with lid and label (no additional text or symbols visible)
BEHÖVS HJÄLP? KONTAKTA OSS!
www.vevor.com/support
SPECIFICATIONER
flowchart
graph LR
    A["White industrial device with pipes and valves"] --> B["Intermediate device with pipe fittings"]
    B --> C["Electrical outlet with pipe tube"]
flowchart
graph TD
    A["Step 1: Initial setup with horizontal bars and connectors"] --> B["Step 2: Internal circuit with water tank and bowl"]
    B --> C["Step 3: Internal circuit with valves and connectors"]
    C --> D["Step 4: Internal circuit with pipe and valve"]
    D --> E["Step 5: Internal circuit with valves and connectors"]
    E --> F["Step 6: Internal circuit with valves and connectors"]
    F --> G["Step 7: Discharge with liquid level and switch"]
    style A fill:#f9f,stroke:#333
    style B fill:#ccf,stroke:#333
    style C fill:#cfc,stroke:#333
    style D fill:#fcc,stroke:#333
    style E fill:#cff,stroke:#333
    style F fill:#ffc,stroke:#333
    style G fill:#cfc,stroke:#333
FELSÖKNING
Adress: 2 Holywell Lane, London, England, EC2A 3ET
Tillverkare: Ningbo YUNSUN Electromechanical Co., Ltd
Adress: Byggnad 3 No.7 Hongshen Road Hongtang Industrial Zone A, Jiangbei District 315033 Zhejiang PR Kina
Tillverkad iKina
EUREP UK LTD
ENHET 2264, 100 OCK STREET, ABINGDON
OXFORDSHIRE ENGLAND OX145DH
EUREP GmbH
Unterlettenweg 1a, 85051
Ingolstadt, Tyskland
VEVOR®
TOUGH TOOLS, HALF PRICE
www.vevor.com/support