
LD-8207 - Glue gun Vevor - Free user manual and instructions
Find the device manual for free LD-8207 Vevor in PDF.
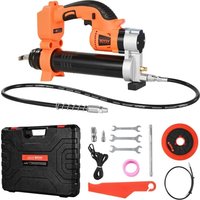


| Product Type | Cordless Grease Gun |
| Model | LD-8207 / LD-8207A / LD-8207B |
| Brand | Vevor |
| Battery Voltage | 18.5 V DC (compatible with 18 V - 21 V) |
| Battery Compatibility | Compatible with Makita batteries |
| Maximum Working Pressure | 6,000 - 8,000 PSI |
| Oil Flow Rate per Minute | 110 - 130 g |
| Motor Type | LY4815A |
| Reservoir Capacity | Cartridge or suction fill (up to 6 vacuum tubes) |
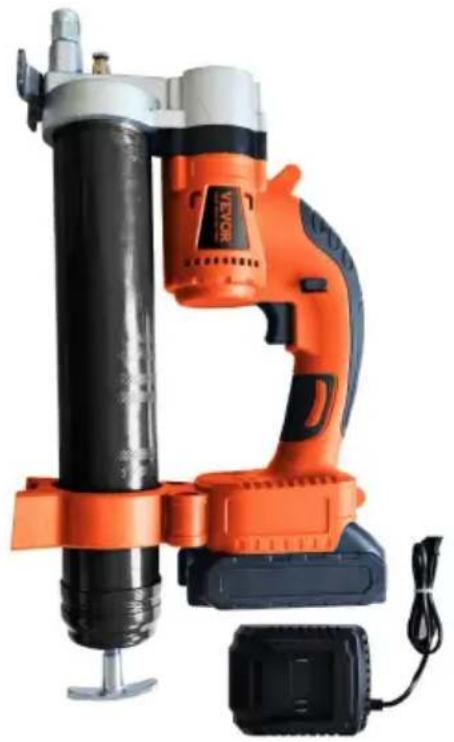
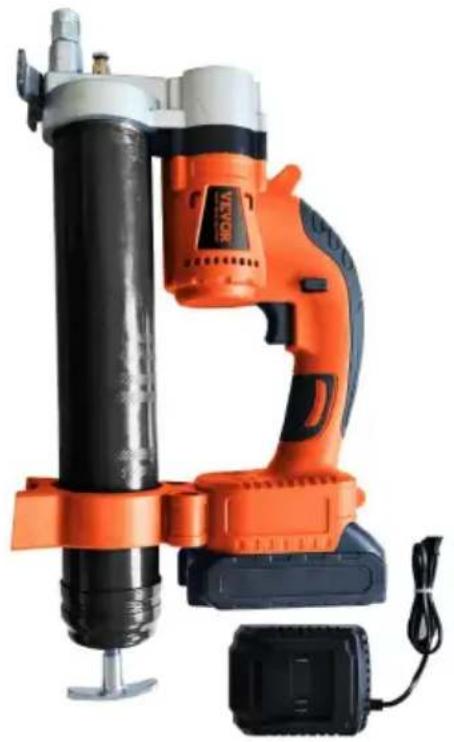
| Included Accessories | Main gun, straps, oil scraper, raw material band, oil pressure housing, wrench, flat nozzle, pointed nozzle, hard tube, hose, charger, battery (depending on version) |
| Operating Temperature | -20 °C to 50 °C |
| Body Material | Alloy steel |
| Motor Lifespan | Over 140 hours |
| Full Charge Time | Approximately 1.5 hours |
| Maintenance | Wipe after use; drain grease if unused for long; recharge battery every 3 days |
| Safety | Do not point at face; wear protective equipment; do not disassemble by non-professional; keep away from fire sources |
| Repairability | Contact dealer or manufacturer for any repair |
| Power Supply (charger) | AC 100-240 V 50/60 Hz (US version) or AC 220-240 V 50/60 Hz (EU version) |
| Operating Current | 4A - 24A |
Frequently Asked Questions - LD-8207 Vevor
User questions about LD-8207 Vevor
0 question about this device. Answer the ones you know or ask your own.
Ask a new question about this device
Download the instructions for your Glue gun in PDF format for free! Find your manual LD-8207 - Vevor and take your electronic device back in hand. On this page are published all the documents necessary for the use of your device. LD-8207 by Vevor.
USER MANUAL LD-8207 Vevor
Technical Support and E-Warranty Certificate www.vevor.com/support
CORDLESS GREASE GUN USER MANUAL
We continue to be committed to provide you tools with competitive price. "Save Half", "Half Price" or any other similar expressions used by us only represents an estimate of savings you might benefit from buying certain tools with us compared to the major top brands and does not necessarily mean to cover all categories of tools offered by us. You are kindly reminded to verify carefully when you are placing an order with us if you are actually Saving Half in comparison with the top major brands.
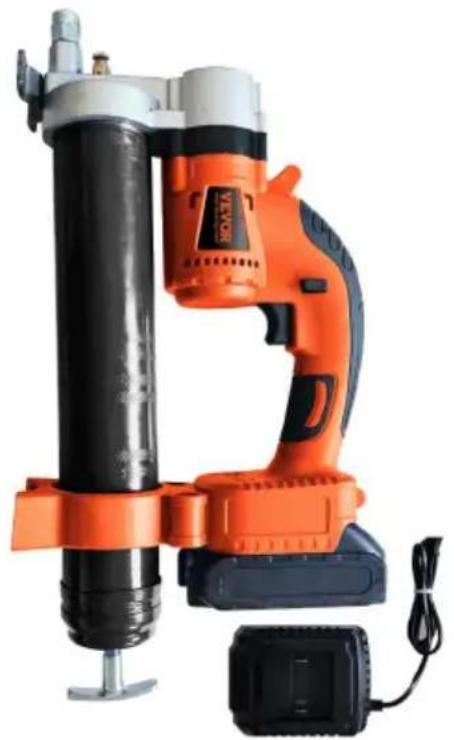
Model: LD-8207 LD-8207A / LD-8207B
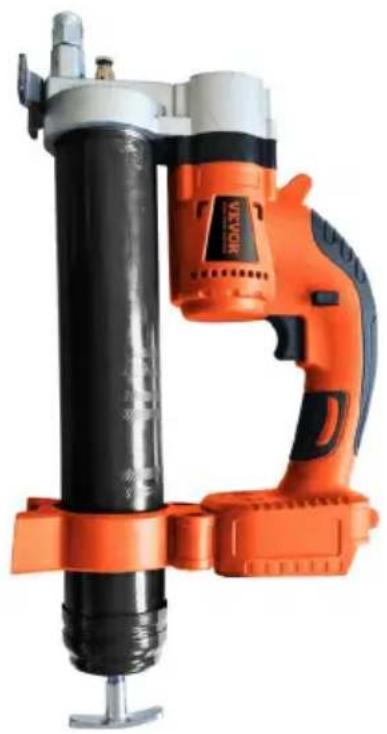
LD-8207
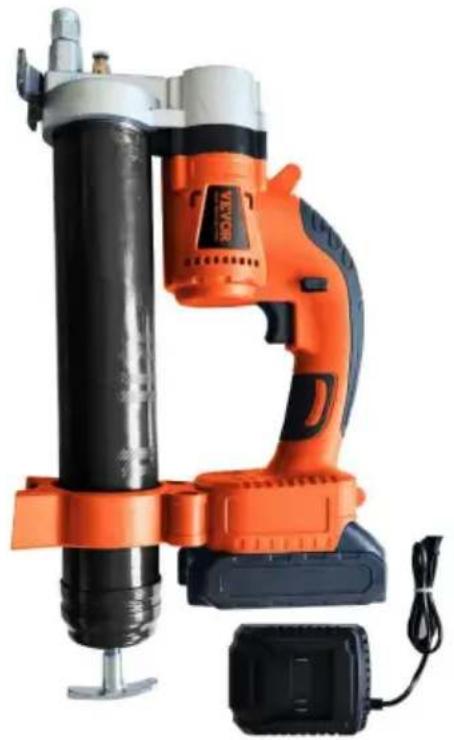
LD-8207A / LD-8207B
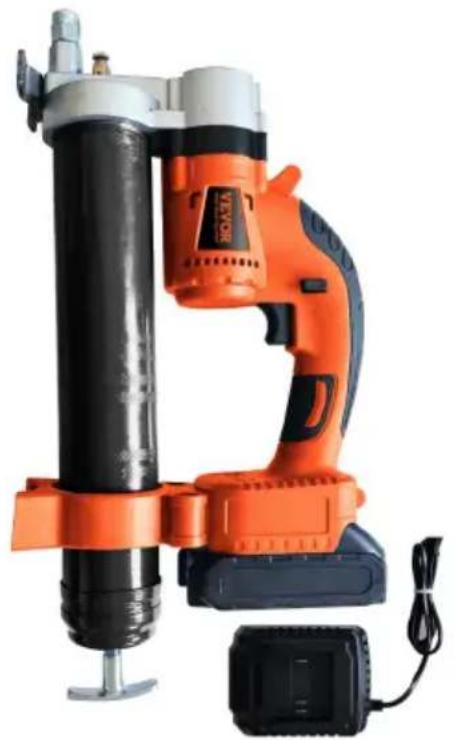
Photo for reference
NEED HELP? CONTACT US!
Have product questions? Need technical support? Please feel free contact us:
Technical Support and E-Warranty Certificate www.vevor.com/support
This is the original instruction, please read all manual instructions carefully before operating. VEVOR reserves a clear interpretation of user manual. The appearance of the product shall be subject to the product you received. Please forgive us that we won't inform you there are any technology or software updates on our product.
WARNING
- Read carefully and understand all ASSEMBLY AND OPERATION INSTRUCTIONS before operating.
- Failure to follow the safety rules and other basic safety precautions may result in serious personal injury.
Specification
Model: LD-8207/ LD-8207A/ LD-8207B used 18V-21V is acceptable. And our tools can be matched with Makita's battery.
| Model | With Battery or not | Plug type | Power | Charger | |
| Input | Output | ||||
| LD-8207 | No | Without | 18.5V DC | Without | |
| LD-8207A | Yes | US | 18.5V 2.0ah | AC100-240V 50/60Hz | DC21V,2A |
| LD-8207B | Yes | EU | 18.5V 2.0ah | AC220-240V 50/60Hz | DC21V,2A |
The product has the following characteristics:
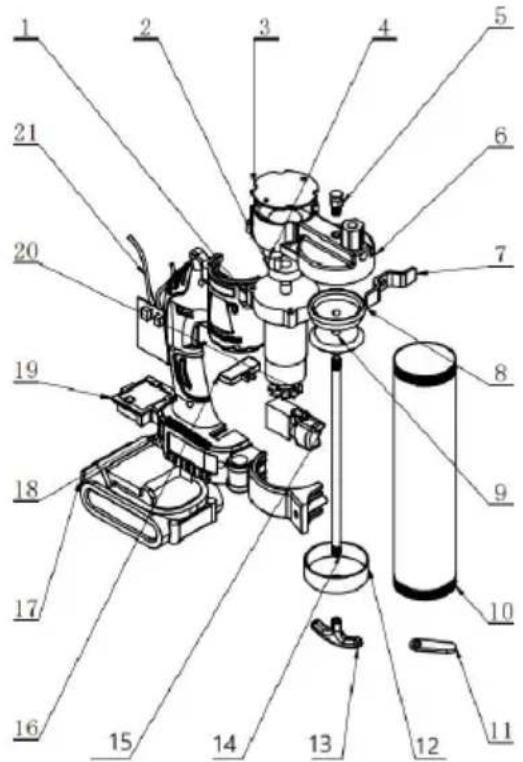
Photo for reference.
Stable oil injection.
Stable exhaust ensures smooth oil injection.
Strong pressure.
High oil injection pressure, continuous balance, quick and effective.
Easy to carry about.
Comes with the car, saves time and effort, and is convenient and fast.
Flexible and efficient use.
It can be injected into any part of the nozzle that can be extended to oil in place.
| SN | Part No | Qty | SN | Part No | Qty |
| 1 | Gearbox | 1 | 12 | Oil cylinder cover | 1 |
| 2 | Eccentric axle wheel | 1 | 13 | Aluminum handle | 1 |
| 3 | Pump body cover | 1 | 14 | pull rod | 1 |
| 4 | Eccentric core rod sleet | 1 | 15 | switch button | 1 |
| 5 | Exhaust valve | 1 | 16 | Card components | 1 |
| 6 | Aluminum pump body | 1 | 17 | Lithium battery pad | 1 |
| 7 | Foot support | 1 | 18 | Shell - Left | 1 |
| 8 | Rubber piston | 1 | 19 | Battery box interfa | 1 |
| 9 | Fixed components | 1 | 20 | electric machinery | 1 |
| 10 | Oil storage cylinder | 1 | 21 | Control board | 1 |
| 11 | Insurance card | 1 |
Before using, check the inspection method: check if the work light will light up when the product is plugged in with a battery. In the case of no load, is the machine running normally?
Instructions for using butter balls.
Step 1. Pull back the plunger rod handle and fill the barrel with grease.
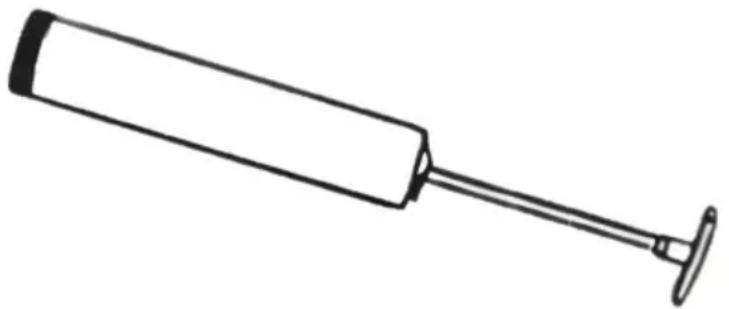
Grease filling options:
1) Cartridge Loading: Remove the plastic cap from the cartridge and insert the open end of the cartridge into the grease gun barrel until the rim of the pull-tab end meets the rim of the barrel.
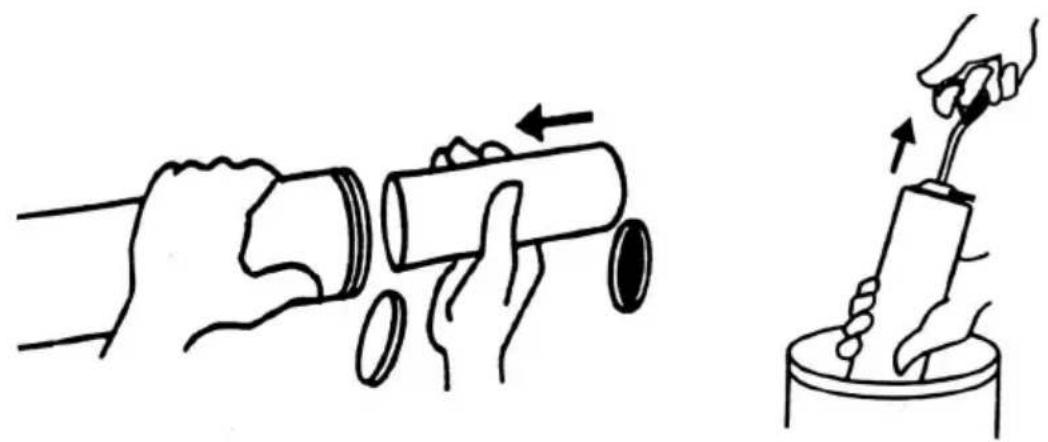
1) 2)
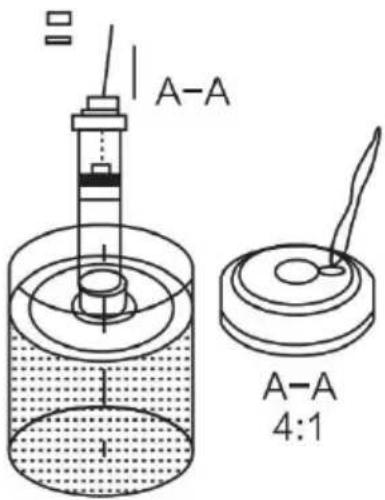
2) Suction Fill: Insert the open end of the barrel about 2" into the grease container. Slowly pull the plunger rod handle to draw in grease into the empty barrel while pushing the barrel deeper into the grease until the plunger rod is completely extended. The outside surface may have a lot of grease stuck to it and should be wiped clean for safety.
Step 2: Assemble the barrel back into the grease gun. Activate the safety catch and push the push rod back into the barrel.
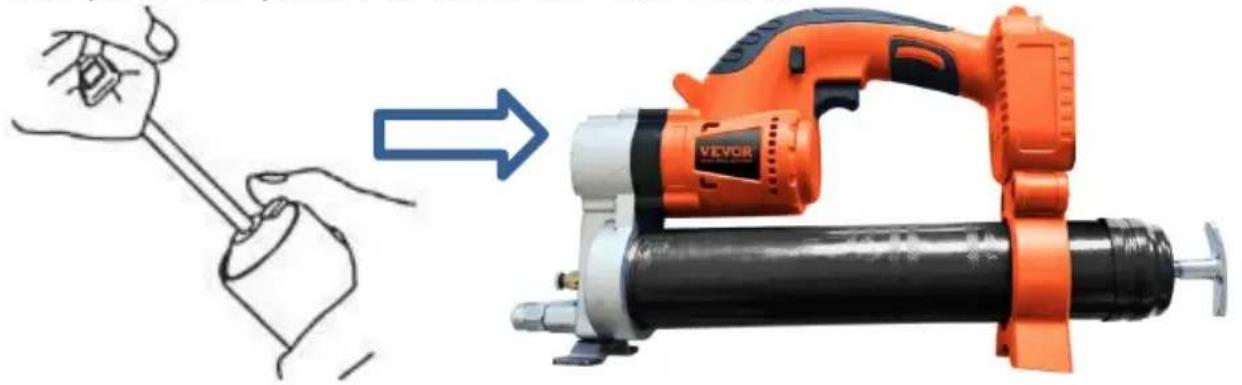
Oil pressure pan use method
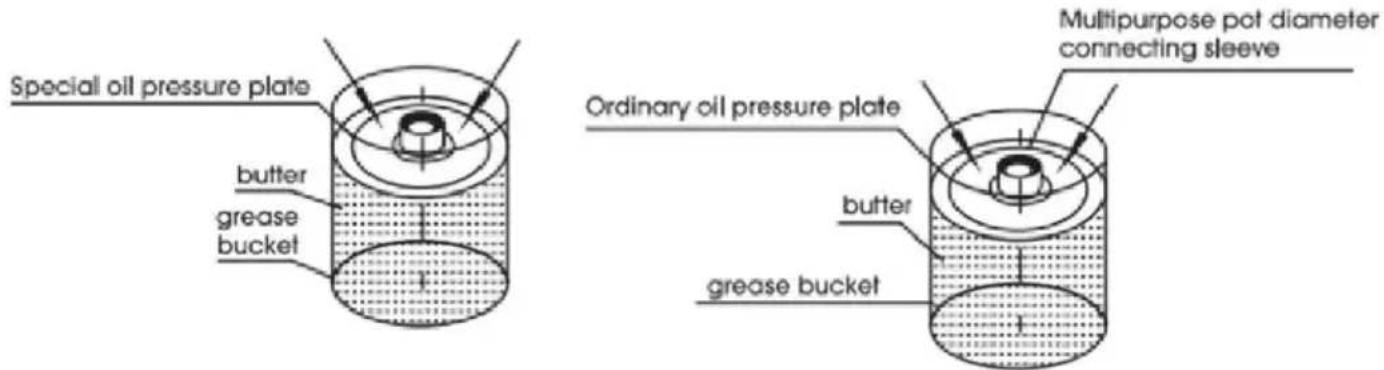
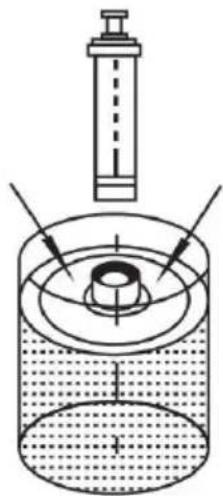
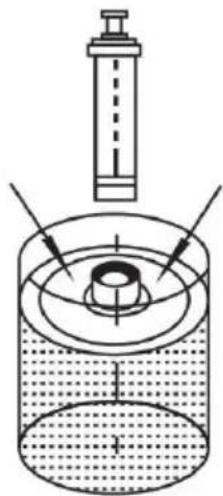
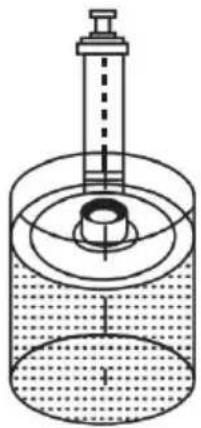
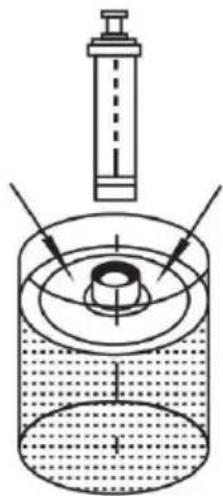
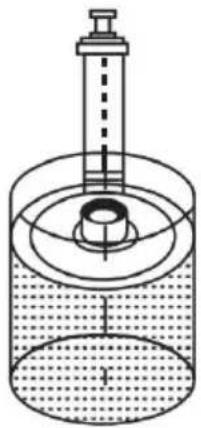
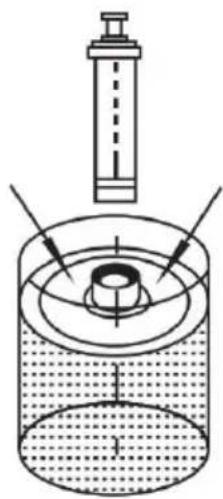
① Before oil suction, please follow the arrow direction. Press down on the oil suction tray to turn yellow. Empty the air from the oil barrel. ② Use a multi-purpose variable diameter oil pressure plate with different calibers first. Rotate the connecting sleeve onto the oil pressure plate, then follow the arrow. Press down on the oil suction tray until the butter is full to the connection. Insert the threaded port to rotate the gun barrel for oil suction.
The usage method of a multi-purpose variable diameter connecting sleeve: Use it with ordinary oil suction cups of different diameters. (Lithium battery dual-purpose grease gun special oil suction tray does not need to be used.)
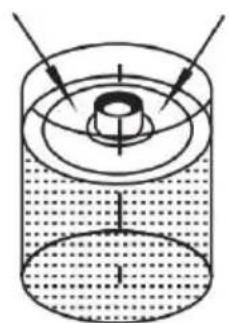
Before oil suction, please follow the arrow direction. Press down on the oil suction tray and turn the yellow. Empty the air inside the oil drum.
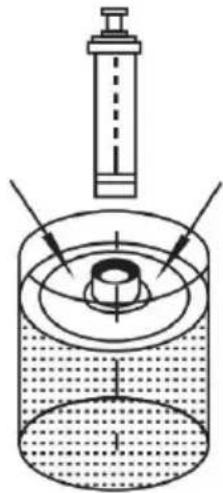
② Until the butter is full. Oil suction cup. Threaded port.
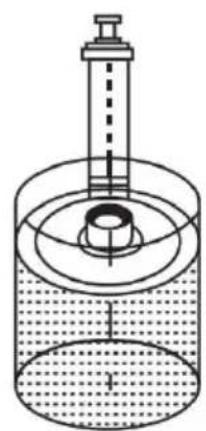
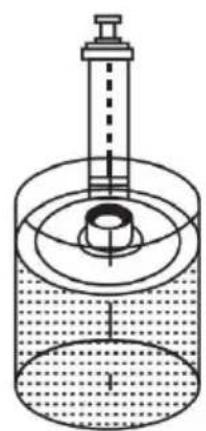
③ Insert the barrel edge and oil pan. Thread turned in and tightened.
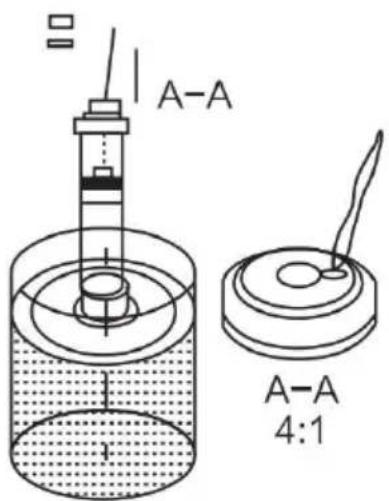
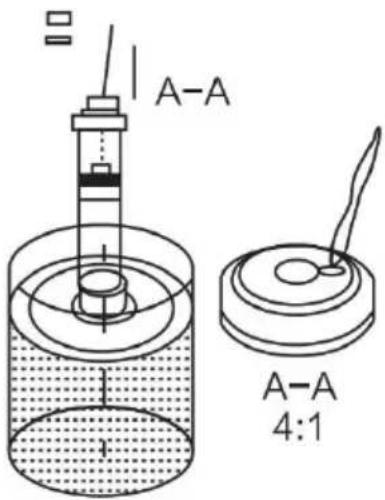
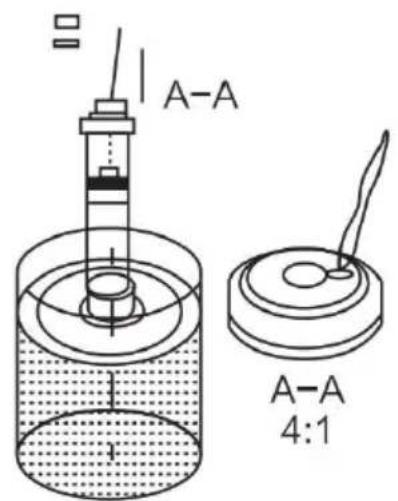
④ Grasp the handle and pull the zipper to extract the contents of the bucket. Butter, clip the zipper back after completion. Cover the buckle and finally unscrew the barrel.
The usage method for breaking up and filing oil, as shown in the figure: Rotate the gun barrel to the specially equipped oil suction plate (when the oil suction plate is waiting for oil suction, please first put the butter bucket into it. Evacuate the air until the butter is full and the oil suction effect is better at the threaded of the oil suction plate. If the oil suction tray is not pressed to discharge the air inside the bucket, the air inside the tube will increase during oil suction, which is not due to poor suction of the product; consumers who purchase this product are advised to be aware of this).
3. Rod handle
1) Pull the rod handle when installing grease in the barrel.
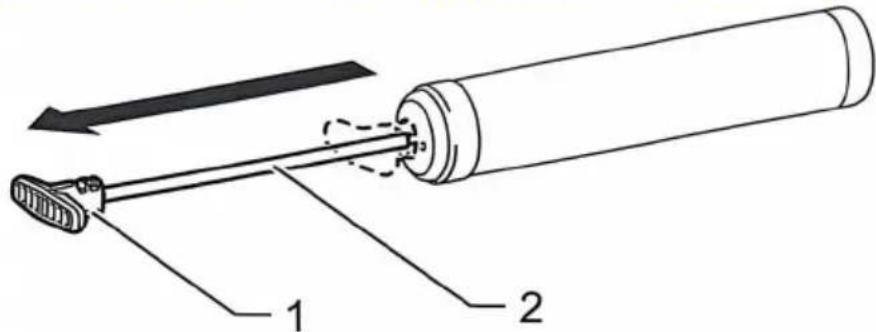
- Rod handle 2. Rod
2) To lock the rod handle fully pulled, pull the rod handle until the groove on the rod can be seen, and then hook the groove onto the slot. To unlock the rod handle, unhook the groove so the rod moves forward.
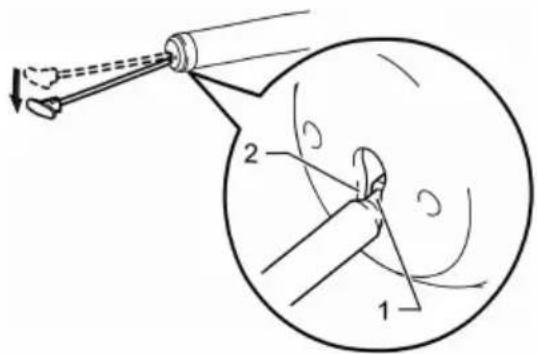
- Groove 2. Slot
As shown in the figure: After pulling the zipper to the bottom and securing it firmly, rotate it onto the gun head. Release the zipper and put it back into the bucket, then use a magnet to attach it above the back cover. You can easily apply oil.
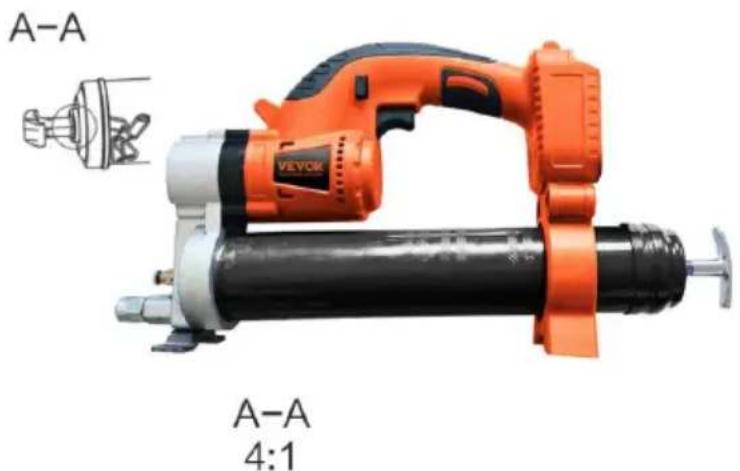
Absorbing iron stone after oil absorption Attached is a diagram of the rear cover
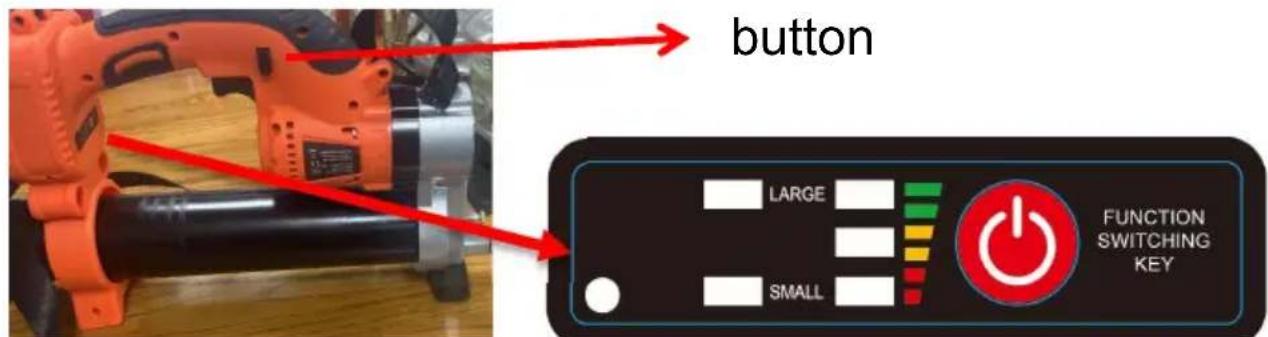
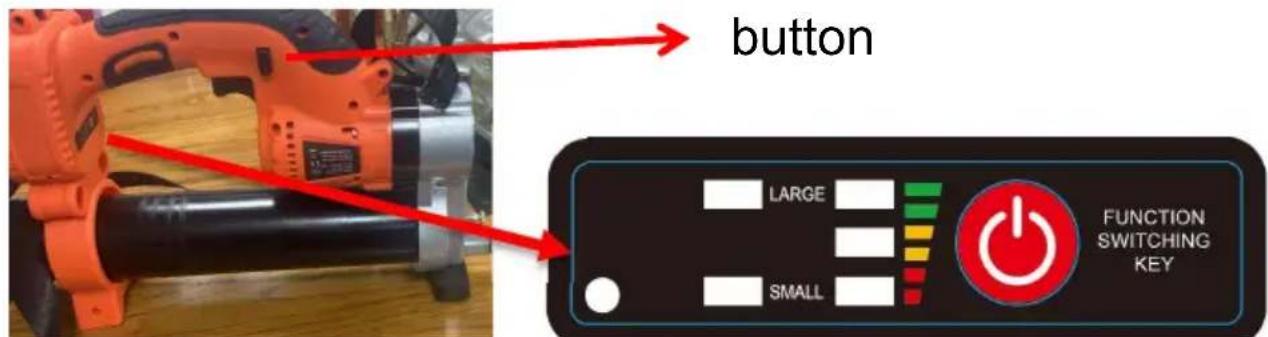
Function panel:
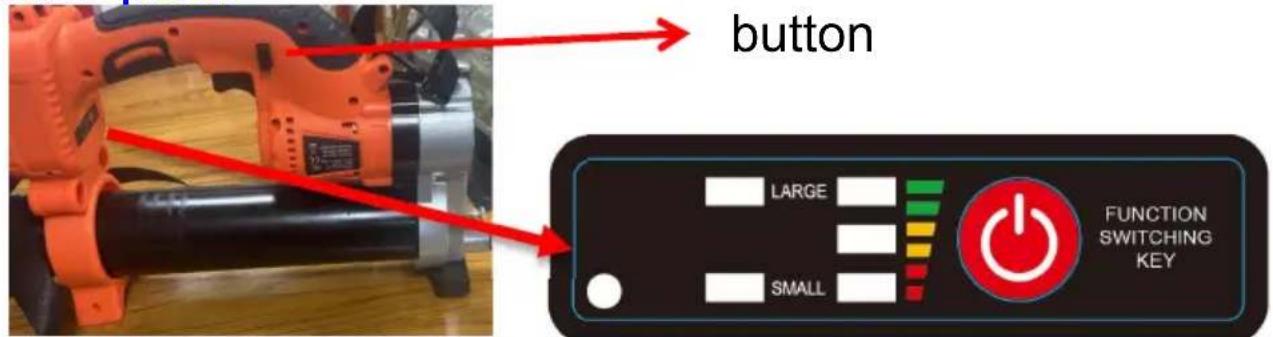
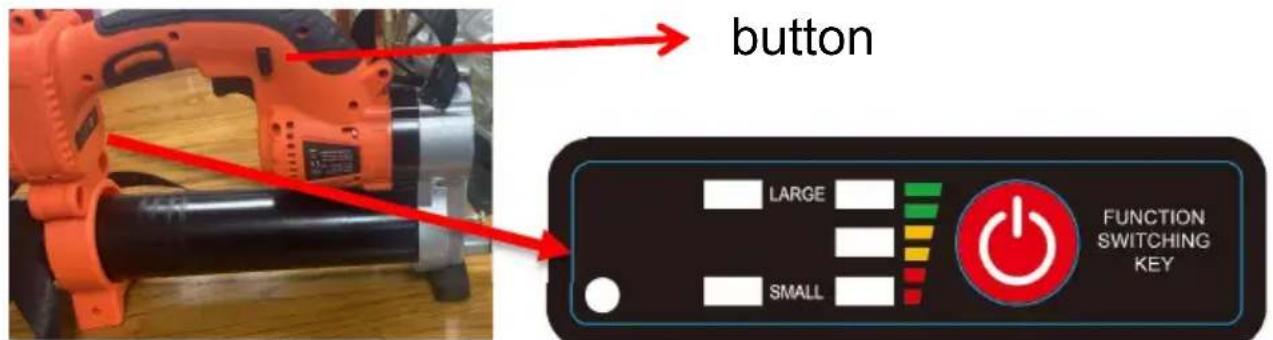
1) When the button is turned left, click the switch key. ① The indicator light is displayed in a large position, the tools can shoot grease fast continuous. ② The indicator light is displayed in a small position, the tools can shoot grease slowly continuous. 2) When the switch key is turned right, click the switch key. ① When the indicator light on the left lower corner is closed, the tools can shoot grease fast continuous. ② When the indicator light on the left lower corner is opened, the tools can shoot grease discontinuous.
Battery usage method
Electrical safety:
① The charging method of the battery needs to be known: the plug of the lithium battery tool must match the socket. Please do not modify the plug; do not connect electric tools with grounding wires to any transformer plug used together. Using unmodified plugs and matching sockets can reduce the danger of electric shock. ② The charging method of the battery needs to be known: the plug of the lithium battery tool must match the socket. Please do not modify the plug; do not connect electric tools with grounding wires to any transformer plug used together. Using unmodified plugs and matching sockets can reduce the danger of electric shock. ③ Lithium-ion tools should not be exposed to rain. Do not place it in a damp environment; water should flow into the electric tool will increase the risk of electric shock. ④ When charging, the battery is strictly prohibited from being close to flammable, explosive, or corrosive materials, with a circumference of 15 meters. No debris should be placed inside, and multiple batteries should not be charged to prevent overloading of the circuit. Use to cause wire heating. ⑤ It is strictly prohibited to charge batteries on wooden, plastic, or other items.
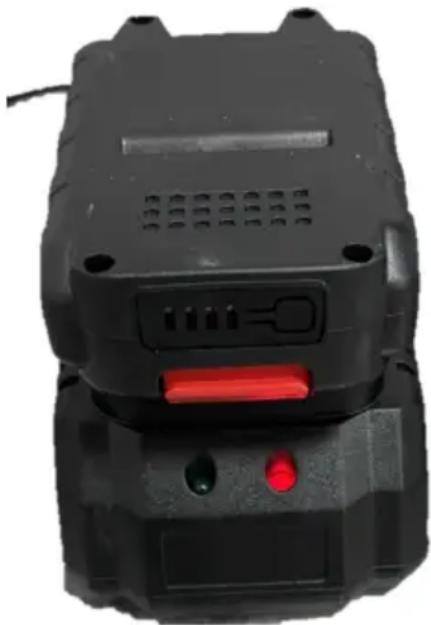
Photo for reference
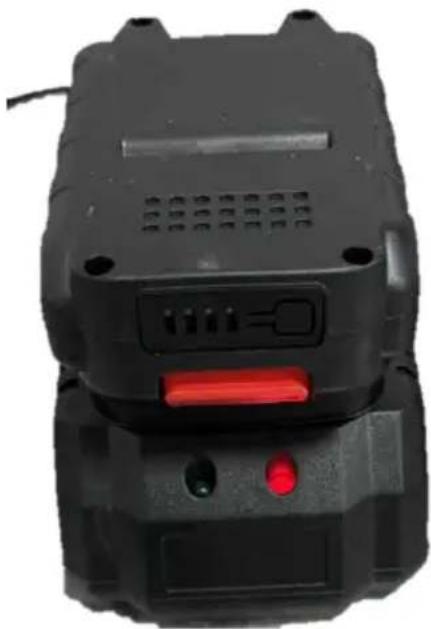
| To charge the battery, line up the slot of the battery with the slot of the charger and slide into place. | The battery indicator light should turn from green to red when the battery is charging. When the indicator light has turned green the battery should be fully charged. |
WARNING: Allow the battery to cool down before charging if the battery is hot after continuous use.
Charging method:
Before using the lithium grease gun, please charge the battery according to the following method
① Insert the power plug of the battery charger into an appropriate AC voltage source, and the charging indicator light will turn green. ② Insert the DC plug of the charger into the DC socket of the battery box. ③ When connected to the power supply, the charger indicator light will turn red, and charging will begin. During the charging process, the indicator light will remain stable, and the red light will remain on. ④ When the charger indicator light changes from red to green, it indicates that the charging cycle is complete. ⑤ After charging, please unplug the power plug of the charger from the power outlet.
Attention:
The battery charger is only used to charge the original factory battery box. Do not use it for other purposes or charge it with batteries from other manufacturers. When charging a new battery case, it may not be fully charged. Please fully discharge it and charge it several times before charging. If charging a rechargeable battery that has just been used or has been exposed to direct sunlight or heat for a long time, the charging indicator light may light up and turn green. Please wait for a while, as the battery pack will start charging once it cools down.
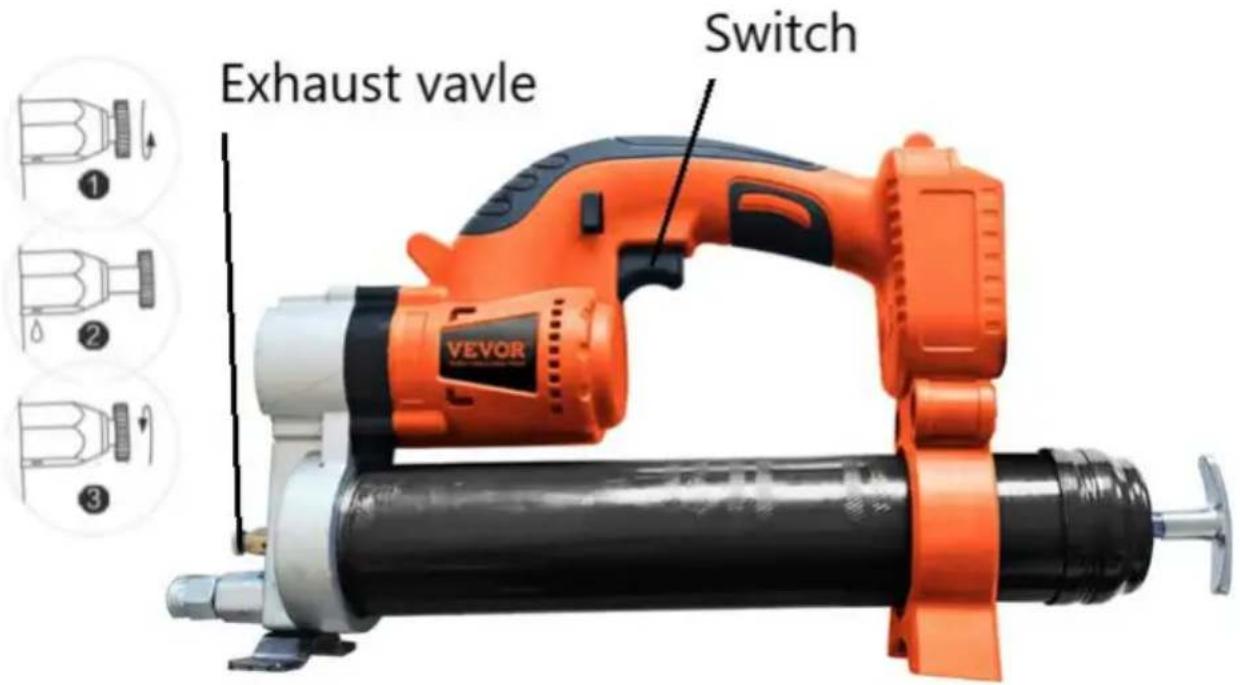
Problems that will occur during the oiling process and the solutions
- Problem: The butter gun operates normally during use, but there is no butter discharged from the oil outlet nozzle. Reason: It may be due to the phenomenon of air being sucked in by the pipe during the oil suction process, causing the butter to be unable to be discharged normally, or checking if the tail chain is stuck.
- Problem: Motor speed slows down. Reason: Oil circuit blockage, insufficient battery power.
Press the switch to the exhaust and oil discharge diagram
Air exhaust operation method, as shown in the figure: Open the exhaust valve as shown in figure 9, rotate the exhaust valve twice, press the main switch until the exhaust valve releases air and a small amount of grease, and then it can be used normally. If the oil still cannot be discharged normally, repeat this operation method to ensure normal discharge.
Product parameters of 18.5V lithium dual-purpose electric grease gun
Model: LD-8207, LD-8207A / LD-8207B
How many pipes of oil can be filled under no-load conditions: with a flat nozzle and a hose, six pipes can be filled. How many pipes of oil can be filled under load of 800 PSI: with a hose and a flat nozzle, four pipes can be filled.
Motor model: LY4815A
Battery voltage: 18.5V
Maximum working pressure: 6000PSI-8000PSI
Oil output per battery: 3200g with hose and flat nozzle. Oil output per minute: 110g-130g
Total oil output of two batteries: 6400g
Motor service life: over 140 hours
Time required to fully charge the battery: about 1.5h
Battery charging output: 21V
Maximum pressure of hose: 8000PSI
Battery charging input: 100~240V/50Hz for US version, 220~240V/50Hz for EU version
Product material: Alloy steel
Working temperature: -20°C~50°C
Working current: 4A-24A
1. Daily maintenance
1) After each use of the oil gun, wipe the outer shell clean and place it in the toolbox for proper storage.
2) When not in use for a long time, drain the grease inside the transparent gun barrel completely.
2. Precautions
① Non-professionals, please do not disassemble or repair the host. If there are quality issues that require repair, please contact the dealer and manufacturer's repair personnel.
② When using the product, please handle it with care and do not throw it high at will.
③ Use the specified type of grease according to the product specifications.
④ Please wear professional protective equipment before using this product on construction sites and operating sites. ⑤ Please do not aim the oil gun at the person's face during operation for safe operation. ⑥ After the product is not in use, please remove the lithium battery. The lithium battery should be charged every 3 days, and the accessories of the product and the operation of the body should be checked regularly. ⑦ Product storage conditions: ventilated and dry, independent storage, not mixed with other products. ⑧ Do not drop or collide the battery pack, and keep it away from sources of fire. ⑨ Regularly check the hose and do not excessively bend it during use.
Introduction to Product Auxiliary Tools
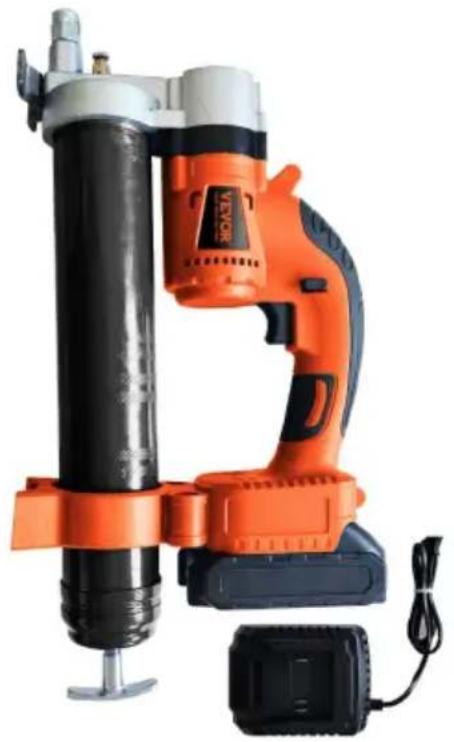
(Only top of the line products include all accessories)
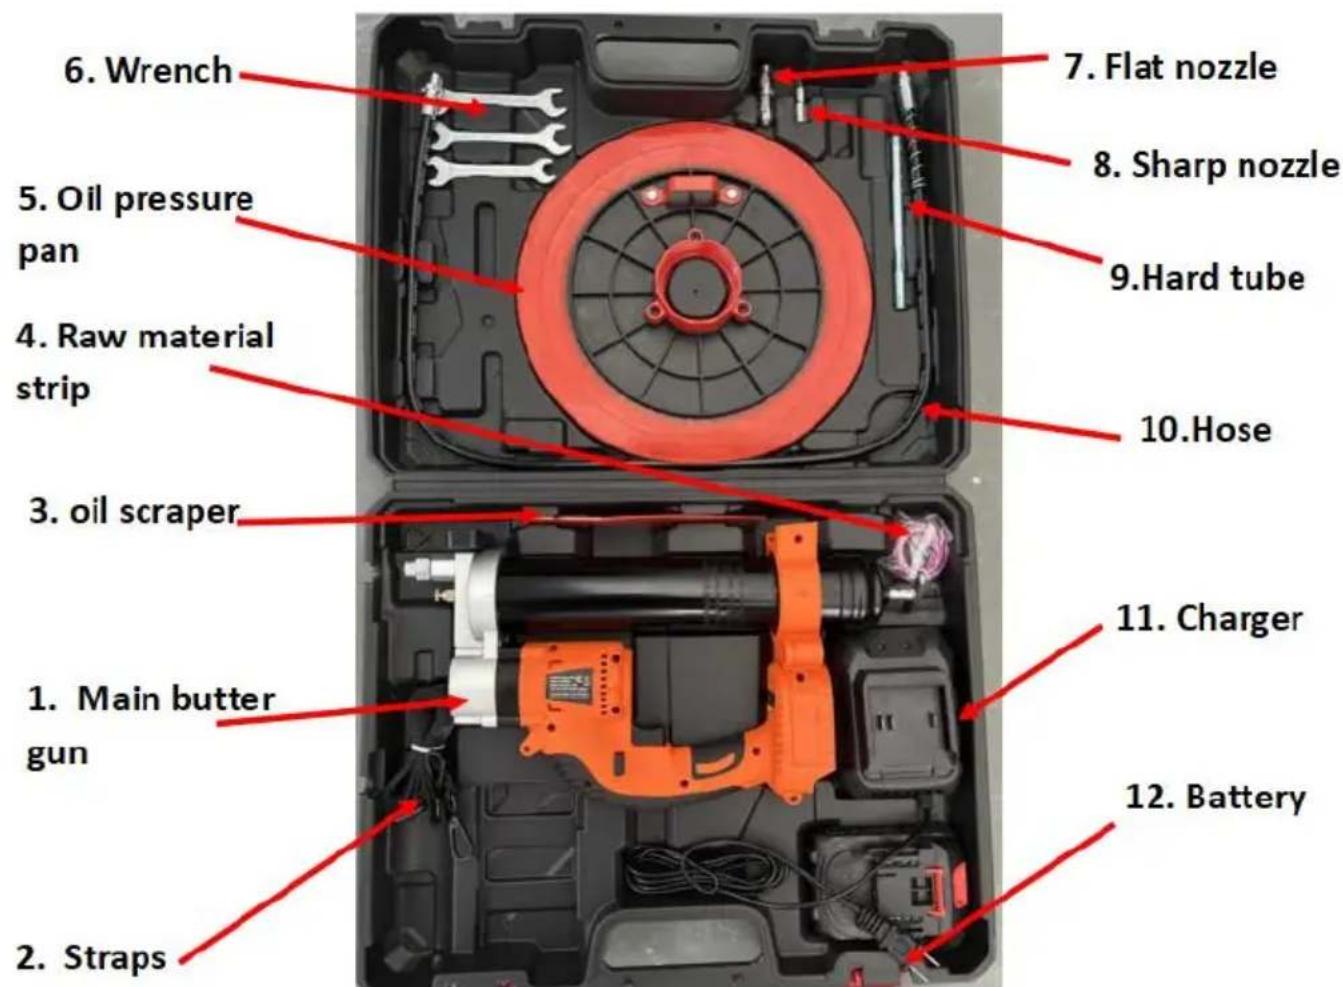
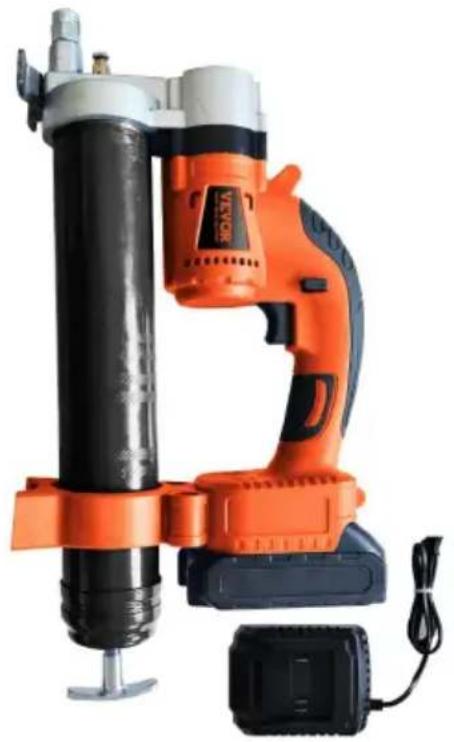
- Main butter gun 2. Straps 3. Oil scraper,
- Raw material strip 5. oil pressure pan 6. Wrench
- lat nozzle 8. Sharp nozzle . 9 Hard tube,
10, Hose 11, Charger 12. Battery,
Comparison of benefits between electric butter guns and manual butter guns in one year
Project: 20 ton excavator
| Electric | Manual |
| 1 Working hours and lost time:8 minutes/day*219 days=29hours*180yuan/hour=5220 yuan/year | 25 minutes/day*219 days=91hours*180yuan/hour=16400yuan/year |
| 2 Fuel consumption:2900grams/day*219 days=197kilograms=13 barrels*200 yuan=2180yuan/year | 500 grams/day*219 days=109kilograms=7barrels*200 yuan=1400yuan/year |
| 3 Machine maintenance+repair costs+loss of work costs4 axles*2000 yuan/axle=8000yuan/2years (repair cost)2400yuan/day * 4 days=9600 yuan/2years(loss of work fee)Total: 13600yuan/year | 4 axles * 2000 yuan/axle=8000yuan/year(repair cost)2400 yuan/day* 4 days=9600 yuan/year(loss of wofee)Total: 27200 yuan/year |
| 4 Purchase price electric:1000 yuan/unit=500 yuan (2 years p unit) | 150 yuan * 2=300 yuan (2 pieces p year) |
| Total:5220+2180+13600+500=21500yuan/year | Total:16400+1400+27200+300=45300yuan/year |
| Total price difference: 45300-21500= 23800 yuan/year | |
Comparison of benefits between electric grease guns and manual grease guns.

Warning - To reduce the risk of injury, user must read instruct manual carefully

Wear head protection
FCC Information:
CAUTION: Changes or modifications not expressly approved by the party responsible for compliance could void the user's authority to operate the equipment!
This device complies with Part 15 of the FCC Rules. Operation is subject to the following two conditions:
1) This product may cause harmful interference. 2) This product must accept any interference received, including interference that may cause undesired operation.
WARNING: Changes or modifications to this product not expressly approved by the party responsible for compliance could void the user's authority to operate the product.
Note: This product has been tested and found to comply with the limits for a Class B digital device pursuant to Part 15 of the FCC Rules. These limits are designed to provide reasonable protection against harmful interference in a residential installation.
This product generates, uses and can radiate radio frequency energy, and if not installed and used in accordance with the instructions, it may cause harmful interference to radio communications. However, there is no guarantee that interference will not occur in a particular installation. If this product does cause harmful interference to radio or television reception, which can be determined by turning the product off and on, the user is encouraged to try to correct the interference by one or more of the following measures.
- Reorient or relocate the receiving antenna.
- Increase the distance between the product and receiver.
- Connect the product to an outlet on a circuit different from that to which the receiver is connected.
- Consult the dealer or an experienced radio/TV technician for assistance.
CORRECT DISPOSAL
This product is subject to the provision of European Directive 2012/19/EU. The symbol showing a wheelie bin crossed through indicates that the product requires separate refuse collection in the European Union. This applies to the product and all accessories marked with this symbol. Products marked as such may not be discarded with
normal domestic waste, but must be taken to a collection point for recycling electrical and electronic devices.
Manufacturer: Shanghaimuxinmuyeyouxiangongsi
Address: Shuangchenglu 803nong11hao1602A-1609shi, baoshanqu, shanghai 200000 CN.
Imported to AUS: SIHAO PTY LTD. 1 ROKEVA STREETEASTWOOD NSW 2122 Australia
Imported to USA: Sanven Technology Ltd. Suite 250, 9166 Anaheim Place, Rancho Cucamonga, CA 91730
| EC | REP |
E-CrossStu GmbH
Mainzer Landstr.69, 60329 Frankfurt am Main.
| UK | REP |
YH CONSULTING LIMITED.
C/O YH Consulting Limited Office 147, Centurion House,
London Road, Staines-upon-Thames, Surrey, TW18 4AX
VEVOR®
TOUGH TOOLS, HALF PRICE
Technical Support and E-Warranty Certificate
www.vevor.com/support
VEVOR®
TOUGH TOOLS, HALF PRICE
LD-8207
LD-8207A / LD-8207B
www.vevor.com/support
1) Before oil suction, please follow the arrow direction. Press down on the oil suction tray to turn yellow. Empty the air from the oil barrel!
2) Use a multi-purpose variable diameter oil pressure plate with different calibers first. Rotate the connecting sleeve onto the oil pressure plate, then follow the arrow. Press down on the oil suction tray until the butter is full to the connection. Insert the threaded port to rotate the gun barrel for oil suction;
Before oil suction, please follow the arrow direction. Press down on the oil suction tray and turn yellow. Empty the air inside the oil drum.
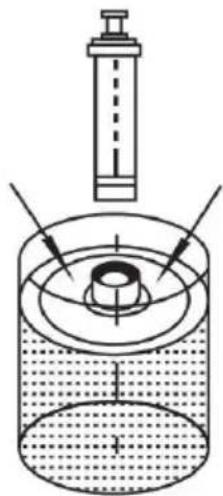
2) Until the butter is full. Oil suction cup. Threaded port.

3) Insert the barrel edge and oil pan. Thread turned in and tightened.
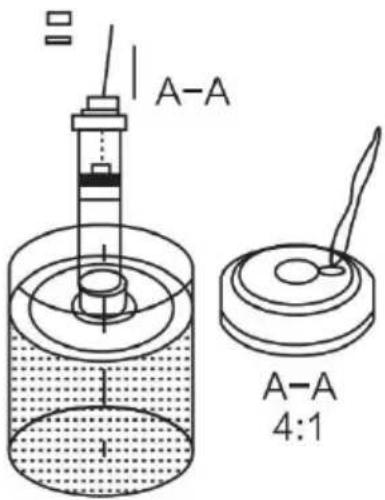
4) Grasp the handle and pull the zipper to extract the contents of the bucket. Butter, clip the zipper back after completion. Cover the buckle and finally unscrew the barrel.
Absorbing iron stone after oil absorption. Attached is a diagram of the rear cover.
Functions:
CORDLESS GREASE GUN USER MANUAL
LD-8207
LD-8207A / LD-8207B
Photo for reference
NEED HELP? CONTACT US!
Photo for reference
1) 2)
① Before oil suction, please follow the arrow direction. Press down on the oil suction tray to turn yellow. Empty the air from the oil barrel!
② Use a multi-purpose variable diameter oil pressure plate with different calibers first. Rotate the connecting sleeve onto the oil pressure plate, then follow the arrow. Press down on the oil suction tray until the butter is full to the connection. Insert the threaded port to rotate the gun barrel for oil suction;
Before oil suction, please follow the arrow direction. Press down on the oil suction tray and turn the yellow. Empty the air inside the oil drum.
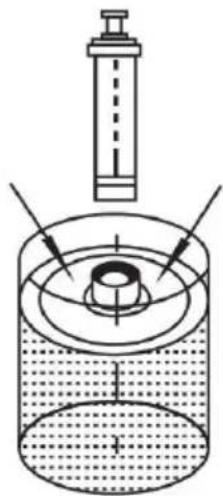
② Until the butter is full Oil suction cup threaded port
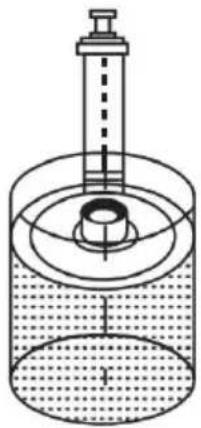
③ Insert the barrel edge and oil pan. Thread turned in and tightened.
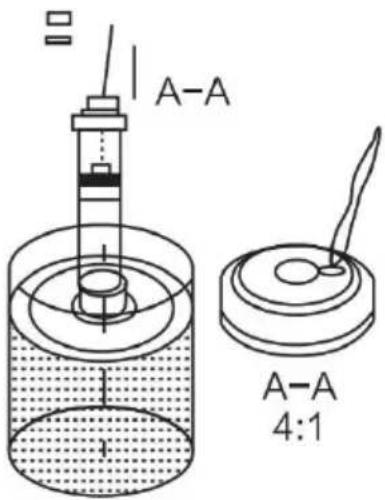
④ Grasp the handle and pull the zipper to extract the contents of the bucket. Butter, clip the zipper back after completion. Cover the buckle and finally unscrew the barrel.
- Nut 2. Slot
Function panel:
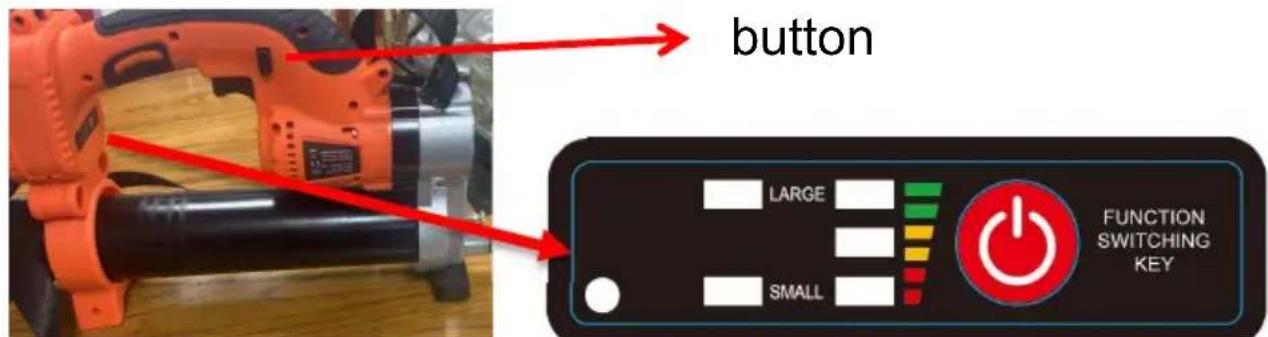
Photo for reference
C/O YH Consulting Limited Office 147, Centurion House,
London Road, Staines-upon-Thames, Surrey, TW18 4AX
VEVOR®
TOUGH TOOLS, HALF PRICE
www.vevor.com/support
VEVOR®
TOUGH TOOLS, HALF PRICE
Model LD-8207A / LD-8207B
Reference photo
NEED HELP? CONTACT US!
www.vevor.com/support
Reference photo
1) 2)
① Before oil suction, please follow the arrow direction. Press down on the oil suction tray to turn yellow. Empty the air from the oil barrel! ② Use a multi-purpose variable diameter oil pressure plate with different calibers first. Rotate the connecting sleeve onto the oil pressure plate, then follow the arrow. Press down on the oil suction tray until the butter is full to the connection. Insert the threaded port to rotate the gun barrel for oil suction;
Before oil suction, follow the arrow direction: press down on the oil suction tray and turn the yellow knob to empty the air inside the oil drum.
② Until the butter is full. Oil suction cup threaded port.
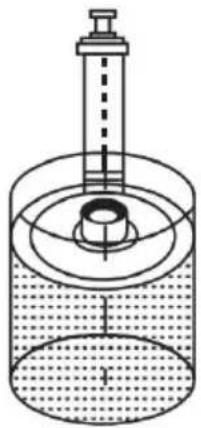
③ Insert the barrel edge and oil pan, then turn the thread to tighten.
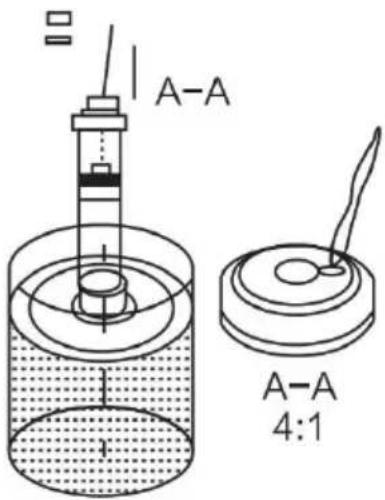
④ Grasp the handle and pull the zipper to extract the contents of the bucket. After completion, clip the zipper back, cover the buckle, and finally unscrew the barrel.
Function:
Reference photo
Imported in AUS: SIHAO PTY LTD. 1 ROKEVA STREET EASTWOOD NSW 2122 Australia
Imported in USA: Sanven Technology Ltd. Suite 250, 9166 Anaheim Place, Rancho Cucamonga, CA 91730
| EC | REP |
E-CrossStu GmbH
Mainzer Landstr.69, 60329 Frankfurt am Main.
| UK | REP |
YH CONSULTING LIMITED.
C/O YH Consulting Limited Office 147, Centurion House,
London Road, Staines-upon-Thames, Surrey, TW18 4AX
VEVOR®
TOUGH TOOLS, HALF PRICE
www.vevor.com/support
VEVOR®
TOUGH TOOLS, HALF PRICE
LD-8207
LD-8207A / LD-8207B
Reference photo
Reference photo
1) 2)
① Before oil suction, please follow the arrow direction. Press down on the oil suction tray to turn yellow. Empty the air from the oil barrel. ② Use a multi-purpose variable diameter oil pressure plate with different calibers first. Rotate the connecting sleeve onto the oil pressure plate, then follow the arrow. Press down on the oil suction tray until the butter is full to the connection. Insert the threaded port to rotate the gun barrel for oil suction;
Before oil suction, please follow the arrow direction. Press down on the oil suction tray and turn the yellow. Empty the air inside the oil drum.
② Until the butter is full. Oil suction cup. Threaded port.
③ Insert the barrel edge and oil pan. Thread turned in and tightened.
4. Grasp the handle and pull the zipper to extract the contents of the bucket. Butter, clip the zipper back after completion. Cover the buckle and finally unscrew the barrel.
- Rod handle 2. Rod
- Slot 2. Slot
Absorbing iron stone after oil absorption Attached is a diagram of the rear cover
functions:
Reference photo
C/O YH Consulting Limited Office 147, Centurion House,
London Road, Staines-upon-Thames, Surrey, TW18 4AX
VEVOR®
TOUGH TOOLS, HALF PRICE
www.vevor.com/support
CORDLESS GREASE GUN USER MANUAL
LD-8207
LD-8207A / LD-8207B
1) 2)
① Before oil suction, please follow the arrow direction. Press down on the oil suction tray to turn yellow. Empty the air from the oil barrel. ② Use a multi-purpose variable diameter oil pressure plate with different calibers first. Rotate the connecting sleeve onto the oil pressure plate, then follow the arrow. Press down on the oil suction tray until the butter is full to the connection. Insert the threaded port to rotate the gun barrel for oil suction.
Before oil suction, follow the arrow direction: press down on the oil suction tray and turn the yellow knob to empty the air inside the oil drum.
② Until the butter is full. Oil suction cup threaded port.
③ Insert the barrel edge and oil pan, thread turned in and tightened.
④ Grasp the handle and pull the zipper to extract the contents of the bucket. Butter, clip the zipper back after completion. Cover the buckle and finally unscrew the barrel.
Absorbing iron stone after oil absorption. Attached is a diagram of the rear cover.
C/O YH Consulting Limited Office 147, Centurion House,
London Road, Staines-upon-Thames, Surrey, TW18 4AX
VEVOR®
TOUGH TOOLS, HALF PRICE
www.vevor.com/support
VEVOR®
TOUGH TOOLS, HALF PRICE
Technical Support and E-warranty Certificate: www.vevor.com/support
SNOERLOOS VETSPUIT GEBRUIKER HANDMATIG
LD-8207
LD-8207A / LD-8207B
Photo for reference
NEED HELP? CONTACT US!
Photo for reference
1) 2)
① Before oil suction, please follow the arrow direction. Press down on the oil suction tray to turn yellow. Empty the air from the oil barrel!
② Use a multi-purpose variable diameter oil pressure plate with different calibers first. Rotate the connecting sleeve onto the oil pressure plate, then follow the arrow. Press down on the oil suction tray until the butter is full to the connection. Insert the threaded port to rotate the gun barrel for oil suction;
Before oil suction, please follow the arrow direction. Press down on the oil suction tray and turn the yellow. Empty the air inside the oil drum.
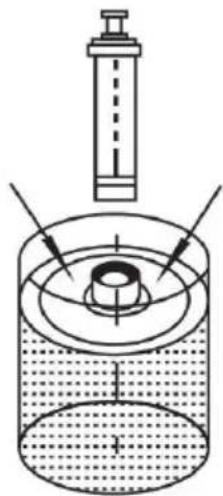
② Until the butter is full. Oil suction cup. Threaded port.
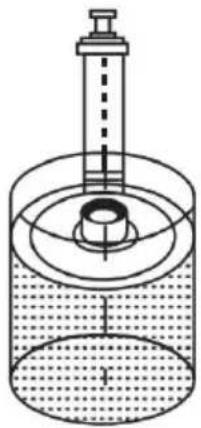
③ Insert the barrel edge and oil pan. Thread turned in and tightened.
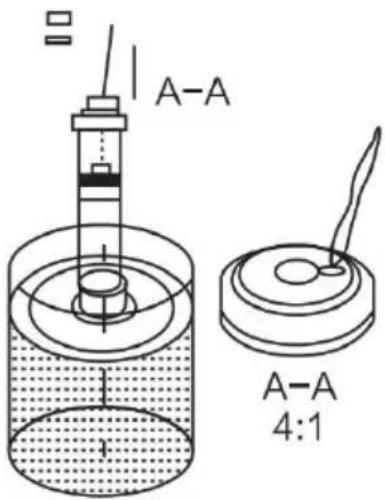
4. Grasp the handle and pull the zipper to extract the contents of the bucket. Butter, clip the zipper back after completion. Cover the buckle and finally unscrew the barrel.
- Rod handle 2. Rod
- Groove 2. Slot
Control panel:
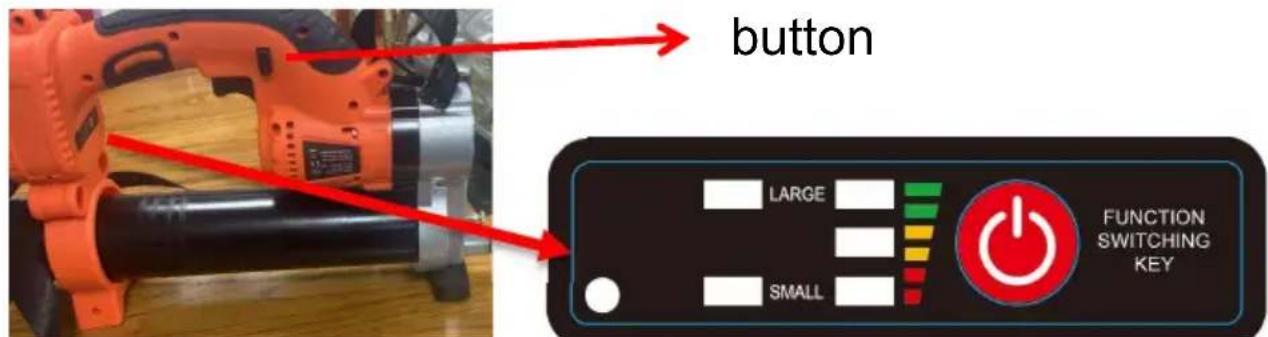
Photo for reference
- Main grease gun 2. Straps 3. Oil scraper,
- Raw material strip 5. Oil drain pan 6. Wrench
- Flat spray nozzle 8. Sharp nozzle . 9 Hard tube , 10, Hose 11, Charger 12, Battery ,
Project: 20-ton excavator
C/O YH Consulting Limited Office 147, Centurion House,
London Road, Staines-upon-Thames, Surrey, TW18 4AX
VEVOR®
TOUGH TOOLS, HALF PRICE
www.vevor.com/support
VEVOR®
TOUGH TOOLS, HALF PRICE
LD-8207
LD-8207A / LD-8207B
Photo for reference
NEED HELP? CONTACT US!
Photo for reference
1) 2)
① Before oil suction, please follow the arrow direction. Press down on the oil suction tray to turn yellow. Empty the air from the oil barrel!
② Use a multi-purpose variable diameter oil pressure plate with different calibers first. Rotate the connecting sleeve onto the oil pressure plate, then follow the arrow. Press down on the oil suction tray until the butter is full to the connection. Insert the threaded port to rotate the gun barrel for oil suction;
Before oil suction, please follow the arrow direction. Press down on the oil suction tray and turn the yellow. Empty the air inside the oil drum.
② Until the butter is full Oil suction cup threaded port
③ Insert the barrel edge and oil pan. Thread turned in and tightened.
4. Grasp the handle and pull the zipper to extract the contents of the bucket. Butter, clip the zipper back after completion. Cover the buckle and finally unscrew the barrel.
- Track 2. Track
Absorbing iron stone after oil absorption. Attached is a diagram of the rear cover.
Function panel:
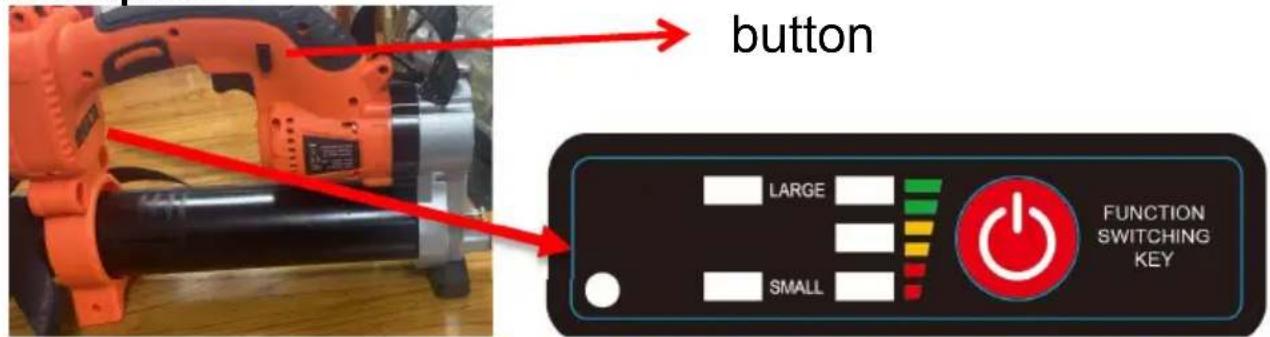
Photo for reference
C/O YH Consulting Limited Office 147, Centurion House, London Road, Staines-upon-Thames, Surrey, TW18 4AX
VEVOR®
TOUGH TOOLS, HALF PRICE
www.vevor.com/support
- CORDLESS GREASE GUN USER MANUAL
- NEED HELP? CONTACT US
- WARNING
- SPECIFICATION
- STABLE OIL INJECTION
- STRONG PRESSURE
- EASY TO CARRY ABOUT
- FLEXIBLE AND EFFICIENT USE
- INSTRUCTIONS FOR USING BUTTER BALLS
- GREASE FILLING OPTIONS
- ROD HANDLE
- FUNCTION PANEL
- BATTERY USAGE METHOD
- ELECTRICAL SAFETY
- CHARGING METHOD
- ATTENTION
- PROBLEMS THAT WILL OCCUR DURING THE OILING PROCESS AND THE SOLUTIONS
- PRESS THE SWITCH TO THE EXHAUST AND OIL DISCHARGE DIAGRAM
- DAILY MAINTENANCE
- PRECAUTIONS
- INTRODUCTION TO PRODUCT AUXILIARY TOOLS
- WEAR HEAD PROTECTION
- FCC INFORMATION
- CORRECT DISPOSAL
- VEVOR®
- FUNCTIONS
- FUNCTION
- SNOERLOOS VETSPUIT GEBRUIKER HANDMATIG
- CONTROL PANEL
Brand : Vevor
Model : LD-8207
Category : Glue gun