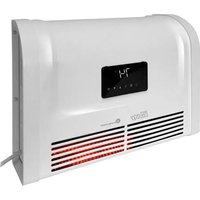
Electric Buddy MHBEW150FATRW - Wall electric heater Mr. Heater - Free user manual and instructions
Find the device manual for free Electric Buddy MHBEW150FATRW Mr. Heater in PDF.


User questions about Electric Buddy MHBEW150FATRW Mr. Heater
0 question about this device. Answer the ones you know or ask your own.
Ask a new question about this device
Download the instructions for your Wall electric heater in PDF format for free! Find your manual Electric Buddy MHBEW150FATRW - Mr. Heater and take your electronic device back in hand. On this page are published all the documents necessary for the use of your device. Electric Buddy MHBEW150FATRW by Mr. Heater.
USER MANUAL Electric Buddy MHBEW150FATRW Mr. Heater
OPERATING INSTRUCTIONS AND OWNER'S MANUAL

Mr HEATER
WALL MOUNTED FORCED AIR ELECTRIC HEATER
Model #
MHBEW150FATRW

natural_image
White portable electric heater with digital display and ventilation slots (no visible text or symbols)Languages included
- English
- Spanish
- French

WARNING: Read and understand this entire owner's manual, including all safety information, before plugging in or using this product. Failure to do so could result in fire, electric shock or serious personal injury.

WARNING: Keep this owner's manual for future reference.
Definitions: Safety Guidelines & IMPORTANT INSTRUCTIONS
The definitions below describe the level of severity for each signal word. Please read the manual and pay attention to these symbols.
Danger: Indicates an imminently hazardous situation which, if not avoided, will result in death or serious injury.
Warning: Indicates a potentially hazardous situation which, if not avoided, could result in death or serious injury.
Caution: Indicates a potentially hazardous situation which, if not avoided, may result in minor or moderate injury. NOTICE: Indicates a practice not related to personal injury which, if not avoided, may result in property damage.
When using this electric unit, basic safety precautions should always be followed to reduce the risk of fire, electric shock, injury to persons, and hyperthermia including the following:
- Read ALL instructions before using this unit.
- ⚠WARNING: Risk of Electric Shock. DO NOT open or try to repair the heater yourself.
- This heater may get hot when in use. To avoid burns, DO NOT let bare skin touch hot surfaces. If provided, use handle(s) when moving this heater. Keep combustible materials, such as furniture, pillows, bedding, paper, clothes, and curtains at least 3 feet (0.9m) from the front of the heater and keep them away from the sides.
- Extreme caution is necessary when any heater is used by or near children or invalids and whenever the heater is left operating and unattended.
- DO NOT operate any heater after it malfunctions. Disconnect power at service panel and have heater inspected by a reputable electrician before reusing.
- This heater is not intended for use in bathrooms, laundry areas, and similar indoor locations. NEVER locate heater where it may fall into a bathtub or other water container.
- DO NOT touch the control panel or plug with a wet hand.
- DO NOT run cord under carpeting. DO NOT cover cord with throw rugs, runners, or similar coverings. Arrange cord away from traffic area and where it will not be tripped over.
- DO NOT insert or allow foreign objects to enter any ventilation or exhaust opening as this may cause an electric shock or fire, or damage the heater.
- To prevent a possible fire, DO NOT block the air intakes or exhaust in any manner.
- A heater has hot and arcing or sparking parts inside. DO NOT use in areas where gasoline, paint, or flammable vapors or liquids are used or stored.
- Connect to properly grounded outlets only.
-
Always plug heaters directly into a wall outlet/receptacle. Never use with an extension cord or relocatable power tap (outlet/power strip).
-
To avoid fire or shock hazard, plug the unit directly into a 120 V AC electrical outlet.
- To disconnect heater, turn controls to OFF, and turn off power to heater circuit at main disconnect panel (or operate internal disconnect switch if provided).
- Always unplug the unit before moving or cleaning, or whenever the heater is not in use.
- Use this heater only as described in this manual. Any other use not recommended by the manufacturer may cause fire, electric shock, or injury to persons.
- DO NOT use outdoors.
- WARNING: To reduce the risk of fire or electric shock, DO NOT use this unit with any solid-state speed control device.
- DO NOT attempt to repair or adjust any electrical or mechanical functions on this unit. Doing so will void your warranty. The inside of the unit contains no user serviceable parts.
- Always use the product in an upright position.
- Hyperthermia can result in death. Symptoms of hyperthermia include high body temperature, headache, nausea, vomiting, tiredness, dizziness, fainting, and rapid pulse. If you begin to experience symptoms related to hyperthermia, turn off the heater and seek medical attention.
- To avoid excessive room temperatures which can cause hyperthermia: DO NOT leave product running unattended in a confined space around infants, or individuals with reduced physical, sensory, or mental capabilities.
- WARNING: This product can expose you to chemicals including lead, which is known to the State of California to cause cancer and birth defects or other reproductive harm. For more information go to www.P65Warnings.ca.gov. Wash hands after handling.
SAVE THESE INSTRUCTIONS.
CONTENTS
WARNINGS....2
SPECIFICATIONS....3
SAFETY FEATURES....3
CLEARANCE TO COMBUSTIBLES....4
ELECTRICAL CONNECTION....4
HEATER LOCATION....4
WALL MOUNTING ASSEMBLY 4
CONTROL PANEL AND DISPLAY....5
INSTRUCTIONS FOR USE....6
CONNECTING TO WIFI/APP USE....8
MAINTENANCE....10
STORAGE....10
TROUBLESHOOTING....11
WARRANTY 12
| SPECIFICATIONS | |
| MODEL MHBEW150FATRW | |
| VOLTAGE RATING 120 V (60Hz) 12.5 Amps | |
| POWER CONSUMPTION 1500 W | |
| UNIT SIZE 18.6 in. W x 4.5 in. D x 12.2 in. H | |
| UNIT WEIGHT 8.7 lbs./3.94kg | |
SAFETY FEATURES
Tip-Over Safety Feature
This heater is equipped with a shut-off safety feature. Once the heater is tipped over, an internal switch will automatically shut the heater off. Once the heater is restored to an upright position, the heater will reset. To continue operation, press the power button on the control panel or remote control.
Overheat Safety Feature
This heater is equipped with an overheat safety feature. When the heater's internal components reach a certain temperature that could cause overheating and possible fire, the heater will automatically shut off.
IN THE BOX
- Infrared Heater
- Screw ST4 x 28mm (4pcs)
• Wall anchors (4pcs)
• L-Shaped Mounting Bracket (2pcs) - Screw M5 x 16mm (2pcs) (Used to attach L-Shaped Brackets to unit)
- Remote Control
- Owner's Manual
WARNING: It is normal for the power cord to feel warm to the touch; however, a loose fit between the outlet and the plug may cause overheating of the plug. If this occurs, try inserting the plug into a different outlet. Contact a qualified electrician to inspect the original outlet for damage.
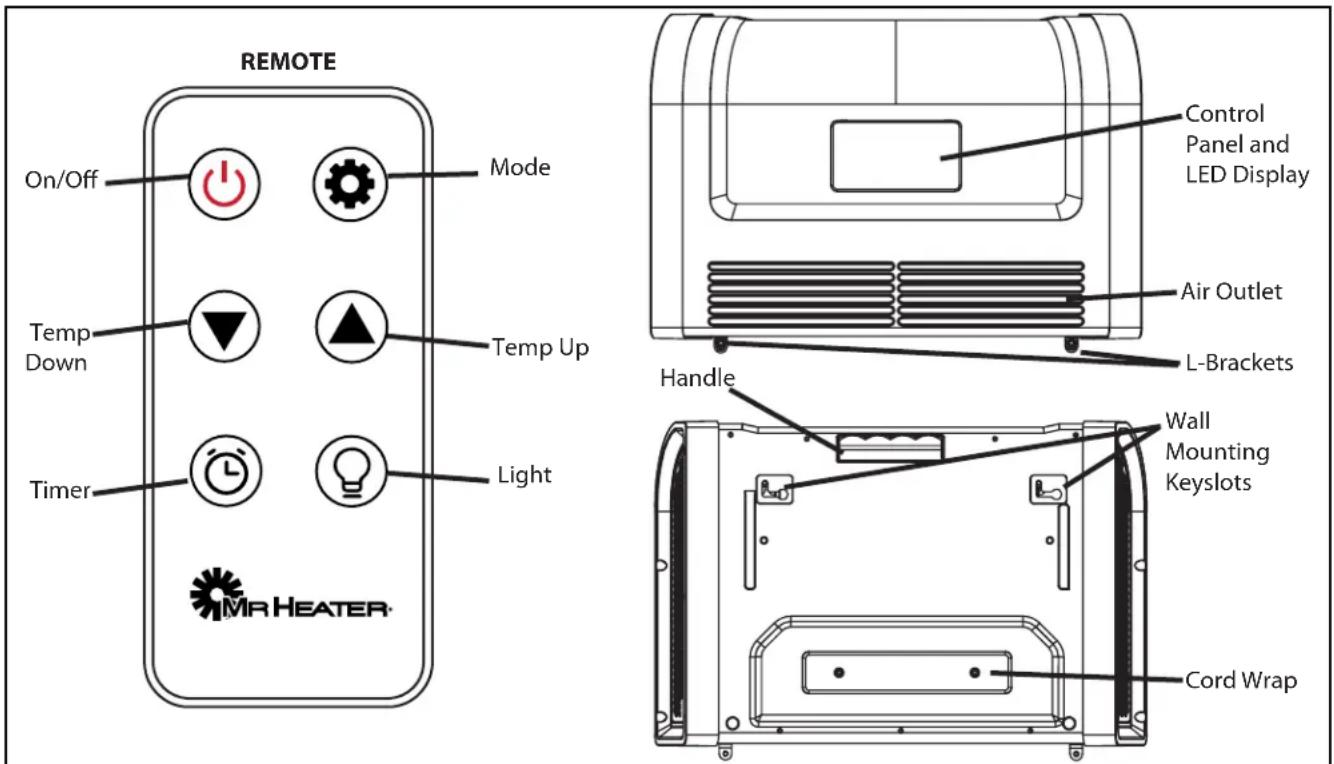
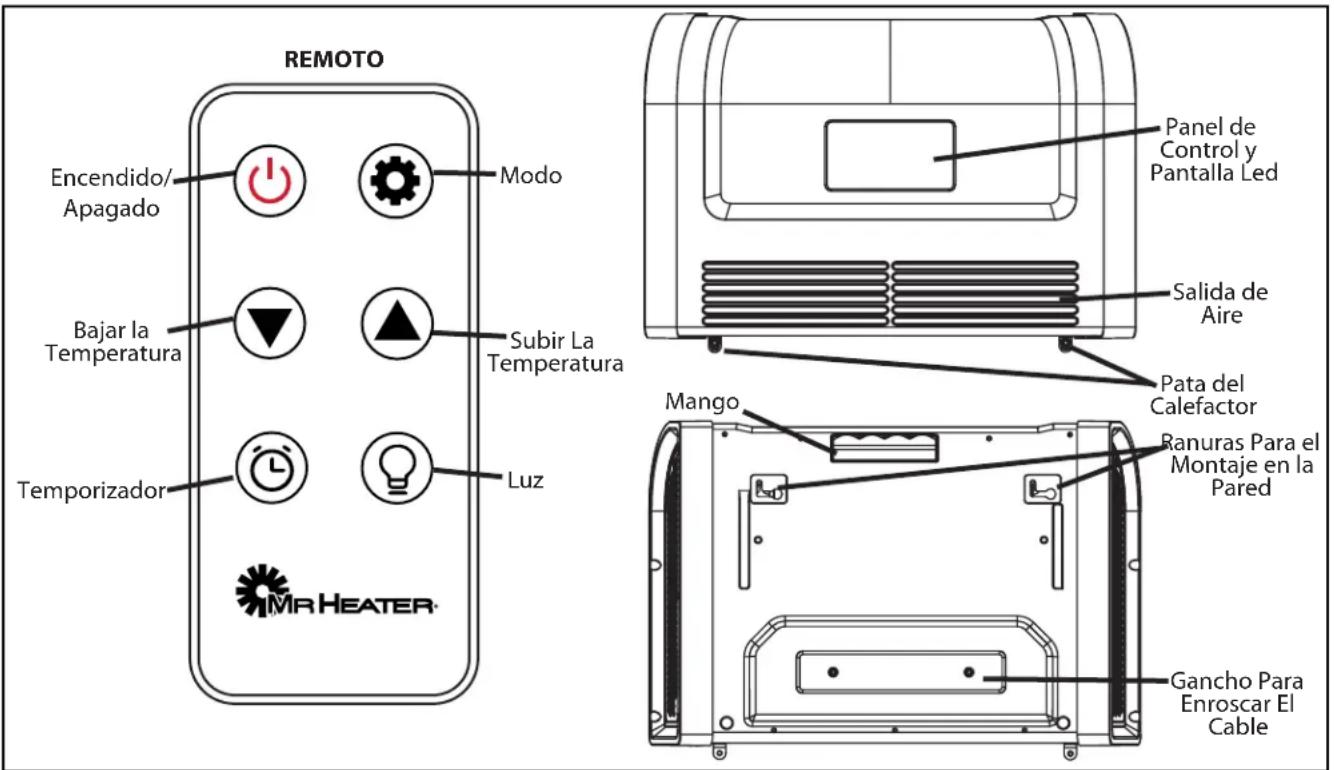
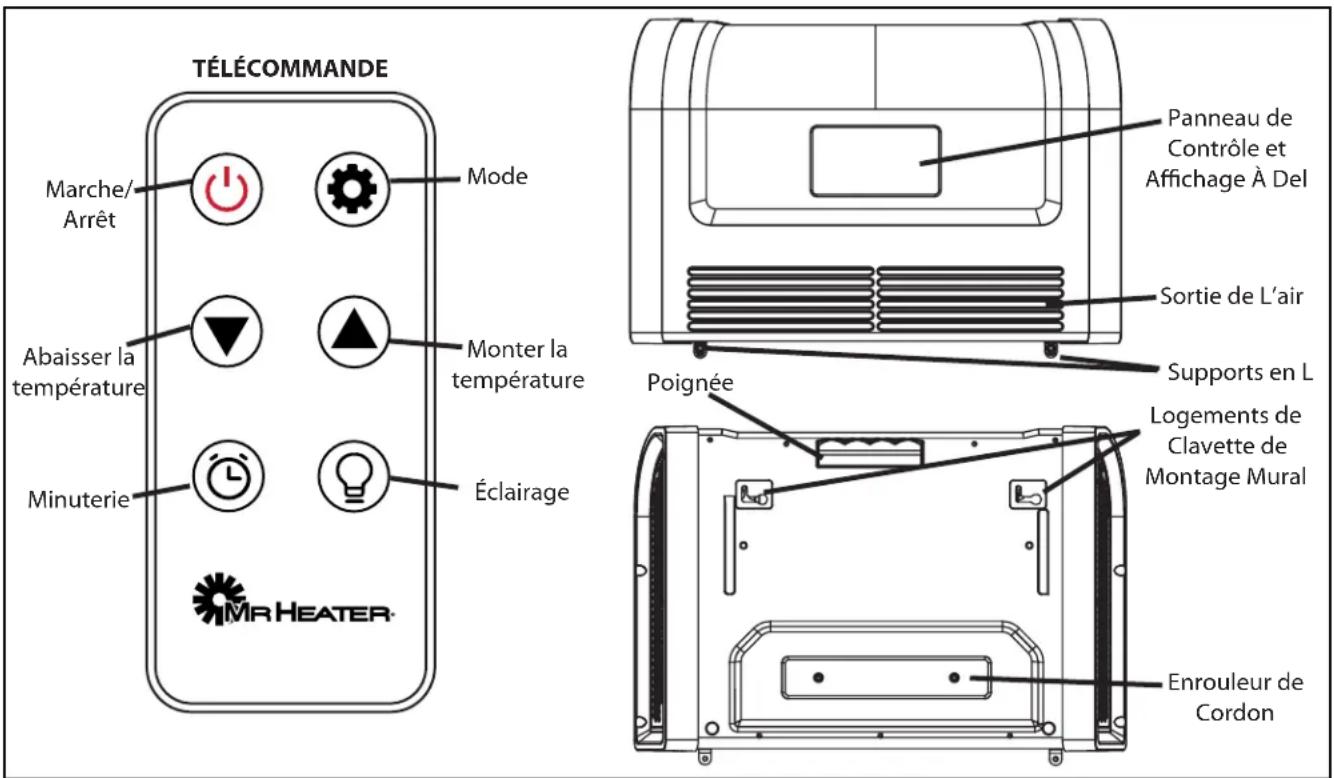
PRODUCT DIAGRAM
text_image
REMOTE On/Off Mode Temp Down Temp Up Timer Light MR HEATER Control Panel and LED Display Air Outlet L-Brackets Handle Wall Mounting Keyslots Cord WrapClearance To Combustibles
Keep electrical cords, drapery, furniture and other combustibles at least 3 feet (.914 M) from the front of the heater and away from the sides and top.
| Clearance To Combustibles | |
| Front 3' | |
| Top 3' | |
| Sides 3' | |
Electrical Connection
A 15 AMP, 120 Volt, 60 Hz circuit with a properly grounded outlet is required. Preferably, the heater will be on a dedicated circuit as other appliances on the same circuit may cause the circuit breaker to trip or the fuse to blow when the heater is in operation.
CAUTION: Do not exceed the current rating of the current tap. Always plug heaters directly into a wall outlet/receptacle. Never use with an extension cord or relocatable power tap (outlet/power strip).
Grounding Instructions
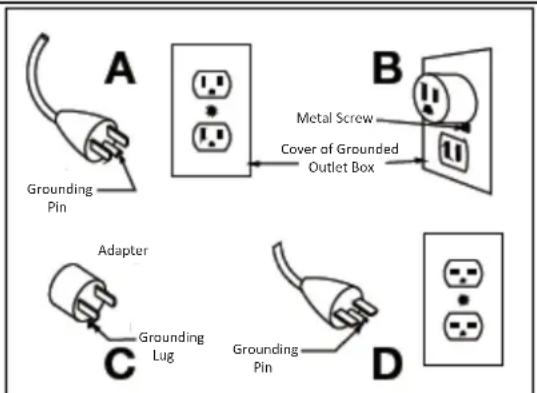
This heater is for use on 120 volts. The cord has a plug as shown as A in Figure 1. An adapter as shown as C is available (sold separately) for connecting three-blade grounding-type plugs to two-slot receptacles. The green grounding lug extending from the adapter must be connected to a permanent ground such as a properly grounded outlet box. The adapter should not be used if a three-slot grounded receptacle is available.
text_image
A Grounding Pin B Metal Screw Cover of Grounded Outlet Box Adapter C Grounding Lug D Grounding PinFigure 1
Remote Control
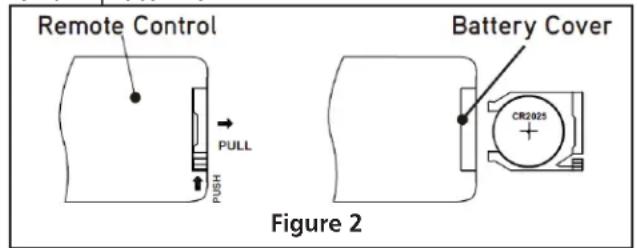
This remote control uses one CR2025 battery (included). Instructions for battery installation are on the Remote Control battery compartment. Refer to Figure 2 for battery removal procedure.
text_image
Remote Control PULL PUSH Battery Cover CR2025 Figure 2WARNING: Chemical Burn Hazard. Keep batteries away from children.
This product contains a lithium button/coin cell battery. If a new or used lithium button/coin cell battery is swallowed or enters the body, it can cause severe internal burns and can lead to death in as little as 2 hours. Always completely secure the battery compartment. If the battery compartment does not close securely, stop using the product, remove the batteries, and keep it away from children. If you think batteries might have been swallowed or placed inside any part of the body, seek immediate medical attention.
Heater Location
When choosing a location for your new heater, ensure that the general instructions are followed. For best effect, install the heater out of direct sunlight.
To prevent fire there must be a minimum clearance of 50 cm (20 inches) on the sides and bottom and 100 cm (40 inches) on the top of the unit.
Cold climate installation recommendation: when installing this unit against a non-insulated exterior wall, it is mandatory that the outer walls be insulated to conform to applicable insulation codes. If you choose to place the unit underneath a window or on a poorly insulated exterior wall, please be advised that the heater may read a colder ambient temperature then the actual ambient temperature of the room.
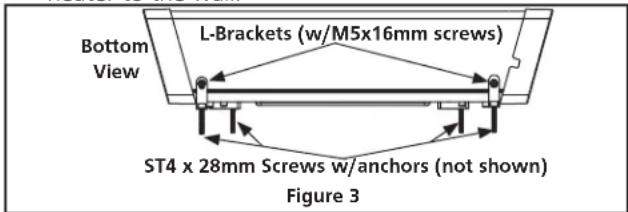
Wall Mounting Assembly (Refer to Figure 3)
WARNING: Your heater MUST BE installed on a wall. Do not prop the heater up against objects or use the heater with the grill placed vertically. PRIOR TO MOUNTING: When drilling holes in this area check the wall to ensure there are no wires, pipes, etc. A SOLID WALL must be used for mounting this unit. Unit CANNOT be mounted on a hollow wall, or wall without studs.
- Carefully place the heater on its backside on a protected surface. Attach the L-shaped brackets onto the bottom of the unit using two M5 x 16mm screws.
- Choose a location near an outlet so an extension cord is not required. Do not position the heater directly below a power outlet. The unit cannot be mounted near electrical cables, communication lines, pipes, combustible materials, etc. that could be damaged or ignited by excessive heat.
- Predrill two holes in the wall 262mm apart (make sure they are horizontal). Insert two wall anchors and two ST4 x 28mm screws.
- Hang the heater by sliding the it onto the screws using the two keyslots at back of unit.
- Using the two holes in the L-shaped brackets, predrill two holes in the wall for the other two anchors and ST4 x 28mm screws. Insert the anchors into these holes and screw in the two screws to finish securing the heater to the wall.
text_image
Bottom View L-Brackets (w/M5x16mm screws) ST4 x 28mm Screws w/anchors (not shown) Figure 3CONTROL PANEL AND DISPLAY
text_image
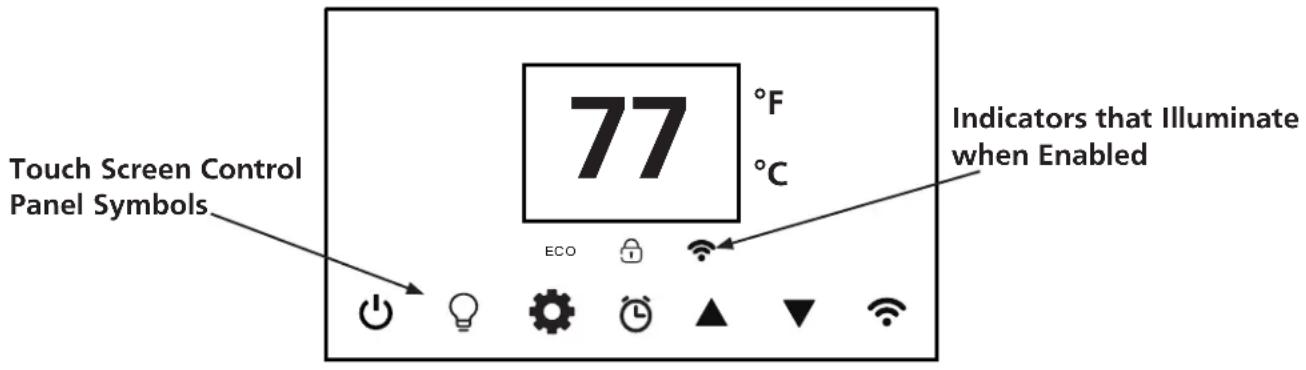
Touch Screen Control Panel Symbols 77 °F °C ECO Indicators that Illuminate when EnabledCONTROL PANEL AND LED DISPLAY
| CONTROLS and DISPLAY FUNCTION | ||
 | ON/OFF Turns the heater ON or OFF. | |
 | Light Sets LED light to be bright, dim, or off. | |
 | Mode | Selects between High, Low and ECO heat modes.Selects between °C and °F by pressing 3 seconds |
 | Timer Sets hour value for the timer. | |
 | Temp Up Increases desired temperature. | |
 | Temp Down Decreases desired temperature. | |
 | ECO Indicator | Lit when ECO is enabled. |
 | Child Lock Indicator | Lit when child lock is enabled. |
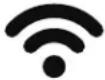 | Wi-Fi Connect or disconnect Wi-Fi. | |
 | Temperature or timer value display | Displays current setting and power off timer. |
 | Celsius Indicator | Lit when temperature displayed is in Celsius. |
 | Fahrenheit Indicator | Lit when temperature displayed is in Fahrenheit. |
INSTRUCTIONS FOR USE
Assemble the unit and plug the unit directly into a 120V AC electrical outlet.
NOTICE: The button functions on the remote are identical to the corresponding button functions on the unit.
STARTING UNIT AND SELECTING HEAT MODE
| UNIT FUNCTION | |
 | Turn the heater on or off by pressing the ON/OFF iconNOTE: Once power is OFF, heating element will stop working. Fan will continue to run for 3 minutes to cool off the heating element. |
 | Press the Mode icon to toggle between the heat modes High, Low or ECO:High Mode: Heater runs at 1500WLow Mode: Heater runs at 750WECO Mode: Heater runs at low/high wattage based on the temperature difference between set temperature and room temperature. |
SELECTING DESIRED TEMPERATURE
| UNIT FUNCTION | |
 | Press the Up/Down arrows to adjust unit to the desired room temperature. |
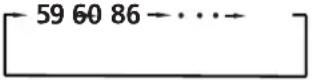 °F °F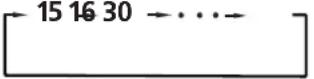 °C °C | Select temperature from 59°F to 86°F or from 15°C to 30°C.NOTE: Once you have chosen the desired temperature, the heater will remain on until room temperature increases to the set temperature on the LED display and then it will turn off, but the fan will remain on for 3 minutes. The heater will then cycle ON and OFF to maintain set room temperature. |
| Modes | |
 | Press and hold mode icon on unit for 3 seconds to toggle between °C/°F. |
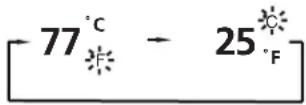 | When the temperature is set in Fahrenheit, the Fahrenheit indicator LED will light.When the temperature is set in Celsius, the Celsius indicator LED will light. |
NOTICE: It is normal for the heater to cycle ON and OFF as it maintains the preset temperature.
NOTICE: When the heat function is used for the first time, a slight odor may be present. This is normal and should not occur again unless the heater is not used for an extended period of time.
SETTING CHILD LOCK
NOTICE: The Child Lock can help avoid the heater from being accidentally engaged by children. The locking mechanism can be set in both the ON and OFF modes. The Child Lock must be reset if unit powers off.
| UNIT FUNCTION | |
 | TO LOCK: Press the light bulb icon for 3 seconds. Locking is complete when a beep is heard and lock indicator is illuminated. When locked, the functions of the control panel and remote CANNOT be used.TO UNLOCK: Press the light bulb icon for 3 seconds. Unlocking is complete when a beep is heard. The control panel and remote control will become functional. |
SETTING DISPLAY BRIGHTNESS
| UNIT FUNCTION | |
 | Press the light bulb icon on the unit to set the LED brightness to bright, dim or off.Note: When the LED display light is off, only the power on/off icon is lit. Other icons can’t be used. To activate other icons, press the light bulb icon again. |
SETTING POWER OFF TIMER FUNCTION
NOTICE: The Power OFF Timer function will allow for the heater to power OFF after a certain set time, and can only be set while the heater is in the ON mode. The Power Off Timer must be reset if unit powers off.
| UNIT FUNCTION | |
 | 1. Turn the heater ON.2. Press the Timer icon. |
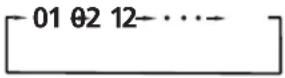 | LED display changes from the "temperature" to the "hours" option for the timer. Hour options for the timer are 0 to 12 hours (in 1 hour increments).3. Continue to press the timer icon to change the number of hours the heater will run before powering itself OFF. |
CONNECTING TO Wi-Fi USING THE SMART LIFE APP
Follow these steps to download the Smart Life App and prepare device:
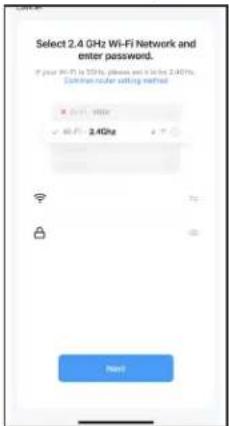
text_image
Select 2.4 GHz Wi-Fi Network and enter password. If your Wi-Fi is 20Hz, please and enter the 2.4GHz. Common router setting method OK Cancel 2.4GHz Next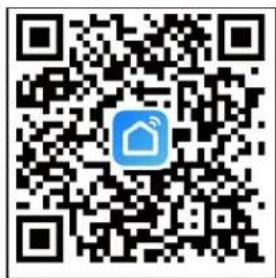
text_image
QR code with a blue home icon in the center, likely linking to a digital service or application.Scan this QR Code with your phone's camera.
Make sure Wi-Fi and Bluetooth are enabled on your device. Connect your device to 2.4 GHz Wi-Fi network.
*For some dual band routers, you may need to manually create a network dedicated to 2.4 GHz.
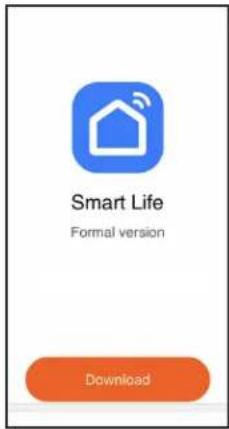
text_image
Smart Life Formal version DownloadDownload the Smart Life App and create a free account.
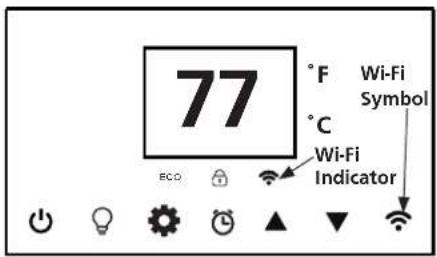
text_image
77 °F Wi-Fi Symbol °C Wi-Fi IndicatorWhile the heater is plugged in and turned on, press and hold the Wi-Fi symbol on the touch screen control panel for 5 seconds. You should see the Wi-Fi indicator start blinking.
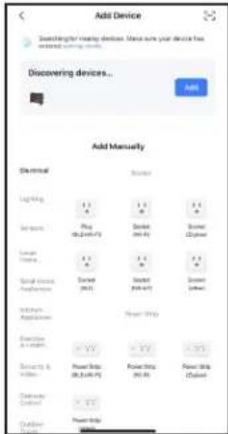
After the above steps, tap "Add Device" in the App and the heater will automatically find the Wi-Fi connection; a window will then pop up to connect via Bluetooth:
BLUETOOTH CONNECT
NOTICE: Bluetooth must be enabled on your device AND in the Settings of the Smart Life app. If the Bluetooth access is not enabled for the Smart Life app, a "Turn on Bluetooth" error message will appear near the top of your device. Click on the Bluetooth error message to allow Bluetooth access to the Smart Life app.
text_image
Add Device Discovering device's adding devices. Make sure your device has been added using devices. Discovering devices... Add Manually Electrical Lighting Smart Large Windows Small Windows Security & Internet Security & Internet Security & Internet Security & Internet Security & Internet Security & Internet Security & Internet Security & Internet Security & Internet Security & Internet Security & Internet Security & Internet Security & Internet Security & Internet Security & Internet Security & Internet Security & Internet Security & Internet Security & Internet Security & Internet Security & Internet Security & Internet Security & Internet Security & Internet Security & Internet Security &InternetOnce the app finds your heater, a window will pop up with the heater image. Tap "Add".
text_image
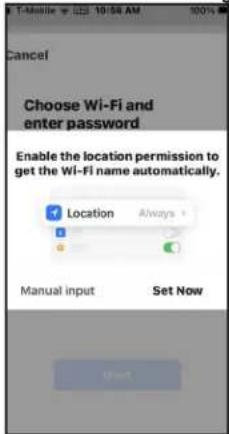
Cancel Choose Wi-Fi and enter password Enable the location permission to get the Wi-Fi name automatically. Location Always Manual input Set NowIf your location permission is already set, it will go to next step and begin adding. If not, enable the location permission to get the Wi-Fi name automatically, or if not available, enter your Wi-Fi network name and password. Each of these fields are case sensitive. Tap "Next".
text_image
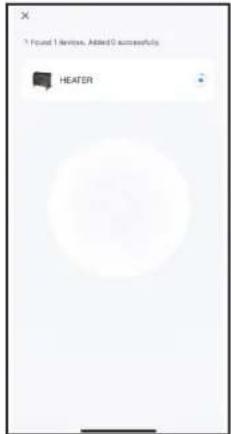
? Found 1 service, Added 0 successfully HEATERYour phone will start connecting your heater to your Wi-Fi network.
text_image
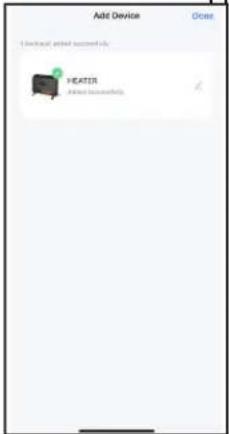
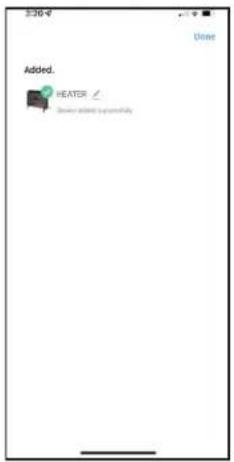
Add Device Does Electrical printed successfully. HEATER Made successfully.Once it is added, tap "Done". If your screen doesn't look like above or shows any error notifications, trouble shoot Wi-Fi.
text_image
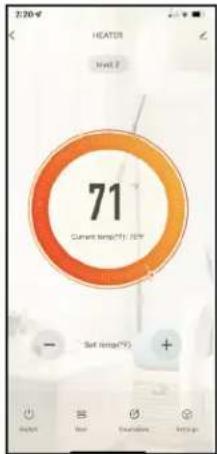
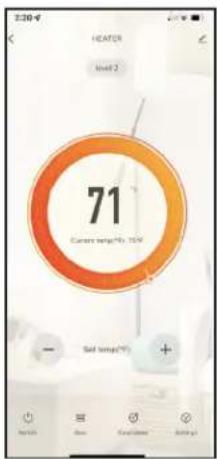
HEATER Level 2 71 Current Temp(%): 70% - Set Range(%) +Connection to heater has now been established. You may now control your heater from anywhere with your phone.
NOTICE: If heater does not appear in list, unplug heater and plug back in. Then turn on heater and restart Wi-Fi pairing process by pressing and holding the Wi-Fi symbol for 5 seconds.
NOTICE: If you don't connect within 30 seconds, log out of the app, re-login and enter your Wi-Fi information manually.
MANUAL CONNECT TO Wi-Fi
text_image
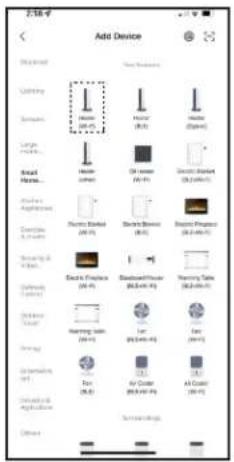
Add Device Lighting Sensors Large Holders Small Applications Hardware Video Audio Audio Audio Audio Audio Audio Audio Audio Audio Audio Audio Audio Audio Audio Audio Audio Audio Audio Audio Audio Audio Audio Audio Audio Audio Audio Audio Audio Audio Audio Audio Audio Audio Audio Audio Audio Audio Audio Audio Audio Audio Audio Audio Audio Audio Audio Audio Audio Audio Audio Auction Audio Audio Audio Audio Audio Audio Audio Audio Audio Audio Audio Audio Audio Audio Audio Audio Audio Audio Audio Audio Audio Audio Audio Audio Audio Audio AudioAfter you tap "Add Device", scroll down and tap "Small Home Appliance", then tap "Heater (Wi-Fi)".
text_image
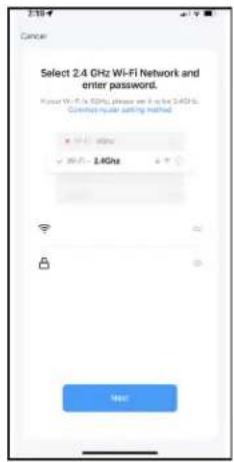
Cancel Select 2.4 GHz Wi-Fi Network and Enter password. Power Wi-Fi is 50GHz, please use it in the 2.4GHz. Common router setting method + WiFi - 2.4GHz - WiFi - 2.4GHz OKEnter your Wi-Fi network name and password. Each of these fields are case sensitive, so be sure to double check each one. Tap "Next".
text_image
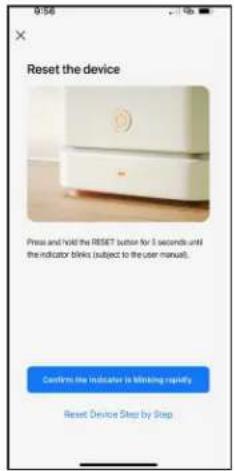
Reset the device Press and hold the RESET button for 5 seconds until the indicator blinks (subject to the user manual). Confirm the indicator is Winking rapidly Reset Device Step by StepSmart Life App will indicate holding reset button for heater. You will actually press and hold the Wi-Fi Symbol on the touch screen for 5 seconds until the Wi-Fi Indicator blinks.
text_image
Added. HEATER User added to availabilityOnce it is added, tap "Done". If your screen doesn't look like above or shows any error notifications, trouble shoot Wi-Fi.
After the heater connects to Wi-Fi:
text_image
HEATER Level 2 71 Current temp(Hz): 70V Sat temp(°C)You may now control your heater from anywhere with your phone.
You may adjust temperatures, set the countdown timer, or set a child lock.
If you have any questions or concerns, contact us at 800-251-0001 or at www.mrheater.com.
NOTICE: If heater does not appear in list, unplug heater and plug back in. Then turn on heater and restart Wi-Fi pairing process by pressing and holding the Wi-Fi symbol for 5 seconds.
App Operation Notes:
- You may rename heater to match the room it is in.
- You can connect multiple heaters in your house or garage.
- You can have multiple users in the same household, but they must all be on the same account, i.e., utilizing the same user name and password.
- When someone with a different Smart Life account, i.e. different user name and password, tries to connect to your heater by pressing and holding the Wi-Fi symbol on the display panel, it will kick out the most recent user.
- When the unit is unplugged or the power goes out, you will need to restart the unit and reconnect the device in the Smart Life App.
- You may enable simple voice controls with common smart home devices. Please refer to the Smart Life App and tap the "Me" button at the bottom of your screen for instructions.
Operation Notes:
- Please remember that with any type of heating process there are many variables; size of the room, how well the room is insulated, how many doors/windows, how much bare concrete (which acts as a heat sink with any type of heating), the opening and closing of an exterior door, etc. Therefore, heating performance will vary in every environment.
- Heating will vary based on how open your floor plan is and the sizes of the rooms involved.
- Rooms with little insulation will not retain the heat as efficiently and may result in your heater running longer or more often.
- It may take longer to heat a room with vaulted or cathedral ceilings initially. Once the room has reached the desired temperature it will cycle on and off accordingly.
- This heater may be used in a basement or garage if it is finished with drywall and carpet.
- This heater cannot be moved while it is running. If moving heater, it must first be turned to the off position and then moved once the fan has completely turned off.
- You may run heater and another appliance at the same time as long as they are not on the same electrical circuit.
MAINTENANCE
WARNING: Disconnect power before attempting any maintenance or cleaning to reduce the risk of fire, electrical shock or personal injury. First turn the main power switch to the "OFF" position, wait for the fan to stop blowing to ensure the inside of the heater has been properly cooled. Then remove the electrical plug from the wall outlet.
- Turn the POWER OFF.
- Unplug the unit and let it cool completely.
- To keep the heater clean, the outer shell may be cleaned with a soft, damp cloth. A mild detergent can be used if necessary.
- After cleaning, dry the unit with a soft cloth.
- Wait until the unit is completely dry before use.
WARNING:
• DO NOT let liquid enter the heater.
- DO NOT use alcohol, gasoline, abrasive powders, furniture polish, or rough brushes to clean the heater. This may cause damage or deterioration to the surface of the heater.
DO NOT immerse the heater in water.
STORAGE
Store the heater in a cool, dry location when not in use. To prevent dust and dirt build-up, use the original packaging to repack the unit.
NOTICE: For the heater to function properly, the desired temperature on the heater must be set a few degrees higher than the temperature in the room. If the heater seems to not be heating, increase the desired temperature on the heater to engage the heat element.
NOTICE: The product is equipped with an overheat safety feature protector which will switch off the heater in case of accidental overheating (ex. Obstruction of air intake and outlet grills, motor turning slowly or not at all).
NOTICE: The product is equipped with a tip-over switch inside. When the product tips over abnormally during its use, it can cut off power automatically.
FCC INFORMATION
CAUTION: Changes or modifications not expressly approved by the party responsible for compliance could void the user's authority to operate the equipment.
NOTE: This equipment has been tested and found to comply with the limits for a Class B digital device, pursuant to part 15 of the FCC Rules. These limits are designed to provide reasonable protection against harmful interference in a residential installation. This equipment generates, uses and can radiate radio frequency energy and, if not installed and used in accordance with the instructions, may cause harmful interference to radio communications. However, there is no guarantee that interference will not occur in a particular installation. If this equipment does cause harmful interference to radio or television reception, which can be determined by turning the equipment off and on, the user is encouraged to try to correct the interference by one or more of the following measures:
— Reorient or relocate the receiving antenna.
— Increase the separation between the equipment and receiver.
— Connect the equipment into an outlet on a circuit different from that to which the receiver is connected.
— Consult the dealer or an experienced radio/TV technician for help.
BATTERY DISPOSAL
NEVER dispose of batteries in fire. Failure to observe this precaution may result in an explosion. Dispose of batteries at your local hazardous material processing center.
- The cells shall be disposed of properly, including keeping them away from children.
• Even used cells may cause injury.
TROUBLESHOOTING
| OBSERVED SYMPTOM POSSIBLE CAUSE REMEDY | ||
| Heater will not operate. | Power is not on or power cord not plugged into outlet. | Plug heater in to appropriate electrical outlet. Also, check if electricity to the outlet is working. See SAFETY FEATURES section for additional information. |
| The heater keeps blowing air when heater is turned OFF. | The heater is functioning as it should. This is the cool down phase. The heater will run for 3 minutes to cool down the internal components. This increases the lifespan of the infrared elements. | N/A |
| The heater is not blowing warm air. | The heater is functioning as it should. The ambient temperature (displayed) is higher than the thermostat setting. | N/A |
| There is something blocking the air flow. | Move the object out of the way of the heater. | |
| The fan clicks on and runs for under a minute and then turns off. | The fan is turning on to pull air across the thermostat. This creates air flow within your room. The heater is trying to determine if the ambient temperature in the room has changed. | N/A |
| The heater smells like burning plastic. | When the heat function is used for the first time, a slight odor may be present. This is normal and should not occur again unless the heater is not used for an extended period of time. | If the smell persists for more than a couple of hours, call Technical Service at 800-251-0001. |
| Cord is getting very hot, especially at the plug. | The connection from the wall wiring to the outlet may be faulty and causing the outlet and plug to overheat. | Make sure there are not too many appliances plugged into outlets on a single circuit. If problem still persists, consult a qualified electrician to diagnose and repair. |
| Heater airflow is diminished | Air inlet on heater blocked. Observe minimum installation clearances on page 4 of manual. | |
| Heater doesn't seem to reach the set temperature, it just keeps running. | If the room is drafty or poorly insulated, the thermostat sensor may be taking an inaccurate reading. | Make sure to keep doors closed so that the heater can heat the room. |
| Heater installed near exterior wall or below a window. | Move heater to interior wall or away from window. | |
| Heater may be too small for the room. | Attempt to heat with a larger heater. | |
| MRHEATER | OPERATING INSTRUCTIONS AND OWNER'S MANUAL | Model # MHBEW150FATRW |
| READ INSTRUCTIONS CAREFULLY: YOUR SAFETY IS IMPORTANT TO YOU AND TO OTHERS Read and follow all instructions. Place instructions in a safe place for future reference. Do not allow anyone who has not read these instructions to assemble, light, adjust or operate the heater. | ||
natural_image
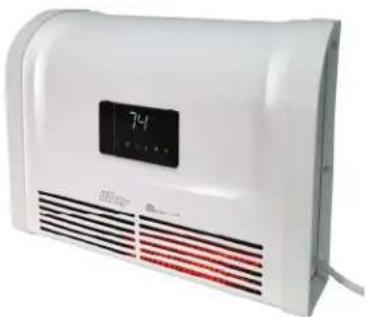
White portable air conditioner unit with digital display and ventilation grille (no visible text or symbols)[Non-Text]
WARNING:
USE ONLY MANUFACTURER'S REPLACEMENT PARTS. USE OF ANY OTHER PARTS COULD CAUSE INJURY OR DEATH. REPLACEMENT PARTS ARE ONLY AVAILABLE DIRECT FROM THE FACTORY AND MUST BE INSTALLED BY A QUALIFIED SERVICE AGENCY.
REPLACEMENT PARTS ORDERING INFORMATION:
FOR INFORMATION REGARDING SERVICE
Please call Toll-Free 800-251-0001
www.mrheater.com
Our office hours are 8:00 AM – 5:00 PM, EST, Monday through Friday.
Please include the model number, date of purchase, serial number and description of problem in all communication.
LIMITED WARRANTY
The company warrants this product to be free from imperfections in material or workmanship, under normal and proper use in accordance with instructions of The Company, for a period of one year from the date of delivery to the buyer. The Company, at its option, will repair or replace products returned by the buyer to the factory, transportation prepaid within said one year period and found by the Company to have imperfections in material or workmanship.
If a part is damaged or missing, call our Technical Support Department at 800-251-0001.
Address any Warranty Claims to the Service Department, Enerco Group, Inc., 4560 W. 160TH ST., CLEVELAND, OHIO 44135. Include your name, address and telephone number and include details concerning the claim. Also, supply us with the purchase date and the name and address of the dealer from whom you purchased our product.
The foregoing is the full extent of the responsibility of the Company. There are no other warranties, express or implied. Specifically there is no warranty of fitness for a particular purpose and there is no warranty of merchantability. In no event shall the Company be liable for delay caused by imperfections, for consequential damages, or for any charges of the expense of any nature incurred without its written consent. The cost of repair or replacement shall be the exclusive remedy for any breach of warranty. There is no warranty against infringement of the like and no implied warranty arising from course of dealing or usage of trade. This warranty will not apply to any product which has been repaired or altered outside of the factory in any respect which in our judgment affects its condition or operation.
Some states do not allow the exclusion or limitation of incidental or consequential damages, so the above limitation or exclusion may not apply to you. This warranty gives you specific legal rights and you may also have other rights which vary from state to state.
Enerco Group, Inc. reserves the right to make changes at any time, without notice or obligation, in colors, specifications, accessories, materials and models.
PRODUCT REGISTRATION: Thank you for your purchase.
Please log in to http://www.egiregistration.com to register your product.
Enerco Group, Inc., 4560 W. 160TH ST., CLEVELAND, OHIO 44135 • 800-251-0001
© 2022, Mr. Heater. All rights reserved

INSTRUCCIONES DE USO Y MANUAL DEL PROPIETARIO

CALEFACTOR ELÉCTRICO DE AIRE FORZADO DE MONTAJE EN LA PARED
Modelo #
MHBEW150FATRW
natural_image
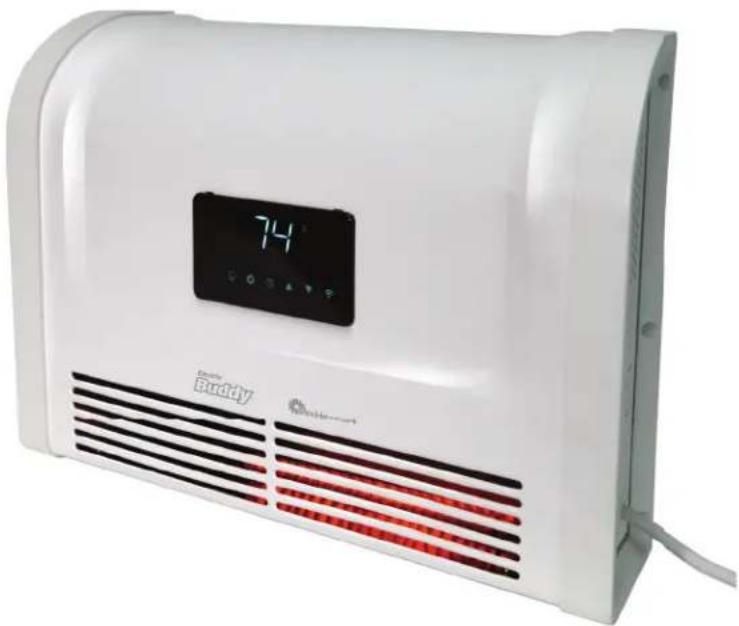
White portable electric heater with digital display and red ventilation slots (no visible text or symbols)Idiomas incluidos
DISTANCIA A COMBUSTIBLES....4
DIAGRAMA DEL PRODUCTO
text_image
Select 2.4 GHz Wi-Fi Network and enter password. If your Wi-Fi is 20GHz, please add to a 3.4GHz. Custom route setting option: ■ Wi-Fi: 2.4GHz ✓ Wi-Fi: 2.4GHz Nexttext_image
QR code with a blue home icon in the center, likely linking to a digital service or application.text_image
Smart Life Formal version Downloadtext_image
Add Device Searching for ready devices. Make sure your device has been added using devices. Discovering devices... Add Manually Disordered Lighting 1.0 2.0 3.0 4.0 5.0 6.0 7.0 8.0 9.0 10.0 11.0 12.0 13.0 14.0 15.0 16.0 17.0 18.0 19.0 20.0 21.0 22.0 23.0 24.0 25.0 26.0 27.0 28.0 29.0 30.0 31.0 32.0 33.0 34.0 35.0 36.0 37.0 38.0 39.0 40.0 41.0 42.0 43.0 44.0 45.0 46.0 47.0 48.0 49.0 50.0 51.0 52.0 53.0 54.0 55.0 56.0 57.0 58.0 59.0 60.0 61.0 62.0 63.0 64.0 65.0 66.0 67.0 68.0 69.0 70.0 71.0 72.0 73.0 74.0 75.0 76.0 77.0 78.0 79.0 80.0 81.0 82.0 83.0 84.0 85.0 86.0 87.0 88.0 89.0 90.0 91.0 92.0 93.0 94.0 95.0 96.0 97.0 98.0 99.0 100.0text_image
Cancel Choose Wi-Fi and enter password Enable the location permission to get the Wi-Fi name automatically. Location Always Manual input Set Nowtext_image
1 Found Devices Added it successfully HEATERtext_image
Add Device Date Health Added devicetext_image
218-4 Add Device Add Device Size: 500 px Size: 30 px Size: 20 px Size: 10 px Size: 5 px Size: 2 px Size: 1 px Size: 5 px Size: 2 px Size: 1 px Size: 5 px Size: 2 px Size: 1 px Size: 5 px Size: 2 px Size: 1 px Size: 5 px Size: 2 px Size: 1 px Size: 5 px Size: 2 px Size: 1 px Size: 5 px Size: Size: 1 px Size: 2 px Size: 1 px Size: 5 px Size: 2 px Size: 1 px Size: 5 px Size: 2 px Size: 1 px Size: 5 px Size: 2 px Size: 1 px Size: 5 px Size: 2 px Size: 1 px Size: 5 px Size: 2 px Size: Size: 1 px Size: 2 px Size: 1 px Size: 5 px Size: 2 px Size: 1 px Size: 5 px Size: 2 px Size: 1 px Size: 5 px Size: 2 px Size: 1 px Size: 5 px Size: 2 px Size: 1 px Size: 5 pxtext_image
Cancel Select 2.4 GHz Wi-Fi Network and enter password. Please use Wi-Fi to access or enter the 2.4GHz. Common cellular setting method + Wi-Fi: 1.0Hz - Wi-Fi: 2.4GHz Nexttext_image
Reset the device Press and hold the RESET button for 3 seconds until the indicator blinks (subject to the user manual). Confirm the indicator is blocking purity. Reset Device Step by Steptext_image
Added. HEATER Done Donenatural_image
White portable air conditioner unit with digital display and ventilation grille (no visible text or symbols)natural_image
White portable air conditioner unit with digital display and red LED grille (no visible text or symbols)Langues incluses
DIAGRAMME DU PRODUIT
text_image
Select 2.4 GHz Wi-Fi Network and enter password. If your Wi-Fi is 50 Hz, please enter to be 2.4GHz. Communicular setting checked. OK ✓ 2.4GHz Nexttext_image
QR code with a blue home icon in the center, likely linking to a digital service or application.text_image
Smart Life Formal version Downloadtext_image
Cancel Choose Wi-Fi and enter password Enable the location permission to get the Wi-Fi name automatically. Location Always > Manual input Set Nowtext_image
1 Point Devices Added it successfully HEATERtext_image
Add Device Done Health-related account. HEATH Help successfultext_image
HEATER Level 3 71 Current length: 200 - Sat length(5) +text_image
2.18 € Add Device Lighting Security Large Small Switch Electrical Appliance Operating & Control Switch Protection Switch Protection Switch Protection Switch Protection Switch Protection Switch Protection Switch Protection Switch Protection Switch Protection Switch Protection Switch Protection Switch Protection Switch Protection Switch Protection Switch Protection Switch Protection Switch Protection Switch Protection Switch Protection Switch Protection Switch Protection Switch Protection Switch Protection Switch Protection Switch Protection Switch Protection Switch Protection Switch Protection Switch Protection Switch Protection Switch Protection Switch Protection Switch Protection Switch Protectiontext_image
Cancel Select 2.4 GHz Wi-Fi Network and enter password. Your Wi-Fi is 50Hz, please send to the 2.4GHz Common reader setting method WiFi: 1.6GHz WiFi: 1.4GHz Nexttext_image
Reset the device Press and hold the RESET button for 5 seconds until the indicator blinks (subject to the user manual). Confirm the indicator is blowing rapidly. Reset Device Step by Steptext_image
Added. HEATER Device added powertrainnatural_image
White portable air conditioner unit with digital display and ventilation slots (no visible text or symbols)AVERTISSEMENT :
UTILISER UNIQUEMENT DES PIÈCES DE RECHANGE DU FABRICANT D'ORIGINE. L'UTILISATION DE TOUTE AUTRE PIÈCE PEUT CAUSER DES BLESSURES, VOIRE UN DÉCÈS LES PIÈCES DE RECHANGE SONT DISPONIBLES UNIQUEMENT DIRECTEMENT DE L'USINE, ET ELLES DOIVENT ÊTRE INSTALLÉES PAR UNE AGENCE DE SERVICE QUALIFIÉE.