170D - Pressure washer Vevor - Free user manual and instructions
Find the device manual for free 170D Vevor in PDF.

| Product Type | Gasoline High Pressure Washer |
| Brand | Vevor |
| Model | 170D |
| Maximum Pressure | 3400 PSI (234 bar) |
| Water Flow | 10 L/min (2.6 GPM) |
| Engine Power | 7 HP (5.2 kW) |
| Engine Speed | 3600 RPM |
| Fuel Type | Unleaded gasoline (octane rating 86+) |
| Fuel Tank Capacity | 3 L |
| Engine Oil Capacity | 0.6 L (SAE 10W-30) |
| Admissible Water Temperature | 0–60 °C |
| High Pressure Hose Length | Approximately 8 m (not exactly specified, estimate) |
| Weight (estimate) | Approximately 27 kg (60 lb) |
| Dimensions (estimate) | 60 × 50 × 60 cm |
| Included Nozzles | 5 nozzles: 0° (red), 15° (yellow), 25° (green), 40° (white), low pressure (black) |
| Features | Manual start, detergent injection, anti-limescale safety, automatic low oil shutdown |
| Maintenance | Oil change every 50 h, air filter cleaning, spark plug every 100 h |
| Spare Parts Available | Pump, engine, nozzles, HP hose, lance, gun, seals |
| Repairability | Repair possible by authorized center; standard parts |
| Safety | Gasoline engine: toxic CO, outdoor use only; eye/ear/hand protection mandatory |
| Warranty | Technical support and electronic warranty certificate at www.vevor.com/support |
| Included Accessories | Handle, wheels, panel kit, water inlet hose, pipette (170D), wrenches, screws, screwdriver |
Frequently Asked Questions - 170D Vevor
User questions about 170D Vevor
0 question about this device. Answer the ones you know or ask your own.
Ask a new question about this device
Download the instructions for your Pressure washer in PDF format for free! Find your manual 170D - Vevor and take your electronic device back in hand. On this page are published all the documents necessary for the use of your device. 170D by Vevor.
USER MANUAL 170D Vevor
Technical Support and E-Warranty Certificate www.vevor.com/support
GAS PRESSURE WASHER
MODEL:170D/180D
We continue to be committed to provide you tools with competitive price. "Save Half", "Half Price" or any other similar expressions used by us only represents an estimate of savings you might benefit from buying certain tools with us compared to the major top brands and does not necessarily mean to co all categories of tools offered by us. You are kindly reminded to verify carefully when you are placing an order with us if you are actually Saving Half in comparison with the top major brands.
MODEL:170D/180D

natural_image
Black and orange industrial power supply machine on a wheeled cart (no visible text or symbols)NEED HELP? CONTACT US!
Have product questions? Need technical support? Please feel free to contact us:
Technical Support and E-Warranty Certificate www.vevor.com/support
This is the original instruction, please read all manual instructions carefully before operating. VEVOR reserves a clear interpretation of user manual. The appearance of the product shall be subject to product you received. Please forgive us that we won't inform you and there are any technology or software updates on our product.
SAFETY INSTRUCTIONS

WARNING!
Read and understand all warnings and safety instructions. Failure to fol any and all instructions listed below may result in explosion, rupture, or serious bodily injury.

ATTENTION!Read all warnings and safety instructions.Failure to follow the warnings and instructions listed below could result in an explosion or serious injury.
Keep all warnings and instructions for future reference. The term "GASOLINEENGINE TOOL": Machine operated by a combustion engine, which is intended to perform mechanical work.
1. Safety of the work area
a. Keep the work area clean and well lit. Clutter or poor lighting in areas can cause accidents.
b. Do not use the device in an environment with a risk of explosion there are liquid fuels, gases or powdered material. Internal combustion engines produce sparks that can ignite materials in dust or vapors.
c. Keep children and other people away from the work area when use machine. A distraction can cause you to lose control of the machine.
2. Personal safety
a. Watch what you are doing and use the machine wisely. Do not use a machine if you are tired, or after consuming alcohol, drugs or medical. Not being attentive while using an internal combustion engine can cause serious injury.
b. Use personal protective equipment. Always wear eye, respiratory and hearing protection. Protective equipment such as a dust mask, non-skin
safety shoes, hard hat, or hearing protectors, used under proper cond will help reduce personal injury.
c. Avoid unintentional starting. Make sure the switch is in the off post before picking up or transporting the machine. Carrying with your finger the switch or plugging in with the switch on can lead to accidents.
d. Remove any adjusting tools or open-end wrenches before starting. tool or wrench attached to a rotating part of the machine can cause when starting.
e. Be cautious. Avoid adopting a position that fatigues your body; keep firm footing on the ground and keep your balance at all times. This allow you to better control the machine in the event of an unexpected situation.
f. Wear appropriate clothing. Do not wear loose clothing or jewelry. K your hair, clothing, and gloves away from moving parts. Loose clothing.jewelry, or long hair can be caught in moving parts.g.Whenever is possible to use suction or dust collection equipment make sure that installed and used correctly. The use of dust collection equipment red the risks derived from dust.

WARNING:This device is not intended for use by persons
(including children) with different or reduced physical, sensory or mental capabilities, or lack of experience or knowledge, unless they have been given supervision or training in operation of the appliance by a person responsible for your safety. Children should be supervised to ensure that they do not use the appliance as a toy.
- Personal safety
a. Do not overload the device. Use the machine intended for the wo performed. With the right machine you will be able to work better an within the indicated power range.
b. Do not use machines with a faulty switch. Machines that cannot be turned on or off are dangerous and must be repaired.
c. Power off before making adjustments, changing accessories, or storing machine. This preventative measure reduces the risk of accidentally starting the machine.
d. Make sure machines are out of the reach of children and people unfamiliar with their use. Internal combustion machines used by inexperienced people are dangerous. Take good care of your machines. Check that they work correctly,
e. without the moving parts getting stuck and if there are any broken deteriorated parts that could affect the operation. If the machine is defective, have it repaired before using it again. Many accidents are poor maintenance.
f. Keep cutting tools sharp and clean. Properly held cutting tools with cutting edges are less likely to bind and are easier to control.9. Use machine, accessories and other parts in accordance with these instructions, taking into account the working conditions and the task to performed. The use of internal combustion machines for jobs other than those for which they have been designed can be dangerous.

IMPORTANT:This device must not be exposed to dripping liquid
splashes.
4. Use and care of gasoline-powered machines
Only have your device repaired by authorized technical personnel using only original spare parts. This is the only way to guarantee the safe machine.
WARNING: This product must not be exposed to dripping liquid splashes.
ADDITIONAL SAFETY WARNINGS FOR THE PRESSURE WASHER.
A. Do not use accessories that are not specifically designed and recommended by the pressure washer manufacturer.
B. Incorrectly sized accessories cannot be adequately protected and
controlled.
Do not use a damaged accessory. inspect accessory before each use for example, the packaging to verify that it does not have cracks or pressure washer or accessory is dropped, inspect for damage or insta known-good accessory. After inspecting and installing an accessory, position yourself and bystanders away from the plane of the accessor run the tool for one minute. Damaged accessories will usually break this test.
Use personal protective equipment. Depending on the application, you must wear a dust mask, hearing protectors, gloves, etc. Prolonged exposure to loud noise can cause hearing loss.
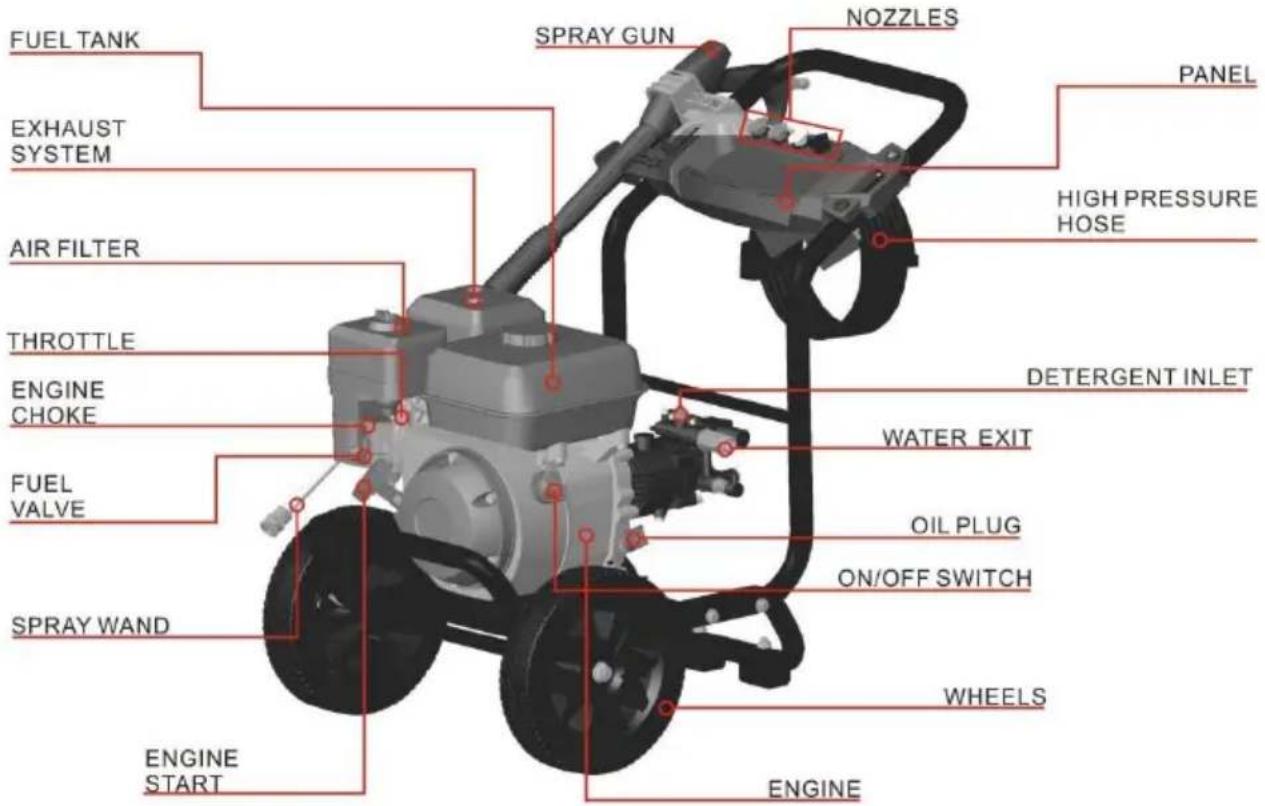
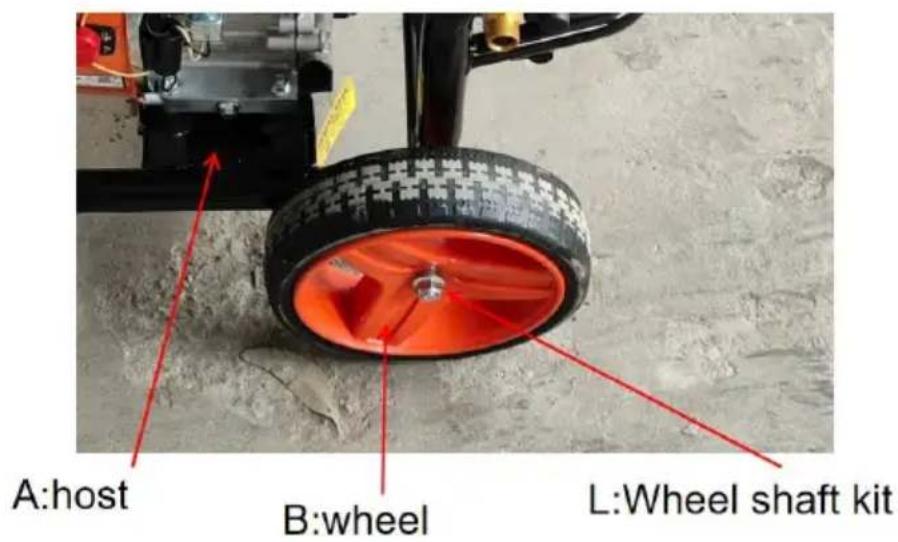
Part List
NOTE: Model 180D with no pipette, 180D with cleaning box.
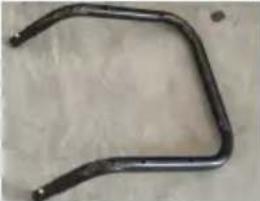
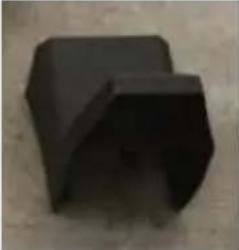
 A:host *1pc A:host *1pc |  B:wheel * 2pcs B:wheel * 2pcs | 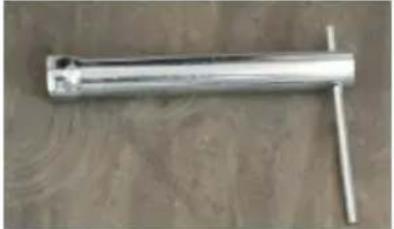 C:bushing kit*1pc C:bushing kit*1pc |
 D:handle*1pc D:handle*1pc |  E:gun*1pc E:gun*1pc |  F:Panel kit x 1pc F:Panel kit x 1pc |
 G:hook*1 G:hook*1 | 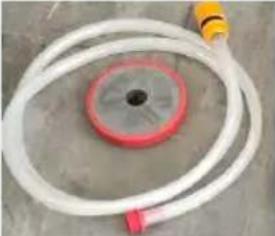 H:Water inlet pipe k*1pc H:Water inlet pipe k*1pc |  I:pipette * 1pc I:pipette * 1pc |
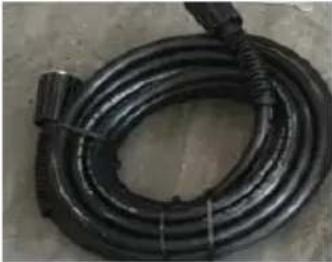 J:high pressure hose*1pc J:high pressure hose*1pc | 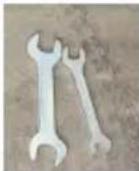 K:Wrench kit*1pc K:Wrench kit*1pc | 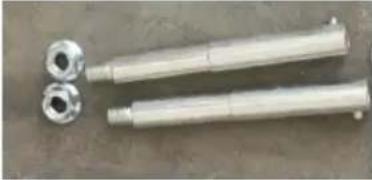 L:Wheel shaftkit*2pcs L:Wheel shaftkit*2pcs |
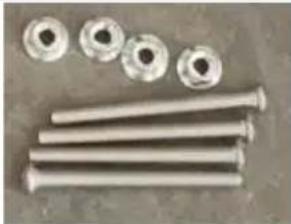 M:M5 screw kit*4pcs M:M5 screw kit*4pcs | 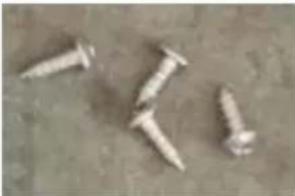 N:ST4*14screw *4pcs N:ST4*14screw *4pcs | 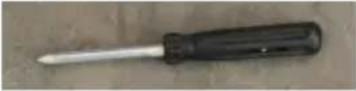 O:bolt driver*1pc O:bolt driver*1pc |
PARAMETER LIST
| Model | 170B | 180D |
| Pressure | 3400 psi | 3950 psi |
| Flow | 10L/min(2.6GPM) | 10L/min(2.6GPM) |
| Rated power | 7HP | 7HP |
| Engine speed | 3600rpm | 3600rpm |
| Allowable temperature | 0-60°CINSTRUCTION S | 0-60°CINSTRUCTION NS |
| Fuel capacity | 3L | 3L |
| Fuel type | unleaded gasoline | unleaded gasoline |
| Oil capacity | 0.6L | 0.6L |
IMPORTANT: Some of the following symbols may be used on the device. Please study them and learn their meaning. A correct interpreta of these symbols will enable you to use the device better and more
ATENTION: Never modify the appliance. Will not be held responsible
guaranteeing the machine if you modify, alter the appliance or do not properly follow the instructions and precautions in this manual.
 | Read the instructions:The instruction manual contains special message draw attention to safety issues,possible damage the appliance and useful information about the operation and maintenance of the appliance,it is suggested to read all the information carefully to bodily injury and damage to the appliance. |
 | Wear head,eye and ear protection:It is necessary to wear head,eye and ear prote avoid serious injury. |
 | Use hand protection:It is necessary to use hand protection,it is advi use nonskid gloves to have a better control of machine. |
 | Use foot protection:Foot protection is necessary, and nonskid work are advisable. |
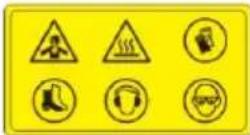 | High-pressure jets can be dangerous if misused not aim at people animals,active electrical equip or at the appliance itself . |
 | Danger:Indicates an imminently hazardous situation whic not avoided,will result in death or serious injury |
  | Prohibited for use in thunderstorms or rain:It is necessary to avoid using the machine in thunderstorms,as there is a risk of electric shoo the appliance in a dry area.No smoking:Smoking is prohibited near the machine in operation,as it may cause sparks and open flan |
 | Carbon Monoxide (CO):Gasoline engines generate carbon monoxide,which a deadly toxic odorless gas,do not run the ma indoors. |
 | Warning or safety:Indicates danger,warning or caution.It means CAUTION! your safety is at stake. |
 | Electric shock:Indicates that there are parts of the machine th conduct electric currents for the operation of the machine,so these parts should never be touched while the machine is in use. |
 | Burn Hazard:Indicates that there are parts of the machine th up to high temperatures,or that these parts sho never be touched until the machine cools down |
 | Volatile objects:Any motorized tool in operation can throw objec this reason it is advisable to use the machine places with few people and to take great dista separation,in case there are more people in the area. |
 | Fire:The engine of the machine is designed to work highly flammable mixed fuels.Never fill the mach fuel tank near fires,stoves,electrical power transformers. |

IMPORTANT:The gas tool maintenance requires extreme care and
technical knowledge and should Must follow the instructions
For your safety, read and understand all instructions before using the tool. Follow all safety instructions. Failure to follow the instructions outline in this user's manual can result in serious personal injury.

WARNING: Read the instruction manual carefully before starting to
use the gas tool. Pay full attention to the safety rules, warning
symbols,danger,caution and warning notices.These safety rules are for your safety and to avoid possible serious injury.If you use the appliar correctly and only for the specified purposes,the appliance will give yo many years of safe and reliable service.

WARNING:Any gas or electrical tool in operation can throw object
into your eyes, which can cause serious damage to them, before turning the gas or electrical tool, always wear safety glasses or goggles with shields and a full face shield if necessary, it is always advisable to cl that the safety glasses are suitable for the protection of this type of is always advisable to verify that these safety glasses comply with the ANSI Z87.1 standard.
Read all instructions
- Familiarize yourself with the gas or electrical tool.
- Read the user's manual carefully.
- Learn the uses and limitations of the electrical tool as well as sp potential hazards.
PARTS
Note: This product may be inconsistent with the pictures in the manu please refer to the physical object.
ARTICLE ASSEMBLY:
Step1.Attach both wheels to both sides of the host with the Wheel s
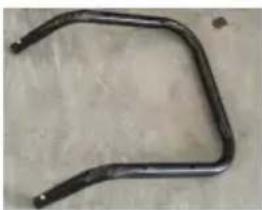
Step2.Align the handle into the host pipe, and use screw to lock the in the handle.
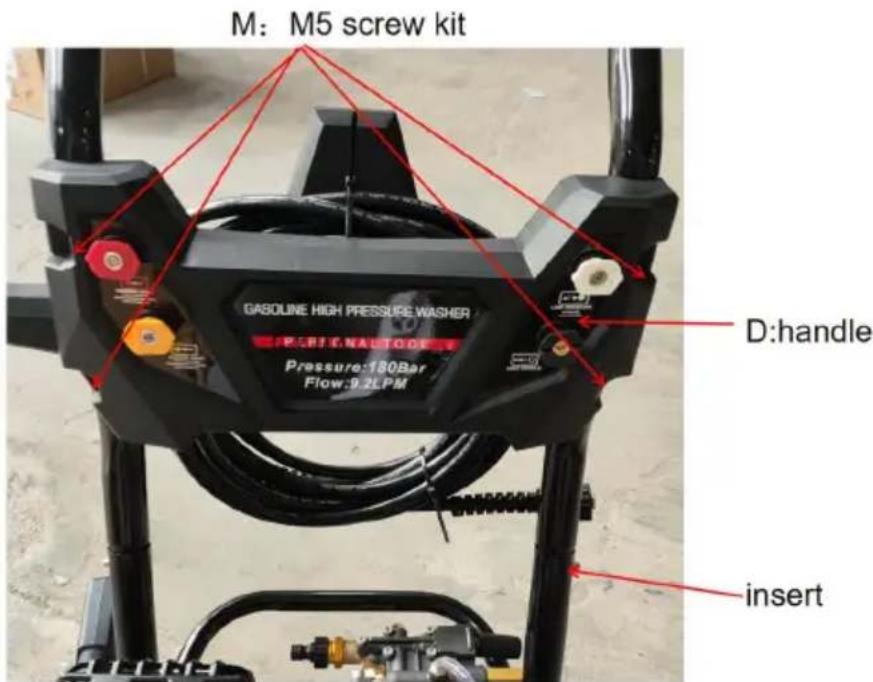
Step 3. Use the screw N to lock hook with Panel kit

natural_image
Black plastic automotive bracket component with curved frame and mounting bracket (no text or symbols visible)Step 4.high pressure hose J to the pressure outlet and assembling the spray gun.
a) Pull back the high pressure hose collar, insert the pressure hose in pressure outlet of the pressure washer and release the collar. Pull or hose to make sure it is securely connected.
NOTE: If you buy a US standard machine, you need to install the co
connector R on the water connector of the main engine.
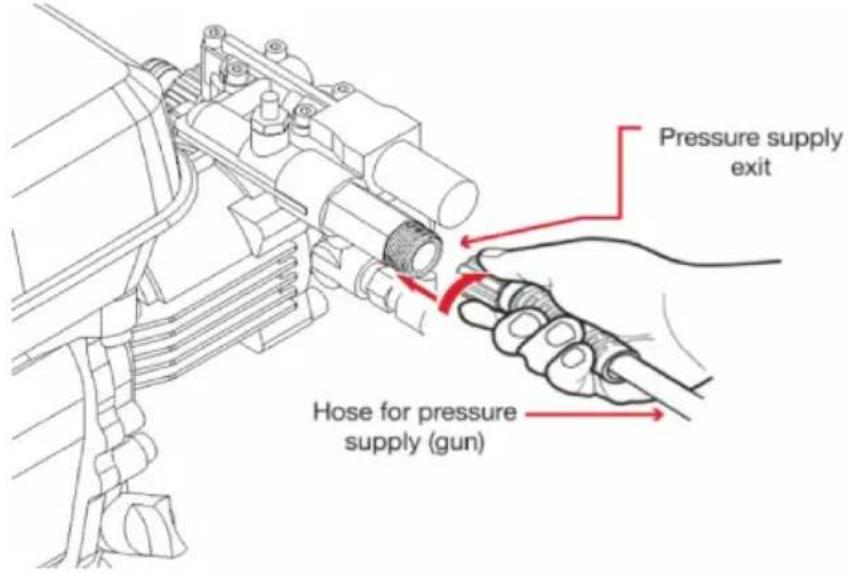
b) Connect the other end of the hose to the quick connection of the
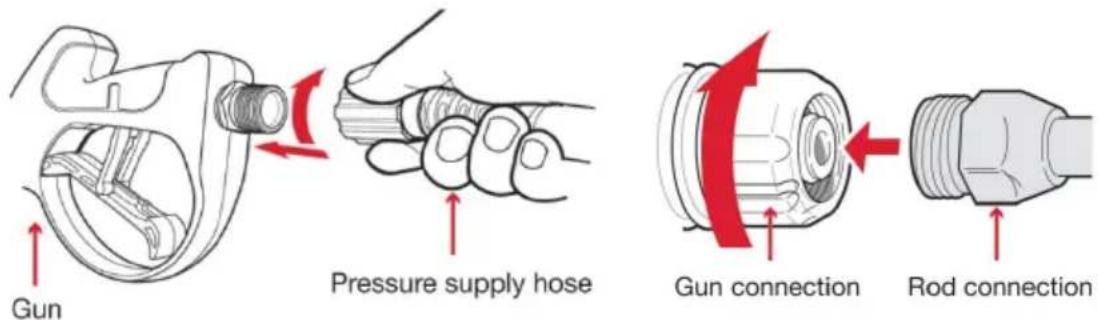
c) Attach the lance to gun; Note: When attaching, align the two projections on the lance with the grooves on the gun.

natural_image
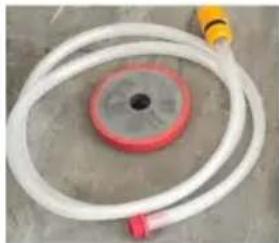
Person wearing blue overalls and gloves holding a tool, no visible text or symbolsStep 6. Close the water supply valve, Water inlet pipe kit H to the wall connector(MAX.20PSI, max. temperature 60^ ) and turn the water on completely.

natural_image
Close-up of a gloved hand adjusting a mechanical component with a yellow tool (no visible text or symbols)Use the operation
CAUTIONS BEFORE OPERATING
To maximize the life of your equipment and your safety, it is very ir to take a moment before operating the pressure washer to check its condition. Be sure to watch for any problems encountered or have a mechanic correct them before operating the pressure washer.

WARNING!
Any improper maintenance of the pressure washer or neglect of any problems before starting operation can cause malfunction and serious injury to the operator. Always perform Before the operation inspection a correct any problems.
Before starting to operate the pressure washer, make sure it is level the power switch is turned off.
- Check the general condition of the pressure washer
a. Look around and underneath the pressure washer for oil or gasoline leaks
b. Check that all nuts, bolts, screws and hose are tight.
c. Remove any excess dirt or debris especially around the starter mu and the recoil.
d. Observe for any signs of damage.
- Check discharge hoses
a. Check the general condition of the hoses. Make sure the hoses a good condition before connecting them to the pressure washer.
b. Check that the hoses are properly installed.
c. Verify that the filter is in good condition.
- Check the engine oil level.
a. Running the engine with a low oil level can cause engine damage
oil sensor will automatically stop the engine before the oil level drops safe limits. However, to avoid the inconvenience of an unexpected stc always check the engine oil level before starting.
b. Check the air filter. A dirty air filler will restrict air flow to the carburetor.reducing engine performance.
C. Check the fuel level. Starting with a full tank will help eliminate or interruptions in operation due to refueling.

WARNING!
Carbon monoxide is toxic. Inhalation of carbon monoxide can cause unconsciousness and even death. Avoid locations or actions that expose you to carbon monoxide.
ASSEMBLY AND OPERATING INSTRUCTIONS
Before using the motor for the first time, please review the safety, additional instructions and precautions before operating.
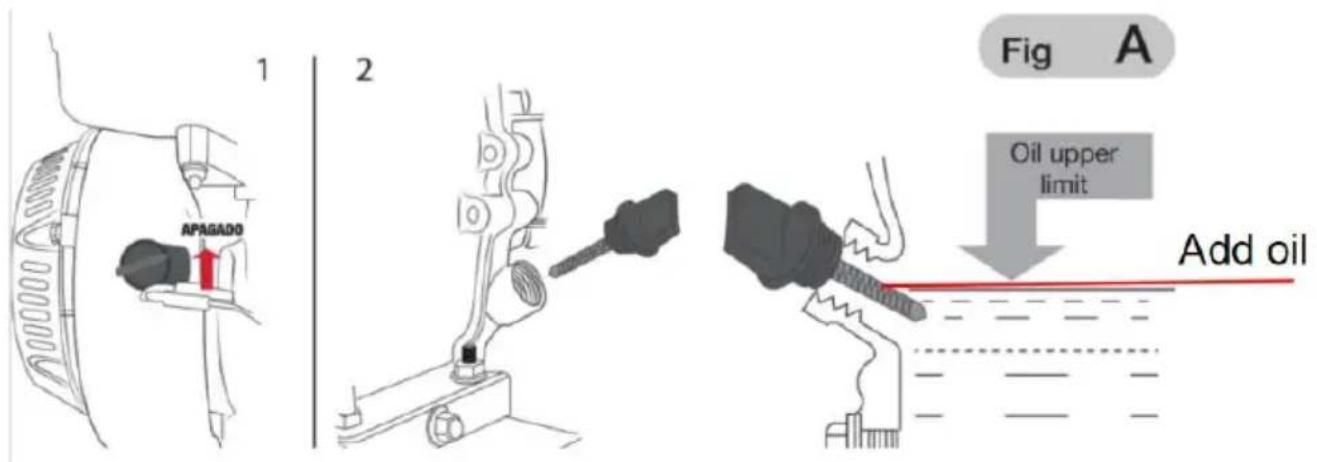
ASSEMBLY INSTRUCTION PLACING AND CHECKING BEFORE STARTING (Fig.A)
a. Place the pressure washer on a firm, level surface: Avoid sandy or surfaces. Fuel may spill if the pressure washer is tipped or tilted. Even pressure washer tips over or sinks into a soft surface, sand.dust or could be introduced into the machine.
b. Make sure your equipment is in the off position.(1)
c. Check the oil level, (it does not come with oil from the factory) for operation. The pressure washer needs 600 ml of oil to operate. The pressure washer has a safety mechanism that if the oil level is not adequate, it will not start.(2)
d. Fill the gas tank. The tank has a capacity of 3 liters.
e. Connect the hose to the gun and the other end of the hose to the pressure hose connection.
f. Connect a water supply to your pressure washer at the water supply
connector.
g.Open the water supply to your equipment. Open the water supply to equipment to start filling.

CAUTION:
The exhaust system gets very hot during operation and remains hot while after the engine is turned off.Do not touch the exhaust system is hot.
1.Spray nozzle selection
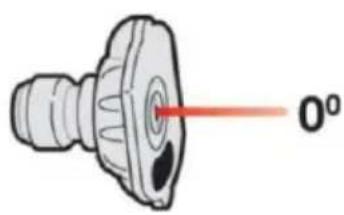 | Red Nozzle -0° :This nozzle provides a fine jet of pressurized and is extremely powerful, covering only a cleaning area. This nozzle should only be di at surfaces that can withstand high pressure, as metals or concrete. Do not use this noz clean wood or other delicate materials. |
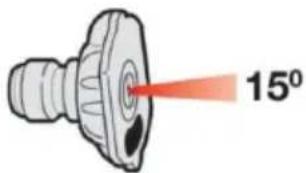 | Yellow Nozzle -15° : This nozzle offers a p spray pattern with a 15 degree angled open intense cleaning of small areas. This nozzle only be used on areas and materials that withstand high pressure. |
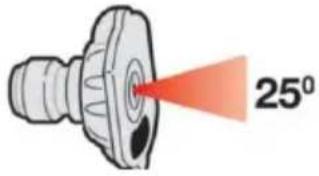 | Green nozzle-25°:This nozzle offers a spra pattern with a 25-opening angle for intens cleaning of larger areas. This nozzle should be used in areas that can withstand the pre this nozzle. |
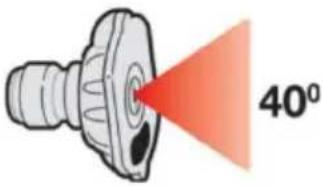 | White Nozzle-40°:This nozzle offers a spra pattern with a 40degree angled opening and powerful water stream. This nozzle can cov much wider area and should be used for general cleaning jobs. |
Black Nozzle: This nozzle is used to apply cleaning chemicals (such detergent shampoos, soap solutions, etc.). This nozzle produces the weakest pressure of the five nozzles.
The pressure washer nozzles are stored in receptacles located on the panel mounted near the washer handle. The colors on the panel ider the location of each nozzle and correspond to those listed above.
2. Nozzles Placement
- To attach the nozzle, insert it into the female quick-disconnect spray wand and press down to secure it.
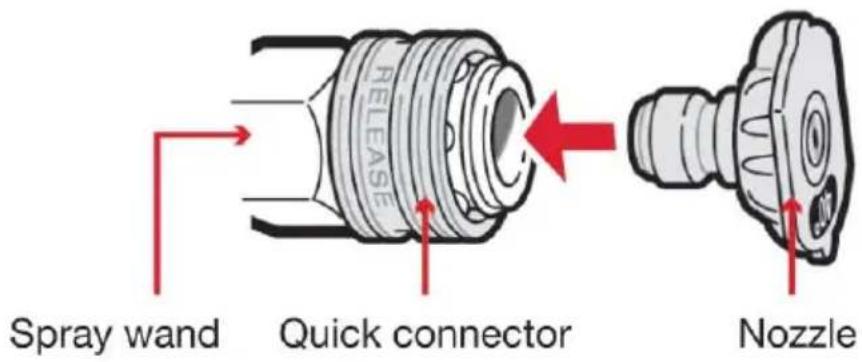
- To detach, slide the sliding ring down on the quick disconnect so eject the nozzle.
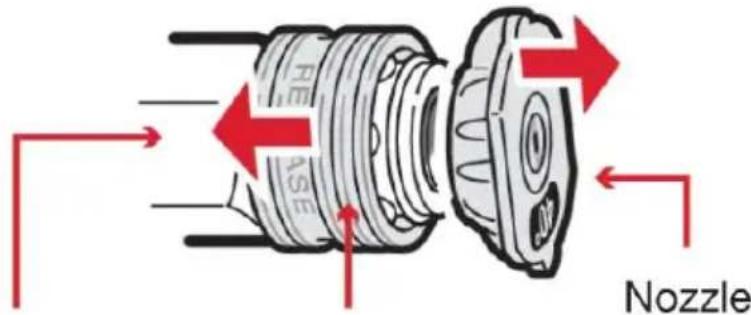
Spray wand Quick connector
3.Add oil and gasoline
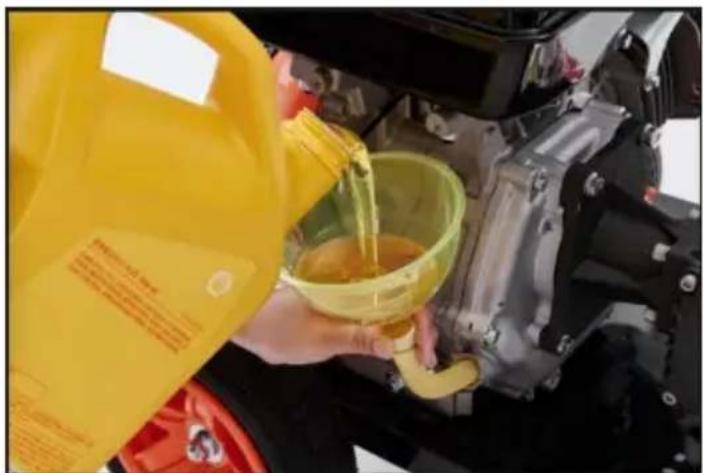
natural_image
Person pouring liquid into a green bowl on an automotive engine compartment, with a yellow safety vest nearby (no visible text or symbols)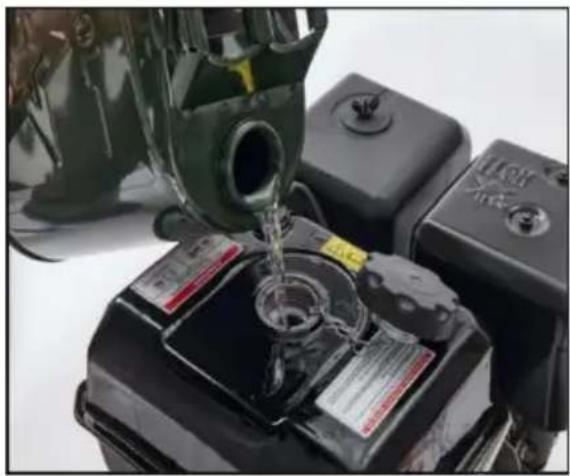
natural_image
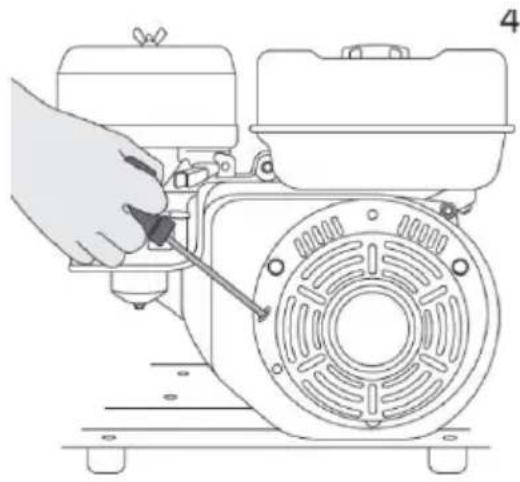
Close-up of a green liquid being poured into a black battery, with no visible text or symbols.4. Start-up (Fig. B)
-
Verify that the pressure washer is connected to a continuous flow water, otherwise serious damage to the equipment may occur.
-
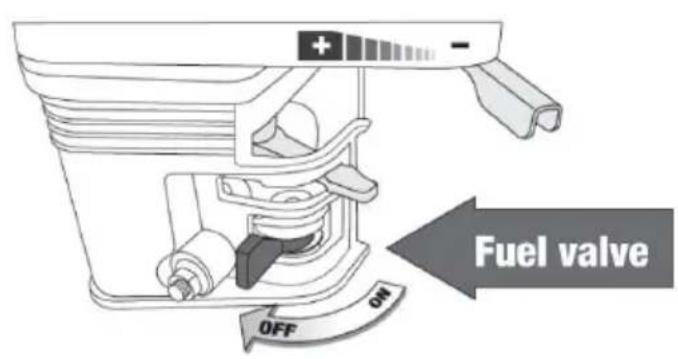
Turn the motor power button to the ON position.(1)
-
The choke lever should be in the OFF position.(2)
-
Fuel key must be in the ON position.(2)
-
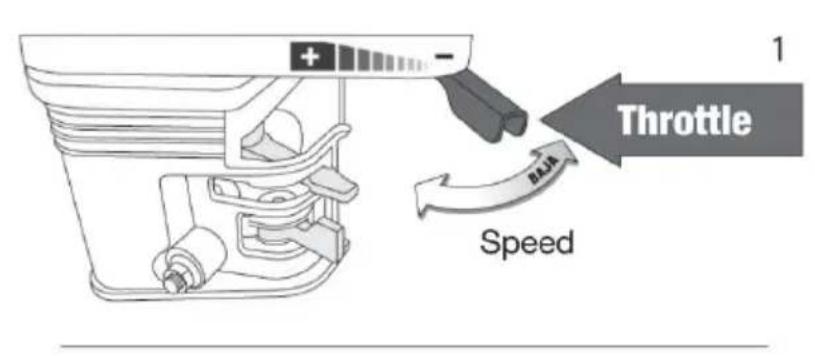
The throttle should be in the idle(-)position. (3)
-
To start the engine pull the starter handle slowly until resistance is felt, then pull hard (repeat 3 or 4 times). Return the starter handle ge
-
When starting the engine return the choke lever to the ON (OPEN)position.(5)
-
Regulate the engine speed with the throttle lever by turning it to (+) position.
Fig
B
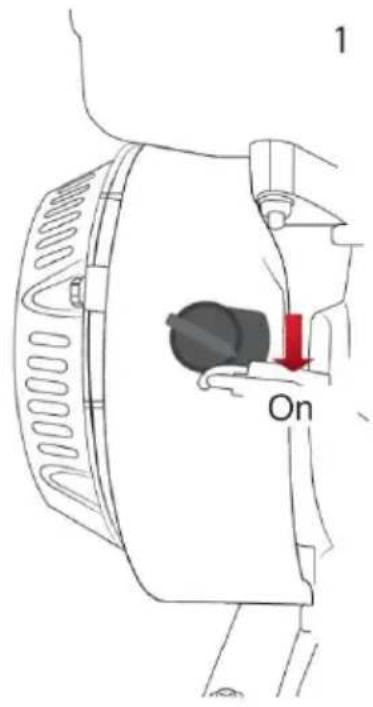
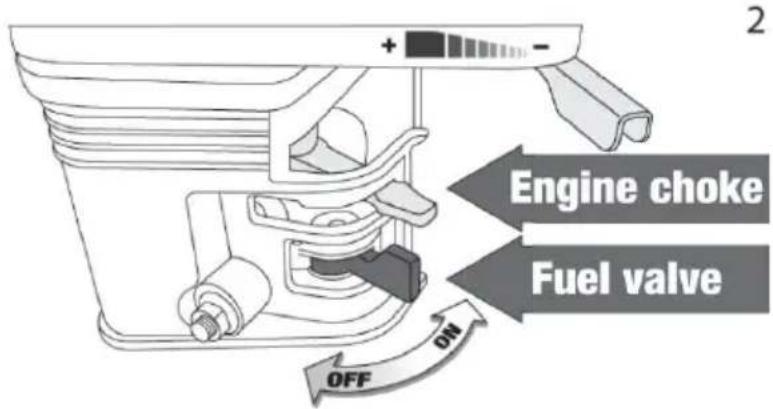
3
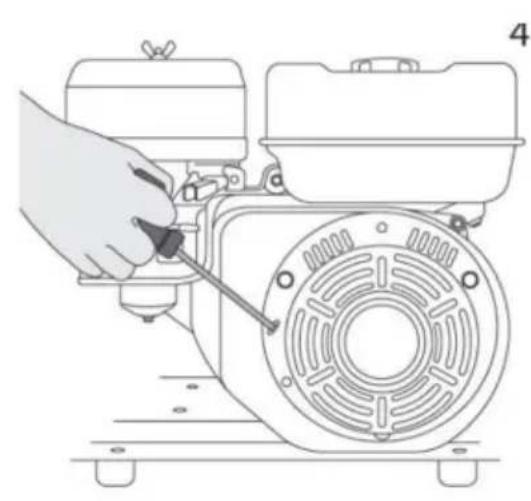
natural_image
Line drawing of a hand using a screwdriver to adjust or install an electric motor (no text or symbols present)

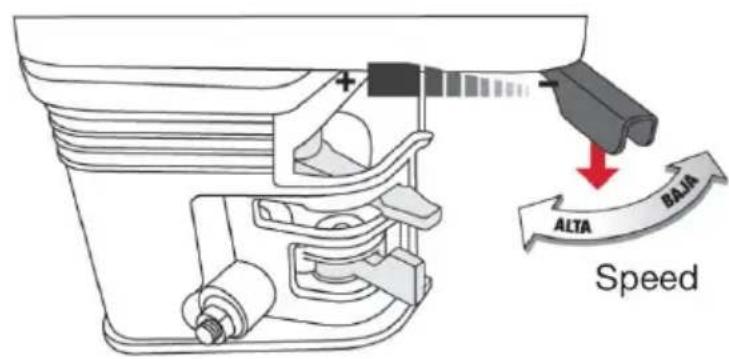
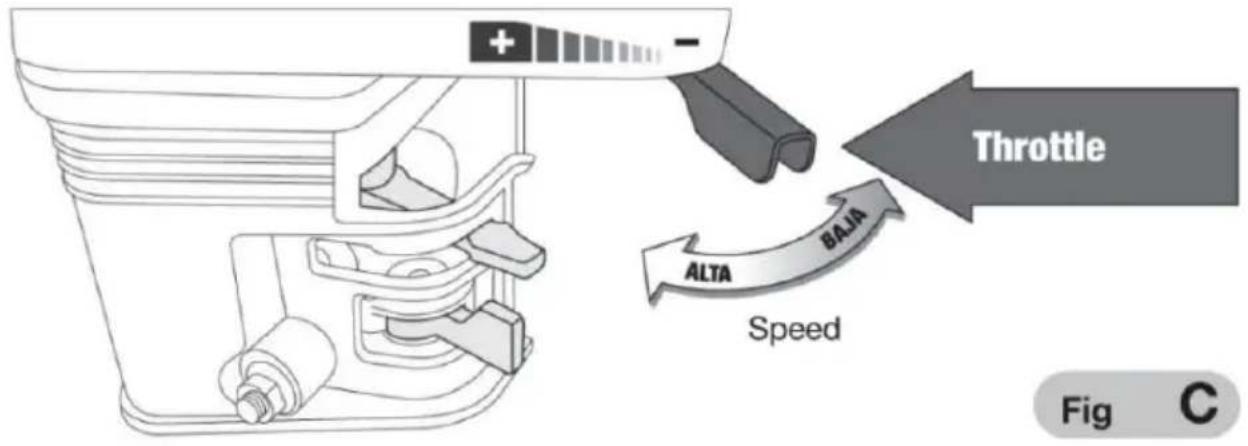
5. Set the engine speed (Fig. C)
- Set the throttle lever for the desired engine speed. By moving the governor lever in the indicated direction you can make the motor run or slower.
- After starting the engine, move the lever to the position and check water output.
The water output is controlled by adjusting the engine speed. Moving throttle lever in the direction will increase the water output and moving throttle lever in the opposite direction will decrease the water output.
WARNING!:Carbon monoxide is toxic.Inhalation can cause unconsciousness and even death.Avoid places or actions that expose to carbon monoxide.
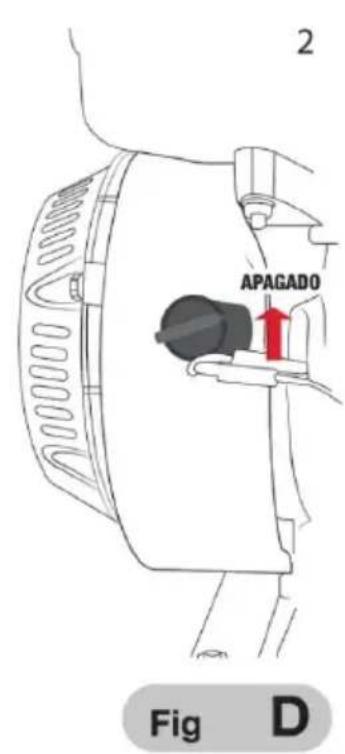
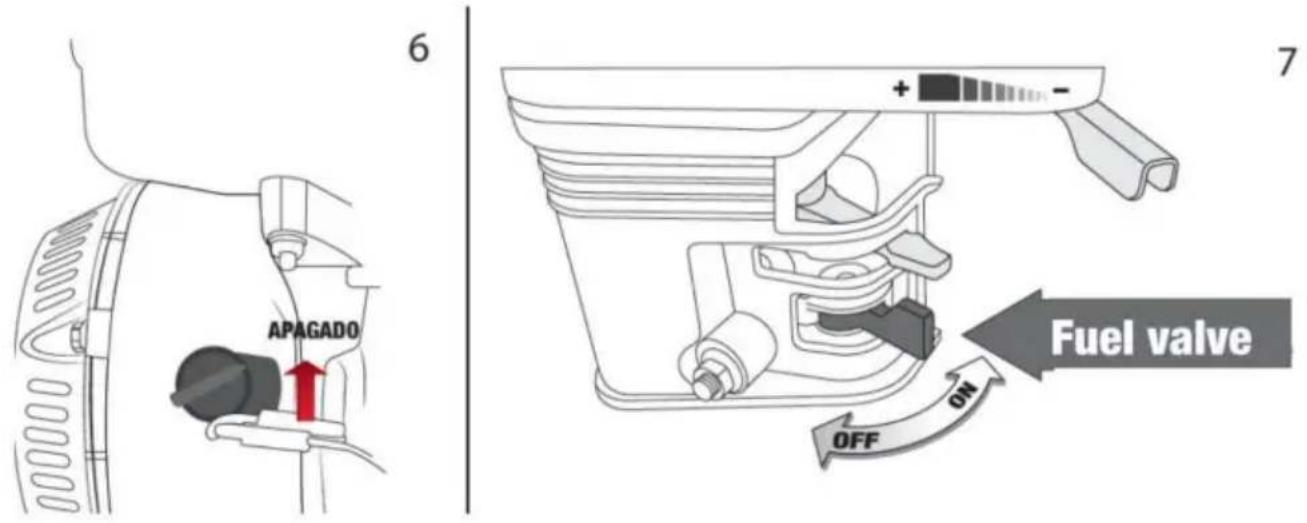
6. Shut down (Fig. D)
To shut down a motor, simply pull the motor switch to the OFF position. Under normal conditions, use the following process:
- Move the throttle lever to the position.(1)
- Turn the engine switch to the OFF position.(2)
- Turn the fuel valve lever and the choke lever to the OFF position. When the pressure washer is not in use, leave the fuel valve lever OFF position to prevent carburetor flooding and to reduce the possibil fuel leakage.
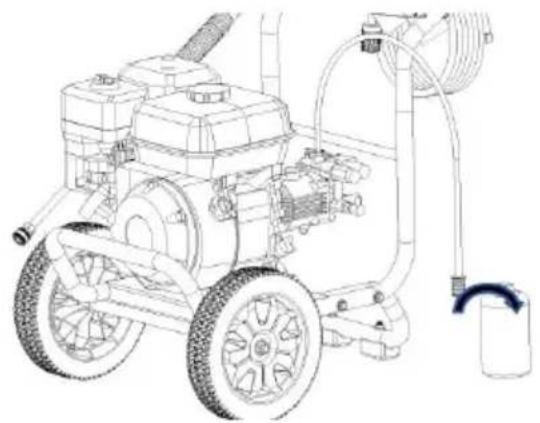
APPLYING CHEMICALS OR DETERGENTSWARNING!
Follow all safety precautions for the chemical or cleaning solution when handling and spraying. Consult the Safety Data Sheet for the product if available.
The pressure washer can spray a mixture of water and chemicals or detergents. The chemical or detergent is siphoned into the pump outlet is mixed during spraying. Only use the soap pressure nozzle (black) as designed for mixing the solutions.
-
Prepare the chemical or detergent per the instructions with the prod
-
Press the open end of the siphon hose onto barbed detergent injection fitting located on the pump outlet.
-
Press the siphon hose with the filter attachment into the container holding chemical or detergent. Make sure the filter is fully submerged solution to avoid drawing air into the system.
natural_image
Line drawing of a mechanical power supply with hoses and wheels (no text or symbols)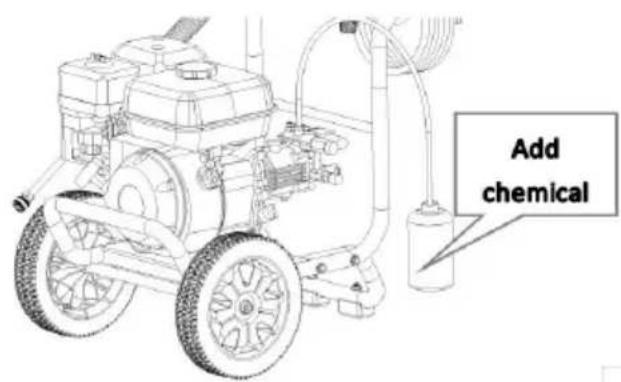
-
Install the soap pressure nozzle (black)
-
Start the pressure washer as instructed in this manual and the Eng manual.
-
Spray the solution following the instructions in the Spraying section.
-
Apply solution to a dry surface, starting at the lower portion of areas washed and work upward, using long, even, overlapping strokes.
A. Allow detergent to soak in for 3 to 5 minutes before washing and rinsing. Reapply as needed to prevent the surface from drying. DO NO allow detergent to dry on (prevents streaking).
B. Consult the chemical instructions to determine if it should be rinse and the time needed to soak before rinsing.
- Clean the pressure washer after using chemicals or detergents by placing the filter end of the siphon hose in a container of clean water on the pressure washer at low pressure and spray to draw clean water through the system to flush it out. This will take 1 to 2 minutes.
7.MAINTENANCE
a.A good maintenance is essential for safety, economics, and trouble fit equipment. It will also help reduce air pollution.

ATTENTION! Poorly maintaining your pressure washer,or failing to address or correct a problem before operating, can cause a malfunction which you can be seriously injured or killed. Always follow the
recommendations for inspection, maintenance and points in this manual. The help you properly care for your pressure washer, the following pages include a maintenance schedule, simple routine inspection procedures using common hand tools.
Other service procedures that are more difficult or require more special tools are best handled by professionals and that is why they are used performed by a specialist.
b. Maintenance applies to normal operating situations. If you operate the machine under unusual situations such as excessive load high
temperature, external humid or dusty conditions, etc.; you are encouraged to consult your servicing dealer for guidance appropriate to your individual needs and usage.
c. Maintenance, replacement or repair of emission control devices and systems can be performed by an engine repair establishment or by a expert.
8.SAFETY
Some of the most important precautionary indications are the following However, we cannot warn you of all reasonable hazards that may ap in maintenance. Only you can decide whether or not to perform each
9.SECURITY MEASURES
Make sure the engine is off before beginning any maintenance or repair work. This will eliminate potential hazards to the pressure washer and you.
Carbon monoxide poisoning emitted from engine exhaust. Make sure this is optimal ventilation whenever you run the engine.
Overheating of the parts. Allow the engine and exhaust system to co before touching them.
d. Injuries from moving parts. Do not run the engine unless you are capable of doing so.
e. Read the instructions before you start and make sure you have the necessary tools and knowledge.
f. To reduce the possibility of fire or explosion, use caution when we around gasoline. Use only a non-flammable solvent and do not use gasoline to clean the parts. Keep cigarettes, sparks and flames away anything associated with fuel element parts. To ensure the best quality reliability, use only new, original parts or their equivalent for repair or replacement.
| MAKE EVERY MONTH OPERATING HOUR INTERVALS(3) | At each use | First 20 months or 20 hours | Every season or 50 hours | Every 6 months or 100 hours | Every year or 300 hours | |
| REGULAR SERVICE PERIOD | ||||||
| Engine oil | Check level | √ | ||||
| Change | √ | √ | ||||
| Gear oil | Check level | √ | ||||
| Change | √ | √ | ||||
| Air filter | Check | √ | ||||
| Clean | √ (1) | √ (1) | ||||
| Change | √** | |||||
| Sediment deposi | Clean | √ | ||||
| Spark plug | Check /adjust | √ | ||||
| Counter spark | Change | √ | ||||
| Clean | √ | |||||
| Dead point | Check /adjust | √ (2) | ||||
| Valve opening | Check /adjust | √ (2) | ||||
| Fuel tank and filter | Clean | √ (2) | ||||
| Fuel line | Clean | Every 2 years(replace if necessa | ||||
**For core and internal vent carburetors only.
** For paper core air cleaners only.
1) Servicing is done frequently if done in dusty areas.
2) They should be checked by a skilled mechanic, unless you have the special tools for the job and have sufficient mechanical knowledge.
REFUELING
- With the engine off and on a flat surface, remove the tank cap at the fuel level.
Refill the tank if the fuel level is new. (Fig.E)
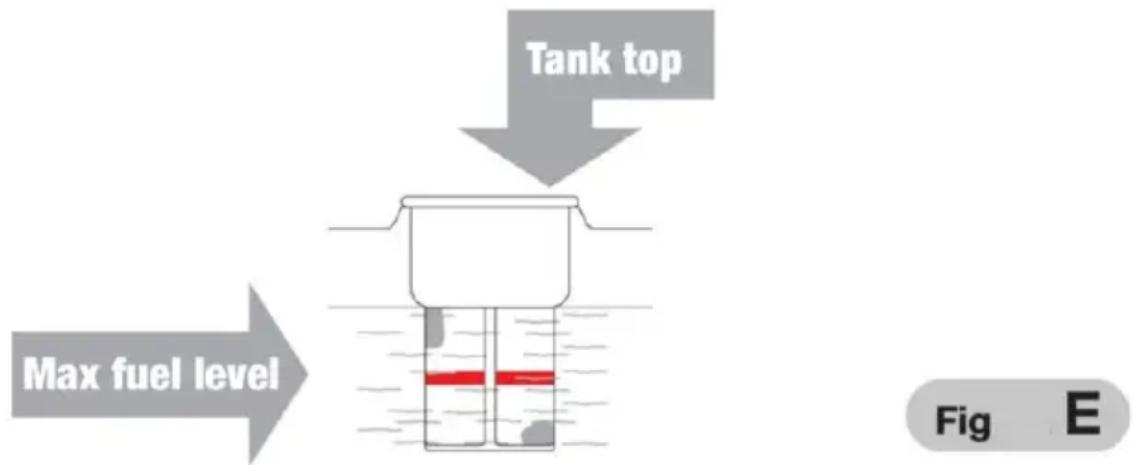
ATTENTION!
Gasoline is highly flammable and explosive. You can be burned or ser
injured when using fuel.Shut off the engine and keep it away from heat,sparks and fire.Only handle fuel outdoors.Clean up spills on the s Fill the tank in a well-ventilated area before you start the engine, if already started it, let it cool. Fill carefully to prevent fuel spillage.Do the tank to the top.
Fill the tank up to the red indicator on the fuel filter. After refueling, the fuel tank cap.
a. Never fill the engine inside a building, where sparks or flames can it. Keep gasoline away from electrical appliances, flames, or sparks. b. Spilled fuel is not only a hazard because it can cause a fire. but also cause damage to the environment. Immediately clean up spills.
WARNING!
Fuel can damage paint and plastic, be careful not to spill fuel while fill tank. The warranty does not cover damage caused by spilled fuel.
c. Use unleaded fuel recommendations with an octane rating of 86 or These engines are certified to run on unleaded gasoline Products have longer exhaust system life and fewer fuel tank problems when using unleaded gasoline.
d. Never use contaminated or rancid gasoline. Avoid getting water and into the fuel inlet. Sometimes a little knocking can be heard while wor with heavy
e.loads.If knocking occurs at a constant speed, under normal load.incre the octane number or change brands of gasoline. If the knocking per see an authorized trained mechanic.
WARNING:
Working with persistent knocking causes engine damage and is considered misuse. Damaged parts are not covered by the warranty as misuse.
ADDITIONAL RECOMMENDATIONS
Oil is an important factor that helps or does not help automotive performance
and service time. Use 4-stroke automotive detergent oil. SAE-10W-30 is
recommended for general use. The other viscosities shown in the diag can be used when the average temperature in your area is within the mentioned range.
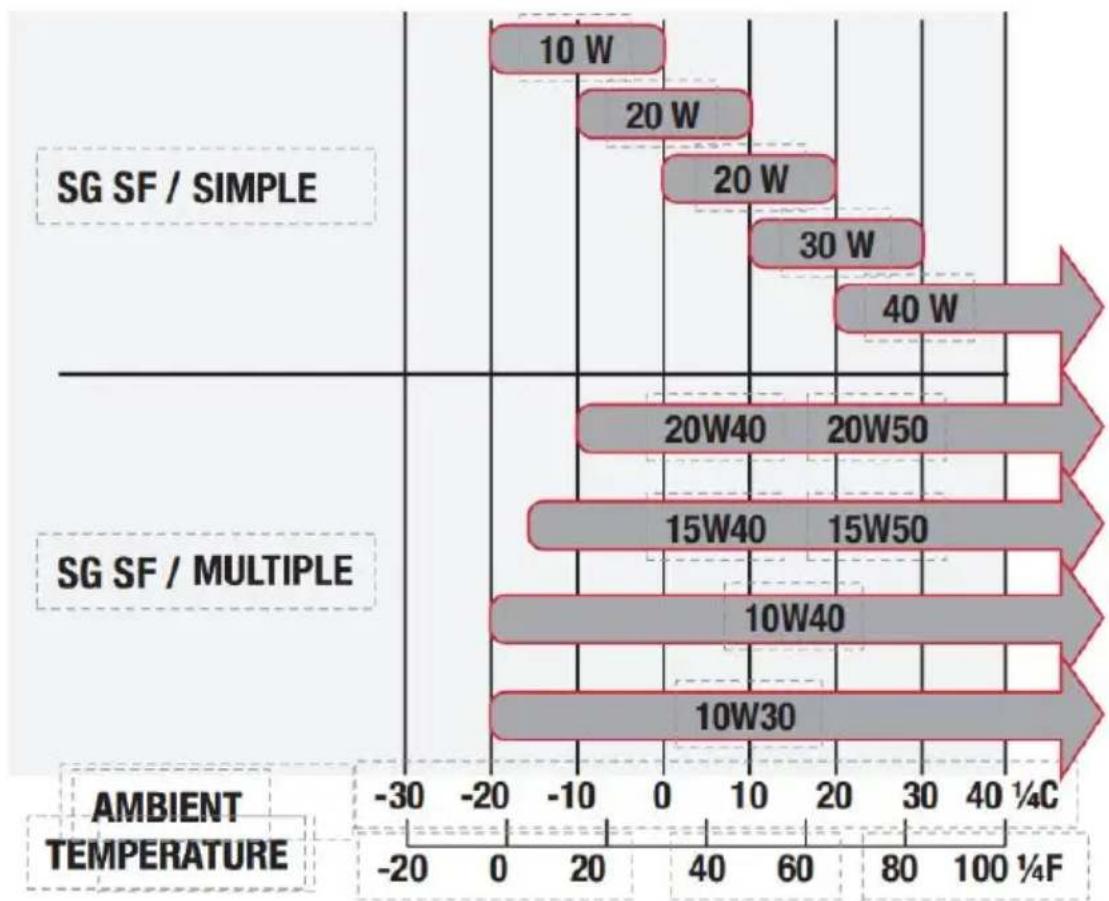
The SAE oil viscosity and service classification are on the API label oil container. The manufacturer recommends that you use API SERVICE category SJ or SL oil.
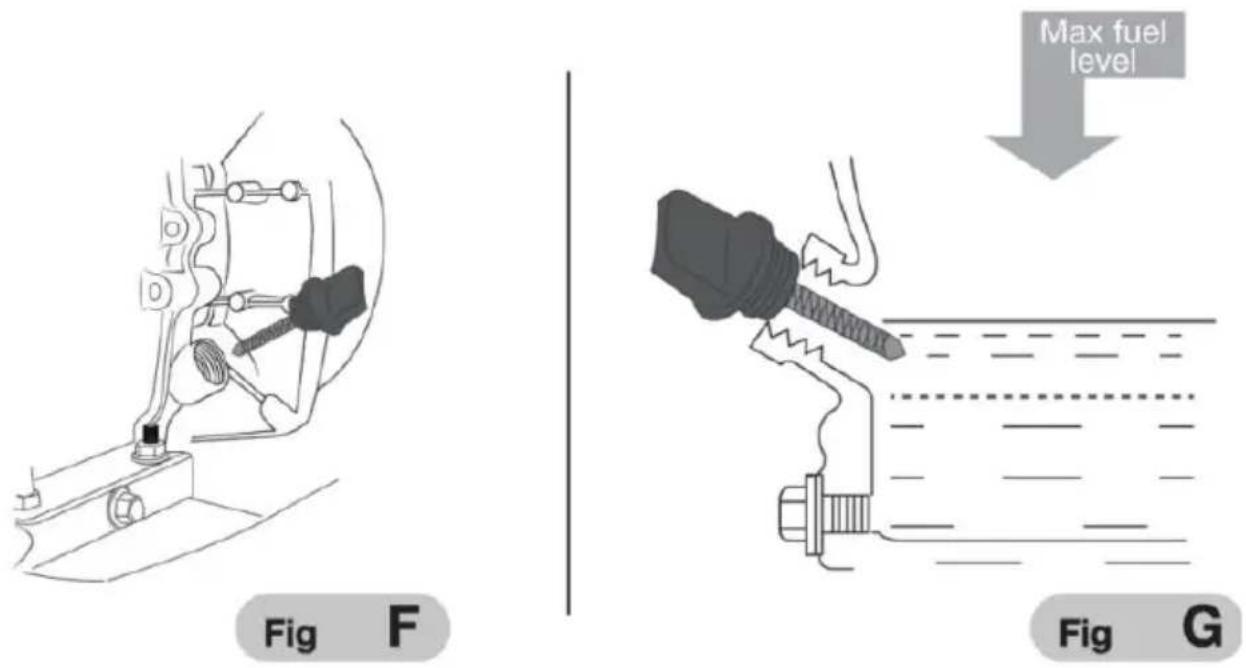
OIL LEVEL CHECK
Check the engine oil level with a level surface and the engine off. Remove the filler cap, (dipstick and clean it). (Fig.F).
Insert and remove without screwing the dipstick into the filter. Check level shown on the dipstick.(Fig.G)"
If the oil level is low, fill to the brim with the recommended oil. Screw on the filler cap (dipstick)
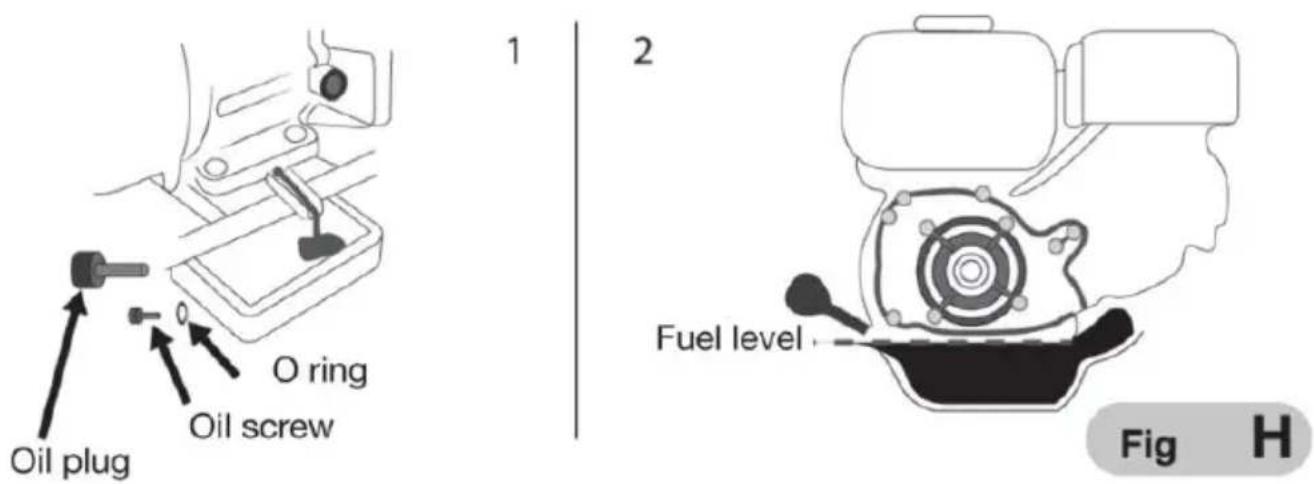
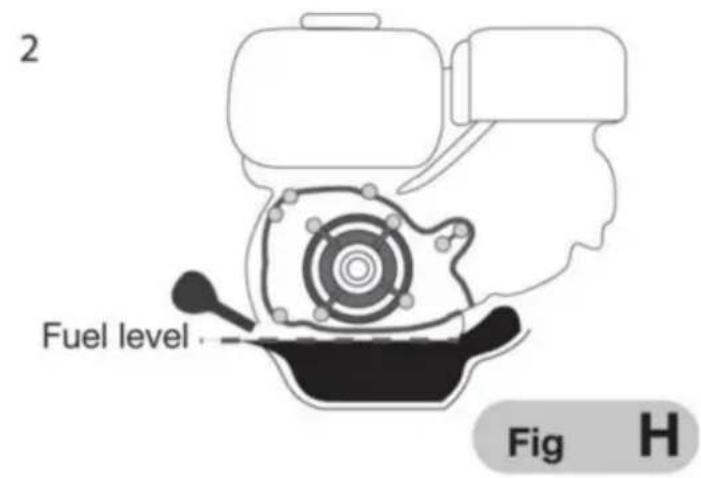
OIL CHANGE (Fig. H)
Drain the used oil when the engine is warm. Draining is faster and complete when the engine is warm.
- Place a suitable container under the engine to collect the used oil, remove the filler cap with dipstick, drain plug and washer. (1)
- Wait for the used oil to drain completely, reinstall the drain plug was and tighten the drain plug tightly. (2) Dispose of used oil in an environmentally friendly manner. We suggest that you store used oil in covered container and take it to your local recycling center or service station. Do not empty down the drain or dispose of on the ground or the drain.
With the engine level, fill to the rim of the outer fill hole with the recommended oil.
WARNING:Running the engine with low oil level could cause engine damage. The oil sensor will immediately stop the engine before the oil drops below the limit. However, to prevent the inconvenience of an unexpected stop, always check the oil level before starting. (Fig.G).
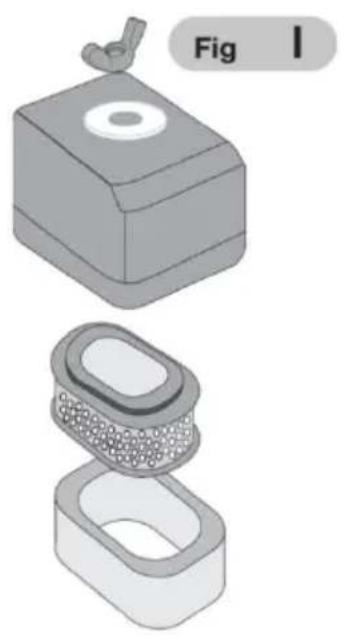
AIR FILTER INSPECTION AND SERVICE (Fig. 1)
A dirty air filter will not allow airflow to the carburetor, reducing performance. If you operate the pressure washer in very dusty places, clean the air filter more regularly than mentioned in the maintenance
WARNING: An engine without an air filter or a damaged one will cause to get into the engine while it is running, causing rapid wear. This type of damage is not covered by the warranty.
- Remove the wing nut and remove the air filter casing.
- Carefully remove the foam air filter from the paper filter, wash in h soapy water, rinse.and allow to dry thoroughly.
Tap the center of the paper filter on a solid, flat surface to remove accumulated dust and blowout with a high pressure air flow (no more 30 psi) - Clean dirt from the inside of the filter base and cover with a damp being careful not to get dirt into the carburetor.
- Once the foam is dry, insert it back into the filter cover.
- Replace the air filter cleaner housing, make sure the gasket is in p under the air filter. Secure the air cleaner nut.
natural_image
3D diagram showing a mechanical component with a knob and two views of a textured internal structure (no text or symbols)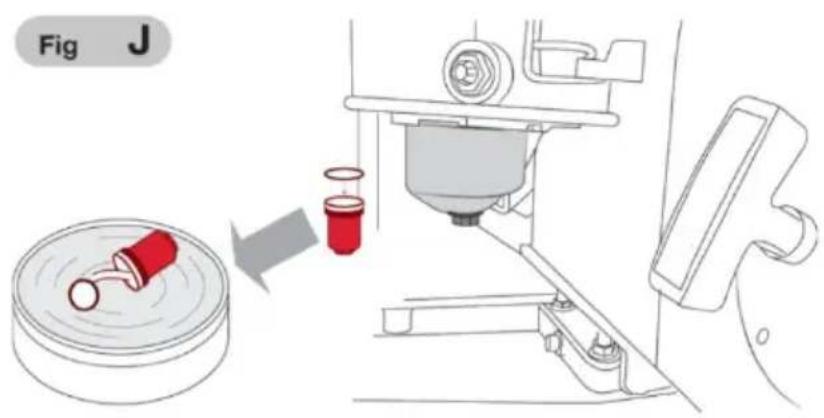
CLEANING FOR THE SEDIMENT DEPOSIT (Fig. J)
- Move the fuel valve to the closed position, then remove the sediment and the o ring.
- Wash the sediment tank and the gasket in a non-flammable solvent dry them thoroughly.
- Put the gasket on the fuel valve and install the sediment tank, and it tightly.
- Move the fuel valve to the open position and check for leaks. Cha packing if there is any leakage.
SPARK PLUG MAINTENANCE (Fig. K)
- Remove the spark plug cap and clean the dirt from all over the p
- Remove the spark plug with a 13/16"spark plug wrench.(1)
- Check the spark plug. Replace the electrodes if they are worn, broken, chipped or worn.(2)
- Measure the spark plug electrode with the indicated gauge. the gap should be 0.025-"0.031"inches. Adjust if necessary by carefully bending the electrode.(2)
• Install the spark plug carefully, by hand, to avoid stripping. • After installing the spark plug, tighten it with a 13/16"wrench to con
the sealing washer.
- If the spark plug is reinstalled, tighten 1/8 to 1/4 turn after installing spark plug."If you are installing a new spark plug, tighten 1/2 turn afterward.

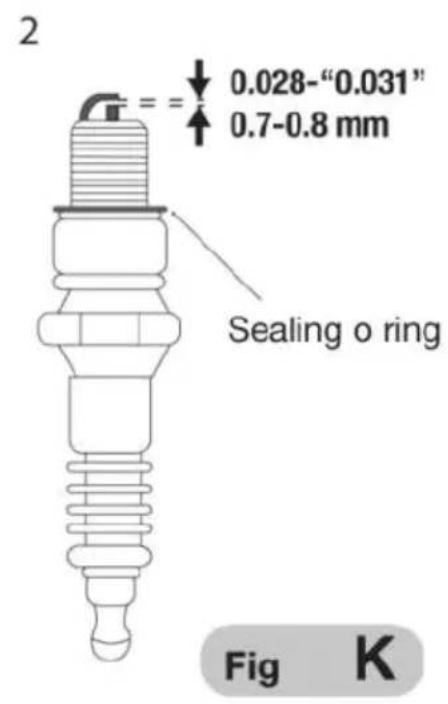
WARNING:A loose spark plug can overheat the engine damaging it. O\ tightening any spark plug can damage its threads.
Put the spark plug cap.
CLEANING SPRAY NOZZLES
Occasionally the spray tube can become clogged with foreign material such as dirt. When this happens, excessive pressure can develop. With the pressure nozzle becomes partially clogged, the pump pressure will pulse and must be cleaned immediately by following these steps:
-
Make sure the pressure washer is turned off and the trigger of the gun is locked.
-
Remove the high pressure spray nozzle from the spray wand. Using nozzle cleaning needle(included). Clear any obstruction by carefully inserting and moving the needle back and forth through the hole in the nozzle under clean running water.
-
After cleaning, remove the needle from the nozzle and save it for use.
- Reassemble the pressure nozzle on the spray wand.
PRESERVATION OF THE PRESSURE WASHER
Proper storage preparation is vital to keeping your pressure washer the free and looking good. The steps below will help keep rust and corros from affecting the function and appearance of your pressure washer a will make it easier to start when it is used again.
1. Cleaning
a. If the motor has been running, let it cool down for at least 30 m cleaning it.
b. Wash the engine and pressure washer. Wash the engine by hand not allow water to get into the air cleaner or muffler opening. Keep away from controls and all other places that are difficult to dry, as wa helps rust.
c. Water in contact with a hot engine could cause serious damage. I engine has been running, wait for half an hour to cool down before it.
- Dry all easy surfaces.
Operate the pressure washer outdoors, let it work until it reaches nor temperature and all external water has evaporated,
2. Fuel
Gasoline oxidizes and damages during storage. Old gasoline does not starting and leaves traces of dirt that clog the fuel system. If the gas the engine goes bad while in storage, the carburetor and other fuel components may need to be discarded or replaced. The length of time gasoline can be left in your tank and carburetor without causing performance problems depends on factors such as gasoline mixture, storage temperature, and whether the fuel tank is partially or complete
full. Air in a nearly full tank and storage at high temperatures can c deterioration to accelerate. Fuel damage problems can occur within several months or even less if the gasoline was not fresh when the was filled. Fuel system damage or engine problems resulting from car storage preparation are not covered by warranty. Fuel shelf life can b extended by adding a specially formulated fuel stabilizer or fuel deterioration problems can be avoided by draining the fuel tank and carburetor.
3. Addition of a fuel stabilizer to extend shelf life
- When adding a fuel stabilizer, fill the tank with fresh gasoline. If it partially filled, the air in the tank will cause it to deteriorate more ra during storage. If you have a gas can to refuel, make sure it only I gas.
- Add fuel stabilizer following manufacturer's instructions.
• After adding a fuel stabilizer, run the engine for 10 minutes outdoor make sure that treated gasoline has begun to replace untreated gasol the carburetor.
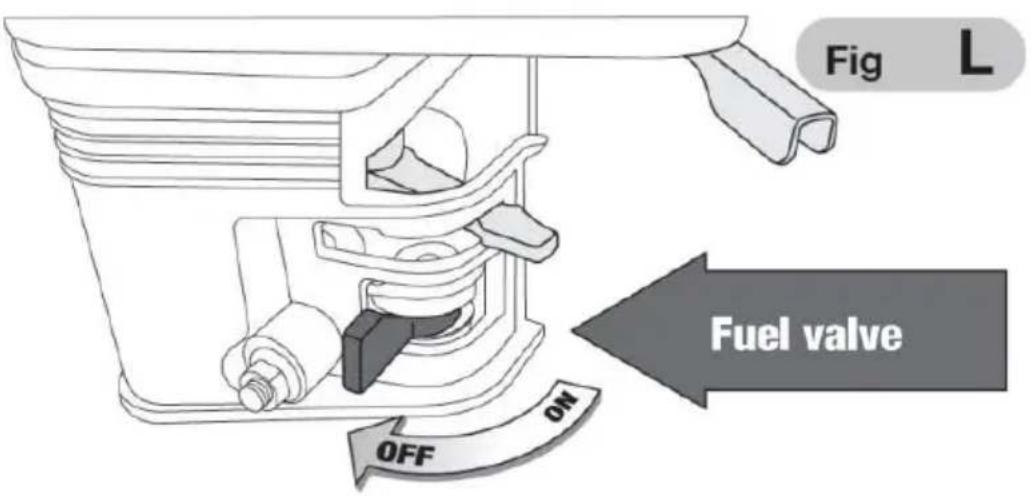
- Stop the engine and move the fuel valve to the OFF (CLOSED) position.(Fig.L)
4. Tank and Carburetor Drain (Fig. M)
- Put a suitable gasoline container below the carburetor and use a fuel prevent fuel spillage.
- Remove the carburetor drain bolt and sediment pan, then move the lever to the ON position.
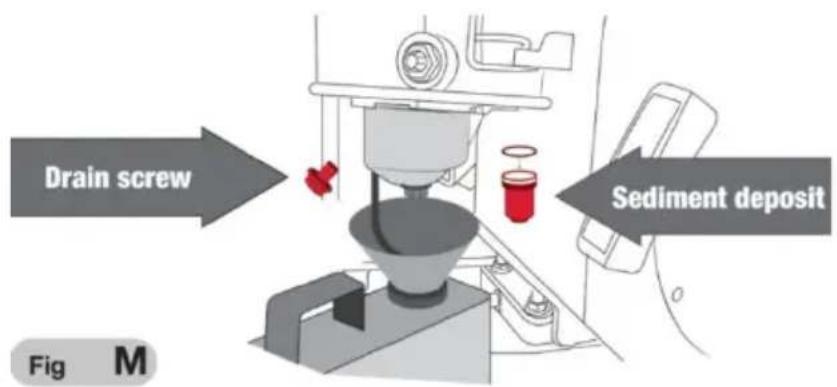
• After all the fuel is filtered into the container, reinstall the drain bo sediment pan. Squeeze hard.
5. Engine oil.
- Replace engine oil.
- Remove the spark plug.
- Pour a tablespoon of clean motor oil into the cylinder.
- Pull the starter rope several times to disperse the oilin the cylinder
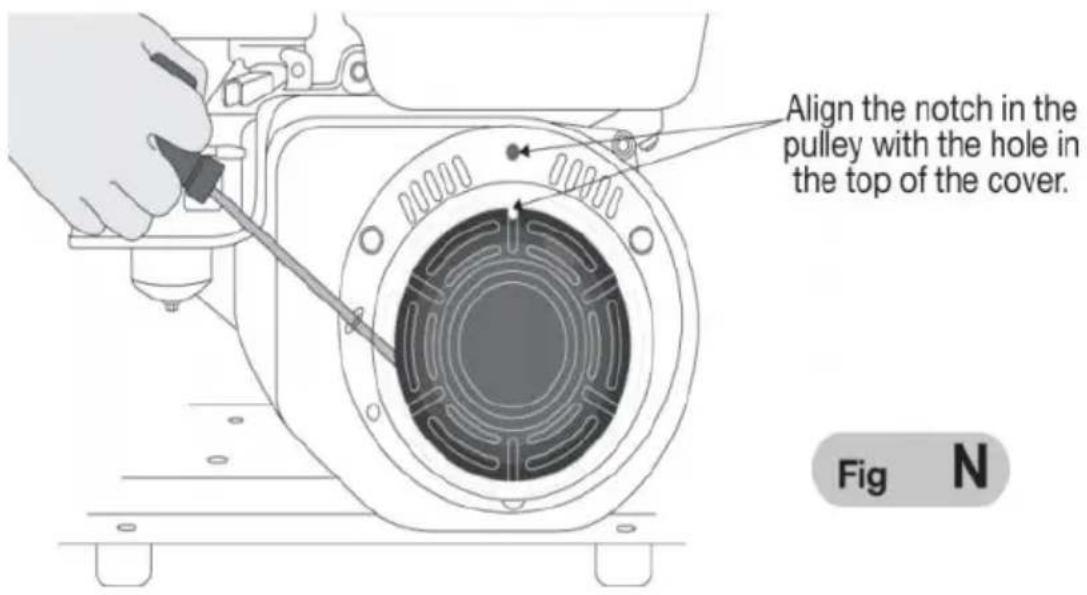
- Replace the spark plug.Pull the starter rope slowly until resistance i and the notch in the starter pulley aligns with the hole in the top o starter cover.This will close the valves so that moisture does not ent engine cylinder. Return the starter rope gently. (FIG.N)
6. Storage Precautions.
If the pressure washer is stored with gasoline in the fuel tank, place valve in the OFF position to reduce possible fuel gas leakage. Position pressure washer so that it is level. Having a bad leveling can cause oil leaks. When the engine and exhaust system are cold, cover the pressure washer to protect it from dust. If they are still hot, they can or melt some materials. Do not use plastics as dust covers. A cover not porous will trap moisture around the engine causing rust and corn
7. Removal from storage.
Review the point described in previous pages as precautions before operating. If fuel was drained during storage preparation, fill the tank fresh gasoline, if you use a gasoline can for refueling, make sure that only fresh gasoline in the can. Gasoline oxidizes and damages over time delaying starting. If the cylinder was coated with oil during storage preparation, the engine may generate some smoke during start-up, this normal.
8. Transport.
If the pressure washer has been running, allow it to cool for at least 15 minutes before you load the pressure washer onto the transport vehicle if the engine or exhaust system is hot it can cause some materials fire and cause burns. Keep pressure washer level to reduce fuel leak when transporting move fuel lever to OFF position.
MODIFICATIONS TO THE CARBURETTOR FOR WORK ATHIGH ALTITUDES
At higher altitudes, the air-fuel mixture from the standard carburetor w very rich. This will lower performance and increase fuel consumption. rich a mixture will also contaminate the spark plug and can make sta difficult. Operation for extended periods of time, at an altitude other th that for which this engine has been certified, may increase emissions. Wide performance altitude can be improved by specific modifications to
carburetor. If you always operate the engine at altitudes above 5,000 meters, you have competent mechanics, perform this carburetor modification. This engine, when operated at higher altitudes with the carburetor modifications for higher altitude use, will meet every emissic standard throughout its useful life. Even with the carburetor modification engine power will be reduced by approximately 3.5% for every 1,000 increase in altitude. The effect of altitude on power will be greater if carburetor is not modified.

WARNING:
When the carburettor has been modified to work at high altitudes, the air-fuel mixture will be a weak tool to work at low altitudes. Working at altitudes below 5,000 feet with a modified carburetor could seriously damage the engine by overheating. For use at low altitudes, return the carburetor to its original factory condition, through a qualified mechanical process.
Waste separation.This product must not be disposed of with norr
household waste.

Separating waste from used products and packaging allows
materials to be recycled and reused. The reuse of recycled materials h to avoid environmental pollution and reduces the demand for raw materials.
| PROBLEM | POSSIBLE CAUSE | SOLUTION |
| THE MACHINE DOES NOT START | The fuel valve is O (CLOSED). | Move fuel valve from O (CLOSED)to ON (OPEN). |
| The choke is open | Close choke unless engir is hot. | |
| Engine switch is OF | Turn engine switch to O | |
| It has no fuel. | Fill the tank. | |
| The fuel is old or engine was stored without treating or draining | Completely drain the tan and carburetor and refill with fresh gasoline. | |
| The spark plug is defective, dirty or with an incorrect interval | Remove and check the spark plug.Clean,drain or change the spark plug | |
| Spark plug is wet v fuel (Flooded Engine | Remove,check,dry and refi the spark plug.Start the engine with the throttle le in the position. | |
| The fuel filter is clogged,there is a carburetor malfunction,ignition malfunction,valves seized,etc. | Take your pressure wash to the nearest AKSI Authorized Service Center for qualified personnel to repair faulty or damaged parts. | |
| ENGINE WITH A LITTLE POWER | Filter elements are clogged. | Check the air filter.Clean, replace the filter. |
| Fuel is damaged by engine stored without treating or draining gasoline or filled with improper gasoline. | Drain fuel and carbureto and refill with fresh fue | |
| The fuel filter is clogged,there is a carburetor malfunction,ignition malfunction,valves seized,etc. | Take the engine to a qualified mechanic,replace or repair faulty parts if necessary. | |
| LOW PERFORMANCE OF THE PRESSURE WASHER | Incorrect ignition timing | Readjust firing angle. |
| There is air in the hose or the hose stuck. | Bleed air or drain fuel h | |
| The main motor is adjusted correctly. | Readjustment. | |
| The carburetor,the valve needle hole ar the main engine ar stuck. | Wipe and blow to finish | |
| The fuel cock is stu | Clean,replace damaged part. | |
| Too much carbon flu in the combustion chamber. | Clean the combustion chamber. | |
| The air filter is clogged. | Clean the air filter. | |
| The inlet tube is leaking. | Change it. | |
| The piston,cylinder o piston ring is worn | Change it to a new or | |
| There is air leakag from the surface where the cylinder wall connects to the cylinder head. | Change the cylinder packing | |
| The valve hole is t big or too small. | Adjust the valve | |
| The valve is too narrow. | Change it. |
Installation steps video explain QR code, please use Google scan.

Manufacturer: Shanghaimuxinmuyeyouxiangongsi
Address: Shuangchenglu 803nong11hao1602A-1609shi, baoshanqu, shanghai 200000 CN.
Imported to AUS: SIHAO PTY LTD. 1 ROKEVA STREETEASTWOOD NSW 2122 Australia
Imported to USA: Sanven Technology Ltd. Suite 250, 9166 Anaheim Place, Rancho Cucamonga, CA 91730
| UK | REP |
YH CONSULTING LIMITED. C/O YH Consultin Limited Office 147, Centurion House, London Road, Staines-upon-Thames, Surrey, TW18 4A>
| EC | REP |
Technical Support and E-Warranty Certificate
www.vevor.com/support
VEVOR®
TOUGH TOOLS, HALF PRICE
natural_image
Exterior view of a black industrial power supply machine with orange wheels and control panel (no visible text or symbols)BESOIN D'AIDE? CONTACTEZ-NOUS!
natural_image
Industrial machine with black and orange components, no visible text or symbolsA:hôte *1pc
natural_image
Close-up of an orange and black tire with five spokes (no text or symbols visible)B : roue 2 pièces

natural_image
Metal mechanical component with a T-shaped extension, resting on a wooden surface (no text or symbols visible)C : kit de bagues *
natural_image
Metal pipe fitting with rounded ends and a looped end (no text or symbols visible)natural_image
Close-up of a black handheld tool with attached hose and brass fittings, placed on a concrete surface (no text or symbols visible)E:pistolet*1pc
natural_image
Two black geometric shapes on a plain background, no text or symbols visibleG:crochet*1
natural_image
Coiled white hose with red and gray components on a concrete surface (no text or symbols visible)natural_image
Coiled transparent plastic hose with a white connector, placed on a textured surface (no visible text or symbols)natural_image
Black plastic automotive bracket component with mounting flanges (no text or symbols visible)natural_image
Person wearing blue overalls and gloves holding a tool, no visible text or symbolsnatural_image
Close-up of a gloved hand adjusting a mechanical component with a yellow tool (no visible text or symbols)natural_image
Person pouring liquid into a green bowl inside a yellow safety container, with mechanical components visible in the background (no text or symbols)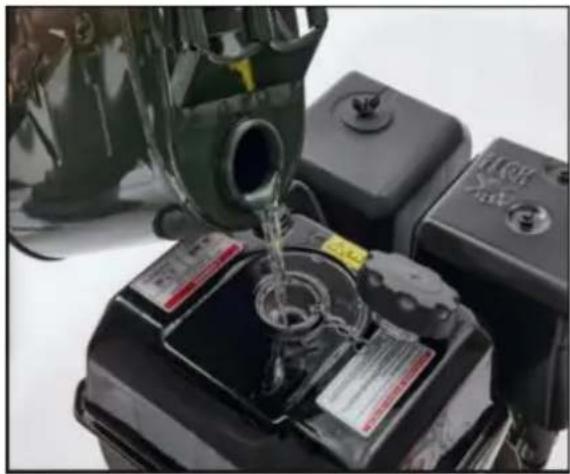
natural_image
Close-up of a car battery being poured into a black engine block, with no visible text or symbols.
natural_image
Illustration of a hand using a screwdriver to adjust or install a mechanical component, no text or symbols present


APPLICATION DE PRODUITS CHIMIQUES OU DE DÉTERGENTS AVERTISSEMENT!
natural_image
Technical line drawing of a portable water purifier with attached hoses and wheels (no text or symbols)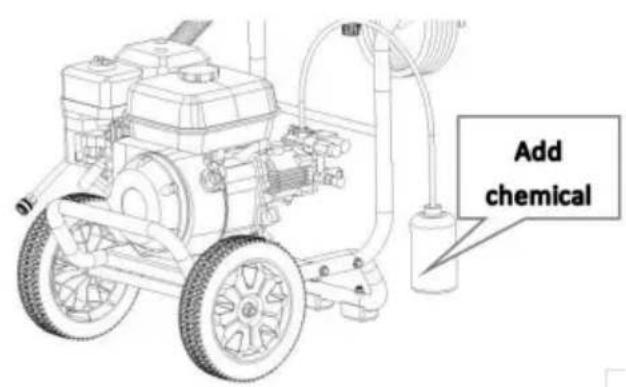
ATTENTION!
VIDANGE D'HUILE (Fig. H)
INSPECTION ET ENTRETIEN DU FILTRE À AIR (Fig. 1)
natural_image
3D illustration of a mechanical component with a knob and two views of a housing (no text or symbols)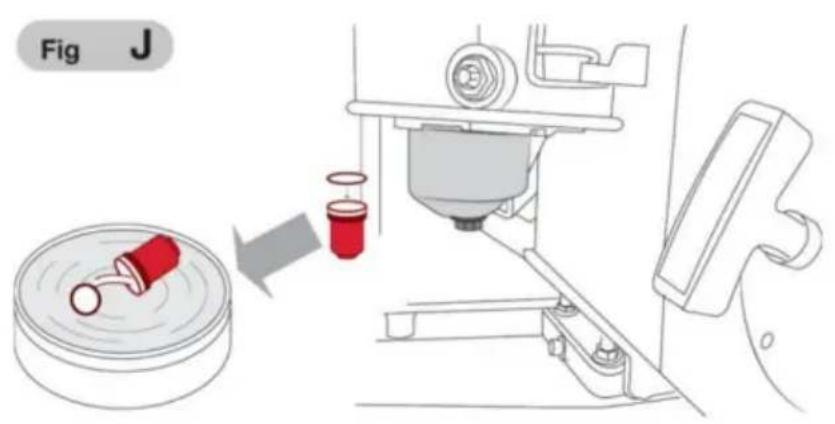
NETTOYAGE DU DÉPÔT DE SÉDIMENTS (Fig. J)

Fabricant : Shanghaimuxinmuyeyouxiangongsi Adresse :
Shuangchenglu 803nong11hao1602A-1609shi, baoshanqu, shanghai 200000 CN.
Importé en Australie : SIHAO PTY LTD. 1 ROKEVA STREETEASTWOOD NSW 2122 Australie
YH CONSULTING LIMITED. C/O YH Consulting Limited Bureau 147, Centurion House, London Road, Staines-upon-Thames, Surrey, TW18 4AX

E-CrossStu GmbH
Mainzer Landstr.69,
natural_image
Black and orange industrial power supply machine on a concrete floor (no visible text or symbols)natural_image
Black plastic automotive bracket component with mounting flanges (no text or symbols visible)natural_image
Person wearing blue overalls and gloves holding a tool, no visible text or symbolsnatural_image
Close-up of a gloved hand adjusting a mechanical component with a yellow tool (no visible text or symbols)natural_image
Person pouring liquid into a green bowl inside a yellow safety container (no visible text or symbols)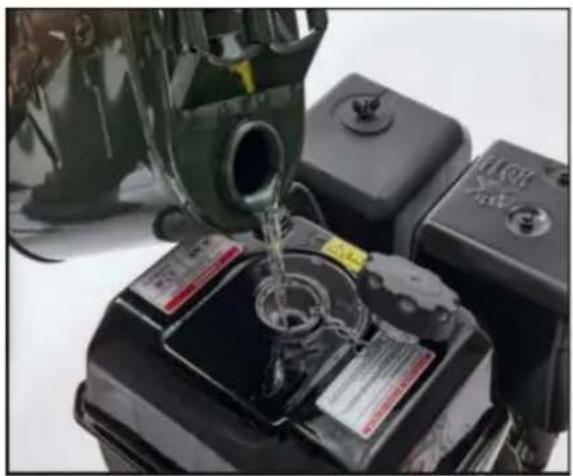
natural_image
Close-up of a car battery being poured into a black electric vehicle charging station (no visible text or symbols)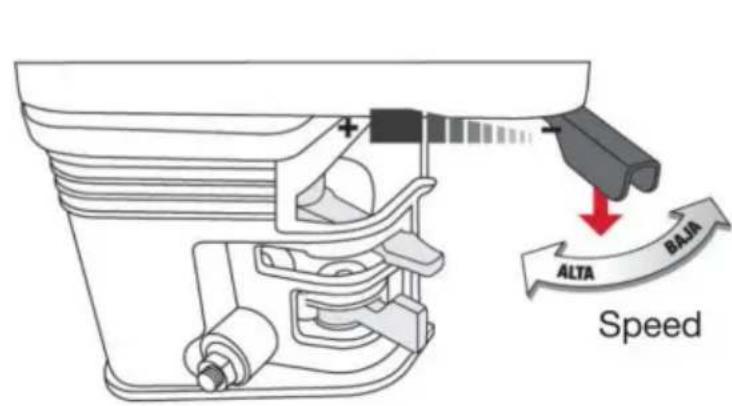

natural_image
Illustration of a hand using a screwdriver to adjust or install a mechanical component, no text or symbols present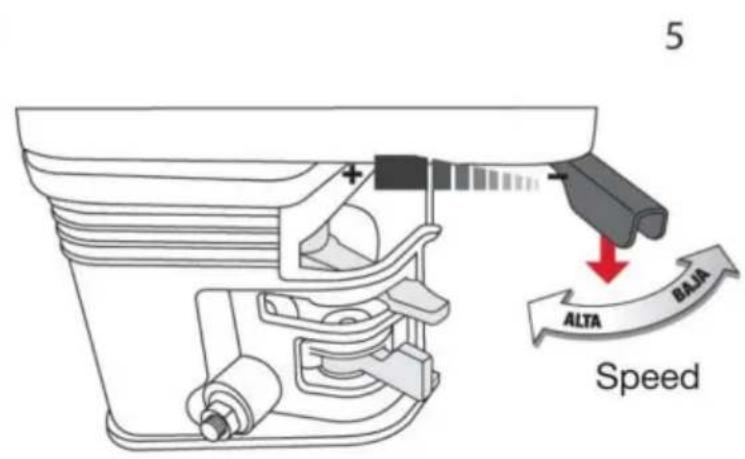


natural_image
Line drawing of a mechanical pump system with wheels and hoses (no text or symbols)
AUFMERKSAMKEIT!
ÖLWECHSEL (Abb. H)
1
natural_image
3D illustration of a mechanical component with a knob and two views of a housing (no text or symbols)

Hersteller: Shanghaimuxinmuyeyouxiangongsi Adresse:
Shuangchenglu 803nong11hao1602A-1609shi, baoshanqu, Shanghai 200000 CN.
Nach AUS importiert: SIHAO PTY LTD. 1 ROKEVA STREETEASTWOOD NSW 2122 Australien
Importiert in die USA: Sanven Technology Ltd. Suite 250, 9166 Anaheim Place, Rancho Cucamonga, CA 91730
| UK | REP |
YH CONSULTING LIMITED. C/O YH Consulting Limited Office 147, Centurion House, London Road, Staines-upon-Thames, Surrey, TW18 4AX

www.vevor.com/support